(Topic ID: 298861)
Linked Games
 Centaur
Bally, 1981
Centaur
Bally, 1981-
Fathom
Bally, 1981
-
Flash Gordon
Bally, 1981
-
Nitro Ground Shaker
Bally, 1980
-
Quicksilver
Stern Electronics, 1980
-
Seawitch
Stern Electronics, 1980
-
Silverball Mania
Bally, 1980
-
Skateball
Bally, 1980
There are more than 8 games linked to this topic.
Click here to show all linked games
Click here to show all linked games
Topic Gallery
Quoted from gdonovan:Outstanding.
[quoted image]
Looks great, good as new or better. I'll send you some playfields I need restored
Quoted from splickety_lit:Looks great, good as new or better. I'll send you some playfields I need restored
Frankly I hope I don't pick up anything this involved again for sometime.
Quoted from gdonovan:Outstanding.
Is this Spraymax or KBS Diamond Finish Clear?
Quoted from Quench:Is this Spraymax or KBS Diamond Finish Clear?
Spraymax2k.
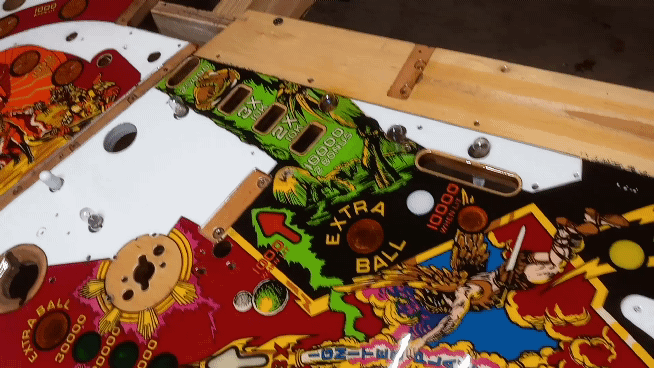
I'm going to try the Diamond clear on Silverball which is moving up rapidly in the queue now that I can do frisket and airbrush. Frankly if something goes very wrong with Silverball I'll not lose any sleep, purchased it to use for parts and decided to fix and give it a go. I'll have to rebuild the center area primarily which if I can get a good picture or scan I can make frisket masks for each paint layer.
Edit: My immediate goal at the moment is the following..
1) Get Flash Gordon playfield completed and operating in cabinet #1 (only one with FG strobe unit and tall opening in back)
2) Assemble Fathom playfield and get installed in cabinet #2, which still needs to be painted/decals and some additional wiring done to support strobe line #5 which I think Fathom requires.
3) Assemble and paint cabinet #3 (half Speakeasy half proto Bally head) this will house Seawitch. I already have a spare Weebly CPU, spare lamp driver board and the rotted Trek just provided a SDB that needs minor repairs. I'll use the original Stern "small transformer" and rectifier board I started out with and use the SB-300 sound board from one of the other two cabinets for now since they will be housing Bally titles. The only thing I have to purchase I think is another set of UNO LED displays or I could just old school kick it with plasma displays for the moment.
All three will be side by side at Pintastic for your playing pleasure April 11-14th 2024.
Have the playfield inside on a drying rack with a oil filled heating radiator under it, measured surface temp is 75F degrees and it's curing very nicely. There is even some very slight dieback around the inserts, you can just see a ghost of an indication they are there. I'm going to give it another day and start on the wiring.
There is more dieback than I'd like so am going to wets and and buff. I'm going to start out with 1000->1500->2000 and then start buffing out with 3 stages of compounds.
Not been idle the last few days, basically more "table setting." Jerked around the interior of the house so my sun room is now a game room, bedroom is in the back, CSX in the garage for the winter, winter storm prep, dealing with a fussy main breaker, testing and running generators and snowblower, insulation, etc. plus work of course.
Aside from the furniture this entailed moving 9 pins about, the last few days have been hectic. Black Hole has finally moved from the main garage to the small workshop. The first Bally/Stern cab is in the house so now as I'm wiring Flash Gordon I can so in t-shirt attire and simply amble in and out as I please rather than having to get dressed to head out to the shop.
20240102_171850 (resized).jpg20240103_124716 (resized).jpg20240106_044130 (resized).jpg
Good progress tonight! Installed the three screw plates for the pop bumpers and all the harness loops at various locations. Now working on the GI/Insert/Coil power harness to the playfield. The blue hot has been run for the inserts and 75% of the GI wiring is done. Should see a GI lamp test tomorrow and then I start the controlled lamp wiring.
Quoted from gdonovan:Drop target #2 ready.
[quoted image]
Probably a stupid question, but I notice one of your drop assemblies has the switches on the back of the assembly and another on the bottom/underneath. Does it matter, is it a preference thing, was it just two different models or does one way work better than another?
Quoted from splattii:I notice one of your drop assemblies has the switches on the back of the assembly and another on the bottom/underneath. Does it matter, is it a preference thing, was it just two different models or does one way work better than another?
Two different drop target assembly models.
The assemblies with the switches on bottom were older and more prone to dropped target switches intermittently opening/closing from playfield vibration and/or poorly tensioned springs/switch leafs.
The intermittent switch action was then resolved in software to remember when a drop target had fallen - this software correction was first implemented in Power Play. Mata Hari was the last factory coded game without the software resolution - there have since been code updates to fix it.
The drop target assemblies with the side switches work better since they are much less susceptible to vibration.
Quoted from Quench:Two different drop target assembly models.
The assemblies with the switches on bottom were older and more prone to dropped target switches intermittently opening/closing from playfield vibration and/or poorly tensioned springs/switch leafs.
The intermittent switch action was then resolved in software to remember when a drop target had fallen - this software correction was first implemented in Power Play. Mata Hari was the last factory coded game without the software resolution - there have since been code updates to fix it.
The drop target assemblies with the side switches work better since they are much less susceptible to vibration.
I appreciate the response, thanks for taking the time to explain this to me.
 Crofton, MD
Quoted from SantaEatsCheese:Nice work! Are you gracing us with your (and your multi-Williams) presence at Allentown this year?
Multi Bally =)
Maybe, be a good place to pickup that Fathom backglass from you.
Internet has been restored.
Picking up steam gents!
Finished the main harness trunk to the playfield edge, pinned the 12 pin connector, installed all the switches aside from the poppers, installed the drop target assemblies and mapped out the various coil wires from the SDB. Had to file some clear out of two of the roll overs till I was satisfied with the operation.
The popper switches I have to mash together from stuff using some original Bally EM hardware with new SS contacts. I had to clearance the stand up switch bracket at the upper popper, very tight against the reset coil for the drop target bank. Still have to toss in the flipper mechs but want to toss them in the polisher to spiff them up first.
20240114_174754 (resized).jpg20240114_174802 (resized).jpgTested switch matrix this morning, only 2 errors which is impressive. 1 rebound, 1 inlane.
Will investigate after work.
Making good progress and I have tomorrow off. It won't be done tomorrow but close; have to wire up the solenoids, install the flippers and wire, make wire guides and install, install apron brackets and plugs, posts, elastics, plastics, ect.
I'm going to install the apron without the "riser pieces" as it is not required when used with the taller DE cabinet. The only change to the playfield will be the addition of the 2 brackets to hold of the front of the apron down (removable) and 2 "plugs" where the apron meets the side rails (also will be removable)
Pleased with the harness, the plugs and spacing are identical to factory FB. So if I get a wild hair to sell, would drop right in a FG cabinet... not that I have any plans after all this effort!
I have some other mischief planned, a change to the cabinet wiring going forward to speed things up when swapping titles which can be applied to all.
Gary
Electrically it's done... in theory. I'll plug it in and test later.
Can you spot the one major error? Not egregious enough to change or affect operations but I had a good laugh once I spotted it.
Ignore the harness, while it follows the factory for the most part I did take liberties in a few areas.
20240118_134828 (resized).jpgQuoted from gdonovan:Electrically it's done... in theory. I'll plug it in and test later.
Can you spot the one major error? Not egregious enough to change or affect operations but I had a good laugh once I spotted it.
Ignore the harness, while it follows the factory for the most part I did take liberties in a few areas.
[quoted image]
Flipper EOS?
Quoted from Mrg50:Flipper EOS?
Nope. They are there and correct, I just have not installed the flipper bats on the lower playfield yet.
Quoted from Mrg50:Are the right EOS points the correct size
oddly enough yes, I checked twice. Different brand.
Pull back a bit guys, look larger.
I was looking at it for days, lol. The fact it's not noticeable right away makes me feel better.
Quoted from gdonovan:Electrically it's done... in theory. I'll plug it in and test later.
Can you spot the one major error? Not egregious enough to change or affect operations but I had a good laugh once I spotted it.
Ignore the harness, while it follows the factory for the most part I did take liberties in a few areas.
[quoted image]
Where is the coil for your top target bank.
Quoted from Mrg50:Where is the coil for your top target bank.
=)
Winner winner chicken dinner.
It's there.. on the back side. The particular assembly it was mounted there, from a Mr & Mrs Pacman I think and it never occurred to me it was mounted on the wrong side for FG. I could swap it but the harness is done and it's causing no harm.
Tested harness, solenoids passed.
20240118_110531 (resized).jpg
Quoted from gdonovan:Electrically it's done... in theory. I'll plug it in and test later.
Can you spot the one major error? Not egregious enough to change or affect operations but I had a good laugh once I spotted it.
Ignore the harness, while it follows the factory for the most part I did take liberties in a few areas.
[quoted image]
Had a chuckle looking this morning.
Harness wire : Mr & Mrs Pacman
Saucer : Mr & Mrs Pacman
3 & 4 drop target : Mr & Mrs Pacman
Pops : 6 million dollar man.
Inline drop target : Made from scratch using an 4 bank regular drop target as a base.
Single drop : from 8 ball game modified so it had memory.
Slings and flippers : Mr and Mrs Pacman.
Various switches and roll over wires from various games collected over the years. The playfield itself was left over from a restoration from 3 years ago that I got a wild hair about making a second FG since I had so many parts that had been replaced during the resto.
Playfield, plastics, posts, apron, side rails, legs, strobe unit, backglass, etc.
Here is where I started that particular journey and it got folded into the "Seawitch from Scratch" project.
https://pinside.com/pinball/forum/topic/flash-gordon-part-ii-
0df504ed67fca7b60a506484df012445ae8c1aac (resized).jpgPinside_forum_6261331_0 (resized).jpg
@ Gdonovan
Brother you are a beast! You did awesome on this project.
You have mapped out a trail for others to have the courage and creativity to follow. It takes an open mind and imagination to use parts from other machines to make a different machine that is way more fun.
![]()
![]()
-Mike
Quoted from Grizlyrig:@ Gdonovan
Brother you are a beast! You did awesome on this project.
You have mapped out a trail for others to have the courage and creativity to follow. It takes an open mind and imagination to use parts from other machines to make a different machine that is way more fun.-Mike
Thank you Mike, been a long journey on this one and the end is finally in sight. Hope to have the playfield fully populated on Sunday and then look into getting loading in the cabinet. I think I have to make an adapter cable but maybe not and I have to wire up the strobe.
Once I do that, I have a small 3D print project I need to start drafting out.. But should be flipping on Sunday.
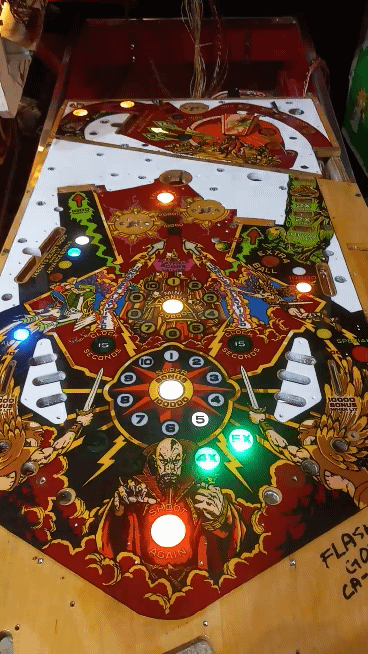
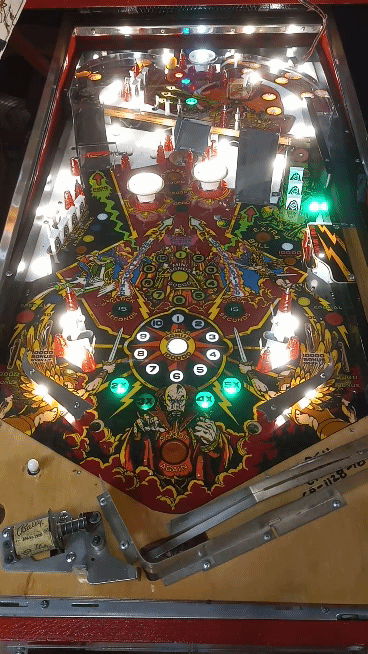
Getting closer... A lot of minor stuff this afternoon. A switch I did not like replaced, two lamp sockets jumpered, some LED's swapped out, flipper bats, apron brackets and apron installed along with shooter gauge, posts and elastics installed.
Need to make and install wire guides, final height setting of drop targets, playfield hangers, a few caps on certain switches and flipper coils along with foam switch backing and the new popper caps once the playfield is installed. I also have to wire the strobe in the cabinet.
Ho ho ho!
Now I have TWO Flash Gordons.
All I have left to do is install the lamps for the logo chaser and burn EPROMs for the S&T. These are the original from the FG I restored and have a bit error which causes "death ray 15 seconds" to not be uttered.
Gameplay is a riot! Home made inline drop target bank works perfect.
Good Morning! Minor punch list below..
1) Shift displays over slightly to line up. (Done)
2) See if I can adjust outhole kicker to have less energy. (Done)
3) Swap/adjust dual saucer mech, kick out to lower playfield is weak time to time. (Done)
4) Install chaser lights. (Done)
5) Burn new eproms for S&T, jumper board. (Done)
6) Masking for a plastic in rear. (Done)
7) Cosmetic plug for cabinet over playfield. (Done)
Reassemble restored Flash Gordon, good cleaning and checkout, list for sale.
Fathom is already on the build table, I got stuff to do.
Quoted from gdonovan:If you have a vinyl cutter and minor Photoshop skills making a blackout mask is a snap. Plastic was my first adventure using waterside decals to make playfield plastic.
[quoted image][quoted image][quoted image][quoted image]
Much better!
Quoted from A_Bord:Much better!
It is, if I can find a factory one for a decent price I'll replace it but it will do for now. The colors just don't pop as much as I'd like.
Outhole fixed.
Apron details: Because I was using a "tall cabinet" I did not have to sink the playfield down to clear the back of the cabinet. This allowed me to dispense with use of the apron riser steel, spacers for shooter lane and playfield stop for ball while in the shooter lane.
Apron, shooter gauge and trough mechs are all Flash Gordon. To mount the apron you will need the 2 small front "tab brackets" from a single level playfield along with the shorter rear apron brackets and playfield hangers. I have the FG apron riser, brackets and shooter stop tucked in a box if the playfield is ever sold or transfered into a classic Bally cabinet.
One "artifact" of having an apron riser from the factor is the wooden playfield support rails are just a touch short. You could either make new rails or in my case I opted for a post in the playfield to keep the ball in the shooter lane. On either side there is no chance of a ball making it through from the playfield, only a small gap there.
Promoted items from Pinside Marketplace and Pinside Shops!
Reply
Wanna join the discussion? Please sign in to reply to this topic.

Hey there! Welcome to Pinside!
Donate to PinsideGreat to see you're enjoying Pinside! Did you know Pinside is able to run without any 3rd-party banners or ads, thanks to the support from our visitors? Please consider a donation to Pinside and get anext to your username to show for it! Or better yet, subscribe to Pinside+!
