(Topic ID: 235022)

Bally 6803 Club - All Welcome

By gweempose

5 years ago


Topic Heartbeat

Topic Stats

  • 868 posts
  • 153 Pinsiders participating
  • Latest reply 3 days ago by cws204
  • Topic is favorited by 69 Pinsiders

You

Linked Games

Topic Gallery

View topic image gallery

HMM (resized).png
Heavy Metal Meltdown (resized).png
Bally_6803_MPU_Module.pdf (PDF preview)
IMG_2142 (resized).jpeg
IMG_0680 (resized).JPG
IMG_0679 (resized).JPG
IMG_0678 (resized).JPG
IMG_0677 (resized).JPG
IMG_0676 (resized).JPG
pasted_image (resized).png
Motordome 3.jpg
Motordome 2.jpg
Motordome 1.jpg
pasted_image (resized).png
IMG_6059.jpeg
IMG_6060.jpeg

You're currently viewing posts by Pinsider MiniPinHead.
Click here to go back to viewing the entire thread.

#640 1 year ago

I’m a new Motordome owner and am reading through several threads, including this one. Noticed the discussion on the Bally Midway 7533 DAC Failures. Does my Motordome C30 capacitor from my soundboard need to be removed? If it hasn’t affected anything this long after the notice does it still apply?

I think this is C30
A95C9C36-2FB9-4924-AADD-85563C6EAC3C (resized).jpegA95C9C36-2FB9-4924-AADD-85563C6EAC3C (resized).jpeg

Full soundboard
BCCF97B9-ED87-4F87-93E0-F8236E812113 (resized).jpegBCCF97B9-ED87-4F87-93E0-F8236E812113 (resized).jpeg

Thank you

#642 1 year ago

Thank you. Can I just use wire cutters and snip it out (obviously power is off)? I'm not at the point of being comfortable soldering a board. Any problems leaving the solder and base of the wire behind?

Thank you

#645 1 year ago
Quoted from snakesnsparklers:

Yep - just clip it off. No need to desolder.

Thank you both! The deed has been done. Both wires snipped and worries of excess voltage discharge have dissipated

B997895D-13F2-4FFC-B9E3-8B1392FA2B4F (resized).jpegB997895D-13F2-4FFC-B9E3-8B1392FA2B4F (resized).jpeg

On a side note, is there any other board work that is recommended for the 6803 boards? I didn’t see anything else applicable to Motordome.

Motordome Boards:

B6D8E140-A446-4963-B0AB-2EC5C9EBADE2 (resized).jpegB6D8E140-A446-4963-B0AB-2EC5C9EBADE2 (resized).jpeg

Prior to the NVRAM mod
793E94A4-C658-4169-8FEF-479379F33D4A (resized).jpeg793E94A4-C658-4169-8FEF-479379F33D4A (resized).jpeg

Prior to the C30 capacitor trim
D659C176-9F79-4620-8647-BACDC1C719F5 (resized).jpegD659C176-9F79-4620-8647-BACDC1C719F5 (resized).jpeg

Pinitech NVRAM mod
50BF0F78-5A7C-41D2-8321-69B84FCB3279 (resized).jpeg50BF0F78-5A7C-41D2-8321-69B84FCB3279 (resized).jpeg

#647 1 year ago
Quoted from Inkochnito:

Reflow the solder on all the header pins on all boards.
Place a sticker on the board when the game has nvram installed, "no batteries needed".
Snip off the battery wires.
Check your display voltage and set it at 180-190V.
Maybe replace the capacitor at the high voltage section and the 5V section on the power supply.

Thank you! I’ll get on that label ASAP and check the voltages, too. Do you keep the display voltage at 180 even if you replace the plasma displays with LEDs?

Is there a recommended capacitor kit for the power supply board?

On a side note, on the game board, what is going on with this capacitor? I just found it odd looking, like it was too big for the space.

0D0AC85C-4C76-4065-9578-20B8ACEF71C5 (resized).jpeg0D0AC85C-4C76-4065-9578-20B8ACEF71C5 (resized).jpeg

39C5A131-7D2E-4DE8-9C8D-8B79829F04BE (resized).jpeg39C5A131-7D2E-4DE8-9C8D-8B79829F04BE (resized).jpeg

#649 1 year ago
Quoted from Inkochnito:

When you use led displays you can pull out fuse FU2 on the power supply.
No need for high voltage when you use led displays.
You don't even have to replace C2 on the power supply, as it is no longer used.
The remaining capacitors to replace are C1 (11000uF/25V) and C3 (2.2uF/25V).
That is not a capacitor, it is a resistor.
It is a higher wattage than needed.
Not the best work.
You might consider replacing it with a smaller wattage that fits the spot and doing a better solder job.

Thank you so much for these recommendations. I ordered a pair of these LED displays: https://www.thepinballwizard.net/x-pin-products/bally/midway-6803-display-orange-xp-bly6803-o/ I thought I read that the LED displays need the higher voltage line, but only consume about 5V. Not sure if that makes sense, or if I was reading something about old LED technology. If I use these displays, would it still be okay to leave the FU2 fuse and replace the C2 capacitor, just to make sure the board is future-proofed?

Is there a recommended capacitor kit for the power board? Can you get more robust capacitors for longevity's sake?

For the incorrect resistor (thank you for the correction) on my control board (sorry I called it a game board), I'm struggling to identify the correct resistor to buy and replace it with. I was trying to look at: https://www.pinwiki.com/wiki/images/3/33/Controlmod.pdf Do you think the capacitor directly below it should also be replaced? It looks like it got jostled at some point.

#652 1 year ago
Quoted from Inkochnito:

If the high voltage is not used, it is better to remove the fuse FU2.
No voltage, no stress on the components, no risk of shock.
If you want you can replace C2.
I don't know any capacitor set for the 6803 set.
It is just a few caps.
R133 is a 1.2K resistor 1/4W (brown-red-red-gold).
The damaged resistor below it is R135 and is the same value.
What a bad schematic.
I will need to update that file.
Here is a better file.[quoted image]

Understood. I'll install the LEDs when they come in, pull FU2, and report back. The plasmas work great, but I prefer using less power and having a system that'll have less risks of having important parts failing.

If I find a 6803 kit, I'll utilize the C2 capacitor

Is the appropriate resistor for R133 and R135 (1.2K resistor 1/4W): https://www.marcospecialties.com/pinball-parts/R025W1.2K and this one: https://www.thepinballwizard.net/resistors/1.2k-ohm-1/4w-5-resistor-carbon-film/? I don't see the brown color, but everything else matches up.

I think vid1900 mentioned these once: https://probemaster.com/speedy-bend-resistor-lead-forming-tool/ Do I need a kit for properly bending resistors and capacitors?

What a glorious file! Thank you @inkochnito. I can read it... sort of (learning the schematics)

#653 1 year ago
Quoted from Inkochnito:

Can you point me to the page where you found the link to this file?
I can't seem to find it.

https://www.pinwiki.com/wiki/index.php/Leon_Borre_Bally_6803_repair

Where it says “The schematic....”

Brings you here: https://www.pinwiki.com/wiki/index.php/File:Controlmod.pdf

#655 1 year ago

On my Motordome, I replaced all the old fuses with new ones and checked continuity on both new and old. All new fuses were good (thanks PinballLife). All new fuses are correct type and rating… several of the old ones were incorrect (one or more were even lower amps than required). On the old fuses I found out one of the fuses was actually bad (FU6 (G.I. backbox) = 15 amp fast-blo). It was either always bad or maybe went bad when I pulled it out (used a fuse remover tool, though). What lights are G.I. backbox?

Started the game up and played a bit. Notice zero changes from the old fuses (shucks, I was hopeful). Got the million shot lit, tried to get it a few times and then the table game stops. General illumination and displays stay lit, but the solenoids are dead. A brief smell of smoke hits the air. I poke around and eventually find the 1 Amp solenoid fuse is blown. So what are the next steps?

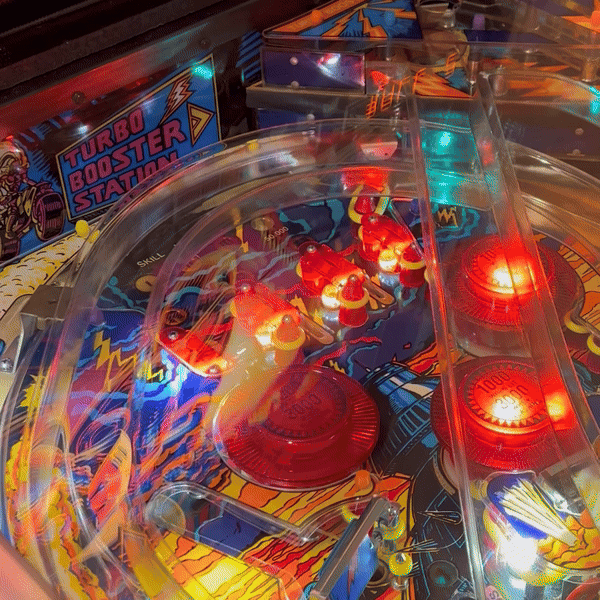
I think this solenoid is a strong suspect and should be replaced ASAP.

59E13319-32A8-4817-AD23-74765E7F9932 (resized).jpeg59E13319-32A8-4817-AD23-74765E7F9932 (resized).jpeg62A57668-63E3-4FE1-B2BC-A2B0CA6CCEFC (resized).jpeg62A57668-63E3-4FE1-B2BC-A2B0CA6CCEFC (resized).jpegA2B8BE66-EA04-41D2-BA77-9B3C4B4C4665 (resized).jpegA2B8BE66-EA04-41D2-BA77-9B3C4B4C4665 (resized).jpeg

Would a swollen coil be the reason for a fuse blowing?

If wiring is still attached on any coils, but you can wiggle part of a strand, could that cause this? Should I just re-solder anything suspect so it’ll be easier to pinpoint issues?

Just trying to figure out if bad soldering or a bad coil could cause this, or do I need to find something wrong with another component? What I find interesting is changing the fuses and correcting them seems to elevate a pre-existing issue and causes the solenoid fuse to blow.

Side note, there’s a fuse that needs to be installed on this table underneath for GI, but it hasn’t been done yet. I’m new, so need to go slow and get help with first steps first. Thank you

#656 1 year ago

Additional question, could a bad diode be the reason a solenoid fuse pops?

Edit:
Found M9’s resistor (right?) is burnt up. I believe this is from the same time the playfield solenoid fuse popped. Trying to put together an order on Mouser for a bundle of the common 6803 PCB parts I’ll need to have on hand. Did anyone ever do that?
5A1CD3B3-A084-44C8-A4E6-AC742A77DBE6 (resized).jpeg5A1CD3B3-A084-44C8-A4E6-AC742A77DBE6 (resized).jpeg

#658 1 year ago
Quoted from jturner:

That solder job looks rough. The pic looks like there is a bit of solder close to the other pin. But no burn mark so it’s probably not it. Just my observation.
Does the solenoid move freely? Can you replicate if you hold the flipper button? How are the voltages on the board? Is there anything else that is moving around and shorting out?

Solder isn’t touching, but I’m going to rebuild that solenoid. The whole thing seems to be breaking down, but I’d like to know how to prove it’s the issue to you experts It moves freely and fires fine, but the coil is loose and you can tell the mech isn’t at all tight.

Voltages are hard to pinpoint for me now. Since the game freaks out without the 1 amp solenoid fuse, I’d rather bullet-proof what I can on the boards. When things were working, I was just getting used to testing voltages and some were correct but some were off. Originally, I figured I should correct the fuses before reporting in. The only other issues are some weird wiring surrounding the flash lamps and the right slingshot not firing.

I think J8 is for the sling shot solenoids, but I could be wrong. Orange and blue is for the right side, I think:
2F8E48D7-9CAB-401E-946C-443F14C846BD (resized).jpeg2F8E48D7-9CAB-401E-946C-443F14C846BD (resized).jpeg

How do you test the transistors on the board that affect the solenoids for the slingshot (and other solenoids)? I think I read you could test them while in the board with the power off?

Should transistors be replaced with the same rating, or can they be higher?

Thank you

#661 1 year ago
Quoted from pinballdork:

Uggg.... Register 25 "Playfield specials feature", was 00(No award). Thanks!

Thanks for sharing the issue and your fix. Sounds like the infamous Bally keypad strikes again

1 week later
#664 1 year ago

Sweet work! Just stick that setup in a backbox, pick a playfield, and update that collection page

#666 1 year ago

Chris would be one person a lot of PinSiders would recommend for you:

http://chrishiblerpinball.com/contact/

1 month later
#689 1 year ago

Looks like CPR did the Motordome plastics set. It even has the U everyone is missing!

https://classicplayfields.com/shop/pinball-plastics/motordome-plastics/

Noticed they even did a topper, which looks like it matches the back glass nicely. Anyone else think so?

https://classicplayfields.com/shop/pinball-toppers/motordome-topper/

0A2A0A07-B71E-433B-A629-F8C03DBA6F1B (resized).jpeg0A2A0A07-B71E-433B-A629-F8C03DBA6F1B (resized).jpeg9EFCBC87-3DD4-4F04-8456-CA93F9ECB1DB (resized).jpeg9EFCBC87-3DD4-4F04-8456-CA93F9ECB1DB (resized).jpegAC09CEC6-EC92-46A1-83E2-8F07F93E0EB6 (resized).jpegAC09CEC6-EC92-46A1-83E2-8F07F93E0EB6 (resized).jpeg
1 month later
#727 1 year ago

This is a direct quote from @bigal56, who has been an amazing resource for helping me get my Motordome in tip top shape:

“Bally switched over to a system of switched lighting called bi-phase. Used in the 6803 games, this allowed a single lamp driver SCR to control 2 different lamps. This requires all switched lamps to have a diode in series. Flashers and GI lights were not required to have diodes.

Use non ghosting bulbs for switched lamps to avoid having to replace the lamp driver board as regular LEDs can flicker…GI lights don't need to be NG but if your going to order a bunch of LEDs just stick with NG all around.”

I hope that helps. It really helped my head grasp the electronics of the lighting in 6803, especially Motordome.

1 week later
#740 1 year ago

Has anyone else tried 6.3v OpMax bulbs from Comet in their 6803?

https://www.cometpinball.com/products/opmax-bulbs

I put them in all my GI for Motordome. I noticed that the GI bulb by the left upper flipper runs very hot to the touch. Do these bulbs run hot or did I mess something up? Installed a new 1N4007 diode and replaced the socket just in case. Same issue.

Thank you

Edit: Added a picture. I realized that maybe this socket doesn’t need a diode (right?) or maybe it’s not technically GI (this idea is getting me tripped up).

IMG_8090 (resized).jpegIMG_8090 (resized).jpeg
#744 1 year ago

Anyone with a Motordome willing to snap a picture of the light socket underneath their upper left flipper plastic? If you use Titan rubber caps for posts it’ll take you two seconds

Edit: Was provided the explanation that the upper left flipper lamp and both upper right saucer lamps in Motordome need the diodes as they are switched lamps, not GI, but also not flashers. We'll assume I installed the diode incorrectly. Will edit once I replace the socket and see if the LED gets hot. Thanks Al!

1 week later
#750 11 months ago

Big thanks to BigAl56 for pushing me through to get Motordome’s upper left switch lamp “flasher” corrected. Lack of a properly soldered diode caused the lamp to be getting too much juice and never fully switch off (just went from very bright down to bright and back).

This style wedge socket was much easier to adhere the diode to than the stock bulb I was working with: https://www.pinballlife.com/miniature-wedge-base-2-lead-socket-with-rear-mounting-bracket.html

You’re the man Al!

IMG_8390 (resized).jpegIMG_8390 (resized).jpegIMG_8391 (resized).jpegIMG_8391 (resized).jpegIMG_8392 (resized).jpegIMG_8392 (resized).jpegIMG_8396 (resized).jpegIMG_8396 (resized).jpeg
#752 11 months ago
Quoted from Inkochnito:

There is a file on my website to print new score and instruction cards for Motordome.
Looks a lot better than the old yellowed cards.
Look in the Bally Section.
http://www.inkochnito.nl
Peter

What are you saying about my classy cards???

I will have to get some decent cardstock to print them out - thank you

I really wanted ralphwiggum to make some fun 3D printed cards, but I'm afraid Motordome isn't on the top of many lists

Edit: Thanks again, Peter! Went with the orange card stock. Still hoping for the ralphwiggum treatment someday.

IMG_8418 (resized).jpegIMG_8418 (resized).jpeg
1 month later
#755 10 months ago
Quoted from Player1:

Hello all,
I seem to be having trouble finding the following two posts for a BTC. They are missing and I can't seem to find part numbers in the parts catalogs for 1986 or other years. Anyone have any idea what the part numbers were or if there are comparable posts still available? TIA for any help.
[quoted image]

Are they 1” tall? Maybe this:

https://www.pinballlife.com/williamsbally-1-metal-post-with-groove.html

#765 10 months ago
Quoted from VR4G63:

Lastly are these wires normally like this? No speaker?

Yes, time for a new speaker

Useful archive listing for photo reference: https://pinside.com/pinball/market/classifieds/archive/115845

From: https://pinside.com/pinball/market/classifieds/archive?s=1s=1&ad_machine_key=227#results

HB 1 (resized).jpgHB 1 (resized).jpg

HB 2 (resized).jpgHB 2 (resized).jpg

3 months later
#803 7 months ago
Quoted from dddanielll:

Okay time to call on the help of any 6803 experts out there!
I'm in the process of testing opto trough boards made by the amazing DumbAss.
Games that use this board set:
ATLANTIS
BLACKWATER 100
DUNGEONS & DRAGONS
ESCAPE FROM THE LOST WORD
TRUCKSTOP
The opto transmitter board is working perfectly and is on location now in my D&D along with an original Bally receiver board.
Now we're having issues getting the repro receiver board to work. Here are the symptoms:
With 4 balls in the trough all 3 trough switches register. When you take 1 out. Suddenly none of them register as closed.
Here’s a video of the behavior I described:
https://share.icloud.com/photos/0bcwLp3KpgzcDpS5QD6wVChRw
The second video is showing that the switches will close individually or in pairs but for some reason aren’t doing so in the context of the trough. I tried covering the trough with a black plastic bag just to see if there was a light leak issue but that didn't make a difference.
https://share.icloud.com/photos/04fZJOaX0xhgjpa8iJRSzAzaQ
Other information that may be helpful:
Transmitter and Receiver Optos all have heat shrink on them to act as light shielding.
The LED and phototransistor are QED123 and QSD124 which have a peak response wavelength of 880nm
The second video seems to prove that the issue is mechanical and not electrical. Open to ideas of how to test or resolve this theory.
Happy to test anything or answer any questions. Would love to get to the bottom of this so we can have a viable option for board replacement.

Just want to ask a dumbass question, but you brought this to @Dumbass's attention, right?

#805 7 months ago
Quoted from dddanielll:

Yeah he’s the one making the boards.

Just making sure you brought the issues up to him, instead of to us first.

Can you see the beams broken with your camera? Sorry, can't open your links.

3 months later
#819 3 months ago
Quoted from Chicanelane:

This was a multi year project, but turned out ok. Still some minor work to do. Put in some flipper set screws to position them. Adjust some switches, and repin one connector. One of the favorites from the arcade days.
[quoted image][quoted image][quoted image][quoted image]

Awesome job! Looks great Have any underside photos?

1 month later
#839 78 days ago
Quoted from Charles_Kline:

I suppose this is the commonly broken plastic huh?

CPR has the Motordome plastics set. If I was them, I'd sell just this piece but for a premium, instead of making people buy the whole set when just one piece is likely needed.

You can always buy the whole set and then sell the rest. Pinside and eBay move parts.

Link: https://classicplayfields.com/shop/pinball-plastics/motordome-plastics/

It's a very nice set and very well done.

3 weeks later
#845 57 days ago
Quoted from Charles_Kline:

Going through my MotorDome, found a possible hack job.
What should these yellow wires be going to?[quoted image]

They’re for the TURBO BOOSTER STAAATTTIIIONNN

Turbo Booster StaaatttiiionnnnTurbo Booster Staaatttiiionnnn

LampsLamps

PlasticPlastic

One of the coolest backboards in all of pinball

#847 57 days ago
Quoted from Charles_Kline:

Realized this is part of the "Bright Light Field Kit" Service bulletin.
[quoted image]

Is your Turbo Booster Station lamp panel working? Do you have a photo of how your Turbo Booster Station is wired? When I got Motordome it wasn't working, but eventually fixed it and did LEDs to space out the lamps like pictured above and lower the current being pulled.

#849 56 days ago
Quoted from Charles_Kline:

None of the flashers are working. I need to look through that flasher bulletin and see if it was installed correctly.
The fuses are all good so I wonder if the transistors had already fried and they thought installing the bulletin would fix it.

I see it now. Your field kit wire is on the left and your stock White-Blue wire is on the right. My game didn't have the extra fuse kit installed. Didn't install it because opted to go for LEDs to lower the current and decrease the load going across the transistors. This led to zero issues.

Field Kit InstalledField Kit Installed

There are 12 flashers, or "Brite Lights" in Motordome. 3 on the back board and 9 underneath the rider's visor and shoulder pads. One of the visor's will likely be in the middle of nowhere with the automotive bulb burning the wood. These should all be turned into LEDs. The field installation kit is essentially just regulating the current, through the additional fuse and high wattage resistor, but the original bulbs will still be very hot even if everything is working correctly.

The 4 sets of 3 Brite Lights each run on a 43V circuit, so if you can do 3 13V bulbs you're close enough for the bulb to work correctly and not melt.

Original SchematicOriginal Schematic

Example of updated Brite Lights under the playfield with LEDs and new orientation

Lamps UpdatedLamps Updated

note: ignore the numbers, they were game specific

If you wanted to skip the field kit, you could go LED and put the original yellow line back into play. One side of the circuit will be the yellow wire and other other is the striped coil ground wire.

Utilized these sockets and bulbs:

9 of these:
https://www.pinballlife.com/bayonet-base-2-lead-socket-with-long-mounting-bracket-for-89-bulbs.html

9 of these:
https://www.cometpinball.com/products/8smd-flashers?variant=12386989146156

And 3 of these:
https://www.cometpinball.com/products/8smd-flex-flashers

I tried to document some of this here: https://pinside.com/pinball/forum/topic/motordome-playing-field-questions

Credit to BigAl56 for schooling me

Promoted items from Pinside Marketplace and Pinside Shops!
Trade
Machine - For Trade
New Cumberland, PA
2,299
Machine - For Sale
Wichita, KS
$ 18.95
Eproms
Pinballrom
 
$ 1.00
Pinball Machine
Pinball Alley
 
$ 36.95
$ 22.95
Eproms
Pinballrom
 
$ 44.99
Cabinet - Shooter Rods
Pinball Shark
 
From: $ 189.00
$ 9.95
Eproms
Pinballrom
 
Wanted
Machine - Wanted
Westminster, MA
$ 1.00
Pinball Machine
Pinball Alley
 
$ 1.00
Pinball Machine
Pinball Alley
 
$ 100.00
Cabinet - Shooter Rods
Super Skill Shot Shop
 
$ 1.00
Pinball Machine
Pinball Alley
 
$ 18.95
Eproms
Pinballrom
 
2,600 (OBO)
Machine - For Sale
Pelzer, SC
$ 22.50
Magazines/books
Pinball Magazine
 
From: $ 14.00
Electronics
Third Coast Pinball
 
Hey modders!
Your shop name here

You're currently viewing posts by Pinsider MiniPinHead.
Click here to go back to viewing the entire thread.

Reply

Wanna join the discussion? Please sign in to reply to this topic.

Hey there! Welcome to Pinside!

Donate to Pinside

Great to see you're enjoying Pinside! Did you know Pinside is able to run without any 3rd-party banners or ads, thanks to the support from our visitors? Please consider a donation to Pinside and get anext to your username to show for it! Or better yet, subscribe to Pinside+!


This page was printed from https://pinside.com/pinball/forum/topic/bally-6803-club-all-welcome?tu=MiniPinHead and we tried optimising it for printing. Some page elements may have been deliberately hidden.

Scan the QR code on the left to jump to the URL this document was printed from.