(Topic ID: 50131)

World Cup Soccer 94 owners. Everyone welcome.

By DEWSHO

10 years ago


Topic Heartbeat

Topic Stats

  • 8,491 posts
  • 740 Pinsiders participating
  • Latest reply 5 days ago by Phoerber
  • Topic is favorited by 272 Pinsiders

You

Linked Games

Topic Gallery

View topic image gallery

wcs2 (resized).jpg
wcs3 (resized).jpg
wcs1 (resized).jpg
20240414_122747 (resized).jpg
IMG_8610 (resized).jpeg
IMG_8607 (resized).jpeg
IMG_8609 (resized).jpeg
IMG_8608 (resized).jpeg
IMG_0650 (resized).jpeg
IMG_6904 (resized).jpeg
IMG_6903 (resized).jpeg
IMG_6900 (resized).jpeg
IMG_5058 (resized).jpeg
IMG_9196 (resized).jpeg
IMG_9195 (resized).jpeg
IMG_9194 (resized).jpeg

You're currently viewing posts by Pinsider neodog.
Click here to go back to viewing the entire thread.

#5727 4 years ago

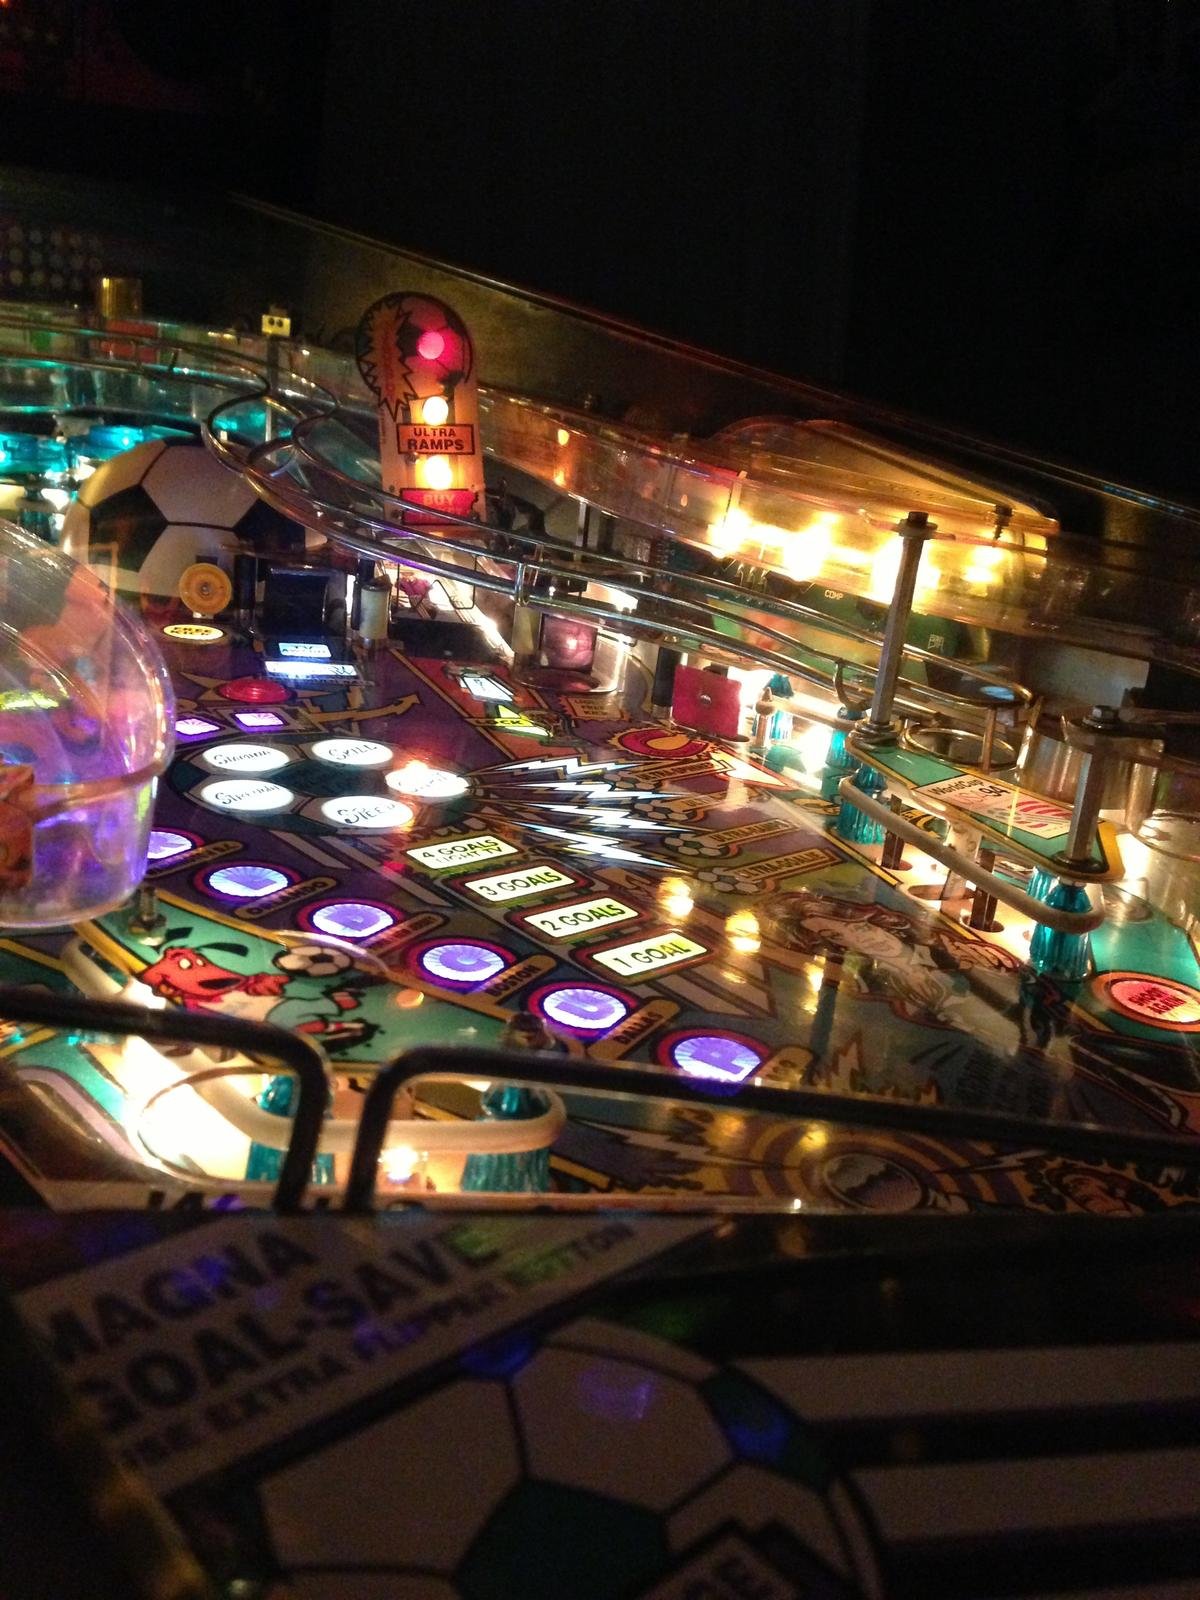
Hi folks, first pinside post.

I've had my World Cup Soccer for about 7 years now, it's my first pin (may it also be my last).

It had a growing number of small problems when I bought it, and problems I've either ignored or for which I've only implemented tiny workarounds. For all these measures it's worked great -- mostly.

Over this recent Christmas with a house full of family, two bridge rectifiers failed, all the solenoids and flashers stopped working, and no amount of duct tape or Fonzie touch would fix it. So I embarked on a campaign to improve the machine.

Prior done list:

- (2013) **Bought** Cliffy protectors
- (2014) Fixed a chronically stuck ball at the lock magnet using a toothpick as a wedge
- (2015) Bypassed faulty GI connections with jumpers and hook clamps
- (2015) **Installed** Cliffy protectors
- (2017) Replaced the failed plasma with ColorDMD (one-color mode)
- (2018) Replaced the goalie plastic (he broke in half -- THAT was a HARD TACKLE!)
- (Occasionally) Open the backbox and reseat a bunch of connections get lighting/sound working again

Done in 2020:

- Replaced bridge rectifiers BR3 and BR4 and accompanying caps (no power to solenoids == no game)
- Both ramps have been cracked and split at the ball drop, for years: I glued them back together, secured and protected them with mylar
- Replaced worn mylar around the lock-magnet
- Replaced broken star posts (almost every single one was smashed at the bottom)
- Replaced other plastics (header, pop caps, the big plastic on the left that seems to break on everyone)
- Replaced worn/partially torn rubbers (including flippers... which were worn so much a the tip you couldn't aim for the ramps)
- Added additional fender washers for more protection
- Quieted the noisy transformer (it's now a whisper)
- Swapped out all lighting for LED (this is still ongoing... it's hard if you're sensitive to 60hz-flicker)
- Cut out bad GI headers/connectors and replaced them with solid connections.
- Cleaned and waxed the field for the first time (wow... such dirty! such clean! such fast!)
- Carefully cleaned the worn ball drop slots and treated the splintered edges with super-glue
- Reversed the spin of the soccer ball
- Replaced missing (!) screws on loose flipper assemblies
- Flashed a Color DMD color rom. Yay!

Todo:

- Fix and secure the ramps for good
- Replace the rest of the rubbers and star posts
- Make the soccer ball and goalie quiet
- Replace cracked roll-over buttons
- Install new Cliffy carbon-fiber protectors
- Install LED OCD to get that strobing under control
- Get mylar protection around remaining rollover slots
- Adjust the right flipper
- <too many other things to list>

Having gone through this process, I'm amazed at how many things can be broken or imperfect and still have a usable machine.

I suppose I shouldn't be, I'm a software engineer; I'm quite familiar with the process of creating usably broken software. I thought the real world would be substantially more sensitive to flaws, but I think it might actually be less.

I'm appreciative of the decades' worth of wisdom people have posted to sites like this one... some of these morsels of knowledge I simply wouldn't have gotten any other way.

#5728 4 years ago

Issue: Securing the bottom end of the right plastic ramp.

One of the issues I'm trying to address with my machine is that the right ramp wobbles when the ball comes down the track. The left side of the plastic ramp has two eyelets on the left side that are mounted onto two elevated posts above the right sling-shot.

The bottom right side of the ramp isn't secured by anything... the slightest amount of force (as with a ball careening around the corner) will cause that side of the ramp to sag and put stress on the left side. This doesn't make any sense to me... shouldn't there be SOMETHING securing the right side of the ramp? I would think it would be designed to rest on supports in a gravity neutral way, not to be constantly levering against those huge posts all the time. This is doubtlessly what caused the ramp's eyelets to crack. In fact, the right side of the ramp rubs slightly against one of the brass coin toss nuts. That's as close as anything comes to offering support on that side of the ramp.

#5729 4 years ago
Quoted from KSUWildcatFan:

What's the easiest way to change the GI bulbs on the middle left (under the mini playfield)? I'm thinking if I just drop the standup target through the playfield I should be able to get to the two bulbs. I've got warm white bulbs there I think, but I'm guessing they're the old style of LEDs and are either 1SMD or not SMD at all. They simply aren't as bright as I think the game needs. But I'm not looking to take the whole thing apart to change them right now..

Aren't those particular bulbs accessible from underneath by unscrewing a mini-PC board and pulling it out? That's how I accessed 90% of the GI bulbs. For two bulbs there would only be one screw holding it.

I used a manual nut-driver so as not to stress the threading; those screws definitely do not need to be tight.

#5734 4 years ago
Quoted from DBUM:

Hey guys so it looks as though my soccer ball isnt screwed down onto the spinng plate but just firction fit. Do you think this is an issue it doesnt seem to move around to much.

Is the screw completely missing or just spinning freely? If it was just missing I would want to find a replacement (with a right-sized washer) and not bet my luck the friction holds forever. If the ball did manage to ride up the post it would likely put more strain on the rubber.

If the screw is stripped, I'd replace it. If the post is stripped, I'd probably wait-and-see in that case.

I think the screw makes it easier to see wobbles accurately.

#5740 4 years ago
Quoted from DBUM:Should my lights be dimming everytime a flipper is fired? I assume that's normal due to the power draw
Quoted from arcyallen:

My lights dim briefly. The screen also gets a tiny bit frazzled when the ball kicks up the habitrail after a goal, like there's too much voltage drop. Despite taking some things off there may still be too much plugged in on that same outlet (for me).

I assume you're talking about the GI lights, not the lights in your room. If so, mine dim briefly also. It's subtle, I have to look closely to notice.

Do you use LEDs for GI?

I've learned that LEDs are likely more sensitive to AC voltage dips because A) they turn on/off instantaneously when current stops, rather than continuing to glow like a filament would, and B) they have a hard minimum voltage to light. Putting these together: even when operating normally, LED bulbs turn off 120 times per second when running on AC. For example, for a fully rectified LED bulb with a 3 volt minimum: while the 6.3VAC sine wave drops between +3VAC and -3VAC, the LED would be off; this occupies 2.6ms out of each 8.33ms cycle; so it's actually only on for 68% of the time. If the voltage sags because of a flipper, the sine wave amplitude is smaller, so it spends less time over the 3V minimum, resulting in a longer off-time and creating the perception of a dimming bulb. At 5.3VAC, the bulb would be off for 4.5ms out of the 8.33ms cycle, so now it's only on 46% of the time. So even a sag of only 1VAC results in an immediate 33% reduction in apparent brightness.

With incandescent there is still a dimming, but as this video shows

it can take several cycles for the filament to cool to the level imposed by a new voltage. Until it cools and the resistance reduces, the change in light output will be proportional to the change in nominal voltage... so you wouldn't immediately see a 33% drop in brightness from a loss of just 1 volt, and possibly never would.

#5741 4 years ago

Both exit lanes have adjustable posts at the top of them, with 3 different positions governing how tight the exit lane is. What is the default setting for these posts? I found both of mine in the most open setting (which is presumably the most difficult). I'm wondering if it was installed that way at the factory per "normal difficulty" design or if it was adjusted to make it harder on the clientele.

#5742 4 years ago

Similar question to the one asked by @andypc.

I bought a set of black replacement rubbers from Marco: How do I know what size rubber goes where? I could just replace the size written on the rubbers I remove from the machine, but someone could have installed the wrong one to begin with.

#5743 4 years ago
Quoted from DBUM:

Hey guys so I drilled out the rivets on the gearbox. Im assuming once I clean them out I should spread a little grease on each gear and not over do it[quoted image]

DBUM I'm thinking of doing this, but never done anything like it. What did you use to drill out the rivets? How did you secure it again when you were done: replace the rivets with nuts and bolts or use new rivets?

Also, did it help in the end?

2 weeks later
#5770 3 years ago

New ramps, from http://starship-fantasy.com, decals applied. It's much thicker plastic than the original, might be strong enough to withstand impact from coronavirus.

So much to do, don't think I'll get to install it today. Maybe tomorrow...

IMG_20200502_073154 (2).jpgIMG_20200502_073154 (2).jpg

#5776 3 years ago
Quoted from BigLebowski:

Does anybody know where this clear plastic is supposed to go?

I happen to have my ramps out.

That piece looks like a perfect fit right here, under the ramp and around the ball:

pasted_image (resized).pngpasted_image (resized).png

I don't have the piece, and I've never known the ball to get under the ramp in this way, so I can see why some would deem it unnecessary. Can't explain my cracked star post, though, maybe just overtightening (happened a lot on this machine).

I do sometimes see the pinball get stuck on top of the bottom edge of the soccer ball, but it's pretty easy to dislodge when that happens and this is a lot of plastic to avoid getting stuck in just that one spot.

#5783 3 years ago
Quoted from provato:

After researching every photo of unmodded WCS94 I could possibly find, I made my own rubber chart and uploaded it on this post:
https://pinside.com/pinball/forum/topic/world-cup-soccer-94-owners-everyone-welcome/page/98#post-4848696

Thank you for the awesome chart, @provato. After only using it for a couple of rubbers, I've already found at least a couple of errors in my machine.

It looks like your map is missing an "A" mini-post right below the "light magna goal" target on the right.

Edit: Can you also double-check the size for "L" bumper posts? It looks like Marco supplied 7/8" sleeves, not 7/16" as listed on your map.

1 week later
#5804 3 years ago
Quoted from provato:

The rubber list I made is based on the ipdb B.O.M. Official Parts list for this game.
So according to that list and countless photos of unmodded or before-restoration photos I found online, there is no “A” rubber below the magna goalie target - the “G” rubber ring wraps around three posts under there - not two.

I see, so it's just not pictured in the map.

Okay, in the center of this photo are the posts in question. You're saying the "G" rubber goes around all three posts in the center? (the triangle between two green star posts and one mini spear-shaped post?)

IMG_20200516_113426 (resized).jpgIMG_20200516_113426 (resized).jpg

Quoted from provato:

Also there are no 7/8 diameter posts in this game. Maybe you mean the “M” rubbers that are 7/8” length? However these are only found inside the coin toss assembly.
Rubber ring kits are well known for missing, old-cracked or wrong rubbers...

Ah, 7/8" is length, whereas 7/16" is diameter, that almost makes sense. So Marco didn't even measure the diameter. And now my machine is disassembled and ready for new rubbers and reassembly, and I have 14 post sleeves that are 14% oversized (they are all 1/2" OD) with no hope of correction in the middle of a 4-day weekend.

$%#@.

...

Is there crying in pinball?

At least they miscounted and included the correct number of sleeves (the packing list shows 17, but 14+4 == 18).

#5805 3 years ago
Quoted from provato:

The rubber list I made is based on the ipdb B.O.M. Official Parts list for this game.
So according to that list and countless photos of unmodded or before-restoration photos I found online, there is no “A” rubber below the magna goalie target - the “G” rubber ring wraps around three posts under there - not two.

BTW, the configuration in the photo linked here is the only configuration I've seen in my search for photos and videos online:

pinside photo
(from https://pinside.com/pinball/forum/topic/world-cup-soccer-94-owners-everyone-welcome/page/2#post-927159)

So if G is supposed to surround 3 posts it seems that quite a lot of people get it wrong.

#5815 3 years ago
Quoted from provato:

The rubber list I made is based on the ipdb B.O.M. Official Parts list for this game.

I've been finding that 7/16" OD sleeves are hard to come by, so I took a look at the parts list to see if I might encounter some insight: https://www.ipdb.org/files/2811/Bally_1994_World_Cup_Soccer_Parts_List.txt

I noticed a couple of anomalies:

1) That list only shows 12 (11 level 2, 1 level 3) instances of the 3/16" ID rings (23-6641), which are noted in your table as 'B'. There appear to be 12 'B' marked on your map (which seems consistent with what's on my PF).
2) That list only shows 13 instances of sleeves 23-6556 (which are 7/16" OD). Not only does your table list 14 of them, I can count them by hand on my machine.

Any idea what the discrepancies are? I couldn't find anything in the list that was similar but listed differently, it looks like the ipdb parts list is just short. Do you remember correcting for this or anything?

Edit: I initially counted 13xB on your map, but now I only count 12. Do you have double B's on any of the posts?

3 weeks later
#5835 3 years ago

Would someone who thinks they have a nominal (or even quiet) sounding soccer ball motor mind posting a video, showing how it performs during the rotation test? It would be helpful to have some perspective about what's achievable.

My soccer ball is noisy. I drilled open the gearbox, cleaned it out and re-greased it; I'm not sure it helped, as it's still quite noisy. It does look like teeth are worn in the middle of the driver gear, but adjusting the position of the motor to use a different part of the gear didn't really help either.

#5840 3 years ago

Thanks @chuckwurt! What volume level did you have the game set to?

The ball was comparably quiet in the video, I had to really crank up the volume to hear it. Is that a fair representation of how it sounds in person?

#5849 3 years ago
Quoted from Gogojohnnyquack:

I've got some pretty major ball hop on my right flipper lane. Is the best way to adjust it to bend the top of the metal guide out? Typically there are screws, posts, and guides here that can be loosened and moved, but the metal guide here is pretty solid.

I just finished rebuilding my playfield (my first), and in the process realized that aligning the guides with the flippers was a thing I could do. To do it, I loosened the screws, flexed the guide (which was indeed stiff, but I didn't permanently bend it), then tightened them again... it seems to hold well enough.

The other variable of course is flipper alignment. I've aligned mine rotationally, which changes the line (and to a lesser extent the position) the guides should align to, but I didn't do anything to make sure mine were properly centered on their holes (if indeed that's a thing you can do).

#5858 3 years ago
Quoted from Ceckitti:

Im thinking i might need to raise the back of my game. When the ball comes around the top left and drops into the return/ball lock ramp it kind of has a back spin on it and will actually either stop for a second or roll backwards a tiny bit. Im wondering if that delay is causing the "combo shot" to time out?
Ill either raise the legs or check with the glass off.

If you're talking about the hairpin "trap" curve, I think that's the design (hence the "trap" designation).

Maybe the left-left-right sequence depends on the initial position of the diverter?

#5859 3 years ago

I've recently replaced my slingshot rubbers and star posts, and adjusted all the leaf switches. I tuned them to perfection, but I'm finding the leaf-switch sensitivity doesn't hold very well over time. One reason I suspect is that the posts are not holding their position against the tension of the slingshot ring, thereby allowing the ring to close in tighter on the resting position of the switch.

Slingshot posts are secured with a bolt/nut in the bottom of the playfield. Theoretically, the tighter I make the post, the more tension they will be able to withstand straight-up, without sliding. However, if I overtighten, I expect depressions will form in the wood and the posts will eventually crack. Is it possible to make them tight enough without incurring those risks? Or should I just expect the posts to get pulled inward when the ring is on?

Promoted items from Pinside Marketplace and Pinside Shops!
$ 180.00
$ 29.95
Playfield - Toys/Add-ons
ULEKstore
 
$ 26.95
Playfield - Decals
Pinball Pimp
 
From: $ 130.00
Lighting - Backbox
Myth Pinball Parts Shop
 
$ 24.00
Lighting - Other
Pin Monk
 
$ 15.95
Playfield - Toys/Add-ons
ULEKstore
 
$ 25.99
Lighting - Led
Lee's Parts
 
$ 39.99
Lighting - Interactive
Lee's Parts
 
6,000
Machine - For Sale
Queen Creek, AZ
$ 15.00
Playfield - Protection
arcade-cabinets.com
 
$ 45.00
Cabinet - Decals
Inscribed Solutions
 
$ 24.00
Various Novelties
Pinball Photos LLC
 
$ 26.99
Playfield - Other
Lee's Parts
 
$ 9.99
Eproms
Matt's Basement Arcade
 
From: $ 159.00
Playfield - Toys/Add-ons
Sparky Pinball
 
$ 24.00
Various Novelties
Pinball Photos LLC
 
26,000 (OBO)
Machine - For Sale
Auckland, NZ
$ 29.95
Playfield - Toys/Add-ons
ULEKstore
 
$ 35.00
Various Other Swag
JK Pinball
 
$ 329.99
Lighting - Other
Lighted Pinball Mods
 
$ 24.95
Playfield - Toys/Add-ons
ULEKstore
 
10,900 (OBO)
Machine - For Sale
Mount Pleasant, WI
$ 9,499.00
Pinball Machine
Classic Game Rooms
 
From: $ 31.50
$ 10.00
Playfield - Toys/Add-ons
Pinball Haus
 

You're currently viewing posts by Pinsider neodog.
Click here to go back to viewing the entire thread.

Reply

Wanna join the discussion? Please sign in to reply to this topic.

Hey there! Welcome to Pinside!

Donate to Pinside

Great to see you're enjoying Pinside! Did you know Pinside is able to run without any 3rd-party banners or ads, thanks to the support from our visitors? Please consider a donation to Pinside and get anext to your username to show for it! Or better yet, subscribe to Pinside+!


This page was printed from https://pinside.com/pinball/forum/topic/world-cup-soccer-94-owners-everyone-welcome?tu=neodog and we tried optimising it for printing. Some page elements may have been deliberately hidden.

Scan the QR code on the left to jump to the URL this document was printed from.