(Topic ID: 252842)

Witness!!! Mad Max Fury Road Homebrew

By SickNate

4 years ago


Topic Heartbeat

Topic Stats

  • 779 posts
  • 153 Pinsiders participating
  • Latest reply 65 days ago by SickNate
  • Topic is favorited by 205 Pinsiders

You

Linked Games

No games have been linked to this topic.

    Topic Gallery

    View topic image gallery

    05C1585F-B774-452B-AC07-AE63802E0BF1 (resized).jpeg
    931572D6-0281-4B03-B5EE-E51232B0C1EA (resized).jpeg
    72C1ADB4-986D-4F9B-8F26-DF303071FE5B (resized).jpeg
    EE19C15C-2548-4F9F-8042-BDCB22DC5B91 (resized).jpeg
    2162D2C5-EE5D-4843-9A8F-92317F0A778F (resized).jpeg
    EEE26A25-664A-47BB-8A43-82133B88EFF7 (resized).jpeg
    2B47ADD9-CBFC-4103-9EB4-7938EE1F37E7 (resized).jpeg
    96B469AA-29E7-4181-B079-F242CB1B2319 (resized).jpeg
    6EC285FD-2AB4-47A8-A0FF-44601E72ACE2 (resized).jpeg
    8036764E-1E65-4062-9DFB-5FA15A68396B (resized).jpeg
    A1B3FB69-5D33-43BA-875F-1297DFD2DF12 (resized).jpeg
    08650A7A-119F-4B14-9ADC-4CA7945CC324 (resized).jpeg
    8A392442-53F9-4694-BB2E-C94B0F0C3D60 (resized).jpeg
    678C0528-AFA6-4128-AF85-F76BEDE39889 (resized).jpeg
    2651F287-68DD-4DA8-A4B3-A93B5A83E58B (resized).jpeg
    5F8D4961-1789-4421-BE72-53BD20AEDCD5 (resized).jpeg

    You're currently viewing posts by Pinsider sicknate.
    Click here to go back to viewing the entire thread.

    267 posts in this topic match your search for posts by sicknate. You are on page 1 of 2.
    66
    #1 4 years ago

    My nephew is a senior in high school and wants to be an engineer.
    He's not sure which type (mechanical, electronic, automation, ..etc) so we decided to build a pinball machine.
    It is the perfect project IMHO.
    We're both huge Mad Max fans so the theme was decided about 30 seconds after the project was decided.
    We got my brother in law on board to do the art, and we're off to the races.
    We set a timeline of 9 months to completion and are going to try our best to achieve that.
    We're about 2 months in and have the virtual/solidworks design done(hopefully).
    Maybe we should count our 9 months starting now

    Anyhoo, hope some peeps will like our build.

    MMFR_Ver8 (resized).pngMMFR_Ver8 (resized).png
    11
    #2 4 years ago

    here's an isometric view

    isommfr (resized).pngisommfr (resized).png
    #5 4 years ago

    Going with fast pinball controller and mpf software
    Using a intel nuc computer

    12
    #8 4 years ago

    The solenoids in the back are to divert the ball to the lower scoop through a subway.
    The brass pipes are supposed to represent the citadel water pipes.
    There are ball locks within them.
    The plan is to have a mode that locks a ball in each pipe. Once all 3 are locked then you hit a scoop. Vid plays of immortan joe turning on the water.
    Light show of blue and white. Balls release for citadel multiball.

    #9 4 years ago

    0990D2C3-C13D-4BCE-9FE9-DE2450947433 (resized).jpeg0990D2C3-C13D-4BCE-9FE9-DE2450947433 (resized).jpegC4E0A987-54CC-4B9A-8DAC-4864832D8746 (resized).jpegC4E0A987-54CC-4B9A-8DAC-4864832D8746 (resized).jpeg

    When down to one ball after citadel multiball “do not my friends become addicted to water. it will take hold of you, and you will resent its absence”

    #11 4 years ago

    Scoop is a concern... pretty close to a mirror of Metallica scoop placement, which I think has good flow. I considered swapping it with the target above it.
    But then subway to it would be hard/tight

    #18 4 years ago

    Right wire feeds upper flipper.
    Will need tuning... just a place keeper for now.
    A lot of 3 flipper games, the upper feeds itself. We want huge combo possibilities, so you can go 1,2,3 back to 1,2,3 etc

    #22 4 years ago

    I’ll post a pic of the mech when I get home. Well... the virtual version.
    I’m pretty confidant in it.
    My real concern is the pop bumpers.
    They’re custom...hopefully won’t need to many revisions to get them working

    FB465D67-33E8-4187-B03D-2CCD6D0A1C6B (resized).jpegFB465D67-33E8-4187-B03D-2CCD6D0A1C6B (resized).jpeg
    #24 4 years ago

    Just about every line/clip in the movie makes great pinball call outs.
    We have a lot planned.... just focusing on mechanical right now

    #29 4 years ago

    We’re big boys...lay the honest opinions on us

    #33 4 years ago

    We actually are planning to have “ILIDILA” in the rectangle between the flippers.

    Play exact vid on extra balls.

    If you look at the iso view of the ramps,
    There are tabs at middle and top. Those will be bent at 90 degrees. Plastic covers will bolt on to save air balls. Also all three turn around will have lids

    25
    #38 4 years ago

    CosmoKramer!!! Thanks for the cab!!!
    I can not recommend him enough for cabs in SoCal

    41F7F48F-7EA9-487D-A1D8-C13D3C7895ED (resized).jpeg41F7F48F-7EA9-487D-A1D8-C13D3C7895ED (resized).jpeg55D0FCFE-7D12-4921-933E-890C2AF58076 (resized).jpeg55D0FCFE-7D12-4921-933E-890C2AF58076 (resized).jpegB0C2F8BD-9D94-45AB-B593-6226239F2903 (resized).jpegB0C2F8BD-9D94-45AB-B593-6226239F2903 (resized).jpeg
    #41 4 years ago

    I didn’t want to bother doing solid model of the oring in an oval.
    There will be one like my quick sketch up here
    F8B256A6-FCC2-4148-B2B8-8637DDBE4F2E (resized).jpegF8B256A6-FCC2-4148-B2B8-8637DDBE4F2E (resized).jpeg

    #43 4 years ago

    As of now the plan for the switches is
    Under red switch co-op or vs mode
    #2 bonus on ramps or orbits
    #3 bonus on pops or slings
    #4 bonus on spinners or targets

    For the different boss modes there will be a best config of switches for most points

    #44 4 years ago

    Toys are hard because there is like zero licensed merch for mad max.
    I would love to do kit cars/ models etc.
    If they existed. My dream topper would be the doof wagon.

    We’ve also kicked the idea around of headers/pipes coming off the side of the upper cabinet

    I plan on making a plunger that looks like furiosa’s bone dagger / shifter.

    Hopefully some kick ass art on the playfield and plastics will pull it all together.

    If I end up getting a 3-d printer I’ll do much more as far as toys go.

    I’ll post later on some of the ideas of theme integration.

    Attached is a pic from awhile back of the ideas for the inserts/lights/modes

    577DE479-186B-40CB-A715-9CCA2E2BAD88 (resized).png577DE479-186B-40CB-A715-9CCA2E2BAD88 (resized).png
    #47 4 years ago

    Mof, this is about the 7th or 8th redraw of the playfield. I’m no pinball wizard.
    I use to own Metallica and loved doing combos one ramp to other for as. Long as I could. Until recently We had the upper flipper ramp feeding itself. As we were fleshing out the rules we changed it.

    Combos are king in this game.
    If you notice the upper scoop has V8 inserts then 3 rectangles. First ramp hit the upper circle of the 8 lights up, then the lower circle, then “thunder up”, “fang it” it, and finally witness. At any point you can hit the scoop to cash out the combo. Witness will play video of morsov jumping at buzzard car kamikrazy explosion.

    #50 4 years ago

    Haha... that’s another case of one oring going around both posts. Hilarious I left a virtual ball there

    #52 4 years ago

    The toys I really want are gigahorse, war rig, and interceptor.
    The newton ball is meant to represent the war rig. A ball can get trapped at the top to represent the fuel pod. The hole is offset so when the trapped ball hits it it will go out at an angle instead of straight up and falling right back in

    0B04A482-518E-45A1-8174-6B8CEFAB7340 (resized).jpeg0B04A482-518E-45A1-8174-6B8CEFAB7340 (resized).jpeg876B4F51-F5E8-417E-B5CD-5ED9FF475D30 (resized).jpeg876B4F51-F5E8-417E-B5CD-5ED9FF475D30 (resized).jpeg
    #56 4 years ago

    The models at shapeways look great
    Thanks for the link.

    Yes I’m machining the parts. I’m actually a machinist by day. I sneak in time on machinery where and when I can.
    I really really want to get a small used cnc lathe and mill for my garage. Someday.

    #57 4 years ago

    Alright, here's some pics of the citadel pipes/backboard diverters to hopefully put some of your fears to rest.
    I realize it's an over engineered monster, but for a prototype/homebrew sometimes that is faster.
    not shown is all 3 backboard diverter turn around things will have lids so the ball wont go flying out.
    and yes "backboard diverter turn around thing" is the technical term.

    backwooddiverter1 (resized).pngbackwooddiverter1 (resized).pngbackwooddivertercutaway (resized).pngbackwooddivertercutaway (resized).png
    12
    #60 4 years ago

    We’re going with quarters/credits for a couple of reasons. We realize we can’t charge for it as we don’t have the rights... but

    For each coin you put in the machine you’ll hear a line from max’s opening dialog
    “My world is fire and blood”
    “Im the one who runs from the living and the dead”
    “Boiled down to a single instinct...survive”
    Etc.

    Instead of start button there will be a key to turn below the plunger.
    Not enough Credits ... engine will turn over and not start. Enough Credits and you get a revving roaring engine sound with shaker motor. When ball leaves plunger switch... burnout sound.

    24
    #62 4 years ago

    “Knocker” installed

    588DE20A-BA26-4514-9752-0DF61ABCAAAB (resized).jpeg588DE20A-BA26-4514-9752-0DF61ABCAAAB (resized).jpeg
    #65 4 years ago

    A little progress this weekend
    Back glass led lights in.
    Shaker motor in.

    19B95CFE-6676-42F5-9FE2-812758FDD5CC (resized).jpeg19B95CFE-6676-42F5-9FE2-812758FDD5CC (resized).jpeg251F1296-C722-48E6-BF3C-FC7577F2FD0C (resized).jpeg251F1296-C722-48E6-BF3C-FC7577F2FD0C (resized).jpeg
    #74 4 years ago

    CLEllison,

    We are going with the 3rd slingshot.
    The pic with the targets was an older version, I only included it to show what the different inserts were for.

    We added the 3rd sling for more chaos and make it more unique

    Mdpinballdude
    Don’t think flames coming out of this machine hasn’t crossed our minds

    Mbecker
    Yes, despite everyone’s advice we’re going straight from cad to cnc. I think of it as a learning experience all the way around.
    So if the geometry is terrible we’ll just cnc another. Besides a lot of the shots are...er...um... borrowed.

    #76 4 years ago

    Slowly pushing forward.

    24557BF0-26F3-483D-9244-B73444925BEF (resized).jpeg24557BF0-26F3-483D-9244-B73444925BEF (resized).jpeg4C7D3FD7-AC36-409E-8F59-8E733580FF81 (resized).jpeg4C7D3FD7-AC36-409E-8F59-8E733580FF81 (resized).jpeg72260A42-0341-4065-9056-3F17AC7A386B (resized).jpeg72260A42-0341-4065-9056-3F17AC7A386B (resized).jpeg
    #78 4 years ago

    I’m trying to get my nephew on here to explain the rules, modes, features etc.

    We’ve split up duties as follows

    Layout , features, mechs 50/50 Nate and Justin (nephew)

    Machining - 100% Nate

    Wiring /assembly 50/50

    Programming, rules, modes - 100% Justin

    Art - 100% Lee (BIL)

    I’m proud/impressed with Justin’s design and mode ideas.

    It started out a 2 flipper game with no orbit. But slowly morphed into what it is now.

    #80 4 years ago

    luvthatapex2,
    Wrath of Olympus looks awesome. Very inspiring.

    This has kinda turned into an obsession for me.

    under playfield shot if anyone is interested.

    underskirt (resized).pngunderskirt (resized).png
    #84 4 years ago

    Mbecker
    Yes it's going to be tight.
    wiring will be an issue...especially when folding for transport

    Dark Pinball
    those look awesome

    oldskool1969
    It's my opinion that there should be 4 Mad Max pinball machines. 1 per movie.
    Thunderdome would need an upper playfield for well..er.. the Thunderdome. and a lower/under playfield for where they shovel pigsh*t.

    tight (resized).pngtight (resized).png
    #87 4 years ago

    Gornkleschnitzer,

    I went with what pinballmakers suggested from pinballife for the sliding bracket parts. Googled “mounting dimensions of stern sliding brackets” just about every way I could think of. All that would pop up is YouTube videos of how to lift your playfield.

    Got so frustrated I made this playfield.

    2F40CAC2-4239-4322-AC7D-45D808CB1CBF (resized).jpeg2F40CAC2-4239-4322-AC7D-45D808CB1CBF (resized).jpeg
    1 week later
    #89 4 years ago

    Op 1 of 2 for 2 of the diverter bodies

    9BE93075-77ED-49F5-9DB2-F833F78D1232 (resized).jpeg9BE93075-77ED-49F5-9DB2-F833F78D1232 (resized).jpeg
    2 weeks later
    10
    #93 4 years ago

    Slowly chipping away. Got my ramps and orbit ready for waterjet.
    Adding plastics. Still have work to do on areas where ball can get stuck.

    NOV (resized).pngNOV (resized).pngSheetMetal (resized).pngSheetMetal (resized).png
    1 week later
    #94 4 years ago

    Getting tired of posting virtual stuff... But haven't been able to get some CNC time lately.
    Wood playfield rev1 design done ...just need to find a good CNC router in SoCal.

    Attached is a pic of a scoop design I'm working on.
    If the scoop is waiting for ball a ball to get there through the subway (from diverters behind backboard), the horizontal coil/plunger will get a ball there faster.
    Then when the subway ball finally gets to the scoop it will replace the ball that was "on Deck"

    if a ball enters from the top, it should work normally

    NateScoop (resized).pngNateScoop (resized).png
    #98 4 years ago

    Russdx

    I use solidworks. Most hobbyists use fusion360 because they have a good student/hobbyist price. I kinda wish I had got and learned fusion360 so I could be a better help to the homebrew community

    Greenmachine19
    Yeah I just copy pasted the 23-800 for the model... will definitely use something smaller in the real world

    #102 4 years ago

    It supposed to fire/shoot the ball out of the scoop anytime there are 2 balls (or more) unless it’s holding them for a video or mode selection.
    This scoop is meant to hold 1 extra ball for speed while waiting for A subway ball

    #104 4 years ago

    Got ramps and orbit back from waterjet.
    Not impressed with quality, they must’ve used max grit size and federate.
    Should work fine though.
    Now I need them welded up.

    90032610-3177-44AA-BD04-70110A0512E0 (resized).jpeg90032610-3177-44AA-BD04-70110A0512E0 (resized).jpeg
    14
    #105 4 years ago

    Got tired of waiting for machine time. Got these bad boys at auction. Just arrived today

    F8BBC83E-1C40-4533-9A0D-6877AD6EF0CA (resized).jpegF8BBC83E-1C40-4533-9A0D-6877AD6EF0CA (resized).jpeg
    17
    #109 4 years ago

    Artwork is starting to come together

    EC333CB6-197C-436A-95D3-0B0FBE05B48A.jpegEC333CB6-197C-436A-95D3-0B0FBE05B48A.jpeg9B3E82F3-BF00-4875-B660-C9F777A2FEE9.jpeg9B3E82F3-BF00-4875-B660-C9F777A2FEE9.jpeg
    #111 4 years ago

    Pinmonk,

    Is that the Christmas edition?

    1 month later
    15
    #113 4 years ago

    I’m a glutton for punishment so I’ll keep posting.
    2 of 3 diverters done
    Scoop machined.... I’ll post pics of it assembled later

    649E5EB1-38C7-4951-B8A1-FD26A520A16F (resized).jpeg649E5EB1-38C7-4951-B8A1-FD26A520A16F (resized).jpegC719A7FC-4683-4DEB-989B-0F464E298E3A (resized).jpegC719A7FC-4683-4DEB-989B-0F464E298E3A (resized).jpeg
    13
    #121 4 years ago

    scoop assembled

    Yeah I know, some of the screws are too long. I used what I had lying around. Will swap out later.

    B7071060-019B-42BB-BFDD-0506E5829D39 (resized).jpegB7071060-019B-42BB-BFDD-0506E5829D39 (resized).jpegC60F767F-BFF9-4B40-A54E-84DE4DE27857 (resized).jpegC60F767F-BFF9-4B40-A54E-84DE4DE27857 (resized).jpeg
    21
    #125 4 years ago

    I have been hesitant to make the playfield because I wasn't sure if my pop bumper design would work or not.

    Well today I tested it and it works !!!!!

    The design is 2" diameter pop bumpers instead of the normal 3". That way I can fit more in the same space.

    When researching pop bumpers I thought they were over complicated with adjusting the spoon and all....
    So I thought I'd take a stab at something that has been working perfectly for 50 years.

    The ball is the switch. That is to say the ball closes the circuit that tells the machine when to activate the coil to bring the ring down.

    The body of the pop bumper is polycarbonate .
    From under the playfield I will light it with an RGB LED and hopefully the whole thing will glow whatever the LED is programmed.

    Attached are some pics.

    I cannot wait to cut the playfield now.

    IMG_1166 (resized).jpgIMG_1166 (resized).jpgIMG_1167 (resized).jpgIMG_1167 (resized).jpgPopCircuit (resized).jpgPopCircuit (resized).jpg
    #127 4 years ago

    Pinballwil,

    Most of what I've made is aluminum.
    Steel is 2.5 X heavier than aluminum.
    The mechs really aren't that heavy.

    I suspect the playfield will be only slightly heavier than average.
    But that is because of # of mechs not weight of them.

    If it does warp... I will use some metal rails to pull it straight.

    #131 4 years ago

    Pinstein,

    The right ramp is meant to feed the upper flipper. (position/length may need tuning)

    There are ball gates below the mid ramp and right ramp. So complete orbit shots will only be available in certain modes.

    So combos will be 1,2,3,1,2,3...... as long as you can keep them going. With orbits and behind the right flipper shots mixed in.

    At 3 “fang it” will light up
    At 5 “thunder up”
    At 7 “witness”
    (Will need tuning)

    At any point you can cash out the combo by hitting a scoop

    At that point a Different video will play depending on the Level of the combo

    At 10 or 15 or so (it’ll need dialing in)
    It’ll show Nux mouthing “witness me” and crashing into/blocking the canyon

    When you get the combo record for the machine truck horn will sound

    There are going to be four Nixie tubes in the apron. 2 will be a hurry up timer and the other 2 will count the combo

    There will be other uses for the nixies in other modes too.

    #137 4 years ago

    I think an aluminum ball would feel all wrong, dent/distort easily, and magnets wouldn’t work. This game has magnet so let’s lay that to rest.

    The pop bumper upper and lower rings are actually 304 stainless steel.

    As far as aluminum mechs go, they don’t need to stay perfectly round, and are an order of magnitude stronger than wood.

    I think a steel ball will ding and dent aluminum mechs, but if wood rails can hold up .... I’ll take my chances

    I’m pretty sure the square newton ball thing on Metallica premium behind the hammer is aluminum . It definitely gets banged up but works fine.

    #140 4 years ago

    Gornkleschintzer,

    Yes the pops wouldn’t work and the magnet wouldn’t work with a ceramic ball.

    Concerned Pinsiders,
    I promise to remake the mechs with steel if they fall apart.

    A lot of homebrews are R&Ded with cardboard and poster board.

    I think aluminum is a step up.

    #141 4 years ago

    Orbit clamps done

    E8AE8E51-A432-44C6-BF67-7C7A2561770C (resized).jpegE8AE8E51-A432-44C6-BF67-7C7A2561770C (resized).jpeg
    #143 4 years ago

    Got the ramps back from welding awhile ago. I went with 20 gauge and if I could do it over would do 18 or 16.

    I’ll just consider these R&D and if the geometry is good , redo them then.

    Everything is a lot bigger IRL than what I think it will be drawn up in CAD.

    I’m kinda on the fence if I should polish all the metal parts shiny and chrome , or leave them more rugged and apocalypse

    153B1D93-62FF-4D9A-B531-B1581DBFEAF1 (resized).jpeg153B1D93-62FF-4D9A-B531-B1581DBFEAF1 (resized).jpeg
    #149 4 years ago

    Zitt,

    Time will tell. This is the mech I’m most worried about . I did all I could Think of design wise .
    I made the upper ring with a parabolic shape to hopefully get better contact.

    If they work poor, I might try having them silver plated.

    I hope it just works.
    If it works good I have some design Ideas for rollovers w/o switches.
    Just strips of metal in pockets on the playfield.

    #151 4 years ago

    MD_Pinball_Dude,

    I'm using Fast Pinball so 12v for switches.

    I tested functionality with a fluke voltmeter set to continuity.
    I put my leads from on the lower ring and the bottom of the "piston"
    there was beep the instant the ball made contact with the rings.

    The Fluke uses a 9v battery so 12v should work even better.

    #155 4 years ago

    CraigC,

    yes I want to do a better job directing the right ramp exit at the upper flipper

    I don't have a lot of height to play with because I'm going under the right ramp.

    I'm afraid if I go too close balls will hit the ramp coming out of the plunger lane.

    Perhaps I should re route it like in this pic

    RightReturnb (resized).pngRightReturnb (resized).png
    #157 4 years ago

    Slowly making progress.

    Made the backwood and some lane guides today.

    Feels good to see stuff designed in solid works IRL.

    If I could do this over I’d use all off the shelf parts since it’s my first pin.

    But all the custom stuff is done (Other than playfield) so I’m excited . Gonna try to CNC the playfield next weekend.

    I’m sure a lot of people were rolling their eyes when I said 9 months to complete this.... And I’m right there with them now.
    A custom pin is no joke. Totally worth it though..... I hope

    9B104F28-6E3B-4D32-8E05-FABA3BC27571 (resized).jpeg9B104F28-6E3B-4D32-8E05-FABA3BC27571 (resized).jpegBA0D1361-73F6-4EDA-9533-5AAB824E027F (resized).jpegBA0D1361-73F6-4EDA-9533-5AAB824E027F (resized).jpegEBC1F57F-7FC2-4546-987B-C6E010B6FBDC (resized).jpegEBC1F57F-7FC2-4546-987B-C6E010B6FBDC (resized).jpeg
    #159 4 years ago

    Vireland,

    I actually love this idea. If I can’t make the geometry work and have to redo the ramp (as you can see it’s already made) I will do it this way.

    With the ramp jumping the return wire it’ll go to the upper flipper regardless. And you’ll only get credit for the shot if you make the jump. I wish you said this a month ago before I made the ramp.

    1 week later
    #162 4 years ago

    Got the lids done on 2 of the diverters.
    Been trying to plan a way for a switch before the diverter for ramp confirm in my head for a little bit . Worked out nicely.

    Got frustrated trying to draw stuff up in cad ... so just started bending wires around . For some stuff that is definitely the way to go.

    Added some inserts on the back wood above the citadel pipes.

    Just 1 diverter And playfield away from being done with the machining.

    ....then the real work starts

    2F3C9809-F6C0-40F9-BBDC-14A6AE8B8C00 (resized).jpeg2F3C9809-F6C0-40F9-BBDC-14A6AE8B8C00 (resized).jpeg914312D5-5B41-4CDC-87BB-1E4D07BBF735 (resized).jpeg914312D5-5B41-4CDC-87BB-1E4D07BBF735 (resized).jpeg1494F4BF-DA00-4A16-B745-3E8415E01B58 (resized).jpeg1494F4BF-DA00-4A16-B745-3E8415E01B58 (resized).jpeg
    #165 4 years ago

    Vireland,

    A bit of thought went into this. I do use an opto pair on the diverter mech to confirm a ball lock at the citadel pipes.

    I changed the scoop to have a ball in the bank to send while waiting for a ball to come in the subway
    (less idle time waiting for a ball you can't see moving)

    I needed to add a switch before the diverter and after a point of no return.
    See attached pic

    I can't have an opto pair above and below in this area because directly below is a subway.

    Also it's wider in this area so the ball won't get stuck.
    The GT 45 degree wall makes it so the ball will roll down toward the citadel pipe even if stopped
    If this wall were straight a ball that just makes the ramp would get stuck.

    Side to side there ain't much room.

    I realize this thing is WAY over engineered ... but I had a vision for Citadel multi ball and I stuck with it.
    diverter (resized).pngdiverter (resized).png

    #167 4 years ago

    Vireland,

    Let me get this right....

    I post a mech I designed and made from scratch that does the following :

    Directs ball from ramp to pipe behind back wood

    Diverts ball to subway

    Holds ball for ball lock

    Confirms hold with opto pair

    Confirms ramp with switch.

    You reply that I should have used Optos for ramp confirm

    I reply with a detailed post on why I didn’t use optos.

    You reply I should use a spinner opto.

    #169 4 years ago

    Touché

    14
    #172 4 years ago

    Designed the apron today and ordered from oshcut. We'll see how it turns out.

    I was hoping to cut the playfield this weekend but couldn't get router time. I have the program ready to go though.

    apron (resized).pngapron (resized).png
    #174 4 years ago

    Jakusu,

    I can’t say enough how impressed I am with your Mad Max. Someday I hope to have my pin beside yours at a show.

    #176 4 years ago

    Plastics done....well they still need art

    7235B855-009C-43F7-A93C-F18983BB8F0B (resized).jpeg7235B855-009C-43F7-A93C-F18983BB8F0B (resized).jpeg
    #178 4 years ago

    I’m used to inputs and outputs for PLCs.
    In the pinball world it’s switches and coils.
    Maybe this is too in the weeds to post
    But I’ll do it anyways. Here is where we stand with I/O now, hopefully it doesn’t have to change much

    MMFR I/O

    Fast Pinball I/O Borads
    board 0 32-08 (1st board in loop)
    board 1 16-16 (2nd board in loop)
    board 2 32-08 (3rd board in loop)
    board 3 08-04 (4th board in loop)

    Lower playfield
    32-08 (1st I/O board after fast controller #0)
    (32 inputs 8 outputs)
    inputs/switches
    0-0 Left flipper button
    0-1 Right flipper button
    0-2 upper flipper button
    0-3 Nate Lower scoop opto1(eject position)
    0-4 Nate Lower scoop opto2(stored position)
    0-5 Target between Nux and lower Scoop "Mothers Milk"
    0-6 Barry opto (top)
    0-7 Larry opto (bottom)

    0-8 Nux target top
    0-9 Nux target middle
    0-10 Nux target bottom
    0-11 NUX motor up switch
    0-12 NUX motor down switch
    0-13 Left outlane rollover "R"
    0-14 Left inlane rollover "O"
    0-15 small target between mid ramp and LL pop "Guzzoline"

    0-16 opto trough jam
    0-17 opto trough 1
    0-18 trough 2 rollover
    0-19 trough 3 rollover
    0-20 trough 4 rollover
    0-21 trough 5 rollover
    0-22 trough 6 rollover
    0-23 trough 7 rollover

    0-24 trough 8 rollover
    0-25 plunger lane rollover
    0-26 Right inlane rollover "A"
    0-27 Right outlane rollover "D"
    0-27 Hidden rollover behind upper flipper
    0-28 small target L of right ramp "Bullets"
    0-29 small target R of right ramp "Aqua Cola"
    0-30
    0-31

    Outputs/Coils
    0-0 Left flipper coil
    0-1 Right flipper coil
    0-2 Upper flipper coil
    0-3 trough eject coil
    0-4 auto plunger coil
    0-5 lower scoop eject coil
    0-6 Lower scoop hold ball coil
    0-7 Nux target motor

    Mid to upper playfield
    16-16 (2nd I/O board after fast controller #1)
    (16 inputs 16 outputs)
    inputs/switches
    1-0 UR pop bumper switch
    1-1 UL pop bumper switch
    1-2 Mid pop bumper switch
    1-3 LL pop bumper switch
    1-4 LR pop bumper switch
    1-5 Left slingshot
    1-6 right slingshot
    1-7 upper r slingshot

    1-8 Target behind Magnet
    1-9 Opto for magnet ball present
    1-10 opto1 eject position upper scoop
    1-11 Opto2 hold position upper scoop
    1-12 Spinner Left
    1-13 Spinner Right
    1-14 Left upper scoop target (LOCK)
    1-15 right upper scoop target (LOAD)

    Outputs/Coils
    1-0 UR pop bumper coil
    1-1 UL pop bumper coil
    1-2 Mid pop bumper coil
    1-3 LL pop bumper coil
    1-4 LR pop bumper coil
    1-5 Left Slingshot
    1-6 Right Slingshot
    1-7 Upper R Slingshot

    1-8 Magnet
    1-9 Dissapearing plunger for NUX multi
    1-10 Justin upper scoop eject ball
    1-11 Justin upper scoop hold ball
    1-12 Flasher 12v LEDs (pops and citadel pipes)
    1-13 Flasher 12v LEDs (Squares under spinners)
    1-14 Left Orbit ball gate
    1-15 Right Orbit Ball gate

    Upper playfield/backboard
    32-08 (3rd I/O board after fast controller #2)
    (32 inputs 8 outputs)
    inputs/switches
    2-0 opto Left citadel pipe ball lock(mid ramp)
    2-1 switch mid ramp made
    2-2 opto mid citadel pipe ball lock(Left/UF)
    2-3 switch left ramp made (UF/mid citadel pipe)
    2-4 opto right citadel pipe ball lock(right ramp)
    2-5 switch right ramp made (r citadel pipe)
    2-6 (reserved citadel ramp spinner)
    2-7

    2-8 Left orbit rollover
    2-9 Newton ball rollover
    2-10 Blood Bag trapped opto
    2-11 upper lane "F"
    2-12 upper lane "U"
    2-13 upper lane "R"
    2-14 upper lane "Y"
    2-15 Right orbit rollover

    2-16 Start key
    2-17 co op/vs
    2-18 orbit / ramp
    2-19 pop /slingshot
    2-20 spinners / targets
    2-21 coin door open
    2-22 (reserved)
    2-23 (reserved)

    2-24 (reserved)
    2-25 (reserved)
    2-26 (reserved)
    2-27 (reserved)
    2-28 (reserved)
    2-29 (reserved)
    2-30 (reserved)
    2-31 (reserved)

    Outputs/coils
    2-0 left citadel pipe/mid ramp appearing plunger coil
    2-1 Mid ramp diverter coil
    2-2 mid citadel pipe/L ramp appearing plunger coil
    2-3 L ramp diverter
    2-4 right citadel pipe/right ramp appearing plunger coil
    2-5 R ramp diverter coil
    2-6 appearing plunger to block orbit for fuel pod lock
    2-7 Black light 12v LEDs

    Cabinet
    08-04 (4th I/O board after fast controller #3)
    (8 inputs 4 outputs)

    inputs/switches
    3-0 coin 1 mech
    3-1 coin 2 mech
    3-2 add credit button
    3-3 service mode button
    3-4 volume up button
    3-5 volume down
    3-7 tilt
    3-7 slam tilt

    outputs/coils
    3-0 shaker motor
    3-1 (reserved)
    3-2 air horn 12v
    3-3 BackGlass LEDs 12v

    #180 4 years ago

    Mbecker,

    Yes single Wound coils and pwm for hold.
    I’m playing around with the idea of turning hold off for multiball or
    Limiting it to 2 or 3 seconds. We’ll see if that is a fun kill or not

    If we need to go to dual and use eos we’ll have to add another board as there aren’t many spare coils/outputs

    You can tell by the list there are three
    Flipper buttons. Not having 2 flippers tied to one switch may help.

    1 week later
    #182 4 years ago

    Finally got some machining time

    072CD5A3-3822-4483-8C9C-E52C87D1F445 (resized).jpeg072CD5A3-3822-4483-8C9C-E52C87D1F445 (resized).jpeg5AD97116-5C7D-4D84-B9DE-96DE0B546C62 (resized).jpeg5AD97116-5C7D-4D84-B9DE-96DE0B546C62 (resized).jpeg
    12
    #183 4 years ago

    Apron cover arrived.

    I’ll need to polish/brush it to get rid of the laser spatter but overall am really happy with it.

    7F36B1A6-5F87-41AC-8788-26C63B2BC09E (resized).jpeg7F36B1A6-5F87-41AC-8788-26C63B2BC09E (resized).jpeg
    11
    #184 4 years ago

    Last diverter done... well minus flycutting the back off.

    F6981FBE-1432-4B29-BA4E-016BADCB774A (resized).jpegF6981FBE-1432-4B29-BA4E-016BADCB774A (resized).jpeg
    #188 4 years ago

    Djshakes,
    Yes I’m in Oceanside. Would love to come in last at your tourney. You’re definitely invited as soon as this sucker is flipping.

    As far as 9 months goes... I thought it was a realistic goal when I set it. Still think it could’ve happened ... would do things differently for a first pin if I could do it over. Or maybe I wouldn’t .

    So far this has been a blast and I would highly recommend doing a homebrew pin to anyone.

    17
    #191 4 years ago
    21C158AD-9C8A-4315-AE5A-07827DEDDAA0 (resized).jpeg21C158AD-9C8A-4315-AE5A-07827DEDDAA0 (resized).jpegE74C2CFA-C82D-484B-996F-FEC0F21A6B5B (resized).jpegE74C2CFA-C82D-484B-996F-FEC0F21A6B5B (resized).jpeg
    13
    #194 4 years ago

    Alright, last diverter cover made
    Optos and switches in.
    I’m officially as far as I can get without cutting the damn playfield.
    (Yeah yeah I know... I can do art and game code programming)
    I have the playfield programmed too.

    I might have to join a maker space for 1 day to get this done.

    00D39CB0-21AB-45AF-A214-A7861E3B0501 (resized).jpeg00D39CB0-21AB-45AF-A214-A7861E3B0501 (resized).jpeg228C105A-A213-4AB4-B94C-9D2BA791527C (resized).jpeg228C105A-A213-4AB4-B94C-9D2BA791527C (resized).jpeg
    #197 4 years ago

    Tiny black dog,

    Thanks for the tips. I’m learning wood definitely cuts different than metal. I’ve done tons of plastic machining and was expecting wood to be similar. It’s not.

    I’ve learned to open stuff up tolerance and size wise. The shit moves and then stuff doesn’t fit. Gotta make pockets and holes bigger than I’m used to.

    #198 4 years ago

    Feeling bummed, machined the playfield on a neighbors cnc router. Not very accurate or consistent. Depths of insert pockets are all over the place. Sizes of pocket suck too. There’s a wood shop in town that has a nice rigid cnc router that’ll let me run my program. I knew I should’ve done it that way to begin with.

    It looks rad though.... I’ll hang it up my garage.

    1A1011F9-D12C-4FC9-B2D2-526C24415CAB (resized).jpeg1A1011F9-D12C-4FC9-B2D2-526C24415CAB (resized).jpegF21139BB-4041-4675-A2DF-255A32EA72D2 (resized).jpegF21139BB-4041-4675-A2DF-255A32EA72D2 (resized).jpeg
    #203 4 years ago

    Any pinsiders in San Diego area with a decent cnc router wanna work with me on making a playfield?
    Or does anyone know a good place to have a playfield made in the SD area?

    I guess the maker space here shut down like 2 weeks ago

    #205 4 years ago

    I emailed them, waiting on a reply back

    18
    #207 4 years ago

    All right , playfield routed .
    Now on to the tough decisions, like what type of glue for the inserts. Where to put starburst or jewel or dimpled inserts.

    It really feels good to have gotten this far.

    I think the real work is gonna be code , video , sound and gui.

    2345E53B-9D70-46EC-BCF3-4441E23BEB0A (resized).jpeg2345E53B-9D70-46EC-BCF3-4441E23BEB0A (resized).jpeg29C45081-C253-4E89-B7B4-0031F0192A4A (resized).jpeg29C45081-C253-4E89-B7B4-0031F0192A4A (resized).jpegB89CEC43-CEDC-4916-9044-8A7B49627789 (resized).jpegB89CEC43-CEDC-4916-9044-8A7B49627789 (resized).jpeg
    #211 4 years ago

    Painting underside.
    Most go grey... I went chrome

    Still drying, you can tell I went heavy where the inserts are

    C0A24CF9-8D1F-4DE4-B0ED-9A6B41488C27 (resized).jpegC0A24CF9-8D1F-4DE4-B0ED-9A6B41488C27 (resized).jpeg
    1 week later
    23
    #215 4 years ago

    Making some progress.

    49EE6A8D-1FE8-4B66-83EB-FF3B7A98D04E (resized).jpeg49EE6A8D-1FE8-4B66-83EB-FF3B7A98D04E (resized).jpeg
    33
    #219 4 years ago
    8F752CD5-A37F-4F10-A6FB-83DF9D0B0403 (resized).jpeg8F752CD5-A37F-4F10-A6FB-83DF9D0B0403 (resized).jpeg
    24
    #222 4 years ago

    Newton captive ball worked out perfect.

    This is for fuel pod multi ball

    #225 4 years ago
    Quoted from pinballwil:

    Looks real awesome.
    But what in single ball gameplay if the ball drops there occasionally. if it can it will happen.

    That is the point. Get a ball trapped there and the trough and auto plunger will shoot another ball into the playfield.
    Then at any time you can slam the newton ball to get multiball.

    Or do you mean drop into the The channel?
    The slot is smaller than the ball so it can’t fall in. Plus I’ll put clear plastic over the top.

    #228 4 years ago
    Quoted from PinMonk:

    You can throw an up-post into the channel path where the captive ball is to prevent multiballs from being possible at specific points, too.

    Good point,
    I think it’ll be hard to actually get balls to go in here.
    I actually have an up-post in the orbit path to make it easier in certain modes.
    If it’s too easy , I’ll definitely use your suggestion

    23
    #229 4 years ago

    I’m getting excited to play this.

    My plastics somehow got cut at the wrong size. I like how the apron turned out.
    It’s made from SS with opaque white plastic under.

    Maybe I should do that for all the plastics

    02EB15E8-DFE5-4AC2-8D67-B3BA8F33A286 (resized).jpeg02EB15E8-DFE5-4AC2-8D67-B3BA8F33A286 (resized).jpeg
    #237 4 years ago

    Did some tuning and captive ball lock works good now. I’m happy with the way it turned out.
    The rail is very slightly down hill.

    Almost impossible to capture the ball without the up post ... up

    #238 4 years ago

    2nd ball flows off nicely.

    10
    #240 4 years ago
    Quoted from JWJr:

    Your playfield leveling is going to have to be very_ precise for that to work reliably.

    I have a hand scraped 10” level that is good to .0001” per foot. I think I can handle it.
    Do machines like this one with it
    D21CEF23-54DF-479B-964A-4302A5A3806A (resized).jpegD21CEF23-54DF-479B-964A-4302A5A3806A (resized).jpeg

    #244 4 years ago

    I can’t nudge it out and I can easily tilt pinball machines.

    Here’s a close up of the mech.

    The slot visible from the third pic is for an opto.

    There’ll be a second opto just below the aluminum rail between the posts.

    That way when you trap/capture a ball the machine will know to kick out another one.

    69AA9E6D-66AE-4A8B-9FE8-048C1022110A (resized).jpeg69AA9E6D-66AE-4A8B-9FE8-048C1022110A (resized).jpeg2D9576FC-3204-4FD1-8CA0-1560D5B901D1 (resized).jpeg2D9576FC-3204-4FD1-8CA0-1560D5B901D1 (resized).jpeg9AA6983B-5810-44B3-B7FE-33397D25519E (resized).jpeg9AA6983B-5810-44B3-B7FE-33397D25519E (resized).jpeg
    10
    #245 4 years ago

    Motorized drop targets and custom scoop in.... barely

    A7B27DC0-2099-43BE-9D0E-2578C255DFF4 (resized).jpegA7B27DC0-2099-43BE-9D0E-2578C255DFF4 (resized).jpegF6D138BF-5807-4F23-B444-E6C76A1AC758 (resized).jpegF6D138BF-5807-4F23-B444-E6C76A1AC758 (resized).jpeg
    #247 4 years ago

    It looked close in cad but not that close.
    Whew

    14
    #248 4 years ago

    Got the first wire form roughed in... and I mean rough.

    Hopefully I get better, can’t get worse.

    Made a bunch of half round clips so I wouldn’t have to weld. Think I’ll weld anyways.
    10261C68-0C8E-4093-8448-6E1C6B2A4F92 (resized).jpeg10261C68-0C8E-4093-8448-6E1C6B2A4F92 (resized).jpeg84B599B4-2473-4FD6-8721-1A4B75198643 (resized).jpeg84B599B4-2473-4FD6-8721-1A4B75198643 (resized).jpeg

    #253 4 years ago

    Rail guide clip design 2.0

    A little stronger and can bend slot at right height to bolt/fasten rails To playfield
    BB906067-9CD8-47B5-9078-6FEFB20AD076 (resized).jpegBB906067-9CD8-47B5-9078-6FEFB20AD076 (resized).jpeg

    10
    #254 4 years ago

    First ball rail guide done.
    Harder than I thought, hopefully next 2 go better.

    Clips worked out good, got it done w/o welding.

    D2170974-9093-4EBD-9722-BB1C8ACA26D5 (resized).jpegD2170974-9093-4EBD-9722-BB1C8ACA26D5 (resized).jpeg
    18
    #258 4 years ago

    2nd wire guide done.

    I just kinda winged it and bent everything by hand. I had planned to make a couple of sets of soft jaws for my vise with different radii . Next time will definitely do that. My hands hurt and it could be better.

    Mbecker, I kinda figured it would be a multiball in the bank for the next player if ball is lost with that mech locked. I think wonka has something similar.
    All the programming I figured I’ll cross that bridge when I get to it. I’ve been completely focused on mechanical. Now that I’m about done there I’m about to dive into mpf. Been learning python here and there when I have time.

    My nephew is in charge of code and is pretty far along on that front.
    221D35CD-E85D-4999-9DFD-95242D28F198 (resized).jpeg221D35CD-E85D-4999-9DFD-95242D28F198 (resized).jpeg

    #259 4 years ago

    Btw, anyone who wants my solid models is welcome to them. I didn’t want to post/give them out until I made sure everything fit.

    I used pinballlife.com parts almost exclusively. A lot of their parts are slightly different from wpc parts.

    It was very tight to get their 8 ball trough and auto plunger to fit. So my playfield could be a good start for anyone looking to go that route.

    #262 4 years ago
    Quoted from Mbecker:

    WireformS look great! I’m interested in the models, I will be cadding mine up at some point and that would def save time..
    Are you guys going with scratch python code I can’t remember? Or MPF, or something else? I just know that MPF is generally looking to collect all the balls back At the end of a game before starting the next but I’m sure there’s a bit of programming to do what you guys want it to. Of course if code is all custom I’m sure it’s not an issue at all.

    DM me your email and I’ll send you the files. Does dxf work?

    We’re using MPF. Hopefully won’t have to do too much python code.

    #265 4 years ago

    The newton ball is the post so to speak.

    19
    #267 4 years ago

    Jabdoa,
    Sweet. That sounds simple enough.

    I really want to start flipping this thing.
    My nephew lives in NV, and has the NUC that we are using to run this thing.
    Don’t know when I can get him down to Oceanside because of this corona thing.
    bummer.

    3rd rail guide in.

    Added a spinner to the left ramp.
    Now each flipper has one.

    I’m going to make a second scoop like the first.
    That way one can hold a ball then when the other scoop is hit, it can be random which scoop the ball is coming out of.
    Then for certain modes both scoops will hold a ball.

    Then it’s time to make a subway.
    Then wait patiently for quarantine to end.

    First try on third rail guide looked like hammered puke.
    Really tight turns , not so easy to bend by hand.
    So I made a fixture/guide and it worked out good.

    F259C243-D2F9-4254-B08E-93E083F4826E (resized).jpegF259C243-D2F9-4254-B08E-93E083F4826E (resized).jpeg4CFA2825-BB09-4B28-9108-FB30AE1C0436 (resized).jpeg4CFA2825-BB09-4B28-9108-FB30AE1C0436 (resized).jpeg
    #272 4 years ago

    I must be playing wrong, cause my back never hurts after .

    Finished the second custom scoop.
    would post a pic but it looks just like the other one.

    On to subways, then learning arduino to program and run some Nixie tubes.

    #275 4 years ago

    Just past gas town , take a left at bullet farm and head straight to nixie city

    #276 4 years ago

    Made and installed the worlds shortest subway.
    Just one more subway to go and this thing Is mechanically complete.
    Well that and some plastics.

    Been playing around with some ideas for SS covers over the plastics.
    Still not sold on the idea.
    EEB0AC3D-839F-4373-A7A5-3EB2B7FEDCDC (resized).jpegEEB0AC3D-839F-4373-A7A5-3EB2B7FEDCDC (resized).jpeg0C6E000A-A6F6-4F4C-8AE2-D9D7824E88CA (resized).jpeg0C6E000A-A6F6-4F4C-8AE2-D9D7824E88CA (resized).jpeg9C3A2DB7-ACC4-415B-AFB2-9866FFDE0196 (resized).jpeg9C3A2DB7-ACC4-415B-AFB2-9866FFDE0196 (resized).jpeg

    #278 4 years ago

    The ball travels about .5” plus it’s own size

    #284 4 years ago

    Had a really tight fit spot for the subway.
    Made this to squeeze the ball between 2 mechs into the back of the lower scoop.

    F9A94150-E539-4E04-B696-AC06B7371BFE (resized).jpegF9A94150-E539-4E04-B696-AC06B7371BFE (resized).jpeg
    13
    #285 4 years ago

    Better pic of subway end.
    Barely fit between motorized drop targets and Nux multiball disappearing post

    F569394E-8795-4FBA-87F1-C671404762EF (resized).jpegF569394E-8795-4FBA-87F1-C671404762EF (resized).jpeg
    30
    #286 4 years ago

    A simple idea like “ I want Nixie tube hurry up timers” seems easy.
    For me ... not so much.
    Turns out I had to learn some:
    c++ to program an arduino
    Python to send serial commands from MPF to the Arduino
    SPI protocol to send data from arduino to exixe nixie drivers.
    Serial protocol to send data from computer to Arduino
    Arduino ....

    2 or 3 days going down the rabbit and I’ve come out the other side .
    My head hurts.

    5C11A8FA-EF5E-447B-99E0-21B39B6D9DC8 (resized).jpeg5C11A8FA-EF5E-447B-99E0-21B39B6D9DC8 (resized).jpeg
    #289 4 years ago

    The wiring isn’t that bad. Once I clean it up it look simple.
    Per nixie you just need 6 wires:
    Slave select (SS)
    Master out slave in (MOSI)
    Clock
    High voltage (180v)
    3.3 volts
    Ground

    I can see now why all the best homebrew pins are made by programmers.
    Making stuff I’d say is my strong suit.
    Art, programming and electronics are my weak ones. Unfortunately that is what’s left. Luckily that is where I’m getting help.

    #291 4 years ago

    Mbecker,
    It’s a step up transformer from 12v to 180v. Not expensive , you can see it in the upper left hand corner of the pic.
    Nixie tubes are what they used on mainframe computers in the 50’s.
    Russia used them until the 90’s.
    Most available now are new old stock from long ago. Some companies have started making them again.
    I thought it was an og idea... but then saw the the score display on munsters pinball displays virtual nixies

    19
    #293 4 years ago

    Nixie countdown timer in action.
    This in a combo mode with 3 ramps hit.
    After the hurry up , the nixies go back to showing count totals for other parts of the game.

    #296 4 years ago
    Quoted from underlord:

    I don’t remember nixies in mad max movies.

    They didn’t have lcd screens, dot matrix, or 7 segment displays either.

    #300 4 years ago

    I promised my nephew I would wait for him to wire it up.
    So I’m just adding finishing touches here and there. 10 points to whoever can guess what this is.

    image (resized).jpgimage (resized).jpg
    #304 4 years ago

    Ouch, guess it does look a little like a high heel boot. Maybe a huge MMFR fan will get it.

    #305 4 years ago

    Mr68 got it. It’s the plunger knob. Supposed to be furiosa’s shifter/dagger handle

    #307 4 years ago

    When machine is playable, and you find yourself in Oceanside, and there is no quarantine consider yourself invited

    #309 4 years ago

    KozMckPinball, points have already been awarded and exchanged

    #312 4 years ago

    Mbecker,

    I’ll bet that I want to see it flip just as bad.
    We’re 7 months into this thing without a single shot.

    #315 4 years ago
    Quoted from epthegeek:

    Machine wise, yes - but the one detail that continually drives me bonkers every time this thread pops up -- it's "Witness me!" that they say when they're about to do something bold/heroic/crazy/dangerous/whatever. Not "Witness!"
    </curmudgeon>

    all the warboys answer back with “WITNESS!!!” After seeing something bold/heroic/crazy/dangerous/whatever.

    We are both right.

    11
    #317 4 years ago

    Alright shifter/dagger knob installed.
    Probably only die hard fans will get what the hell it is.

    Once I finish the subway I’m pretty much done until the quarantine is over.

    Should I post what we’re thinking so far for rules and modes?

    My eyes kind of glass over when I read that stuff on threads.

    28E4F6AA-F7EF-450D-BC97-2060E8C04D53 (resized).jpeg28E4F6AA-F7EF-450D-BC97-2060E8C04D53 (resized).jpeg
    #320 4 years ago

    Think of it as dagger mode. When a skill shot is hit it’ll show a video of furiousa throwing the dagger into the shoulder of foe.

    #321 4 years ago
    97C5D192-ED94-46E2-83DE-58D9389B5B09 (resized).jpeg97C5D192-ED94-46E2-83DE-58D9389B5B09 (resized).jpeg
    33
    #323 4 years ago

    Just finished the subway.

    Rev. 1 is mechanically done .

    Now we just need to wire it up , write the code, complete the art, test play it, then do it all over again for whatever needs fixing. Homebrew pinball ain’t for sissies...

    Still feels good to reach this milestone.

    E07EA861-78F2-47EB-A706-8DFF87AE89F2 (resized).jpegE07EA861-78F2-47EB-A706-8DFF87AE89F2 (resized).jpeg
    #325 4 years ago

    Rosh,

    I would say the easy part is done. I’ve been a machinist for over 25 years. Making things out of metal is what I do.
    It was still a big challenge. I can’t wait to see how hard it is for things I don’t do for a living.(still trying to wrap my head around what in the f “self” means in python)

    I honestly thought we’d be done with the whole thing by now. In my/our defense, this isn’t exactly a simple build for a first attempt.

    At least we get to play the thing while we dial in code, rules, art etc.

    Hopefully it doesn’t play like shit.
    I like my chances , but it could need a lot of rework/ adjusting. Once we hook up electricity.

    Plays like a dream just flipping the flippers by hand...

    #327 4 years ago

    Apparently .

    I’m starting to get some understanding.
    Knowledge takes more effort than when I was younger.

    3 weeks later
    #329 3 years ago

    wiring done!!! well minus the LEDs.
    Onto coding.
    Waiting for artwork decided to take a stab at photoshop....think I'll leave the art to the professionals.
    This is just so I can explain concepts/layout to the artist/BIL

    pf (resized).pngpf (resized).png
    #330 3 years ago

    Some stuff I made to fit opto into tight spots.

    7C6E4C3F-BF3C-4D6F-8690-394C7D42BD6F (resized).jpeg7C6E4C3F-BF3C-4D6F-8690-394C7D42BD6F (resized).jpeg8323D03E-F0A1-47ED-B918-0316AA006E47 (resized).jpeg8323D03E-F0A1-47ED-B918-0316AA006E47 (resized).jpegD47C49B5-6F13-451C-8DFE-B1B1A3330669 (resized).jpegD47C49B5-6F13-451C-8DFE-B1B1A3330669 (resized).jpeg
    1 week later
    48
    #332 3 years ago

    Made my first flips on this thing . Needs a lot of fine tuning.

    I’m happy with shots.
    All the angles work.

    Gonna need a rev 2 on the pop bumpers
    They work...just not the chaos I was looking for.

    Also going to dual wound, with the glass off its very buzzy

    #336 3 years ago

    Homebrew has a great community.
    I asked for advice on flipper buzz.
    Jab_doa whipped up an algorithm with a more random pwm patter but with the same overall hold power.
    This is for MPF with Fast

    You can hear the difference in the vid below. Left flipper has it on. Right flipper is normal pwm.

    #337 3 years ago

    I was a little disappointed in my pop bumper design.
    Actual I was sick about it.
    These were my biggest concern out of the mechs I made.

    The balls would just flow thru the pop bumper area and not even fire a PB.
    If one fired that was about it.

    The main problem was the bottom/base.

    I made it 15 degrees with a corner radius of .015"
    I figured/hoped the ball would just roll up and hit the top.
    This didn't happen.

    I think the key for Rev 2 is to counterbores in the playfield and have the lower part of the PB flush with the playfield.
    Basically how plastic inserts sit.

    Also the diameter should be bigger than the top/piston diameter.

    trying to salvage these and this whitewood I put tapped m5 holes on the top of the bodies.
    Then adjusted the pistons down with allen bolts so the ball would contact the top and bottom at the same time.

    I learned a big lesson in pinball design here.
    I had used 11/16-18 threads on the bodies and matching nuts underneath the playfield to hold the mech.
    real easy to install...terrible to service. Try getting a 1 1/8" (the size across the flats on a 11/16-18 nut) wrench at at the bottom of a playfield and turning.
    not so easy with mechs/lights/wires everywhere. next design will bolt in/on with phillips screw driver.

    after adjusting the height on all the pop bumpers so the ball would contact the top and bottom at once, I gave it a try.

    It worked a lot better, but still kind of sucked.

    I started thinking this was a stupid idea and I should just replace these 5 mini pop bumpers with 3 normal ones.
    I really want 5.
    You see, 3 slings and 5 Pops adds up to 8. V8!!!
    I really want some sort of bonus you can cash out when you hit all 8, and level that bonus when you hit them all twice..etc.

    So I played with the debounce settings on the switch .

    Set them to 1ms close and 15ms open.

    IT WORKED AWESOME!!!!

    poprev1 (resized).pngpoprev1 (resized).pngpop2 (resized).pngpop2 (resized).png
    #341 3 years ago
    Quoted from Rascal_H:

    Someone catch me up. Is the ball completing a circuit thus eliminating need for a skirt?

    Yes, the ball is the contact that closes

    The piston/ring is positive of the switch.
    The solid skirt is negative.
    When the ball contacts both, the switch is completed

    #343 3 years ago

    My next machine I’ll use the same switch style for rollovers and trough.

    Any mfgs reading this thread, if your interested in prototype/R&D/contract machining let me know.

    Think I might get a cnc mill in my garage so I can putter on weekends

    14
    #344 3 years ago

    Here’s another video with the slings and pops working.

    This is only autofire coils.
    No code so far.

    Magnet still needs code/config

    I can’t mentally move on to coding until everything is good mechanically.

    Also note, both ramps can be backhanded.

    And don’t talk shit on my pinball skills, I know I’m a noob.

    #347 3 years ago
    Quoted from PinMonk:

    Ben Heck already did a very similar design years ago:

    Not built as heavy duty, but it's the same "ball completes the circuit to fire the pop bumper" design you've done here.

    I’ll have an OG idea someday.

    I think if I was stuck in a room with Ben Heck, a cnc lathe and mill, and all his electronic equipment and 3D printers, great things would happen.

    #349 3 years ago
    Quoted from Billy16:

    You are way behind the curve as far as designing pop bumpers that always seem to evade being struck by a ball. J-pop mastered that with TOM.

    I’m actually happy with them now. Just needed to play with the debounce settings.

    It was just draining through because the ball contact time is very short.

    It could be that I’m only happy because it sucked so bad before. Maybe they’re just mediocre.

    #355 3 years ago
    Quoted from zacaj:

    it almost feels like they're too far apart? usually bumpers are about 4" apart center to center, but at least 1.5 of that is the skirts. I wonder how the actual 'area where the ball won't trigger anything' distance between your bumpers and a regular set would compare

    here's the Dims of PB to PB

    pbDistance (resized).pngpbDistance (resized).png
    #357 3 years ago

    The skirts are 2.000” diameter.

    1 week later
    12
    #361 3 years ago

    All right, gi and insert lights in.
    On to coding.

    You have three choices pinside.
    1. I go dark for a month or two (or more) until we have something cool to show you.
    2. I go over rules/modes planned so far... and maybe listen to suggestions from y’all
    3. I go over what I’ve learned and what I’d do different next time. Ideas that worked and why....and the ones that didn’t

    90CA0CD7-4CE4-40C7-86B1-1546E809597E (resized).jpeg90CA0CD7-4CE4-40C7-86B1-1546E809597E (resized).jpeg
    12
    #368 3 years ago

    First lesson/regret is "know the medium".

    I didn't know that much about pinball when I started this project.

    About 4 years ago I bought a NIB Metallica pin for my home bar/man cave.
    I did it because I like Metallica and thought it'd make my bar cool.
    I had probably spent somewhere between 10 and 20 bucks in my entire life on pinball before that.
    When I first played it I thought " I could make one of these, that would be fun".
    In that moment I knew one day I would make one.

    So I only had it for 3 or 4 months and sold it because I knew I was moving and didn't want to have to haul it with the move.
    The only work I ever did on it was adding a shaker motor and changing 1 fuse.

    Anyways, that was my entire pinball experience before CADing up what you see in the 1st post.

    In the last couple months I've read a lot on line and listened to some podcasts.
    I think where I've failed on this pin is toys.
    I took for granted the importance of them to enthusiasts.
    I plan to add stuff around the playfield but at this point it won't be integrated in the design.
    Best I can come up with other than vehicles squeezed where I can, is a pinball in a birdcage suspended over the magnet.
    If I'm lucky when the magnet flings the ball, the cage will dance.
    Long story short , I wish I had done more research.

    Lesson 2.
    Pick a theme with off the shelf toys or buy a 3D printer
    It seems George Miller and Warner Bros. were in a lawsuit shortly after the release of Fury Road...leading to not many toys/models.

    Lesson 3.
    exactly what Vireland said... "It's the journey"
    A couple months into this I was completely frustrated at how long it was taking.
    It actually made me depressed.
    I told myself I needed to enjoy the time spent making it or just go buy a pin.
    And that's what I've done.
    It was ego getting in the way, In the first post I said 9 months and I knew people would read that and roll their eyes.
    In my defense...I thought I'd just do mechanics, and art and code would fall on other people...so I did do my part in 9 months

    Lesson 4.
    wood sucks .
    I can't believe manufacturers are still using wood on machines that now cost 6 to 9 Gs.
    It moves, warp,s splinters etc.
    Shit will perfect, then 3 days later won't.
    the lesson is go oversize for all holes and cutouts.

    lesson 5.
    Own a pinball machine while attempting to build one.
    I had to figure a bunch of things out by scouring the internet for pics.
    Many wheels reinvented for no reason.
    There are a lot of things that are easy if you have something to measure.

    lesson 6
    Homebrew pinball is all about the community.
    I would never have gotten as far as I have if not for tons of work by others in the homebrew community.
    My talent is in machining and CAD. I did this in solidworks and will freely give all files to anyone that wants them.
    Solidworks ain't cheap and most of the homebrew community is using Fusion360.
    On my next build I'll use Fusion so maybe my work can better help others.

    Lesson 7
    Stealing shots works great.(no shame in my game)
    Everything you read online says you have to make a cheap whitewood and get all your shots dialed in before CNC routing.
    I disagree.
    First, how do you know you are accurately measuring your whitewood to transfer to CAD.
    Answer, If you don't have a huge expensive CMM you don't.
    Second, How do you know your art will line up if you don't draw it in CAD.
    Answer ... see above
    I would highly suggest drawing up everything in CAD first.
    You can get the whitewood CNC routed for $100-$150.
    Try that out, if stuff feels off/doesn't work....adjust in CAD and re-route.
    This may cost 2-3 hundies...but when done you'll have a file that you can use where the artwork will line up perfectly.
    Use CAD to visualize the shots and you'll be time ahead, or just steal them.
    In the attached pic I sketched up how the ball will come off of the orbits.
    Draw a ball tangent to the end of the orbit, then draw a line parallel to the end of the orbit. then draw another ball at the flippers.
    Now I don't have to worry about how the ball will come off the orbit, I know it'll land slightly higher on the flippers than the pic because of gravity(depending on speed).
    It seems like a no brainer, but I've seen tons of games where the orbit angles are wrong.

    Upper flipper shots are tricky.
    I knew I wanted to have a right upper flipper and a ramp.
    I watched youtube videos of games with upper flippers and ramps for that flipper.
    Spiderman seemed to fit the bill.
    I found A PDF of the playfield in an instruction manual online.
    Dropped it in my CAD as an overlay and Voila.
    Just the right amount of difficulty and satisfaction.
    This can be done for every shot. There's 50 years of pinball shots for the taking

    I'll post more later.

    orbitshot (resized).pngorbitshot (resized).pngvenomRamp (resized).pngvenomRamp (resized).png
    #371 3 years ago

    Vireland,

    We are done mechanically. I'm not saying it can't be improved, I'm saying we want to get on to coding.
    Good enough is the enemy of perfection, perfection is the enemy of completion.

    This ties into another lesson learned.
    Everything thing added mechanically needs to be coded.
    I know everyone is thinking " no shit sherlock"
    But I never once thought about coding when adding stuff.
    Just "I'll cross that bridge when I get there".
    Whelp, I'm at the fucking bridge, all I can think now is "What have I done?"

    Another quick example of working out shots in CAD.
    I knew I could make the newton ball shot from the lower right flipper becasue I drew it up in pic 1.
    in pic 2 you can see the angle the trapped ball will leave when hit.
    This is how I decided how far off center to make the ball rest when trapped.
    Pic 3 the red arrows point to the bottom point of the ball.
    I know a second ball will not get trapped up here because these are in the air.
    I did zero math and had pretty good confidence these would all work.
    Technically CAD did a whole lot of math.
    And I had so much confidence that I didn't post these techniques until after confirming they worked.
    I'm sure a lot of this stuff obvious to most, I just want to show people on the fence about doing a homebrew that it isn't that bad.

    newton0 (resized).pngnewton0 (resized).pngnewton1 (resized).pngnewton1 (resized).pngnewton2 (resized).pngnewton2 (resized).png
    #372 3 years ago

    Another HUGE lesson learned is to keep in mind maintenance when designing stuff.
    I alluded to it earlier with the pop bumpers but it'll be the worst with the behind the backwood diverters.
    plain and simple the whole playfield has to come out to work on those. And that is a flawed design.
    In hindsight i would just do 2 sets of optos per turnaround. And if a second ball gets locked..just bring down the plunger long enough to release one ball, then back up...simple.

    But because both scoops can hold a ball, and I can make any ramp divert to the lower scoop, I will be able to do some interesting things though.
    If a ball is locked in the upper scoop, on a ramp hit I can make the ball instantly shoot out of the upper scoop. To the player it'll feel like magic.
    Then the next time the upper scoop is hit, the ball can instantly come out of the lower scoop.

    I would consider having all 3 ramps going behind the backboard to 180 the ball a design success.
    I love metal ramps but they kinda of hog the view of the playfield. Also, I think it's slick that the ball gates(with actuators) for the orbit are directly under 2 of the ramps.
    I know, I know, don't break my arm patting myself on the back... I'll even it out with some bad choices.

    Another lesson is HAVE A BACKUP PLAN.

    I was worried about the lower scoop slowing the game down from to many balls going in.
    See some of the first posts on this thread as to why I was worried.
    My back up plan was adding a controllable ball gate if it turn out that way.
    It didn't, it actually barely goes in.

    The thing I was most worried about was the pop bumpers...and for some reason no backup plan.
    in hindsight I should've routed the playfiels with a huge .125" deep pocket the size of the pop bumper area. then bolt a big flat piece of metal in that area.
    Then I could swap out design revisions at will.... oh well, next time.

    Another shot that could've gone better is the behind the upper flipper shot. It's hittable but damn hard.
    I finally realized why it's so hard...It can't be banked in because of the slingshot below.
    Other games(spiderman comes to mind for some reason) you can bank off the targets into the back of the flipper that bounces the shot in.
    You hit the upper sling on this machine and the ball is on the other side of the playfield.
    Worse, if you hit the bottom tip of the flipper bottom, it banks into the slingshot and straight to the leftside outlane.
    I swapped out the top star post to a smaller diameter post and it helped a lot...still a very dangerous shot.
    Maybe I can code in for the autofire to turn off for that sling when the right flipper is held.

    #373 3 years ago

    Another lesson that I'm sure is a no brainer to everyone who's worked on pins.
    I learned the hard way.
    First step for every coil is to SOLDER AND CRIMP ON A CONNECTOR. see pic.
    do this as soon as you get the coils in the mail.
    Like a Jackass I just hardwired..er um hard soldered... everything right on the playfield.
    I did this knowing I would have to do it again when swapping out the playfield for one with art work

    coil (resized).jpgcoil (resized).jpg
    #375 3 years ago

    Next lesson,
    When wiring, first do all the insert lights, then the switches, then the coils.
    I think my wiring wouldn't look like the catastrophe that it is If I had done that.
    maybe the first 2 steps can swap but definitely do the coils last.

    Also, If you fail to plan you plan to fail.
    I had no wiring plan and just winged it. My wiring suffered because of it.

    Just an opinion but boards should be available in R&D configuration with screw on pluggable type connectors.
    I'd pay $50 bucks more per board to get them way..maybe more

    pluggable (resized).jpgpluggable (resized).jpg

    #376 3 years ago

    another lesson...USE T nuts on EVERYTHING.
    So much easier to bolt stuff down.
    These make it so you can do everything without lifting the playfield and giving it a reach around.

    If there is something under the playfield that gets in the way, get the correct counterbore end mill , go about .065" deep so the Tee nut will sit flush.

    teenut (resized).jpgteenut (resized).jpgcounterboreEM (resized).jpgcounterboreEM (resized).jpg
    #377 3 years ago

    Another design win so far is how I did my orbit.
    I machined a .0625" wide by .06" deep channel/slot into the playfield the exact shape I wanted the orbit.
    Designed some clamps. Production clamps could be extruded from aluminum on the cheap.
    Designed the orbit sheet metal with notches where the clamps will hold down the orbit.
    Put some holes for GI light to bleed through.
    Made an L shaped cut out flap to bolt straight to the side rail.
    I was able bend the sheet metal right in by hand and clamp it down.
    Worked out great I think.
    In a production run every machine orbit would shoot identical this way.
    No tuning.
    Metallica kind of bugged me that some times the Orbit shot would hit some thing and shoot off sideways.
    This Orbit is one piece and seamless

    orbit (resized).pngorbit (resized).pngorbitsheetmetal (resized).pngorbitsheetmetal (resized).pngorbitclamp (resized).pngorbitclamp (resized).pngorbitflat (resized).pngorbitflat (resized).png
    #378 3 years ago

    I'm under no illusion that this will be a production machine btw.
    I just think this style of orbits guides might be good for some one else.

    Another mistake/regret I think is the magnet opto in front of upper flipper ramp.

    It holds an opto in a very tight space and blocks the ramp from getting destroyed by balls coming at it at wrong angles.
    it has to be attached from a small distance away because there is a magnet directly beneath it.
    This is for a multiball mode where it'll hold one ball and you need to knock it off with another.
    problem is it gets hit a lot because of location, and the ball action slows way down.
    I think on a redesign I'll add rubber to it to keep the game popping.

    magnetOpto (resized).pngmagnetOpto (resized).png
    #380 3 years ago

    One last lesson learned and I’ll move on to game rules.

    Take an ohm meter to all the different sized coils in the machine. Especially if you have only one of that cool.
    Write the reading down somewhere or memorize it.

    You see , I enabled the magnet to test how it would work with no logic to release...and hold power set too high.
    Blew a fuse and maybe let some smoke out(definitely let electronic smell out). I’m afraid to re enable and test the magnet because I don’t know if it’s shorted. Taking an ohm meter reading will do me no good because I don’t have a baseline.

    Anyhoo, anyone on the fence about doing a homebrew reading this , I say do it.
    This has been a blast so far.
    I can’t tell you how good it felt to get the flippers going and shoot this machine the first time. This’ll sound lame, but just pressing a rollover down and watching it’s state change on the monitor brings satisfaction.
    Just go into it knowing it’s a lot of time and money.
    Once again if anyone wants any of my solid works files let me know.

    #382 3 years ago

    Someone wanna help me out with the resistance of the ball magnet from pinball life?

    #387 3 years ago

    Sweet... I didn’t fry it.

    Thanks Vireland

    #389 3 years ago

    I’d be happy to. I’ll get on it.

    2 weeks later
    19
    #390 3 years ago

    Been busy with irl.

    Still needs some fine tuning but got the credits working.
    Turn the key w/o a credit and you get the war rig sputtering sound. As you add credits you get the opening lines.
    Turn the key and get a start and rev from the war rig.
    Need to make the ball eject after the rev so it’s more audible, maybe it’ll be ok with glass on.

    Who’s ready for long boring posts about the rules?

    11
    #392 3 years ago

    Obviously this will need tuning, but this is what we're thinking for rules.

    First of all this is a wasteland full of scavengers. in multiplayer, all physical ball locks can be stolen.
    this includes fuel pod multiball and Nux multiball.

    Left orbit = Buzzards
    Left ramp = Bullet Farm
    Right ramp = Gas Town
    Side ramp = Citadel
    Right orbit = Rock Riders

    there are 5 different multiball modes planned.

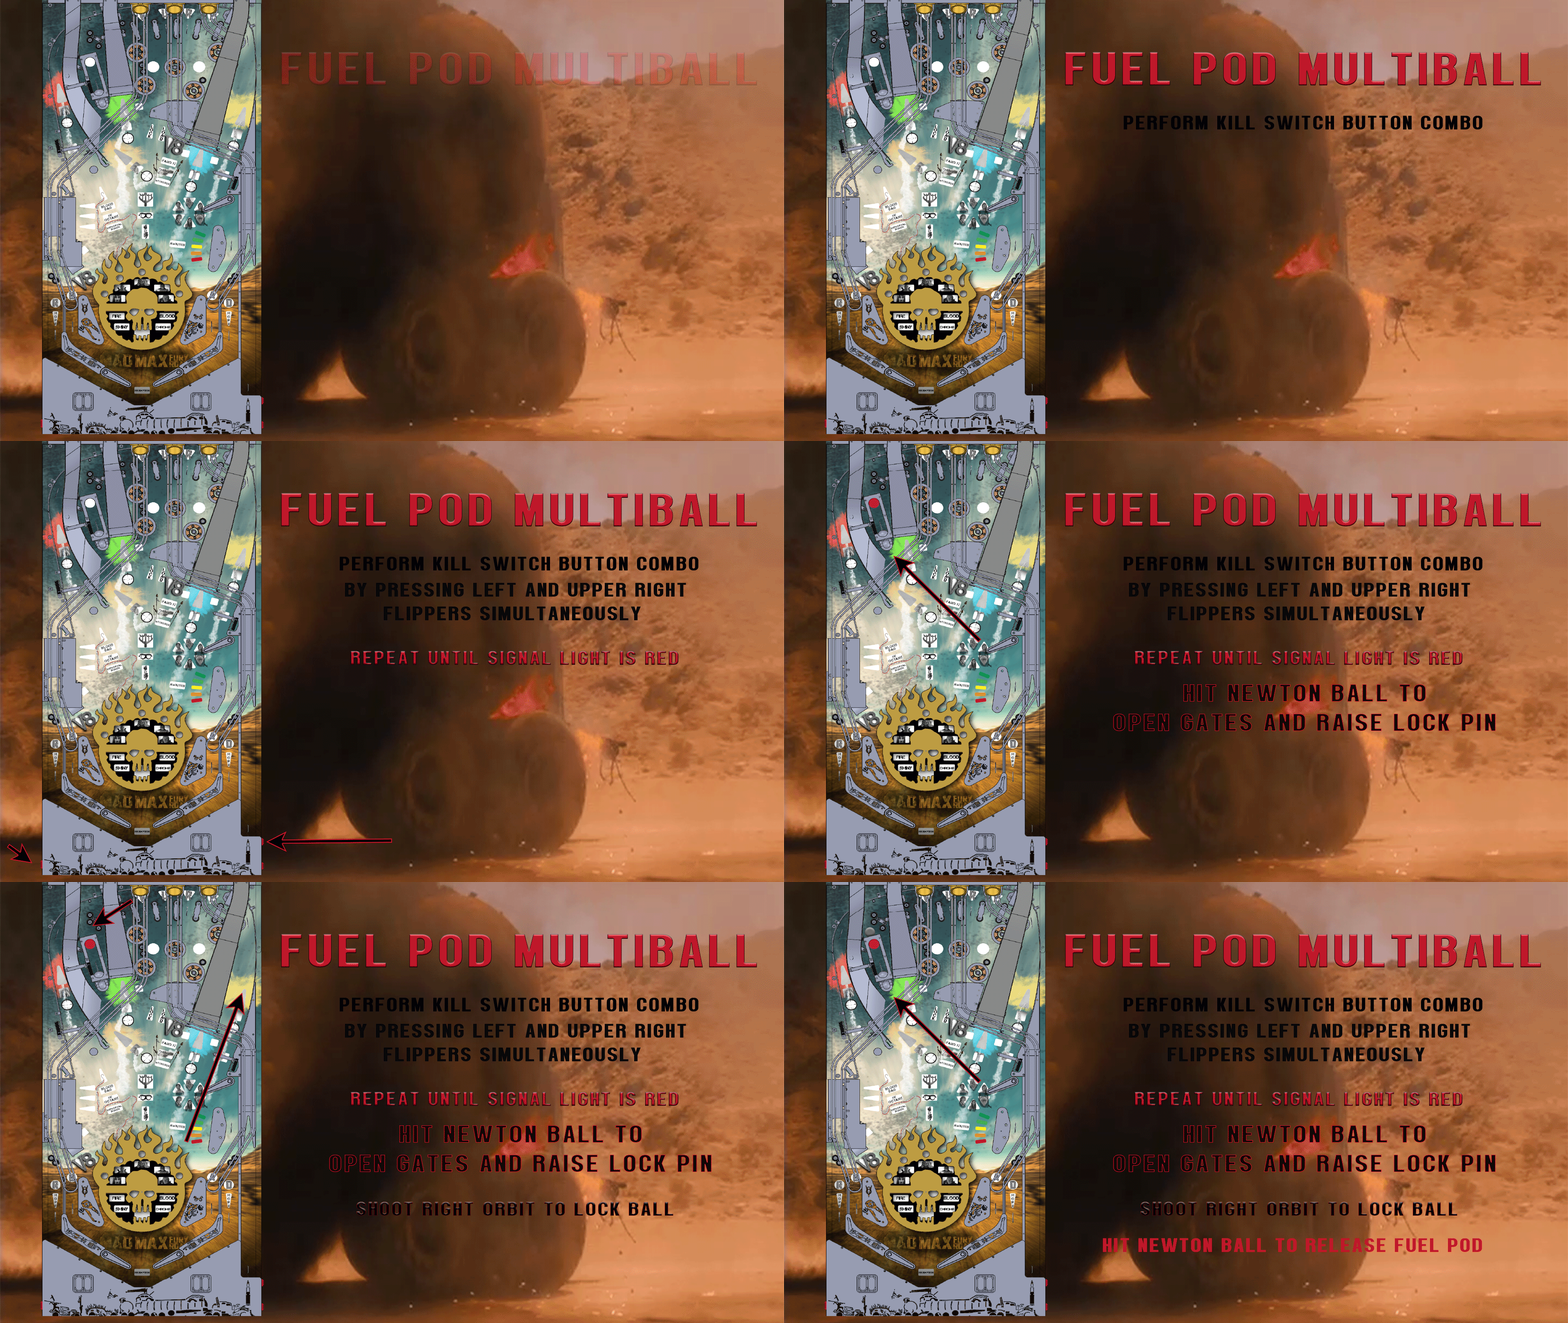
    2 ball - fuel pod (ball lock on top of newton ball)
    3 ball - Nux (2 balls locked behind motorized bank target to the left)
    4 ball - Blood Bag (bash magnet)
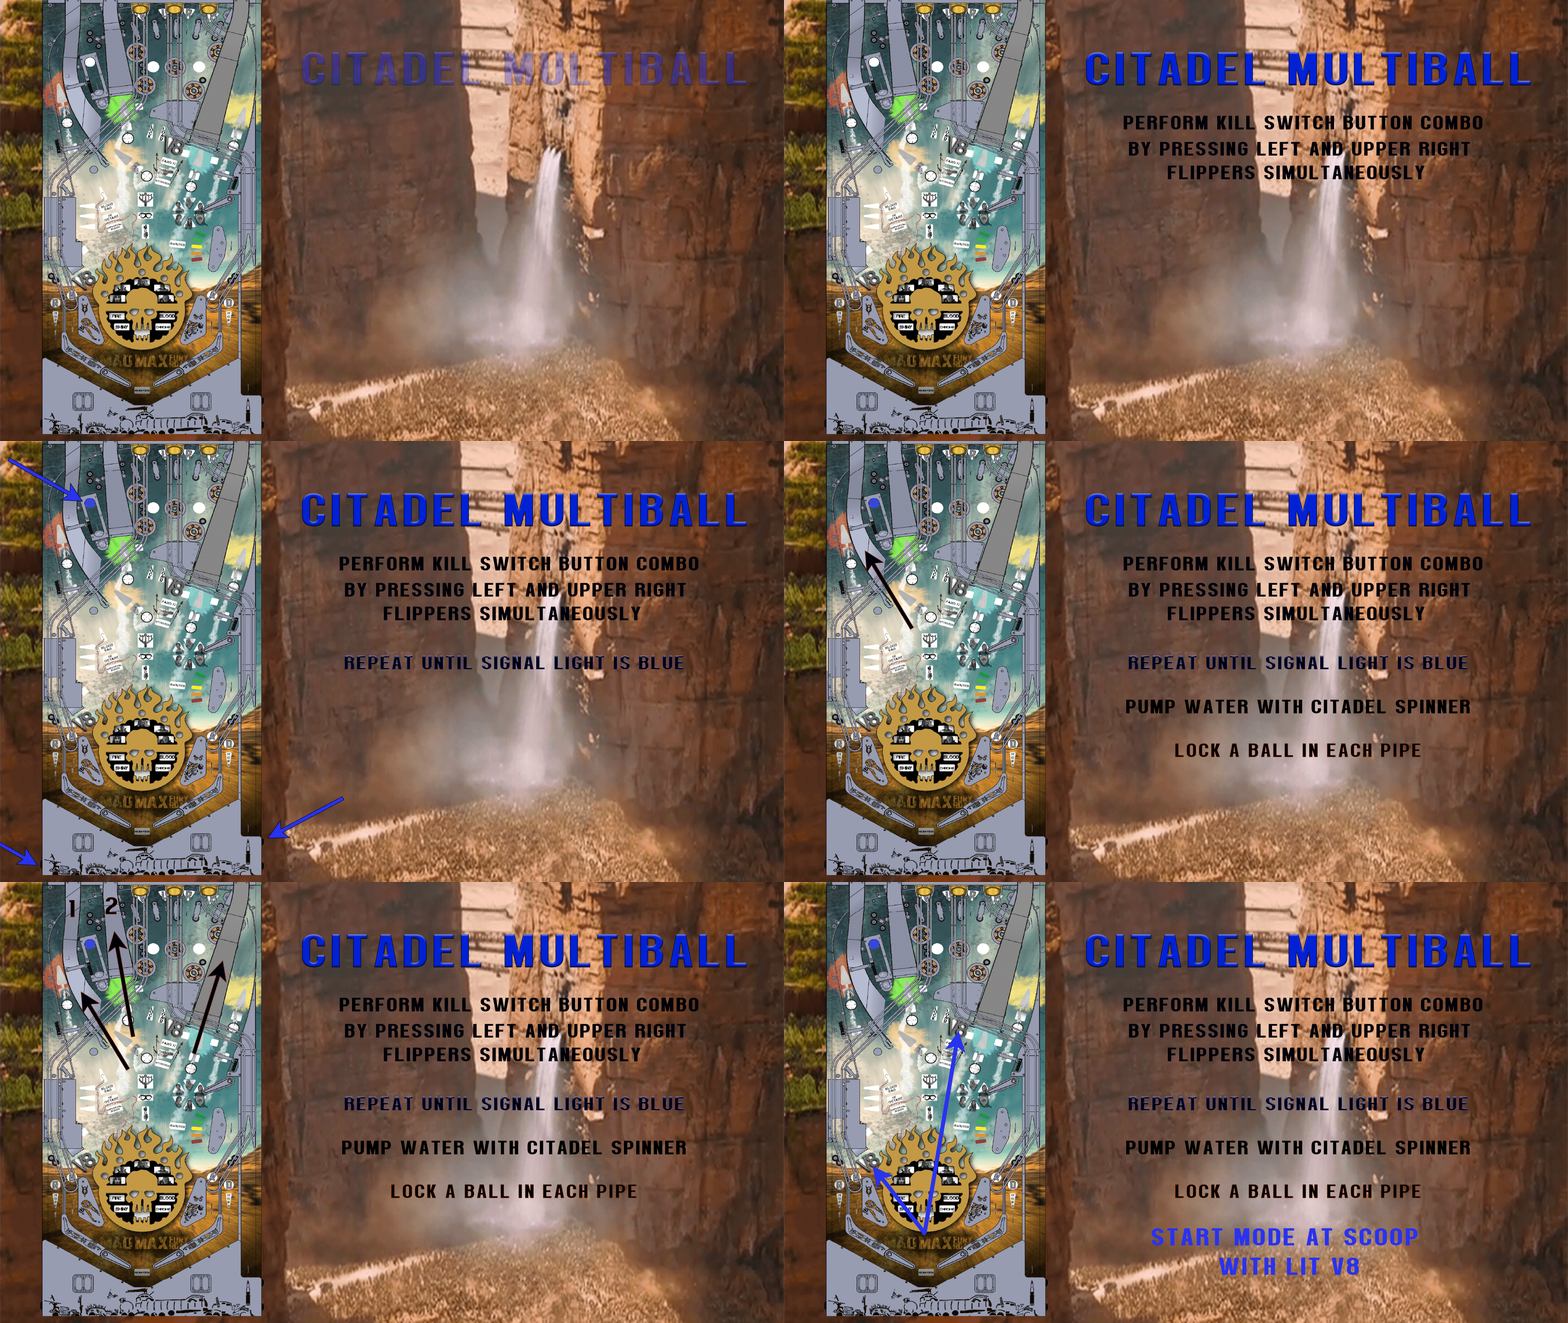
    5 ball - Citadel (lock 3 in pipes and 2 in scoops)
    6 ball - the wives (collect 5 wives and baby)

    There are 4 main resources
    Aqua Cola (water)
    Guzzoline (gas)
    Mothers Milk
    Bullets

    These are represented with the 4 mini targets in the playfield.
    Yellow=bullets (just above lower left scoop)
    Blue= aqua cola (to the right of left ramp)
    White= mothers milk (left side of right ramp)
    Red=Guzzoline (right side of right ramp)

    hit these once and the square insert in front of them will blink- collect 1 resource of that type
    hit twice and they turn solid color - collect 2 resources of that type and the next ramp or orbit hit will turn it's square the color of that resource.
    once all mini targets are solid they will turn black and the process continues.
    ramps and orbits can be assigned multiple resources. the squares will change color for each resources assigned to them.
    when a ramp or orbit are hit, it collects 1 resource each that has been assigned to it.
    once all ramps contain all resources you unlock an extra ball (Redemption)

    at the end of every ball all resources will be collected as bonus points

    spend resources before end of ball in the following ways

    hit the newton ball to cash out guzzoline.
    cash out enough and it brings the Sandstorm.
    this opens the orbit gates and brings up the appearing post that will guide a ball to the fuel pod ball lock

    collect enough milk to start the wives hurry up mode
    a ramp or orbit arrow will turn white, hit it to collect a wife.
    this will extend hurry up mode time and make another arrow white.
    once all wives and baby are collected, hit behind up flipper shot to start wives multiball

    spend bullets on targets next to upper scoop.
    1st target is lock 2nd target is load.
    after locked and loaded , hurry up combo mode is started.
    All 5 crosshairs are lit. after one is hit only crosshairs that combo off that shot are lit.
    each shot hit buys more time. hit upper scoop before time runs out to double combo points
    3 shots - fang it
    5 shots - thunder up
    7 shots - witness!!
    10 shots witness me!!! extra ball#2

    Spend aquacola at Citadel spinner(side ramp) to pump water to citadel
    pump enough water to turn on locks at pipes.
    lock 3 balls at pipes and 2 at scoops to start citadel multiball
    lose ball before locking all 5 and be greeted with "AHHH..MEDIOCRE"
    watch in disgust as flippers are disabled and locked balls are ejected and know exactly how NUX felt.

    Multipliers
    spell "Fury Road" to advance playfield multiplier.
    Fire 2X
    Blood 3X
    Shiny 4X
    Chrome 5X
    5th time fury road is spelled = extraball #3
    bonus for every time after that

    Awaited-
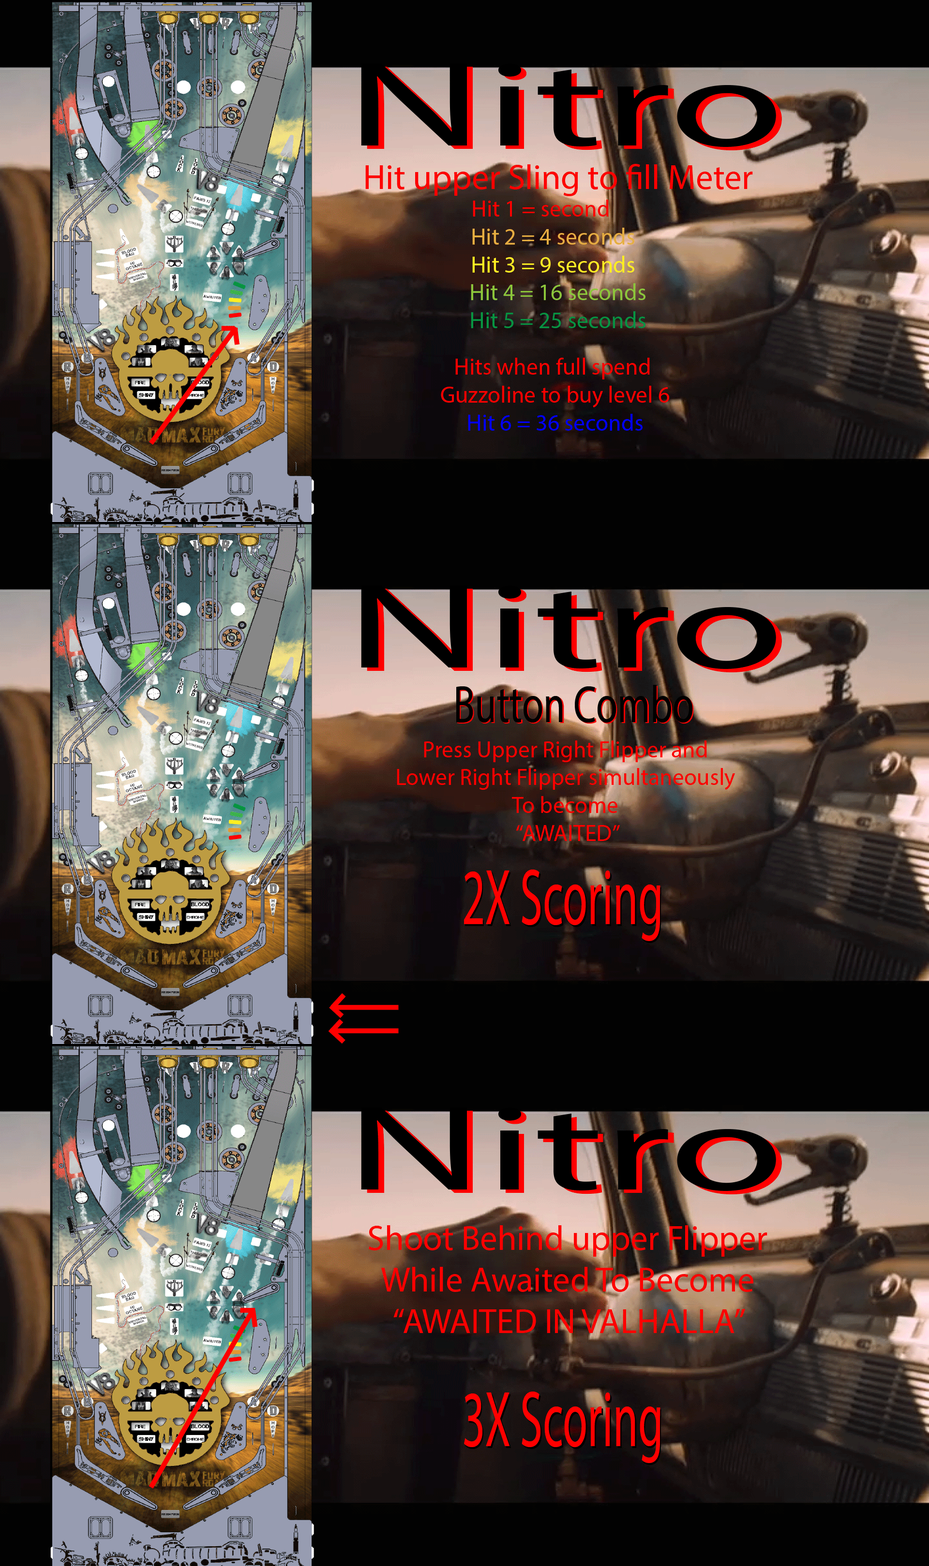
    hit upper slingshot to fill nitro meter
    5 seconds for every segment(5 total)
    after that 1 second per hit.
    hit newton ball with both right flipper buttons held (yes there are three flipper buttons) to start awaited.
    another 2X multiplier on top of the playfield multiplier
    hit the behind the upper flipper shot during Awaited to become "Awaited in Valhalla" which is 3X for up 15X total

    3 switches in coin door will give slight bonus to players choice
    ramps vs orbits
    pops vs slings
    target vs spinners

    switch with cover is for VS. or co-op....if I ever get to coding co-op
    vs
    In normal play (VS) you have 3 balls. for each ball you choose Max, Nux, or Furiosa.
    you can only choose each 1 time. each will have perks TBD. the order you pick them will effect the game.

    there will be four miniboss fights/ wizard modes.
    Slit, Bullet Farmer, People Eater and Rictus.
    They will be on a carousel and you can choose them in any order.

    to start a miniboss fight you need to light the Mask, the goggles and the mechanical arm.
    the mask is lit by hitting enough ramps and/or orbits
    the goggles are lit by hitting enough pops and slings
    the arm is lit by playing a new multiball

    each character(Max, Nux, and Furiosa) automatically unlocks their light
    This way even shit players(like me) get 1 wizard mode on ball 3 no matter how bad they suck.

    beat all 4 mini bosses and unlock mask, goggles and arm again to fight Immortan Joe

    hit all pops and slings to hear "V8, V8, V8" chant. hit lower scoop to cash out random bonus
    these can get to level 2 and 3 if wait on the scoop.

    other mission type modes are planned... but I think my nephew and I will be plenty busy for awhile.

    Any suggestions are welcome...just don't be offended if don't use them.
    Also we got another nephew on board doing light shows.
    61389091489__A7EBC8A5-8418-429E-B368-E267C6AF9263 (1) (resized).jpeg61389091489__A7EBC8A5-8418-429E-B368-E267C6AF9263 (1) (resized).jpeg

    #395 3 years ago
    Quoted from LynnInDenver:

    How many balls are loaded in that trough of yours? I counted 8 physical locks in your ruleset.

    8 ball trough.
    Only the wives multiball might need to steal locked balls. Probably from nux mb

    #400 3 years ago
    Quoted from QuickSilverShelby:

    Sicknate, Mad Max is a dream theme for me. So much so that I named my boy after the character. No kidding, when my boy was born July 1st, 2004, I named him after Mel Gibson's character in the Road Warrior. Not Maximus or Maximilian. Just Max.
    As you proceed to build this game please consider building two of these games. I'd like the opportunity to purchase your inspired creation. I might be able help supplement some of your costs. I'm a huge fan of the series and I would be grateful to finally get a Mad Max pin which is way long over due.
    I'd put it right next to my 4 other grail movie pinball games Alien, The Big Lebowski, Indiana Jones and The Lord of the Rings.
    Hell ya!
    QSS

    QuickSilverShelby,
    This is the highest compliment you could give, but I can't go selling a theme I don't have rights to.

    When done with this project I'd be happy to give you all the solid models and assets.
    Had I used only off the shelf parts it would be easy(relatively speaking) to make a pin from that. Unfortunately there has got to be about $1000 or more in custom machined parts. If taken to a machine shop I'd bet more along 2k plus

    If you really want one I can help you make it happen....but you'll have to build it, print the art etc.
    I don't want to do any copyright infringement.

    #404 3 years ago

    The tilt warning call outs are gonna be from that scene. “Don’t blow my rig” and “ I’m gonna judge her...
    Just a bit”.

    I like the nitro war idea. I’ll have to work that into the slit battle for sure.

    I’ve read the mission pinball framework guide/docs like 5 times and it’s finally starting to click.... I think.
    Really I learn by trying stuff , checking the logs for event post , then try more stuff... you know until the crap sticks to the wall.

    I’m used to ladder logic programming so it’s a different way of thinking with posting events and all.

    The hardest part for me is going to be the GUI. I have ideas for what to do art wise... just zero skills to accomplish it.

    1 week later
    13
    #406 3 years ago

    Code is coming along....

    Art is coming along...

    As the code fills in it is more and more fun to play.

    My nephew came by for the 4th weekend and got a lot done.

    He set up the nitro/ awaited mode so on the first hit you get 1 second, 2nd hit is 4 Seconds, 3rd Hit 9 seconds , 4th hit 16 seconds and finally 5th hit is 25 seconds.

    Works out awesome. It’s weighted to make you want to wait until level 5 to use it. Already have come up with a strategy to try and hit the behind the upper flipper shot and if you make it immediately press both right flipper buttons to start the mode at 3X . I’ll post a vid of it in action soon.

    Also we plan to make it so the
    Mode will add 5 seconds to any hurry up. So if your running low on time it’s smart to save the nitro and use it then.

    I am really happy with the layout.

    Only a few tiny changes for rev 2 planned.
    Mostly a rev 2 version of the pop bumpers.

    Also a one way wire gate where the motorized target bank is on the side.
    When the bank is down Upper flipper shots bounce of the side rail and out.
    Right now you have to “luck” your way in.

    MPF is awesome and makes most of the coding easy.
    I am very thankful to everyone who has put in time to make this software

    EE06241D-C382-424D-9C70-6D0284CF2193 (resized).jpegEE06241D-C382-424D-9C70-6D0284CF2193 (resized).jpeg
    1 week later
    17
    #408 3 years ago

    Got the flip/flop scoops working

    Thank you Jab_doa for the MPF code update.

    2 weeks later
    20
    #409 3 years ago

    My nephews finally made it to town.
    They’ve been working on code and light shows for 2 days . Here’s a vid of where we’re at.

    I’ve got everything dialed in mechanically (mostly) and am letting them do all the coding.

    #415 3 years ago
    Quoted from PinMonk:

    That's awesome, but why is the sound barely audible?

    The sound is actually loud on the machine.
    Must be something with my phone.

    25
    #416 3 years ago

    Citadel multiball as explained by Justin.
    5 balls released all at once from 3 ramp locks and 2 scoops.

    1 month later
    30
    #421 3 years ago

    Took a couple of weeks off. Actually I’m pretty much done. The nephew is doing all the code.
    That and art is all that’s left.
    He has come down from Vegas for a week 2 times now and is pounding out the code.
    It is amazing how important the code is.
    The game shot pretty good right out of the gate but wasn’t fun until the code started filling in.

    Anyhoo here’s a vid of the Progress

    #425 3 years ago
    Quoted from russdx:

    That is incredible looks like such a fun game, love the target which freezes the ball for a second great effect and the subway which shoots the ball UP the machine that’s fantastic, can’t wait to see this thing with artwork.
    Keep up the great work.

    Check out post 94 and 121. Both scoops can hold an extra ball. The game has some logic that makes it seem like the ball is moving from scoop to the other. But it just changes where it is holding an extra ball.

    Any pinsiders want to take a stab at GUI and/or back glass?
    Art is where my nephew and I fail.
    I feel like I could spend a year learning photoshop and illustrator and would still suck at art. I would rather move on to laying out homebrew #2 playfield and mechanics.

    28
    #431 3 years ago

    thank you to sixtyfourbits for a kick ass back glass.

    madmax2 (resized).jpgmadmax2 (resized).jpg
    #433 3 years ago

    I'm trying to make animated GIFs as instruction slides to play during attract mode.

    I'm terrible at photoshop but maybe this will help me get better.
    Then maybe I can talk someone into re - doing these that has a better artistic eye.

    Maybe the rules are too complicated if I need to make these in the first place.

    On other notes, we find that the switches on the coin door with their present use never get used.
    boosting points on ramps vs orbits etc. isn't a compelling reason to reach down and actually do it.
    Plus it isn't fun.

    Also, finding the right balance of earning resources and then spending them is tricky.
    We find the game is much more fun when you start a bunch of resources and don't have to earn them to spend.

    Maybe we set up the game where you don't spend resources to do things, but earn them for end of ball bonus .

    NitroGif.gifNitroGif.gifcitadel.gifcitadel.giffuelpod.giffuelpod.gif
    #440 3 years ago

    The final wizard mode in the game is a battle with immortan joe. We plan to put red flashers behind his eyes on the back glass.

    For me I really like the idea of immortan joe staring you down while you play.

    As far as paid art for the playfield....this is just for shits and gigs, I don’t really want to go out of pocket for that.

    I know everything else wasn’t cheap... but there was something to be learned by my nephew and I in all of it, so I don’t mind the cost.
    Not much to be learned paying an artist.

    As far as the angle of the playfield, this game is brutal(to my skill level anyway)...it may seem floaty because all the shots are far from the flippers, but in person the game is fast.

    If peeps in the Oceanside area want to play test it ...dm me.

    I really love the layout and don’t want to move anything. Some stuff worked out accidentally. The lower scoop doesn’t slow the game down at all, and actually ratchets up the tension.
    I hear/read a lot of talk about scoops slowing the game down, but with both of them flip flopping, I think speeds it up.

    We are thinking of doing an OG theme on the next one so maybe it could be made for more people if it ends up any good.
    After today’s DR fiasco I actually have confidence I could do better at mfg.

    3 weeks later
    #442 3 years ago

    Had a local pinsider over last weekend Pinballdork from Carlsbad.

    He had some good insight on the game that I’ve worked in.

    I added a rubber bumper to the upper ramp post /magnet opto switch holder.
    Improved the gameplay a lot.

    Also added some wires and platforms where the ball was getting stuck so I could play with the glass on.

    Amazing how much better pinball feels with the glass on.

    Watching someone else play I realized the rules are probably too complicated.

    I simplified how gaining resources works and think it plays much cleaner now.

    Gastown ramp earns guzzoline
    Bulletfarm ramp earns bullets
    Citadel ramp earns aqua cola and mothers milk

    Orbits earn some of each or if you do a “kill switch combo” more of whichever resource is selected.

    I added “V8 multiplier” to resources.
    Hit all 5 pop bumpers and 3 slings to add boost to the engine. This gains more resources per ramp or orbit hit and extra points on pops and slings

    Also added a “Downshift multiplier”
    Hit the 4 mini targets to gain their associated resources. Get them all solid.
    Their lights go off, blinking then solid.

    Then whichever resource is hit next you gain a bunch of and the end of ball bonus for resources gets multiplied.

    Added skill shot combos up to 8 deep.

    All that’s left is 4 mini boss modes, 1 wizard mode, 5 or 6 mission modes and a shit ton of art and this thing will be done.
    Simple right?

    Really struggling with GUI and playfield art.

    For a homebrew since most people only see it online and don’t actual play it, art is probably the most important thing....
    for kudos anyway.

    Layout, mechs , and shots wise I would put this thing up against anything....still have a long way to go on code and art.

    Anyone want to do background art for the GUI while playing? Or maybe lead me in the right direction.

    3AC9EA1D-4AD0-40A7-B408-F95B5506B663 (resized).jpeg3AC9EA1D-4AD0-40A7-B408-F95B5506B663 (resized).jpeg9DD49084-7542-419C-991F-6907685BA934 (resized).jpeg9DD49084-7542-419C-991F-6907685BA934 (resized).jpegBEDCAD2C-B43A-4C37-8C04-BFBD0A4CB156 (resized).jpegBEDCAD2C-B43A-4C37-8C04-BFBD0A4CB156 (resized).jpeg
    #444 3 years ago

    If I’m only 30% done then I’m 100% done.

    #446 3 years ago

    Oh, I’m long past the point of no return .

    I’d like to believe I’m past 30%....wether it’s true or not.

    #457 3 years ago

    Thanks for all the encouragement pinsiders....

    Vireland's a good dude and has helped this project out a ton.

    I'll leave it to him to say how if he wants....

    I know if people find out.... every homebrewer will be knocking down his door.

    Coding isn't that bad now that I'm getting the hang of MPF.
    I can't thank enough all the people who've put hundreds of hours into it.
    Very powerful tool that is helping non programmer peeps like me build a pin.

    Watching people playtest this thing really helps.

    So please, more Socal people help me out by playing this thing. (send pm here at pinside)

    1 week later
    47
    #464 3 years ago

    Getting closer.

    All multiballs and mission modes done.

    Just need 4 mini boss and 2 final boss mode.

    Then tuning and playfield art and GUI art.

    873904AB-80AB-43BF-BB45-76A88C63D0B0 (resized).jpeg873904AB-80AB-43BF-BB45-76A88C63D0B0 (resized).jpeg
    #471 3 years ago
    Quoted from stoli1:

    Can you share your thoughts on the cabinet and backglass graphics? What kind of media were they printed on? Did you have them printed locally or from an Internet business? How did the application go?

    I did the cabinet and translite with https://www.gameongrafix.com/

    for the translite I chose "backlit film with adhesive" and got 1/8" thick tempered glass,

    for the cabinet art I got everything about 1" oversized in all directions.
    stuck it on, and then razorbladed the excess.
    This worked out good for me. Took some of the pressure off of getting it perfect.

    I'm happy with gameongrafix and would use them again.

    #474 3 years ago
    Quoted from stoli1:

    I have a few random questions for you Nate.
    1. Ramps - How do you get from the curved surfaces in your CAD assembly to a 2d file used to cut the sheet metal? Does Solidworks have some sort of flattening tool?
    2. How did the fitment of those ramps turn out? Did they blend right into the cutouts on the playfield and back board or were there some “adjustments”?
    3. To clarify what you mentioned in an earlier post, you would go with a thicker gauge sheet metal for a future build. Why is that?
    4. Nixies - I understand how they work by themselves (an Arduino sketch on the micro processor controls the exixe driver boards that the Nixie tubes are mounted on), but how are you interfacing that assembly with MPF?
    Thanks

    1. In Solidworks you can "convert to sheetmetal" and then "flatten".
    I'm sure Fusion360 has similar functions.
    There are a few tricks to get this just right with ramps. Another pinsider asked me how to do it and I wrote a quick tutorial on it.
    If other people want a Solidworks tutorial on this hit me up.

    2. Fitment of the ramps worked out great w/o adjustments.

    3. I used 20 gauge sheet (.0375") for the ramps. I've played hundreds of games (if not in the thousands) on the machine and it shows no wear.
    The guy that welded it said this gauge was a nightmare and he would've preferred 18 gauge. I'm sure with a good laser welder it would be easy, but other types of welding he told me it's hard not to burn through.

    One thing I would change is the way I drew up the ramps. Where the ball enters the ramp it parallel to the playfield.
    I thought I could just file in a bevel/chamfer and the ball would go up just fine. with a very good chamfer filed in the ball still wants to jump when starting the ramp. I cant use shim stock because it wont sit flush. So in the future I would have 5 degree minimum entry angle for ramp.

    4. Nixie tubes will run off of custom python code through MPF.
    I'll have a timer in mpf call custom code maybe every quarter second or so to control to the nixies.
    I wrote python code to do timers and what not through USB to the nixies to test and it worked fine.
    Haven't actually used them through MPF yet.
    Waiting for game code to be done.
    There are tons of game timers I want to use, but need to write out priorities and such, If I do that now, I'll have to redo a lot.

    #477 3 years ago
    Quoted from CLEllison:

    For the love of God don't get discouraged and definitely don't give up! This is such a well done project thus far. I never did a homebrew because I KNEW I'd get frustrated and quit. I also knew coding can make a break a game. Here's my advice "for whatever it's worth". If you are satisfied with how everything plays and you'd label it gold standard then get the playfield artwork done. Get the playfield artwork applied and get it over to Ron Kruzman as that will take about 3 months. Mean while you can work on your coding via virtual pinball and either work on learning graphical work or sub it out. Seriously that's such a cool pin don't give up. In fact you could sell plans to other members and offer the code and artwork for "free". Several ways to get around the whole IP issue.

    We are definitely not getting discouraged.
    The more code we add the more fun it is.

    We're making steady progress, The nephew was down last weekend and we added a few modes and did a ton of tuning.

    The game is brutally hard right now but before we go making things easier we need to try it with the extra balls added

    There will be 3 total extra balls to earn
    Ride Eternal
    Redemption
    ILIDILA (I Live I Die I Live Again)

    #481 3 years ago

    Here's my arduino code "sketch" for the Exixe nixie driver ....
    This is for driving 4 nixie tubes
    you'd have to change the code to do more

    just send serial commands like this

    "<9r8g7b6w>"

    1st digit will be 9 with a red color
    2nd digit will be 8 with green color
    3rd digit will be 7 with blue color
    4th digit will be 6 with white color

    code/sketch below

    pinside took out the indentations... so hit me up for correct source arduino code

    #include <SPI.h>
    const int ss1 = 7; //slave select pin for digit 1
    const int ss2 = 8; //slave select pin for digit 2
    const int ss3 = 9; //slave select pin for digit 3
    const int ss4 = 10; //slave select pin for digit 4
    byte nix_buff[16] = {0xaa, 0x80, 0x80, 0x80, 0x80, 0x80, 0x80, 0x80, 0x80, 0x80, 0xff, 0x80, 0x80, 0xff, 0x80, 0x80};
    char serialReceived[8];

    byte digit1= 9;
    byte digit2= 8;
    byte digit3= 7;
    byte digit4= 6;
    byte d1c=115;
    byte d2c=119;
    byte d3c=112;
    byte d4c=115;

    void setup() {
    pinMode(ss1, OUTPUT);
    pinMode(ss2, OUTPUT);
    pinMode(ss3, OUTPUT);
    pinMode(ss4, OUTPUT);
    Serial.begin(19200);
    SPI.begin();
    SPI.beginTransaction(SPISettings(4000000, MSBFIRST, SPI_MODE0));
    digitalWrite(ss1, LOW);
    for (int i = 0; i < 16; i = i + 1)
    SPI.transfer(nix_buff[i]);
    digitalWrite(ss1, HIGH);
    delay(1000);
    digitalWrite(ss2, LOW);
    for (int i = 0; i < 16; i = i + 1)
    SPI.transfer(nix_buff[i]);
    digitalWrite(ss2, HIGH);
    delay(1000);
    digitalWrite(ss3, LOW);
    for (int i = 0; i < 16; i = i + 1)
    SPI.transfer(nix_buff[i]);
    digitalWrite(ss3, HIGH);
    delay(1000);
    digitalWrite(ss4, LOW);
    for (int i = 0; i < 16; i = i + 1)
    SPI.transfer(nix_buff[i]);
    digitalWrite(ss4, HIGH);

    }

    void loop()
    {
    recWithSEmarkers();

    writenix(digit1, d1c, ss1);
    writenix(digit2, d2c, ss2);
    writenix(digit3, d3c, ss3);
    writenix(digit4, d4c, ss4);

    }
    void recWithSEmarkers() {
    static boolean recvInProgress= false;
    static byte ndx = 0;
    char startmarker = '<';
    char endmarker = '>';
    char rc;

    while (Serial.available() > 0) {
    rc = Serial.read();

    if (recvInProgress == true) {
    if (rc != endmarker) {
    serialReceived[ndx] = rc;
    ndx++;
    }
    else {
    serialReceived[ndx] = '\0'; //terminate the string
    recvInProgress = false;
    ndx=0;
    }
    }
    else if (rc==startmarker){
    recvInProgress=true;
    }
    digit1 = serialReceived[7]-48;
    d1c = serialReceived[6];
    digit2 = serialReceived[5]-48;
    d2c = serialReceived[4];
    digit3 = serialReceived[3]-48;
    d3c = serialReceived[2];
    digit4 = serialReceived[1]-48;
    d4c = serialReceived[0];
    }

    }

    void writenix(int number,byte DigitColor, int sspin) {
    if (DigitColor==119){
    nix_buff[13] = 0xff;
    nix_buff[14] = 0xff;
    nix_buff[15] = 0xff;
    }
    if (DigitColor==114){
    nix_buff[13] = 0xff;
    nix_buff[14] = 0x80;
    nix_buff[15] = 0x80;
    }
    if (DigitColor==103){
    nix_buff[13] = 0x80;
    nix_buff[14] = 0xff;
    nix_buff[15] = 0x80;
    }
    if (DigitColor==98){
    nix_buff[13] = 0x80;
    nix_buff[14] = 0x80;
    nix_buff[15] = 0xff;
    }
    if (DigitColor==121){
    nix_buff[13] = 0xff;
    nix_buff[14] = 0xff;
    nix_buff[15] = 0x80;
    }
    if (DigitColor == 112){
    nix_buff[13] = 0xc8;
    nix_buff[14] = 0x8d;
    nix_buff[15] = 0xff;
    }
    if (DigitColor==111){
    nix_buff[13] = 0xff;
    nix_buff[14] = 0xc0;
    nix_buff[15] = 0x00;}

    if (DigitColor==110){
    nix_buff[13] = 0x80;
    nix_buff[14] = 0x80;
    nix_buff[15] = 0x80;}

    for (int i = 1 ; i < 11; i = i + 1) { //clear numbers
    nix_buff[i] = 0x80;
    }
    nix_buff[0] = 0xaa;

    if (number == 0)
    number = 10;
    nix_buff[number] = 0xff; //write number

    digitalWrite(sspin, LOW);
    delay(1);
    for (int i = 0; i < 16; i = i + 1)
    SPI.transfer(nix_buff[i]);
    digitalWrite(sspin, HIGH);

    }

    4 months later
    23
    #483 3 years ago

    Long time no update.
    Took about 6 months off.

    Last couple of times the nephew came down we just played the game, and didn’t code.

    Did change the pop bumpers a little bit anD now they work amazing.
    Added some .005” shim stock under them and took away the lower 15degree rings. Now the millisecond the ball touches the upper ring the pop bumpers fires.

    Also added spring plunger set screws to the top. Now I can adjust the pops height .

    The lower they are the closer they are to each other . So I can tune how active they are.

    Have figured out code is everything for pinball.

    All the mechs and shots worked from day one....well day after assembly anyways.

    Game was barely fun with no rules.

    As the code fills in the fun goes up exponentially.

    73B33E48-475F-44F7-B071-DE03A47C247D (resized).jpeg73B33E48-475F-44F7-B071-DE03A47C247D (resized).jpeg
    #488 3 years ago

    Wilberto757 you are hired.

    I will dm you and we can discuss

    #489 3 years ago

    Zacaj,

    Yes playfield is dirty. over 1000 play. This is white wood #1.

    I’m torn between sanding down and applying art to this one or making a new playfield for the final game.

    I like the idea of a finished game with first Prototype playfield.

    I also really want to try a new style of playfield....
    10 mm white plastic playfield with 2mm polycarbonate top, artwork sandwiched between.

    Yeah yeah ,I know other people have done polycarbonate covers....but they all use wood underneath.

    Problem with wood is it grows and shrinks with temp and humidity changes. Plastic on plastic won’t have that problem.

    Instead of inserts I’ll just cut through holes/shapes in the 10mm part.

    This way I can make any shape I want. I may even cut in grooves for EL wire to light up shot paths.

    #493 3 years ago

    Some plastics are very tough.
    On the audits, there’s over 40,000 hits on some of the pop bumpers. They’re doing fine with plastic bodies.

    Most sag will be mitigated by the side rails , back wood, and mechs themselves being bolted down.

    The 2 pieces will be held together by all the mechs and side rails being bolted together.

    As far as screws in plastic, I would not use wood screws. I would drill and tap holes and use machine screws. In areas that need more strength, pem/insert nuts.

    #496 3 years ago

    If any streamer in SoCal would like to come play and stream this I’d be down.

    As riveting as me explaining all the code and rule changes would be, I think video would be better.

    I was hoping to get this thing to a pinball show by now.

    #498 3 years ago

    You do realize that the coils are surrounded by plastic already. Sleeve. What do you think the wire is wrapper around?

    If hot plastic was that dangerous we’d all die driving cars around.

    #505 3 years ago

    Alright, wilberto757 has joined the team.
    GUI art is looking awesome. I’m stoked that the project is moving forward, kind of stalled out for a bit

    #510 3 years ago

    Swinks,

    I am a machinist by day. I’ve done a bit of machining of Caron fiber. It eats cutters.
    Only thing that holds up to it is diamond cutting tools.
    Plus carbon fiber ain’t cheap.

    1 week later
    31
    #512 3 years ago

    Nephew came down for a week.
    Got a ton of coding done.

    Always feels like we’re really close to done on code , then we do a bunch, and we don’t feel any closer.

    Video recording pinball with a phone blows.
    Glass off, can’t hear anything but clacking.
    Glass on, upper part of playfield is back glass reflection.

    1 week later
    #521 3 years ago

    Tried to add the Nixie tubes under apron, but it was a big spaghetti mess. Made a couple of PCBs for the first time. If they work it was easier than I thought.

    64E82D89-4B20-4660-ADB1-247D4B95A0C2.jpeg64E82D89-4B20-4660-ADB1-247D4B95A0C2.jpeg71E805DC-3D94-410D-8B50-9FE8AAF9442C.jpeg71E805DC-3D94-410D-8B50-9FE8AAF9442C.jpeg
    11
    #524 3 years ago

    Had to set a machine up for work to show for a customer. I don’t like doing useless widgets (which I have to do all the time).

    So I setup for citadel pipes.

    3AD6F4B9-FB33-485E-B621-007C4ACD78AA.jpeg3AD6F4B9-FB33-485E-B621-007C4ACD78AA.jpegC6162A2E-910E-4D5F-9163-DAACA5BD23CC.jpegC6162A2E-910E-4D5F-9163-DAACA5BD23CC.jpeg
    #527 3 years ago
    Quoted from SLCpunk2113:

    How much does that bad bear cost?

    ~400k

    #530 3 years ago
    Quoted from Manny65:Very cool bit of tech - great to see these clips! Thanks

    I’m always on the fence about posting stuff like this. I think some people will find it interesting. I don’t want to seem like a braggy attention huuer though.

    #537 3 years ago

    I found a local wood shop with a multicam cnc router that did the playfield for $150.00

    I asked if I could write the g code but he he declined.... said metal workers didn't know how to cut wood.

    So I sent him a dxf file with everything separated into different layers for all the different depths.

    I'm used to holding very close tolerances for my day job(medical/aerospace parts) so I definitely went to tight.

    I would go at least .005" per side oversized for the inserts (.010" total)

    I used radius gauges(see pic) to to get the exact corner radii of all the inserts. The solid files I found online were quite a bit off.

    I did pockets (see pic) for the inserts to sit on and went .245" down from the top. As it turns out wood sands much easier than the plastic did so next time I would go .255" down and sand the playfield down to the inserts. (plus because of the glue, the inserts dried much higher than .005" above wood)

    I think just about every insert has a minimum corner radius of .125" so a .25 diameter cutter will work for most of the playfield.

    The router at the shop I used had a tool changer on the router so he used several different cutters to do the playfield. all the through holes he did at .125" and then I re-drilled them by hand to size.

    I believe he used a down cut endmill for most of the routing. (normal/up endmills make the top surface splinter)

    I supplied a .062" cutter for some small slots , it was for hard steel so it made short work of the wood.

    I supplied a 1/2" ball endmill for the shooter lane and programmed a 3-d surface path for that.

    insert shelves (resized).pnginsert shelves (resized).pngradiusgauge (resized).jpgradiusgauge (resized).jpg
    #541 2 years ago

    Got the Nixie tubes in and coded. Will do a better mounting job when I get playfield with art in.

    Started out with using them for a bunch of different timers but is was too confusing/messy
    Now the left 2 keep track of combo count and right 2 keep track of time left to cash out the combo.

    Before playtesting and refining the code the witness combo was a central part of the game. Now it’s a minor part. Funny how things work out.

    Also hopped on the band wagon and did some custom led boards with 3 lights for big arrows , because why not.

    Really need to get art work done so I don’t have to look at this filthy playfield.
    I wonder if it’ll shoot better with smooth hard coat.

    4E42D256-3922-4AAC-8BF6-BC4997415C2F.jpeg4E42D256-3922-4AAC-8BF6-BC4997415C2F.jpegimage.jpgimage.jpg
    1 month later
    #550 2 years ago

    His name was Marvin. Witness Him!!!!

    3 weeks later
    #553 2 years ago

    The original intent of the switches was to choose bonus points.

    We set it about 50% bonus
    pops vs slings
    Targets vs spinners
    Ramps vs orbits

    We noticed we never flipped them and it added no fun. So we took the code out.

    Still trying to figure something out for them. Honestly I don’t think any use of them will actually make the game more fun.

    Coding has been coming along and we’re at 90%.

    Modes , multipliers, multiball, missions are done.
    Rictus, slit, and bullet farmer battles are done.

    Only people eater and immortan joe remain.

    I finally bit the bullet and hired an artist for the playfield. We hope to have the whole thing done by end of summer and take it to a show then.

    1 month later
    #558 2 years ago

    I’ve seen this. A lot of really cool GUI stuff I’d implement if I were an artist/could.

    Not much to report…just waiting on playfield art.

    4 weeks later
    #561 2 years ago

    Wow, I can’t think of anything cooler than showing up to cruise night in the gigahorse.

    Justin and I each got 3D printers recently so while waiting for playfield art we will start making sculpts. Any one have any good 3D models of fury road cars they want to send ?

    #570 2 years ago

    Pinmonk has helped me tons on this project totally free. And I thank him.

    I have an amazing artist doing the playfield paid. It is a bro deal so I need patience with the timing.

    21
    #575 2 years ago

    got some sketch up/concept art. Very rough to make sure artist and I are on same page.....Hope he doesn't mind me posting.

    concept art (resized).pngconcept art (resized).pngroughconcept (resized).jpgroughconcept (resized).jpg
    1 month later
    12
    #579 2 years ago

    I really wanted to have this thing finished and at the event this weekend....just wasn't in the cards.

    I haven't done much of anything for a couple of months....just waiting on artwork.

    Decided I could squeeze in a couple more shorts so did some CAD this weekend and added a flipper and a really tiny upper playfield right in the middle.

    Coming off the far left ramp( from upper right flipper) if the player doesn't swing, the ball will return to the right flipper normally.

    An early hit will drop it into the upper scoop via 1" subway behind it already the.

    A well timed hit will bring the ball up ramp #4. Right now planning on this ramp feeding ball back to the plunger lane

    Late hit ball will fall off onto playfield.

    I got rid of the big piece of metal in the center of the playfield.... turns out none of my code in the game needed to know if the ball was stuck on the magnet.
    so I don't need an opto there anymore.

    I noticed late hits with the upper right flipper(aiming for the ramp) would slam into the orbit right above the motorized drop target bank.

    Couldn't really move it before, because I thought I needed the other half of the magnet opto.

    Now that the opto is gone I can make a shot there....Turns out the subway passes right under that spot.
    boom...secret shot to subway from upper flipper
    upperupperflipper (resized).pngupperupperflipper (resized).png

    #580 2 years ago

    I do have some concept art/rough sketches from the artist.
    Hope he doesn't mind

    concept art (resized).pngconcept art (resized).pngroughconcept (resized).jpgroughconcept (resized).jpg
    2 weeks later
    #582 2 years ago

    Can I fit a flipper here?

    …rhetorical question

    2B5416C9-7CB9-41FB-9694-A8C21F982DC4 (resized).jpeg2B5416C9-7CB9-41FB-9694-A8C21F982DC4 (resized).jpeg
    #583 2 years ago

    Got the 4th flipper in… barely.
    Had to make a barebones flipper mech.
    No eos. If I find I need an eos switch (not using on other 3 flippers) I’ve come up with a way. Just use the plunger and plunger stop as the switch.

    0929793F-5AE6-4DA1-B19D-BB523058B2B1 (resized).jpeg0929793F-5AE6-4DA1-B19D-BB523058B2B1 (resized).jpegDF5CB610-AD69-4D9B-8A2F-E6DE79058015 (resized).jpegDF5CB610-AD69-4D9B-8A2F-E6DE79058015 (resized).jpeg
    #586 2 years ago

    Crappy pic…. Thought I had the right size band for the flipper… was wrong.

    Still working on what shots to do with flipper.

    Gonna play with some different ramps and jumps to see what’s fun. Maybe a 180 loop that feeds the Newton all lock. Maybe a jump to the ramp directly to the right .
    Maybe a jump to ramp that feeds it to the plunger lane

    9436E397-A4A6-4153-B9C7-0D16FD5A9D07 (resized).jpeg9436E397-A4A6-4153-B9C7-0D16FD5A9D07 (resized).jpeg
    #588 2 years ago

    I want to try and make it so if the flipper is just held, it will get to the scoop below. No swing it continues on a wire form to right inlane. Plus 2 shots. If they’ll fit

    Maybe a jump to a target to symbolize blowing up the pass

    #589 2 years ago

    Also, a local pinball enthusiast Glenn has joined the team. A lot of great ideas coming from him. Can’t wait to show them

    1 month later
    15
    #592 2 years ago

    After printing out 5 or 6 upper playfields , we’re getting close on the 4th flipper.

    Main shot for the upper left flipper is a jump to a wall ride that feeds the right ramp that was already there. This was Glenn’s idea and it works awesome. Plus that feeds the upper right flipper, so you can keep a figure 8 going with the upper flippers or let the ball go past the upper left flipper to a wire form that feeds the lower right flipper.

    My advice to anyone is steer clear of jumps unless you want to spend a ton of time dialing it in. Just too many variables.

    Now that the shots are dialed in we’ll have to reprint that big white thing as something cool. I’m thinking doof wagon. There will be one more shot/jump right in front of the white thing.

    It’ll be a wire form that lead to behind the upper right flipper.

    Third shot is already there. A very late flip will go to a wire form that feeds the plunger lane.

    This will be how to start certain mission modes

    8D43E6E3-F9B0-45DE-B8FA-D2F462CD5948 (resized).jpeg8D43E6E3-F9B0-45DE-B8FA-D2F462CD5948 (resized).jpeg
    #594 2 years ago

    Mostly it falls into the metal ramp, sometimes it’ll go onto the rails that lead to the plunger lane.

    I played with a couple of upper playfields where the ball would fall into scoop below if held. But it made the jump really random and unpredictable. So I scrapped the idea.

    B62213ED-79A1-49A9-B3FC-FAE84C7AD4CC (resized).jpegB62213ED-79A1-49A9-B3FC-FAE84C7AD4CC (resized).jpeg
    #598 2 years ago

    There is a sandstorm mode in the game.

    It’s basically an orbit game mode.

    #600 2 years ago
    Quoted from roar:

    That jump shot looks really cool, would love to a see video of it when you have it dialled in. How are you detecting that you actually made the shot? Does the wall ramp portion have a switch on it and any impact to the wall ramp will register a hit?

    We’ll use some timer logic with the ball coming out of the middle pipe. Hit the right ramp within so many seconds and we’ll know it come from upper playfield jump.

    1 month later
    #601 2 years ago

    Long time no update.

    Glen, a local pin enthusiast has joined the project and had a lot of great input.

    So while waiting for art we changed a few things. So much that we’ll need a new playfield. This led to me telling the artist he can move around inserts and shapes to whatever he wants.
    Should of done that long ago because it’s looking killer now.

    Attached is the new layout in solid works… not the art

    Just a few subtle changes that I think will make a big difference.

    ver9c 2 (resized).pngver9c 2 (resized).png
    #605 2 years ago

    Upper shot has 3 paths

    1 jump into wall ride/bounce to right ramp

    2 jump onto wire forms that drop off behind upper right flipper (not pictured)

    3 across rails to plunger lane for “thunder up” modes

    4 let go by and feeds lower right flipper

    8F42748A-B2C3-421D-B6DD-035DA4E4E18F (resized).jpeg8F42748A-B2C3-421D-B6DD-035DA4E4E18F (resized).jpeg
    #609 2 years ago
    Quoted from PinMonk:

    Are those white spots on the inlane guides just inserts, or are they player or software-controllable walls that let you block outlanes to make the side with the block up "safe?"
    Also, that left ball return will drop the ball past the inserts below, not on them, right?

    Yeah the wire form should drop the ball after the v8 inserts. The v8 inserts are also going to change.

    It’s inserts on the drain lanes. But an up down block for the save would be awesome

    #611 2 years ago
    Quoted from miracleman:

    If I read you right, your return/outlanes are reversed like Fathom, so a normal speed or faster ball down the outer return lane will make it over the gap to the left flipper. The small guide to the left of the gap (right on other flipper) should be a bit higher than the one next to the flipper so that can happen.
    No need for a pop-up-block in those gaps, just some rubbers on those small guides so a player can try to nudge save it like on Fathom.

    We actually measured Fathom and offset the height the same amount.

    There will be one way gates after the gap(like fathom)

    2 months later
    #613 1 year ago

    Flipper works good. Really fun shot. Haven’t done anything with the game since my last post. Just waiting on art. Here’s some concept stuff I recently got.

    89F85DFA-B906-40D0-88E7-D3814BBCF6F9 (resized).jpeg89F85DFA-B906-40D0-88E7-D3814BBCF6F9 (resized).jpegFA95E847-B5C6-453D-9E7F-1D00AF996447 (resized).jpegFA95E847-B5C6-453D-9E7F-1D00AF996447 (resized).jpeg
    #615 1 year ago

    Only thing holding this thing back is art.

    The artist is moving the inserts around so I don’t really want to code until that is done. Or at least insert locations are confirmed.

    We are trying to simplify the code. It was way to complicated and difficult to get modes going. It’s still complex, just not so confusing.

    I really really want to take this to the Chicago pinball show. I hope we can get the playfield art by then.

    1 month later
    #618 1 year ago

    About to cut playfield rev b.

    Waiting on welder for rev b ramps.

    Waiting on art.

    Whole lot of waiting.

    16
    #620 1 year ago

    New ramps with shims/flaps are in.

    Amazing what a difference that makes.

    Also went with 18gauge this time instead of 20. Much better.

    Also changed the geometry on the upper left ramp so the Newton ball is easier to hit from lower right flipper.

    Sent off CAD file to router and am awaiting playfield revB

    29378903-0CD0-4EAE-9017-66AC1FA20B89 (resized).jpeg29378903-0CD0-4EAE-9017-66AC1FA20B89 (resized).jpeg
    #623 1 year ago

    I designed the flaps in solidworks and had them made at oshcut.com

    A made flaps out of .005” and .007” hardened spring steel.

    Are you asking what height the sides are or how much higher the ramps go than the playfield?

    #625 1 year ago

    L to R
    3.1”, 2” and 2.5”

    But they go through the back wood so that is kinda high. Have to keep flipper power high for these ramps.

    Also 18 feels more solid. Balls seem to keep more speed on rebounds off the sides

    3 weeks later
    12
    #628 1 year ago

    It’s close, I recently got a Cnc mill(Fanuc robodrill) so my time lately has been spent on getting that ready to make parts .
    Also we have decided To design and make a Cnc router for shits and gigs… so that is a big project. Mostly just waiting on art for this project. Here’s what the artist sent me recently…. Makes me want to have him redo the cabinet art… just don’t have the patience for that though.

    24535DB0-E415-4E29-B7D6-AD1F6026C897 (resized).png24535DB0-E415-4E29-B7D6-AD1F6026C897 (resized).png
    3 months later
    10
    #637 1 year ago

    Not much for updates.....Still waiting on art.
    Got a playfield solid model off to a local CNC router shop....And he's been flaky
    (not returning texts/emails)

    I guess it's a blessing because just stewing on this thing I've decided to make some changes.

    I'm going to change out the mini targets that also act as ramp protectors for posts that'll be built in switches. Not sure if these exist or not.
    They do in my head anyways and now in solidworks on my computer.

    I'll used an off the shelf post and rubbers that already exist and make a bushing that'll go into a counterbored hole in the playfield.

    the post and bushing will be the switch.

    I'm in the middle of designing and building a CNC router to start making playfields myself.
    (another reason I haven't done anything on MMFR for awhile)

    I've thought about posting stuff from that project here, but don't want to hear a bunch armchair quarterback suggestions.

    switch_post (resized).pngswitch_post (resized).png
    5 months later
    17
    #646 1 year ago

    I've just been waiting on art....Only at this point I've pretty much written it off. I guess I need to start looking for a new artist.
    I was waiting for art to make my rev.2 playfield. But I just recently decided to just go ahead with Rev.2,
    Sent off a solid model to a local cabinet maker and should have a playfield within a week.

    Made a couple last minute changes.

    The upper scoop location now goes to a subway that leads to a new lower right scoop. (see red arrows)
    behind the flipper shot will lead there too.

    I swapped out a post for a mini target where it was used as a protector for the upper right flipper ramp (see orange arrow)

    Added a mechanical diverter at the inlanes(that drain) so it'll be 50/50 on that. (blue arrow) I think I'll do it on both side.
    Beauty of it is if you drain, you also set up the next player with a save.

    Changed the "Lock" and "Load" targets to a mini sling for extra fun.(green arrow)

    We plan to make a ton of code and rule changes to simplify things once rev.2 is flipping.

    I plan to do more posts in the future, it helps keep me motivated and pushing forward.

    I'm really going to try for chicago pinball expo this year, we'll see how the build/code goes.

    updates (resized).pngupdates (resized).png
    #647 1 year ago

    Got the mini slingshot/mini upper flipper combo mech designed. Took much longer than I though it would but I got it done.

    Spoke with my artist friend and he promised me the playfield art by August 1st.

    I think I'm going to Fiver the GUI art.

    minisling_miniflipper (resized).pngminisling_miniflipper (resized).pngminisling_miniflipperTop (resized).pngminisling_miniflipperTop (resized).png
    1 week later
    11
    #649 11 months ago

    Machined all my custom size/shape inserts for when I finally get a new playfield. Was supposed to get it this week but Cnc router place has stopped answering emails. Maybe I’ll have to find another spot.

    46947B85-8A08-4154-8855-732107306B76 (resized).jpeg46947B85-8A08-4154-8855-732107306B76 (resized).jpegEEEEBB4B-245D-40D3-A569-6EFB2509FCCE (resized).jpegEEEEBB4B-245D-40D3-A569-6EFB2509FCCE (resized).jpeg
    #651 11 months ago

    .250 thick polycarbonate sheet.

    Used double sided tape for hold.

    I machine all the inserts to a depth of .235 inch then do a final pass at full depth. Otherwise I think the endmill would fling them

    1 month later
    17
    #653 10 months ago

    Finally got playfield version 2.0 made. Sent the CNC router guy files 3 months ago and just picked em up. Had 2 made so I cen get the machine going while waiting on art. When art is done I’ll swap em out. Artist has promised me August 1st he’ll be done. If everything goes good I’ll bring it to Chicago pinball expo this year

    1D82C992-0524-4B28-BCA4-36D168F0FFE3 (resized).jpeg1D82C992-0524-4B28-BCA4-36D168F0FFE3 (resized).jpeg
    #655 10 months ago

    Art posted above was concept art. It’ll be close to that.

    1 month later
    #656 9 months ago

    Line art is getting close.
    Fellow home brewers… do you think you get better results with direct UV printing or vinyl sticker?

    39720C26-0440-4DF6-B89D-7FD28DB3EE54 (resized).jpeg39720C26-0440-4DF6-B89D-7FD28DB3EE54 (resized).jpeg
    #658 9 months ago

    Honestly, the more of the stuff you can buy …probably the better.
    There is so much work to an entire pinball machine, I think it’s better to save your energy and focus to stuff you have to do…
    No reason to do a bunch of unnecessary work.
    The artist chose a bunch of sizes and shapes that do not exist. That’s why I made some. I still bought all the inserts that come off the shelf.

    I’m still trying to figure out if I’m gonna do direct print or overlay

    1 week later
    31
    #665 8 months ago

    Artwork is getting darn close

    1D5E67C4-8AF9-4E70-819A-7F6C62A50D71 (resized).png1D5E67C4-8AF9-4E70-819A-7F6C62A50D71 (resized).png
    21
    #668 8 months ago

    Art work is really close to done.
    I’m very happy with it.
    The wait has been worth it.

    MMFR_Playfield_Color03 3.jpgMMFR_Playfield_Color03 3.jpg
    #672 8 months ago

    Ok, got the final art. At full resolution it looks sooo much better. I could not be happier.

    I think my plastics will be metal. Shiny and chrome. The art was so much more work than my friend thought it would be. I’m embarrassed to ask him to do any more.

    1 week later
    #676 8 months ago

    Finished making my scoops version 3.0
    (Well except for the actual scoop/curved part of it, will get that done tomorrow)
    Each scoop can lock 4 balls.
    They will mostly be fed by subways. But if balls are locked and the scoop is hit I have a plunger/coil to shove the locked balls back… to let the jammed ball fall.
    Also the balls are the switch except in the jam position.

    61B58335-736D-40EA-A87F-69C8503A621F.jpeg61B58335-736D-40EA-A87F-69C8503A621F.jpeg817207FB-C6FD-46D0-AF9D-34A9412443B4.jpeg817207FB-C6FD-46D0-AF9D-34A9412443B4.jpegD1422A8E-0848-4F13-A15A-F45C1D527E85.jpegD1422A8E-0848-4F13-A15A-F45C1D527E85.jpeg
    #679 8 months ago

    Just gravity. The size of the scoop is barely larger than the ball. The ball will roll to a wall in the scoop. Then it’s straight up and out.

    My last scoops were similar but could only lock 1 extra ball. The ball was held below the scoop in Y axis. Then any ball that falls in would be in position for ejection. If I wanted the locked ball out a coil would fire to bring that to position.

    On this scoop the balls are on rails that are above the ejector.
    One of the rails is ground.
    The others rail alternates between plastic and metal for switches. I hope that makes sense

    #680 8 months ago
    Quoted from PinMonk:

    I'm disappointed. I expected you to have magnetic launchers to really get those balls moving. Just borrow some parts off a NASCAR pin and you're set, no designing necessary.

    There were some serious clearance issues, had to design these to fit.

    Trust me… these scoops are gonna fly. Both are pointed right at the inlanes(outside lanes technically) and will go straight to the flippers at speed.

    #681 8 months ago
    C5CBF404-F75B-4CCD-B03F-962AEAC6414E (resized).jpegC5CBF404-F75B-4CCD-B03F-962AEAC6414E (resized).jpeg
    #683 8 months ago

    No just 1 way.
    I need the scoops (2 of them in this game) to go perfectly straight into the inlanes.
    Hence the shape of the scoop.
    Made it out of polycarbonate…so maybe I’ll hit them with an rgb led… maybe I’ll re do out of metal

    #687 8 months ago
    Quoted from Cmartin1235:

    Nice work. I bet it lights beautifully. How did you machine the inner curvature of the scoop?

    1/2” ball end mill 3D surface “lace” path.
    I have a Cnc mill in my garage.

    1 week later
    #692 8 months ago

    Honestly don’t think I can make expo this year. I keep getting sent out of town for work so I haven’t had the necessary time to finish by then.
    Plus from SoCal it’s a 28 hour drive, I don’t want to go unless it’s complete.

    2 weeks later
    14
    #695 7 months ago
    Quoted from PinMonk:

    Looking at the Ride Eternal insert, it might be nice to make the insert a bit bigger and do something like Indy's ETERNAL LIFE insert where the text is screened over the insert, lighting up the words.
    [quoted image]
    Or, alternately, put a Valhalla symbol on the insert, since that's what they're always talking about in the movie.
    [quoted image]

    We’re actually using the Valhalla symbol.
    Im doing an apron 2.0 that is supposed to be like a car dashboard.

    With a bunch of warning lights for unlocks/upgrades/bonuses/modes/hidden combos.

    There will be a tach for seconds left in shots for combos

    And a meter for water level for citadel multiball

    0FB677D0-E0F0-4F07-9483-90B956B57AA0 (resized).jpeg0FB677D0-E0F0-4F07-9483-90B956B57AA0 (resized).jpeg
    14
    #696 7 months ago

    After reviewing proofs and resending files 4 times I ordered some clear vinyl …. They still screwed it up. The parts that are supposed to be transparent are white.

    I’ve also contacted every local flatbed UV printer and can’t seem to get a quote.

    Nothing is easy

    CFAD702B-8D64-4DF4-A244-1EEBD62B79CB (resized).jpegCFAD702B-8D64-4DF4-A244-1EEBD62B79CB (resized).jpeg
    #699 7 months ago

    I have ordered a laser cut apron and designed and ordered 6 different pcbs . I’m gonna try it that way… If it sucks I’ll go with a screen. I did consider that… then remembered how I much I’m struggling with gui with just 1 screen

    12
    #702 7 months ago

    Have it half mocked up with lights .

    Just need hidden combos and modes and Larry and Barry

    Oh yeah and the tach/timer

    70E9DD4E-3FF3-4474-AA3A-F40D0CD1D366 (resized).png70E9DD4E-3FF3-4474-AA3A-F40D0CD1D366 (resized).png
    #705 7 months ago

    I think they need a little work, but these are the 7 hidden combo lights.

    As a test if these represent the combos , I’ll ship a poster of the playfield to whoever guesses the most correct answers to “what are the names of the hidden combos”?

    Just list 7 guesses

    I’ll give all the correct answers and choose winner Wednesday night.

    I’ll give you a hint, they are all words
    Or phrases spoken in the movie.
    (I’m shipping to US only)
    FEA0594F-E58C-4E8C-9784-870A17F50A0F (resized).pngFEA0594F-E58C-4E8C-9784-870A17F50A0F (resized).png

    #706 7 months ago

    1 day left… pm me your submissions.

    So far there is a clear front runner

    #708 7 months ago

    Pinsider Ferros from Colorado is the winner. He got 4 out of 7 right.

    The names of the combos are as follows:
    (Clockwise from 10 o clock)

    “Thunder up”
    “ We fang it”
    “Home”
    “Kamicrazee”
    “All this for a family squabble”
    “That’s my wheel”

    (Center)
    “Fukushima”

    13
    #709 7 months ago

    Got the apron 2.0 and all the pcb’s I designed for it delivered.

    Now if I could just get artwork onto the playfield .

    97DD9FFF-7790-4673-9493-00CE6DA84BFE (resized).jpeg97DD9FFF-7790-4673-9493-00CE6DA84BFE (resized).jpeg
    1 week later
    #711 7 months ago

    Alright after requesting quotes all over SoCal for direct uv printing and getting none, I’ve sent my playfield off to Fantastic pinball in Canada.
    In hindsight I should’ve just done that to begin with

    Also close to done on mission modes part of apron.

    Here is how it sits now:
    Rock riders
    Buzzards
    Scavenger
    War boys
    Supply run
    Back to the citadel
    Flamers
    Sand storm
    Polecats
    Imperator

    E983B8C0-C3C8-4944-B9AB-828C805B7EC5 (resized).jpegE983B8C0-C3C8-4944-B9AB-828C805B7EC5 (resized).jpeg
    #714 7 months ago
    Quoted from PinMonk:

    I feel like the crow and the flying warboy with the spears need to be stylized more to get rid of the very thin lines that make them up. They're the only two that don't really fit stylistically and don't work as pure icons.

    Agreed, I did an outline of the crow to keep it black, but it does need work . Also I’d prefer a head shot of a war boy with the v8 hands above. I’ll see what I can do. I’m not an artist.

    Anyone on pinside want to take a stab?

    #717 7 months ago

    Here is my 2.0
    I used a Nordic style raven.

    Although I think I like the top Raven of the 4
    You sent

    I’m going to try it with that one

    65B7B386-1629-4ABC-B435-5C40F0896E12 (resized).jpeg65B7B386-1629-4ABC-B435-5C40F0896E12 (resized).jpeg
    2 weeks later
    #721 6 months ago
    Quoted from stoli1:

    How deep are the electronics below the mission mode panel? Will there be an issue with the ball return path?

    The apron height is 2.0” so that leaves .9375” to get the leds, spacer and cover plastic done. I think I’ll make it.

    #722 6 months ago

    Been trying out making the vinyl stickers/covers for apron.

    1st try not so good.
    I’m doing 1/16” clear acrylic with a vinyl sticker sheet over it. Then using a spring loaded scribe to cut the pattern. With just one pass it kinda sucked and detail was horrible.

    I tried again with 2 passes w/o coming up and it worked much better.

    Now I’ll have to do the first one over with new parameters

    1C1AFD99-9B0E-4DB7-A0A1-B901DEEE9112 (resized).jpeg1C1AFD99-9B0E-4DB7-A0A1-B901DEEE9112 (resized).jpegB88A51AA-3BD6-4CDB-96DF-105A00851A0C (resized).jpegB88A51AA-3BD6-4CDB-96DF-105A00851A0C (resized).jpeg
    #723 6 months ago

    Made the aqua cola meter.

    B205F7C7-A2E7-4656-9361-416CC6BEFEE1 (resized).jpegB205F7C7-A2E7-4656-9361-416CC6BEFEE1 (resized).jpegF83BA91C-669B-4609-A459-6AC6017E116D (resized).jpegF83BA91C-669B-4609-A459-6AC6017E116D (resized).jpeg
    11
    #724 6 months ago

    Finally went with a different printing company for a Vinyl sticker, after 1st company couldn’t figure out how to get transparent areas correct.

    This new place got color and transparencies right, but some how the scale is wrong.

    It’s about 1/16” short in the X direction. So inserts and mechs on the outside don’t line up very well.

    I can’t wait to get the direct UV printed playfield.

    275A4F5E-35F7-402E-8762-7D68E3B48670 (resized).jpeg275A4F5E-35F7-402E-8762-7D68E3B48670 (resized).jpeg
    #726 6 months ago

    Code is getting completely revamped.

    When we made the 1.0 version we owned no pinball machines and didn’t know much.

    Now Justin owns Godzilla and Aliens.

    We’re going to make the fun much closer to the start button.

    I haven’t really gotten into the new rules because that seems like a very boring read for everyone.

    Basically there’s 6 boss fights, 6 multiballs,
    10 mission modes. 4 resources and kills to collect for end of ball bonus. 7 hidden combos.

    And about 24 upgrades to collect.

    Once it’s done physically we’ll code it from scratch.

    We still have all the sound and video assets we made from 1.0 but everything else will need to be redone.

    #728 6 months ago

    I’m making the vinyl myself. I have a small Cnc mill in my garage.

    I double back tape .0625” thick acrylic sheet to a flat piece of metal. Then put a vinyl sticker sheet on that. Then scribe. Then cut out. Then I tweezer out the parts I want light to come through (pain in ass/nerve wracking)

    It seems I can get pretty good detail

    30212AEF-3EE5-4B04-8E02-536E5D9A4DDF (resized).jpeg30212AEF-3EE5-4B04-8E02-536E5D9A4DDF (resized).jpegE3B4BAB2-B26C-43DF-BFE6-557AE8D013EA (resized).jpegE3B4BAB2-B26C-43DF-BFE6-557AE8D013EA (resized).jpeg
    #730 6 months ago

    I first tried signs.com …. They could not seem to ever get it right.

    Then I tried bestofsigns.com
    Colors are Much better from them. Size was just a little small in X

    3 weeks later
    39
    #732 5 months ago

    Looks like the uv direct print went well.
    Now I just have to wait for hardcoat and it’s time to assemble

    pinside.9826f70b1920682b38503cfda9826fc08a723943 (resized).jpegpinside.9826f70b1920682b38503cfda9826fc08a723943 (resized).jpeg
    19
    #734 5 months ago

    Finished the apron…minus servo and rpm pointer.

    Hopefully it’s not an overwhelming/distracting amount of info.

    76706055-E3DD-43FB-81BF-B62C8A1AA20D (resized).jpeg76706055-E3DD-43FB-81BF-B62C8A1AA20D (resized).jpeg
    267 posts in this topic match your search for posts by sicknate. You are on page 1 of 2.

    You're currently viewing posts by Pinsider sicknate.
    Click here to go back to viewing the entire thread.

    Reply

    Wanna join the discussion? Please sign in to reply to this topic.

    Hey there! Welcome to Pinside!

    Donate to Pinside

    Great to see you're enjoying Pinside! Did you know Pinside is able to run without any 3rd-party banners or ads, thanks to the support from our visitors? Please consider a donation to Pinside and get anext to your username to show for it! Or better yet, subscribe to Pinside+!


    This page was printed from https://pinside.com/pinball/forum/topic/witness-mad-max-fury-road-homebrew?tu=sicknate and we tried optimising it for printing. Some page elements may have been deliberately hidden.

    Scan the QR code on the left to jump to the URL this document was printed from.