Kevin,
The frame frame collar and the bat arm assembly are a loose fit normally. As you say its just very tight!
If you want put the bat lock nut on and whack it with a hammer hard and often. ![]()
Kevin,
The frame frame collar and the bat arm assembly are a loose fit normally. As you say its just very tight!
If you want put the bat lock nut on and whack it with a hammer hard and often. ![]()
I was able to get the bat arm assembly free from the frame collar!!! Thanks Steve and Tuffano for the tips.
The attached picture shows how I ensured I preserved the threads. This was so tight that hitting the nut with a wood block impaled the nut in the wood! I put an acorn nut on the bat arm threads, and then used a hammer on the handle of a nut driver placed over the acorn nut.
I cleaned up the inside of the collar arm with some 800 sandpaper on a dowel attached to a cordless drill. I also sanded any rough spots on the edges of the bat arm assembly, as well as the collar.
Nice action, though it has some rebound due to either needing new rubber bumpers and I may try a new spring.
Thanks again!
Amazing how old grease can imitate a locktite product.
Your frame shows zero wear from binding so all is well.
What's next?
I still have some work to do. It appears that any target that is hit with the ball is only knocking the target down and that's it. The man unit is not activating, the score reels are not turning, and the outs are not illuminating (have not checked the bulbs yet).
When should the targets reset? After the ball is pitched, or only after a target is knocked down?
I'll see if I can read more about the basic operation of the game. I think I saw something in another post, and a couple of videos online.
Have you taken out the target assembly? There are switches on the target cams. The schematic tells you which switch is where on the diagrams on the right lower part of the schematic. With a multi meter and continuity wire this will be straight forward to sort out.
I am away from home working so do not have access to the schematic.
Quoted from SteveinTexas:Have you taken out the target assembly? There are switches on the target cams. The schematic tells you which switch is where on the diagrams on the right lower part of the schematic. With a multi meter and continuity wire this will be straight forward to sort out.
I am away from home working so do not have access to the schematic.
I have not removed the target assembly yet. I see the switches on the target cams you are referring to on the schematic. Seems fairly straightforward.
Thanks Steve.
Quoted from kevstang67:I have not removed the target assembly yet. I see the switches on the target cams you are referring to on the schematic. Seems fairly straightforward.
Thanks Steve.
I studied the schematic for the target assembly, ready to tackle the gremlins in my machine. When I plugged it in, the man unit reset, and upon starting a new game, almost everything is working properly!!! The Triple target did not work, but after I removed the home run plastic, it too started working.
Spencer once said something to the effect of the more you play the game, the more things will start working!
Issues:
1) The Grand Slam scoring unit does not move at all. I am assuming that the scoring reel is intended to increment on a typical grand slam, as in the real game of baseball. I manually loaded the bases by pressing the targets, then dropped a ball in the home run opening. Nothing.
2) The bat on my machine has a round hole, so it is slipping. I looked at the repro bats, and they have a 1/4" square opening. What was the original bat color on these machines? I've only seen them offered in black from places such as Marco.
3) Hitting the ball does not appear to have much power, often times just grazing a target and draining. It could be that the machine is too level....I have it on a carpeted surface. Any suggestions on how the incline should be set?
4) The out lights are not illuminating but I know the outs are adding up correctly, as I get three outs per game. It may just be the bulbs. I'll look at that tonight.
THANKS EVERYONE FOR GETTING ME THIS FAR!!!
Kevin
Kev, you have the schematic yes? I am traveling so recalling this from memory.
You can make a jumper wire say 5' long withe two alligator clips?
Quest 1. There is a line of relays at the bottom of the cabinet board adjacent to the transformer that work in series to fire the grand slam relay and flash a light. The grand slam reel is powered by the grand slam relay the other two relays action the flashing light with a stepper. It is discussed a bit in the troubleshooting section #10 of this thread. Set up the grand slam and watch the relays to see if they all move in series. The one that doesn't is the culprit. If they all move then a switch is not closing properly. You should be able to use the jumper to power the relay using the schematic and zero in on the switch or switches that are not working.
Quest 2. Regarding the color of the bats there was tan, brown and recently black. I cut the little arm off the back and use them. There all you can buy so invest in three of them and you will be fine. Remember to buy more than one as they sell out for months (Marco) so don't think the supplier will always have them available. ![]()
Quest 3. Regarding the incline it should not be the issue. If the bottom of the cabinet is level it is fine. Two problems with the power of the hit. Main issue is the pitch and is it fast enough. Second is the bat strength. It has a variable podimeter inside the front door that can be adjusted. Tell us which it is and we can move on from there.
Quest 4. It's a switch on the out stepper. Or bulbs.
Steve J
Thanks for the tips Steve. I read the troubleshooting thread, and it seems straightforward.
Took a step backwards......
When it went to troubleshoot the Grand Slam issue, my machine won't start up. It's doing exactly the same thing as before, when things magically started working. Ugh! The score reels only reset when I hold the start button in, and then the light bulbs turn off. The main motor runs for the same duration as pressing of the start button, then stops upon one revolution.
And I thought I was so close!!!
Back to troubleshooting. I have not touched a thing, only lifted the playfield.
Quoted from SteveinTexas:Running Man Unit
This horizontal running man was first introduced in 1951 on the Super World Series #47. This arrangement has not changed much thru 1973.
Unrestored Running men Assemblies (Men and background removed)
The unit has a wooden playfield representation with a cardboard grandstand background. Below the playfield is an electro mechanical assembly with a running man motor that drives the runners onto the field that run the bases mimicking how the game is scored during the game. It’s real cool how it all works. When a base or a multiple of are scored the target switch closes a relay in the running man assembly and this actuates the motor to run. How many bases the men will run is actuated by individual base relays in tandem with a mechanical arm is released by a coil.
A man is then rotated 90° onto the playfield driven metal post and runs the base or bases. On completion of a run scored the man then is mechanically rotated back to the original position ready to run again.
There are four men on arms to indicate all the running men. It’s quite simple, robust and realistic.
Disassembly Over view
To disassemble the unit first remove the cardboard background and the player caricatures and carefully store before stripping the metal hardware for tumbling. I was able recently to get two full set of backgrounds from a pinhead off eBay here is the link. ebay.com link » New Williams Pitch Bat Pinball Play Field Background Panels 1956 67
Name is Roundnose 58. Similar quality, less cost, all three parts and the correct dimensions.
New and original Background setsBackground drilled and riveted to installation brackets using 1/8” X 7/32” rivets.
With the men and background removed we can invert the assembly to get at the mechanics of this interesting unit. See Picture below.
Running Man Electro MechanicsThe motor drives a double shaft. On one end the playfield pivots as the shaft rotates the running men on a ball bearing placed in the end of the shaft. The other end of the shaft rotates a triple cam and bases switches.
The cams and the running men bracket are secured to the shaft by roller pins. The running man assembly mechanical parts have a motor connected to a U shaped metal frame with cams to drive the runners and a 4 legged running man metal bracket. To remove the roller pins you must drive the spring roller pins out of the holes with a suitable punch, the parts can then be removed. The fastening is the opposite.
Motor ArrangementThis was a simple to execute procedure except for one. I broke my removing tool when one just refused to budge. I could not see why and after purchasing another punch I was still unable to drive the pin out. Although I could not see any evidence I surmise that the hole may have been peened over the pin ever so slightly and this was trapping the pin. Usually we drive from one end so it comes out the way it goes in. I used a round ended dremel tool and ground the face of the hole and pin on both sides to remove any accidental peening. Success! The last pin was successfully removed and I could separate the motor from the running man bracket.
Also not sure why or exactly when Williams started putting 27 Volt coils in lieu of 24 Volt coils. It was in the late 60’s for sure and it’s my opinion his was because of failing motors used in a transformer high tap voltage setting that was causing game issues for operators. My calipers measurements indicate the coil wire was increased from 20 to 22 AWG. No issue to use a 27 volt more in a 24 volt circuit. So a 27 Volt NOS motor I found with the identical spec to the 24 Volt motor will be used in the games. Same rotation speed just slightly different motor coil.
All the metal parts removed were put in the tumbler and the wood playfield were set aside for sanding and repainting.
The installation is the reverse of the dismantling. One point to be aware of the playfield center is quite vulnerable to breaking when dismantled due to the 300° running man track. When the parts are all reconnected there is a screw that needs to be tightened so the playfield center is level with the rest of the playfield.This screw touches the top of the motor shaft rounded rotating end and effectively supports and locks the playfield to the metal frame. If you over tighten the screw the center wood raises too high if you under tighten it is too low. Need to get it just right. Simple and very effective.
Large Tumbler makes short work of two running men metal parts48 hours in the tumbler with walnut shells and some ‘Scratch Out’ will have them shining up like nearly new. Don’t know why I am showing a picture of a tumbler.
if you can get a track of (roundnose 58) let me know i would like some
All,
I have had the pitching spring for this game remade. its as good or better than the original. See my thread linked for availability. https://pinside.com/pinball/forum/topic/williams-pitch-unit-springs-now-available#post-4262127
Steve J.
Hi Steve, I'm new to this site and i'm in the process of restoring a 1963 Williams "Big Inning". I'm looking for the coin door decal that you made. Is it possible to buy one from you or would you know where I could find one like yours?. Your restoration on these two games were amazing, great job!
Thanks-
Kevin
Kevin,
Send me your address I will post one to you. The door is straight forward to clean up. Your door was chromed originally but others from that time period were painted with a silver Hammer finish. That is what I used.
Steve
Quoted from SteveinTexas:Sounds like the jones plugs.
TIme to get back to the machine. Glad to see your still active on here Steve. Just getting back on this thread has made me wonder why I have been gone so long!
Regarding your tip with my intermittent with my machine not starting up fully, would you recommend I clean all the contacts on the jones plugs, or inspect/reflow the solder joints?
Quoted from kevstang67:TIme to get back to the machine. Glad to see your still active on here Steve. Just getting back on this thread has made me wonder why I have been gone so long!
Regarding your tip with my intermittent with my machine not starting up fully, would you recommend I clean all the contacts on the jones plugs, or inspect/reflow the solder joints?
Kevin,
Better refresh me what is happening, and we can take it from there.
Steve, do you have a wiring diagram for the Major League machine? I have been working through various gremlins that appeared when the machine was moved last year (pitching machine rebuild, batter solenoid replaced, runners not clearing bases, etc., etc., etc.) and now have a problem with the machine simply not starting. No fuses are blown, no breakers are popped; when I press the start button nothing happens.
Quoted from alp_ga:Steve, do you have a wiring diagram for the Major League machine? I have been working through various gremlins that appeared when the machine was moved last year (pitching machine rebuild, batter solenoid replaced, runners not clearing bases, etc., etc., etc.) and now have a problem with the machine simply not starting. No fuses are blown, no breakers are popped; when I press the start button nothing happens.
Alan,
Look at trouble shooting thread #85. On power up as I understand there is no lights etc when you start the game.  110V Schematic (resized).jpg From my memory and write up "On review of the schematic to power up the game you need to add a coin or have credits and press the replay button. This will initiate the reset sequence by energizing the coin relay. The coin relay energizes the control motor to rotate and the reset sequence begins. The coin relay powers stays on long enough to energize the lock relay and the game will remain powered on until the game is switched off".
Assuming that you probably know this, and it still is not energizing then as per the 110 V part of the schematic shown in thread #85 it must be the coin relay circuit as it makes and powers up the game if the anti cheat switch is closed, check that and you may have your answer. A continuity meter may be your best friend here if the switch appears closed.
Hope that helps.
Steve J.
Hi, i have a few questions and can't find answers yet. What size staples did you use for cards etc? Is there anything besides replating or clearcoating cleaned metal brackets you suggest to slow down oxidation. I was thinking triflow or gun oil which I believe has Teflon in it ? Seeing all the time put in just go back to rust in few years is depressing.
Thanks
Dave
Regarding staples; I have two tool options First is a hand stapler from a box store for labels etc that uses T50 staples and a pneumatic stapler that uses 22g staples and is what I use for new ground braid when needed.
I read from Steve Fury to polish with Johnson’s wax and it would stop oxidation for a long time. I have used it and it seems to offset oxidation in my games too. Not aware of the gun oil but it’s worth a try.
Regards Steve J
Going to look at one of these tomorrow. What’s the value on something like this? Nice job restoring it..
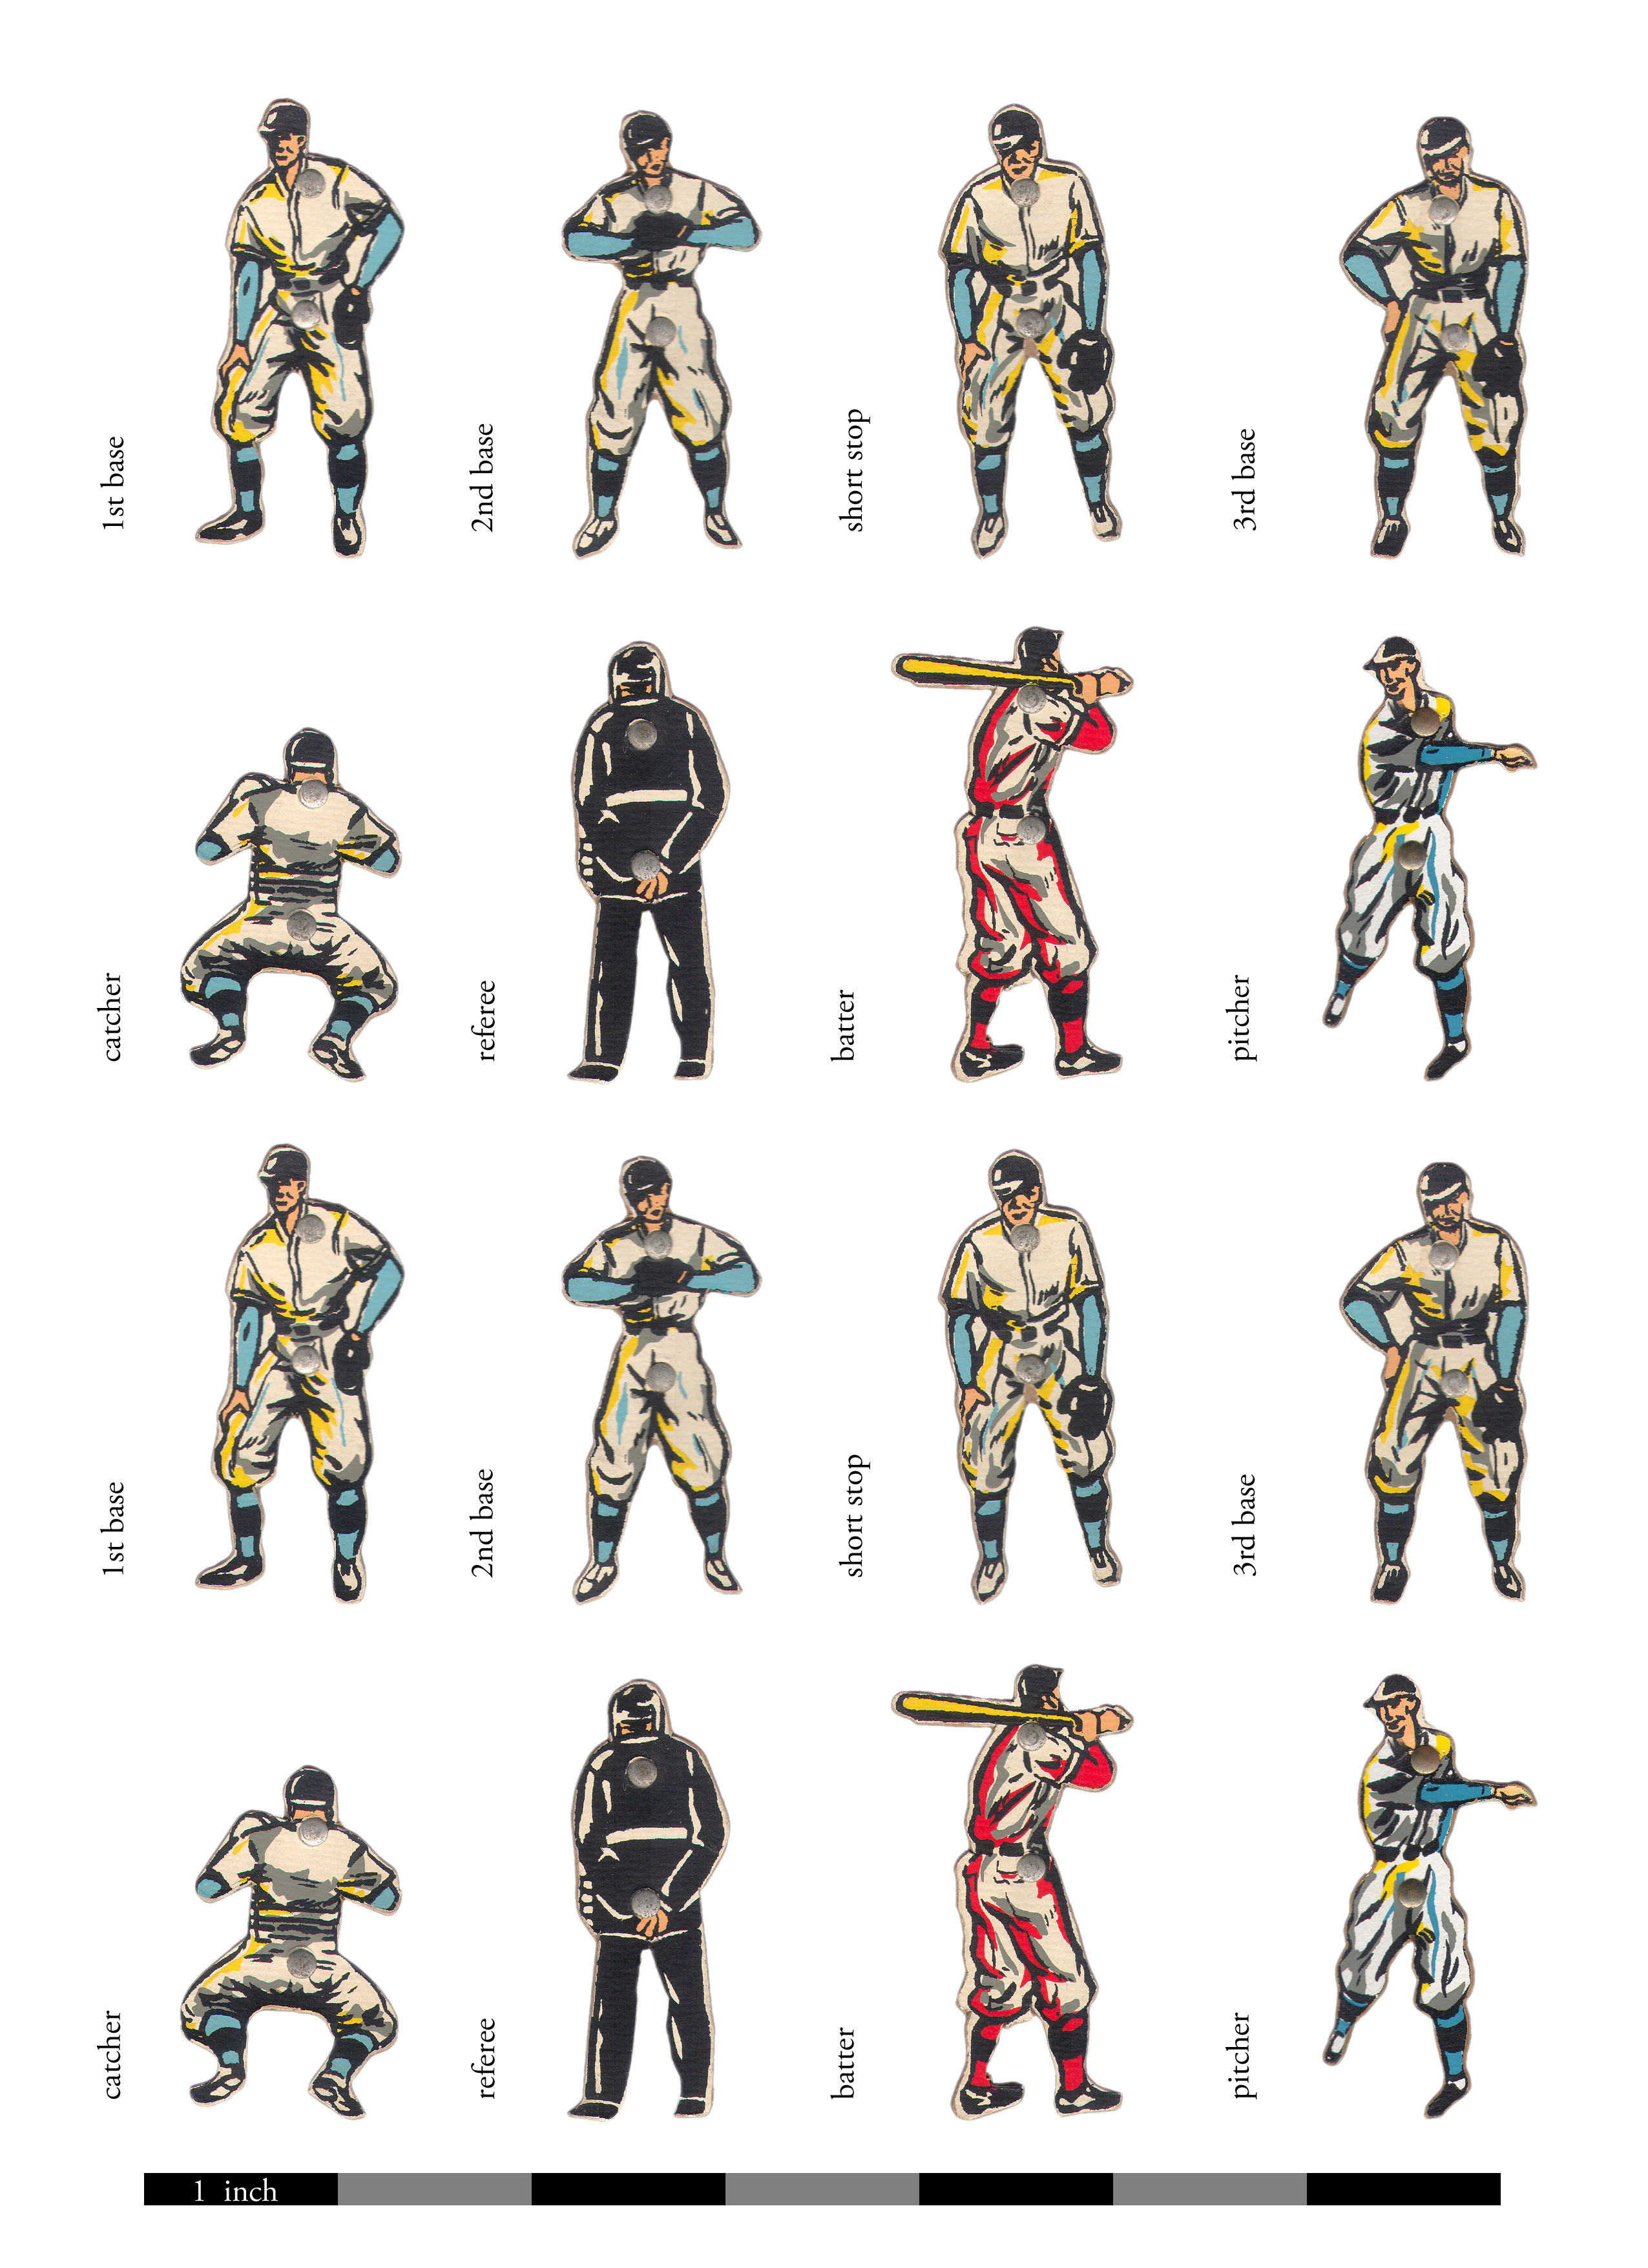
Quoted from SteveinTexas:The baseball men are reproducible by following my tutorial starting on thread 71. Mark Gibson made a jpeg and Clay Harrell linked here on Pinside.
Thanks to Mark Gibson, the players are now downloadable from
http://www.pinrepair.com/baseball/pbplayers.jpg just print on waterslide laser paper and you are all done.
Thanks for the plug. The players mentioned above as well as the background artwork are available on my web site at https://www.funwithpinball.com/resources
/Mark
Quoted from pacman11:Going to look at one of these tomorrow. What’s the value on something like this? Nice job restoring it..
I don’t know the answer to your question, but it’s a super fun game. I grew up playing one at a local arcade, so I might be biased. But it’s fast and exciting and gives off a great glow in a dark game room.
Quoted from pacman11:Going to look at one of these tomorrow. What’s the value on something like this? Nice job restoring it..
The value is the same as other Williams baseball games of this timeline. The unobtainable parts such as the home run plastic is available now from me. Next batch target is September and the back glass is now made by Bgresto. So no issues getting it in first class condition if you want to.
If the game is complete but not working they can go from a few hundred to $1000, depending where you live. If it’s working and has a nice back glass and a home run plastic $1500 is a steal. If in good cosmetic condition also then $2500 is fair.
Also, thanks to SteveinTexas for being the patron saint (at least to me) of this particular title. This restoration thread as well as his tips on turning unobtanium into obtainium really helped me bring my game back from oblivion. Much appreciated Steve!
Quoted from Ballypinball:anyone here know the playfield glass size for this game
The glass on mine is 39" x 23".
Wanna join the discussion? Please sign in to reply to this topic.

Great to see you're enjoying Pinside! Did you know Pinside is able to run without any 3rd-party banners or ads, thanks to the support from our visitors? Please consider a donation to Pinside and get anext to your username to show for it! Or better yet, subscribe to Pinside+!

This page was printed from https://pinside.com/pinball/forum/topic/williams-1963-major-league-restoration/page/5 and we tried optimising it for printing. Some page elements may have been deliberately hidden.
Scan the QR code on the left to jump to the URL this document was printed from.
 Saint Leonard, MD
 Montréal, QC
 Melbourne