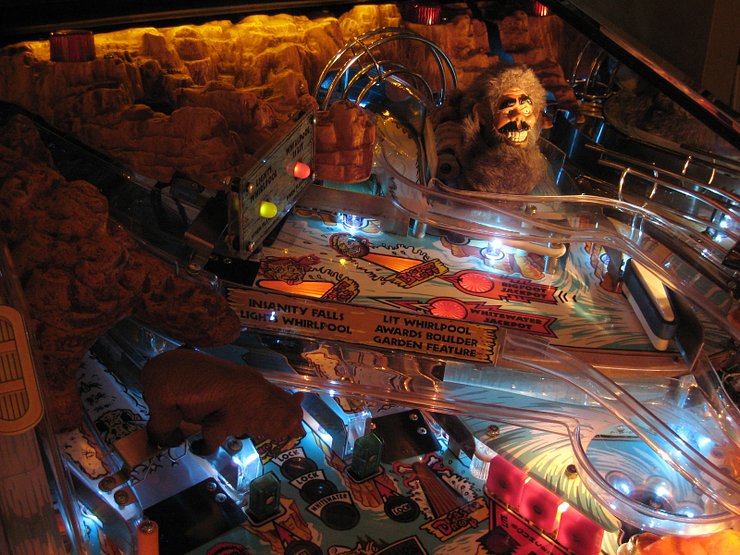
(Topic ID: 57710)

WHITEWATER CLUB= Lifejackets not required

By Skypilot

10 years ago


Topic Heartbeat

Topic Stats

  • 7,815 posts
  • 630 Pinsiders participating
  • Latest reply 11 days ago by MiniPinHead
  • Topic is favorited by 298 Pinsiders

You

Linked Games

Topic Gallery

View topic image gallery

pasted_image (resized).png
White Water 12-7043 Wire.pdf (PDF preview)
IMG_7687 (resized).jpeg
IMG_7686 (resized).jpeg
IMG_7692 (resized).jpeg
IMG_7693 (resized).jpeg
IMG_7694 (resized).jpeg
IMG_7678 (resized).jpeg
IMG_0736 (resized).jpeg
IMG_0732 (resized).jpeg
IMG_0737 (resized).jpeg
IMG_6165 (resized).png
IMG_1689 (resized).jpeg
IMG_0518 (resized).jpeg
Pic (resized).jpg
IMG_2208 (resized).jpeg

You're currently viewing posts by Pinsider jam_burglar.
Click here to go back to viewing the entire thread.

262 posts in this topic match your search for posts by jam_burglar. You are on page 1 of 2.
#13 10 years ago

I've been meaning to start this thread for a while now. You beat me to it. I'll have to put some pics up of my baby. It's still got the original art in really nice shape. Playfield is close to perfect. No bubbles in the topper. PDI glass, chromed coindoor, siderails, etc. mirror blades. I'm still working on the lighting but currently I've got colored non-ghosting LEDs in the inserts and I'm using a mix of normal and colored incadescents for the GI.

The color DMD is next on my list for MODs.

So far I've got:
-Bigfoot spolight MOD from Pinball Life (my favorite)
-Missing Mountain from Red West (close second)
-Rear mountain LED illumination (from eBay)
-Yellow rafts (from eBay)
-Bear MOD (from Michaels, with my own homemade bracket)

Does anybody have the waterfall MOD from Pinball Decals? That looks cool but is really pricey and the youtube video doesn't really help much

#17 10 years ago
Quoted from blimpey:

Your post finally made me get off the fence and buy the yellow rafts from the Ebay seller.
I had never seen the ramp mod. in the video before. That looks pretty cool. If it is anything like other items on the Pinball Decals site the guy who actually makes the mod. would be selling them for less than half of what Pinball Decals marks them up to.

Yeah, I think the rafts were around $35 with free shipping from the UK and I ordered along with the rear mountain LED lights. The Bear is about $5.00 from Michaels.

The rafts are really cool and they match the rafts on the playfield inserts.

#29 10 years ago
Quoted from BR80:

Holding on to mine for awhile, it's not in as nice condition as others here....but great fun to play.
Question: What is she saying when the ball drops out of the upper to lower ramp and hits the inlane switch? Sounds like she saying "Fourteen Million!", but that's not it. It's really starting to drive me crazy...lol.

"Multimillions." The switch in the right inlane opens up multi-millions and if you hit the spine chiller ramp you get the award.

#37 10 years ago

So, Nordman made Blackwater, then White Water. What's next? I hope its not Yellow Water or Brown Water. Blue Water would be nice.

#48 10 years ago

What

Quoted from Iamdarras:I made this for my WH2O!!

What about the sign for Insantiy Falls/Whirlpool?

#81 10 years ago

Hell yeah! I was watching the signs on eBay thinking, those are cool but wouldn't match without all the signs being done. Those are dope!

#95 10 years ago

Here's my White Water. I'm still working on getting things just right.

01_White_Water.jpg01_White_Water.jpg

#96 10 years ago

More
02_White_Water.jpg02_White_Water.jpg03_White_Water.jpg03_White_Water.jpg

#97 10 years ago

And more

04_White_Water.jpg04_White_Water.jpg05_White_Water.jpg05_White_Water.jpg

#99 10 years ago
Quoted from pinster68:

So blingy!
Looks real sharp. I like the illumination on Bigfoot. Is that triggered when he turns his head or always on?

Only when he turns his head. You can get these at Pinball Life. They're awesome!

#107 10 years ago
Quoted from smassa:

Picked up a HEP WH2O from a pinsider earlier this year. Has quickly become one if my all time favorites.
Gotta love iphone photos

Where are the pics? I'd love to see it.

#116 10 years ago

My friend linked me to this the other day. I only knew some of this before.

White Water, Williams 1993

Cow 1: During Attract mode, with no credits, press the following sequence:
3L, 1S, 15R, 1S, 23L, 1S. This also gives a DOHO on the saw blade.

Cow 2: During Bigfoot Hotfoot, the fifth item in Bigfoot´s Cave is a cow.

Cow 3: When the cow in Bigfoot´s Cave has been collected, getting the Mystery Canyon as a Whirlpool Award will show a picture of the Spirit pulling a string on the legless cow. A loud "moo" is heard.
This picture can also be seen very briefly in the Vacation Bonus award.

Cow 4: When you shoot "Disaster Drop" there's a display effect where you see a splash of water coming at you. At the end of the effect, when the water splashes, there it is: in the lower left corner of the display.
You have to look very carefully because you can only see it in a fraction of a second.

On the backglass, the man with the surprised look on his face is artist John Youssi.

The yeti is based on designer Dennis Nordman, he even has the photos where he modeled for it.

http://hem.bredband.net/b257182/Cows&Easter.htm#W

#117 10 years ago

Also, if you have the L-5 commercial rom and you like to use the "auto-replay %" feature to configure your replays (this feature uses the scores from your last 50 games to determine the score you need for a replay), then here is how you get this feature to work in "free play" mode.

1) Put the game in COIN-OP mode.

2) Set your replay percent to whatever your preference (I like 5%).

3) Play 50 games in coin-op mode until the auto-replay % kicks in. This is a little bit of a pain but not too bad. You can either feed it quarters or open up the door and add credits (it's also fun to use the replay boost feature in coin-op mode).

4) Once the auto-replay % feature has kicked in in coin-op mode (you'll see the replay go from 90,000,000 to some other number, depending on your scores), THEN switch the game over to "Free Play"mode.

5) From there on out the auto-replay % feature will work, so your replay amount will change every 50 games, even though you're in freeplay.

**If you don't do this and try to put the game in "auto-replay %" mode then the replay will always remain at 90,000, or whatever static value you set it at, no matter how many games you play.

#124 10 years ago

Here's another tidbit of info:

My Bigfoot fur had seperated at the hands. I did some internet research and it was pretty inconclusive as to what type of glue would work. Brian Kelly recommended contact cement, which is probably the best permanent solution but the permanentness of it, along with the fact that I'm not very versed in using contact cement, lead me to look for something else.

So, I was in Target and found this Loctite "Vinyl, Fabric and Plastic Flexible Adhesive". I put it on Tuesday, let it cure for 24 hours and so far its been holding up great. Dries clear too. I'll let people know how it holds up in the long run.

Loctite_(Vinyl_Fabric_Plastic_Flexible.pngLoctite_(Vinyl_Fabric_Plastic_Flexible.png

1 week later
#131 10 years ago
Quoted from chalkup8:

Just added the raft mod and the vuk protector,but the edge of the protector is about 3 mm short of the ramp and creates ball hang ups on some plunges.Anyone else had this trouble?

You have to slide the protector forward. It's slotted so that you can do this. It can be pretty challenging to get it just right so that there are no hangups. You may have to use washers or other metheds to get it to work just right. You might try to adjust it without a teardown of the section but you're probably going to have to remove the ramps, etc. in that area to dial it in.

Making sure your game is properly LEVELED can really help too. My White Waters were both very sensitive to leveling issues. Not having it levled right causes all sorts of weird stuff (ball taking too long in the whirlpool, more hangups at the VUK, balls getting caught up in insanity falls ramp, etc.)

#148 10 years ago

Yeah doro-mini that looks good. For the steal you got that game for you can get the nice $200 boulders and not feel bad at all. The original boulders are often shot.

By the way, WH2O crew, I got my initials up on two of the White Waters at PAPA. One was the hard one with the wonky kickout and the rubbers removed from the outlane posts. I was soooo close to Rivermaster.

#152 10 years ago
Quoted from doro-mini:

Is WHITEWATER a difficult pin of repair?
In my whirl pool, ball spins too much and does not fall immediately.
I was able to count up to ten seconds.

Could be a leveling issue. What you should do (in my novice opinion) is remove the upper playfiled and all of the ramps. Get a 6" level and put it directly on the playfield, both at the front and the back. Get it leveled. With the upper playfield on there its hard to get the back end leveled as well because there's no place to put the level for a reading, that's why it's good to get the game leveled when the upper playfield is off.

While you're at it clean everything with Novus 1 (and Novus 2 in the rougher areas), replace all the rubber, and put Cliffy (and maybe mantis) protectors on it. Then wax it and reassemble. Put new pinballs in.

You pretty much need to do all the cleaning and whatnot anyway. In my experience the leveling can greatly affect the amount of time the ball stays in the Whirlpool. If you want to put in reproduction ramps (they cost around $600) or reproduction boulders, this is the time to do that too.

#169 10 years ago

FYI, if you put LEDs in the GI then the dimming effects for the game won't work. For example, when you hit "ride the whirlpool" the GI and backbox lights all dim down and the whirlpool lights and flasher light up. There are other dimming effects that get ruined by putting LEDs in the GI or backbox as well.

#177 10 years ago
Quoted from tracelifter:

Mine has a hidden magnet somewhere I can't find, when WW says "Head for the blinkin' lights" the magnet sends the ball SDTM.

Mine has a hidden magnet that drains the ball as soon as I get Bigfoot hotfoot to start.

#191 10 years ago

I've had 2 WH2O's and I've never broken that bulb. I've probably played close to a 1000 games. I wonder if there's something set up or alligned wacky on the ones that easily break those bulbs. How are you even hitting that spot?

#198 10 years ago
Quoted from doro-mini:

OK
I think that is going to buy along with the other parts.
Magnet? It is foolish....

Have you leveled it correctly? Both front and back? I'm not saying that's necessarily it, but the leveling can affect the length of time in the Whirlpool big time!

1 week later
#211 10 years ago
Quoted from doughslingers:

A few playfield pics.

What's the spotlight for?

#224 10 years ago
Quoted from fattrain:

I join this club tonight gentlemen

Congrats!

By the way, to update on my earlier post, the Loctite "Vinyl, Fabric and Plastic Flexible Adhesive" is still holding Bigfoot's fir on great.

Here's ANOTHER thing I figured out that might help some people.

One of the earliest playfield wear spots you'll see on a WH2O (the first being the VUK dent) is the switch slot on the right inlane where the ball drops down from the upper to lower playfield ramp. There is a piece of mylar there from the factory but it's too high! The ball drops right between the mylar and the switch slot and will tear that area up, especially becuase of the exposed wood corners from the switch slot.

Mine had the slightest bit of wear starting to show there (some cracks in the clear) so I installed a Cliffy universal switch slot protector. That helps protect some of the area but the top of the switch slot is still exposed! So, I took a tip from Adams Family Arcade here on pinside and got some of this clear static cling vinyl.

http://www.amazon.com/Grafix-9-Inch-12-Inch-Cling-6-Pack/dp/B002J6CO9I

This stuff is great because, unlike mylar or the self laminating sheets, it's non-adhesive. I ran the lower edge under the Cliffy and it's holding there great. I may even eventually remove the Cliffy and vinyl over the whole switch area.

#225 10 years ago

Delete

#237 10 years ago
Quoted from yzfguy:

really? I think I would prefer the 4 or 5 spins to waiting forever.

I think the first one is actually the 'after'.

#246 10 years ago
Quoted from tp:

just got my life jacket and paddle, woohoo! which rapids er i mean mods should i head to first? dmd falls, missing mountain eddy, grizzly bear hole, sasquash sluice, empty raft rapid, moonlight bigfoot? im gonna check our rafting center store tomorrow, they always got cool little rafting related items. game is big time fun, but oh that horrible sound... please ingenuous electronic savy people save us with your ingenuity and create what needs creating and pass it along to us mere mortals. otherwise loving this freaking game.

My favorite is still the bigfoot spotlight. But yeah, fix your ramps and boulders first if they need replacing. New ramps make a huge difference!

2 weeks later
#268 10 years ago
Quoted from jathomp22:

I just joined the club this week. I have one question. Is the plunge supposed to go around and down the ramp and straight down the middle? or should it hit the left sling or into the left flipper if the plunge goes all the way through the upper playfield. I'm pretty sure it's leveled and at the right pitch. I've learned to plunge to the upper flipper but I've noticed anyone new plunges around and straight down the middle and the get frustrated.

I've owned 2 now and a hard plunge goes to left flipper on both. Every one I've played in the wild has gone to the left flipper too. Something seems off about it draining like that. Missing the skill shot should not equal death.

#269 10 years ago

Although you should get another ball if it drains like that. Hehehe.

1 week later
#273 10 years ago
Quoted from doro-mini:

Are these correct?

Yes. See the little hole in the Bigfoot's Cave boulder? That usually gets a ziptie to hold it down.

1 month later
#299 10 years ago
Quoted from VolunteerPin:

Any tasteful LED insert color and GI suggestions?

No LEDs in the GI or backbox. It kills the fading effects on the game, and there's a lot of fading effects going on with this particular game.

#304 10 years ago
Quoted from ChrisBardon:

Hey, random question-has anyone else had a problem with the bulb right in front of bigfoot getting broken all the time? I had it get smashed by the ball three or four times before I finally replaced it with a lower profile LED that I had around to keep it from breaking. Seems like the single rubber there isn't enough to protect it? Anyway, other possibility is to double up the rubber on those posts to protect it, but just wondering of anyone else had a better solution. LED flicker on this game is really bad.

I've heard other people mention this and I suspect that this is a flipper problem that causes that bulb to get hit (especially if you're breaking it from a direct shot off of the flipper.) I've had two White Waters, I've put tons of games on them, and I've never broken that light. The ball's trajectory just doesn't get you to that spot. The most I could see is it breaking on a ricochet, but I've never personally had that occur. You might check to make sure you're flipper is alligned correctly. You might also check to make sure you've got the right coil in your flipper. It should have a red label (and I don't think that's listed in the manual.) I can get the specifics if you need it.

Putting a low profile LED there is an easy fix.

#307 10 years ago
Quoted from ChrisBardon:

I know I have the right coil in there, since I replaced them all when I first got the game (had all the wrong ones in there). I'll check the alignment though-there's a possibility that's off.

I think the manual infers that you put a blue (FL-11629) flipper coil in the upper playfield. That's the wrong coil. The correct coil is red. There are some other differences as to how that flipper is set up too.

2 weeks later
#336 10 years ago
Quoted from hlaj78:

Why is it that if everyone has diamond plate, there are so many games out there with wear on the playfield?

Most of the wear spots are either from kickouts/ball drops or because of planking. For some reason they were really prone to planking. You also see a decent amount of wear on these from uneven insterts. In certain areas the diamond plate is not enough protection.

2 weeks later
#364 10 years ago

Finally got my auto-replay up over 300,000. It's now officially at 304,000 (3 ball play, no ball save, no extra-ball on replay). Yippie!

1 month later
#394 10 years ago
Quoted from iceman44:

Just bought this to give it a try. I love "self laminating sheets" and gonna try this now.

Just to update, I've had the clingy (non-adhesive) clear vinyl under the right inlane drop for months now and it's working like a charm. I still have the cliffy over the switch hole, but the clear vinyl covers the spot just above that and below the Mylar (which is exactly where the ball drops).

I've seen that area get pretty bad because the ball is constantly dropping right at the top of the switch hole. Due ball repeatedly dropping at/near that switch hole that whole area is more susceptible to damage. The clear can crack, then the paint will chip and eventually the wood around the top of the switch hole will splinter. Dirt from the ball gets ground into all the cracks. Putting the clingy vinyl there cushions the ball drop a little, and prevents dirt from getting ground in there. Luckily, I got mine on before any real damage started but I've seen lots of others that get a little trashed in that area.

3 weeks later
#403 10 years ago

Anybody ever seen this plastic piece on the underside of the their whirlpool popper where the ramp and eject mechanism connect? I'm thinking it's a non-original part but figured I'd check to see if anybody has seen one on theirs.

Unknown Plastic Piece.jpgUnknown Plastic Piece.jpg

#407 10 years ago
Quoted from horseflesh:

Joining the club thread.
Any tips for making the upper right flipper more snappy? I have checked and re-checked the flipper mech, and it seems to be aligned properly yet the Insanity Falls shot is a little harder than it should be--so I am told by those who have played other samples, anyway.

This could be a leveling issue. If the leveling of this game is off a little it can have a pretty drastic effect on the ramps.

#421 10 years ago

It would take a bit to do all that counting, and also try to tell you where they are locatated. Your best bet would be if somebody's got an LED map from a kit they'd be willing to share.

Keep in mind LEDs in the GI are going to kill all of your dimming, and White Water uses quite a bit of dimming (unless you can get a hold of Herg's GI OCD mod).

#427 10 years ago
Quoted from webdiddy:

The Whirlpool bulbs, are they #44's or #555's? It looks like the sit on a board and that would make them #555's, are they?

Yeah, whirlpool bulbs are 555s.

2 months later
#456 9 years ago
Quoted from RumRunner9:

I recently picked up some Mantis lock protectors. It does seem a tight fit. Any install tips before I start drilling new holes under the play field?

I installed them on my first White Water and it was mildly tricky. I would remove the target lights, prefit everything, measure 3 times and drill once. I haven't put them on my new WH2O becuase the playfield is so nice that I can't bring myself to drill into the playfield (even the underside). I keep looking for signs of damage but I haven't seen anything.

1 month later
#464 9 years ago

A few months back a did some tweaking to my Bigfoot so that his chin wouldn't rub his hands and wear off the paint. I also got his chin repainted and have info on the paint type and colors. Anybody interested in the details of stuff like this?

2 months later
#477 9 years ago
Quoted from Mattman55:

Does anyone recommend changing the Lost Mine kickout coil from a AE-23-800 to a weaker coil AE-23-1200?

Here's my thoughts on it. I say "yes" BUT don't castrate your game in the process. The original coil kicks the ball out something fierce and you have to gain control, which is tricky.

A lot of people reduce the coil strength but do so in a way that the ball kicks to the (unactivated) right flipper, then bounces over perfectly so you can cradle it in the left flipper. This makes the game SO MUCH EASIER. Lyman Sheets exploited that in a previous PAPA and got some crazy high score. You can get multiple, multiple whirlpool completions on a regular basis like this.

What I did with mine is put in a weaker coil to prevent damage, but it's still a bitch to get controll again after the kick. If you try to let it bounce off the right flipper it will drain down the center, so you must try to control with the right flipper, which leads to all types of variations on where the ball ends up. It's not exactly the same as factory, because the kick is weaker, but the amount of skill needed to regain control is comparable to the original design.

I have a 26-1200 in mine, which is what a lot of people use to get the easy kickout, but you can adjust the coil so that it kicks out a little weaker so that the ball won't bounce all the way over to the left flipper.

#485 9 years ago
Quoted from hardware:

At the time I knew I would miss the machine, but was getting my grail pin at that time. No regrets though as I'm much happier with a nicer machine.
I'm not a fan of very expensive mods, but did anyone see that cave/skull mod at pinball decals? That thing looks great. I'd love to see it with the missing mountain installed.
» YouTube video
Post edited by hardware: link added

I saw that a few weeks back. Pretty cool. I don't think it will fit with the original missing moutain. I'd also like to see a wider shot to see how it looks on the playfield with everything else. Anybody got one?

#492 9 years ago
Quoted from Atomicboy:

I have the skull mountain mod, and love it, just got it (and the rafts). I need the missing mountain though, either version, but neither seller is getting back to me.
Anyone got one? Otherwise, I'm likely buying new boulders, I'll just cut one out of the old large one at the back, I mean it's all brown plastic, should be able to come up with something that will fit.

London-20140903-00028.jpg 203 KB

Do you mind posting a pic of the whole playfield?

#504 9 years ago
Quoted from Pinballer22:

I would like to do it myself...going to be doing a full restoration on a beater I have and want to get everything done/ready at the same time.

It requires a daugher pcb that you'd need to develop.

#507 9 years ago
Quoted from Atomicboy:

It's all about entertainment IMO. Whatever music, PF, light show, it’s how it’s used. The song is great for what it is. Most that dislike I’m guessing haven’t spent enough time, or haven’t gone far enough through the rafts to allow the potential of the main theme song to do what it does. It’s goin’ 90 by Wet Willie’s!
All in all I was very surprised by this, as it’s a one and only cool thing in pinball.

Bowen Kerns mentions the progressive music in hiw White Water tutorial.

3 weeks later
#517 9 years ago
Quoted from Thor-NL:

Cleaning the sender and receiver opto by using some alcohol on a q-tip works wonders
See if they are still aligned properly. Look at the solder-points, not cracked or dull looking, if so reflow.

Yes, what he said. I would also check the subway fitting from the whirlpool to the lost mine (to make sure the ball isn't getting caught up somewhere).

4 weeks later
#533 9 years ago
Quoted from urbanledge:

What rom should I be running?
I need to dial in this game. So many sdtm with no ball save! There is a room with a ball save isn't there?

If you plung it just right it will go straight down the middle, but if you don't score any points the ball is kicked back out. The true commecial roms do not have ball save (L5 is the latest one). The home rom L6 adds a ball save feature and, more importantly, fixes the hold-bonus glitch (on previous versions the hold bonus that saves your river class after you hit disaster drop 6 times never works). I used L6 but turn off my ball save so that the game plays as close to factory intentions as possible.

#536 9 years ago
Quoted from urbanledge:

Hay.
Looking over this game I picked up and noticed this rubber. Supposed to be here?
It's in the pops. Blocking a route out towards the in/out lane. Excuse the filth!
IMAG0043.jpg 148 KB

It's not uncommon to see that there. I don't like that rubber there because it there's a switch down below that that will never trigger if you use it. Doesn't make sense that the game would be designed that way.

See here for different configurations
https://pinside.com/pinball/forum/topic/white-water-wh2o-boulder-garden-layout

#538 9 years ago
Quoted from urbanledge:

Good info there.
I've a feeling I'll be getting rid of it and the star post when I strip her down.
Another quick one.
My shooter Lane switch is fine but the game goes into ball search after 5seconds.with the ball in the lane. This normal? I'm on an early rom.

That doesn't sound right. I had an L2 rom at one point and didn't have that issue.

#553 9 years ago
Quoted from Endprodukt:

I will work on the Pinsound (for more information please go to Pinsound.org) reorchestration for White Water in a couple of weeks. I have to finish IJ first.
I'm very happy to work with Warren Davis, who is the original voice of Wet Willy.
Some comparisons, old/new:
https://www.dropbox.com/s/wevue4ztcr1yunj/Spirit.wav?dl=0
https://www.dropbox.com/s/hyypu29auwaf4kl/Welcome%20To%20Wet%20Willys.wav?dl=0
Hope you dig it. It will take some time to finish and I won't make promises on how long it takes. Maybe 2 month, maybe half a year.
I will try to match the original Songs/FX as close as possible but update it with high quality sounds and real instruments. Stay tuned.

Can't wait to hear it. Some of those sounds are going to be tricky. Are you going to need horns for the end of game music?

4 weeks later
#608 9 years ago

Yeah, all that color in the backbox is overkill mang. Less is more!

#612 9 years ago
Quoted from TheLaw:

I like incandecents in the yellow raft inserts for sure.

Mine are incandescent now but I've done some experimenting with LEDs that look a little more yellow (which I like) but are still close to the incandescent. The incandescents can come off looking a little orange for my tastes. What I don't like is the harsh on/off of the LEDs since parts of the light show have those lights "scrolling" up the river. I'm waiting until I get a chance to install my LED OCD board to swap them out.

#614 9 years ago
Quoted from TheLaw:

Yellow is always the toughest color to match.

If I remember right, the cointaker frosted in warm white was what looked the best to me (just a little more yellow than incandescent and not too bright.) I'm going to try pink before I make my final decision though.

#617 9 years ago
Quoted from Deaconblooze:

I'm interested to hear how the LED OCD works, please keep us updated!
I've been considering adding one for the GI, as well. The game has some nice fading effects that are unfortunately lost with the addition of LEDs.

I've got both boards but need to buy the LEDs so I haven't gotten around to installing yet. The LED OCD will work with incandescents so I may go ahead and do that one soon but the GI OCD pretty much needs all LEDs so I have to purchase those first.

One of the main reasons I bought the GI OCD was to LED the backbox, which pretty much looks too orange/yellow for my tastes with the incandescents in there. One thing I'll really hate to give up though is my blue incandescents in the back. They give a really nice light that matches the aqua of the game really well.

#620 9 years ago
Quoted from yzfguy:

LOL..I had a battle with that switch too.....such a pain to get to and I had to do it a few times before I got it right. We have since made up and moved on

It's attached to the ramp, no? It's pretty a quick job to just remove that whole ramp.

3 weeks later
#641 9 years ago
Quoted from MAJRob:

Also, I just got "the secret of the cow" somehow. I don't really know what I did but it was the old man with a cow...kind of cool.

To get "secret of the cow" you have to

(1) Complete the Bigfoot Hotfoot (i.e. you'll activate hotfoot then shoot Bigfoot's Bluff to get the map, then the key (unless you already have them), then the camera, then finally the cow) and

(2) After completeing Hotfoot, you need to get the "Spirit of the River" award from the Bouldergarden. Once you do that, you'll get the "Secret of the Cow" and then get your Spirit of the River Award.

I don't even know if you get any points for Secret of the Cow but it's cool.

Quoted from MAJRob:

I really need to fork out the dough on the Color DMD.

Yep, the animations are much better in color because you can really see what's going on.

#644 9 years ago
Quoted from pinster68:

Anyone know where I can get a new speaker panel? Anybody making repros for these?

No repros that I've ever seen. I have seen them on eBay once in a blue moon.

#652 9 years ago
Quoted from PBINTHESOUTH:

Would love to join the club.
Anyone here have a recently restored WH20/HUO/used pin that has been well shopped/given loving attention on here.
PM if so...

There are a couple restored ones for sale now if you do a search. Expect to pay crazy money (over $6,000) for anything that's been restored.

#663 9 years ago
Quoted from Blackbeard:

Going to look at one of these bad boys on Sunday and super pumped to possibly be purchasing.
I've read a bit about planking on these playfields, but are there any areas in particular on the pf I should really pay attention to?
Thanks!

I've seen it most on the right side of the playfield (below the hotfoot targets) and it often runs up into the area around the whirlpool (keep in mind there is no ball travel there). The other spot I've seen it is the entrance to the left loop. I imagine it could be anywhere though. The only place you can't really check would be back loop.

2 weeks later
#696 9 years ago
Quoted from Blackbeard:

Guys, I remember reading about the time it takes the ball to exit the whirlpool ramp and correcting it if it takes more than the usual time. I can't find the posting.
Is this a leveling issue?

It can be a leveling issue. It might also be that the bottom of the whirlpool isn't fitting into the playfield/lightboard hole just right.

#711 9 years ago
Quoted from Blackbeard:

I see. We may have different issues Industen.
The issue I saw in mine while at the seller's house was that the ball spun in the whirlpool a little bit too long as compared to most wh20 I've seen. In other words, the ball didn't get into the subway ramp fast enough.
I saw this mentioned on a posting somewhere.

Just make sure you're carefull if you have to remove the Whirlpool light board, the subway, and the opto down there. First, take pictures before you take the stuff apart. Second, make sure the spacers are all there for the screws when you reassemble and that you have the right screws. Third, make damn sure the spacers are all in place and that you have the right screws before you reassemble.

I've seen multiple Whitewaters with spots around the whirlpool playfield art where screws have come up through the playfield art from below because people either forgot to put a spacer back in or they put the wrong screw length in when reassembling that area. That's the one playfield area on mine and it pisses me off every time I see it (thankfully no ball travel in that area and it's mostly obscured/hidden by the whirlpool, still though, effing savages with their wood screws).

#723 9 years ago
Quoted from Blackbeard:

Fellas: noticing the switch under the mountains near Bigfoot (canyon main #57) isn't registering most of the time. This switch is the one that makes the furry beast spin his head and growl.
My question: as its under the back mountains, is it just a matter of unscrewing a few screws to lift off the mountains to get to that switch to either adjust or replace?
Thanks
Great game!

Yep, just remove the back mountains and it's right there. That area should have a clear plastic kidney shaped ramp cover with three screws and three black spacers. The last spacer should be replaced with a significantly shorter one. This will prevent the ball from hitting the microswitch and eventually breaking your ramp where the microswitch is screwed in.

Pinball Decals MAY make an alternative fix. I'm not 100% sure on this but I believe their "Bigfoot Bluffs Ramp Cover" is designed to cover the whole area so the ball never hits the switch and doesn't require the spacer trick I mentioned above. If you go this route doublecheck with them first. http://www.pinballdecals.com/PartsByGamePages/WhiteWater_Page.html

#724 9 years ago

By the way, that LED job on the translate looks pretty good. Do you mind posting a pic of the backbox with the translite removed so we can see what bulbs are in there? If I can ever get around to installing my GI OCD I'm going to LED my backbox as well.

#730 9 years ago
Quoted from Blackbeard:

This was in the Baggie with the pin:
I think it's the same as pinball decals.

image.jpg 101 KB

That looks like it to me. Let us know if it fits/works. Judremy's method is first method I was referring to and it's the cheaper, more practical approach, but it does require you to find a new spacer (cut down your old spacer) and it does bend that plastic piece. That's the method I've always used and it works perfectly but the "Ramp Cover" you have there seems more user friendly and perhaps less invasive.

#731 9 years ago
Quoted from judremy:

I posted this years ago when I got my WH2O. It was something I read about on some geocities or some other weird blog. The site is no longer there, but the guy was smart. I made many tweaks based off his recommendations and the one you mentioned is #1 as that bracket takes a beating if you don't adjust the third spacer.
I had made a video a couple years ago on what needs to be done:
» YouTube video

You're the person who I learned the mod from. Thanks!

#769 9 years ago
Quoted from Blackbeard:

Is it me, or is the skill shot damn hard sometimes?
I ordered a replacement spring just to make sure the correct one is in there, but I make the shot about 4/10 times.

Mine is kind of tricky. I don't know if my spring has been replaced or not but it's the stiffer variety, not the loosey goosey type. I wouldn't say it's that hard but it is very common for me to have to take a couple shots where I don't clear the hump, or I overshoot and have to let the ball drain to re-try.

#773 9 years ago
Quoted from mot:

The operation of the plunger is not just affected by the stiffness of the spring. The two prongs on the shooter gauge (metal piece that the ball rests against) can bend, and they have a big influence on where the shooter contacts the ball and how much energy is transferred.
When I first got my White Water, a full hard plunge would give me the skill shot 90% of the time. The ball would very rarely ever go all the way around and down the spine chiller. I didn't like that one bit. I thought the shooter spring might be wrong and the game might be too steep. I eventually disproved both of those theories and found that bending the metal prongs on the shooter gauge gave me a ton of control to get it just how I like it.
And in case it's not clear what I'm talking about, I'm talking about the U shaped part at the top of this guy:

shooter-gauge.jpg 33 KB

I wonder if I've got the wrong spring in mine. If I pull back the plunger all of the way the ball is going to FLY! The amount of play between being too short, just right, and too long is very small. I like the difficulty though.

#775 9 years ago
Quoted from Blackbeard:

Any of you guys apply any mylar on the pf where the ball drops from disaster drop? That area on mine is nice, and I'd like to protect it..
Thoughts?

I put a cliffy switch protector over the switch cutout there. The switch hole there seemed extra susceptible to damage. I've never seen any playfield damage there.

The main places I worry about (excepting the VUK which should be cliffy protected) are the drop from the ramp to the right in-lane (this is one of the main spots I see chewed up on other White Waters) and the landing area from the skill-shot. I put down a piece of clear cling vinyl right below the factor Mylar in the right in-lane and then put a cliffy over the switch cutout. The cliffy keeps the vinyl from moving and this has prevented wear here.

Next time I do a tear down I’m going to put some vinyl or Mylar in the area where the skill-shot drops. That area tends to get dirt and I don’t want to wait for the clear the wear through to do something about it.

I also have a piece of Mylar down to prevent Lost Mine kick-out wear, but after reducing the coil strength there I’m not sure it’s even needed.

#776 9 years ago
Quoted from fiberdude120:

If I pull mine back all the way it will go all the way around every time.

Hmm, if I even get to 1/2 way back mine is gone.

#778 9 years ago
Quoted from fiberdude120:

Same here. I was just saying.

Okay, I see. It wouldn't suprize me if what I have in there is the original spring. Hardly anything had been touched on mine other than the ramps. It was pretty damn clean when I got it.

#789 9 years ago
Quoted from Blackbeard:

Thinking that wh20 is a keeper for a bit, so in my shopping of it, I will possibly look to replace the spine chiller (lower to upper) ramp that has a tiny chip at the entrance. SO, in doing so, I may get the lock target cliffys.
Does anyone have experience with them? I've read a bit and some people say they're difficult to fit, etc.

They aren't cliffies, they are mantis protectors. They are a tight fit, but they fit. I haven't put them on mine yet because (a) no damage to that area so far, and (b) when installed them on my last WH2O they required new holes and I'm really OCD about stuff like that. I don't like to permenantly change anything, even if its just the underside of the cabinet. It's kind of stupid actually. Just my hangup.

But yeah, they work. They can slightly change the play on those two targets and the entry to No Way Out. I don't mean this in a bad way, just slightly different because the ball can glance the protector where otherwise it would be glancing the target itself.

#795 9 years ago
Quoted from Blackbeard:

Talk about the screwing into the playfield part.... They screw in from the bottom>?

Yeah, from the bottom. IF, I remember right, I had to do four new holes for the mantis protectors and then I also think I had to move the actual targets back too and drill new holes for that. Somebody correct me if I'm wrong on the need to slightly relocate the targets. It's been a few years.

#803 9 years ago
Quoted from Elicash:

Hi guys. I have an unusual problem. I just realized that my Bigfoot's head is on backwards. In other words, he is always looking at me - instead of facing away from me. When I hit a shot that activates him, his head spins back behind his back (instead of just turning to look directly at me).
I read somewhere that this is a pretty easy adjustment at a screw on the back of his head. The problem is - the fur. I am very cautious to pull that back as mine is glued down just right. Anyone have any experience with this? Anyone pulled the fur back from the head and able to put it back with no issues?

Fur doesn't cover the screw. If you poke around back there you'll see. There is a recessed screw.

#804 9 years ago
Quoted from judremy:

I have mine really far forward and it makes the skillshot much harder. Curious what others say. I would think you would want it all the way back.

Mine is aligned with the pin. I'm pretty sure its factory.

#816 9 years ago
Quoted from Blackbeard:

Anyone have an uncracked one of these around (Boulder)?

image.jpg 187 KB

Hard to come by unless you buy the whole moutain set. Pretty dumb if you ask me. They could sell lots and lots of this specific boulder if they'd sell it individually. Not that many people are willing to buy a whole boulder set just for that one boulder.

#828 9 years ago
Quoted from PjM:

I guess mine is no better on a lighter note, I am almost done with my complete renovation!

image.jpg 168 KB

image-468.jpg 147 KB

image-649.jpg 229 KB

image-931.jpg 241 KB

image-919.jpg 310 KB

FYI, one of those flipper coils is wrong. The left should be an orange one. FL-15411

#845 9 years ago
Quoted from Blackbeard:

How the hell does one light RIVER 5 times without losing a ball?!!! Crazy..

Some people just keep shooting the center and picking up letters from the right inlane but that's boring. I tend to do that only in small spurts. Multiball and Bigfoot hotfoot are good opportunities to pick up lots of letters. If you're past class 4, then bite the bullet and try to complete the river class by hitting the center shot and getting spot letters from the right inlane.

There is also a "hold bonus" if you hit Disaster Drop 6 times. This will carry your river class over. This feature does not work on any rom set but L6 (the home rom set).

#850 9 years ago
Quoted from Blackbeard:

Hoping spirit gives me class 6 at some point.

Another great way to pick up river letters (my favorite) is to hit the Spine Chiller repeatedly. If you light up the "spot river letter" in the right inlane each time you'll pick up river letters plus get the "multi-millions" award. You can pick up river letters really quick this way. Its still pretty difficult to get to class VI on one ball but it happens.

The other thing you might come across if you have the L6 rom is that the "extra ball" award from hitting the Disaster Drop can block out the "Hold Bonus" award, which happens at 6 drops. For example, sometimes it will say "Extra Ball at 5 drops" and then 50 games later it might change to "Extra Ball at 7" drops. Any time the extra ball award falls on 6 drops, the extra ball takes precedent so you won't get your hold bonus at 6 drops. I stumbled on this because I wasn't getting the "Hold Bonus" at 6 drops and then realized it was because the Extra Ball award was falling on that number of drops. Once extra ball changes to another number a drops (typcially every 50 plays) then the "Hold Bonus" award will come back.

#855 9 years ago
Quoted from Elicash:

I am having some strange scoring issues:
I am awarded hazard shots for hitting the 're-light kickback' shots, is this normal?

Yep, normal. You'll also get spotted rafts and hazards by hitting the Disaster Drop ramps at times.

Quoted from Elicash:

Also sometimes (not always) awarded 'boomerang bend' when I hit boulder garden or spine chiller.

This doesn't sound right. I don't think Boomerang Bend is supposed to properly register until you hit both switches on the loop which runs behind the mountains. The ball needs to travel all the way around the loop to give you that hazard. In other words, even if the boudler garden kicked the ball up past the first switch, the hazard shouldn't register unless the ball goes all the way around the loop to the other side. Spine Chiller definiately should not spot you Boomerang Bend. Disaster Drop, on the other hand, could spot you that raft as would hitting the lite kickback targets after your lite kickback is already lit.

Quoted from Elicash:

Finally, every time I go into lost mine, I already have been awarded the 'flashlight'. It only takes me two times entering the mine to get the multi ball (map and key award). Is this part of the most recent software? Or maybe a glitch in my game

This is normal. If you want to "earn" the flashlight too then put the game in tournament mode. Then you'll need to get into the lost mine 3 times to start Goldrush.

1 week later
#901 9 years ago
Quoted from PjM:

I am having issues with BF spotlight mod. I cannot connect the new PCB to the existing motor PCB! Not enough clearance. Also my motor board does not look like the one in their instructions. Before I call has anyone else experienced this?

Make sure you have it oriented right. If I remember right the instructions have the board upside down or reversed in some way. I can post pictures of mine installed if you still can't figure it out.

#918 9 years ago
Quoted from Elicash:

Motor board is in bottom left corner of the machine with the playfield all the way up in service position. This confused me too! Not anywhere near the actual bigfoot motor in the upper pf. Board is small and rectangular. About 3x4 inches.

Yes, this! Bottom left corner of the playfield.

The picture in the installation instructions has that little board flipped 180 from how it was on both of the WH2Os I've had. Sounds like others had the same issue.

#922 9 years ago
Quoted from pacman11:

I am so pissed I installed new green targets for the ball lock and mine are already cracking after two weeks. Anyone have a solution to this problem. argh!!!

Do you have the right flipper coils installed?

#931 9 years ago
Quoted from leatherface:

Did WH2O come factory with 2 x 11629 coils on the lower flippers coils as printed in the manual?
Is the 15411 used as to not smash targets, boulders etc on the right hand side and is there much of a difference between the two coil strengths?

It came with two different coils on the lower flippers (at least mine did). I know I've got the original coils on mine. Contrary to what you posted, the manual shows two different coils as well. I've seen quite a few WH2Os with two blue coils on the bottom flippers but they're usually beaters and I've assumed they were just incorrectly replaced.

I don't know the exact reason for it but it seems logical that they felt the left flipper didn't need the power of the right because the only obvious ramp shot is disaster drop. Every once in while I get the spine chiller from a cradled ball on the left flipper, if I hit it just right, but I'm assuming it was designed to make the spine chiller either really hard or impossible from a cradled ball on the left flipper.

#937 9 years ago
Quoted from judremy:

On mine, I have both lower flippers as the blue 11629 ones. I can make all the shots fine with both flippers, so I don't know if I need to change the left one to a stronger coil. The right one has trouble making the Spine Chiller ramp at times. Advice?

A higher number on the coil means LESS strength (according to this anyway http://www.pinballmedic.net/coil_chart.html )

So the blue FL1-11629 coil is stronger than the orange FL1-15411. The left flipper takes the weaker orange coil. So with two blue coils, your left flipper is STRONGER than the design intends.

If you hit the shot well you sould be able to make the spine chiller pretty easily from the RIGHT (blue coil) flipper. Obviously your milage varries depending on the circumstances. But from a cradled ball on the right flipper, you shouldn't have much trouble making it up the Spine Chiller ramp as long as you aim the shot correctly. If your shots are aimed well and you're still barely making up that ramp you might look into rebuilding that flipper.

Now, from a cradled ball on the left (orange) flipper (this is the weaker flipper) it is very very hard to make the Spine Chiller shot because that flipper is weaker by design. I normally need some play on the ball to make that shot from the left flipper.

#956 9 years ago
Quoted from fiberdude120:

For me its just a lucky shot.

I agree with this. If you were really good and consistent you could hit a slow shot up the left loop but that's crazy accuracy to do consistently.

I usually tend to hit it when I make a left loop shot that isn't all that clean. The ball gets caught up enough to slow down and can't make it all the way around the loop, then it falls down through the secret passage.

The other way it tends to happen is on multi-ball and a ball gets knocked in there either through No Way out or the left loop.

On less frequent occasions I make the shot from the right loop but that's pretty rare.

#963 9 years ago
Quoted from Pinballer22:

That's probably it...will be home soon and check that out first thing. Should have thought of that but thought it tested proper but might have missed it. Thanks

It's the optos at the top of the ramp (by Bigfoot) that trigger the completion of that ramp shot. check the metal bracket behind Bigfoot to make sure it's secure and not blocking the optos. After that I'd check alignment of the optos, then clean them, then check connections.

1 week later
#999 9 years ago

I use incandescent blues in the whirlpool (as opposed to LEDs or whites with blue rubber caps). Also, I use a blue flasher cap for the whirlpool flasher (I may have put a blue LED flasher in there too, I can't remember.)

I also use blue LEDs for the river letter and river class inserts. Looks better in my opinion.

I keep the mountain flashers red because blue there doesn't look right to me.

My GI is all incandescent at the moment but I do use blue incandescent bulbs in the rear of the game only. The soft "aqua" blue color seems to match better to my eyes. This also darkens the area around bigfoot a tad so when my spotlight mod comes on its more noticable. I may switch over to LEDs and use a GI OCD board. I won't switch to LEDs in the GI for this game without the GI OCD board because it sacrifices the dimming (and WH2O uses lots of it).

You can see pics of my game at the bottom of page 2 of this thread if intersted. I've made some changes since taking those pics but the blue incandescents are in there.

1 week later
#1014 9 years ago
Quoted from mot:

Can't help with that in particular, but I do have a good tip for you I picked up from High End Pins via their photos. Two bulb covers over the star posts on the shooter lane will protect it from further scratching that piece when the playfield is raised.
See the photo here: http://christopherhutchins.com/gallery/album362/22_G

He has another one where he used shooter tips (those might be even better than bulb covers due to added cushion).

3 weeks later
#1047 9 years ago
Quoted from TheLaw:

In the op world...that dude is like the Michelangelo of hacks. Probably involved hammers, chisels, plumb bobs...impressive.

I'm just going to go ahead and say this . . . "Plumb Bob Square Pants" would be a great user name.

#1068 9 years ago
Quoted from Crash:

For you is the ball just draining out of the bumper area through the right channel that is now open? The switch was causing the credit dot yes, it showed up in the test report. The problem was the incorrectly installed rubber ring was pushing the ball too far away from the switch to trigger it. I also adjusted both of those arena switches while I was at it.

The credit dot may be due to your ROM version as well. I didn't go back a look but I think L6 no longer triggers the error for that switch.

What I did was to remove the ring but leave the post. I've never had a problem with the pop bumpers or excessive drains out of the boulder garden. I have the right outline set to the largest opening.

2 weeks later
#1095 8 years ago
Quoted from yzfguy:

Never seen that mssing mountain...this is mine.

Yours is the original Red West missing mountain. After those became unobtainable a Pinsider started doing his own version, which is what you see above.

#1101 8 years ago
Quoted from Crash:

I've always wondered about the missing mountain, and where the "Red West" name came from. Was it something originally part of the design but removed from final production, or a mod someone came up with?

No, it was just a mod. Here you go
https://sites.google.com/site/redwestwh20/

As I understand it, he had some health problems and has not produced them for many years. Lots of people have tried to contact him and purchase but I haven't heard of anybody successfully doing so.

#1109 8 years ago
Quoted from ck1sport:

I just purchased Wh20 for the second time. I missed this game so much, I had to get another one. Tonight I rebuilt the flippers with new coils ( fl-11629), sleeves, end of strokes and bushings. Now when I play the game it almost seems like the flippers are too strong now and the ball flys erratically around the Playfield. The coils are the proper ones for this game but the speed of the ball off the flippers seems a bit too fast.
Is this normal, or should I install a resistor to weaken the coils?
Any insight would be greatly appreciated.
Thanks

Check your manual again, the left flipper uses a weaker coil: FL-15411

1 week later
#1112 8 years ago
Quoted from PjM:

So I upgraded to the L-h6 chip, all is good. Now in the middle of a game if there is a switch out it stops and does a test. Cancels the game - that might be the best game you are having. Is this normal or is this L-h6 flawed?

Hmmm, doesn't seem normal compared to my experience with L-H6

1 week later
#1129 8 years ago
Quoted from Gorgonzola:

Can someone please tell me where the ball is meant to end up after you shoot disaster drop or boomerang bend?
On my machine, 90% of the time the ball will come off the left ball guide and aim straight for the drain. I've gotten used to nudging the machine fairly hard to bump the ball off the ball guide so that it hits the tip of the left flipper, but I'd like to fix it properly.
I've seen videos online of different machines. Some feed the left flipper, some feed the right flipper, and I've even seen one where the ball guide throws the ball across to the right slingshot.
If anyone can post a close up of the left ball guide, that'd be great too so I can see how mine differs either in shape or mounting position.

On my machine, depeding on spin and trajectory of the ball, a shot to Disaster Drop can end in a drain, especially from a cradled shot from the left flipper. Shots to Disaster Drop at speed from the left flipper will drain much less often. Shots from the right flipper to Disaster Drop almost never drain. The other Disaster Drop drain is a shot that doesn't make it up all the way up the ramp and will usually drain when it rolls back down the ramp. I always wondered if that was why they called it "Disaster Drop".

As for Boomerang Bend, that shot is so damn dangerous that I don't go for it as much but I don't recall having any drain issues off the loop.

Based on the above, with my machine anyway, the drain has more to do with tragectory and spin than the way the ramps are inherently set up. I do not take Disaster Drip shots from a cradled ball on the left flipper because the chances of a drain are pretty good. Otherwise it's a fairly safe shot (as long as you can collect the ball afterwards).

1 month later
#1154 8 years ago
Quoted from Allibaster:

I've got a question on the rules.
Most the time, the river class resets after each ball. Sometimes it doesn't. Anyone know why?

It resets unless you get the "hold bonus" award by completing Disaster Drop 6 times during a game, in which case it will hold over the river class for the next ball only. This feature ONLY works on the LH-6 romset (all previous romsets are faulty). Also, the extra ball award "floats" around to different numbers of Disaster Drop completions so if the extra ball award happens to fall on Drop number 6 then it will cancel out the "Hold Bonus". After 50 games or so the Extra Ball will move again and that should free up the "Hold Bonus".

#1156 8 years ago
Quoted from billsfanmd:

Thanks gac. I don't want to over mod wh20. But that mountain with the led eyes and the rafts look great. Color Dmd if budget allows

My votes go to the Bigfoot Spotlight and the Color DMD.

1 week later
#1191 8 years ago
Quoted from TheLaw:

Look for both sides of the equation. One switch tells the game the ball is in the Whirpool ramp, so it makes noises and shows the whirpool animation, then the opto at the bottom of the whirpool that shows it's made it down, and awards something. It can be a bit confusing becasue if the whirpool entry switch isn;t working, the game will still award a boulder...it just has to get all the way down and then realize it's there. Just run a switch test and make sure they're working.
Before you start spending all your monies on animal dolls to glue to the game, get the Color DMD

I'll add that the bracket that holds the optos under the whirlpool can be a bit of "tricky" area. I've seen the screw come loose and the optos therefore fall out of place. It's also pretty common for people to lose the spacer on the long screw holding everything together and THEN SCREW UP THROUGH THE TOP OF THE PLAYFIELD when working in that area. Be careful about that. My suggestion is to take pictures and if your spacer is missing replace it so that you don't accidentally put a screw through the top of your playfield when working with those optos or replacing the Whirlpool lights.

#1202 8 years ago
Quoted from Elicash:

Hey guys - anyone have advice on how to adjust the Mine Kickout?
Recently played one on location and the kick out was much softer and easier to control. Mine rockets the thing out and I really can never control it.
Thanks for any help.

It's designed that way, however, the unfortunately side effect is that it causes wear on the playfield. You can put a weaker coil in the mine (do a search here for the type of coil, the info is out there) but I highly suggest against "castrating" the game by making the kickout a "gimmie". What I did on mine was to put in a weaker coil but adjusting the kickout so that you still have to skillfully control the ball off of the kick.

Aside from changing out the coil you can play with the "tightness" of the bracket and that will affect the strength to the kickout to some degree.

#1207 8 years ago
Quoted from Elicash:

I would look at a fabric store. Or an on line fabric store to try for a match. Faux fur is pretty common as a textile.
Also, there are super glues specific to vinyl and fabrics that may work a little better than rubber cement.

Yeah, I found some stuff that's specific to attach vinyl to fabric and it's held up really well. I used it to glue Bigfoot's arm fur to his hands. I still need to do a write-up on that and the chin-wear factor. I got about 1/2 way through the writeup and lost steam.

#1214 8 years ago
Quoted from Sean_R:

Hey all! Happy to have recently joined the club :0)
I'm in the process of re-building my WH20 and ordered some parts from Little Shop of Games (Curly's great, BTW!). The new Spine Chiller ramp that feeds the ball to the upper playfield doesn't have "tabs" to hold the optos like the existing one did (see attached below).
Any idea as to why this is? And should I be using these optos, or are they pointless?
I've gotten some feedback that my pin could be a prototype, but I'm not sure if there's any other way to tell. Either way, if the optos belong in the pin, I'd like to figure out a way to implement them without jeopardizing the new ramp in any way.
Thanks in advance for any insights you can provide!

spine_chiller.jpg

I've heard of this on early versions I believe. Check the area to the right of the upper flipper. If it's yellow there you at least have an early production model and that could be the explanation. I belive the optos were moved from the ramp to the playfield. You do need them to register that ramp shot.

#1222 8 years ago
Quoted from billsfanmd:

gonna replace my ramps. Anyone have a picture guide of getting ramps back together. Never torn down a Wh20 and looks a little confusing getting ramps back right

It's in the manual.

#1223 8 years ago
Quoted from Sean_R:

@mot @Jam_Burglar thanks for the insights here. Definitely yellow to the right of the flipper, which makes it sound like it's an early version (see below). I'll have to figure out the mounting for the opto on the upper playfield's entrance.

Definitely double check me because I'm going off of hazy memory alone. Does your version have this opto bracket here?
Optos Behind Bigfoot.jpgOptos Behind Bigfoot.jpg

#1227 8 years ago
Quoted from Sean_R:

@Jam_Burglar thanks for the picture - that's incredibly helpful. No, my version doesn't have the opto bracket there. I'll have to source that part and probably make some "sight" holes in the rail guards for the optos to work properly. Much appreciated!

I don't know if drilling up your playfield and rail guards will devalue the game or not. If the early versions have any extra collector value (and I have no clue if they do or not) it would seem that keeping it closer to original might be to your advantage.

Also, it might be easier to fashion a way to attach optos to the new ramp. You could get some plastic tabs and either superglue or bolt them to the repro ramp, then attach the optos in the same way they are attached to the old ramp.

#1228 8 years ago
Quoted from billsfanmd:

Im sure once ramps are out I can just put back in reverse.
Looked for this on other threads. Best way to clean a rusty ramp flap?

Steel wool is usually what I start with before breaking out sandpaper.

1 week later
#1244 8 years ago
Quoted from Fifty:

Hi guys! So I finally put my VUK back together. I completely stripped it, cleaned it and then reflowed the solder on the opto boards which I had proven already work (see my earlier posts).
So I turned on the game. I press START. I hear the sound bite for the VUK and it fires. Then the sound bite for the VUK sounds again and it fires. So something is still messed up.
Do I go into switch test mode now? Anyone ever had a similar issue to this?
[EDIT] I just re-read the pinwiki. Since the transmitters all seem to work I'll try this out tomorrow on the receivers;
"The "receiving side" of an opto pair, which should be housed in a black plastic frame, can be tested with just about any strong incandescent flashlight. Note that an LED flashlight does not typically work too well for this test. Place the game in switch test. Block the sending opto that would normally illuminate the receiver under test. Shine your bright incandescent flashlight on the reciever opto. The switch state as shown on the display should change."

There were some old threads on RGP about this. I believe optos were replaced and that fixed it.
http://newsgroups.derkeiler.com/Archive/Rec/rec.games.pinball/2009-06/msg13370.html

Heres one from pinside, failed solder joint
https://pinside.com/pinball/forum/topic/wh2o-issue?responsive=0

#1270 8 years ago
Quoted from billsfanmd:

Just put new ramps on. What 2 screws are used to connect Bigfoot cave ramp to the small ramp that feeds right flipper? Thought I recall black plastic rivets instead of screws I have temp screw for the pic

image.jpg

I'm going to be shopping mine very soon. I can tell what the stock answer is if you want. There shouldn't be any black plastic rivets. It's either going to be a screw as shown or a nut and bolt (likely with a star washer.)

#1276 8 years ago
Quoted from KingDaddy:

Officially a member
What is the best LED approach? Was looking at Cointaker - their premium frosted kit.... Apologies if this has been covered.

Keep in mind that unless you get the GI OCD from Herg you'll mess up all the fading effects with LEDs in the GI and backbox (and there's a lot of fading activity with White Water). You can get by pretty good with LEDs in the insterts.

#1284 8 years ago
Quoted from KingDaddy:

Is there a color "recipe" or even a kit for the inserts... Also, part of me wants to light the PF somehow... My Indy 500 has those illuminating LED spotlights. Want more light punch, without monkeying with the fading effects or topper. Any other thoughts appreciated.

So far I've tried a bunch of LEDs in the rafts and I like the cointaker warm white. It's different than the original incandescent (which comes off as much more orange) but I like the difference. I'm going to get some pinks and see what they look like as well. I've heard that pink in the hazard inserts works well.

I play in the dark every once in a while and I do think spots on the playfield would help for that. The center of the playfield is pretty much un-illuminated. I just don't know how I feel about those big ugly spots in the way when I've tried damn hard to camouflage all of my mods so that they blend in well. I keep thinking that maybe I'll buy some spare mountains and actually drill a holes to hide the bodies of the spots. I haven't gotten that far yet (and probably never will). Anyway, if you want the spots not to mess up the fading and light show effects then tie them into the GI tract. Just jump them off a GI bulb and they'll act just like the bulb you're jumping off.

#1294 8 years ago
Quoted from Allibaster:

https://pinside.com/pinball/forum/topic/white-water-led-recommendations
-Color matched inserts with exception of "RIVER", which I did in blue
-->Use Pinball Life's smaller LEDs for small inserts, CoinTaker's supers for larger
-Comet Optimax natural whites under the slings
-Comet 2-LED fluted natural whites under lane dividers (frosted on left)
-Cointaker 4+1 warm white towers under pops and left mountains
-Comet warm white 2-LED fluted under back playfield plastics
-Comet natural white and one blue fluted by whirlpool GI
-Whirlpool is half white and blue Cointaker frosted, looks great when animated
-Upper playfield is Cointaker warm white frosted
-Very back is Comet 2-LED blue fluted
-Pinball Bulbs LED strips and spotlights
DSC04605.jpg

How did you mount the spotlights in the upper left? Is there a screw up there?

3 weeks later
#1315 8 years ago
Quoted from Fifty:

Boom! My very first Vacation Jackpot and I did it on ball 1! 22 waterfalls! 3 ball, L-5, Factory, My best game ever!
20150906_110354.jpg

That's a great game! No ball-save and no hold bonus, on L-5.

1 week later
#1321 8 years ago
Quoted from Fifty:

Thanks! I'm still smiling!
To be honest, I don't find getting the bonus on L-5 that bad especially after playing it for a bit. I don't have any plans to upgrade to 6. I'm going to leave it this way as I like the additional challenge. I don't go out of my way to complete the bonus, but the inlanes help quit a bit with spotting you letters. I'm usually up to Class III before I know it and then once I hit Class V I give it a little more attention. Nothing worse than only being a couple letters away from finish it and draining.
I find the most difficult shots to be the bounceback, hotfoot, and extra ball (this one is deadly). Those and the damn boulder hazard. For some reason my kid can get the Secret Passage every game, sometimes 2 or 3 times in a row. I can't find the sweet spot for that one, but he has it nailed.

What I did was upgraded to LH-6 but turned off the ball save so that it operates just like L-5 (except that with L-6 the hold bonus feature actually works.) I also open up the right outlane all the way and make sure my Lost Mine kickout isn't a gimmie. White Water is a bitch when you set it up hard.

I just finished doing a hell of cleaning job on mine (stripped the entire top-side of the playfield) and played a practice game with the glass off and lockbar off to make sure everything still worked. I ended up getting the Vacation Jackpot and hitting 900,000,000 or so. I love this game when its freshly waxed and playing fast!

#1323 8 years ago
Quoted from Fifty:

I don't mind that the hold bonus feature doesn't work. When you first start playing WH2O you think "What?! That's insane" but after playing for a bit getting Class VI really isn't that difficult. I do see your point though, but I like it this way - at least for now.
I actually hit my second Vacation Jackpot last night. My score wasn't as high this time, only in the 700,000,000 range but the game last well past the Vacation Jackpot. I ended up getting Class IV and a bunch of Whirlpool modes finished. This was my second only VJ, and I did it the same way - finished the Bonus, finished the Boulder area, finished Wet Willy's and then triggered Vacation Jackpot with Multiball. Very cool doing it this way as you get the VJ show and then the game goes right into multiball mode. Super exciting!
I still need those plumb bob part numbers guys! (see post #1320)

http://www.marcospecialties.com/pinball-parts/12-6231
http://www.marcospecialties.com/pinball-parts/4406-01120-00

The wire is out of stock but the part number is there.

1 week later
#1362 8 years ago
Quoted from offdutyninja1:

Just got to join this club Friday with my first ever pinball machine!
A couple of questions from a noob for you pros...
1. When you put the playfield in the upright maintenance position, is it supposed to lean on the back box via the star posts on the shooter guard? There is a lot of damage and wear on the top right of the back box where the star posts contact, and the shooter guard is cracked (it seems from letting it hit the back box too hard)

I use shooter tips. I'm pretty sure High End Pins came up with this method too. They give you a lot more cushion than other methods.

Quoted from offdutyninja1:

3. A failed soft plunge to the upper playfield goes from the spine chiller sdtm. Any advice on a fix?!

Do you have the metal ball guides still attached to the bottom of the spine chiller ramp?

Quoted from offdutyninja1:

4. The side guard of insanity falls right after the first drop is cracked off, usually not a problem but 1 in 10 shots hits the exposed edge and falls off onto the playfield. I assume this will only make the damage worse... Any advice before buying a new ramp?

I would buy new ramps if I were you.

Quoted from offdutyninja1:

5. The kickback works, but the tip of the plastic shooter is very cracked and sharp. Can I cover it with a rubber plunger tip?

I wonder if this part is out there as a standard Bally/Williams part. I half-way remember looking but I don't think I ever found it.

Quoted from offdutyninja1:

6. Any fix for a bubbled topper foil?

This was another thing High End Pins had some technique on but I'm not sure he's revealed it. Supposedly it's pretty tricky and you could ruin your topper if you don't know what you're doing.

Quoted from offdutyninja1:

7. I know the flippers are supposed to be different strength, but all 3 of my flippers are the same (orange wrapper). Worth changing if they all seem to work fine?

Definitely get the right coils on there. Too much power and you're running a much higher risk of destroying your game.

Also, if your green targets are still there make sure the foam inserts are still in tact. Replacing the foam will help save those targets from breaking.

1 week later
#1370 8 years ago
Quoted from woody76:

What is correct shooter spring? 10-148-1 silver or 10-148-4 green? I have heard both. My White Water on a full plunge shoots the ball back to lower playfield. I played another White Water this weekend and on a full plunge the ball dropped right onto the upper playfield for whirlpool or insanity falls shot. How is it supposed to be?

The manual says 10-148-1 (medium-high). Mine had a 10-148-2 (red, highest tension) and it was really hard but I switched it out for the medium-high tension under the assumption that it's the correct one. Full plunge should take you easily down the spine chiller so you have to have some skill in your plunge to keep the ball on the upper playfield (that's the whole point of the "skill shot".)

1 week later
#1373 8 years ago
Quoted from GorillaBiscuits:

Hi all. Joined the club last week, super stoked! I have a small issue I could use some guidance on.
Namely, the switch the ball rolls under upon exiting the disaster drop does not work, it just seems super loose and has probably never been replaced. I'm referring to the piece of bent wire that hangs down. In test mode I can sometimes push up and make it connect with my finger, but in actual play the ball rolls right past it and just does not connect. I figured this out after finally getting to Willy's and realizing the disaster drop insert continued to stay lit no matter how many times I hit it. DOH!
I looked up the part from the manual and found the attached photo on Marco. Looks like a cheap fix but a potential pain in the ass to do with all the layers of stuff that needs to be removed to access.
1. Is this the correct part and only thing I need?
2. I see a transistor bridging the switch between 2 of the 3 connectors. Can I remove this and re-use on the new switch? Should I be using the world's thinnest solder on it? I ordered some .015 by mistake but perhaps it could work here.
3. Seeing that there is a very small transistor involved and I would be soldering directly over a ramp/playfield, is this something that should be fixed by a proper tech? I do need to replace that particular ramp so perhaps it wouldn't be the worst thing if I accidentally dripped a bit of hot solder onto it... of course I could always just put cardboard under it and not be total idiot. Sorry, I'm working this out in my head as I go! BTW My soldering experience is exactly ONE solenoid.
Thanks in advance!

switch_2.jpg switch.jpg

Like urbanledge says, the first thing to do is inspect the switch to make sure it's mounted solidly and then bend the metal switch arm down to see if that helps create a consistent connection. Get a good look at the switch so you can see how the arm is triggering the microswitch. They're pretty simple. Use an actual pinball for testing!

The if the above does not help then you probably need to replace the switch or the diode, they can both go bad. Do a google search for testing pinball switches with a multimeter, there is some good info out there on how to test everything. If I remember right you need to desolder a leg of the diode to test it (get a cheap solder sucker to remove solder if you don't already have one). Through testing you can figure out whether it's the switch or the diode, then order the part. Check your manual for the correct part number on the switch! All the info should be in there.

When it comes to soldering, I recommend removing the switch all together. There may be molex connector for it under the playfield, if so, unhook that, then remove the switch assembly entirely. Now you have room to work and don't have to risk getting solder on your playfield. Working in tight or uncomfortable spaces with a soldering iron with very little experience is a recipe for disaster.

2 weeks later
#1397 8 years ago
Quoted from Archytas:

Firstly the game is pretty dirty, everywhere on ramps etc. From what I can see WH20 is going to be a pretty hard game to tear down completely but I just wanted to hear from anyone else who has done it. I'm not looking to completely take everything off the playfield but just enough so I can nicely clean the back of the game, habitrails etc to get it fairly clean again. Is this doable?

It's really necessary to remove the upper playfield at least once a year or so to clean back there. This is also a good time to deal with LEDs in the upper playfield, Cliffy protectors, and other MODs. To do it right you're going to need at least 3 hours or so. There are about a dozen connectors that need to be unconnected so make sure you label them (I used numbered stickers from the electric dept of the hardware store). When you pull off the playfield be very slow and make sure you don't have any connections that are still connected. If you get resistance go back and check your work. Once you get all the right connections labled the reassembly and subsequent removals will go a lot faster.

I typcially remove all the mountains and ramps and the most of the plastics when I do a full teardown. Otherwise you won't be able to adequately reach all the spots that need cleaned. Take lots of pictures because there is hardware everywhere and much of it is specialized. I usually get a large rectangular shelf board (about the size of the playfield) and put it next to the game and when I remove parts from the playfeild I put them in the corresponding area of the board. That makes things a lot easeir (as long as the cat or a kid doesn't tamper with your board! That's why you take pictures!)

#1405 8 years ago
Quoted from Elicash:

Guys - need a little help. Can anyone tell me the size and type of screws that hold the upper boulder in place on the metal posts? The boulder right above the 'light hotfoot' white targets? My game seems to have the wrong ones, also some odd-sized washers.
I am trying to install the pinbits boulder protector and it is not fitting. That is when I noticed I have some odd machine screws of differing sizes.

I'm not 100% sure on the length but this is the correct type
http://www.marcospecialties.com/pinball-parts/4006-01027-06

Machine Screw 6-32 x 3/8" p-rwh

#4006-01027-06

Machine Screw 6-32 x 3/8 inch long phillips with round washer used in Williams / Bally pinball machines. head and incorporated washer.

Reference:
•4006-01027-06
•Equivalent 4006-01005-06

#1406 8 years ago

^Washers are built into these screws.

1 week later
#1411 8 years ago
Quoted from pin2d:

Reason I'm asking is that he needs some left arm work done (it appears...to be amputated). I'm wondering if there is a way to lower him and/or fluff his hair a bit at the same time.

Not normal. I keep meaning to post a tutorial on the arm fur and the paint on Bigfoot's chin. My armfur was detached as well, but when I glued it back I found that the chin would rub against the arm fur when his head sput and that wore down the pain on Bigfoot's chin. So I came up with a way to prevent that from happening and I also have some good info on repainting the chin, which is more tricky than you might think.

#1412 8 years ago
Quoted from pin2d:

Hello, I am new to the club as of a few weeks ago and love this game! I have one question I haven't found by searching so far - is it typical for Bigfoot's head hair to be flat pressing against the glass?
IMG_3749.jpg
It isn't affecting game play at all. But I just feel a bit bad for him, or maybe he just has a big head.

If the head in on correctly, then I suspect your entire upper playfield is sitting too high.

#1419 8 years ago
Quoted from Elicash:

I had good luck with this fabric glue from locktite.
http://www.homedepot.com/p/Loctite-1-fl-oz-Vinyl-Fabric-and-Plastic-Adhesive-1360694/202487188
Used it to glue fur back onto back of his head and his hand. I defer to Jamburglar though. He is expert on all things WH20.

Yes, this is the stuff to use and it holds great. My problem was that once I glued the arm-fur to the hands there was more friction when Bigfoot's chin hit the fur when his head spun and that started wearing off the paint on his chin.

To remedy this you need to add a spacer to the black rubber stopper below Bigfoot so that the log comes to rest a little further out from Bigfoot's body. With the Bigfoot in his default resting position pull the log back away from his body and look straight down. You'll see the armiture that moves his hands/the log and a black rubber stopper where that armiture rests when Bigfoot is in his resting position. What I did was take a mini-post ring (like so http://www.pinballlife.com/index.php?p=product&id=35) and cut it in half with a razor blade. I attached that to the existing rubber stopper with a piece of double-sided foam tape. Now the log comes to rest just far enough out from Bigfoot's body so that his head turning does not rub up against the arm fur. The main thing you need to be careful about is making sure you don't extend the stopper too much. Bigfoot's log will now rest at a little bit more of an angle and a little further out but this will not affect game play if you get the distance correct. Visually, the change is virtually unnoticeable.

#1421 8 years ago
Quoted from Kneissl:

Where do you get new fur? Any fabric craft shop?

It's a little known fact but Bigfoot's fur is made of actual trimmings from Dennis Nordman's beard. This is what gives it such an extraordinarily soft and full texture. I'm sure you can PM him and he'll send over clippings for your project.

1 month later
#1444 8 years ago
Quoted from Fifty:

Does anyone have the bear mod? I bought the bear locally for under $20. I just need to fabricate a bracket and mount it now. I want to see what the bracket looks like underneath. Please post or PM me with a pic. Thanks very much!

I went to Micheal's (where I bought the bear) and picked up a metal offset bracket (like so http://www.michaels.com/10418197.html ) (I can't remember the exact height I bought). Attach one end of that bracket to the Spine Chiller ramp gate bracket (right side). Attach the other end of the bracket to the bear (I put a small woodscrew through the bear's foot). Then, for good measure, take some double-sided foam tape, cut out a piece the size of the bear's rear foot, and then stick the rear foot to the flat top of the Spine Chiller gate bracket. Mine has been going strong like this for years.

#1447 8 years ago
Quoted from Fifty:

Wouldn't be the left side of the Spine Chiller ramp (from player's perspective)? Which foot did you put the screw into? I'm guessing the rear most foot, but if your's is still going strong I would like to duplicate what you have exactly.

Pictures of my machine are on page 2 of this thread and you can check out how I have it set up there. I have my bear set so he's kind of looking over the No Way Out lane.

1 month later
#1502 8 years ago
Quoted from mystman12:

Okay so, I've gotten a little fed up with how much I'm seeing this, and I have to ask; What is the appeal of the white mountain and abominable snow man mods? I think most mods are awesome, but the white mountain mod makes literally 0 sense and just makes the game look super cold. When was the last time someone went white water rafting in freezing cold snow covered mountains? And the abominable snow man... Again, what does Rudolph the Red nosed reindeer have to do with white water rafting? Not to mention everything else still refers to him as Big Foot.
This is just my opinion of course, but I have to admit I really don't like just how many WH2Os are getting these mods and I really hope they're reversible. So for those who do like it, what are the reasons you like it?

I thought it was cool when the guy did it as a "one off". It seems like a lot of people have copied that. Not the sort of thing I'd ever do to mine though. I really like the mods, especially with this game, but I don't like anything that sticks out. I like the missing mountain, the Big Foot Spotlight, the bear is fine. The skull mountain is a cool concept but I don't think it's integrated right.

1 month later
#1586 8 years ago
Quoted from Mokthemagicman:

Just picked up a White Water last night, set it up and love it! Everything works great except I notice when the balls get ejected to the top play field they take a bit to roll around to the upper flipper. Isn't this play field supposed to be set at 6.5 deg? Should it be higher? Anyone else have this issue?

Before messing with rubbers on your wireform (ayo), check to make sure the wireform is installed correctly. There is a set-hole all the way down in the top ball trough where you need to set the wireform (I'm talking lower playfield here, just look down in the hole next to bigfoot and you should see where you need to set the wireform). Then make sure your wireform is firmly attached to the upper playfield. If you do this and it's still backspinning there are a few other things you can try before doing the more unorthodox rubber bumper fix.

Also, if you don't have a Cliffy protector back there where the ball kicks out you should get one now.

#1589 8 years ago
Quoted from Mokthemagicman:

I have the Cliffy protector. Wireform is installed correctly I believe.

If you've verified the set wire is in the set-hole in the ball trough, one more thing you can try is adding washers under the TOP wire-loop (the one furthest from Big foot) where the wireform connects to the upper-playfield (put the washers between the playfield and the underside of the loop where the wireform attaches to raise that side slightly.)

I learned this trick because I had a broken weld on a wireform once and the "fix" for it ended up raising that side of the wireform by several millimeters. Consequently, raising that side reduced the backspin enough to correct any issues with the kickout. I've since replaced with another wireform and that one works fine with no modification but I had to torque the wireform to make it fit in the sethole which gave it a similar tilt to my previous fix. Anyway, this makes me hypothesize that the backspin may be caused by the shape/angle of the wireform.

Your mileage may vary with the above method (my evidence is merely anecdotal) but if you're trying to avoid the rubber post-bumper fix (which DOES work, but also looks kind of ugly), then you might try the washers as a last ditch effort before doing the rubber fix. Or, you you don't care and just want the spinning to stop them just go straight to the rubber post bumpers. That also takes some tweaking to get the spin to stop.

#1595 8 years ago
Quoted from jrockne:

Hi,

Who's powdercoated their machine? I'm debating on a color, I was thinking of going with a metallic yellow that would match the Williams logo on the side of the back box. What colors do you think work for this game?

Chrome

01_White_Water_(resized).jpg01_White_Water_(resized).jpg

#1600 8 years ago
Quoted from Elicash:

Wow, Jamburglar, really like the look of your game. Where did you send off to get chromed and (if you dont mind) what did it cost?
I am planning my WH20 restore and i really like chromed rails and lockdown bar. But will probably skip the coin door. I am also planning to build up enough courage to do my cabinet decals.

The coin door was done by Mike Chestnut but I'm not sure about the rest. I've had two White Waters and, oddly enough, both of them had chrome when I bought them. The the first one I bought had the lock-down bar and coin door done by Mike. The second one I bought was really nice, fully chromed, but had a generic, chrome coin door (no coin shoots or anything). When I sold the first one I swapped the original chromed coindoor over to the nicer machine because I couldn't bear to let it go. If I remember right the guy who sold me the first one said it was $300 for the coindoor.

I agree it looks awesome but I'm not sure I could ever bring myself to pay to have all the parts chromed. I imagine it's expensive to chrome everything (legs, coindoor, lockdown, rails, and backbox trim.)

#1601 8 years ago
Quoted from Mokthemagicman:

Ok so I just got my White Water and I noticed something odd. When I shoot into the Lost Mine for the first time it always shows that already have the "Flash Light" and I gain the Map. So it only takes two shots into the Lost Mine to get the Gold Rush mode? I know this Pin has the Home Roms in it too. I tried to do a factory reset but this still happens if I shut the game off and turn it back on. Any ideas on how to fix this? Is this a Home Rom thing?

The only way I know of to set it so you have to "earn" the flashlight is to put it on Tournament Play. This makes you earn the flashlight both through direct slots to the Lost Mine and on the Bigfoot Hotfoot mode.

#1621 8 years ago
Quoted from Fifty:

It's easiest is you go from the bottom and remove the subway. The subway is just held on with a couple brackets, nothing major. It's much easier that going through the top and removing multiple ramps.

Agree. The BIG thing is making sure you replace the spacers correctly. I've seen several WH2Os where people screwed up through the top of the playfield because they left out the spacer. Luckily that part of the playfield is largely hidden by the Whirlpool but still.

2 weeks later
#1711 8 years ago
Quoted from yzfguy:

That ball save is only on the newer rom.

If you don't score any points you get the ball back, even if no ball save is on.

#1774 8 years ago
Quoted from Tlamb:

The rubber between the 2 pop bumpers looks strange to me. I will have to check mine out when I get home but I dont believe I have one there.

It's common to see variations in this area. I don't like that the manual's setting blocks off that whole area. So I left the star post and put a small post-rubber around it. I either did the right rubber like a triangle, or put another post-rubber around the upper star post.

White_Water_Boulder_Garden_Tear_Down_3_(resized).jpgWhite_Water_Boulder_Garden_Tear_Down_3_(resized).jpg

#1815 8 years ago
Quoted from nsmith:

so game works great after the rebuild. Ball occasionally gets stuck in the upper play field, may need to adjust the ramp

Do you have the Cliffy installed up there? Without the Ciffy you'll get a divot that will hang the ball up.

The other thing is the spot between the Spine Chiller ramp and the upper playfield (ESPECIALLY if you you've got a new ramp installed). I struggled with this spot for years using washers, mylar to cover the spot between the ramp and the cliffy, etc. I spent hours trying to get the ramp and the Cliffy lined up exactly so the transition from ramp to Cliffy would be smooth. While I could get it really good, I never entirely eliminated the problem.

So, I finally decided I was going to figure it out. I took the ramp entirely out of the game and tried to see what was going on with the ball traveling off the end of the ramp. With the ramp out I experimented with putting the ball on there and trying to get the ball to hang up. What I learned was that the edge of the ramp itself was causing the hangup! This is critical because common sense would tell you the ball is getting caught in the little crease between where the ramp ends and the Cliffy begins. Not so with(with mine anyway)! There's something about the physics of the ball on the end of the ramp that makes the ball want to stop rather than roll off. There wasn't any "lip" stopping the ball, but for some reason it still wanted to stop right at the end of the ramp (only if traveling very slowly). What I ended up doing is shaving down the 90 degree "drop off" at the end of the ramp to give it a slight downward angle. I then sanded, and used Novus polish so that ended up with a really smooth roll-off at the end of the ramp. I would then go back (again with the ramp entirely out of the game) and see if I could get the ball to hang up. I kept working the end of the ramp and eventually, while the ball would still hang if I positioned the angle of the ramp just right, it was much, much less likely to hang up than before. It actually became challenging to make the ball hang up whereas before it would hang as long as there was very little momentum. When I reinstalled the ramp I retested, trying to get the ball to hang and the situation was greatly improved. Since rounding out the edge of the ramp lip I think I've had one instance (over 100s of games) where the ball hung there. Not only that, but getting the ball unstuck just took a little nudge (whereas before I'd be lifting the whole rear corner of the pin to get the ball free.

#1822 8 years ago

Good one. I'm assuming the same LED flasher bulbs that didn't work in the particular socket you're having trouble with work in other flasher sockets? If so, I suspect its something with how the bulb is making contact in the socket.

Also, I haven't forgotten about the picture I promised you of the Bigfoot spot. I just need to find some time to do it.

1 week later
#1839 7 years ago
Quoted from Kneissl:

So what else didn't make it besides the insanity falls ramp with lanes and right return? I think that's the only major change I saw.

Did you see the apron ramp? There was also a lot on that white board that never came to fruition.

2 weeks later
#1913 7 years ago
Quoted from jrockne:

I was wondering the same thing, what is the best ROM for home use? I think mine is running L4 right now...

LH6 (the home rom) is the only one that fixes the Hold Bonus issue. It fixes a bunch of other stuff too but that's the main fix. It does add a ball save feature but I turn that off.

3 weeks later
#1958 7 years ago
Quoted from Gorgonzola:

Before you bend any metal as per other suggestions, shine a flashlight down the upkicker hole and check the condition of the 'Ball Popper Cup' (Part Number 03-8561). I experienced this exact problem and it was due to the 4 teeth that hold the ball centred being worn/broken (see attached photo). This allows a second ball to sit across the edge of the cup, which then gets squeezed when the coil fires, slowing it and causing the ball that was in the cup to lose momentum and fail to complete the arc.
A new Ball Popper Cup with 4 nice teeth eliminated this problem 100%.

Yes, cup your balls!

1 month later
#2008 7 years ago
Quoted from DocRotCod:

Couple questions for my fellow wh20 owners:
I installed all new ramps and I have a slight ball hang behind Bigfoot where the lower to upper ramp meets the playfield. Part of it was I needed to bend the metal ball guide to meet with the wall of the plastic ramp. The other is the plastic ramp is higher than the wood playfield, but there is a lip right at the end of the ramp. Do others sand this lip down or do I need to leave this lip in place?
On the upper playfield, how far out should the flipper be when at rest? Someone came over and told me it was adjusted too far in.
Thanks!
I love this game

See my post #1815 on page 37 of this thread. I go into some good detail about how I ended up resolving this. It took me a long time to figure it all out.

1 week later
#2053 7 years ago
Quoted from Fifty:

L-5 is the best ROM in my opinion.

I would agree if it weren't for the failure of the river class holdover. What I do is turn off the ball save so it's basically L-5 but the holdover works correctly.

#2060 7 years ago
Quoted from Fifty:

I think you mean hazard targets. If the hazard target is lit inbetween the two locks and you have multball ready to go you need to avoid it. There are a few ways to progress. You can advance a raft through the boulder garden. You can re-light the bounce back. You can send the ball through the Distaster Drop loop. Any of these will advance the raft and switch up the hazard targets that are lit.

^This! It's not a bug in the code. Part of the strategy is not to get multi-ball too early. It's very common for me to end up trying to advance rafts without hitting the center shot because I've got 2 balls locks and the 3rd lock primed.

For Vacation Jackpot, you really want to try to get that on the first or second multi-ball because hitting multi-ball the third time is much more difficult because your lite-locks expire quickly. Frankly, I've never even been able to figure out exactly how lighting the locks works for the 3rd multi-ball. The lights will flash, then go solid, then go out. All I know is you need quick successive hits to both green targets to prime the lock and you don't have much time.

3 weeks later
#2067 7 years ago

That's right. The second picture shows the bracket in the proper place. It's wrong in the first pic.

Also, get a Cliffy protector for the damage under the VUK!

#2070 7 years ago
Quoted from billsfanmd:

I can see on one side the ball guide is raised so beam goes under it bit the receiver ball guide is solid

Hmm, transmitter (inside guide) side and receiver (outside guide) side both have cutouts so the beam will go under on mine. Any chance you have a early serial number? Check to the right of your upper flipper. Is it blue there or yellow? I believe the early models may have used a different configuration there, maybe a microswitch but my memory is a bit hazy on this. I wonder if somebody retrofitted that opto there.

#2072 7 years ago

billsfanmd, check out post 1212 in this thread. It shows the early production style ramp with the optos attached directly to the ramp.

I bet you've got the early production and somebody replaced the ramps. Since the new ramp didn't have the tabs to attach the opto, they put that bracket in.

#2075 7 years ago
Quoted from billsfanmd:

Jam. Thx. I looked at your pic on post 1223 that is where I am moving the Opto bracket. But there is no hole for the receiver Opto. Isn't this Opto bracket on all wh20 ? Don't think my ramp has Optos.

I think you may have an early production White Water. One way to tell is to look at the upper playfield just to the right of (behind) the upper flipper. If it's yellow there, instead of blue, you have an early production game. One difference between the early production games and the later production games is how that opto at the switch behind Bigfoot is set up.

On the early production games, the optos were attached to the ramp as shown on the ramp to the right in post 1212 (page 25) of this thread. The later production-style ramp is shown on the left in that same picture (note the lack of optos attached to the ramp on the left). The later production models also have cut-outs in the ball guides behind bigfoot to allow for the updated opto placement so the beam can pass through. The early production models don't have these cutouts so the opto won't work in that spot.

So here's the thing, the reproduction ramps that you can buy for White Water are all modeled after the later-production (no opto) style ramp. My bet is that you have an early production model White Water. Somebody replaced the original ramp (with the optos attached) with the later-style reproduction ramp (no tabs to attach the optos). In doing so they no longer had a way to mount those optos in the original configuration. Therefore, they got a bracket from the later style model and put it in that unorthodox spot because it won't work on your model in the regular spot.

I think you have a few options. If the optos are working in that spot, you can leave them there. If you want to keep the game more original you can fashion a way to attach the optos to the reproduction ramp in a similar way to how they are shown in post 1212 (page 25). Or, you can try to tack down some of the new-style ball guides with the cutout for the opto beam and replace your original ones with those. The ball guides may be tough to find.

I'm not sure whether the placement of the opto before the VUK kickout on the early production models (instead of after the VUK kickout on the later models) is of any consequence. It's possible that later software relies on the opto being after the VUK but I've never heard of anyone saying that's a problem.

#2078 7 years ago

Personally, I would mount the optos to the ramp as it was originally. It should be petty easy to make something work. You may devalue the game if you drill through the ball guides. Perhaps somebody here can chime in on the code.

#2085 7 years ago
Quoted from Mbecker:

So I guess I'm confused then -- is the whirlpool lit light just for whirlpool awards?

That's right. Hit insanity falls to prime the Whirlpool awards. Hit the Whirlpool to get the award corresponding to the lit award in the boulder garden.

The only way Bigfoot doesn't divert the ball is if you get the "hotfoot" and his head starts spinning around. The idea is that you lit his foot on fire and he's distracted, and he doesn't divert the ball so you get to go through "Bigfoot's Cave".

#2111 7 years ago
Quoted from TKDalumni:

Should you be able to backhand spine chiller?

Not very easily, especially if you have the correct flipper coil in the left flipper. Left flipper was designed with less power.

2 weeks later
#2182 7 years ago
Quoted from golfingdad1:

Man great info, thanks so much.
I may screen shot this and do the inspection as listed.
Also seller described machine as , no fade original artwork. Was it originally painted or a decal ? And is the blue darker than funhouse or the same ?

Original was direct screen printing on the sides, not decals. It's actually pretty rare to have an unfaded cab. See mine on page 2 of this thread. The sides are unfaded (or have only the slightest of fade) while the front has some minor fading (see the color of the eagle as more of a yellow/gold rather than orange-brown.)

Unbubbled toppers are also very hard to find.

For the playfield, aside from the Lost Mine kickout and the wear under the VUK, check the spot on the right inlane where the ball drops from the upper ramp. That's a very good indicator of how much play it's had and that area is normally beaten up. The VUK spot will pretty much always have wear.

Frankly, I'd be less concerned about the mountains and the ramps as they are replaceable (although not necessarily cheaply or easily).

If you get a good clean machine, I highly suggest the Cliffy under the VUK, a mylar protector where the lost mine kicks out, mylar or cling vinyl under the right inlane spot and mlyar or cling vinyl in the channel that runs from the upper flipper to the VUK cliffy on the upper playfield (you WILL get ball trails here and it's good to prevent them from embedding). Even in home use these 4 areas will get worn down without added protection. I also think its a good idea to put Cliffy switch hole protectors in the right inlane and in the back left where Disaster Drop dumps back onto the main playfiled.

#2184 7 years ago

Looks like some minor planking in the trees (look above the two hotfoot targets and under the disaster drop arrow.) Not very bad though. Also the lock lights are not right and there's some boulder breakage. Overall looks pretty good though.

3 months later
#2314 7 years ago
Quoted from TheLaw:

Vacation Jackpot it a must. You'll see getting there the scores are very similar...starting around 1.4ish
Enjoy!

I've come to learn the most important thing is getting the 5x jackpots during multiball. Usually my high scoring games include a vacation jackpot and/or beating Wet Willies too but not always. One of the best indicators of a good game for me is getting the Insanity Falls record because it usually means I racked up on jackpots during that game.

#2329 7 years ago
Quoted from TheLaw:

5x jackpots are always part of the game plan, but it would be rare to hit that many of them to get you up over a billion. Pretty tough work to get more than 2 MBs

I may be tripping because I don't always follow the particulars of scoring like the guys who compete a lot but I think you get about $170,000,000 for Wet Willies ($10M for each ramp shot in round one, then $100M for round two).

For the Vacation Jackpot the amount varies but I believe mine typically runs just over $200M (don't quote me on that).

For 5X jackpot I'm usually getting about $100M per insanity falls. The first 3 should happen within 5 secs (so that's $300M) then I've got 15 seconds for subsequent jackpots. As I don't screw it up I can get about $600M just on the 5x multi-ball (maybe more but often less because I choke). I've had lots and lots of games over a billion and never hit the vacation jackpot, and I'm sure a good amount where I botched the 100M shot on Wet Willies.

Anyway, if I play my cards right, I'm getting about 3 times as many points for the 5x multi-ball than I am for Wet Willies or the Vacation Planner. Getting 2 5x multi-balls lined up in the same game rarely happens but I had one game around 2 billion and that's how I got that one. I probably also hit the vacation jackpot and beat Wet Willies (maybe even twice in that game) but I'd say I had about 1.2B just in the 5x multi-balls.

Camera Craze can really jack up a score too (especially with the 5X) as can the Whirlpool multi-ball!

In all honestly though, it's not infrequent for me to get the 5x multi-ball and shit just goes wild for few minutes and I look up and my once 200M score is now 900M or something like that.

#2330 7 years ago
Quoted from webdiddy:

Anyone liking this design?
I have to say I think it turned out pretty sweet!

Nice!

#2331 7 years ago

Hey, does anybody else turn on the Auto% replay feature so that your replay value is based on your scores for your past 50 games? If so, what's your replay at?

#2341 7 years ago

The Wet Willies shirt is great too (by the way).

#2359 7 years ago
Quoted from Cserold:

Sent a WH2O to High End Pins. What are the groups opinions on LED vs LCD colorDMD for this game? Appreciate it!

ColorDMD is awesome and I think makes the animations much clearer and easier to digest.

I would never LED the GI unless you also use Herg's GI OCD. White Water relies heavily on dimming and without the GI OCD board you'll kill a lot of the cool dimming effects (that also tie into and assist the gameplay).

You can LED the inserts but would recommend that you use the Herg's LED OCD if you're going to do that as well. While not as essential as with the GI, the harsh on/off of the LEDs does take away from some of the cool strobing effects the inserts do. I noticed the improvement immediately when I installed the OCD LED. You get nice smooth sweeps after Herg's board is installed rather than harsh flashing.

#2364 7 years ago
Quoted from Cserold:

Sent a WH2O to High End Pins. What are the groups opinions on LED vs LCD colorDMD for this game? Appreciate it!

Haha, I totally misread that!

2 weeks later
#2383 7 years ago
Quoted from Luppin:

No, that is A2. 09 Hot Foot Count. Hot Foot percentage does not make sense, I cant understand what type of percentage could be related to Hot Foot...??

I believe this refers to what percentage of games hotfoot is triggered. So, if hotfoot is set to trigger on two completions of the targets and you're getting hotfoot too frequently, then the game will bump it up to 3 completions automatically so that getting the hotfoot is not too easy to get. I think this is calculated off of your last 50 games, just like the percentage reset numbers.

I really like playing with the percentages as opposed to set figures because it pushes me to get better.

3 weeks later
#2431 7 years ago
Quoted from Luppin:

I've installed a new plunger in the bounceback. The problem is that the tip is a bit too long and it blocks the balls when it drains (when bounceback is off). Should I cut it a bit?

First preference would be to adjust it. Is it physically different than the old bounce back plunger? Is there any way to adjust either the positioning or the mech itself? Or, if the parts are not identical, is there a way to swap out the tips only?

#2465 7 years ago
Quoted from allsportdvd:

How does your missing mountain attach to the game? I have tried one with velcro that didn't hold unfortunately

This is one reason I think the original Red West missing mountain is the best one. It has a nice, clean, sturdy way it attaches. The mold matches the style of the original boulders really well. The only thing is you can't underlight it like the others because it's much thicker.

3 weeks later
#2488 7 years ago
Quoted from allsportdvd:

I'm having an issue with my machine in that when I lock the 3rd ball for White Water Multiball, 1 of the balls always come out of the front of the VUK back down No Way Out instead of being launched to the top flipper.
Anyone seen this before and have advice for me?

First thing to check would be if the game is properly leveled.

If the game is leveled, I suspect the popper and the VUK are putting some wicked backspin on the pinball. You should check the popper cup and the VUK alignment. Some people put rubber rings on the VUK wireform to stop spin but I've found that if the VUK is alligned right you don't need it (at least on my machine).

#2491 7 years ago
Quoted from allsportdvd:

Okay, pinball is level.
Looking at it more closely, the force of the VUK is knocking the other balls that are leaning against the one being popped back into the playfield.
Should the balls in the VUK be leaning against each other?

Okay, I misunderstood your question. I was thinking about it as the ball rolling back down the Spine Chiller (backspin).

I would inspect the ball trough to make sure it's not coming loose or something, and then look for broken parts in or around the mech. I don't think there's any real adjustment to the trough, other than making sure it's attached tightly. Check to make sure the cup that holds the ball under the VUK is not damaged. I'm just theorizing here, but if the balls are rolling too far forward then the popper could be forcing them back the other way when it pops. Or, if the trough isn't angled correctly then there may not be enough gravity to hold the balls in when the VUK pops.

#2497 7 years ago
Quoted from paynemic:

Just joined the club tonight! Got one in good shape from a very nice local gentleman for $2800!! He knew it was worth more but had quoted me that price and honored the price anyway. Great guy. And a mint huo tspp for $4500 (not AS good a deal...). Can't wait to learn more about this classic pin. Any must have protection (cliffys) or mods? Is there a colorDMD and is it worth it?

I felt like the color DMD added a lot of value in that it's easier to digest the information (for me) when it's in color.

One of my favorite mods is the Bigfoot Spotlight mod. It integrates perfectly, interacts with play, and lights up that area when Bigfoot is doing his thing. If you're going to put LEDs in the machine you really need the OCD boards Herg makes. White Water has a lot of fading and scrolling effects with the lighting and you need those OCD boards to preserve that.

2 weeks later
#2540 7 years ago
Quoted from pindude80:

This my other thought, the games were left on for hours hours and hours, possibly days for who knows how long so is me having it on for a few hours a week going to make it much if any worse? I still think like yzfguy said it's not going to hurt anything drilling holes in the dome. The only reason I was hesitant to drill the holes was because it's the factory dome with the matching serial number on it, but it's got a crack in anyways so it's not like it's perfect plus replacements are available.

I have a bubble-less topper and it's never gotten any bubbles by being on for a few hours or sometimes even the better part of a day. I think you're right that it's the prolonged exposure in an arcade environment that likely caused the issue.

Holes in the back of the dome is a good idea though.

2 months later
#2596 6 years ago
Quoted from 27dnast:

So here's a problem (s):
My kickback light (left lane) stays lit the whole game. After kickback, it flashes, but then comes back on (even though I haven't hit the kickback targets). However, it goes off when the River Letter insert above it isn't lit (as those letter inserts cycle with flipper buttons)....once that River Letter insert lights up, the kickback comes back on.
I'm also have a weird thing with the lock lights... once I get the first ball locked, the top lock light goes solid. Then, randomly, the very bottom lock light eventually turns on (solid) even though I haven't locked a second ball. When that is happening, the middle lock light remains off.
Anyone ever dealt with these kinds of issues?

I'd have to think about it some but my first guesses would be (a) PCB problem (check ribbon connections is a good place to start), (b) miswired switches, or (c) switch matrix issue (phantom switches).

1 month later
#2640 6 years ago
Quoted from Fifty:

This.
The best way to access the whirlpool is from under the PF.
You have to remove the insanity falls ramp to access the flasher.

Just don't forget the SPACER. I've seen too many White Waters where somebody screwed up through the playfield because they forgot to put the spacer in when the reinstalled the whirlpool lamp board.

1 week later
#2645 6 years ago
Quoted from Tjohejsan:

I need a new mini playfield
Both a new and a used one will work fine.
Please let me know if you have One!

There's one on eBay right now.

4 weeks later
#2666 6 years ago
Quoted from Aflacjack:

Started putting LED's in my Whitewater. The inserts and 3/4 of the playfield are probably one of the easiest I have done. Now comes the Whirlpool ramp. Good God, what a logistical nightmare. Tonight will attempt to tackle unhooking all those wires, those ramps, and that stupid upper playfield. Say a prayer please.

To access the Whirlpool lamps take the lamp-board out from underneath (TAKE PICS OF THE WAY ITS INSTALLED, PARTICULARLY THE LONG SPACER). Install the new bulbs, then replace the lamp board. There's no need to take off the upper playfield. You will need to remove the subway ramp (at least partially). Just make sure you don't forget the spacer and be careful not to screw any of the woodscrews up through the top of the playfield (should not be a problem if you put it back the way you found it).

#2695 6 years ago
Quoted from Kevlar:

I've just joined the club and went straight in for a /strip/clean/rubber etc. First question, close this gap up or not? It was closed up with a rubber before I stripped it which I found strange as there's clearly a route there for the ball with 2 switches to hit. The manual shows it closed up with a 1 1/4" rubber. On pinball arcade its open for a ball to pass through. Do most people close it off or leave it open?

Open it up. I don't get many drains from that area anyway.

#2708 6 years ago
Quoted from adii:

What ever happened to the Bigfoot spotlight mod? Pinball used to have it but I haven't seen it in a long time.

I believe the guy who made them stopped producing them.

1 week later
#2730 6 years ago
Quoted from dr_nybble:

I tried to fix my ball hangups last night. I have the rubber on the VUK wireform and pushed the Cliffy up against the ramp so there is no ridge. Sadly I am still getting ball hangups. The reason is that the ball guide and ramp edge don't line up so the ball hangs up against the edge of the ball guide.
Has anyone bent the ball guide to fix this? Looks like 2-3 mm would fix it.

Search this tread because i have some pretty detailed posts about this issue. I've done hours of work on this and I'll give you the cliff notes of my findings.

First, I've manged to set up my game so that rubber washers are not needed to prevent the ball spin. The first thing to do is make sure that the metal VUK guide is correctly set. There is a hole in the metal ball-guide apparatus (on the lower playfield) where a "leg" on the metal VUK guide/cage needs to be inserted. Also, I've found that some washers (I think on the side closest to the translite) angle the VUK guide enough to prevent the spin. I'm pretty sure I have a post in here that gives some more detail. All of the VUK guides are probably a little different so it may just be that mine is bent right, but regardless, I've got mine set now so there's no need to fool with washers.

Second, make sure your game is leveled correctly. You need to level White Water with the upper playfield OFF, with a level near the back of the lower playfield (you need to check the front too but that's easy to get to).

Third, after LOTs of testing, I found that it was ultimately my plastic ramp edge causing the hangups. I observed the exact same thing you did, and it looked like the ball was getting hung up on the side, where the plastic ramp meets the metal vertical ball guide. I spent hours trying to adjust the ramp setting (washers on one or the other side, using tape to angle the sides in, etc.) but no amount of adjusting fixed the hangup. How I ultimately figured out it was the ramp lip was that I removed the plastic ramp from the game entirely and put a pinball on it by hand: I found that the ball just liked to hang up right on the edge of the lip (almost like when you overfill a glass of water and the water creates a "bubble" above the top of a glass rather than trickling over the edge.) So ... I got out some sandpaper and sanded down that sharp plastic lip until the ball tended to slip off the end of the ramp rather than getting hung up. Then I used finer sandpaper to smooth out my work and then did the old Novus 3, 2, 1 treatment to smooth everything out. When working the ramp I would do my best to try to find a way to MAKE the ball get hung up on the end of the ramp and then work the area more so that I could no longer effectively do it. By the time I was done it was still possible for me to get the ball to hang, but it was WAY more difficult than how I started out. I figured that once I added the natural tilt of the game to the equation the ball would no longer hang. Lastly, when I reinstalled the ramp I thoroughly tested the area as I was setting the ramp (BEFORE YOU TOTALLY REASSEMBLE and while you still have good access to that area). I would use my hand to place the pinball in that area and try to get it stuck, then adjust if needed. Challenge yourself to try to get the ball to hang and if it becomes very difficult or impossible for you to get the ball to hang then you know you've done your job.

I honestly have not had a problem since. It's been over a year since I did this and I've only had a handful of times (less than 5) when the ball has hung back there. Even then, a small nudge would get the ball to move. I can't remember when the last hangup occurred, it's been over 6 months.

Of course all of this requires significant disassembly, which you should be doing periodically to clean the game anyway. I tend to do a full breakdown and cleaning about once every 2 years. When I reassemble I pay very close attention to that area and make sure I roll test with a pinball before full reassembly to make sure that area is squared away. I struggled with this for YEARS and it was ultimately the sanding and smoothing of that ramp-lip that fixed the issue.

4 weeks later
#2772 6 years ago
Quoted from Playdium:

I replaced 3 of the ramps and now have the following problem.
When launching a ball, it will make it to the "Lower to Upper Ramp" (#A-15840), at the top of the upper playfield, then roll back down through the "Upper to Lower Ramp", (#03-8691).
The 3 ramps I replaced are, Suicide Canyon Ramp #A-15840, Whirlpool Ramp #03-8693, and Big Foot Ramp #A-15837.
It seems like the Suicide Canyon Ramp is pushing up slightly on the Lower to Upper ramp, preventing the ball continuing through to the play field.
Anyone have similar issues with these?

You mean when launching the ball it get's "rejected" and won't go all the way around, down Disaster Drop (the Lower to Upper Ramp)?

I wonder if you don't have the entire upper playfield misaligned. There's lots of stuff that can get jammed and keep that playfield from fitting where its supposed to (cables, connectors, misaligned brackets, the Whirlpool Ramp funnel not sitting all the way down through the lower playfield, another ramp not installed correctly.) Sound like you think Suicide Canyon ("Bigfoot's Cave") might be incorrectly installed. That could easily do it.

When you have everything set right things should naturally fall into place.

#2775 6 years ago

Could be. I'm having a hard time understanding what's happening. If the ball is physically unable to travel from the upper playfield down the Spine Chiller (not Disaster Drop as I previously said) off of a plunge means there's a hell of an obstruction somewhere. I have heard of people needing to file down the ramps where they meet the playfields due to thickness.

1 week later
#2798 6 years ago
Quoted from per3per3:

I have rom version L-3 and sound rom L-1. Could it be that I just need to updated to the home rom? If so, it looks like the home rom LH-6 is latest and greatest...how about the sound rom?

I would update the ROM as a starting place (don't know about the sound but the LH-6 allows you to carry your river class bonus like the game was intended).

There is a switch right before the bigfoot diverter and an opto at the bottom of the whirlpool that you can check. It could be that your opto is dirty or flakey.

#2805 6 years ago
Quoted from per3per3:

Thanks for the advice...I fixed it! It ended up being the switch underneath the boulders not always registering. After some adjustments, everything is working perfectly!

You might want to either modify the current plastic protector that comes right before that switch or buy the modified plastic protector that replaces the OEM. That area is notorious for problems because the ball carries through that area with speed and often airballs to hit the switch (eventually breaking it).

Here's the modified plastic http://www.pinballdecals.com/PartsByGamePages/WhiteWater_Page.html (White Water Bigfoot Bluffs Ramp Cover (CLEAR))

Here's the part it replaces http://www.marcospecialties.com/pinball-parts/31-1726-3

There is info about the modification of the OEM part in this thread. Essentially, you use a smaller spacer in the hole closest to the switch to force the ball back down to the ramp instead of letting it airball up to hit the switch.

Of course you can't see any of this during gameplay because that area is covered by boulders.

2 weeks later
#2821 6 years ago
Quoted from ViperJelly:

Need help identifying the metal deflector next to suicide canyon ramp. Any leads? I already bought the wrong one once

I think they are basically unobtainium. The part number isn't listed anywhere in the manual and the one that's readily available is for the other side of the ramp. I don't think it was included as part of the "A-15840 Suicide Canyon Ramp Assy" (I've seen that part NOS without the guide metal).

4 weeks later
#2844 6 years ago

White Water is my only game and has been for years. I play it almost every day. $6k is very high unless it is in pristine condition. For that price I would say, (almost) no playfield wear (maybe a small amount by the vuk, some shooter lane wear, but no lost mine wear, and definitely no sign s of planking), no cab fade or damage, no broken plastics, no bubbles in the topper, fully working, fully shopped, throw in a color did and led OCD kit, ... then you're getting into that range.

#2846 6 years ago

Planking can be a problem with White Waters and that would be one of the bigger issues (for a 6K machine). Look for any type of cracks or lines running vertically through the playfield. Supposedly the SP (as opposed to LS) playfields are less prone to planking.

#2856 6 years ago

Yeah, something's not right with that shot only registering from one flipper. The opto registeres the water sound and the micro switch in the back triggers the completion of the shot. It would be really odd for the ball speed or trajectory to trigger the switch from one angle but not the other.

I know that in Williams games of this era there is software that goes into effect if a switch is not working. It's unclear exactly how it works but maybe (and I'm really taking a stab here), that shot gets phantom activated by an inlane switch and one or the other disaster drop switches getting activated. If an inlane switch is also out that could potentially cause the disaster drop to only trigger from one of the flippers. I don't know though, that's a pretty "out there" hypothesis.

I would do some really thorough switch testing and the follow TheLaw's advice and shop the thing out while correcting issues.

#2857 6 years ago
Quoted from Stormtrooper:

Thx, I was hoping someone could confirm that before I get into checking out that opto. It looks buried deep under the upper playfield and difficult to get to.

I think they are actually in the front part of the ramp. Still tough to get to though.

1 week later
#2863 6 years ago

There's a few threads or posts about problems with the opto board that controls Bigfoot. I would do a search and see if you can't troubleshoot it. I think most people get it sorted.

2 weeks later
#2885 6 years ago
Quoted from gcmess:

Been searching this board for solutions to the annoying loud sound I have when shutting down my WH2O. I have found a few interesting ideas and even a components list for a suppression circuit using radio shack p/ns. I think radio shack is dead. Anyway....anyone have any new ideas or fixes that I could try....I am worried about damage to my speakers. Thanks in advance.

Why not send the boards off for repair? It's a little pricey, but worth it.

6 months later
#3114 5 years ago
Quoted from delt31:

yep - I believe that's it. Getting repaired now....will report back.

I agree that seems like the best place to look. Nice topper! I don't see any bubbles.

#3116 5 years ago
Quoted from delt31:

thanks - there is a very minor wrinkle but the topper is really stunning. It's a HEP restore and the new nicest pin I've ever owned and I only like nice pins. I'll take some pics too - such a great look game in general and hard to find in very good quality (not just a "nice" one).

Yep, mine (was) a very low play and extremely nice survivor. Now it has a lot more plays but is still extremely nice

#3129 5 years ago
Quoted from Blitzburgh99:

This game is kicking my tail...the cave kickout is hitting the metal ball guide and sending ball directly to bounce out. No chance of getting the right flipper on it to try and control. Only strategy I have now is to “bump” the game forward, with hopes of getting the ball up to the river targets on kick outs. That’s fine when it’s just one ball and I can focus. But when multiballs are going, it shuts them down in a hurry with drains down the bounce back.
Any suggestions? Where is that cave kickout supposed to be going to?

I put a lower power coil in mine but it's still set up in a way that causes a lot of randomness. A lot of people have it feed directly to the flipper which is pretty lame in my opinion. The game was designed to make that a tough catch. The main problem with the original coil is that it kicks out with so much speed that it will destroy the play-field in that area. I've seen anywhere from a little worn spot to a big old "trail" of worn down playfield from that kickout.

#3144 5 years ago
Quoted from delt31:

Do you think it blocks too much though? I was thinking about it but it does block some of the ramp etc

I don't think it blocks anything that would cause a problem with play. I always thought it was a really cool idea but I've never been crazy about the way the mountain sits out in the middle there. It doesn't tie into the the other mountains quite right and therefore looks a little out of place. The texture on the boulders is also not quite right. I wonder if it would work better if it tied into a "missing mountain" on the left ramp and had some slight tweaking to the sculpt. Still a cool mod, maybe I'm being too picky.

#3147 5 years ago
Quoted from TheLaw:

Mountian(t) mod is better than blue lights in the whirlpool i guess

I've been burned.

1 month later
#3279 5 years ago
Quoted from Elicash:

Did you use Purple Power on the bigfoot fur? Any issue with it? I am a big fan of purple power but I am a little afraid to use on bigfoot since he is irreplaceable.
FYI, several posts back someone was asking about flue for the bigfoot fur onto the hands. I found a really good fabric glue at Home Depot. Believe it was in same section as gorilla glue, locktight, etc.

I used Loctite "Vinyl, Fabric & Plastic Flexible Adhesive" to reattach the hand fur on my Bigfoot. Seems to have done the trick.

Some things I learned about Painting Bigfoot:

(1) Prep the surface. If you water down Elmer's glue and brush on a very thin layer, you'll get better paint adhesion. The thin ("wash") layer of glue will dry clear. Put on a few coats to prep the surface and the paint will stick better. I learned this from reading about model painters who paint on vinyl figures.

(2) Use acrylic paint. I tried model glue at first and this failed. It wouldn't dry. Acrylic paint works great.

(3) Matching the color for Bigfoot's beard. I was also able to get a "dead-on" match for repainting Bigfoot's beard by mixing black and white acrylic paint. Grey can be a very complex color to match if anything other than simple black and white are used to make the original color you're trying to match to. For example, let's say the original grey you want to match to has blue and yellow mixed in to make it more of greenish grey. That can be very tough to match! Luckily, Bigfoot's beard is just a straight up mix of black and white so you can mix up the black and white paint until you get a nice visual match. Another suggestion is to make sure you experiment some to make sure your paint matches WHEN DRY because wet paint may not always look the same color when dry. This can be frustrating when mixing small amounts of paint because by the time your test dries the paint you mixed up to do your test has also dried, so you have to mix the paint all over again and hope you get it the same. I was patient with this and got Bigfoot's beard to match perfectly. The new and old paint blended together seamlessly.

(4) Stop the beard from getting worn down again. The reason the beard color gets word off is that when Bigfoot's head spins his beard rubs up against the fur on his hands. The best way I found to prevent the wear this was to extend the bumper that his log mech rests on so that the beard no longer rubs up against his hands when his head spins. This mech bumper is located directly down below Bigfoot's hands, close to the lower playfield. If I remember right I cut a small rubber ring in half and somehow affixed that to the black rubber bumper. That way, Bigfoot's log doesn't rest quite so close to his head, and when his head spins around his beard doesn't rub up against his hands anymore.

I think I did my fix 4 or 5 years ago and Bigfoot's beard is still great.

#3282 5 years ago
Quoted from pindude80:

Hey WH2O friends, I want to get the two rafts that look like they are floating down the ramps. I did a quick search of this thread and didn't come up with anything. Does anyone know where I can get them? I also would like to get the bear that goes over the left ramp entrance. I think I remember reading somewhere that it can be bought at Hobby Lobby, does that sound right?

You can find the bear at Michael's. You have to find a way to mount it to the the ramp too. They have these little metal "L" mounts in the picture framing department that work pretty good. I have mixed feelings about the bear but he does hide that switch on the Spine Chiller so I guess he's okay.

#3283 5 years ago

I believe the original maker also sells them on eBay for cheaper (or used to). If I remember right they are a Judge Dred mod.

3 weeks later
#3330 5 years ago
Quoted from Soulrider911:

Is anyone using Leds in the topper? I'm going to be using an led ocd, and in order for it to work error free all your feature lamps need to be led that would include these I'm,pretty sure .

The topper lights aren't driven by the LED OCD. Totally separate so you're fine leaving them as incandescents.

#3331 5 years ago

Whope, Bryan beat me to it.

#3343 5 years ago
Quoted from Soulrider911:

Was not happy with the stock color treatment on skull mountain so attempting to match closer almost there. Still needs some work
[quoted image]
[quoted image]

Much, much better.

#3358 5 years ago
Quoted from chaosrooster:

Shopping out my game, the left screw hole for the flap to my insanity falls ramp looks like big foot got hungry and took a bite out of it! The screw isn't really holding very well. Is there any way to fix this or should I just let it be? I was thinking of patching it up with some wood filler and using the screw to form a new groove but I wasn't exactly sure.
[quoted image][quoted image]

For a stripped screw hole in wood you can take some wood glue and fill the hole with a toothpick (or toothpicks if the hole is large enough). Then let it dry, clip off the excess toothpick, and reinsert the screw. Sometimes I pre-drill a small pilot hole to make sure the new screw goes in right if I'm feeling extra saucy.

For something like that, you may need to reconstruct the surrounding wood to reinforce things. You could always start with the toothpick trick and if that fails move on to more elaborate methods.

1 week later
#3400 5 years ago
Quoted from djreddog:

Thanks to mrwizzo, I’m in this club for the first time. Bought the machine for my fiancé, she absolutely loves this game![quoted image][quoted image][quoted image][quoted image][quoted image]

Whoah, really nice looking example there!

#3401 5 years ago
Quoted from Blitzburgh99:

Hmmmm???
[quoted image]
Also searched this thread only and not found a definitive answer....maybe 3-4 mentions

Here's a thread I started a few years back.

https://pinside.com/pinball/forum/topic/white-water-wh2o-boulder-garden-layout

I don't think you'll ever find a definitive answer. I left all my posts in on the insane theory that the ball could somehow get stuck in the divot (which makes no sense). But anyway, I've always used method two from the above thread, leaving the posts in, and it works well for me.

#3406 5 years ago
Quoted from Yesh23:

I posted this in the wrong forum:
Anyone have any recommendations for me? 35% of the time I go up Big Foot Bluffs my ball comes back down. It's hitting the top of the switch (I have circled in white). I didn't know what the easiest fix for this would be? Below is the response I received with the picture, anybody know where I could get this mod, or does anyone else have recommendations?
RESPONSE:
Years ago there was a guy that made a ramp cover that fixes that problem by keeping the ball down in the ramp. It looked like this. It also helped correct broken out mount points for the switch.
[quoted image][quoted image][quoted image]

This is a common problem and a bit of a design flaw.

Two fixes.

First, you can buy the plastic from Pinball Decals: "White Water Bigfoot Bluffs Ramp Cover (CLEAR)"
https://www.pinballdecals.com/PartsByGamePages/WhiteWater_Page.html

Second fix is to take the existing plastic and shorten (or remove) the black, plastic spacer on the 3rd screw, the one closest to the switch. This forces the ball trajectory downward so that the ball does not hit the switch.

The factor plastic piece is meant to keep the ball from popping up and hitting the switch but doesn't quite do the job. That plastic piece on Soulrider 911's post is not factory.

#3421 5 years ago

That paint job on the skull mountain makes a world of difference. I still think it should somehow tie into the "missing mountain" by basically combining those two mods but obviously the molding is tough.

#3469 5 years ago
Quoted from mbaumle:

Here’s the link. You can read the saga unfold. He who shall not be named also makes an appearance, citing some B.S. copyright claims.
https://pinside.com/pinball/forum/topic/white-water-reorchestration-for-pinsound-and-warren-davis

I thought they got that worked out. My understanding was it was held up due to the crazy amount of work.

#3472 5 years ago
Quoted from boostedskex:

My understanding is that the issues were finally worked out between Ollie and PPS. Endprodukt's last post on the other thread was that his machine was back together and he was motivated to work on his reorchastration. The sound clips I heard were absolutely amazing! WH20 is my favorite game as it is but, his reorchastration will be the icing on the cake!! Below is the link to his youtube video.
https://www.youtube.com/watch?time_continue=3&v=PHN6xclwbIw

Agreed his work is amazing. The stock soundtrack really intricate how it builds on itself as you advance through the rafts so, while putting something like "Dueling Banjos" in as a replacement seems like it could work, I doubt it would have the same impact as the original soundtrack. Endprodukt's recreation keeps the original composition and just ups the sound quality tremendously.

#3483 5 years ago
Quoted from Paul_from_Gilroy:

That’s a ColorDMD LCD running in “HiRes” mode (which is a mode you can choose via its setup menu).

That's right. Instead of keeping the dots it connects the dots (la la la) into solid blocks and makes the animations look much more cartoonish. I did lots of back and forth testing when I got my LCD a few years back and settled on the HiRes for this game. I was very hesitant because it completely changes the look of the traditional dots but I honestly felt like HiRes looked the best in this case.

1 week later
#3512 5 years ago
Quoted from Soulrider911:

Manking progress on pain matching the missing mountain almost there. Also lighting underneath [quoted image][quoted image]

The skull mountain looks much better with the missing mountain almost tying into it. I think the skull mountain maker should explore that and come up with an altered mold.

I think its the color of that blue that's a little too intense. Something with more of a cyan color might match better. Not that big of a deal.

The big thing I found you have to watch out for is the fading affects and how they tie in with additional lighting. I added some spots to mine in various places but they are incandescent and tie into the GI wiring so that they dim along with the other GI lighting. That way everything integrates really nicely.

1 week later
#3518 5 years ago
Quoted from Blitzburgh99:

Ive heard folks say they get tired of hearing the “whee-a-wheet!” sound from No Way Out to the upper flipper. I say, grow some stones and take the Spine Chiller up top!!! Try hitting Insanity Falls from Spine Chiller. That takes some skillz

I always thought it sounded like Diz from "Out of Control" but it later dawned on me it was a wolf whistle like "hey, look over here, your ball is about to get kicked out!". It used to grate on me more than it does now, but yeah, the Spine Chiller is not to be slept on, especially for the combo bonuses.

3 weeks later
#3558 5 years ago
Quoted from DK:

What's the best ROM version to route? I've got LH-6 in there (freeplay only) and am curious what's best for location play? L-6?

L-5

#3559 5 years ago
Quoted from Utesichiban:

I am a new member of the club and excited to be a Whitewater owner. I am planning on getting it set up.this weekend when I get some time.
I noticed on the pin I bought that the previous owner hadn'y put any LED's in to light up the red boulders both at the back of the game and in the other areas. This is something I would like to do.
Can anyone recommend the best way (where to buy a strip, etc) to do this and what color LED's may work best? Any advice on how to best do this is very appreciated!

There's a mod on eBay for illuminating the rear boulders. I like the yellowish LEDs back there over the red. If you want other lighting you may need to fashion something yourself.

#3573 5 years ago
Quoted from Elicash:

I just looked it up and it looks interesting. Anyone have any more pics or video of their game with this installed? Does the lighting run above or under the boulders? Do you need to drill into the back panel to run the wiring? And do you tap into the GI or does it just always stay lit?
I agree I am not a fan of the red boulder lighting. But this one could be the one i am looking for.
FYI here is the ebay link:
ebay.com link » Whitewater White Water Pinball Mountain Light Mod

That's the one.

Here's what it looks like installed (this is from my post on page 2, post 96.)

This particular mod hooks up directly to the PCB so it turns on with the game switch, not through the other GI. Therefore, it doesn't interact with the other lighting in the game, it's always on. I actually kind of like that in this specific case though.

The strip attaches to the underside of the cabinet overhang (right below where the glass slides in). No drilling or anything.

It would probably be pretty easy to fashion something yourself that's similar, or something that ties into the GI. Keep in mind that these are LEDs and you're not going to get them fading correctly without GIOCD. I've kept all of my GI incandescent due to the extensive fading and light shows in the game and having this LED strip powered outside of the GI prevents issues with LED incompatibility. I've got some incandescent spots whatnot that I've added and I always tie those into the GI so that they fade and flash with the rest of the game.

#3628 5 years ago
Quoted from Utesichiban:

Pretty sure that bear isn't going to obstruct anything. Why is it such a big deal to you if some of us want to add a thing or two to have fun with a game?

I confess, I bought the bear (it was $5.00 from Michael's). It's not great, but it DOES hide the ugly grey switch cover and that was my justification for getting it. It is a little bit lame but as far as mods go it's pretty unobtrusive.

#3632 5 years ago
Quoted from Utesichiban:

Yeah for $5, I don't see a problem with getting one. If I don't like it, its not like I'd have much money into it.
What did you use to secure it to that area?

I got a small bracket from Michael's that looks like this " ¯|_ "and attached the bottom end of the bracket to the switch screw to the right of the ramp. Then, I put a small screw through the top end of the bracket up into the bottom of the bear's front foot. Then I used double-sided 3M tape to attach the bear's rear foot to the top of the metal switch bracket.

So, yeah, the plus side is he hides the switch. The minus side is that you now have a plastic bear in the middle of your pinball machine.

03_White_Water (resized).jpg03_White_Water (resized).jpg
#3634 5 years ago
Quoted from Bryan_Kelly:

You said it, not me.

Yeah buddy, come back when you're a highly-regarded pinball restorer who commands the utmost respect of pretty much everyone in the pinball communi .... oh, .... oh really? So, you're THAT Bryan Kelly? .... Well ...... neeeeever mind.

#3635 5 years ago
Quoted from TheLaw:

Well it also takes your focus away from the lame rafts sooooo....there's that

LOL! I was young and foolish!

#3638 5 years ago
Quoted from branlon8:

I had a small divot where the ball hits the playfield under the VUK with the occasional ball hangup so I put in the cliffy there. Put a touch of 2K filler in the divot. I put a bit of cardboard under the ramp leading from spine chiller so it was higher than the cliffy. When I tried it the first time I was half way expecting that lovely clinking sound of metal against metal, but what I got was a ball hitting a hard surface and bouncing. So the ball bounces I think around twice or so and then rolls down to the upper pf. This means it needs slightly longer to reach the upper playfield. So I put a coin size piece of mylar right under the VUK thinking it might dampen the impact a bit, but if anything it slowed it down a bit more with no perceivable reduction of the bouncing. The ball even got stuck once on the mylar, I’ll probably peel it off again.
I reckon I’ll get used to the bouncing and the slight delay (it still feels kind of funny, though), but I was wondering if anyone else has had this and if yes I’d like to hear your thoughts and/or actions.

I have a few really detailed posts in this thread about that area if you want to search for them. In a nutshell, you shouldn't be getting a lot of bouncing and I wonder if your VUK is positioned correctly. Where I always got hangups (on the two different WH2Os I've owned) was between the ramp and the playfield, right before the spot where the Cliffy goes. When everything is set up right, I've found that you don't need a lot of unorthodox modification in that area (spacers, cardboard, mylar, rubber on the VUK bracket to stop spin). I think it was designed right from the get go but when you start fooling with that area its easy to get off track. Reproduction ramps are thicker than the originals and that causes part of the issue. I had to do some filing and smoothing of the edge of the ramp but otherwise mine has the Cliffy and that's it.

#3642 5 years ago
Quoted from Utesichiban:

I'd rather get the missing mountain mod but the guy that was still making them in Europe sounds like he isn't doing them anymore. Ditto for the guy in Colorado.
Anyone have am extra they want to sell?

I thought somebody new picked up the mod. I may have an extra of the one Aeneas (from Europe) did. My favorite is the Red West but those are loooooong gone.

#3643 5 years ago
Quoted from branlon8:

Thank you for your comments. I searched this thread for “cliffy” before I posted, but I’ll have another look. The only hangups I was getting were directly on the divot. This is why the cliffy appealed to me. The ramp on my game was slightly higher than the playfield, but it was slightly lower than the top of the cliffy, this is why I raised the ramp. The horizontal gap is maybe 4mm. Not sure how I could put in the VUK differently as there are two screws on the pf and a hole on the popper to align the input end, but I’ll look. Since you are not getting bouncing, clearly something is different.

Sounds like you've got the VUK in right. It's worth double checking but it sounds like you've got that right. I eventually solved my problem by doing lots of testing with the mountains off, trying to get a pinball stuck, and then taking measures to correct for that. It's hard to tell what's going on unless you can see. Could it be that the bondo is so hard that you've created a situation where the ball is more prone to bounce?

#3646 5 years ago
Quoted from Utesichiban:

Is the one in the picture of your machine the one from Europe? I may be interested as it looks like a decent match for the game in your picture. What happened to the red west guy? Did he just stop making them?

No, actually the one in my picture is the Red West version. It's much bigger and the material is kind of thick. A light inside the cave would not illuminate through like the boulder garden. Aenaes's version is smaller and has a thinner material, closer to the original thickness but not exactly, and more hand-made feeling. His probably would illuminate. When planetary does the next run of repro mountains it should really do a missing mountain and make it the same way as the originals. That would be cool.

1 week later
#3682 5 years ago
Quoted from Blitzburgh99:

I need some help...I just got another Vacation Jackpot today...that’s 2 in two days. I’m pretty sure I’m not that good.
I am running ROM LH-5. Is there a bug or something in that ROM set? I ran the River Level up to 6 on first ball by focusing exclusively on doing just that, using multiballs to move rafts and river letters. I had an extra ball. When I drained, the Extra Ball was served and River was still at 6. When I drained the extra ball and ball 2 was served, I expected river to be back to 1. The inserts on the playfield showed back to start of river. But the DMD Vacation Planner had River 6 still completed. I think I had a Bonus Hold somewhere between ball 1, extra ball, and ball 2.
Does anyone know how river 6 can be held over or kept?

That's weird that the River Class held on an extra ball but possible I guess. I haven't played L-5 in years. But yeah, as others said you only need to hit Class 6 once during the game to check off that vacation jackpot requirement. Also, on L-5 you may get the DMD telling you the River Class will be held but it doesn't actually hold the River Class. This was a bug that LH-6 fixed. I actually prefer the L-5 roms except for that bug so when I run LH-6 I turn off the ball save. I wish I could turn off the end-game light show too but it won't let you do that. We need LH-7!

1 week later
#3730 5 years ago
Quoted from DANGERTERROR:

One issue I’ve run into is that the yellow river inserts, even with warm leds, look too light, almost greenish. Sickly. Not gold enough. Anyone have a trick color or idea for warming up yellow inserts. I need ULTRA WARM. Or something.

I went with Cointaker 555 Super in Warm White. They look like a nice bright yellow instead of orange or green. What I found was that I got lots of variation between different types and brands. I probably tried 5 or 5 different bulbs on those inserts and settled on the Cointaker Warm White. This being said, they are much more yellow with the Warm Whites than with the incandescent, which come off as more of an yellow-orange. If you're looking to mimic the original incandescent then you might try something different (maybe pink?)

1 week later
#3743 5 years ago
Quoted from dmacy:

This was a big help jam_burglar seeing this before and searching for it. That lip you talk of is on mine too and cleaned it up. I did find that on top of that, I had two other issues which will hopefully help someone:
- The lower screw holding the ramp down would hold a slow ball. I've removed it so I can get a smaller head that recesses. Alternatively you could carefully drill the tapered part further. For now I'm running without the screw and it's working great until I get a smaller headed screw.
- Keeping the ball guide and ramp tight with no gap. I didn't have much, but it was enough. A slow ball would still sit there despite the ramp lip and screw. Now that all have been adjusted for, I didn't have any hang ups in 30 or more games.

Nice, it's well worth the effort! I've been running mine for years now and have maybe had two or three hangups ever, and even then they just roll right out if you nudge the table.

2 weeks later
#3797 5 years ago

Had a pretty good game last night.

IMG_20190226_211510 (resized).jpgIMG_20190226_211510 (resized).jpg
4 weeks later
#3921 5 years ago
Quoted from Blitzburgh99:

Whitewater is one word
[quoted image]

True but what about this?

Arcade-Game-Williams-Pinball-White-Water-WPC-Schematic (resized).jpgArcade-Game-Williams-Pinball-White-Water-WPC-Schematic (resized).jpg
1 week later
#3952 5 years ago
Quoted from GCS2000:

So the wife has made it clear that she does not like the red bulbs in the whirlpool. She insists they should be blue.
What do you guys suggest I use for blue in the pool? blue covers, blue frosted LEDs?
And is there an easy way to change out these bulbs or am I looking a tear out of the ramps?
TIA

I used blue incandescent bulbs and they work well there. I know there are a lot of people that like the red but it never felt right to me so I changed it.

Word of advice though, when you remove the light board take note of the plastic spacer keeping the long woodscrew at bay. I've seen quite a few Whitewaters where someone has lost or forgotten that spacer and consequently screwed the woodscrew up through the top of the playfield! Be careful not to do that.

1 week later
#3999 4 years ago
Quoted from Devinsupertramp:

White Water Whirlpool eject problems. My White Water that I had restored has had several big issues from the start. You all helped with the first big issue, but the second big issue I haven't seemed to figure out, if anyone has any advice on that, that would be awesome.
Two issues I have are both with the ball once it goes into the Whirlpool, it gets stuck near the very end, right before it gets to where it gets fired out. It gets stuck 90 percent of the time. I have photos of where it gets stuck. The other issue is with the game knowing when to eject the ball from the whirlpool exit. The moment I turn on the game it starts firing at the exit of the whirlpool. I have a video of exactly what happens when I power on the game.
I did a couple test on the switches as well, here's what it said, guessing that's one of the issues.
Whirlpool Popper 61 (A) - OPEN
Whirlpool Exit 62 - CLOSED
Whirlpool Right 63 - CLOSED
Any advice on how to prevent the ball from getting stuck down the chute from the whirlpool?
Any advice onto how to fix the exit from constantly firing when it shouldn't?
Here's a link to the whirlpool eject and what it does the moment I turn on the machine and the moment I start a new game. Thinks there's a ball there when there is not.
https://www.dropbox.com/s/tppip52jjjun7dc/IMG_4059.MOV?dl=0
[quoted image]

You may have dirty or failing optos in the Lost Mine (or possibly elsewhere). These matrix issues can be confusing and (in my REALLY limited) experience you have to methodically track them down. Here's my thread on a similar, or maybe even the same issue.
https://pinside.com/pinball/forum/topic/phantom-switch-opto-issue-wpc-white-water

The ball getting stuck sounds more like a mechanical issue. If you really get in there and start looking at the issue you should be able to figure it out. I'm sometimes surprised at how easy it is for a pinball to get hung up. Anything out of alignment can cause an issue, debris, rough plastic, etc.

4 weeks later
#4036 4 years ago
Quoted from arcadenerd925:

I'm curious as well. I'm assembling the parts needed to do a full restore and I feel lighting is definitely something I need to address. I was thinking of putting RGB LED strips (both pointing up and down) under all boulders and then just play around with programming them to see what looks good.
As for LED kits, my .02, I'm just not into them. After doing several LED conversions I have my own preferences now on color matching, warmth, etc etc. But it's always nice to know how many you need of each type of bulb, etc etc. I will say this, vendor wise, Comet's are my preference.

LEDs in the inserts turn out okay but even then I would only go there with the LEDOCD board. The sequencing of the lights is not right without it. I did lots of experimentation to find color combinations I'm happy with. It all depends on the insert. For GI I think you're asking for trouble using LEDs (unless you get a GI OCD board). LOTS of fading going on with this game which will be totally destroyed if you put LEDs in the GI or backbox without proper control of the LED fading. With the GI, you need to be subtle. A lot of people kill the game with too much blue. I actually put some aqua incandescents in some upper playfield spots on mine and that works but LEDs were way too strong. Much safer to stick with a sunlight if you go LED and ONLY (ONLY!) if you have GI LED board.

#4048 4 years ago
Quoted from arcadenerd925:

It's just too dark to me. Next to my TSPP which is bright and colorful I just dont like it. When I play with the lights down or off, too hard to see, etc.
This game is a keeper for me, so I have no issue forking out the $$$ for both OCD boards.

You might try experimenting with spots tied into the GI. That's what I did. I've got two attached to the apron to light the flipper areas and a partially modified one that is hidden under Bigfoot's cave shining towards the "lost mountain" mod. All of these are tied into the GI so they dim, etc. in sync with the other GI lighting.

I also have the bigfoot spotlight mod which lights him up when he turns.

With that and the normal GI I've been good. If you LED the GI without an GI OCD board you will kill all of the dimming, etc. designed into the game's light show, and that is a huge part of the lighting for this game.

#4049 4 years ago

Looks like Mirco fixed the coloring issues with the brim of Wet Willies hat etc.!

1 week later
#4089 4 years ago

When my boards act up, I send them to CoinOp Cauldron. They come back fixed, Clive tells me what he did to fix them, and usually tells me any other preventative maintenance he's done. So, when all else fails (or you just don't feel like messing with it) send it off for repair.

As for the sound, I know that people often complain about Whitewater's sound, but I'm fine with the stock sound and unless you are very meticulous (like Endprodukt) whatever you replace the stock sounds with will probably not be comparable to the original sounds. Unless and until Endprodukt finishes his work, I can't see the value in paying for a Pinsound for this game vs repairing the original board.

2 months later
#4233 4 years ago
Quoted from SantaEatsCheese:

Two questions for you folks.
1. ....
2. The ramp with "multi millions" on it in the far left isn't scoring correctly. When the yellow arrow is there, and a shoot a ball up the ramp, it doesn't register it, but still makes sounds when it hits the gate. The same thing happens when multi millions is lit. I have no credit dot and no switch errors. I'm really scratching my head on this one and would appreciate any help.
...

In my experience the Spine Chiller will sometimes fail to register if the ball in moving slow enough. The rushing water sound effect you hear is from the first microswitch on the ramp, however, that's just a switch for the sound effect, it does not effect whether or not you "make the shot". The switch that registers a successful shot is an opto back behind the mountain/bigfoot. It may be that adjusting the opto can lead to various results, but on my game the Spin Chiller shot will often not register if the ball is travelling very slowly. When the ball has some speed to it, then the opto gets triggered just fine.

If yours never registers then you need to check that opto.

#4285 4 years ago
Quoted from SantaEatsCheese:

Finally got some time to take the glass off of the machine. The symptom was that when shooting up the "multi millions ramp" you wouldn't get the award or get the flashing yellow error ramp. The switches register and make sound. However, upon doing a switch test I have discovered that the opto behind the yeti registers as "disaster drop". How do I fix this? I am assuming there are two wires in the backbox, or two wires under the playfield that got crossed. If someone has a simple fix I would appreciate the help.[quoted image]

I would start with the harnesses that get unplugged to remove the upper playfield. Some of them are the same size and its possible these were simply swapped out during a previous teardown. Do yourself a favor and when you get them sorted, number the harness connections on each side of the molex connector (both sides of connection gets a number, 1, 2, 3, etc.). That should make it much easier to reconnect the upper playfield after a teardown and also help to prevent you from unplugging harness connectors that don't need to be unplugged. Some people use a sharpie to number the molex connectors, but you can also get little numbered electrician's stickers at Lowes or Home Depot that are basically made for this type of application.

If that doesn't work you can pull out the manual and it should tell you where the switches connect to the PCB. You can use your multimeter set on continuity to confirm where any particular wire is going.

#4286 4 years ago
Quoted from Trooper11040:

For the life of me, all of a sudden Big Foots paddle is hitting the bottom of the ramp and I can’t lower the ramp anymore[quoted image]

It's been too long since I've broken down the upper playfield to say exactly what it is, but something isn't aligned right. When its assembled correctly everything will fall into place. There's not really any room for error so it's not something where bending or forcing is the answer. Incorrect alignment also tends to screw up the ball travel so make sure you get it right. I've found that the order of reassembly can affect the ease of the process.

#4297 4 years ago
Quoted from SantaEatsCheese:

You sir, are a genius. There were exactly 2 plugs that had been switched. Took 30 seconds to fix and immediately got my high score afterwards. It's like a new game now that I can properly play it. Thank you!

Glad you got it sorted! Figuring out exactly which harness points need disconnecting for the removal of the upper playfield and then numbering those harness connectors takes some time but it's well worth the effort in the long run. Probably a task best suited for the next time to tear down for cleaning.

1 week later
#4346 4 years ago

Send you board to Clive at Coin Op Cauldron. Well worth it.

2 weeks later
#4377 4 years ago
Quoted from SantaEatsCheese:

Insanity Falls Ramp Adjustment:
Okay, so I'm losing my mind on the Insanity Falls ramp. I switched out my old one for a much nicer one and now the ball is not consistently going all the way down and usually just makes the bend, doesn't make the first hill, and then just drops off.
The following have not fixed the issue:
1. Cleaning/waxing the ramp
2. Tightening down all screws on ramp
3. Adjusting switch to it's lowest point
4. Rebuilding top flipper
5. Cranking the pitch up to 8
I am open to suggestions.
Thanks!

I would take it out and inspect your work, and try again. My guess is that its an install issue.

1 month later
#4439 4 years ago

Here you go

IMG_20191028_200718 (resized).jpgIMG_20191028_200718 (resized).jpg
#4442 4 years ago
Quoted from Pesmerga:

Thank you very much! Could you show the screws in the central waterfall part too??

Tough to get a good pic without taking off the dome but here you go. Basically looks like a bolt and 2 washers.
IMG_20191030_201717 (resized).jpgIMG_20191030_201717 (resized).jpg

1 week later
#4466 4 years ago
Quoted from Jenniebear:

Is it normal for the Big foot head to hit the log when spinning? His chin is half missing. I got a new head and replacement diverter shaft ( hands and log attaches to). The motor shaft does not look bent. The head is hitting an getting stuck. Any suggestions?

I think that it's probably normal for him to rub his chin on his arm but I don't think it's normal that his chin would be hitting the log. There's a black rubber piece on the mech that might be missing from yours. To prevent any rubbing all together I added an extra spacer so that this chin clears everything. I had to re-paint the tip of Bigfoots chin but there was no damage to the actual plastic. FYI, if you need to re-paint his chin the good thing is that the grey they used is a simple black/white mix and I was able to get a perfect match. Grey can be very tough to match when it has different colors other than black and white mixed in but bigfoot's beard is fortunately just black and white.

1 month later
#4514 4 years ago
Quoted from TheLaw:

Just sharpie the numbers on both sides of the plastic connector.

Or be a huge dork and use matching number stickers from the electrical supply section of Lowe's.

4 weeks later
#4571 4 years ago
Quoted from PinDeLaPin:

I am currently running LH6 roms. I will definitely mess with it when I get home this afternoon. Now I am totally 2nd guessing myself about maybe hitting those bounceback targets. However it still doesn't explain why a different lit tarhet would be called out when another target is hit. Pinball, it's great when it is working!

If you rule out the fact that Disaster Drop and and the Bounceback targets will "spot" rafts, you may need to dig into "switch matrix" issues. These can be really confusing and can cause the type of thing you are describing. Combinations of certain switches can trigger this behavior and when you add optos to the mix it can get maddening. Try to figure out what is causing the incorrect behavior. For example, does hitting the Lost Mine trigger Insanity Falls? Is it every time, or just some times? Definitely check every switch, including the optos, in test mode. If your wiring is correct, my advice is to make a copy of the switch matrix and map out where the problem may be. Being able to write on the matrix helps to wrap your head around the problem.

There are articles on the switch matrix and how to troubleshoot it. You may have to read these carefully and really dig into the issue to get anywhere.

I had a similar issue a few years back and it turned out to be a failing opto. The opto wasn't always out, so the problem was intermittent. Remember that an opto is reversed from a switch so it's natural state is "on" rather than "off". When the beam failed (which was intermittent), AND I completed a certain shot, the combination of those two switches being simultaneously activated triggered the third switch, causing the incorrect behavior. Replacing the opto bulb fixed the issue.

1 week later
#4610 4 years ago
Quoted from Mando:

Lol I guess I am must wondering how much a no no it is to get one without a topper .
Apparently he actually has the topper but it’s in bad shape .. I’ll need to get a pic but let’s just assume it’s not there

I suspect you'll find that, overall, the complete lack of the topper is a big deal. Perhaps the tides have shifted some because people are realizing there's no clear path to a repro, but I doubt the market has shifted THAT much. It's an unobtainable part that may not be important to game play but it's part of what makes the game unique. Aside from the waterfall effect, it's the only place on the front of the game that contains the title. So, there's always been lots of talk about the topper and it seems like everybody who doesn't have one on their game REALLY wants one. There have been lots of threads about possible repros with tons and tons of interest but nobody has delivered yet. Moreover, really nice toppers are super-rare. Maybe 1 in 10 isn't all bubbled out. So it seems that people have come to peace with living with a so-so topper but probably not no topper at all. Even poorly executed repro toppers have gained some value.

So, if the guy you're buying from has the topper I would definitely get it, even if it's in bad shape. And I think it's fair to expect a pretty steep discount for a game without the topper. A game with a so-so topper is pretty much the norm. Games with really nice toppers tend to fetch a premium (assuming the game is otherwise nice). That's been my take over the past 10 years or so but I haven't paid close attention lately.

1 week later
#4641 4 years ago
Quoted from arcadenerd925:

alright fellow wh20 owners. I nearly have all the parts needed for my restore. The last thing to sort out is the armor.
I was originally thinking of doing powder coated white but have since been talked out of it, heh.
Then I was leaning towards chrome (did my FH in chrome and I love it)
But my wife thinks we should do like a light blue powder coat.
Anyone feel like sharing any pics of theirs?
Much appreciated.

I inherited chrome when I bought mine but I have to admit it looks good

01_White_Water (resized).jpg01_White_Water (resized).jpg
#4647 4 years ago
Quoted from Soulrider911:

Is that chrome t-molding on the backbox!?

Yup.

#4670 4 years ago
Quoted from mystman12:

Okay, so I got my bounce back working just about perfectly. I just needed to adjust the switch, as before it was being triggered too early and it also wasn't straight, so it would rub up against the side of the playfield and get held down. Thanks for the help!
I did notice though that Big Foot's arms are not attached to his hands. His left arm is all covered in some sort of glue, but not his right. What is the best way to reattach them?[quoted image]

There is a vinyl fabric and plastic glue made by Picture that works well. One thing to watch out for is, once you reglue the hands, the fur/hands can rub up against his chin and wear off the paint. I put a spacer down in the mech to stop that and it's worked well for years now.

#4671 4 years ago

"Loctite" not "picture". Effing autocorrect !

#4694 4 years ago
Quoted from jawjaw:

Put some toothpicks in there with wood glue. Works great.

The problem is it's busting out the side.

1 week later
#4702 4 years ago

I haven't seen that. Before doing anything I would make sure it's not some other issue, like an obstruction causing the ramp to lay untrue. Also, I would alter the ramp before the playfield.

I believe the repro ramps are thicker, but I can't recall anybody having this specific issue.

If you need to sand or trim the ramp consider doing it on the underside. If worried about plastic cosmetics, after sanding with progressively finer paper use Novus 3, then 2, then clean with 1.

Set up properly the game should be hard. Open up the right drain to the max. Make sure the Lost Mine isn't giving you an easy catch. Turn off the ball save (it was never on the commercial rom anyway).

#4703 4 years ago

Edit

#4705 4 years ago
Quoted from Sciddleybop1980:

There’s not a lot you can do with the ramp, except sand it, which then scratches the hell out of it and looks awful. I think a small sharp chisel and some care will sort it.

This is what Novus is for. If you sand progressively using finer and finer paper as you go along, then finish with Novus, you can get a nice, smooth, glossy finish.

#4714 4 years ago
Quoted from mystman12:

Well crap, I think something very bad might have just happened... I had pulled the playfield out to adjust a few things, the left slingshot switch, the plastic guide at the top of Insanity Falls, and I added a couple rubber rings to the No Way Out VUK to try and eliminate roll back. Once I finished I turned the game back on, heard a very faint click (Which I initially assume was just a plastic settling, and maybe it was) but the game won't get past the test screen. GI does come on. It still makes the normal beep sound but that's it, after that it's completely unresponsive. Test buttons don't do anything. Big Foot's head never spins like it normally does when starting up. I tried restarting the machine a couple times, no change. Worst part is, unless I'm now just being paranoid and this is totally normal and I just never noticed before, I think I was able to smell something electronic. Not smoky, just seems to be a stronger than usual electronics smell.
I checked all the fuses. None seem to be blown (I checked with a multimeter while they were installed) however a few are incorrect according to the manual. I'd been meaning to check them all to make sure they were correct but I was having too much fun playing and kept putting it off...
The incorrect fuses are:
F113 - Has a 5A fast blow, manual says it should be slow blow
F114 - Looks like an ordinary slow blow fuse, however manual says it should be normal blow. I'm not really sure how to tell them apart though so it could be correct EDIT: Just did some research and found that normal blow means fast blow, so this is definitely wrong.
F115 - Manual says it needs a 3/4A slow blow, but the fuse that's currently there doesn't seem to specify what it is. Labels on it are 32 VOLTS and BUSS AGC 5
F901: Has a 3A fast blow, should be slow blow
F902: Has a 2 1/2A slow blow, should be 3A
F904: Has a 5A slow blow, should be 3A
I'm not really sure what to do next. I'll swap out the incorrect fuses with the correct ones although I might not have all of the correct ones on hand. Besides that though I'm kind of afraid to try turning it on again and potentially causing more damage... Assuming something's been seriously damaged already. Hoping it's just a loose cable or something.

Yes, definitely makes sure the board LEDs are doing what they should. It's worth doing a careful check of the places you did work to make sure you aren't shorting somewhere on the playfield. If you can't figure it out and you're convinced it the PCBs, this is the stage where I send the boards to Clive at Coin-Op Cauldron. Some people are good with troubleshooting PCBs, that's not me. The problem with these old machines is that sometimes you're inheriting some previous owner's hacks, improper fuses, etc. In my mind its worth sending out the boards to Clive, who will make sure they are functioning properly, that the voltages are making it to all the places they need to make it, that the headers are good, that all the fuses are in order, etc.

Last time I used him he upgraded all my headers and then I ordered and replaced all the crucial molex connectors on the wire side. I feel like the board service is worth it even for preventative maintenance.

3 weeks later
#4740 4 years ago
Quoted from Billy16:

So last nite ol' BF stops working right (again), I check the switches and find the one on the ramp has totally broken off. I recall reading about the plastic cover fix, so I spent most of the afternoon dorking with a sheet of lexan cutting it out, sanding, fitting, re-cutting, drilling, etc. Of course the first two broke while cutting--then it's a white-knuckler drilling the holes when you finally do get a good one. First practice hole I drilled shattered a piece of scrap--good thing I got that out of the way. If anyone has a good way to cut this stuff--please LMK.
Works great--well, it did after I soldered the switch wire back on that I broke while maneuvering the assembly around...
Thanks to the Pinsiders who posted this fix previously!
[quoted image]

Nice, clean DIY fix and I gather you'll never have to fool with it again!

2 weeks later
#4783 4 years ago
Quoted from Billy16:

I recall reading several posts about glueing the fur back onto BF without seeing a good answer. I tried some Scotch tacky glue that I bought at Michael's--one of the many craft glues they have that claim to work on "fabric, metal, paper, wood, fairy dust", etc. Well, it actually worked--even though it did not seem like it was going to stick at first. Let it dry for 24 hrs--everything I tried to glue down was solidly attached. If it does not last I'll report back.

I keep telling people that the Loctite Vinyl, Fabric & Plastic Flexible Adhesive has been working for years and years on mine.
https://www.loctiteproducts.com/en/products/specialty-products/specialty/loctite_vinyl_fabricplasticflexibleadhesive.html

I posted this 6 years ago
https://pinside.com/pinball/forum/topic/whitewater-club-lifejackets-not-required/page/3#post-1022958

Promoted items from Pinside Marketplace and Pinside Shops!
$ 60.00
Cabinet - Decals
Pinball Haus
 
$ 399.00
Cabinet - Decals
Mircoplayfields
 
$ 329.99
Lighting - Other
Lighted Pinball Mods
 
$ 79.99
Cabinet - Armor And Blades
PinGraffix Pinside Shop
 
$ 12.95
$ 12.95
Playfield - Decals
Pinball Pimp
 
$ 5.95
Lighting - Led
Mitchell Lighting
 
$ 10.95
Eproms
Pinballrom
 
$ 34.99
Rubber/Silicone
NO GOUGE PINBALL™
 
$ 27.95
Eproms
Pinballrom
 
$ 84.99
Cabinet - Armor And Blades
FlyLand Designs
 
$ 189.00
Playfield - Plastics
Starcade Amusement
 
From: $ 9.99
Eproms
Matt's Basement Arcade
 
$ 30.00
Playfield - Other
YouBentMyWookie
 
$ 119.99
Cabinet - (Alt) Translites
FlyLand Designs
 
From: $ 110.00
Lighting - Interactive
Pinball Z
 
$ 9.95
Lighting - Led
Mitchell Lighting
 
$ 225.00
Cabinet - (Alt) Translites
FlyLand Designs
 
$ 225.00
Lighting - Interactive
Professor Pinball
 
$ 1,059.00
Flipper Parts
Mircoplayfields
 
15,000
Machine - For Sale
Ontario, CA
From: $ 27.00
Boards
KAHR.US Circuits
 
$ 15.00
Playfield - Other
Nezzy's Pinball Prints
 
$ 9.95
Eproms
Pinballrom
 
17,250 (OBO)
$ 69.50
Boards
Pinball Haus
 
7,780 (OBO)
Machine - For Sale
Wilsonville, OR
7,699 (OBO)
Machine - For Sale
Evansville, IN
Hey modders!
Your shop name here
262 posts in this topic match your search for posts by jam_burglar. You are on page 1 of 2.

You're currently viewing posts by Pinsider jam_burglar.
Click here to go back to viewing the entire thread.

Reply

Wanna join the discussion? Please sign in to reply to this topic.

Hey there! Welcome to Pinside!

Donate to Pinside

Great to see you're enjoying Pinside! Did you know Pinside is able to run without any 3rd-party banners or ads, thanks to the support from our visitors? Please consider a donation to Pinside and get anext to your username to show for it! Or better yet, subscribe to Pinside+!


This page was printed from https://pinside.com/pinball/forum/topic/whitewater-club-lifejackets-not-required/page/1?tu=jam_burglar and we tried optimising it for printing. Some page elements may have been deliberately hidden.

Scan the QR code on the left to jump to the URL this document was printed from.