(Topic ID: 248218)

Welcome To The Jurassic Park Prem/LE Club!!

By Royale-W-Cheese

4 years ago


Topic Heartbeat

Topic Stats

  • 9,218 posts
  • 803 Pinsiders participating
  • Latest reply 8 days ago by scootss
  • Topic is favorited by 439 Pinsiders

You

Linked Games

Topic poll

“What is the first MOD you will buy??”

  • Toppers 59 votes
    46%
  • New Jeep 51 votes
    40%
  • Plastic Characters 18 votes
    14%

(128 votes)

This poll has been closed.

Topic Gallery

View topic image gallery

IMG_1098 (resized).png
B8996674-A600-487D-9DA1-0CC0391ECFB2 (resized).jpeg
IMG_1086 (resized).jpeg
IMG_1077 (resized).jpeg
IMG_1079 (resized).jpeg
IMG_1059 (resized).JPG
IMG_0878 (resized).JPG
IMG_0881 (resized).JPG
IMG_0798 (resized).png
IMG_0797 (resized).png
IMG_0818 (resized).jpeg
IMG_0811 (resized).jpeg
IMG_5630.jpeg
Pinside_market_106545_2.gif
002-pro-jurassic-park 2 (resized).jpg
PXL_20240116_030524583 (resized).jpg

Topic index (key posts)

18 key posts have been marked in this topic, showing the first 10 items.

Display key post list sorted by: Post date | Keypost summary | User name

Post #885 TECH: PLAYFIELD. T-Rex alignment bulletin from Stern. Posted by pickleric (4 years ago)

Post #1396 TECH: PLAYFIELD. Shooter fix Posted by Chambahz (4 years ago)

Post #1619 read before dismantling the raptor Posted by timlah79 (4 years ago)

Post #1830 TECH: PLAYFIELD. T-Rex adjustment info according to Keith Elwin Posted by sk8ball (4 years ago)

Post #2358 TREX Adjustment info Posted by imagamejunky (4 years ago)

Post #2625 TECH: PLAYFIELD. Raptor pit detailed adjustment instructions. Posted by yancy (4 years ago)

Post #2994 TECH: PLAYFIELD. T-Rex head removal tips and Jaw screw fix. Posted by f3honda4me (4 years ago)

Post #3326 Amber Bonus rules and details Posted by fooflighter (4 years ago)

Post #3417 TECH: SWITCHES. Opto sensor not registering on orbit fix Posted by caker137 (4 years ago)


Topic indices are generated from key posts and maintained by Pinside Editors. For more information, or to become an editor yourself read this post!

You're currently viewing posts by Pinsider markharris2000.
Click here to go back to viewing the entire thread.

251 posts in this topic match your search for posts by markharris2000. You are on page 1 of 2.
#5517 3 years ago
Quoted from zh2oson:

I have the same question. It seems like the official Stern shaker has the capacitor but others like Pinball Life do not. Is there a potential to void my warranty if I don't use a capacitor?
This is the only video I've seen where someone does the install with the capacitor version and he mentions that it is to prevent slam tilts (3:23 mark):

Very confusing to be sure. Aftermarket kits (and earlier STERN kits) seem to use motors that draw too much power for a few milliseconds during startup, and the 220uF capacitor buffers the power available for that tiny duration. I just received the Shaker part #502-5027-01 directly from Stern (June2020) and there is NO capacitor visible, nor does it include the capacitor adapter cable. I suspect the new revision of the kit 502-5027-01 uses a different motor with less power drawn during startup so no need for the capacitor.

1 month later
#5786 3 years ago

Finally decided to become more than a spectator on JP, and just got word that I have a 300 pound box in transit to me. It's a JP Premium manufactured a couple of weeks ago. After reading 116 pages of posts here, sounds like I could have plenty to keep me busy, after I unbox it and knock out a hundred games or so!

Sounds like first must-do: a few software setup adjustments are in order to reduce intensity of some coils that may be overpowered by default, sorting out any loose screws I find rattling around, adding a washer to the left side of shooter lane if needed, and perhaps I'll spring for the flipper bat top surface 'caution' decal mod.

My goal it to keep the glass ON and just play it as designed (if that is possible). 8-)

#5804 3 years ago

I wanted to get a hardcopy printout of the Jurassic Park Premium manual and noticed for some reason that Stern left the front and back page graphics in black & white, even though they have used color throughout the rest of the book. So before I sent the book to bestvaluecopy.com and paid for a bound copy, I editted the PDF and swapped the color image on both pages and created a new PDF. Best Value Copy will print it in color, with clear front cover, hard back cover and plastic spiral edge for $33 out the door shipped (with coupon FCOC1). Its 66 pages and can be printed on heavier paper stock. I have the updated PDF if anyone wants it.

#5816 3 years ago
Quoted from chubtoad13:

I ordered these. I can post a pic installed when they get here. They use some of the art from the playfield so I think they’ll look nice.
[quoted image]

I see you have a Premium as well, and I am thinking of getting the same one. Love to hear your thoughts once you have them in hand on the quality of the material, the printing process and the graphic itself (up close).

m

#5840 3 years ago

Cliff must get a wave of inbound orders when a new batch of pinballs lands. I just ordered a set of Stern JP shooter lane protectors from Cliff this morning! He'll be busy cutting and bending stainless stell sheets this evening...

1 week later
#5866 3 years ago

Do we have any general concensus or guidance on what to do with the post at the tip of the right upper flipper to protect the playfield? Stern ships it with a metal washer. I noticed a few posts here that have shown chipping and damage of the playfield at that post around the washer, but with just 10 games on my game, I was wondering if anyone had a solid suggestion I should do before it happens. Should I get a fiber or neoprene washer and add it against the clearcoat?

Also, is it just me, or did they make access to that post locknut underneath the playfield incredibly difficult? It is literally under the flipper assembly. (Asking for too much?)

#5871 3 years ago
Quoted from cscmtp:

today I FINALLY broke a BILLION!! 1.4 to be exact. First time getting to secure control room and king of the island!!

My first game ever was 235Million, and I thought "how hard could it be" to go higher if my first game was 235M? I was wrong. I barely break 200Million for the last few days...

Nice job on 1.4B!

#5876 3 years ago
Quoted from tyson171:

Any luck ever getting this installed?
I have a premium on order along with cliffys lane protector, just looking for some advice/write up on installing. This is my second pin, pretty new to all of this, but planning on installing the cliffy before i run a single ball through. I bought his kit, never even removed a post before. Anyone have an additional feedback on installing the whole kit and or tips?
Thanks!

I will be installing Cliffy protectors in my new JP-Premium this weekend. (I installed 5 layers of BLUE PAINTER'S TAPE in the shooter lane before I turned it on the first time to protect the clearcoat and wood until the protectors arrived. I told Cliff about this clever blue tape bandaid approach and it made him laugh, but he didn't hate it!). Anyway, I will let you know if I have any issues installing in a new build.

#5879 3 years ago
Quoted from Markharris2000:

I will be installing Cliffy protectors in my new JP-Premium this weekend. (I installed 5 layers of BLUE PAINTER'S TAPE in the shooter lane before I turned it on the first time to protect the clearcoat and wood until the protectors arrived. I told Cliff about this clever blue tape bandaid approach and it made him laugh, but he didn't hate it!). Anyway, I will let you know if I have any issues installing in a new build.

I had some free time tonight so I put the protectors in. It’s not hard, but takes 20 minutes. You have to remove the two screws on the right side rail, and then carefully position the long protector just right to align with the edge of the lane. Took some eyeballing to get it right. Then just tightened the screw on the rail. The second Protector piece required the apron to be removed, and then the two screws near the end of the trough need to be removed, protector put in place, and then apron put back. Took 20 minutes.

While I was at it, I swapped the green shooter spring for an Orange one (Proper one), and added a small washer under the left fork of the shooter Ramp to make the half-pipe more attainable manually and with auto-shooter. I also added a thin 15mm hard nylon washer under the post at the tip of the flipper to protect the clear coat from chipping...

A good 45 minute investment...

2 weeks later
#5891 3 years ago
Quoted from FatPanda:

My JP Prem is waiting for me in the garage. Wife took delivery of it...and I'm itching to tear that box open!

The concensus in this thread is the first and only essential thing to do as part of your setup is to put in the shooter lane protectors before you load the balls, otherwise you will risk damaging the shooter lane wood. Cliffy has the whole kit (left and right) for $20 or so, and PBL has just the left side (about $8). I ended up using Cliff's right side (easy to install under the side rail) and PBL's left side (stick down without removing the apron. They match perfectly.

Obviously make sure everything on top is still in the right place, Trex jaw is not stuck under the wire ramp, raptor tail is not stuck near the tower, no screws or washers floating around on the playfield or in the cabinet bottom. Make sure you check the third flipper tip post too. Make sure its tight and centered. Then you will likely want to lift the left shooter lane tong and add a washer as previously mentioned in a bunch of places to help ball travel success up the half-pipe.

Install the tilt mechanism. Then the only choice you need to make during setup is whether to put the two backbox bolts in from the back or from the top.

#5893 3 years ago
Quoted from Manny65:

I think that lowering the trough kickout power to the lowest setting will address the issue and a shooter lane protector is simply an added protection. So I personally wouldn't hold out playing games because you don't have a protector on the shooter lane.
Just my 2 cents worth

I used a poor-man's lane protector until Cliff got my protectors to me.... 3 layers of blue masking tape! I cut three 2 -inch strips of 3/4" wide blue painters masking tape and I put them on top of each other on the right side of the shooter lane opposite the kickout from trough. It protected my lane really well until I got the protectors installed and left no residue when I remove the tape. (It would have been better to have the protectors in hand when I unboxed). Anyway, when I told Cliff what I did, he laughed and thought it was pretty ingenious!!!

LOL

#5897 3 years ago
Quoted from FatPanda:

Thanks for the pointers. I just spent the last 2 hours setting it up, I added mylar to the shooter lane, installed a shaker, a coat of wax and checked some posts and screws. It all looks good so far. I was initially confused with how the right flipper switches operated. I had never seen how the lower flipper switch is actuated by releasing tension by pressing in the flipper button. It was gapped far enough where there was a "lag" on a fast flipper press. The upper would fire before the lower and it threw the timing off. I tapped the flipper switch much closer together and it feels more normal now.
My little guy breaking it in.
[quoted image][quoted image]

The right flipper button is "staged" allowing the two flipper mechanisms to operate kind of independantly. They are intended to respond independantly, depending on how far you depress the button. Mine was a bit too close, but other on this thread suggest it is intentional and encourages more aggressive timing.

#5902 3 years ago
Quoted from FatPanda:

So i gotta ask, what mods?
I have an external sub connected to the game already and I will be trying out the custom audio. Plus I'm aware of the replacement jeep. Anything that is functional that should be added?

Some items to 'coin'sider:
-The flasher near the control room seems VERY bright to me. It's blinding white and covered by a clear piece of plastic. Distracting to me. ULEK makes a really nice replacement themed plastic that requires nothing but a swap. ULEK about $20

-Lots of folks replacing gthe shipped GREEN spring with an ORANGE spring. Not sure if that is a 'mod', but puts the game back to how it was designed. About $5

-Titan has a nice translucent green rubber for the flippers, and whatever else you think feels more jungle-y. About $5-10 depending on how many you swap

-Modfather and a few others make an AMBER shooter for $100, and a few yellow LEDs can be easily added to the shooter plate to illuminate it (tied into CN15)

-PBL has a set of protectors that are neon green tinted, for the outramp and slingshots. A 4-piece set for about $15

-The JADA 1:43 JP12 jeep can be found for $15 to $50 depending on source. I have that on my list to install over the weekend.

- The backbox speakers can be swapped with high quality 4-inch 4ohm to get much better sound. I used the Kicker 43DSC40's, about $40 for the pair.

#5912 3 years ago
Quoted from jedi42:

Waiting rather impatiently for my Premium to arrive, and have read there is a setting for 4 or 8 ohm speakers. Does it matter which a person goes for if there is a system setting to deal with them? In other words, why did you specify 4 ohm?

The current factory speakers are 4ohm, so I wanted a transparent swap. If there is a setting for 8 ohms, then it should not make much of a difference in this application. Conventional wisdom says the LOWER ohm speakers will be more efficient, higher power and some say audiophile quality by being able to handle more power more efficiently (fewer sound artifacts when looking on an oscilliscope), but at these levels, I doubt you will hit those limits or notice any difference. If there was a huge cost difference go with the chepare, but the 4's and 8's I see are all in the same $30-$50 range for a pair...

#5918 3 years ago
Quoted from Manny65:

Actually the Pro and Premium factory backbox speakers are 8 ohm (031-5004-02) while the LE has 4 ohm (031-5017-00), and why they have the ability to change it in the settings. The cabinet speaker is the same in all 3 models - 8" 4ohm (031-5007-01).
Some of the earlier code versions would change the speaker ohm setting if it detected the machine was an LE but it resulted in poor audio - these issues are all now resolved.

Great to know. I thought they were autodetected by the software, but it sounds like the 'auto-detect' part wasn't so 'auto' afterall and likely removed from the 1.02 code! LOL

Do you remember where the setting is to change the backbox speaker ohm setting? I may have mine mis-set, but I am glad that it: 1) works fine even mis-set and 2) will potentially sound even better once I set it correctly!

#5927 3 years ago
Quoted from CTHOMAS1998:

Good Afternoon. I have had a strange thing start happening on my Premium. Its a home use pin, bought it new. It has the latest code. I decided to add a DBA and take it off if Free Play just for fun. Makes forna big expensive bank hahahaa! Anyway, while I was in the settings, messing around with custom pricing, all of the sudden, the menu and everything locks up, and I can't get out of it. I have to power cycle the machine, then it just goes into a bootup loop continuously. I have to reload the latest code fully, to get it back. Rhis has happened twice. Decided to leave it alone. Ive had the machine for many months. Any ideas?

Sounds like a 'showstopper' bug in the code itself. You said you did this twice, and was repeatable, so changing a pricing setting seems to be corrupting the code on SDCARD, presumably during a write sequence. BIG "IF": If STOCK firmware, I would document step by step and send to Stern support. If using Tim's AUDIO update version of firmware, try installing the STERN STOCK version and see if it still happens. If it does not break when using STOCK firmware, then again document your steps using HIS version of the firmware and send to Tim.

#5929 3 years ago
Quoted from NeilMcRae:

There is no extra amp - its built into the stern CPU board. the speakers are wired to a 4 pin connector to the board and then spilt with a 4 pin connector to left and right from CN1.
CN4 has a pair that runs to the sub directly also.
upgrading the speakers on my IMDN Premium made a big difference. (you will need to do this in anycase of adding an amp.

I also found a nice difference by upgrading speakers, but I did NOT see much of a difference changing the boxbox to 5-1/4 versus high quality 4-inch. I ended up saving the $40+ cost of the new mounting plates, and just put some Kicker DSC40's that mount directly to the existing screw studs on the existing JP premium speaker plates. Pair of DSC40's 4-ohms were $50, new cabinet speaker was another $35 or so.

#5934 3 years ago
Quoted from Mr_Tantrum:

There is potentially a Stern JP in my future, so I have some questions for the group. To begin with, I will be purchasing off the resell market, so availability, location, price, etc. will all be variables for me to consider. I would typically hold out for a LE, but was wondering if the differences are enough from the premium for me to pass up an opportunity. I realize they art is different, LE has green armor, shaker, and sound upgrade, so my main questions are 1) can a shaker be purchased for the Premium?, 2) How noticeable is the sound difference?, and 3) Does the topper work on a Premium? Any additional input on differences would also be appreciated.

My 2-cents:
1. Shaker is a must and can be found for $100-150. The Premium cabinet is pre-drilled with t-nuts already installed and ready for it. Plugs right into CN15 near coin box
2. The std Premium speakers are pretty mediocre, but for $75 to $175, you can swap. ($75 DIY, $175 complete kit). The cabinet woofer upgrade is very noticeable, the backbox speaker upgrade is somewhat noticeable.
3. I suspect the $600 topper works on either.

Lastly, you could find a distributor with no tax and free shipping that may yield you about the same price as a resale unit.

#5952 3 years ago
Quoted from Mr_Tantrum:

I've seen the scale for replacing the jeep as 1:43 & 1:32 - which is best/closest to the original size?

1:43 seems to be nearly identical to original. I hold them side by side and they look the same to me

#5959 3 years ago
Quoted from zh2oson:

This just happened to mine last night. Do I have to disassemble the whole mech to reattach the bottom jaw?[quoted image]

MY jaw dropped when I saw what happened... Yikes!

#5965 3 years ago
Quoted from Mr_Tantrum:

I know the backbox speakers in the LE are Kenwood KFC-1366S 5.25" speakers, but could someone please tell me what exact make/model the cabinet speaker is?
Also, from what I can discern, are the speakers themselves the only difference in the audio systems of the LE & Premium (i.e. no extra amps, etc.)?

Correct. No other AMPS or cross-overs used. Its simply a design choice of speakers that was made to save cost. The speakers they chose for the Premium are just generic 4-inch and 8-inch speakers. You can loosely correlate the quality of a speaker to 1) the capacity of the coil usually noted as how many Watts it can handle, and 2) the weight of the magnet which can be visibly seen, but hard to actually weight. This largely affects the amount of air that is moved.

Note: You do not HAVE to go with a larger speaker to get better sound. This is a common mis-conception. If the two factors above are considered, you can use much smaller speakers. Size doesn't always matter! (Bose made its name 30 years ago building Acoustimass speakers which were the size of your fist and yet filled an entire room with amazing audiophile quality sound)

#5967 3 years ago
Quoted from Mr_Tantrum:

Thanks for the clarity. I'm aware that speaker size/quality doesn't necessarily correlate, but wanting to achieve the look of the LE speaker grills with added lighting is really the driving purpose of upgrading to 5-1/4" speakers (silly to some I'm sure). I know that even the LE sound could be improved with a more expensive setup, but from what I've read in these forums most all the LE owners seem to be happy with the sound quality. The exact Kenwood backbox speakers are only about $40, so I was wondering what it would be to match the LE's stock cabinet speaker also, which is why I'm interested in the make/model of it (I assume it is some Kenwood, but I have not idea what size or model).
Still haven't made the decision to order a JP yet, but I'm getting close so doing research ahead of time.

Nothing better to help you speed up your research then having a JP on order and on its way to your house..... 8-)

#5970 3 years ago
Quoted from Mr_Tantrum:

Still would like to know what cabinet speaker comes with LE (a pic of the label by an LE owner would suffice). However, would also be interested what make/model you went with for your cabinet speaker (I think you may have posted it before, so I can go find it if you don't know off the top of your head).

I looked at a bunch of 8-inch speakers, most these days have mounting brackets or air handlers that protrude outward from the plane of the face which would make mounting tougher, or they have dual 4-ohm coils, which is not really the right answer for this application (although you could wire in series as an 8-ohm and then change the settings, but I wanted to stay true to the 4-ohm cabinet setting shipped by Stern). I found the BOSS Audio Systems CXX8 Subwoofer to be a great fit. Plenty of power handling, easy mounting, single 4-ohm coil, rubber surround, poly cone (instead of paper). Low cost under $30.

#5980 3 years ago
Quoted from cleanandlevel:

just happened to me as well. it's kinda tough getting under the jaw to screw them back in. any recommendations from someone that has already had this happen to them? did you have to disassemble the rex? loctite the screws? thanks.

If you DO fix it and decide to loctite the screws, consider BLUE 242 instead of RED. Its semi-permanent, rather than perm. That will save your world NEXT time you need to service that screw(s).

#5986 3 years ago
Quoted from Mr_Tantrum:

Well, on the classic games of course - not the brand new Sterns. PinSound boards, speakers, etc. rock! I highly recommend them to anyone wanting to bring new life and a more immersive experience to any of the classic pins that are supported.

I have never actually played a machine with Pinsound, but as I understand it, its far more than just new speakers or amplifiers. My understanding, Pinsound taps into the same logic control that on older machines triggered/generated their sampled original audio (music, sounds and voice) clips and played mono boring audio, and instead actually uses those same triggers to generate a whole new sound track entirely. And the Pinsound sound package can be modified at will (and they have a library of user's contributed custom sountracks) to be used depending on your mood. In this way, the machine 'thinks' its still pumping out the old school sound, but in reality the entire Pinsound audio system is working in parrallel with a whole new audio track, hifi sound...

Am I correct?

#5991 3 years ago
Quoted from Green-Machine:

What is a “cassette tape” an old band or something?

Cassette Tape was a sister band to the "8-Tracks"

#5993 3 years ago

Had some folks ask about the cabinet woofer upgrade on my JP Premium. So here are some images of the swap I made, using the $30 Boss CXX8. You can see the dramatic difference between the Stern stock (grey magnet) and the Boss. Both are 4 ohm, and mount in 8-inch spaces, but otherwise it's like night and day. I placed the speakers on a scale to show the massive difference in magnet size too (more than 3 times the weight). You can see it installed in last picture. Simple swap: pull the old one out with 4 nuts, move wires with a soldering iron, then use a round file to enlarge four of the holes in the CXX8 just a hint. Then press the CXX8 into place and put the nuts back on the posts (they will be hard to thread, but will work with some pressure and patience). Finally a drop of blue thread locker on each...

IMG_1320 (resized).jpgIMG_1320 (resized).jpgIMG_1321 (resized).jpgIMG_1321 (resized).jpgIMG_1322 (resized).jpgIMG_1322 (resized).jpgIMG_1323 (resized).jpgIMG_1323 (resized).jpgIMG_1324 (resized).jpgIMG_1324 (resized).jpg

#5997 3 years ago
Quoted from ABE_FLIPS:

do you think this makes sense if using an external sub at the same time? And you do not us an amp or something right?

If using an external sub, you took a different approach and probably getting all the low-end you can handle! That said, I like the self-contained approach, which leaves the machine identical to the way it shipped from the manufacturer and can be sold without needing any explanations about extra boxes.

Looking at the installed picture you can see I did not add any type of amplifier and just moved the two wire connector from their OEM speaker to my CXX8 (some simple testing showed me that the built-in cabinet speaker amplifier has plenty of power... it was just missing the way to get the power out effectively). In a previous note I showed the Kicker DSC40's I installed in the backbox (uses the same 4-inch mounting), and coupled with the CXX8, I wanted to show a $75 all-in upgrade for the top and bottom that makes a big difference.

#6003 3 years ago
Quoted from JRay23:

So I am getting ready to order those kicker cabinet speakers that are recommended, I noticed that the stock ones are 8 ohm speakers. I don’t have a ton of speaker knowledge, so I am wondering why we wouldn’t have to replace the factory speakers with 8ohm instead of 4?

The machine's settings can be set to 4 ohm or 8 ohm. Premiums are set to 8-ohms with horrible 4-inch OEM speakers. LE's are set to 4-ohm with much better 5-1/4" speakers. (Some audiophilers will tell you you'll get a faster responce with lower ohm speakers). In this application I don't think ohms or size makes a big difference, but the absolute quality of the speaker DOES make a difference. The Kicker DSC40's are amazing, and mount in the EXACT same bolt pattern on the Premium without requiring any new (and expensive) LE-style mounting plates. You could find some 8-ohm speakers, but I preferred to use similiar speakers as those used in the LE (which are 4-ohm) but get the 4-inch version.

#6005 3 years ago
Quoted from JRay23:

Thanks for the reply, so if I go with 4ohm speakers on my premium, I should go ahead and change the setting to 4 ohms correct?

Yup. Works like a charm

#6014 3 years ago

Had a bunch of questions about my JP-Premium speaker swapping, so I wanted to summarize here:

1. The Premium comes with 4-inch backbox mounting plates. The LE comes with 5-1/4 inch plates. The plates determine where the mounting bolts are. Swapping these plates can be expensive, $30 or so each side (PBL), unless you are buying with the SpeakerLEDs upgrade and they save you some $$
2. Kicker makes a great series of two-way speakers called the "DS", with zero front extension and great power handling and large magnet. Depending on the mounting plate you have or want to have, you can get the 4-inch DSC40 pair ($50 Crutchfield), or the 5-1/4-inch DSC50 pair ($60 Crutchfield).
3. The OEM backbox speakers in a Premium are 8-ohm, and the OEM backbox speakers in an LE are 4-ohm.
4. The DS series in both sizes are 4-ohm. The machines SETTINGS allow either 8 or 4 ohm, selectable.
5. The Cabinet speaker in both the Premium and LE are 4-ohm. It is an 8-inch speaker
6. You can replace the Cabinet speaker with a BOSS CXX8 8-inch 4-ohm poly woofer. To do so, you simply move the connector (easy soldering required) and use a rounded file to enlarge four of the mounting holes ON THE CXX8 just a hint. (Takes 2 minutes)
7a. The cabinet bolts for the speaker are short. Just barely long enoung to swap in a better speaker. You can install the CXX8 on the same mounting bolts embedded in the cabinet with some solid downward pressure and then using the original nuts to grab a few threads. A drop of Blue loctite and you are done.
7b. If your bolts are really too short, you can instead get four of the #6-32 1/4" T-Nuts, knock the spikes off them, and then use upside down with a #10 star lock washer and a drop of blue locktite.
8. Go into SETTINGS and confirm the OHM settings match the speakers you have installed.

Note: Already have an external sub-woofer installed? You may find that the cabinet speaker is STILL giving you a bunch of lower-end frequencies which the external sub-woofer is likely not reproducing. That said, swapping the cabinet speaker may not be needed since the deep bass is being handled by the external.

2 weeks later
#6036 3 years ago
Quoted from AndHart120:

Minor issue I am having.....
When the T-Rex head swings to the left it keeps hitting into the electric fence post enough so that the post gets pushed back slightly each time the head hits it. Is there an adjustment in the settings to make the head not go that far to the left or does some other adjustment need to be made?
Thanks!

Does the T-Rex center up on the ramp properly, or is he off there too?

#6054 3 years ago
Quoted from smoke20:

Soon to be JP owner (on fence between PREM and PRO, here. Question. I think I understand there is a setting in the PREM that 'turns off T-Rex ball throw'. Does that mean the toy will be completely inactive like in the PRO model?....or will the toy still wiggle around?

I haven't changed the setting (yet), but the T-Rex can drop the captured ball cleanly on the wire-ramp, or it can thrash around and then kinda randomly THROW the ball (literally) toward the upper ramp and bumpers and see what it hits or lands upon. It hurts me everytime I see it throw the ball, but not enough to turn it off. As shipped from factory, it does both, depending on the sequence in play.

1 week later
#6079 3 years ago
Quoted from yzfguy:

Man, thank you again.... Took about 30 seconds and he is fixed! I took the last way and wedged a ceramic coaster and a microfiber cloth in there to protect everything but his arm so I didn't have to take it apart to remove him. I will second the earlier advice of only heating BRIEFLY, as I heated him at the shoulder with a heat gun on low for like 4 seconds and I think 6 seconds would have melted the arm off! Worked out perfectly, thanks again!

For anyone using a heat gun with plastic, vinyl and pvc, its an art to know how long to hold it in place and how close the gun is to the part itself. Keep in mind that the thicker the part is that needs to be deformed, the slower you want the heating to occur because the heat gun is essentially being applied to the OUTER surfaces, but to permanently deform these materials, you need the INSIDE of the part to be softened. While you may have reasonable results with fast hot burst on the surface, once cooled the inside material may continue to be stressed and over time will force the part partially back to some of the original shape.

I recommend trying this a few times on a piece of scrap plastic or vinyl to get gthe hang of it. (Before you start "melting your raptor"... LOL.) Actually its quite easy, but takes a few minutes of practice to really get the results you want. Lastly, once deformed, make sure you have something (ties, rubber bands, string, whatever) to keep the part in the new position you want, as it could take a couple of minutes of blowing on it before it is set to the new shape.

1 week later
#6136 3 years ago
Quoted from Jmxdc:

Anyone know where I can get a replacement molex connector for the speaker connection in the back panel. I am trying to find a similar one but figured I would hit up this channel before I go buy the wrong ones.
[quoted image]

Correction: This note is identifying the PCB connectors that the harness plugs into.

Refer to schematic, #520-6936-01 and they refer to the speaker connector as Molex 26-60-4020 for the cabinet speaker, and Molex 26-62-4056 for the backbox speakers.

#6139 3 years ago
Quoted from Jmxdc:

unfortunately those are the connections to the board.

Oops... You are right. Let me look at the harness.

#6145 3 years ago

Jurassic Park fun...

JPS (resized).jpgJPS (resized).jpg
1 week later
#6239 3 years ago
Quoted from Chopper36:

Hi guys have been enjoying reading the posts because as of today my nib premium is being delivered. Any must have mods you guys recommend? Love all the speaker lights, this is my first stern game so not familiar with the different light companies. Thanks hope I can contribute to the forum as I get to know the pin.

Must: Shaker motor ($125), shooter lane protector ($25), Tim's Software update (free)

There are a ton of 'Nice to Have" other mods like those listed in the previous note, but the MUST list is above. Shaker and SDCard are all about the experience, and the protector will protect your playfield in the most likely area that will be damaged in a few dozen games.

#6252 3 years ago
Quoted from yzfguy:

I ended up having to buy a whole rescue pack of them on ebay just to get the helicopter. Looks like we created a shortage!

I had to do the same to get the copter. Got the whole 5pc kit for $22 on ebay, shipped to me from puerto rico...

#6315 3 years ago
Quoted from ElkGrovePinball:

Having difficulty consistently hitting the tower shot. In researching this, it looks like my upper flipper is slightly out of alignment (alignment hole should line up with front of plastic/flipper bat). Am I seeing this correctly?[quoted image]

While the bats on Stern machines usually are intended to lineup with the play field indent alignment hole, one of the developers confirms the upper bat should be below. Much like in your picture...

#6321 3 years ago
Quoted from Green-Machine:

The 12 inch long kind!

I had to buy an 8-inch PH1 screwdriver from amazon for this one screw! It was a $7 tool for a one-time use.... but worked fine!

#6322 3 years ago
Quoted from Indusguys:

I removed the ramp flap completely, no mylar, about 200 games and no wear.

Be careful without any protection. Without the flap or any mylar protection, any failed attempts where the ball starts it's upward climb will land the ball smack down on the front of the ramp where it meets the playfield (where the flap would normally be), likely damaging the wood/clearcoat after awhile. The ball will be essentially dropping a few inches over and over from each failed attempt.

Cliffy has a new carbon fiber replacement flap that adheres to the surface and is made for the exact location.

#6324 3 years ago
Quoted from MikeS:

I used a ratcheting right angle screwdriver. These come in handy for hard to reach places.
amazon.com link »

I had time to get the tool so since I noticed that Stern made a nice little cut-out above the screw for a long screwdriver, away I went!!! Your rachet may have worked good too as you had it in your toolbox already. All I had to do was remove one of the Tower roof triangles first. (I have since replaced the whole roof with a home-made thatched/bamboo version)

To remove the screw, I got the "uxcell #1 Phillips Screwdriver 8 Inch Round Shaft Non Slip Comfortable Handle" from amazon, now $8.79
https://www.amazon.com/gp/product/B07D7D4SNW/ref=ppx_yo_dt_b_search_asin_title

#6327 3 years ago
Quoted from Mr_Tantrum:

It's a screwdriver. I promise you'll find another use for it.

LOL

#6345 3 years ago
Quoted from Freakyguy666:

Do you happen to have a link for the cliffy flap?

[email protected] is his email. Just tell him what you need and he will let you know cost and send you an invoice via PayPal.

#6348 3 years ago
Quoted from Jodannar:

Ball search isn’t going to find this magic spin ball. Bounced up from a hard pop bumper hit on the chaos shot and just spun there

What is the angle of your playfield?

#6351 3 years ago
Quoted from Green-Machine:

Yeah something is definitely wrong for that ball to sit on the wireform. Your playfield is flat or tilted backwards

Actually I think the playfield is angle too STEEP! This corkscrew wireform ramp angle is normally sloping front to back (higher in the front of the ramp than the back of the ramp), whereas most pinball ramps slope back to front. So having a steeper angle of the playfield will flatten the 'backward' slope.

Is your playfield more than 7-degrees?

1 month later
#6484 3 years ago
Quoted from Mr_Tantrum:

Over a month ago on December 2nd, I let the group know that I had found a deal on 6 of the choppers we use for modding, and I took reservations for those who where interested in purchasing one from me. Well, I've continued to follow-up with the order, and it's status still shows pending. As I mentioned, this was not with a known distributor but they did at least have a website with shopping cart and secure checkout.
I would say at this point the deal is not going to happen. However, I'll keep checking occasionally, and if the order actually does come to fruition then I'll be contacting everyone on the reservation list for first right of refusal.

I have one of those ready to install modified copters which I didn't get installed before my machine went to a new home. So if anyone is looking for the copter mod, I will sell it at my cost. PM me.

While I am at it, I also have the PBL set of four plastic protectors with the greenish flourescent tint which look amazing install. I didn't get these installed before my machine went away, so these are for sale too. PM me...

1 month later
#6657 3 years ago

Left the club for a few months but always regretted it! So I am re-joining now, second JP Premium just ordered...

#6659 3 years ago
Quoted from JMCFAN:

Whats your lead time? Ordered in Oct.... told mid to late March now...

I am part of that same Mid-March production batch.

#6661 3 years ago
Quoted from Royale-W-Cheese:

Welcome Back, what did you buy after leaving the club?

It wasn’t my original plan, but I ended up cycling out my pristine Totan and Funhouse, then picked up a AIQpremium, then settled on putting in a Ripley’s, RCT and a new JPpremium. Odd group, but each for a reason.

#6665 3 years ago
Quoted from Munsters:

Sold my LE yo early and thinking to buy an new prem with borndate mid 2020. Should i buy this one or wait for the new batch?

Unless you are finding a 'real deal' on the price, another batch of premiums is arriving in a couple of weeks and you can likely land one NIB for $7500 delivered to your door.

#6667 3 years ago
Quoted from JMCFAN:

I sure hope so!!! Been waiting a while....

I have one on order as well and was told to expect a call during the third week or so of March

#6679 3 years ago
Quoted from JMCFAN:

Just heard from my distributor that my Prem should ship 1st week of April!!!

Checked with my disti too.... Now first week of april too!

#6689 3 years ago
Quoted from mbl1116:

Curious what people think...is JP premium a fun game for all skill levels or does it lean far more heavily towards experienced players?

I owned JPpremium last summer and I do NOT consider myself a deep hard-core player. I mostly wanted a game where I can shoot at lots of toys and if I remember and acheive some of the rules, then that's great! That said, I sold it last fall thinking there were just too many rules to keep track of. BUT after cycling through a number of other machines in the past 6 months, I have placed an order for another JP Premium! It *CAN* be deep and challenging, but it can also be a visual smorgasborg of fun when set to EASY. I kept two Pat Lawlor games, but adding Keith Elwin's JPpremium back to the line (I am getting my new JPpremium in a couple of weeks.)

#6705 3 years ago
Quoted from mbl1116:

Anyone else here waiting on a NIB Premium? Curious if anyone heard a specific timeline on delivery from their distributor. Last i heard was first week in April hopefully

I also have one on order. My disti says THEY will receive it "by April 1st" then you add another week to guess when it arrives from disti in your driveway...

#6708 3 years ago
Quoted from Lanemeyer:

Have a premium on order... expected to land in Australia around July.
I have read this entire thread, and made some notes and a list of mods to consider....sadly shipping to Oz is crazy expensive rn
Oh, and I decided its time to stop lurking and start getting involved.

You could use the next 4 months to create an Aussie-specific backglass with a native dino pictured, like the Muttaburrasaurus. That would help you get involved!! LOL. Seriously, you will love the machine when it lands in Oz...

Mut (resized).jpgMut (resized).jpg
#6714 3 years ago
Quoted from Sulaco:

Hi! I am new to Pinside and recently purchased a JP:Premium! I am enjoying it quite a bit and wanted to reach out to the community of owners to help me get the most out of this awesome pin! I also had some questions regarding some odd play observations / general rules:
-Is there an optimal audio setting for this machine? It has a sub-woofer in the cabinet that I feel isn't punching as much as it should. I read about adjusting the ohms/bass/treble in the menu. I would need somebody to hold my hand through that process if that is the way to do this.
-Is anyone else experiencing the T-rex not catching the ball when his mouth is on the ramp (or maybe I am not hitting it perfectly)? Or the opposite where you hit his mouth, but the event triggers anyway without him catching it.
-Amber slings? I hear the call-out for them, but what are they and how did I activate them?
-Finally, any other fun little adjustments, settings, mods (beside the amazing audio/video enhancement mod), or tips to getting the absolute most out of this pin?
Thanks for your comments and time!! Looking forward to them!

You will get tons of mods and recommendations here, but I wanted to start off with what I consider the MUST HAVE stuff:

1. Confirm you have the Cliffy protector for the shooter lane. Many previously owned machines do, but easy to add if needed. It's an easy-ish install.
2. Confirm you have some type of carbon or nylon washer under the upper right flipper post. (Usually requires a thin mechanic's ignition wrench to access unless you want to remove the whole flipper assembly.) Again, Cliff sells one of those as well.
3. There is a screw on the left side of the tower ramp, that usually interacts with the ball due to poor alignment. Some people grind it down, some people replace with a flat head, and some people have just removed it. In any case, consider adding Cliff's tower ramp flap protector to allow a smooth ramp entry.
4. Most people add a flat washer under the left fork of the shooter lane ramp to allow the half-pipe to be accomplished more often. I recommend a #6 brass washer, which nearly vanishes under the stainless fork.
5. Consider getting a set of green flourescent plastic protectors from PBL for the slings. They sell a set of 4 for about $10 which add a great color and protect those plastics.
6. The Control Room flasher on the left side is blinding because it's installed under basically clear plastic! You can replace the clear half-dome cover with a yellow one, or go to ULEK and get a plastic replacement for the top plastic which might look even better and looks 'factory'. $15 or so. I did both.
7. Print yourself a set of custom apron cards. Lots of designs on this site, and FEDEXoffice will print one on waterproof thicker 'plastic'-like material for $2 which is well worth your time.
8. And if you own the JP movie DVD, you can get the information needed to update the SDCARD with an updated gamecode. Search here for the updated code, and see timlah79 for detail if needed.

Most of all, enjoy playing it!

#6735 3 years ago

October 29th was a long time ago in "pinball years", and I feel that a new gamecode version 1.04 might be perculating around Illinois these days since they are still producing a huge backlog of JP machines (Promised April21 and July21 deliveries already being seen).

Anyone else getting that sixth (sick) sense?

#6737 3 years ago
Quoted from JMCFAN:

New code bad?

New code can be good, if it adds new rules or fixes known bugs. It can be frustrating if any customized A/V work has been done using tools like PinballBrowser.

#6741 3 years ago
Quoted from Sulaco:

Hi - After my playing this pin for about a month I wanted to share some observations to see if anyone is experiencing the same thing I am:
-Ball wiggles up the ramps: I am either off a fraction of a mm to cause the ball to rock/wiggle up the ramp (and fall back down) or something else is off. If I am off target, then so be it; but it seems to happen quite a bit.
-Tower halfpipe is a tough shot to complete: most of my shots into this seem to hit the top and then fall back down. Is it possible to dial back the strength of the flippers? Or as with the above...I am just off target?
-My T-Rex is slightly to the left when he is on the ramp. Curious if anyone else's T-Rex is off center a pinch? Is this easily adjustable as some of my shots do tend to bounce off his nose.
More than happy to make any adjustments to the factory settings to get the most out of the pin.
Thanks!

Regarding your Tower Half-Pipe, have you confirmed the left fork screw is NOT interferring with the ball? In MANY machines, that stainless steel entry flap has a screw on the LEFT fork that touches the ball as it enters. (Do this test with the glass off and use your hand to move the ball across the front entry and past the screw. See if it touches). This issue has been discussed a number of times in this thread. The shot becomes much easier if you can modify so that the ball doesn't bounce off the screw. Most recommended fixes: 1) grind the head of the screw down, but not so far that you can never remove the screw, 2) replace the screw with a flat-head screw, or 3) remove the screws and flap altogether and replace with a Cliff Carbon Fiber entry flap. Note: DO NOT simply remove the flap as balls that fail will drop back to the playfield right where the stainless protector flap is supposed to be and damage the clearcoat/paint at the entrance.

#6749 3 years ago
Quoted from Casey_Bryson:

TBD ouch! Thanks for posting the update even though it's not great news.
For me it just means I'll probably have all my mods ready to install, even those from Europe, assuming they aren't coming by boat
Speaking of which: does anyone have a source for the Orange Translucent plastic protectors? Mezel mods is out and the ones from Germany are almost triple the cost when you factor in shipping. I bought PBL's clear ones just in case I can't find any.

PBL has the fluorescent green ones, but not the orange ones.
https://www.pinballlife.com/mm5/merchant.mvc?Screen=PROD&Product_Code=PBL-300-0142-00

#6755 3 years ago

I think the guys in Germany sell them in six different colors. Who knew? LOL

#6757 3 years ago
Quoted from Mr_Tantrum:

So, I have a means to produce a set of orange plastic protectors for the lower slings and return lane guides similar to what others are offering. I'd like to know if someone can contact Mezelmods to see if/when they will be offering more, and if they will not be making more of if it will be in the distant future, then I would like to know how many would be interested in purchasing a set for around $25-$30.
If enough people are interested and if Mezel cannot supply them, then we will move forward and create a set available for purchase.

I sent MezelMods a note just now and will advise their reply.

1 week later
#6760 3 years ago

I just got an updated shipping date (from my distributor) on my JP Premium of somewhere around April 27th. I guess the global materials and container shipping issues are affecting everything!!!!

https://www.wsj.com/articles/americas-imports-are-stuck-on-ships-floating-just-off-los-angeles-11617183002

#6767 3 years ago
Quoted from Averhoeven:

What notification did you guys get when it shipped?

I purchased JP through Jason at CGR. When he has the machine IN HAND from Stern, he requests balance due, and then once that is paid, I get an email with tracking number when he ships. Usually takes 24 hours for the tracking number to become live at the freight company website.

#6778 3 years ago
Quoted from Averhoeven:

Oh, I thought they were drop shipped from Stern

Drop shipping would make sense, but I believe they ship to distributors first, and then the distributor takes care of getting it to the customer. (My machines have always been shipped from Georgia, where CGR is located).

#6779 3 years ago
Quoted from Utesichiban:

I received my Stern lighted shooter rod last week and am qoeking on installing this morning. The instructions Stern sent me I don't think are for this shooter rod, though.
The instructions I received says don't remove the two hex wood screws at the bottom of the plunger mounting plate inside the cabinet. However, the JP rod comes with its own plate and it won't fit with the attached cord through the standard plunger hole.
It looks like I need to remove the wood screws as well and attach the new JP plate to make this work but want to confirm with those that have already done this that maybe received good instructions from Stern first.... also, where does it attach into the board to light up once everything is installed?[quoted image]

One tip which may help some folks out when they try to install the amber shooter rod...

*BEFORE* you take the shooter plate off your machine, use Painters blue tape on the OUTSIDE of the cabinet very carefully marking the exact place that the shooter plate was installed at the factory. Line the edges of the blue tape up with the edges of where the plate meets the cabinet. Make sure the tape is sticking to the cabinet ONLY, and that you do all four sides. (Be kinda precise with the tape because if the blue tape is touching the metal at all, it will probably get stuck under the new plate during re-assembly). THEN install the amber shooter plate by removing the whole back plate, and for re-assembly, match the new shooter plate to the edges of where the blue tape is outlining the location.

#6783 3 years ago
Quoted from Utesichiban:

Thanks for the shooter rod tips everyone. I got it installed today. My only concern is that I may have stripped the wood hex screw areaa bit as they didn't really tighten up fully when I tried screwing them back in. It seems secure enough, though, as the other three screws tightened up well and seemed to secure the plate.
I'm assuming it is normal for the rod to flash off and on with the game, right? I thought it would be illuminated all the time. It is when not playing but goes off and on during game play.

Yes, the LEDs pulse and dim with the gameplay.

#6787 3 years ago
Quoted from Joeymonkey:

Hi everyone, just got my premium on Friday from Mike at Automated Services. He even got me the shooter rod and topper! I installed powder coated armor from Pinball Refinery and alternate translite from Retro Refurbs! Plays perfectly right out of box! Loving this game so far!
[quoted image][quoted image][quoted image][quoted image]

It really is an amazing machine. You'll probably look back and say it was the best $10K you ever spent as a collector.

#6788 3 years ago

The update late last week from my distributor is that he had ordered 20 Premiums months ago, and received a shipment of 10 units at the beginning of April. He is expecting the remainder of his order towards the last week of April. Sounds like *some* units are making it out of the factory (first batch had build dates 3/30 thru 4/2 I think)...

#6800 3 years ago
Quoted from Averhoeven:

Mine can never give me anything specific other than they are building then now.

I suspect any distributor would just be guessing until he has a freight bill and tracking info for a shipment to his location from Stern. Anything else is really just an educated guess since they don't know where their order is relative to other orders either! My distrib got 10 units in first week of April and is waiting on another 10 units 'soon'.

#6814 3 years ago
Quoted from Averhoeven:

I definitely ordered from a smaller vendor than Cointaker. I'm beginning to get suspicious that my order may not have been submitted to Stern when I placed (AND PAID) for it. It took 4 weeks of "reminders" once per week to get the shaker and shooter I also bought at the same time shipped to me when I still thought early April was a possible arrival date (I ordered the shooter and shaker, which he had in stock when I ordered, at the same time as the machine and just received them 2 weeks ago).

Most times a distributor buys in batches. So even though you bought and paid your distributor, that distributor may have been collecting more orders which had the effect of adding weeks or longer before he placed the order with Stern. In some cases, distributors SPECULATE that they can sell a qty ofmachines, so they order them from Stern in advance of having firm orders in hand. (That takes alot of money commitment up front). In some cases distributors order smaller batches with orders in hand. The scenerios are all over the board, but I think VERY FEW IF ANY of the possibilities include a distributor buying one at a time from Stern the day you pay them for it.

Stern ultimately turns around and schedules/prioritizes deliverys of their volume constrained machines based on (mostly) the order in which the orders were received and/or the relationships that affect the most longer-term business for them. (They keep their best customers happy)

#6821 3 years ago

There are at least 4 mods I have seen referenced on this thread for that damn blinding control room flasher, in my order of elegance (IMHO):
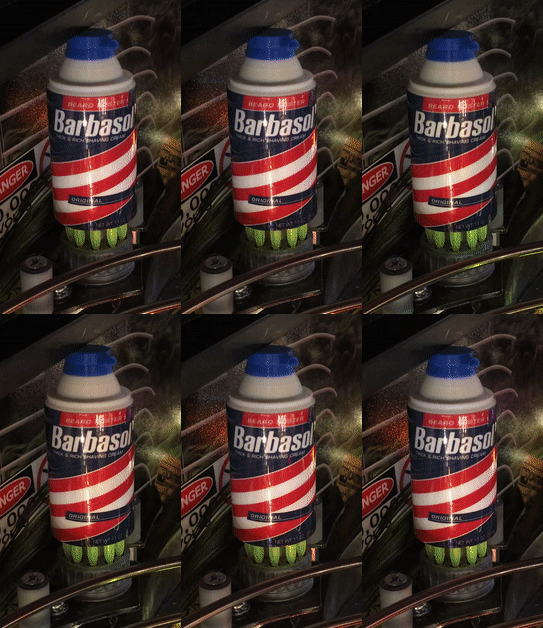
1) The 3D printed Barbasol can by Mr_Tantrum (far and away the most elegant and engineered and exciting answer)
2) The ULEK store's simple replacement plastic with screened printing (laser cut and screened replacement for the clear plastic)
3) The single-tab half starburst dome cover, in Yellow/Amber (a $1-$2 item, #03-8662-16, and carefully trim one tab off)
4) The 906 flasher replacement with a Yellow/Amber 906 (a $1 bulb available individually in a few places, part # 906Y)

No matter what mod you choose, choose something before you go blind!!!

#6831 3 years ago
Quoted from colonel_caverne:

Just wanna buy a new board. I guess it is possible to replace it, doesn’t it?

The comet part *IS* a new board. Stern machines have the single-LED PCB soldered with two-wires, so you MUST unsolder the old board, and swap in the new Stern or comet board. If you bought the Stern OEM part, you STILL need to solder it in! (The only difference in the two parts is the Comet part has two wires that must be cut off or unsoldered first, PLUS the Comet costs $1 and the Stern costs TEN TIMES more).

#6833 3 years ago
Quoted from Green-Machine:

Sippin’ on gin and juice..... never mind

You should be sippin on a Green Dinosaur...

https://mixthatdrink.com/green-dinosaur/

Or a Jurassic World...

https://tipsybartender.com/recipe/jurassic-world-cocktail/

#6846 3 years ago
Quoted from kcirrick:

I placed my order the end of December for a March delivery. March 31 quote from my distributor, “Stern is still waiting on parts, but I think a few will be ready to ship this week”. Mine was shipped April 5. If Stern has truly been waiting on parts then perhaps more machines will soon be out the door. I know that’s kind of vague. Sorry.

There appears to have been a batch of JP's built March 31-April 2. I suspect they had enough parts for that batch which must have been sizable to warrant starting the JP line up again, knowing full well there would be a pause in JP production waiting for JP specific parts. Two weeks ago, my distributor got 10 of the 20 units he had ordered.

I am thinking their production scheduler must be pulling their hair out these days... and everytime I see the Port of Los Angeles pictures of traffic in the shipping lanes and cargo ships all waiting to unload for days or weeks, I picture a container of servo motors, wire-ramps and T-Rex heads just waiting to get on a truck to Illinois!

#6855 2 years ago
Quoted from Snaggletoes:

Hi All,
I just received my JP Premium and during a few games at the start of ball two, 2 balls are ejected into to the plunger/shooter lane. Both balls can enter the field of play and if one drains the game continues. I can't imagine this is a mode and assume it's some type of error. Has anyone had this happen and/or know where I can make a change to either a menu setting or sensor replacement.
Thanks

Are they ejected into the shooter lane ONE at a time, with some time between them, or ALL at once?

#6857 2 years ago
Quoted from Snaggletoes:

All at once, no pause in between. I did put brand new ninja brand balls in the machine instead of the ones that came with it.

Did it work the day you unboxed it? Ninja's can become magnetized in some situations. T-Rex is a strong magnet with teeth and while he's holding the ball thrashing around, it puts quite abit of magnetism into the balls!

Remove the variable: Go back to the factory balls first and see if it fixes the issue (or affects the behaviour at all).

#6865 2 years ago
Quoted from Averhoeven:

I got mine today and hooked up my shaker and amber rod. When I turned it back on I got a loud pop and some smoke from the front board. There was also a "liquid" that sprayed. I'm pretty sure it was the add on capacitor that comes with the shaker that blew. I removed that and everything seems to be working fine. Any thoughts?

There is a Service Bulletin about Shaker Kit installations. In this case, it sounds like your cable was somehow plugged in backwards, or the cable was assembled backwards causing the capacitor to blow.
https://sternpinball.com/wp-content/uploads/2018/08/Stern-ShakerMotorAdvisory.pdf

Added over 3 years ago:

Just got an update from Pablo with Stern support regarding the need/use of the capacitor adapter:

"Good Morning and thank you for your email. The capacitor service kit is not need on all newer stern game. The capacitors are incorporated into the cabinet node board and should be able to connect the shaker motor direct to the cabinet NODE boards CN16 and not have to use the shaker motor Capacitor harness."

Looks lioke you don't need the capacitor adapter at all for newer games!

#6890 2 years ago
Quoted from dapperdan24:

Looks great! Can you tell me more about the Jeep replacement? Where did you get it, how did you install in place of the stock one?

There are a ton of notes about modding the Jeep, and you can find one on Ebay and other places easily for about $25. Just Google "Jurassic Park Jada 1:43 Jeep" and you'll find the right part. MAKE SURE you get the 1/43 or 1:43 size!!! Then there are some great instructions on this thread on the (relatively) easy modification process.

#6895 2 years ago
Quoted from Averhoeven:

I got mine today and hooked up my shaker and amber rod. When I turned it back on I got a loud pop and some smoke from the front board. There was also a "liquid" that sprayed. I'm pretty sure it was the add on capacitor that comes with the shaker that blew. I removed that and everything seems to be working fine. Any thoughts?

I suspect the node board in your machine has the capacitor built in (since it's a newer machine) and you'll be fine WITHOUT the capacitor kit entirely. (In fact, you do NOT want to install the capacitor kit cable if you have the newer node board). That said, the symptom of needing the capacitor kit is to observe mysterious SLAM/TILT triggers for no apparent reason when the shaker is running. If your machine has that symptom, then you'd need to get a new capacitor kit from Stern and install it. But I received an email from Stern Support yesterday, stating that all newer machines already have the capacitor built INTO the cabinet node board, so the cable was only needed for older machines.

#6906 2 years ago
Quoted from RefugeNate:

I just received my JP Prem a few days ago and my T-Rex ramp exit opto didn't work out of the box. So yeah, after a 6 month wait to finally get the game it's pretty much worthless because you can't start a mode or do anything that needs the left ramp to register. I thought the same thing you did about maybe the QA is lacking a little to get the games out the door. I can understand over time something failing or small tweaks here and there but an opto not working straight from the factory? I think that is poor QA. I guess I can just play the Trex events over and over until my new part shows up someday.

There are a few simple fixes that might save you time. The opto connectors could be loose, and need to be reseated, or the optos themselves may have moved and need to be aligned. Can you provide any observations on the optos positioning next time you pull the glass? Did you try to manually make the opto register in TEST mode? Any more details on what it looks like or what you have already tried may help here...

1 week later
#6943 2 years ago

Ok, after a long journey, I am back in! Build date 20-Apr-2021

#6945 2 years ago
Quoted from hoby1:

Gees..... been waiting for my Prem. for 6 months. Still didn't hear anything. They keep saying its shipping next week. How long ago and who did you guys order from.

Classic Game Rooms in Georgia. Ordered about 10 weeks ago.

#6949 2 years ago

Initial observation on my April 2021 build versus my August 2020 machine: The playfield finish is very different. Whereas the August 2020 machine had a thick layer of clearcoat which made the entire surface of the playfield appear like a sheet of glass, the newer build has a thin layer of clearcoat, where you can visibly see the inserts and decals with some dimension when looking at an angle. Still a beautiful machine, just surprising that they have settled on the thin clearcoat to resolve the pooling issues some people experienced in the past. (Feels like trading one set of issues for a different set of issues)

#6955 2 years ago
Quoted from JMCFAN:

Nice....I have my amber rod waiting for me....along with a few other mods....lol

I had an amber lighted shooter rod just waiting to be installed in my JP, and it turns out Mr_Tantrum has a great Jurassic Park themed shooter rod plate he mentioned a couple months ago that look great in person. It's available with and without the LED cutouts. Peel and stick. 8-)

#6976 2 years ago
Quoted from Kneissl:

I’m in the club! Any hot tips/mods? It’s got a shaker and the original movie sound/vid clips.

Lots of mods available, but my favorites are: the stern lighted amber shooter rod, mr_tantrum’s shooter plate 3D insert, the control room plastic by vlek, the raptor pit fence by mezelmods, and the lighted flipper buttons kit and the 4-piece neon green protector plastics for the slings and inlanes you can get at PBL. Lots of other cosmetic mods can be found pretty easily. That said, there are a couple of fixes people general apply, including shooter lane protectors by Cliffy, swapping the left screw in the tower ramp, adding a washer to the left fork in the shooter lane, and adding a nylon or Cliffy carbon fiber washer under the third flipper post washer.

Keep reading this thread for more ideas…

#6978 2 years ago
Quoted from Hayfarmer:

what does the left screw in tower ramp and 3d flipper washer do?

The left screw in the tower ramp flap usually interferes with the tower shot. The ball touches it as it passes. You can grind it down or replace with a shallower screw so the ball can pass smoothly by.

The third flipper post takes a beating, loosens up can begin to damage the play field. Many folks add a nylon or carbon fiber washer between the play field and washer to allow a good solid tight post without damaging the play field.

#6981 2 years ago
Quoted from Mr_Tantrum:

Another "fix" is upgrading to the orange shooter rod spring. If you buy the amber rod it comes with it, otherwise it is worth upgrading for more consistent launches.
As far as the mods I offer, you can see some in the Pinside Market but I list everything here: http://thezumwaltfamily.com/pinball

Your shooter plate really compliments the amber shooter. I highly recommend it to anyone with the bug to add mods to JP!!

IMG_1610 (resized).jpgIMG_1610 (resized).jpgIMG_1611 (resized).jpgIMG_1611 (resized).jpg

#6984 2 years ago

Notice the LED lighted flipper buttons from PBL? They are a perfect match in color to the LED amber shooter if you have Margaret send the translucent Yellow buttons with her BrightButtons LED kit. They are an easy install and plug into the Ticket connector on the node board.

#6987 2 years ago
Quoted from seenev:

Do you have a picture?

You can see the amber rod and the lighted flipper buttons in these pictures.

IMG_1610 (resized).jpgIMG_1610 (resized).jpg

IMG_0407 (resized).jpgIMG_0407 (resized).jpg
#6990 2 years ago

Silly question but.... I am ready to swap the sling rubber rings, mainly for color, but also a little bit for the feel. I know manuals are notorious for being wrong, but the Stern manual (Pg 37) shows these 2.5" rings, and yet the actual rubber installed SEEMS to be a 3-inch ring when I removed and measured it. I tried putting 2.5" rings on and they were very tight, and yet the 3-inch factory rings seem just a hint loose to me.

What size is everyone else replacing those with. I was thinking of Titan's.

#7025 2 years ago

I recommend that you add whatever shooter lane protectors you probably purchased already, before you start the first game. It's quick work, but the shooter lane clearcoat can be easily damaged otherwise. Enjoy!!!!

#7045 2 years ago
Quoted from DeathHimself:

Thanks, yep that's what I'm doing and nope I don't have the machine yet but it's coming in a few short weeks.

The Jada 1/43 Jeep is *really* hard to find. I just had to order one from China for $22!! If you have a machine coming, get an order placed on eBay now...

#7047 2 years ago
Quoted from DeathHimself:

These look like them, just not sure about that pull back action non sense lol.
ebay.com link: itm

No way to know if those are correctly sized but the scale against the finger *seems* to be right. The same jeep is made by JADA in 1/24, 1/32 and 1/43 scale. That listing doesn't state the size in writing so you kinda need to estimate based on the hand in the pictures. You ONLY want the 1/43 version.

#7051 2 years ago
Quoted from RoadQueen:

Hi everyone. Another newbie here joining the hobby. Just waiting for a JP premium to be delivered in the next hour or so... my first pin ever, so exciting! So I guess I can consider myself a new owner. I've been following Pinside for a while but just joined. I love these threats, particularly the JP ones, and it's wonderful to see all the support from experienced members regarding issues with machines, fixes, mods, etc. It makes being a newbie way less stressful so I'm very happy to join this community. Anyway, like many more, while eagerly awaking for this day I've been collecting mods in anticipation and there are multiple more on the way or in production. Can't wait to start playing this. Have a nice day all!
Wait, I think I see the FedEx truck pulling up front...
[quoted image]

I don't see any shooter lane protectors. You'll want to add those and also (recommended) adjust the ball eject power in settings to something closer to 200. Both of these steps will protect the clearcoat in the shooter lane.

#7054 2 years ago
Quoted from RoadQueen:

Thank you for the tip! Yes, I'm waiting on a set of Cliffy's protectors, but it might take a few weeks because I think Cliff is pretty busy with new orders.

Silly as it sounds, but I put three layers of blue painters tape covering just a few inches of the trouygh eject area in the lane until my Cliffy's arrived!!! (Am I a bit OCD??)

#7055 2 years ago

Updated: I am considering adding side artwork to my JP premium. Seems like the 6 choices I have found (staying only with a blue/green palette) are loosely described as:

1.Stern store or PBL supplied Dino Eyes Closeup
2.SideBlades Blue and Green with tall wooden gate
3.SideBlades blue and green landscape only
4.TiltGraffix Electric Fence Gameblades
5.Pingraffix Pinblades Blue and Green with Dino head
6.WizBlades, multiple dinos on a green/blue background

Does anyone have preferences or comments about quality of the vinyl material and/or the print inks, etc?

#7058 2 years ago

They look vcery nice, and your website makes shipping to USA very straight-forward since prices listed are inclusive. I see you have the blue/green and sunset themes as well. Nice.

Question: On the magnetic WizAprons, how does that material accommodate and perform over time over the recessed indents for the apron cards? Does the magnetic material just hang in the air above the steel, or would it better to add a few layers of filler cardstock to keep the new WizApron flat (over time I would expect it to sink slightly otherwise)?

#7066 2 years ago
Quoted from RoadQueen:

For what it’s worth, I previously ordered the blades from Pingraffix blue and green. But then I found the ones with the gate from Retro Refurbs in UK and liked them better. So returned the pingraffix ones (obviously never installed). They both felt very good quality, possibly slightly thicker on the pingraffix but happy with both.

Good to know about the quality. I had side art on my Houdini machine and it was paper thin, like tissue paper! I ended up buying PinballUniverse side protectors that I use diligently now anytime I lift a playfield in any machine. Even without side art, it's so damn easy to scratch the black painted side surfaces.

#7069 2 years ago

Thanks guys. I am also set on the green/blue version, and likely to buy from either WizardMods or RetroRefurb. But due to shipping, the Retro version is $30 more shipped to the USA. Both have blue/green palettes, and both have multiple dinosaurs running through the jungle....

So my choice is getting narrower...

#7071 2 years ago
Quoted from Hayfarmer:

Put in mirror blades. They reflect so good on this game. It needs more lighting in my opinion anyways,,

Dohhhhh... I hadn't even thought of that. (Not sure why it never crossed my mind.) I know there are a bunch of brands of them and they price out in the same $100 or so range. Thought I was getting close, but perhaps time to do a little more research....

#7073 2 years ago
Quoted from JMCFAN:

Still waiting... and no Fed X shows exception/delay....but still delivery today... grrrrr
[quoted image]

Thats a full weekend of mod work ahead! The Jeep and Helicopter each take a 60-90 minutes! The PBL outlane/sling neon protectors take 60 minutes. The amber shooter rod takes at least an hour. (be careful to mark the current location BEFORE you remove the old plate). The Mezel Raptor pit pen will be 30 minutes. The shooter lane protectors will take 30-45 minutes. Shaker is 30 minutes or less. And that is just what I see. All the other little stuff in your envelopes takes time too!

A word of advise, you CAN go overboard. Too many little plastic palm trees, dino eggs and bunny rabbits may be too much, but that is a personal choice.

Couple of questions/comments: What are you doing for sound? (Stock, speaker swaps or external subwoofer?) Are you adding SpeakerLEDs? (DIY or the off-the-shelf .com version). Don't forget to address the tower ramp left screw (which contacts the ball and prevents clean tower shots so often).

#7076 2 years ago
Quoted from JMCFAN:

No plans on sound upgrades...yet... I dont have the Mezel Raptor pit... yet... Shake was installed at dealer... have the audio video upgrade ready too...
Whats the fix on tower ramp left screw....?

For a lowest-cost sound upgrade, consider getting a CXX8 woofer ($25/each) that directly replaces the cabinet speaker, and a set of Kicker 4-inch DSC040's or 44's ($50/pair) for the backbox, again they are drop-in replacements. You'll get MUCH better sound across the board just by putting higher end speakers into the existing mounting holes and wiring.

#7079 2 years ago
Quoted from StoneyCreek:

It's time I put a shaker motor into my JPpre. any suggestions on what manufacture I should buy from? not sure the dif between Stern's and others.

PBL has a nice unit back in stock, $79 for the 'equiv' unit, and $99 for the 'factory authorized' unit.

https://www.pinballlife.com/shaker-motor-kit-rev-c-for-stern-spike-spike-2-system-games.html
https://www.pinballlife.com/stern-factory-authorized-shaker-motor-kit-for-stern-spike-spike-2-system-games.html

Read a (circa 2015) discussion about these two types here: https://sternpinball.com/wp-content/uploads/2018/10/Stern-SB184.pdf

That said, the two units PBL ships today look IDENTICAL to me, so the earlier non-factory units may have been very different...

#7081 2 years ago
Quoted from StoneyCreek:

thanks Mark. incredible how helpful you are on this channel.

I enjoy helping folks, and keep them from stubbing their toes!!!

(Note: When installing the shaker motor, get yourself a little bottle of BLUE loctite, Harbor Freight for $2) when you put in the four cabinet base screws. All that shaking could cause the screws to loosen over time, and the BLUE loctite is semi-permanent). Good luck!

#7090 2 years ago
Quoted from Mjesposi:

Hi Mark -
For the CXX8 woofer swap out on the JP Premium, do you need any more amp power to drive it or is what in the machine currently good enough? I have only used the innovators subwoofer adapter for Stern Spike systems and tied that into an external powered sub and then also have the connector that you can connect multiples to it. This pin would be at a different location so looking at my options.
Thanks for the help!!

The CXX8 is a drop in replacement for the factory cabinet speaker and uses the factory amplifier itself. Turns out the Stern amp is not at fault, it's the cheap speakers that prevent you from hearing more clarity and richness. (Obviously if you want to "light-up" the house with JP sound and feel the house shake with the music bass, then an external AMP would make sense, but in many HUO situations, the factory amp MAY very well be suitable for you. It is fine for me.)

The CXX8 has the same mounting holes and the same two wires to connect. You unsolder the existing two wires from the original speaker and then resolder them to the new speaker. The ONLY thing you need to do is use a 1/8 or 3/16 inch round file to just slightly widen the mount hole slots inward. 5 minutes with a hand file. No AMP or other wiring or anything else is required. I can snap a picture of mine if you need to see it installed if you want.

#7096 2 years ago
Quoted from DugFreez:

It seems odd that 4" speakers don't have a universal mounting hole placement. Stern (going back to the Data East days) always used to have their speaker mounting holes so they used the outer limits of the 4" speaker mounts. With SPIKE 2....they strangely started using the inner limits of the 4" speaker mounts.
It seems most 4" speakers use either ovaled out mounting slots or open ended mounting. This makes it so they can be used no matter where the 4" speaker mounts land. However some speakers, as you are describing, do have smaller, more strict mount holes on them. Fortunately, it sounds like with the speakers you are describing, that was pretty easy to rectify. Like the ones you have described, it seems on most of the 4" speakers that I have seen that do use smaller / stricter mounting holes....they are usually using the wider mounting limits that Stern used in the past. So it seems like Stern made a bit of a misstep when changing their 4" mounting pattern on the SPIKE 2 4" speaker plates, after using the same mounting pattern since Back to the Future (1990).
I'm expecting no thought went into that design change decision and as long as the current 4" factory speakers fit on the studs....it was OK'd. Now if they find default speakers to use that cost $1.35 instead of the $1.48 ones they are using now...that will only work with the original wider 4" mounting pattern, they will be kicking themselves and wondering who made the mounting stud position change on the 4" SPIKE 2 speaker plates.
Hashtag:BoringSpeakerPanelStuff
Doug (SpeakerLightKits.com)

The backbox 4-inch speakers can be pressed into place on the existing plates without too much pressure and no filing required. It is the 8-inch cabinet speaker that takes a bit of filing, but again, ever so slightly,

#7100 2 years ago
Quoted from Munsters:

Looking for this to

The copter and the jeep are both VERY hard to find. I had to buy a full set of 5 jurassic pieces from a guy in Puerto Rico which also included the helocopter, and then I found the Jada 1:43 #12 jeep recently from a seller in china. Try to search ebay regularly. They are there, if you catch it right.

Note: You can find the exact same copter in other colors, and missing the Jurassic logos, for less than $10 and much easier to find. You can always spray paint an orange copter and make it blue...

#7101 2 years ago

Has anyone seen had their JP-Prem machine start a ball search, during normal play with the ball in motion on the playfield? I had it happen last night, the first time ever. V1.03 code. All balls installed and accounted for. Feels like a minor bug in the gamecode but didn't really interfere with the game play since everything was still working while the ball search was completing.

#7103 2 years ago
Quoted from MrMikeman:

If you hadn't hit a switch in a while then yes it happens. On all games. Even on older WPC. JP is a bit worse for that since it's easy to brick a bunch of consecutive shots on posts.

The ball was in play and I was hitting the slings and the jeep and some stand-ups. It's very weird. Switch-level activity *WAS* happening, and yet a ball search started....

#7108 2 years ago
Quoted from dapperdan24:

Do these fit with the speaker light kits? I know depth was tricky with some...

I am going to guess that the commercially available 3D speaker light kits all add the same depth (about 3/8" due to the width of the offshore manufactured LED strips that are intended to mount inside the spacer) and have a provision for mounting to the original posts. Those kits are very nice. I wanted to try speaker lights so I just went out and got a set of speaker light spacers, and find that the speaker mounts to the new spacer with a couple of #6 - 5/8" screws, and then the new speaker/spacer unit mounts to the posts using the original hardware. See my picture below for detail on how it all fits together in my JPP.

IMG_0408 (resized).JPEGIMG_0408 (resized).JPEG

#7110 2 years ago
Quoted from JMCFAN:

DANG..... in the bottom of the box......
[quoted image]

Cross your fingers that it is just an extra screw that was accidently dropped inside during assembly..... 8-)

#7115 2 years ago
Quoted from JMCFAN:

What monitor?

The LCD monitor panel mounted in the backbox.

#7126 2 years ago
Quoted from dapperdan24:

Hey Doug! They are indeed your light kits (I have them in 4 machines presently lol). My worry is clearance with the components in the backbox on the right side. Stern's cheapo speakers are super low profile while lots of replacements like those mentioned earlier in the thread are 5-6" deep. Added with the additional depth of the light kit (or even without) they seem like they'd hit the various stuffs in the head of the unit on the right side. I took a chance on some low profile Kenwoods from Best Buy and I'll play with those. It is a $40 gamble, so nothing lost if they don't work.

I know it looks tight on the right side, but even with the 3/8" thick speaker led frame installed, and a Kicker-type deeper profile replacement speaker, I see extra space on the right. Not alot, but enough not to worry. (maybe 1/2" or so at closest point). You can see the total height of the parts I am using in my JPP by looking at post #7108 above. In the picture, the Kicker is about 2-inch tall, and the led spacer is 3/8".

#7150 2 years ago

Just added color

Quoted from JMCFAN:

Getting ready to install my Cliffy set....how do get the post off in front of upper flipper to install the carbon disc...???

See my earlier note about this. It can be done, carefully, using a thin mechanics ignition wrench. There is a nylon lock washer under the flipper assembly. I removed the post without having to touch the flipper assembly, but takes the right tool and some patience...

#7158 2 years ago
Quoted from Munsters:

Wich Kenwood speakers are the best?
Have some noise and cant fix it by settings or wire.

Many people with 5-1/4 plates (LE) are using Kenwood 1366’s. If you have a Premium, it has a 4-inch plate. I recommend Kickers for the 4-inch type.(or you could swap the plates for the larger speaker size for about $50)

That said, tell us more about the ‘noise’ since better sounding speakers might just make better sounding ‘noise’…

#7162 2 years ago
Quoted from Munsters:

It’s like an crackling sound. You maybe think it’s the amplifier?
Around the 15' second you can hear it very good, link: https://voca.ro/18kAgLk7GquZ

I don't hear anything unusual in your recording. I listened carefully at 15-second mark and just don't hear any odd sound.

Does anyone else here it? I must be missing it.

#7167 2 years ago
Quoted from Munsters:

Wich Kenwood speakers are the best?
Have some noise and cant fix it by settings or wire.

Still so many questions to help troubleshoot your issue:
1) Do you hear the 'noise' sound in ONE specific sound sequence, or is it prevelant throughout the normal game play. Do you here it in many places?
2) Are you using 40TS custom gamecode, or 1.03 stock game code? (Good to know, although this issue has never been reported in either software image)
3) Do you hear the sound from the backbox, or from the cabinet speaker? (Get really close to each speaker and see WHERE you can hear it coming from)
4) What are your specific settings in the EQ setup? And what VOLUME setting do you have your game set to?
5) Have you added an external subwoofer, and if so, how is it connected?
6) can you confirm that you have stock (factory) speakers in the cabinet and backbox?
7) Have you opened the backbox and confirmed that the two locknuts on each of the speakers are tight, and that the speakers themselves are solidly mounted to the plate?
8) Can you also confirm that there is a fiber washer between the backbox speaker metal frame and the plate on each threaded post? Older builds were missing those washer.
9) What is your machine's build date?

#7169 2 years ago
Quoted from JMCFAN:

Does anyone have directions for the Stern amber shooting rod? The ones that came with it are lame with no wiring directions etc... any issues I should know of etc...?

The instructions they have are for a generic shooter plate install. I guess they never bothered to make real instructions. That said, PM me and I can advise. I have installed twice...

#7171 2 years ago
Quoted from EaglePin:

Pretty straightforward install. Just unscrew all 5 screws on the plate inside the cabinet. Remove the stock shooter rod and that plate. Swap in the entire Stern shooter mech and the new inside plate that came with it (run the wires from the shooter rod through the slots in the new plate). Replace the screws to hold it all together and plug into CN15. Here's a post that has a picture of what it should look like from the inside when you're done. In this one both wires were run through the left slot. I put one wire through each side. Either way works just fine.
https://pinside.com/pinball/forum/topic/welcome-to-the-jurassic-park-le-club/page/114#post-5747821

One small caveat: THE VERY FIRST THING TO DO is I mark the OUTSIDE of the cabinet with blue painter's tape BEFORE you remove the old plate. Put tape along all four edges of the original plate. In that way you can align the new plate in the EXACT same place, making sure the shooter is aligned with the playfield lane in exactly the same place as the factory one.

#7181 2 years ago
Quoted from Munsters:

Ive cut en paste and repeat the high hz sound, listen on: https://vocaroo.com/1jK4MoPhbzSR you hear the constant high noice sound?

I may not be the right guy with the right ears, but to me, it sounds like the blades of a helicopter. Like something part of the soundtrack intentionally there.

Here is an idea with two possible next step options:
1) If you know how to use PINBALL BROWSER, you can open the game code and then find the exact clip and listen to it on your PC, instead of the Pinball Machine. That would eliminate the pinball hardware entirely. Whatever you hear is part of the source file.
2) Or, if you don't know PB, describe the EXACT sequence of sound that you hear the 'noise' to @timlah79, and ask him to listen to the SOURCE audio clip of that exact same thing on his machine. I am sure he has the original source. If the sound is in his source file, then it is supposed tio be there.

#7197 2 years ago
Quoted from Mjesposi:

Appreciate everyone’s help with this. I will go into settings and disable that tomorrow. It was scaring the crap out of me when it would happen!!

The synth knocker sound is shocking, even after people hear it a few times! PBL has a 'real knocker' kit ($50) which swaps the synthetic sound with a real mech knocker. Stern must have known this would be a concern, since their software supports the mechanical knocker coil. The mechanical knock is still a bit startling, but this real mechanical knocker sound just feels 'familiar' (same one been around 30+ years) as opposed to this alien baseball bat sound...

1 week later
#7246 2 years ago
Quoted from Alamo_Pin:

I did transport it from the FedEx dock to my house in my car, but I never stood it upside down and never put any pressure on the top side. So it might be possible the backglass falling out is on me. But if you look at the picture above of the box, you can see the slight damage to the box near the shooter rod area. That’s how it looked when I picked it up. It didn’t seem severe enough for me to inspect it, and it turns out all will be well. I was able to fix the flipper leaf switches and shimmy the shooter rod back into a playable position. My distributor is going to send me a replacement for the cracked plunger housing. I have the game up and running and am loving it.
It’s still a mystery why there was no tilt bob, though.

The TILT bob is packed in a brown manila envelope, shipped uninstalled. I think it comes INSIDE the coinbox. In any case, it's an easy thing to get replaced by Stern and then installed by you if needed.

#7260 2 years ago
Quoted from rai:

I'm going to buy a nib premium, is there anything that I need to be aware of out of the box?

You'll likely be fine. I've purchased two NIB JP Premiums (Aug2020 and May2021 builds), and not an issue of any type with either. First had the thick clear coat, second had the thinner playfield finish. Both were perfect for me. I had no issues with gadgets, guides, ramps or Trex, or anything else. Some folks had a few minor issues, and a couple had some kind of major issue (like the TREX head not working), but MOST people find their machines just fine out of the box.

My suggestion, buy it, and then when it arrives add a few protectors and then enjoy.

#7295 2 years ago
Quoted from pinopinballmods:

Thanks for this information, today since my post, I have had around twenty new customers who have bought this mod. This interesting thing is mostly the spring made with the iron rod to give a realistic fly of Pteranodon when you shake your machine. I hope there is plenty of new customers on JP Machine because Stern sells this machine around the world every day. Here are a photo of my next new mods I built for this week. .
Tell me if you want it !
Regards,
Lionel.
[quoted image]

It might be good for you to work with one of the distributors here in the USA and have them purchase in quantity and then ship for customers in the USA. Shipping from Europe is expensive and take so much time. If you could send 20 of them to Mezel or Little Shop (or any other USA based mod vendor), they would add to their catalog and people would add to orders for other stuff, and save on combined shipping. I place orders all the time with places like that and would love to see your mod on any one of their sites next time I place an order.

#7365 2 years ago
Quoted from Limdul:

I think i know the answer, but perhaps this will serve as confirmation or maybe a PSA.
I picked up the amber shooter several months ago and found time to try and install it today. I removed the hardware from the original rod, lined up the new plate assembly, and started to hand thread one bolt. The bolt felt like it caught a thread, but was resisting rotation. I went to the screw driver, but it too was tough to rotate. Moving onto another hole, I tried to repeat everything to similar resistance. I decided to undo everything and remove the rod for inspection and found what looked like untapped holes for the bolts (the exception being my first bolt, where I think I may have forced some threads through my struggle).
Are theses holes meant to be left untapped and/or am I missing something with the install? Has anyone else made a similar observation with their rod's bolt holes?
[quoted image][quoted image]

Those holes should be threaded from the factory. Your plate is a factory defect. If you have a Tap&Die set, you can thread it yourself.

#7370 2 years ago
Quoted from timlah79:

Upvoting this because you should put this on Stern for the defect and get a new plate. I did not have this issue and mine is from I think the 2nd/3rd run. While good advice about how to thread it yourself, I don't think you should have to given what you likely paid for it. I would say DON'T ask for a new amber mold as well if you are happy with the way yours looks, just get the plate. The various runs of the mold have been hugely hit and miss. Only the first run actually looked like the mosquito intended. Almost all runs I've seen pics of since Stern changed manufacturers of that mold have been a terrible representation of Hammond's IMO (except for a few folks who seemingly got lucky with how theirs turned out).

It’s a weird defect to be sure, and Stern should make this right and ship a new lighted plate…
but in the meantime, threading the holes yourself can allow the shooter to be installed right away.

#7378 2 years ago
Quoted from VillaThrills:

The alternate sounds brought this game back from the brink for me. Awesome job. It will now stay in my collection for the foreseeable future. I am putting in the last mods like trees, maybe a goat, etc. Still need to figure out which art blades I like.
Did anyone ever figure out the T-Rex hitting the left tower? Last I tried, the travel settings did not seem to fix when T-Rex shakes his head side to side.

Consider the WizardBlades. The color scheme matches the machine quite well. Feels like the OEM LE blades a bit.

#7396 2 years ago
Quoted from hd60609:

I was going to attempt to cast an amber shooting rod with epoxy resin. Curious to see how it will turn out. I already purchased the blank threaded shooter rod from Pinball Life.
Can anyone with the official Stern Jurassic Shooter tell us the dimensions of the amber? Diameter and length? Thanks.

I am totally impressed even before you start! I watched a Youtube video of a guy doing exactly that, and it was so involved, I couldn't even imagine. But if you have the lathe, and the time, and some sandpapers, then it should work out fine. Again, touche' (in advance)

#7399 2 years ago
Quoted from Mr_Tantrum:

You, my friend, are quite impressive indeed (and the humility just oozes out of you).

I meant "Impressed", not "impressive" !! LOL

#7401 2 years ago

Just curious if anyone has had problems with their Jeep spinning freely during the first 20-25 games? This is basically a new machine and the jeep spun fine for the first few games, but now sticks up. I am going to dig into this over the weekend, but it seems pretty straight-forward. Page 62 in the manual shows me they have the jeep sitting on a steel post that runs through a nylon flipper bushing. Not much to it. I have picked-up some of the recommended 100% silicone spray, and will disassemble the mechanism, then hand apply a hint of the silicone to the post before I re-assemble. I am kind of baffled what could cause the jeep to stick up and away from the kinetic ball post, but will likely answer my own question after I get into it.

Just thought I'd see if anyone has walked this same path before...

#7408 2 years ago
Quoted from baxelrod:

Markharris2000 Let me know how it goes. My jeep is starting to stick after about 2 months. I'm going to try the fix described here: https://pinside.com/pinball/forum/topic/jurassic-park-stern-2019-owners-club-welcome-to-jurassic-park/page/106#post-5683784 this weekend.

Home Depot sells the B'laster 100% Silicone spray for $4 a can (Amazon sells a pack of three cans for $25) and you'll find it where the garage door supplies are kept.

I might install the WizardBlades I got last week while I have the glass off and playfield lifted.

Good weekend project...

#7429 2 years ago
Quoted from baxelrod:

I just dissembled and lubricated the truck assembly. it really was easy. the assembly looks scary from underneath. but you only need to remove the allen set screw and then you can remove the post. there is a really cool thrust bearing in there!

In one of the two JP Pinside conferences, there was a picture of the thrust bearing and a callout for a replacement part. I don't see it on the drawing, but if you see it, then I have a hunch my thrust bearing is defective. I will know more this weekend.

I wonder why the bearing is not shown on the diagram? (Page 62)

Jeep-Page.pdfJeep-Page.pdf

10
#7434 2 years ago

WizardBlades installed in my JP Premium. Notice the colors of the blades perfectly match the backboard of the playfield...

IMG_1653 (resized).jpgIMG_1653 (resized).jpgIMG_1654 (resized).jpgIMG_1654 (resized).jpgIMG_1655 (resized).jpgIMG_1655 (resized).jpgIMG_1656 (resized).jpgIMG_1656 (resized).jpgIMG_1657 (resized).jpgIMG_1657 (resized).jpg
#7440 2 years ago
Quoted from Markharris2000:

Just curious if anyone has had problems with their Jeep spinning freely during the first 20-25 games? This is basically a new machine and the jeep spun fine for the first few games, but now sticks up. I am going to dig into this over the weekend, but it seems pretty straight-forward. Page 62 in the manual shows me they have the jeep sitting on a steel post that runs through a nylon flipper bushing. Not much to it. I have picked-up some of the recommended 100% silicone spray, and will disassemble the mechanism, then hand apply a hint of the silicone to the post before I re-assemble. I am kind of baffled what could cause the jeep to stick up and away from the kinetic ball post, but will likely answer my own question after I get into it.
Just thought I'd see if anyone has walked this same path before...

Update:

So I decided to remove the Jeep and take a look at why it was not spinning freely. I noticed the whole assembly was pretty tight to the playfield and had NO vertical movement at all. Even by hand the jeep didn't spin very freely. I expected it to have the same kind of vertical clearance as any flipper bats since they are actually using the same flipper bushing for the Jeep.

I get my Hex wrenches out to remove the end stop, and after finding that the hex set screw is a 3/32, I put my wrench and and start to twist, and twist, and literally damaged the wrench trying to get the set screw to turn. Nope. Not having it. Run down to Home Depot and get a 3/32 hex bit, put it into my 1/4 torque wrench adapter, and again try to remove it. It's very hard, and then I hear the pop, and the screw is freely turning.

So I pull the jeep and shaft, look at the sandwich of washer and thrust bushings, and realize they all appear to be fine. The nylon flipper bushing also seems fine. So I guess it really was just be too tight against the playfield. Simply fix, right? Nope. Some over-achiever at the factory must have put the hex screw on SO tight, he/she actually created a deep crater in the flat side of the shaft, and any small movement (i.e. credit card thickness) was not possible, because the set screw wanted to slide back into the crater.

So I had two choices: 1) make the vertical space bigger so that the set screw did not line up with the old crater, or 2) file the shaft flat side to remove the crater. I choose door number 2, and in about 5 minutes, I had the flat side of the shaft flat and rid of any sign of the crater.

Now I could adjust the shaft into the nylon bushing at the standard "credit card thickness" that folks use for flipper bats, and re-assemble the whole thing. A hint of B'laster 100% silicone applied by hand to post and thrust bearing, and it all seems good... for now!

#7455 2 years ago
Quoted from JayTeeF:

Has anyone gotten the clear shooter lane protector to work? Getting switch test #22 alert with it on. It seems others have had the same issue.

On my first JP premium(aug2020 build), I tried the clear protector but it wouldn’t sit down 100% in the rounded part of the lane. It seemed to have a different radius curve. So I removed it and then installed Cliffy’s and I think it works perfect…. And looks great. On my new one (may2021 build) I just put Cliffy’s on to begin with.

#7459 2 years ago
Quoted from Only_Pinball:

Did you sell the first one miss it and get another? Just curious.

Yes. I don't even have a good reason, but I sold it thinking I was done learning it. I was crazy selling it as I realized it's just plain FUN, so I got another NIB without too much difficulty… just had to wait a few months!

#7482 2 years ago
Quoted from scootss:

It seems extra weird because it's a pretty bad noise coming from the speaker. Sounds like something is wrong...
...in the olden days this came from a "knocker" which is a solenoid that hits the cabinet instead of coming from the speaker.
In order to save cost, they dropped the knocker and switched over the pop/bark that you're hearing. It's kinda meant to sound like a knocker..but just ends up sounding bad!

If you miss the 'real' knocker, PBL sells to add-on kit which puts the solenoid back, and uses the Q24 driver just like 'the olden days. Its $50. The game's software still supports it (I think it's setting 44 & 55) , even on the newest machines, so you can turn the weird synthetic tone off, and turn the hardware knocker on.

https://www.pinballlife.com/real-knocker-kit-for-stern-spikespike-2.html

#7529 2 years ago
Quoted from chickenscratch:

What are these magnets(?) for that came with the shaker motor??[quoted image]

What is the part number for the Shaker motor you ordered, and where did you get it from? The ferrite clamps and capacitor adapter are not part of the latest Stern OEM kit for Spike 2 machines. The current Stern part number for the shaker kit is 502-5027-01, it is sometimes referred to as "Rev C". You can see a good picture of it attached. Notice it also comes with the two cover screws, and the 4 cabinet mounting screws. No need for the Ferrite clamps nor Capacitor add-on adapter. That said, you are probably fine adding the Ferrite clamps around the power leads close to the cabinet node board, but don't use the capacitor adapter as it's function is already built into JP machines. (I posted an email from Stern support advising this a few months back).

Shaker pbl-100-0020-00 (resized).jpgShaker pbl-100-0020-00 (resized).jpg

#7536 2 years ago
Quoted from SeafaringSpiders:

Why do you think Stern still uses distributors? To shield them from talking to customers directly.

Distributors are used to scale a business and when done right, actually HELPS the consumer big time!!! That said, distributors come in all shapes and sizes, and the quality of each of their business models can make or break the whole thing. The most successful vendors hand select their partners and treat them as if they were pseudo employees.

These same vendors are highly selective on CHOOSING WHO they authorize as a distributor, how they train them, how they measure them, how those partners interact with their customers, etc. It works great when great partners are chosen and helps support customers with answering simpler tech issues, offer add-on purchases, etc. And one of the big advantages is buying from a local distributor can help solve time zone issues too since German customers (for instance) will find “Mike in Munich” to be available 9 hours before Stern wakes up!

I am a big fan of using carefully chosen distributors since those distributors take their value-add and responsibilities to the customer very seriously.

#7542 2 years ago
Quoted from SeafaringSpiders:

You could just as easily make an argument for why the system is bad for the consumer. When you have a warranty issue, it's basically adding a step in between you and Stern. You basically have to make your case to your distributor and then hope they are effective in dealing with Stern. There's no denying that some Stern distributors don't put in the effort. I've had bad experiences with distributors who just don't want to put in effort after the sale.
There's also the fact that it adds cost to the purchase to have the distributor take a cut when the vast majority of machines are not being sold from some local game room... They're being shipped. They might as well be shipped from the factory and save some money on shipping and the middle man.
I can't help but think that the distributor system is used more as a shield for companies than a network of support for customers.

Almost all of the big companies (HP, IBM, Sony, Samsung, ) use distributors for scale.... but as you point out, the actual distributor can vary in quality widely and if poor, can simply be "in the way". That said, big companies are VERY careful who they authorize. They want added value, or they don't authorize. And they review qualifications and customer satisfaction annually.

My Stern distributor is great (but others may not be) so if you believe your distributor is 'in the way', then you might want to find a different distributor.

Mark

#7554 2 years ago
Quoted from Limdul:

Update from Stern; the machine screws are apparently self tapping and the blank mounting holes are standard. Wish me luck; I'm going to be a bit frustrated when I shear a factory screw into the amber rod leaving me effectively with two unusable rods

My amber rod kit from Stern (purchased 60 days ago) had the holes factory threaded. I actually hand turned and then tightened the screws into the rod plate. Perhaps they changed the design recently? In any case, if you have a tap&die kit, thread the holes yourself and save a world of frustration for yourself! The screws are hard enough to get right and tight even when they are threaded, especially the one closest to the cabinet edge. (Alternatively if you don't have a tap&die kit, try self-threading the screws into the plate OUTSIDE of the cabinet. Screw each of the three screws in with the plate while its sitting on your bench. That will make the threads fairly well too.)

#7574 2 years ago
Quoted from seenev:

So you have a premium but got pro blades to match the backboard? Interesting. I was thinking about ordering the premium blades but now I don't know.

I found the WizardBlades matched the backboard better than Stern's blades. Wizard doesn't really market these as "Pro" or "Premium", they market them based on the color palette, default is the blue, and they also offer their 'sunset' version. You can decide if it matches your pro or premium as you see fit. It now looks more like a continuous theme that wraps around the player's view of the playfield.

#7578 2 years ago
Quoted from seenev:

I guess I assumed the sunset blades were the premium style because they show them on that model. I could swear some of the JP mods had the model names in the title. I might get the blue then.
Is a shaker worthwhile on this game? I had a topper on order but it kept getting delayed and I started to think it's not worth $600, so I'm thinking about other mods that are a better value...

Pinball Life has the Rev C shaker for $90. It's a no-brainer. Trex feels like he's walking around your gameroom!!! LOL.

#7583 2 years ago
Quoted from seenev:

How hard is it to install the art blades.

With a little practice, you can install without removing the play field. I use a modified dry approach. I remove a portion of the backing, maybe 10 inches wide, and about a third of the way from the back edge. (The parts between the playfield in upright position and the left and right cabinet edge) You can then easily slide the blade in and position it quite easily by only touching the parts of the blade that have backing remaining. Align it properly by still only touching the backed portions, and once in place, gently press a portion of the uncovered blade to the surface. This keeps it in place. You can then easily work towards each edge front and back, keeping alignment along the way if needed. Press down with a hard rubber roller.

#7587 2 years ago
Quoted from Royale-W-Cheese:

HAPPY 4TH WEEKEND ALL.
I did the impossible.......JP and BM up on the block for a weekend sale. Mama needs her first PIN and I have 2 in mind.
Local pick up gets a super deal.
Let the games begin.

You said it *might* happen.... How will you live without JP? (I did that too, and then came back after a few months. You'll be back!)

#7607 2 years ago
Quoted from Green-Machine:

Has anyone needed to adjust the flipper angle to make some of the tight shots? Are the flippers coming from factory centered on the
Alignment mark?

May 2021 build, flippers 'slightly' below the alignment mark.

#7613 2 years ago
Quoted from MrMikeman:

Yeah this game requires pinpoint accuracy on most shots. Otherwise it's a total brick-fest.

When I make a shot and know it was crisp and perfect and intentional, I can just feel it. Like the ping you hear when you hit a perfect shot off the tee with a driver in golf. It just feels SOOO good. But you have to take those perfect shots mixed in with a ton of 'near misses', or 'lucky' ones that work, but just don't feel as deliberate. Like MrMikeman says below... "Just takes practice"

#7641 2 years ago
Quoted from GoRun26:

Super glue seemed to work well. Everything is holding steady through 3 games. I circled the break in the pic. Caution and patience for those planning this mod. Though I appear to be the only one that had this problem, so must be me.
[quoted image]

I anticipated the same issue before I started installing mine, so I pre-formed the wire and then carefully pushed/pulled it through. That said, Mezel really should switch over to an aluminum wire instead of the steel one they supply. Aluminum would bend and form SOOO much easier, and looks nearly identical, perhaps even better!

#7646 2 years ago

Been playing a bit with the jeep as it was factory installed a bit too tight. In the process of resolving that issue, I ran into a couple of alternatives to the thrust bearing that Stern uses, which *seem* to work even better than the plastic type Stern supplied. The first one is a roller pin thrust bearing. You can find them lots of places and they are cheap. Part is "TC411+2TRA" and I got a pack of 5 for $8 on eBay, took 2 weeks to arrive. They are a bit more visible since the diameter on the outside is larger. I then found the metal roller bearing style, similar looking to Stern's but in metal, Amazon $7. Look for "F7-13M". If anyone is looking to replace their own, these both seem like great alternatives if you are looking for all-metal construction.

b1 (resized).JPGb1 (resized).JPGb2 (resized).JPGb2 (resized).JPG

#7651 2 years ago
Quoted from zr11990:

I was wondering m I f it would mess the game up if you installed the capacitor that came with the shaker motor if the game already or not. I installed it then I took it off. I did t want to mess anything up.

I don't think it would mess anything up, but you definitely want it removed on a JP machine.

#7661 2 years ago
Quoted from chickenscratch:

So trying to fix the opto for O lane. Not really understanding where to place washers, am I just trying to raise a side enough to not fully be centered with home and thus cut off like the tape method?
I won’t have washers on-hand soon as store about to close, so might just try tape trick but want to do it correctly and right over lens, not lane.
However, how am I supposed to know which is transmitting and which is receiving lens, being my first time; halp
[quoted image][quoted image]

See the red lines I drew in. That's where the washer go to LIFT the

opto2 (resized).pngopto2 (resized).png
#7663 2 years ago
Quoted from chickenscratch:

Thanks, began thinking that was the case, but isn’t that just another way of doing the tape fix? Right now with the sensors out, I could just cover half of the transmitting opto with tape, just don’t know which one it is lol

Tape fails over time. Washers don’t…

#7699 2 years ago
Quoted from Only_Pinball:

Anyone hear anything more on the July run? Are they on the line yet? I am in for a premium. Looking forward to going you guys!

July 19th appears to be the start of a new GOTG run, so not sure where the JP run fits in their production schedule.

#7707 2 years ago
Quoted from scootss:

Someone on one of the pinball fb groups who seemed well informed said July 26th…

Possible there is a date that PRODUCTION starts, and date perhaps a week later that SHIPPING starts. I am guessing it takes a week to build machines from start to finish. If so, then both of those dates make sense. July 19th was the date I was told PRODUCTION starts.

#7712 2 years ago
Quoted from Mr_Tantrum:

Nice find. Just to confirm, it's the F7-15M (7x15x5mm) set?

yes, these are AMAZING!!!!! I had the issue with my Jeep being installed too tightly against the playfield, and in the process of fixing the issue, I found these. I got a pack from AMZ and another from China. Maybe $1 a piece for the ones from China, and just under $2 each for the ones from AMZ. For whatever reason, Stern went with the lowest quality version of a thrust bearing, probably because of the light weight of the Jeep and what they perceived was a lower cost. That said, I looked at the application of this bearing and realized that we hit the Jeep a thousand times a week, so perhaps a plastic bearing wasn't the best choice!!!!!! The F7-15M is the metal version, and the MATCHING washers are made to directly mate with the bearings by having rescessed channels where the bearings actually touch. This channeled washer lengthens the life of the bearing 'sandwich' by distributing the load over a wider area, not just on a single point. The balls stay round, longer.

Long story short: The F7-15M is the thrust bearing Stern should have used in the first place. The plastic version should have been used ONLY on the prototype machine back in Chicago, before real production began!

Added over 3 years ago:

Update: Just getting ready to swap in a set of F7-13M parts, I had ordered from china. These have the same center hole diameter, but have a 13mm outer diameter (instead of 15mm), which will reduce the visibility of the ring. This is down to nits, but the parts finally arrived, so worth the swap. Will report more soon.

F7-13M

#7743 2 years ago
Quoted from Drac:

I just swapped over to one of these jeeps and it does look better however it now does not swing as readily as it did with the plastic factory jeep. I'm sure this is just because of the extra weight of the metal jeep compared to the original plastic jeep. Anyone else finding this?

What is the level of your playfield? The steeper it is the more noticeable the Jeep weight is on freely swinging if you have mounted the Jeep less than center. At 6.5 degress it seemed just a hint less free than the plastic factory version. I had the Jada Jeep on my first JP, and noticed that reduced swing just a hint, so I have not yet done the mod on my second JP for that very reason. If I do, I think I will a bit more careful about where the exact center of the Jeep mounting holes should be. I guess its time for precision measurement and drilling!

#7750 2 years ago
Quoted from Drac:

Just looking for some opinions on the Mezel Electric Fence Upgrade and also their Raptor Pen. Are these worthwhile and fit well in the game. Not tacky at all??
Thank you.
https://mezelmods.com/collections/jurassic-park-pinball-stern

You can’t go wrong with the raptor pen. $50 well spent and it looks factory. Installation is easy, and it’s 100% reversible if you ever wanted to, but you won’t.

#7758 2 years ago
Quoted from embryon:

Btw how reversible is it. I put the signs on and that tape is mighty strong. So how easy would this mod actually be to remove? I used bluetac to put it in place as the mod covers some screws and I figured I might need access one day.

I would never remove it but if I HAD to for some reason, I would simply rotate the surface rather than try to lift it. The rotation is quite easy and breaks the tape bond. Once the plastic is removed, you would need to use an tape adhesive removing cleaner (like the goo-b-gone stuff) on the residue left behind. I have done this previously and it works great.

#7762 2 years ago
Quoted from seenev:

The sound is definitely more muted in the video compared to in person. How's it look?
[quoted image]

Update (retro): Looking at post 7766 below, there are two differences inthe two installations, 1) The knock plate itself is not flush against the top wood surface. The plate is not flat possibly due to the screws not being tight, 2) The coil assembly appears to be about 3/16 of an inch too high. That would make the travel distance a bit short and the sound slightly different.

I think the consensus here is the plate issue is causing MOST of the audiable dissappointment. The hint is the metallic sound you mentioned. A properly installed knocker plate actually uses the wooden panel as the SOUNDING BOARD, literally!

Good luck!

#7769 2 years ago
Quoted from Mr_Tantrum:

Not to nitpick, but it looks like you are a little askew. This may prevent the armature from hitting the plate flush, thus not maximizing the sound produced.

You had to rain on his parade??? Lol!!! Yes, it’s slightly askew, but he’s sooooo close now.

Lol

#7775 2 years ago
Quoted from MANTO1975:

is only one of these required?
cheers

Yes, just one is installed. 7mm inner, 15mm outer

1 week later
#7831 2 years ago
Quoted from rhampo:

Hi all - does anyone have dimensions for where to drill for LEDs for lighting up the shooter knob? I finally ordered a Modfather amber shooter rod (and one day after I did, got a mail from Marco specialties that the Stern ones that come as an assembly with the LEDs was now in stock again - sigh.) and want to add LEDs to the existing shooter plate. I want to know what angle (don't think that they should be perpendicular - more likely angled toward the shooter) to drill and what is the proper location to get good illumination. Anyone have experience and could make a sketch? Also if you have done this, did you paint the drilled hole barrel black or leave it shiny aluminum?
Thanks in advance!
Best Regards,
Richard

Get ahold of Mr_Tantrum and purchase one of his shooter plate 3D prints made for JP. He has the LED holes built into the print, so you should be able to locate the center of the two points to drill perfectly. Make sure you tell him you want the version of the plate with the LED holes, since it makes plates with and without the LED holes.

#7855 2 years ago
Quoted from Lanemeyer:

I have an April 21 build, and curious if anybody elses raptor looks like this, skewed to the side. I have the Mezel Raptor Pen mod but the raptor fouls with it so I cant get it on. I had the assembly apart but cant see any way to make any adjustments, so the only thing I can think of is to heat it up and try to bend it.
[quoted image]

Mine was built the same day and the Raptor does sit facing LEFT a bit, but perhaps not as much as yours is skewed. I installed the Mezel Pit and also had to use a heat gun on one of the Raptor's arms just a hint to keep it out of the way.

#7858 2 years ago
Quoted from JMCFAN:

I tried that.... just went right back where it was after a day or 2

The key to using a heat gun to reshape plastics is to heat it up SLOWLY, so that the material throughout the entire arm is hot. If you use a heat gun too quickly, the material on the surface will become pliable, but the inside is still fixed in position. The inside is fighting with the outside for placement! Heat the arm slowly, a few inches away, so the the whole arm bends quite easily.... then remove the heat and be prepared to hold it in position for awhile until the whole arm cools down.

#7868 2 years ago
Quoted from rhampo:

Ok. Had something really weird happen today. All the high scores on my JPP reset except for grand champion. Is this a software bug or something? We had no power glitches or anything like that. Has anyone had this happen to them?
Thanks!

How many games do you have on it? Something like 2000? There is a feature to reset scores after NNN games. I think the default is 2000.

1 week later
#7912 2 years ago
Quoted from demandecan55:

Thank you, I will try that.
Happy to finally have the machine, it’s pretty great! Is the software with the movie clips someone posted on here popular, or do most people use the regular software and animations?

Very popular. Contact timlah79 for more details to try it...

#7914 2 years ago
Quoted from demandecan55:

Thank you for the reply, I did try to search for the issue, but I didn’t search how you suggested, and I am seeing more posts now. To be clear, when the ball hits the helicopter it doesn’t really spin, just moves a fraction of a centimeter until the blades were out of the balls path and no longer moved.
Again, your post was helpful, thank you for taking the time to help.

It sounds like it is definitely hung up. Something below the playfield is amiss. The blades should spin literally by blowing on them. There should be no resistance at all!

#7928 2 years ago
Quoted from Razzz:

Firstly, do you think there will be any problems with me installing the Ultimate code on this pinball as it will be built in December and Stern is making some changes, and is there a version for the Premium?

Yes, timlah79 created his ultimate code SDCARD image for JP pro and premium. It is based on v1.03 gamecode specifically at this point. Now *IF* Stern starts using new node boards in the next JP production run, they will likely release a new updated SDCARD image to initialize those boards properly. It would happen at the same time as the new units begin to ship and you will see it as a new version of game code (v1.05 perhaps), and then *IF* oga83 can update his Pinball Browser to open this new version of SDCARD image, then code artists can update their work to be compatible. There are a few *IF*s here, so to be sure, monitor the pinball browser thread and see if oga83 has made progress to support GOTG V1.08 SDCARD first. That is the first game that has the new node board support in their SDCARD image. Its a very good sign *IF* he gets that done.

#7944 2 years ago
Quoted from Lounge:

Stern would have to recode for the new boards and then manage four versions of code. JP spike 2 pro/premium and JP [new node board] pro/premium.
There’s no way they would do that. The time, effort, and expense - not to mention the support nightmare is counter intuitive and would destroy the bottom line.

Thats what I thought, but.... they *ARE* already doing exactly this for the latest run of the Guardians of the Galaxy machines! From what we can determine, the worldwide chip shortage has forced them into this drastic approach, and are using a new revision of the node boards (with a new chip which they could get more easily) which REQUIRES a new initialization code on the SDCARD. So older GOTG machines have a different node board than the latest run of the same machine. New GOTG machines shipped last week will ONLY work with the latest code that was released last week to support the new chip (but older GOTG machines will work with ANY version of the SDCARD).

Go figure!

#7959 2 years ago
Quoted from JMCFAN:

Will have to disagree with that....I have used a hairdryer...and the small heat gun... get him nice and straight...even use compressed air to cool... was good for a day... right back where he was.... tried twice...

Did you heat the arm up slowly? The trick is to get the arm heated THROUGHOUT the entire arm. All of the plastic, not just the surface material. Even though 30 seconds of heat will make the arm 'feel' soft and bendable, you need the whole arm to soften, including the inside. You will know that has happened as the arm will be willing to stay in any position you choose without any resistance or memory of the arm trying to move back to original, THEN you allow it to cool. Instead of 30 seconds, try moving your heat source away a little more, and then applying for 90 seconds or so. Let the whole arm get completely soft, and then be ready to hold it in its 'new' place for 4-5 minutes. This is definitely not a quick "heat and go" process.

3 weeks later
#8066 2 years ago
Quoted from Skhantom2:

Hi! Need some help: I have a JPPE and recently the Jeep with the NewtonMail Will not move all the way around when hit. It stops midway. Tried some WD 40 but didn’t help. Anyone had the same issue?
Added some pictures. Even when it moves all the way, it doesn’t quite rest on the Newton ball…
[quoted image][quoted image][quoted image]

Although you might be able to just clean it up and be good to go, you MIGHT find that someone at the factory over-tightened the allen screw on the collar underneath while it was mis-positioned. Doing so has not only caused the post to have no vertical play (space), but they may have tightened the allen screw so tight that it sank a divet into the flat surface on the post itself damaging it. The damaged post with the set screw divet no longer allows any adjusting of the vertical play as the allen set screw only has one place to land-- in the divet! As a comparison, think of the gap required when rebuilding any flipper assembly and how you need to be able to slide a credit card between the playfield and the bat to test the vertical play before you tighten it down. The Jeep assembly actually uses the SAME BUSHING PART as any flipper, so no wonder it has the same gap requirement.

Easy fix but will take a few minutes of carefully repairing the flat surface on the post with a flat file. (Look at post 7440 where I wrote about this). And if you are going to be dis-assembling the JEEP post anyway, you might want to order an "F7-13M" steel bearing to replace the plastic one STERN uses. (Amazon has them too)

1 week later
#8084 2 years ago
Quoted from rolandthoms:

whats a good re-sale price for a premium? i am thinking of letting mine go.

There is one in the market right now listed at $8500 and sale pending. There is one at $9500 that has not moved yet. Most of the typical mods found on a machine don't return their cost in resale, so be careful setting the bar too high if you decide to sell. So you might have a hint at the acceptable range for buyers right now.

#8115 2 years ago
Quoted from Rat:

Sold out, currently unavailable, does anyone have another source? I tried googling the part number without sucess.

Most of this comes from China anyway, so you can always get it from aliexpress.com. It takes 2-3 weeks or so to receive...

#8121 2 years ago
Quoted from Freebird:

Hi everybody -
New to the forum, just got my Premium about a month ago. So far I am loving it. I noticed today that the newton ball is loose, probably about an eighth inch play (the one on the playfield, not the one on the truck). I have to believe it is supposed to be tight to the playfield, but I just wanted to check to be sure before I go tightening it up. Thanks!

More than likely the post and the ball have separated. Older machines used a threaded part, but from what I saw, new machines use a manufactured press-fit part so there is really no way to "tighten" the ball to its post. The post is held on to the playfield by a locknut under the playfield, which you can check. Those newton balls take a beating, so they break over time where the post fits into the ball. If under their 90-day NIB warranty, get it from Stern, otherwise most of the other sources (like marco and Pbl) carry them for under $10 each. Once you lift the playfield, you'll see the post locknut directly above the opto rotary sensor truck bushing assembly and pretty easy to get to.

#8123 2 years ago
Quoted from MacGruber:

I was always getting a 1 year parts warranty with my NIB Sterns. Did they change that to 90 days?

Their paperwork says officially 90-days now, but I have never 'tested' if pablo or one of the other Stern support folks enforce that, especially for small items it might be easy for them to just send it to you.

#8139 2 years ago

If I had found some enhancement for a pinball machine that could just as easily be ordered directly from the supplier, I would just post a link here for others to get it directly. But if I had to MODify that same item to make it fit, or change the color, or add a mounting hole, (even if slightly) then I would consider offering it as a MOD if any instructions would be too hard to explain. But that’s just me…

#8162 2 years ago
Quoted from R_O_S_S:

I’ve contacted stern to see, Is there something that I need to tighten to make this a permanent fix?
[quoted image]

I see the hint of a set-screw which is normally what needs to be tightened. I circled in purple.

pic1b (resized).jpgpic1b (resized).jpg
#8172 2 years ago
Quoted from jeffro01:

Thinking of grabbing a premium JP in the next run but one thing I'm not clear on is whether or not the custom code with the actual movie clips will continue to work with the "insider connect" stuff. Do we have an answer one way or the other yet and I just missed it? I'd hate to pick up a JP and then find I can't swap out the SD Card...
Jeff

First, Jurassic Park is an amazing game, with or without the custom A/V gamecode SDCARD.

Second, the new microcode on the last run of GOTG forced a new SDCARD. I expect that the new connected updates for all '17 Spike2 machines' will also create new SDcards for each of them. That's alot of new SDCARDS coming. Now, assuming that there is no technical deal-breaker in these new SDCARD files (like the use of the new node boards that *could* have some kind of security checking built-in to assure the SDCARD image is factory)....

If the security hardware issue mentioned above is found to not exist, then its two steps:
1) Pinball Browser must support the specific image. We'll see if oga83 can support any of these newest sdcard images.
2) The authors of these custom A/V versions of the SDCARDs must be willing to spend the time to converts their previous work to the new version.

#8175 2 years ago
Quoted from gblack:

There were a few posts around misaligned raptors. Really only notice after trying to install the mezelmods raptor pen. Mine seems to be facing players left. Before I go trying to apply heat to bend the raptor did anyone align better another way?

I don't know that anyone posted a proven 'fix' to reposition the raptor other than using heat. It's actually quite easy. I suggest that if you get your heat gun out, go slowly to heat the arm for 30-45 seconds to allow ALL of the material in the arm to be fully softened, you should be able to reposition the arm without any resistence. If any resistence, then apply more heat, slowly. THENlet it cool in the new position. It will work fine...

2 weeks later
#8228 2 years ago
Quoted from FightCave:

My right pop bumper goes off by itself during gameplay. Is there a quick fix?

Easy to fix. It's a spoon contact, and it's easy to access from underneath. Just raise the playfield, and look at the copper colored contact blades in the center. You'll likely see the blades too close together. Carefully spread them apart just a hint. Really, be careful not to spread them too far apart or you'll be kicking yourself. In general it is much easier to spread them to be LESS sensitive, than close them to be MORE sensitive, so open them ever so slightly at first and repeat if it still needs to be less senstive.

#8230 2 years ago
Quoted from BenB:

Curious if the shaker motor is a good upgrade on this game? Seems to be a good fit with Trex modes etc. I’ve had had my premium for a few weeks and love it so far!

Yes, get it now!!!!! It is so tightly integrated into the code, you'll be shocked it's not standard! LOL

#8231 2 years ago

After 6 months (correction: a year), my personal best... 925,950,850

IMG_0473 (resized).jpgIMG_0473 (resized).jpg

#8237 2 years ago
Quoted from TheBeefSupreme:

My 18 month old is obsessed with our JP Premium. He waits at the basement door to be taken down and then grabs his stool and brings it over so we can turn it on and he can watch us play. He just likes hitting the action button himself. It’s pretty nice because it has gotten my wife to play and now she is getting into it.
[quoted image]

Maybe you should re-wire the action button to also activate both of the flippers and shoot the ball launcher!!! One button does everything!!!!!

1 week later
#8259 2 years ago
Quoted from bdaddy:

Just joined the club! My premium arrived today. It has insider connect already installed and running version 1.04.0. I don’t know any other info as I’ve only played 1 game so far and just about to setup IC now, but just letting others know as I think it was not really known what software version these would ship with since 1.03 is the latest on Sterns site.

We'd love to see the release notes for 1.04, but no sign of it online for download anywhere... YET. (I suspect 1.04 will include more than just IC, but time will tell!)

1 week later
#8298 2 years ago

New firmware release notes:

V1.5.0 - November 18th, 2021
============================
- Insider Connected - achievements added. see achievement list on https://insider.sternpinball.com/
- Goat Mania - mode has now been added to the game if you are connected to Stern IC
- Goat Mania - without a Topper this mode will now start on the 5th Super Supply Drop
- Goat Mania - with a Topper this mode will only start via Topper Letter collection as usual

- Adjustment Changes:
- added "IC GOAT MANIA SUPER SUPPLY DROP" only when a topper is not connected, default to YES
- override "TOPPER LETTERS START GOAT MANIA" to NO for competition mode

- System - Updated to V2.97.0 on OS: V2.4.0
- Updated to nodeboard firmware/protocol v0.80.0

- Added Standard Adjustment "LCD DISPLAY BRIGHTNESS" to allow dimming of LCD display.

- Added adjustments for Login and Play Again display timers:
AD_NET_LOGIN_TIMER - "INSIDER LOGIN TIMER" default 30 sec
AD_NET_PLAY_AGAIN_TIMER - "INSIDER PLAY AGAIN TIMER" default 20 sec

- GAME RESTART (hold start button) behavior change:
Holding the start button on ball 2 or greater will follow the
logic of the AD_START_BUTTON_BEHAVIOR adjustment.
If (AD_GAME_RESTART == YES) and (AD_START_BUTTON_BEHAVIOR == ADV_START_BUTTON_BEHAVIOR_ALL_LOGGED_IN)
holding the start button on ball 2 or greater will restart the game for as many
players as is necessary to accomodate the users that are logged in.
If there are not enough credits to restart the game for the necessary number
of players, the the game will not be restarted.

- Address Insider Connected game registration corner cases.

- Upon entering the Service Menu for the first time after a software update, a screen
will display the game and system version numbers. This screen will be displayed
for a minimum of 1 second, and is dismissed by the enter button. This replaces
the dots display previous shown at power on after an update.

- Login changes:
* When a user logs in during a game in progress and the player up slot
is occupied, assign the user in the first open slot from lowest
player to the highest player.
* When a user joins a game in progress, award achievements that were
earned up to that point.
* When user authorization failure, remove the user from the session.
Added audits for connectivity games and scanner use

- Connectivity support for Spike 2 games.

- Added Standard Audit "Total Power Ons" which will display the number of
time the machine has been power cycled (Spike2 only). This audit was added in
system 2.45 and is not included for display.

- Update HSTD RESET COUNT adjustment to increment/decrement by 100s when >= 100 and
by 10s when < 100

- Turn on cabinet lights, if installed, when in the Service Menu.

1 week later
#8351 2 years ago
Quoted from PinDescabarian:

Does anyone know of a good company for plastic protectors for this game?

Take a look at colorguardprotectors.com they have a 6 piece with the main four in orange hue. Pinballlife.com has the 4 piece green hue or clear style

1 week later
#8389 2 years ago
Quoted from dacdjsteve:

Thanks! Loving and yelling at the game all day long! So fun!
So far, I've ordered:
Amber light up shooter rod
Matchbox Helicopter
Jada Jurassic Park 1:32 Scale Jeep Wrangler
Shaker Motor
Stern Topper (Still available from Marco Specialties if anyone is looking)
and an assortment of mods from Mezel Mods

Put the shaker in tonight if you already have it. It makes all the other effort worth your time. The shaker is an easy 30 minute install with instant and very tangible gratification.

#8392 2 years ago
Quoted from dacdjsteve:

Will do! Shaker getting delivered today and got these recently.[quoted image]

See my previous note about using painters tape on the cabinet BEFORE you remove the old shooter plate. That will mark the exact position. Makes the replacement with the amber one much easier.

#8419 2 years ago
Quoted from freddy:

Mark was one hand tied behind your back?

Lol. It took me 15 of those minutes to find my blue threadlocker for the screws!

2 weeks later
#8441 2 years ago
Quoted from Lounge:

The tail is getting caught on the wire-form. Can be bent with a heat gun. Check the “key posts” at the top of the page for greater detail.
[quoted image]

The tail is one of the easiest fixes to do with a heat gun. The key is warming the tail thoroughly and then letting it cool in the slightly narrower position naturally. If you are able to heat the material throughout, you won’t need to apply any pressure to it while it cools, and it will stay in the right position permanently. Heat it slowly until it’s pliable. Then let it cool in the new shape.

3 weeks later
2 months later
#8614 2 years ago
Quoted from NoSkills:

I adjusted the sensor to be closer to the spindle and I think it’s fixed the problem, though it wasn’t happening every game so I need to play more to make sure. Seems a bit wrong that it needed to be closer, I’d think that was only the case if it wasn’t registering but I don’t really understand the mech! Before and after photos below. Hopefully it’s fixed, if not I guess I may need a new sensor.[quoted image][quoted image]

It may be a magnetic sensor, so proximity can make all the difference…

#8621 2 years ago

Finally had a moment to make a custom roof mod for my second Premium. It's cost me about $10 and about 4 hours. I have provided a visual how-to for anyone that wishes to do something similar. Nothing beats a real bamboo roof in the jungle!

IMG_1852 (resized).jpgIMG_1852 (resized).jpgIMG_1853 (resized).jpgIMG_1853 (resized).jpgIMG_1854 (resized).jpgIMG_1854 (resized).jpgIMG_1868 (resized).jpgIMG_1868 (resized).jpgIMG_1869 (resized).jpgIMG_1869 (resized).jpgIMG_1870 (resized).jpgIMG_1870 (resized).jpgIMG_1871 (resized).jpgIMG_1871 (resized).jpgIMG_1873 (resized).jpgIMG_1873 (resized).jpgIMG_1875 (resized).jpgIMG_1875 (resized).jpgIMG_1876 (resized).jpgIMG_1876 (resized).jpg
1 month later
#8662 1 year ago
Quoted from SimplePin:

I'm proud to be an official member of the club. My premium just arrived and the box is perfect. Now the fun begins!

Resist the urge to spend all your time adding mods to it, and really have fun PLAYING the machine!!! (The main exceptions are listed below) It's pretty amazing and you'll grow to love and/or hate the various shots and strategies involved in such a deep game. Almost all the other mods are cosmetic.

1. Consider adding some kind of a shooter lane protector has that lane wood takes a beating.
2. You might find yourself having to grind down the left tower flap screw if it contacts the ball as it interferes with the tower shot otherwise.
3. Most people find the shaker add-on to be almost essential since it it SO tightly coordinated with the playfield action.

There are a ton of other cosmetic mods, some amazing (like Stern's amber lighted shooter, ULEK's control room plastic, WizBlades 'blue' side blades, custom Apron cards or Mezel's Tower replacement and raptor pit), and some less amazing (a hundred kitchy mods to choose from)! But modding is the realm of art, so enjoy the ride and splash on a hint of your own personality if you like! 8-)

1 month later
#8701 1 year ago
Quoted from Lounge:

Did a “Key Post” search - found nothing.
Does anyone make an off the shelf truck mod?? All the screws are falling out of mine and won’t stay put. I would like a more permanent solution.
Tia

Drop a note to Lucxor and see if he still makes the 3d printed bracket with the Jeep.

#8741 1 year ago
Quoted from RoadQueen:

Agreed, contact Lucxor to see if he still makes the plate to attach the Jeep. I got it from him and he was great to deal with. Even got a failure in the initial plate and he improved the design and material and sent me a free one and it has been solid. I bought the plate and Jeep together from him. But you can find the Jeep easy on Amazon and might just need the plate. Previously thought that you would need a 1:43 scale Jeep but actually the 1:32 labeled scale is exactly the same size and will work.
Jada Jurassic Park 1:32 Scale Jeep Wrangler in Quality Die-Cast Metal Open Doors for Children Ages 8, Multicolor (253252019) https://a.co/d/hTC1YTL

I contacted Lucxor and he confirmed that he no longer makes the JP Jeep replacement bracket mod. Owners should follow some of the other step-by-step Jeep mod instructions which are pretty easy to do on your own.

#8744 1 year ago
Quoted from A_J_B:

New to the JP Premium club this week (second pin for the house). Machine seems to work as advertised (I'm reviewing the key posts this weekend) so hopefully it stays this way.
One question on the T-Rex multi-ball when the T-Rex head moves back and forth and drops the ball, is it suppose to be dropped randomly or put somewhere specific? The other T-Rex modes, it places it on the wireform from the ramp with no problem.
I'll try and keep the n00b questions to a minimum but please forgive me if I ask something that has been answered 10 times already.
-AJB

Rampage mode throws the ball where ever it lands... other modes drop it on the wire ramp. You can change the setting to stop rampage ball throw.

1 month later
#8777 1 year ago

I also posted the schematic to add two LEDS to the shooter plate which allows it to be animated by the gamecode. stern’s shooter comes with the amber rod and the animated plate. I built the LED plate and posted the schematic a few times in this thread if anyone wants to DIY it.

#8781 1 year ago
Quoted from hd60609:

I made some JP shooter rods. These are meant to simply replace the standard shooter. I cast an actual crane fly in resin in the middle of three amber layers. The casting was the hardest part of the process as the crane fly sometimes had small bubbles near his body or floated toward one of the edges.
[quoted image]
After casting, I mounted a brass fitting in the resin and screwed in the threaded blank shooter rod from Pinball Life to ensure the proper length. I wanted to make sure they provided the proper full plunge.[quoted image]
I then lathed them into a very nice plunger shape, which happens to be a bit larger than the official JP plunger. They were then sanded with 220, 400, 600, 800, 1000, 1500, 2000, 3000 and then polished to a high gloss finish.[quoted image]
I ended up with 7 shooter rods. 4 of which I would consider very nice. There are three that I would consider seconds. The shooter itself looks great and has great feel, but the crane fly cast is not perfect.
Anyone interested can PM me before I list them in a Pinside ad.
[quoted image][quoted image][quoted image][quoted image][quoted image][quoted image]

It looks like it would be kinda fun to make those, with the right tools and know-how. Starting with resin molds, then turning and polishing on the lathe. (But it also looks like a bunch of clean-up at the lathe afterwards!). Looks like a "fun" weekend project to be sure, and it reminds me I need to find myself a lathe someday...

#8784 1 year ago
Quoted from crwjumper:

I have looked at all of your posts in this thread and cannot find the schematic you mentioned. Would you please post it again?
Thank you!

Stern Shooter Schem 3 (resized).jpgStern Shooter Schem 3 (resized).jpg
#8786 1 year ago
Quoted from athomepinsider:

Ordered mine
Didn’t wanna pull the trigger on a pricey Stern one, so I opted for one of hd60609’s “secondary” plunger rods for $39, $48 after shipping. Very excited to give my Premium some extra style points. Will post pics when installed.

Consider splurging on the LED mod as well, it's cheap and takes advantage of the animation built into the game code for the shooter plate LEDs. A connector, some wire, two LEDs and two resistors.... plus an hour or so.

#8788 1 year ago
Quoted from athomepinsider:

Do you know if this topic has been covered in either thread?
Thanks -
Will

I posted pictures of the wiring mod in ONE of the JP threads a year ago. Look for my name and I will try to find it too.

1 week later
#8792 1 year ago

Looks like all current machines got new code today! Here is JP's release notes. The first two lines are interesting. The first sounds like they did a big change to the operating system itself which is hopefully invisible to owners (its now called SpikeOS V2.7), the second may be addressing the reported reboot/freeze when IC hardware is installed. The rest is IC stuff and some coin handling changes.

V1.07.0 - September 12th, 2022
==============================
- System - Updated to V3.22.0 on OS: V2.7.0

- Corrected potential game reset issue.

- When entering a WiFi password, the previous characters will be displayed as an asterisk.
The WiFi password will be displayed as all asterisk when entering the setup screens or scanning
the WiFi setup QR code.

- Added Service Menu Tech Alert when weak signal strength is detected. The signal strength
and SSID will be displayed. An average signal strength < 40 is considered weak. A weak
WiFi signal may contribute to a slower or inconsistent connection which may effect the abilty
to login or download software updates. Signal strength can be improved by the use of an
inexpensive WiFi extender. A wired Ethernet connection can also be used in cases where WiFi
signals are problematic.

- Added Standard Adjustment "ENABLE HOME TEAM IN COINPLAY", default value of NO.
Setting this to YES will allow Insider Home Team to be available for machines not
set to Free Play. Normally "USE INSIDER HOME TEAM" is only available in Free Play
mode. Many home players, who choose to use their game in Coin Play, have requested
the ability to enjoy Home Team! Setting this this adjustment to YES will default the Home
Team Guest Retention to Never. If you wish a different setting you will have update that
adjustment after enabling Home Team in CoinPlay. Home Team is not available for machines
registered to a Pro account operating in a commercial environment.

- Added Standard Adjustment "REMOVE FRACTIONAL CREDITS". Values are:
"NEVER" and "AFTER X MINUTES IDLE", where X is between 30 and 240.
The default value is "NEVER". If the game is idle (no coin or flipper
switch activity in attract mode) for X minutes, any fractional credits will
be removed. Whole credits will NOT be removed.

- Added Standard Audit "FRACTIONAL CREDITS REMOVED", which will track the number of
fractional credits that have been removed when the game was idle.

- Changed the default value for Insider Connected Software Update to "Install updates automatically".

#8797 1 year ago
Quoted from superNESjoe:

Hey everyone, hoping for some help here. Got a NIB JP Pro, less than 100 plays on it and I've had it only a week or so.
The ball next to the jeep that the jeep spins around came off. I've tried popping it back on with a little force and a rubber mallet but it doesn't take much more than some wiggling to get it to pop right back off again.
Any suggestions?
[quoted image]

You need a new part, under warranty. That ball is pressfit into the post and takes a pretty big beating in every game. Any glue you try will struggle after enough plays… maybe 10 games and then you are back to looking for a real fix. Easy to swap, but you need the part from stern.

2 months later
#8844 1 year ago

I ran into a great little mod over at Mr_Tantrum 's mod store that I wanted to share. I never thought about that generic warning decal on the center of the apron surface, but he has magnetic (or pressure sensitive decal) printed badges that go right over the factory warning. It's a 10 second iupgrade, $12 shipped and he has some stock images or you can supply one yourself. For the machine that has everything....

IMG_0603 (resized).jpgIMG_0603 (resized).jpgIMG_0604 (resized).jpgIMG_0604 (resized).jpgIMG_0605 (resized).jpgIMG_0605 (resized).jpg
2 weeks later
#8846 1 year ago

Found a really well made mod over at DystopicPinball for the Raptor tower. Well built, visually about as authentic as you can get from the 1993 movie, and includes 3 tower compund lights. (It has now replaced the one I made last year to look like thatched roof hut also shown below)

IMG_1876 (resized).jpgIMG_1876 (resized).jpgIMG_2204 (resized).jpgIMG_2204 (resized).jpg
#8848 1 year ago
Quoted from Jarbyjibbo:

What am I missing, why do people keep turning their raptor pen watchtower into a back yard palapa? There's not one piece of straw on the roof of the watchtower. Obviously it's yours to do what you wish (I'm sure plenty of people wouldn't do the mods I do either), I'm just at a loss as to how the straw roof connects to the watchtower.
[quoted image]

That is why I switched the straw/thatch roof OUT, in favor of the new tower mod that matches the picture very closely (even has a standing guard with a red hat on the deck). Originally I was going for a jungle hut looking thing, but that is not accurate to the movie.

#8856 1 year ago
Quoted from PinRat:

Hello knowledgeable friends - I had a screw come out and it disappeared and I can't figure out what type of screw needs to go back in to get things together. In front of the left (trex) ramp there's an airball protector plastic that is not on any of the manual schematics. I'm missing the bottom left screw and I am just trying to figure out what I need to pick up to replace it if anyone can help. Thank you!

Post a picture of the missing screw area and we can tell you the screw for sure. It’s likely a 6-32 x 3/8 long, but a picture will assure the missing screw is identified properly.

#8860 1 year ago
Quoted from classic-chevyguy:

Just installed the Stern Amber Shooter Rod. My JP Premium has a green spring and the Shooter Rod has an Orange Spring.
The Amber shooter rod does not launch the ball as strongly as the original shooter rod.
Any thoughts on how to solve this issue?
Thanks

Most factory games are shipped with the GREEN spring even though the manual shows it should have an ORANGE spring installed (which is more powerful). The Stern supplied shooter upgrade comes with the orange spring which should be strong enough. Check your shooter tip and/or playfield-shooter alignment if you are not getting succesful launches.

#8865 1 year ago
Quoted from classic-chevyguy:

I also installed the new base plate with cutouts for the light wires.
Sorry for my ignorance, but doesn't the base plate, once installed, lock in the position of the shooter rod, since the shooter rod and the rod screws penetrate the base plate?
Perhaps the new base plate is different from the factory base plate.
Thanks for the help.

I posted the painter's tape instruction (and pictures) a couple of years ago specifically because there is so much 'play' in the mounting plate and holes. The front plate is always identical positioning for the rod, that's why the painter's tape BEFORE you start is so important. Best thing to do at this point is with the glass off, to loosen the screws on the back of the plate slightly to allow the plate to be moved with a little force, and with playfield lowered then move the shooter plate from the front side to side until the tip of the shooter tip is dead on with the center of the ball and lane. Then raise the playfield and lock in those screws.

#8867 1 year ago
Quoted from classic-chevyguy:

I am assuming that the screws mentioned are the hex screws for the backing plate into the cabinet, and not the phillips screws between the backing and front plate?
Thanks to all for the great suggestions.

Correct. The issue is there is enough play in all of these parts to allow the shooter plate to be moved slightly in all directions. Best bet is to dead-on adjust the plate to the lane and ball by eye now. You’ll get it right with a little trial and error.

1 week later
#8879 1 year ago
Quoted from EEE:

Could one of you Premium / LE owners please post a picture or two of the playfield with the apron removed? Maybe from a recent shop out?
I could use close-up shots of where the holes for the built in apron threaded hold-downs go through since I need to drill those holes in my Pro playfield.
I could also use a picture of how the plastic triangle insert lighting is situated.
Thanks for the help.

I think you’ll need to use some blue tape and measuring to get this right. I was not able to get an accurate enough guide for drilling from pictures. You should be able to remove the plastic apron and the posts that hold it in place, and then place the metal apron on the right location based on aligning with the front u-brackets. Use the two screws on the u-brackets to make site it’s really aligned. Put some blue painters tape on the playfield where the edge of the apron hits the playfield in the return lane and mark with a sharpie the location of the slits. Now remove the apron and measure backwards where those brackets must be to hit the two slots. Once I think I had it, I used double sided tape to attach the brackets to playfield before I drilled to make sure it’s aligned and in the right place. If the brackets are in the right place, then drilling the 6 holes is now the easy part.

#8881 1 year ago
Quoted from EEE:

There was a recent design change in the premium / LE aprons. Screws are now riveted to the front.
I’d really like to see a picture looking straight down with the apron removed on a JP Premium or LE.
[quoted image]

The PRE/LE apron now has a welded post attachment that runs through the playfield? Like a ball guide? I was not aware. PBL had the traditional metal apron and brackets kit last time I did this a year or so ago.

1 week later
#8882 1 year ago

Got an odd problem with my Premium that started today, so I want to get some advise from anyone that may have seen a similar problem... ( I found a few folks reporting the same issue but didn’t actually find a fix discussed other than swapping the whole head assy like PumRibby didva couple years ago)

Running stock 1.07 game code and today the TREX started landing on the far right side and trying to lower it's jaw which impacts the wire ramp. It sits there most of the time when in normal operation should be dropped on the plastic ramp with mouth open.

I went into diagnostics, and ran HORIZ tests, and it properly moves between position 35 on the far right, 197 in the center, and 165 to the far left. Using the flippers I can move the head through all three typical points horizontally and they are properly positioned. In vertical test mode, I can move it up and down between 64,65 and 66 positions using the flippers as expected.

I am stumped where to look. More times than not during a game, it thinks it is in the center position with jaw lowered, when it is really on the right ramp position with jaw resting on wire ramp.

ANY suggestions welcome.

#8884 1 year ago
Quoted from JMCFAN:

MIne did somethng very similar... right after I installed 1.07 . I first did it with USB update... and things were really wierd. I did a card image... seems much better...but still some odd TREX behavior. I posted this issue but no reponse...
Just played a game and seemed fine... except i sucked... lol

Coincidently, this was the first time I powered it up for more than the boot screen after I upgraded from 1.05 to 1.07. I would like to drop in factory 1.05 but I overwrote the raw file.

Anyone have the 1.05 premium stock raw file?

#8886 1 year ago
Quoted from JMCFAN:

I you find a copy of 1.05 I would be interested....

I am copying a factory 1.05 SPK file over from Pin42 right now. I will do the USB install routine to drop it to a card and make sure it's viable, and then share with you. For me, I am trying to eliminate variables to resolve an odd Trex head problem that coincidently started about the same time I went from 1.05 to 1.07. May be unrelated, but want to check nonetheless.

#8897 1 year ago
Quoted from Markharris2000:

I am copying a factory 1.05 SPK file over from Pin42 right now. I will do the USB install routine to drop it to a card and make sure it's viable, and then share with you. For me, I am trying to eliminate variables to resolve an odd Trex head problem that coincidently started about the same time I went from 1.05 to 1.07. May be unrelated, but want to check nonetheless.

Just loaded 1.05 and the TRex head issue still exists. Ugg. Off to Stern support to try and diagnose it…

1 week later
#8914 1 year ago

There really is a brick issue but it has nothing to do with using the movie code versus the factory code. If you look at the node boards, the 'universal' boards are green in color. All spike2 machines up to covid timeframe used them. Those use a single chip that has been used for years and is supported by all versions of their microcode, old or new. (microcode versions are things like .47, .58, .72, etc and declared in the release notes) Any game code you have will work with any JP with GREEN node boards. (Game code versions INCLUDE microcode versions in the same image). During mid-COVID days, they had to redesign the node boards to eliminate that hard-to-find chip, and went with 7-8 discrete chips instead of the one chip design. (You can visually see one chip became eight smaller chips on the board, right above the TO220 driver transistors. Apparently those smaller chips were easy to find during the supply chain shortages. BUT by using that redesigned board, the microcode had to be updated. They changed to boards to BLUE to visual help operators spot the difference and the part number changed as well.

Net-Net: If you have BLUE node boards in ANY recent build Stern machine, you are limited to their latest gamecodes, beginning with the version that it shipped with to be safe. DO NOT TRY TO LOAD EARLIER CODE or there is a reasonable chance that the new board will try and succeed to update itself with old microcode, and once microcode is updated permanently break the communication line in the process, making it impossible to even fix the board with new gamecode since there is no way to get it into the node board which is no longer listening to the RS485 communication line.

#8918 1 year ago
Quoted from Markharris2000:

Just loaded 1.05 and the TRex head issue still exists. Ugg. Off to Stern support to try and diagnose it…

Just heard back from Pablo. He recommended some diagnostics and a factory reset but also suggested there is a Home Position switch that can be flaky. I just need some time to locate and test that switch this weekend. Stay tuned…

#8925 1 year ago
Quoted from etien:

My pin came with 1.07 in 2022 and I installed the movies / 1.05 with no problems, not sure I understand this post

1.05 supports either version of the node boards..

2 weeks later
#8938 1 year ago

Still trying to repair my T-rex head, Stern support recommended that I replace the Servo Motor, Switch 68, and the Controller but I am out of warranty. I found the servo and switch at PBL, but wondering if anyone has recommendations on source or a distributor that 'is happy' to order replacement parts like the board (520-8424-00). The distributor that I purchased the machine from originally seems to have ignored my requests....

Suggestions welcome.

#8941 1 year ago
Quoted from jalpert:

Terry at Pinball Life has always been happy to place Stern orders for me.

I will check with terry in the morning…

#8946 1 year ago
Quoted from JMCFAN:

So if you are out of warrenty you can not order parts...???

It appears that IN-WARRANTY machines can receive parts directly from Stern. AFTER warranty replacement parts must be sourced/purchased from an authorized distributor. I found two of the three in stock at PBL, but they had to request pricing and availablity on the horiz controller board. (which I think is about $175)

3 weeks later
#8961 1 year ago
Quoted from Markharris2000:

I will check with terry in the morning…

Update: Looks like all of the three possible parts recommended by Pablo at Stern are on the way! PBL had the Servo motor and the roller microswitch #68 in stock, and sourced the 520-8424-00 controller board (she had to special order from Stern). The only 'gotcha' was the servo motor shipped with bare wires. I had to grab a 6-position molex connector and put it on (which takes a little bit of effort without the right IDP tool). While I was at it, I ordered a set of "pinball jacks" to lift the playfield up out of the cabinet to make this replacement easier.

#8964 1 year ago
Quoted from pinheadpierre:

I’ve never heard of a jack for a playfield. Do tell….

It's a $60 set of 'clamps' that are formed for the rails on the cabinet that are made to suspend the rear of the playfield above the cabinet for maintenance. You can use a couple of old clamps or some old rags, but those are a bit more precarious and harsh on your sidewalls/sideart blades and powder coated rails, etc. These simply slip over the walls and hold the playfield up without scratching or damaging anything else. Nothing magical, but a purpose-built tool for the specific job. You can find them in the Market here on pinside. (The black plastic part in Manny65 pictures below are actually a softer 3D printed rubber-like feel which protects the rails and art from damage).

2 months later
#8987 10 months ago
Quoted from jalpert:

Anyone know when the premiums are going to leave the building?

I think the factory has been shipping JP premiums for two weeks, with some units still in transit to some distributors…

3 weeks later
#9013 10 months ago
Quoted from TheBeefSupreme:

Had a premium before and missed it, got another yesterday and had my first trip to the visitors center! Unfortunately I had not yet setup my insider connected so I’m sure I missed a few achievements there didn’t quite break a billion yet either.
[quoted image][quoted image]

I know what you mean about re-purchase. As soon as I heard the current production of JP machines might be final run, I had to grab one. (now sitting in the box in my garage until I have a place to put it).

#9017 10 months ago
Quoted from marspinball:

I just unboxed a JP premium and the T-Rex is not working right at all. It moved to the right at the start of the game and started grinding and then completely stopped working. Went into test mode and it will move roughly back and forth then stop and start grinding. Also doesn't move up and down correctly. Mouth never opens. When it does go back and fourth it is hitting the ramp.
Not sure where to go next. Inspected the assembly but not sure what I'm looking for. Searched pinside for answers but can't find the answer.

Take a look at the centering collar to make sure it it installed properly. Refer to Page 59 in the manual, top right picture 5.50 , there is a part #2 that should be installed on the servo shaft and positioned so that it activates the microswitch (shown as part #5 on same page 5.51) when the head is centered above the ramp. It has an allen set screw and should be tightened to the servo motor shaft. Make sure the collar is tight, the microswitch is installed, and the wiring to the switch is not damaged or incorrect/mis-pinned. If that collar/switch are not sensing the head centering, it may be struggle as you describe.

#9022 9 months ago
Quoted from Markharris2000:

I know what you mean about re-purchase. As soon as I heard the current production of JP machines might be final run, I had to grab one. (now sitting in the box in my garage until I have a place to put it).

Update: Finally got around to unbox it yesterday. May 20th build date. Looks perfect, minor Raptor Pit gate alignment/leveling issue that should be easy to fix when I have time. Shipped with latest 1.08 code and the 30th anniversary backglass emblem. Played one game, got to Chaos Multiball which seemed to test 'nearly everything' and called it a night!

#9024 9 months ago
Quoted from brooklynknight:

Just joined the club and get the NIB today at 5pm. How do I go about getting the movie code. Anything I should look for when unboxing and before playing adjustment wise. I normally set all games to a 7.0 to 7.2 I assume this will work with JP too. So stoked to be here now!!!

Movie code was last updated around gamecode version 1.05. Today, factory gamecode is version 1.08. You would need to make a choice of running factory V1.08 and all of its newer features, or run the modified V1.05 and be limited to those features that existed in V1.05. You can look at the release notes and see what has been added since 1.05 to determine what features you would be missing if you run the older modified movie code.
https://sternpinball.com/wp-content/uploads/2023/04/JURASSIC_PARK_LE_1.08-README.txt

Many owners say the 1.06 thru 1.08 adds nothing more than a bunch of coin-operated changes, some home team and internet connected changed stuff, and a few default changes. Not sure if *ANY* new features have actually been added since 1.05 was released. You decide! (And you can always switch back and forth if you can not make up your mind!)

#9031 9 months ago
Quoted from brooklynknight:

Appreciate your opinion! Just incase I decide to do this and my run is from this year I have to revert to the old code first then add movie mode? I read there is a chance I can brick it. Not worth it if that's the case.

Best to stay with factory code until you know more about the game. I am not aware of any changes to the version of node boards in new runs of the machine, but that’s a mistake you don’t want to make.

#9035 9 months ago
Quoted from Jamesays:

Recently picked up a premium and have been enjoying this Machine.Posting to get the thread in My Que.
I just noticed there are 2 threads Today.

Yes, the two threads are annoying, and lots of folks suggested that they be combined, but apparently no-can-do.... You'll need to check both threads as the topics are not precisely sorted by machine type. In most cases, the base thread gets most all of the JP (any version) new content, and the PREM/LE thread is more limited to topics just for PREM/LE owners.

As for mods... so many to choose from, but the SHAKER is a must-have since the code is strongly integrated with it. Everything else is a matter of taste. Shooter lane protectors go on my machines, side blades (there are a ton to choose from), the amber and LED shooter rod from Stern (also integrated in the code), and a replacement of the control room clear plastic with the ULEK version and a yellow half dome to eliminate the blinding white light!

Enjoy the machine... it is a very deep code base that will keep you on your toes!

1 week later
#9041 9 months ago

Setting up a June 2023 premium, and noticed the raptor gate is not centered front-to-back in the rectangular playfield cutout like my previous units were. In fact the top of the gate actually sticks when lowering. It's a simple mechanism, and I tried just repositioning the unit with the slack in the mounting holes, but it's much farther off, so I will adjust it's position by elongating the four mounting screw holes.

Something has changed, and I suspect it's poor machining of the bent metal of the mechanism rather than a change to the CNC pattern of the wood cutout location... and I was curious if other people have seen this on their recent machines? I am estimating it's a full 1/16 or 3/32 of an inch off.

#9044 9 months ago
Quoted from JohnDeere:

Are you on the latest code? I know on some of the older builds the raptor gate would stick up a small amount and never fully go down until you reboot.

I am running the latest 1.08 (it shipped in June with the latest gamecode). I am certain this is a machanical problem, since with the playfield raised, I can see the lip of the metal top interacting with the wood surface when I move it manually. (I was curious at the design because it actually lowers by GRAVITY- the motor allows it to lower, but gravity actually lowers it.)

3 weeks later
#9066 8 months ago
Quoted from crossy1010:

I also have this issue on a May build Premium. What was the outcome? Did you fix it yourself or contact your distributor?

Easier to just fix it myself. The distributor path would have taken months to see anything, and there is a HIGH likelihood that any replacement part sent would be identical to my current part. I think their QC team is much more tolerant than owners are, and the replacement part used for warranty may not even be inspected individually to check tolerances, etc. It took 10 minutes with a rounded file. Simply remove/grind/reinstall.

#9067 8 months ago
Quoted from hiker2099:

Just curious, but my son noticed a 30th anniversary emblem on our new JP premium. Can anyone confirm if this is a new design?
[quoted image]

I have owned JP-Prem three times. A mid 2020 build, a late 2021 build and a recent 2023 build. The first two did NOT have the "30th Anniversary" logo on the glass, the newest one did.

m

2 months later
#9076 5 months ago
Quoted from jacksparrow0112:

Just brought home a premium and have this exact issue, except I cannot locate the screw in the bottom of my cabinet. I checked the entire TREX head and motor assembly, and cannot find it anywhere.
Does anyone have the specs on this screw or a recommendation on how I can quickly replace it? Thanks much!!!

Pgs 58-61, likely the 4-40, either 1/4 or 5/32, or could be the 6-32 1/4. The 4-40 screws tend to be black anodized if they are visible.

#9079 5 months ago
Quoted from jacksparrow0112:

Found it - Page 61 - SCREW, 6-32 X 1/4" PPH SEMS

And use some BLUE Loctite... (Harbor Freight, $2.99)

(I think they forget the Loctite at the factory quite often which is why some many of these Trex screws 'fall out'.

4 weeks later
#9095 5 months ago
Quoted from datakyki:

Welp, sadly I had to take the custom head back off. Solved the jaw sticking open but the back of the head was made without enough clearance angle and bound up on the mech when fully to the right side. Caused a different problem. Sigh. So I got out the razor knife and went to work on the factory T-Rex. After a couple attempts I got the jaw working fine. Was actually binding in two places, the same place as Freebird but also up high inside where the jaw solenoid actuator is located. The two pins on the actuator that the jaw lever rides on were rubbing on the inside of the head and sticking the jaw open as well.
I'm still going to try working on the custom head to make it fit by grinding off a better angle on the rear of the mold to clear the mech. It looked so good in the machine and, well, I have it so I want to use it! lol
An upside of all this is after doing it no less than 4 times in one evening I've become fairly proficient at disassembling the T-Rex head without removing the entire assembly. May not be the only way (or even the best way) but assuming I do this again I'll try to take pictures next time I do it and post them here. I looked and didn't find anything like that when this started so maybe that'll help someone in the future.

The T-Rex head assembly seems daugnting at first glance, but as you found, once you get your hands and eyes on it a couple of times, it's pretty simple... Four screws to mount it to backboard and 4 connectors to drive the motion/sensors kind of thing. The mechanism is pretty straight forward, left and right, up and down, and the manual pages that illustrate it are very clear. (Note to readers: Having the back of the playfield propped-up with something makes the T-Rex maintenance 1000% easier).

#9107 4 months ago
Quoted from jackd104:

Key post by K.E. says top of upper right flipper should be aligned to the dot (not center of flipper), but with that, the balls hits the post below the flipper on the way down from the orbit. Seems like if the flipper was “out” just a little more, it would return smoothly to the lower right flipper. Color me puzzled.

Lots of trial and error required here. The thickness of the flipper ring you are using may also influence the alignment of the bat too. I think the best advice is it’s your machine, you can set it anyway you like, but on my machine I make sure that the rolling ball on the bat just nicks the post sleeve a hint, changing the direction ( to the left) just a bit to prevent SDTM.

#9110 4 months ago
Quoted from jackd104:

Could someone with 30th LE possibly take a close look at your back glass and let me know if it has many of these tiny dots where it looks like the art is scratched out and the mirror is showing through? Not sure if this is normal or a defect. [quoted image][quoted image]

I don’t think that was intentional, but lots of 30th owners are reporting the same “cosmetic blemish”. Not sure Stern will do anything to correct it.

4 weeks later
#9134 3 months ago
Quoted from kciaccio:

Finally joined the club with a Premium yesterday.
I heard there is a cool code out there that you can upgrade to.
Anybody have a lead on how to get that code?[quoted image]

DystopicPinball has great movie code for beginners (who don't have the rule set down yet), and butterz and PoMC each have a more advanced movie code version (for people that already know the rule set solidly).

1 month later
#9168 64 days ago
Quoted from kciaccio:

Awesome! Thanks everyone who responded.
Went with the control room plastic and might change dome color.

Good choice. The ULEK plastic coupled with an amber half dome make it blend right into the look of the rest of the playfield.

1 week later
#9171 57 days ago
Quoted from CypherPinball:

Hi Everyone,
New to the club. Just got a NIB JP Premium. We are having an issue with the trex head, it will not align with the ramp and open its mouth for a trex shot. Even when it clearly says on screen to shoot the mouth. Everything seems ok in diagnostics. No issues from what I can tell. Thrashes and moves around during gameplay as well. But, when it comes time to shoot the mouth it doesn't quite align with the ramp. It's very close, but not quite. And doesn't try to open its mouth. Though if it did it's too for over to actually open with out hitting the side of the ramp.
We are very new to JP, literally was delivered today. Any help on where to begin troubleshooting would be greatly appreciated.

I think the setting is called "HORIZ BIAS" and ranges from -7 to +7 if I remember correctly. Those coarse bias settings should fix you up. (There may be a finer adjustment too, but those rarely have to be changed). It as to do with the oddly designed mechanism that does not actually know when the head is directly above the center of the ramp. There is a physical microswitch that tells the CPU when the head is IN THE VACINITY of the center of the ramp, but the rest of the horiz positioning is done through timing calculations. The servo motor positionng of the head may therefore change if the movement slows or speeds for any reason. (like a mechanical obstruction)

#9186 52 days ago
Quoted from Jeffo:

Hey all! Just joined the club, #191 30th anniversary checking in.
Absolutely LOVE the machine so far, but I did have a question. When sound seems to get intense (lots going on, especially T-REX roar) it can start to stutter on and off a bit. Anyone else experience this? It was like this right out of the box so not sure if a software or hardware issue or what. Couldn't find too much about this either.
Other thing seems to be the left ramp doesnt always register the shot, which to me suggests could be a partially faulty opto board.
Any suggestions on either would be fantastic, but otherwise it is a sweet ass machine! Happy to have it in the line up.

You can confirm the 'tape fix' will help by taking the glass off and rolling the ball by hand slowly across the opto sensors. If the slow travelling ball registeres 100% of the time, then the 'tape fix' will likely solve your problem. The issue has to do with the duration of the time that the light beam is broken by the presense of the ball. The closer you are to the surface of the playfield, the less obstruction of the light due to the shape of the ball. Try it. Roll the ball slowly and you'll have your answer.

Promoted items from Pinside Marketplace and Pinside Shops!
$ 29.95
Playfield - Toys/Add-ons
ULEKstore
 
$ 29.95
Playfield - Toys/Add-ons
ULEKstore
 
$ 19.50
Cabinet - Other
NO GOUGE PINBALL™
 
9,000 (OBO)
Machine - For Sale
Birmingham, AL
$ 45.00
Cabinet - Decals
Inscribed Solutions
 
$ 9,499.00
Pinball Machine
Classic Game Rooms
 
From: $ 31.50
From: € 30.00
Playfield - Toys/Add-ons
Pino Pinball Mods Shop
 
From: $ 30.00
Cabinet - Other
Rocket City Pinball
 
From: $ 15.95
$ 5.00
Playfield - Plastics
UpKick Pinball
 
$ 17.00
Lighting - Other
Pin Monk
 
12,500
Machine - For Sale
Orlando, FL
Trade
Machine - For Trade
Pinson, AL
$ 15.00
Cabinet - Other
Pinhead mods
 
$ 289.99
Cabinet - Armor And Blades
Maine Home Recreation
 
€ 75.00
Playfield - Toys/Add-ons
Pino Pinball Mods Shop
 
$ 69.99
Cabinet - Decals
Inscribed Solutions
 
$ 45.00
Cabinet - Decals
Inscribed Solutions
 
$ 49.99
Cabinet - Toppers
Lighted Pinball Mods
 
$ 35.00
12,000
Machine - For Sale
Sunbury, PA
$ 15.95
Playfield - Toys/Add-ons
ULEKstore
 
From: $ 6,999.99
$ 10,899.00
Pinball Machine
Maine Home Recreation
 
251 posts in this topic match your search for posts by markharris2000. You are on page 1 of 2.

You're currently viewing posts by Pinsider markharris2000.
Click here to go back to viewing the entire thread.

Reply

Wanna join the discussion? Please sign in to reply to this topic.

Hey there! Welcome to Pinside!

Donate to Pinside

Great to see you're enjoying Pinside! Did you know Pinside is able to run without any 3rd-party banners or ads, thanks to the support from our visitors? Please consider a donation to Pinside and get anext to your username to show for it! Or better yet, subscribe to Pinside+!


This page was printed from https://pinside.com/pinball/forum/topic/welcome-to-the-jurassic-park-le-club?tu=markharris2000 and we tried optimising it for printing. Some page elements may have been deliberately hidden.

Scan the QR code on the left to jump to the URL this document was printed from.