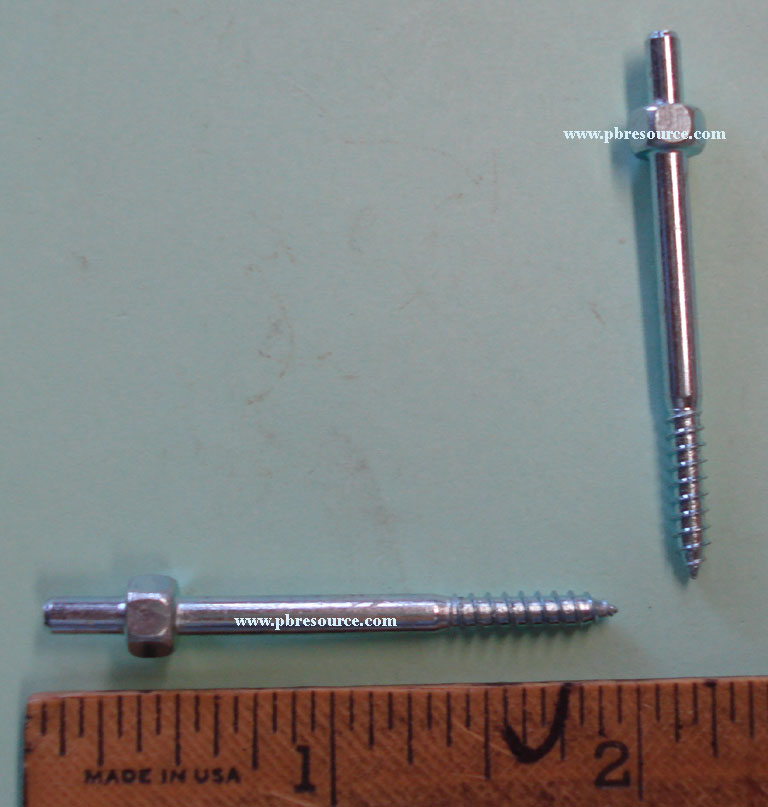
(Topic ID: 33446)

Vid's Guide to Ultimate Playfield Restoration

By vid1900

11 years ago


Topic Heartbeat

Topic Stats

  • 8,789 posts
  • 803 Pinsiders participating
  • Latest reply 3 hours ago by Jagrmaister
  • Topic is favorited by 1,972 Pinsiders
  • Topic is sticky in its sub-forum

You

Linked Games

Topic Gallery

View topic image gallery

20240419_165132 (resized).jpg
20240415_125716 (resized).jpg
PXL_20240404_002101962 (resized).jpg
PXL_20240404_002010342 (resized).jpg
THUMP BUMP HOLE ENLARGE1 (resized).JPG
THUMP BUMP HOLE ENLARGE2 (resized).JPG
IMG_3225 (resized).JPG
IMG_3141 2 (resized).JPG
image (resized).jpg
Pinside_forum_1762038_386370 (resized).jpg
IMG_3141 (resized).JPG
PXL_20240304_203555066 (resized).jpg
20240301_160448 (resized).jpg
20240301_131123 (resized).jpg
IMG_2646 (resized).jpeg
IMG_3299 (resized).jpeg

Topic index (key posts)

143 key posts have been marked in this topic, showing the first 10 items. (Show topic index)

There are 8,789 posts in this topic. You are on page 127 of 176.
#6301 5 years ago
Quoted from DropTarget:

What's the best way to remove the threads from a post screw that has snapped off in the playfield? I'm assuming it has to be drilled out.

It snapped flush with the top of the pf.

Use a Tubular Screw Extractor from the backside

Don't drill all the way through, just about 3/4 of the way, then tap shaft out from the face side.

Plug hole with a 1/4" dowel, or just use a T-nut and machine threaded post.

https://www.woodcraft.com/products/screw-extractor-1-4
124210.0 (resized).jpg124210.0 (resized).jpg

#6302 5 years ago

Thanks Vid,

Unfortunately, The screw hole was not drilled all the way through the pf, it was for one of those Gottlieb post screws that get the acorn nut on top. http://pbresource.com/postscrew/gtb-a8857.jpg

I ended up drilling the area around the post and backed it out, then filled with glued in an dowel and wood chips for the surrounding area. Hopefully it will hold.

I'm sure your info will be helpful in the future, preferably to someone else!

#6303 5 years ago
Quoted from DropTarget:

Unfortunately, The screw hole was not drilled all the way through the pf

Usually they do not go all the way through.

If I can't find where it is from the backside, I tap the shaft with a punch, and that makes a dome on the rear.

Then I go ahead and remove, & plug.

Quoted from DropTarget:

I ended up drilling the area around the post and backed it out, then filled with glued in an dowel and wood chips for the surrounding area. Hopefully it will hold.

Glad you got it figured out!

If the dowel was tight in the hole, it's stronger than the original playfield wood.

#6304 5 years ago

thx Vid

11
#6305 5 years ago

About a year later, but in finally got my F-14 Tomcat reassembled and fully operational. Didn’t think it was possible for this game to be *even faster*, but there you have it. GREASED LIGHTNING.

D8B4868E-07FA-4395-A46B-3AFA5BA1F7A3 (resized).jpegD8B4868E-07FA-4395-A46B-3AFA5BA1F7A3 (resized).jpegE105E13E-8867-4D4D-83EA-F1C22B3CAB48 (resized).jpegE105E13E-8867-4D4D-83EA-F1C22B3CAB48 (resized).jpeg0E09070C-E40D-458A-9D21-55278DD09D48 (resized).jpeg0E09070C-E40D-458A-9D21-55278DD09D48 (resized).jpeg8A8890EE-C20B-4D8D-985B-DCC293CFF8F0 (resized).jpeg8A8890EE-C20B-4D8D-985B-DCC293CFF8F0 (resized).jpegFAE5E1AE-3956-4E06-9162-EE54E289F94F (resized).jpegFAE5E1AE-3956-4E06-9162-EE54E289F94F (resized).jpeg
#6306 5 years ago
Quoted from sethbenjamin:

About a year later, but in finally got my F-14 Tomcat reassembled and fully operational. Didn’t think it was possible for this game to be *even faster*, but there you have it. GREASED LIGHTNING.[quoted image][quoted image][quoted image][quoted image][quoted image]

Whoh baby!! That gal looks great! Was it a CPR playfield or touch up? Nice work!

#6307 5 years ago
Quoted from Waderade812:

Whoh baby!! That gal looks great! Was it a CPR playfield or touch up? Nice work!

It’s the original play field, and I did the whole 9 yards on it; pulled up mylar, removed old inserts, replaced with new ones, a bunch of airbrush work...
Pretty much followed Vid’s guide step by step, really! Also, because I forgot to tell the finisher to plug the lamp sockets, I had to replace all the GIs, so I used Vid’s idea about copper foil tape instead of threading braided wire everywhere and soldering every connection. Just stapled the sockets to the foil, and it worked perfectly.

#6308 5 years ago

Brother Laser Printer on sale $54:

https://www.amazon.com/Brother-HL-L2300D-Monochrome-Printer-Printing/dp/B00NQ1CLTI

This takes the super cheap 660 toner carts, so it will be less than a penny per page.

#6309 5 years ago

I was just talking to one my Co workers about how great that printer is....

Duplex!

#6310 5 years ago
Quoted from vid1900:

Brother Laser Printer on sale $54:
amazon.com link »
This takes the super cheap 660 toner carts, so it will be less than a penny per page.

That's a nice solid little printer.
I have one in my office.

#6311 5 years ago

Holy S, I could buy one of these for the cost of ONE of the cartridges for my current Samsung.
GEES.

#6312 5 years ago
Quoted from Atari_Daze:

Holy S, I could buy one of these for the cost of ONE of the cartridges for my current Samsung.
GEES.

Yep, printer manufacturers don't make their money on the hardware, they make it on the consumables.

#6313 5 years ago

Pretty sad when one can buy a new printer with cartridges for less than one replacement cartridge. Talk about planned obsolescence!

#6314 5 years ago

That's what I do. A new laser jet is 150. New toner is 175

#6315 5 years ago
Quoted from D-Gottlieb:

That's what I do. A new laser jet is 150. New toner is 175

That's the great part about owning a popular printer.

The big, high-yield toner carts for the Brother are 2 for $18, and often go on sale for 2/$12

Each cart prints about 2400 pages....a zillion times cheaper than ink jet.

https://www.amazon.com/dp/B00TS2F4T8/ref=sspa_dk_detail_0

#6316 5 years ago

Those Brother printers are awesome. I have one, and I printed my Firepower decals on it. Crazy cheap for toner.

#6317 5 years ago

I finally read a printer post that wasn't OOS when I went to buy it! My cheapie laser comes tomorrow. The off times I'll need color, I'll try taking the decal sheets to work... Vid - Thanks again for all the help

#6318 5 years ago

Hi all,

I'm slowly working my way through this guide, but have a quick question. Is there anything that can be done to make these two gouges less noticeable without taking out and refinishing the entire playfield? That is something I may do down the road, but not anything I can do anytime soon.

Thanks for your help!

gouges (resized).jpggouges (resized).jpg
#6319 5 years ago
Quoted from neemypeemy:

Hi all,
I'm slowly working my way through this guide, but have a quick question. Is there anything that can be done to make these two gouges less noticeable without taking out and refinishing the entire playfield? That is something I may do down the road, but not anything I can do anytime soon.
Thanks for your help!
[quoted image]

Put mylar over them to protect the area from further damage.

#6320 5 years ago
Quoted from pinballinreno:

Put mylar over them to protect the area from further damage.

Thanks, I'll do that. But will that make them less noticeable? I just searched again and found that 2 part clear epoxy can be used to smooth out gouges where you won't be sanding/removing paint. Would this be a good candidate?

#6321 5 years ago
Quoted from neemypeemy:

Thanks, I'll do that. But will that make them less noticeable? I just searched again and found that 2 part clear epoxy can be used to smooth out gouges where you won't be sanding/removing paint. Would this be a good candidate?

It will crack and chip out pretty fast. Even filling with clearcoat wont last unless you do the whole playfield.

It's best to mylar over the area until a complete teardown is done.

#6322 5 years ago

Thanks both, I appreciate your help!

#6323 5 years ago
Quoted from neemypeemy:

Thanks both, I appreciate your help!

Wax first to limit the risk of pulling anything when you remove the mylar.

#6324 5 years ago
Quoted from lb1:

Wax first to limit the risk of pulling anything when you remove the mylar.

Will do, thanks!

#6325 5 years ago

Would someone mind helping out with this post? Asking about what I can actually inject to fix a delaminating decal over an insert.

https://pinside.com/pinball/forum/topic/mylar-removal-lead-to-insert-delaminating

#6326 5 years ago
Quoted from harryhoudini:

Would someone mind helping out with this post? Asking about what I can actually inject to fix a delaminating decal over an insert.
https://pinside.com/pinball/forum/topic/mylar-removal-lead-to-insert-delaminating

My understanding is that you can refrigerate Spraymax and greatly extend its shelf life after mixing (i.e. 7 days). See https://pinside.com/pinball/forum/topic/the-spraymax-2k-auto-clear-in-a-can-club/page/6#post-3422895.

#6327 5 years ago
Quoted from harryhoudini:

I am familiar with vid's guide and the repair of injecting clear.

This is on data east JP on the C in CHAOS. About 1/3 of the clear/decal is visibly pulled away from the insert. So I assume I am going to cut a tiny slit on the black border and inject the clear. Problem is that I don't have the clear he references. I bought the 2 part spray can clear (that you mix at time of use) to coat the playfield. I don't think it will last long enough (after mixing the two parts) to do the injection and wait for it to cure and then spray it. Can I use a more generic, one part clear spray paint? Or does it have to be a two part auto clear? Are there any other things I can use to inject (cyanoacrylate? epoxy?).

One part clear needs to evaporate to harden, so that's never going to happen under the flap.

Epoxy is too yellow and brittle, the whole thing will break off.

#6328 5 years ago
Quoted from lb1:

My understanding is that you can refrigerate Spraymax and greatly extend its shelf life after mixing (i.e. 7 days). See https://pinside.com/pinball/forum/topic/the-spraymax-2k-auto-clear-in-a-can-club/page/6#post-3422895.

Refrigerate! Heck, I can just leave it outside

Awesome, thank you!

#6329 5 years ago
Quoted from vid1900:

One part clear needs to evaporate to harden, so that's never going to happen under the flap.
Epoxy is too yellow and brittle, the whole thing will break off.

Thanks. So, sounds like the spraymax is good to go then.

#6330 5 years ago

Question for you folks... I am swapping an insert from my Jurassic Park playfield because the new playfield was missing the "S" in CHAOS. I sliced it out and heated and removed it but the "S" decal lifted off on one side and then basically peeled all the way off. I epoxied the insert in. The C also has some liftage which I need to inject clear into. Can I "glue" the entire S back on with clear as well? Maybe putting some wax paper over it and something flat to keep it seated? Or would it be better to go with a water decal? I have them but not sure my inkjet is working so don't want to go to the trouble unless I have to.

#6331 5 years ago

^ You've got a lot of reading ahead of you, before you get in over your head:

Quoted from harryhoudini:

Can I "glue" the entire S back on with clear as well?

https://pinside.com/pinball/forum/topic/vids-guide-to-ultimate-playfield-restoration/page/2#post-551833

Quoted from harryhoudini:

I have them but not sure my inkjet is working so don't want to go to the trouble unless I have to.

You can't use inkjet:

https://pinside.com/pinball/forum/topic/vids-guide-to-ultimate-playfield-restoration/page/3#post-633680

#6332 5 years ago

Oh, I've read.. that's why I was asking if I could glue the entire "decal" back down (the entire circle that covered the "S" insert). Meaning, would that be an appropriate way to solve it. I know that is a solution for the "flap" but wanted to know if that was also fine to try for the entire piece (which is completely detached).

Thanks on the note for inkjet... odd that I have these decal sheets from Testors that are inkjet only which I thought I bought for this purpose some time ago. Makes sense when you think about it.

#6333 5 years ago
Quoted from harryhoudini:

that's why I was asking if I could glue the entire "decal" back down (the entire circle that covered the "S" insert).

Yep, you glue it down the same way you do the ghosting.

Put wax paper on over it and gently clamp.

#6334 5 years ago

Vid, I have a question about injecting ghosting inserts with clear. Obviously there was something that made the original clean not “stick” what is the probability that these will ghost again I the future. I have a future project that has ghosting on probably 75% of the inserts. My original plan was to just cut all the insert decals off and redo them. Just wondered how it would work long term to I ject them all. Save me a lot of work on the insert decals.

#6335 5 years ago
Quoted from vid1900:

Yep, you glue it down the same way you do the ghosting.
Put wax paper on over it and gently clamp.

Thanks!

#6336 5 years ago
Quoted from Lonzo:

Obviously there was something that made the original clean not “stick” what is the probability that these will ghost again I the future.

Usually they ghost when the insert moves, that's why we epoxy the inserts down before fixing the ghosting.

The next most popular reason is when someone pulls Mylar upwards, rather than back upon itself. This is a very unnatural stress on the clear, so it often lifts right off the plastic.

As long as there is no movement, the clear should stay stuck.

Will it last forever? Who knows. These games were only supposed to last 3 years....

#6337 5 years ago
Quoted from vid1900:

Usually they ghost when the insert moves, that's why we epoxy the inserts down before fixing the ghosting.
The next most popular reason is when someone pulls Mylar upwards, rather than back upon itself. This is a very unnatural stress on the clear, so it often lifts right off the plastic.
As long as there is no movement, the clear should stay stuck.
Will it last forever? Who knows. These games were only supposed to last 3 years....

That’s a good point. The inserts are flat but the Mylar was taken off before I got it so maybe that is what caused it. I might give this a try since I can always cut them out later.

#6338 5 years ago
Quoted from vid1900:

These games were only supposed to last 3 years....

I always thought it was 10 years.
I guess it depends on the operator and the location.

#6339 5 years ago
Quoted from PinballAir:

I always thought it was 10 years.
I guess it depends on the operator and the location.

When I attended Bally school, they literally taught us 3 years.

1 week later
#6340 5 years ago

vid1900 or anyone else who may have had/seen this issue.

Not sure why this happened, there were no blemishes on the clear from layer 1 until layer N. I didn't bump it, didn't do anything. The only thing I can figure is that when I was hammering the pop bumper nails in, this dislodged.

It will be under the rail, so I'm not concerned about that specific piece (it is down to the bare wood, I can feel the fibers).

1.) Why would this have happened? Every layer of clear went on beautifully, no fisheye, naphtha applied right before first coat, wiped down well, scuffed well

2.) Would this be indicative of future problems? I'm just putting this together now, and wondering if I should expect cracks around scoops, etc etc.

3.) I presume there's nothing I can really do at this point, and just keep on keepin' on.

And vid, once again thank you for all you do here. This is my first restore, and I could not be happier with the before and after. Second photo just a glamour shot.

keywords: clear coat JC660 chip crack clearcoat broke off

IMG_0241 (resized).pngIMG_0241 (resized).pngTop1 (resized).pngTop1 (resized).png
#6341 5 years ago
Quoted from sethbenjamin:

It’s the original play field, and I did the whole 9 yards on it; pulled up mylar, removed old inserts, replaced with new ones, a bunch of airbrush work...
Pretty much followed Vid’s guide step by step, really! Also, because I forgot to tell the finisher to plug the lamp sockets, I had to replace all the GIs, so I used Vid’s idea about copper foil tape instead of threading braided wire everywhere and soldering every connection. Just stapled the sockets to the foil, and it worked perfectly.

Looks great. Mazing how faster it plays after a new playfield huh? My shadow is almost impossible to control now. Need to make it steeper.

#6342 5 years ago
Quoted from plankalkul:

(it is down to the bare wood, I can feel the fibers).

1.) Why would this have happened? Every layer of clear went on beautifully, no fisheye, naphtha applied right before first coat, wiped down well, scuffed well

The thicker the clear, the less it can flex along with the wood.

That's why the thicker the clear, the more likely it will ghost above a loose insert.

So when you banged the playfield, the wood flexed more than the clear, and it cracked and separated.

You could sand back the clear a little so it's not so thick - remove a bunch of worry at the same time.

Playfield looks great!

#6343 5 years ago

Ok, wanted a quick opinion, though I'm pretty sure I know the answer.

Down the line - this PF will likely be one I consider going the full nine on (if the game sticks in my collection). The inserts are cupped and the planking is rough, but roughly flat to the touch.

My question is - this is it after some vigorous naptha. Until I go to restore it (already have one in the works, it may be awhile) - just wax and play from here? I'd like to clean it better, but with the extensive planking I'd be afraid anything else could absorb and damage the board. I figured I'd ask the pros before I go any further. Thanks in advance for your help!

20190127_214355 (resized).jpg20190127_214355 (resized).jpg
#6344 5 years ago

Is there anything I can do with the wear that’s on the outside edges of the Whirlwind spinners? Thanks

74BAA18B-10D7-4EEA-AA6E-FDA4F364348A (resized).jpeg74BAA18B-10D7-4EEA-AA6E-FDA4F364348A (resized).jpeg
#6345 5 years ago
Quoted from statictrance:

My question is - this is it after some vigorous naptha. Until I go to restore it (already have one in the works, it may be awhile) - just wax and play from here?

Wax and play.

If you see the playfield flaking, STOP!

Playfields that have frozen in a garage, will often quickly flake off all their paint.

#6346 5 years ago
Quoted from scampcamp:

Is there anything I can do with the wear that’s on the outside edges of the Whirlwind spinners? Thanks
[quoted image]

Raise your spinners properly.

If you are clearcoating, you can repaint the damage, then clear over it.

No one will ever know.

1 week later
#6347 5 years ago

Learning a ton from this thread, thanks vid & all the contributors.
I was curious if a coat of clear should ever be applied before touch ups. I did read that you may want a coat of clear on before any waterslide decals, but does this apply to paint as well? Or do paint touch ups before any clear?

#6348 5 years ago

You often want a thin lockdown coat, so the frisket does not pull up the original paint

#6349 5 years ago

Naphtha vs vm&p naphtha ... Is there a difference? Because I cannot find just plain naphtha.

#6350 5 years ago
Quoted from scampcamp:

Naphtha vs vm&p naphtha ... Is there a difference? Because I cannot find just plain naphtha.

I believe it's just the brand VM&P. Same stuff. Awesome stuff.

Promoted items from Pinside Marketplace and Pinside Shops!
$ 18.95
Eproms
Pinballrom
 
$ 27.95
Eproms
Pinballrom
 
$ 54.99
Cabinet - Shooter Rods
Lighted Pinball Mods
 
$ 54.99
Cabinet - Shooter Rods
Lighted Pinball Mods
 
$ 54.99
Cabinet - Shooter Rods
Lighted Pinball Mods
 
$ 39.00
Cabinet - Other
Arcade Upkeep
 
From: $ 35.00
Cabinet - Armor And Blades
arcade-cabinets.com
 
$ 179.00
$ 12.95
From: $ 209.00
$ 9.99
Eproms
Matt's Basement Arcade
 
$ 22.00
Cabinet - Shooter Rods
arcade-cabinets.com
 
$ 54.99
Cabinet - Shooter Rods
Lighted Pinball Mods
 
3,000 (OBO)
Machine - For Sale
Walnut Creek, CA
From: $ 9.99
Eproms
Matt's Basement Arcade
 
$ 199.95
Electronics
PinSound
 
$ 30.00
Electronics
Yorktown Arcade Supply
 
$ 40.00
Cabinet - Other
Rocket City Pinball
 
From: $ 3.50
Playfield - Other
Rocket City Pinball
 
From: $ 170.00
$ 18.95
Eproms
Pinballrom
 
There are 8,789 posts in this topic. You are on page 127 of 176.

Reply

Wanna join the discussion? Please sign in to reply to this topic.

Hey there! Welcome to Pinside!

Donate to Pinside

Great to see you're enjoying Pinside! Did you know Pinside is able to run without any 3rd-party banners or ads, thanks to the support from our visitors? Please consider a donation to Pinside and get anext to your username to show for it! Or better yet, subscribe to Pinside+!


This page was printed from https://pinside.com/pinball/forum/topic/vids-guide-to-ultimate-playfield-restoration/page/127 and we tried optimising it for printing. Some page elements may have been deliberately hidden.

Scan the QR code on the left to jump to the URL this document was printed from.