(Topic ID: 168639)

TZ Check Fuse 114/115 with Rottendog Boards

By djsolzs

7 years ago


Topic Heartbeat

Topic Stats

  • 61 posts
  • 5 Pinsiders participating
  • Latest reply 7 years ago by djsolzs
  • Topic is favorited by 7 Pinsiders

You

Linked Games

Topic Gallery

View topic image gallery

20160915_230954 (resized).jpg
RD 18V cap.jpg
twelve.jpg
DMM-902 134.jpg
J101.jpg
409062b.gif

You're currently viewing posts by Pinsider djsolzs.
Click here to go back to viewing the entire thread.

#1 7 years ago

I want to thank everyone in advance for any help! I also want to recognize that there are several very good posts pertaining to this issue and that I have read the pinwiki here:

http://www.pinwiki.com/wiki/index.php?title=Williams_WPC#Check_fuses_F114_and_F115_message

Picked up this machine about a month ago and when I got it home it had switch matrix short message. The machine has a Rottendog Power Driver board in it when I picked it up. I tracked the issue down to the MPU/CPU board and ended up replacing that with a Rottendog as well. Plan is to send original board for repair out but the seller gave me some extra $$$ because of the issue so it paid for most of the rottendog board (cpu).

Everything was playing great until last night when in the middle of a game all flippers activated then kind of shut off and the game went in to a weird state. I promptly shut it off... and in turning back on was greeted with the Check Fuse f115 f114 message.

A lot of the posts point directly to issues either on the Driver Board or the CPU - both which have been replaced with Rottendog board in my machines and is why I am posting this. Any insight of issues with these boards? Both of them are new within the past couple months - the cpu is less than 3 weeks old.

What I know:

1. New Rottendog CPU and Driver Board Installed

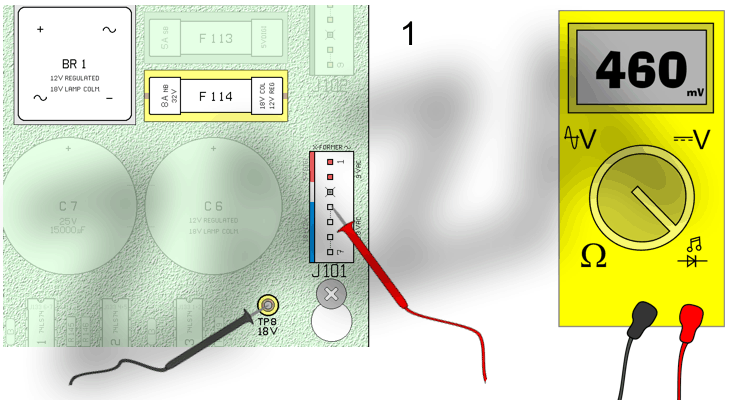
2. Fuses 114 and 115 are not blown and test fine

3. LED6 is lit tests fine

4. LED1 is NOT lit - voltage shows 0 vdc instead of 12v

5. LED 8 tests fine

Seems the start of my research points to checking the diodes as well as C2 and 7812.

My hesitation/question is - where do I go since both of the boards are new? Continue down the same testing path as documented? Are there common failure components for rottendog boards? I read there were some bad ones out there but couldn't find details? Thanks

#3 7 years ago

Thanks I will try that and report back.

Im not sure this matters but I also removed J205, J207, J209 from the CPU and powered it on just to see. No change with this - this was part of the troubleshooting I did for the switch matrix short error.

#5 7 years ago

Well I tried powering it on and the ball in trough kicked out then it died. 8 amp fuse blew by the transformer.

I had coin door closed may have been a stupid mistake. Replaced with new 8 amp and plugged j114 back in same issue no +12. Kinda nervous to remove j114 again and power it on... I'm wondering if it was the coin door though?

#7 7 years ago

I pulled J210 on the CPU while I was waiting (thanks for the super fast reply!) and powered it back up. No led light on +12 led and the voltages seemed to be jumping around and steadily increasing so I powered it off.

So unplug j114 and j102 and power it on?

No power switch in the door I just thought I read it can cause problems if the door was closed when testing? I am probably way off base here... It is a reimport converted back from 220v or whatever they use over seas.

But it blew that 8 amp fuse immediately while activating those coils briefly when powered on with j114 disconnected.

#9 7 years ago

With j114 and j102 unplugged 12vp was 12, 5v was 5, 50v was nothing, 12vd was nothing no led lit, 18v was 12v, 20v was nothing

#11 7 years ago

Ok I'll test again to double check. Thanks again for the help. I wonder if I should give rottendog a call although swapping a cap is no problem.

Does this rule out the cpu?

#13 7 years ago

In diode test numbered based on your image :

1 - 609
2 - 609
3 - 611
4 - 623

Also fuse f114 has 8 amp fuse in it and f115 has 1/2 amp fuse in it

#14 7 years ago

Tp1 11v
Tp2 5v
Tp6 0
Tp3 0
Tp8 12v
Tp7 0

Quoted from zaza:

With this plugging it should be like this:
TP1 12Vunreg = 14-15 Volt
TP2 5Vdig = 5.0 Volt
TP3 12Vreg = 12.0 Volt
(TP4 ZC = zero crossing: freq. = 100/120 Hz europe/ USA)
TP5 GND = ground
TP6 50V = 0 Volt (J102=not connected)
TP7 20V = 0 Volt (J102=not connected)
TP8 18V = 17-19 Volt
If your 18V testpoint is only 12Volt, something is wrong with capacitor or rectifier BR.1 and 12Vd cannot be made by regulator Q2

#16 7 years ago

As far as I know it is configured correctly. Only had the machine about a month now and havent had any issues outside the CPU switch matrix short issue. Replacing the CPU with rottendog *seemed* to fix this issue. Odd how I lost that voltage so suddenly while playing a game.

Thermistor (NTC) failing ? - I guess I would have to take the voltage testing all the way back. Never tested for this before.

Mains Supply ok ? - Coming from the wall or out of the transformer?

For the test - black lead on ground and red lead on pin 1 and 2 should show 9vac? - Im not sure how to read the blue lines in the picture since they are split - does this mean the rest of the pins 4 - 7 should read 13.3?

#18 7 years ago

OK so when powered on with J101 disconnected I should see the following:

Black lead on pin1 red lead pin2 = 9 vac

Black lead on pin4 red lead on pin7 = 13.3 vac

Just want to get this right so I dont mess anything up

#20 7 years ago

Ha of course I wouldnt get anything without that plugged in! Glad I asked... ooops!

Thanks again! Will report back after work

#21 7 years ago

I got 8.5 vac and 11 vac

Edit: Switched outlet to different outlet from wall

Getting 9.65 and 12.54 (on J101)

Plugged everything back in (except J114 and J102)

TP1 - 13

TP2 - 5

TP6 - 0

TP3 - 0

TP8 - 13

TP7 - 0

Replaced fuses at f114 and f115 as well

D1 Banded side = 11.4vdc

D2 Banded side = 10.7vdc

#23 7 years ago

There was nothing to remove at j133 but I unplugged everything between 133 and 138.

I checked quickly before I left for work but tp8 is now 17.54 vdc

Still 0 at tp3

Thanks

#25 7 years ago

Thanks good to know - I am pretty sure u20 was the issue on my original CPU. Hopefully I didnt burn it up on the new rottendog one.

I agree and was thinking the same - if I dont fix the cause it will happen again. The previous owner swapped out the upper right flipper coil and explained that we has having a hard time getting the solder to stick when replacing and indicated there were reset issues (which never happened to me) I did however check this connection and it at still looked good.

What were your troubleshooting steps to find the wire that was the issue? Visual inspection or were you able to check continuity on the plugs and trace it back?

In thinking back I had just added a light mod and clipped it on to one of the flashers with alligator clips just before this all happened. i did get several games in over several days after installing. I promptly removed this after the issues started - not sure if this could cause this or not.

I have some general knowledge but certainly am not well versed in troubleshooting these types of issues.

Ill be happy once I have the 12v back and can start looking for the short.

#28 7 years ago

Prior to swapping in the new rottendog CPU I had shorted rows I think 3 - 8 reporting short to ground. Non of the switches on the mini playfield or optos were working. Magnets werent working either.

I assumed U20 was the issue after using a logic probe on the connector on cpu as I was not getting pulse on couple of the pins. when I put the new CPU everything worked great no credit dot... then I played maybe 25 games until I ran in to this problem.

Zaza my man - where do we go next?

#30 7 years ago

Yes except last time the game was playable even with the shorted columns (I said rows above but they were columns) and I was able to go in to test mode and troubleshoot (which pointed to u20).

This time I am not getting the 12v on the power driver board with CPU disconnected. Removing J133 - 138 allowed my 18v which was 12vdc at TP8 to get back up to 17.5 vdc at TP8

From the explanation so far I will need to square away 12v before I can even tell if I have a problem with U20 again.

Quoted from adii:

If you never found what had originally shorted these rows, it sounds like whatever it was got you again. U20 is likely the result of the short. Once you find it and repair U20 I would think you'd be good to go. It could just be a wire that is intermittently grounding out and that's why you were able to get some games in before it happened again. You may have to trace all of the wires in that row and inspect everything.

#32 7 years ago

I still gotta track down the 12v I think - unless I have a bad connection at J102... because Im still not getting 12v with everything I have already unplugged?

Im going to D1, D2, and 7812 next to verify voltages there now that we have 18 vdc just to verify - unless I get other instructions

#34 7 years ago

D1 16.6 d2 15.2

Top leg 16.95vdc

Bottom leg .65 vdc

#35 7 years ago

Tested f115 getting .65 vdc looks like bad voltage regulator?! Ill see if I can pick one up tomorrow at rat shack.

Is it more likely this is a cold solder joint or the VR itself?

Is it advisable now to plug in the j133 to j138 connectors one by one to see if I can find the connector bringing down the 18vdc?

#37 7 years ago

Well I did not pull f115 I tested it while it was in - so I will do that when I am home. I have no way to test the caps without just replacing them but I would be shocked if the caps were bad since it is a rottendog and they dont visually show signs of failure.

Would/could a short cause 7812 to go bad? Or could it fail on its own?

Obviously something is pulling down the 18v Ill be curious to plug the connectors back in to see if I can find the voltage drop.

Yes thanks I understand it may not be the connector I just figured I could find out which one may be bringing the voltage down or which one had the wire to trace back to look for the short.

Whats the best way to check for a short of the lamp matrix in my case? Is there continuity check I can do or should I follow the testing sequence as seen in the pinwiki? I dont think I have a bulb socket handy for this test.

#39 7 years ago

Ok so I will test again with F115 out to see what I get.

Then I will pull the board and for the heck of it reflow the solder joints on 7812 - and also remove C2 and leave it removed?

Plug board back in and test voltage with C2 removed?

#41 7 years ago

Thanks for the assistance zaza and your time - I am learning a lot through this process. Sure I can see/read a lot of this in your wiki but it helps to be coached through this process!

also if you see this - what the heck time is it for you right now??

#43 7 years ago

Right on man starting to cool off in the evenings where I am - sounds like you are having a good day regardless of the heat! Thanks again for the help Im looking forward to narrowing this down and getting this machine back up and running!

Are you thinking in my case 7812 may actually be good but in "shut down" mode? Is the 17v I was reading from the top leg too much? I thought that voltage would be more in line with the Diode voltage...

All these components on this board are so new which was the point of installing this in the first place

#45 7 years ago

With f115 out getting .65 vDC on right side

With j133 to 138 plugged in I get 12vd

With j138 unplugged only it jumps to 16.2vdc

With J136 AND j138 unplugged I'm at 17.1 for the 18v at TP8

Will remove cap and report back

#47 7 years ago

Reflowed c2 and the VR as well as the 2 caps. Tested no change

Removed C2 tested voltage on right side of fuse with f115 removed - getting .65 vdc

Should I test voltage at leg again? or is there a better spot to test?

#48 7 years ago

Looks like the diode is touching the the middle leg I assume this is no good...

20160915_230954 (resized).jpg20160915_230954 (resized).jpg

#49 7 years ago

Seems like I will be replacing the voltage regulator and that cap tonight.

Can I use a 100uf 100v for that cap? Im pretty sure the rule is the voltage can be higher just not low.

Can a diode touching like the picture above cause a short?

-1
#51 7 years ago

Great thanks Zaza - I already found the 7812 at Radio Shack I am going to pick up the cap today as well.

https://www.radioshack.com/products/radioshack-12v-fixed-voltage-regulator-7812?variant=5717601477

The above will work for 7812?

#53 7 years ago

Im pretty new to pinball repair (as you can tell) so the only spare parts I have are fuses.

Any worries with just replacing the 7812 first - then testing to see if I get back the 12v - then if I need to replace BR1? I mean is there a downside to not replacing BR1 right away?

#56 7 years ago

Thanks for the advice Circus Charlie I figured the peanut gallery would chime in at some point

Got everything replaced and soldered just gotta switch it on. Fingers crossed

Quoted from Push600:

I think you need a new canewton circuit.

#57 7 years ago

After replacing g 7812 and c2 I have 12vd and I'm back up and running! Thanks zaza!

Clock is out of wack not defaultong to 12 so I'll need to figure that out or reset it somehow?

I'll also go back over my voltages. I really need to figure out how to prevent this in the future!

#59 7 years ago

Everything is working well so far except the clock.

I noticed when the machine went down it was out if wack when I turned it back on... the clock that is.

Go figure clock is a rottendog clock board.

It will go 1, 2, 3, 4, 5, 5 on the hour hand and then it's behind. Happens twice between 12 and 12 that once it reaches say 10 pm at 11 it jumps back to 10 but the minute hand keeps moving.

Thoughts?

#61 7 years ago

Yeah I'm pretty pumped! After playing a couple games the clock fixes itself during gameplay... credit dot goes away. When power off then back on it breaks again. But again during gameplay fixes itself...

I'm hesitant to play it too much until I track down the cause of the issue I'd prefer to not blow that voltage regulator again.

Any advice on tracking it down? Is there any way to work backward on the 12v to narrow down where the cause could have been or trace wires back?

Thanks again

Promoted items from Pinside Marketplace and Pinside Shops!
$ 15.00
Playfield - Other
YouBentMyWookie
 
From: $ 99.95
Playfield - Toys/Add-ons
pinballmod
 
$ 49.99
Playfield - Toys/Add-ons
Lighted Pinball Mods
 
$ 125.00
Cabinet - Shooter Rods
Super Skill Shot Shop
 
$ 24.00
Various Novelties
Pinball Photos LLC
 
$ 119.95
Playfield - Toys/Add-ons
pinballmod
 
$ 9.95
Eproms
Pinballrom
 
$ 34.99
Rubber/Silicone
NO GOUGE PINBALL™
 
10,950 (Firm)
Machine - For Sale
Grosse Pointe Farms, MI
$ 1,059.00
Pinball Machine
Mircoplayfields
 
$ 35.00
Cabinet - Other
Rocket City Pinball
 
9,950 (OBO)
Machine - For Sale
Centerport, NY
$ 14.95
Playfield - Decals
Pinball Pimp
 
$ 69.00
Playfield - Toys/Add-ons
Lermods
 
$ 129.50
Cabinet - Decals
Pinball Haus
 
$ 15.00
Playfield - Decals
Metal-Mods
 
$ 62.00
Playfield - Toys/Add-ons
Lermods
 
From: $ 10.00
Playfield - Protection
UpKick Pinball
 
$ 359.00
Playfield - Other
NO GOUGE PINBALL™
 
$ 14.95
Playfield - Toys/Add-ons
ULEKstore
 
$ 1.00
Pinball Machine
Pinball Alley
 
$ 24.00
Various Novelties
Pinball Photos LLC
 
10,000 (OBO)
Machine - For Sale
Mount Pleasant, WI
$ 43.99
Lighting - Interactive
Lee's Parts
 
$ 24.95
Lighting - Led
Mitchell Lighting
 
From: $ 100.00
Lighting - Interactive
Professor Pinball
 
10,750 (Firm)
Machine - For Sale
Canfield, OH
Hey modders!
Your shop name here

You're currently viewing posts by Pinsider djsolzs.
Click here to go back to viewing the entire thread.

Reply

Wanna join the discussion? Please sign in to reply to this topic.

Hey there! Welcome to Pinside!

Donate to Pinside

Great to see you're enjoying Pinside! Did you know Pinside is able to run without any 3rd-party banners or ads, thanks to the support from our visitors? Please consider a donation to Pinside and get anext to your username to show for it! Or better yet, subscribe to Pinside+!


This page was printed from https://pinside.com/pinball/forum/topic/tz-check-fuse-114115-with-rottendog-boards?tu=djsolzs and we tried optimising it for printing. Some page elements may have been deliberately hidden.

Scan the QR code on the left to jump to the URL this document was printed from.