(Topic ID: 63352)
Linked Games
 Twilight Zone
Bally, 1993
Twilight Zone
Bally, 1993
Topic Gallery
You're currently viewing posts by Pinsider bikefreak.
Click here to go back to viewing the entire thread.
1 month later
Quoted from Blitzburgh99:Scrolling through Craigslist ads and ran across this photo in a Twilight Zone ad...talk amongst yourselves!
You've just crossed over into the Twilight Zone... (watch your back for yetis and spiderman)
I've been slowly working on my TZ restore. (currently everything is off and reassembly is about to start) I purchased Ingo's clock board (looks awesome but will be a while before it see it lit up) I also have a blue housing so swapped everything over to the new.
Found a odd screw that needed to be replaced on the back of the clock. It is a #6 sheet metal + pan head 1-3/4" long screw. Was a bugger to find. I now have 99 extras. ![]() If you are looking for 1-4 let me know and I can ship some out for the cost of postage. (USA only/Paypal) It doesn't have the little cut at the tip of the screw but I don't think that would matter much.
If you are looking for 1-4 let me know and I can ship some out for the cost of postage. (USA only/Paypal) It doesn't have the little cut at the tip of the screw but I don't think that would matter much.
1 month later
Quoted from Coyote:I contacted them twice to see if they fixed the missing '7'. Never, ever got back to me.
I ordered in December and it has all the numbers on the colored one. (no guarantee yours will, I suppose, and communication with the seller was non-existent) They were poor quality alignment wise. nearly cutting off the numbers. I think the actual printing is pretty good. (glossy and seemed crisp once the protective layer(s?) were removed. The clear plate (square) was about 3/4 the length needed. LOL. Needless to say, I don't recommend them. I ended up using one (the white one which was the better of the two. When installed, given the additional thickness I couldn't get the hands on anymore. (too thick)
I did come up with a creative solution though. I took out the piece of plastic that the decal usually sticks to and has the plastic standoffs for the square face plate. I needed new stand offs as a result. I ended up using plastic tubing cut to the correct length. (1/8" if I recall) like a air hose from a fish tank. Turned out great. (except for the offset clock plate.
2 months later
Quoted from Durzel:I spent quite a bit of time today disassembling the clock, fitting an Ingo clock board, etc. Even managed to work out how to get it dead on 12 first go.
Connected it all back up, everything worked first time... excellent!
...except, the minute hand opto interrupter is fouling the clear clock decal plate. When this happens the clock makes a nasty clicking noise, like it's skipping a tooth. Needless to say I turned it off quickly.
I pretty much replaced everything in the clock apart from the shafts and E/C rings.
I am now using a PETG clock face which sits behind the clock decal plate. I can only assume the tolerance is so small that this PETG plate is enough to catch it.
I've already got a washer on the back of the shaft (was already there), although I don't think this extends the long shaft anyway, I think it just stops there being any play in the big black gear.
Any thoughts? I've got some prototype clock decals on order, so I can try that, but it seems like I'm missing something here, unless the minute hand opto breaker tolerance really is that precise.
Looks like you got some other suggestions that would work. I ran into the same problem you had (or nearly so). I have the original plate/decal with standoffs attached. Added the PETG plate underneath and arm would hit. I removed the original plate/standoff piece. Then used 1/8" clear plastic tubing. (like for fish tank air lines) Cut them to length and used those as my standoffs so the top plate was properly lined up.
Tubing allowed for some minor tweaking so the top plate lined up in the right spot. They are clear so no problems there. It allowed for the PETG plate to be the only plate under the clock arms so no interference. Just another suggestion that doesn't change any of the existing parts.
5 months later
I'm rebuilding my TZ (still ever so slowly.) I'll be putting in a gumball light kit but am undecided on which one and looking for input from those that have seen them in person.
Dazzler by PinballPro or
Pinbits Lamp kit
I'm using Pinballbulbs kit LEDs if it matters.
I'll have colored glass gumballs in the machine.
Price isn't a deciding factor, looking more at functionality.
I've watched the video(s) but it is more zoomed in than I would care for and isn't the best to help me decide.
Dazzler seems like it does more (more lighting modes) but I'm not sure that is a positive or not. Pinbits seems like it is basic but that may not be a bad thing.
Does Pinside have a feature to add a poll to a post? (doesn't look like it)
Thanks for the input.
Quoted from lyonsden:Shameless Plug: My preference would be the Pinduino kit: https://pinside.com/pinball/market/shops/1025-professor-pinball/00472-twilight-zone-interactive-ramp-and-gumball-lighting-kit
Interactive gumball light and ramp light. PM me if you just want a kit with the gumball lighting.
Looks cool and impressive what can be programmed but more than I'm looking for to light the gumball.
Quoted from monkeyboypaul:I went Pinbits, but use silver pachinko balls in my Gumball machine (roughly 25-30 in each side) to match the translite more.
Using Comet 2SMD frosted Sunlight, with LED OCD and GI OCD.
Thanks for the insight. Why pinbits over the others?
1 month later
Quoted from allsportdvd:I have seen some pics on this thread of post Leds in the upper Playfield. Anyone have any advice?
I also have a question as to which rubbers fit here
I bought a kit from Titan but none seem to match this spot[quoted image]
https://images.pinside.com/b/ac/bacc98084c034124bccc3d732862541bd719c012/resized/large/bacc98084c034124bccc3d732862541bd719c012.jpg
Not sure the link will work. It gets a plastic and some small rubbers.
10 months later
Quoted from gunstarhero:I know they have directions on the site... which seems to be down. I reached out to them tho, hopefully that will be addressed soonly.
It’s been so long since I installed mine I wouldn’t even know what to tell you.
Site is up for me.
http://www.iobium.com/installing_the_gumball_lamp_boar.htm
If it is down in the future this should work:
https://web.archive.org/web/20190830033420/http://www.iobium.com/installing_the_gumball_lamp_boar.htm
Quoted from McSquid:Does anyone have a picture of the wiring for the 3 standup targets surrounding the piano? I don't feel like I have enough wires coming out of the harness. I have a broken yellow wire that doesn't seem to have a home though...
Let me know if you need any better pictures. This should be the yellow and two red targets.
Yellow target has 2 Green w/blue stripe to one side. 2 white w/yellow stripe to the other.
Red target #1 has 2 Green 2/blue stripe to one side. 2 white w/green stripe to the other.
Red target #2 has basically two yellow jumpers to Red target #1 (one wire to each)
4 weeks later
Quoted from monkfe:you really need the magnet, it just doesn't deaden the impact, it holds onto the ball too, but just enough though to allow it to fall off. People have used cheaper magnets you can get at home depot and use double sided tape ( I used velcro as the tape didn't hold that well) while your waiting for the other to come back in stock. It really is a necessary mod IMHO.
Menards also carries the magnets. (usually in a little bin caddy with other chain and cable types of things)
8 months later
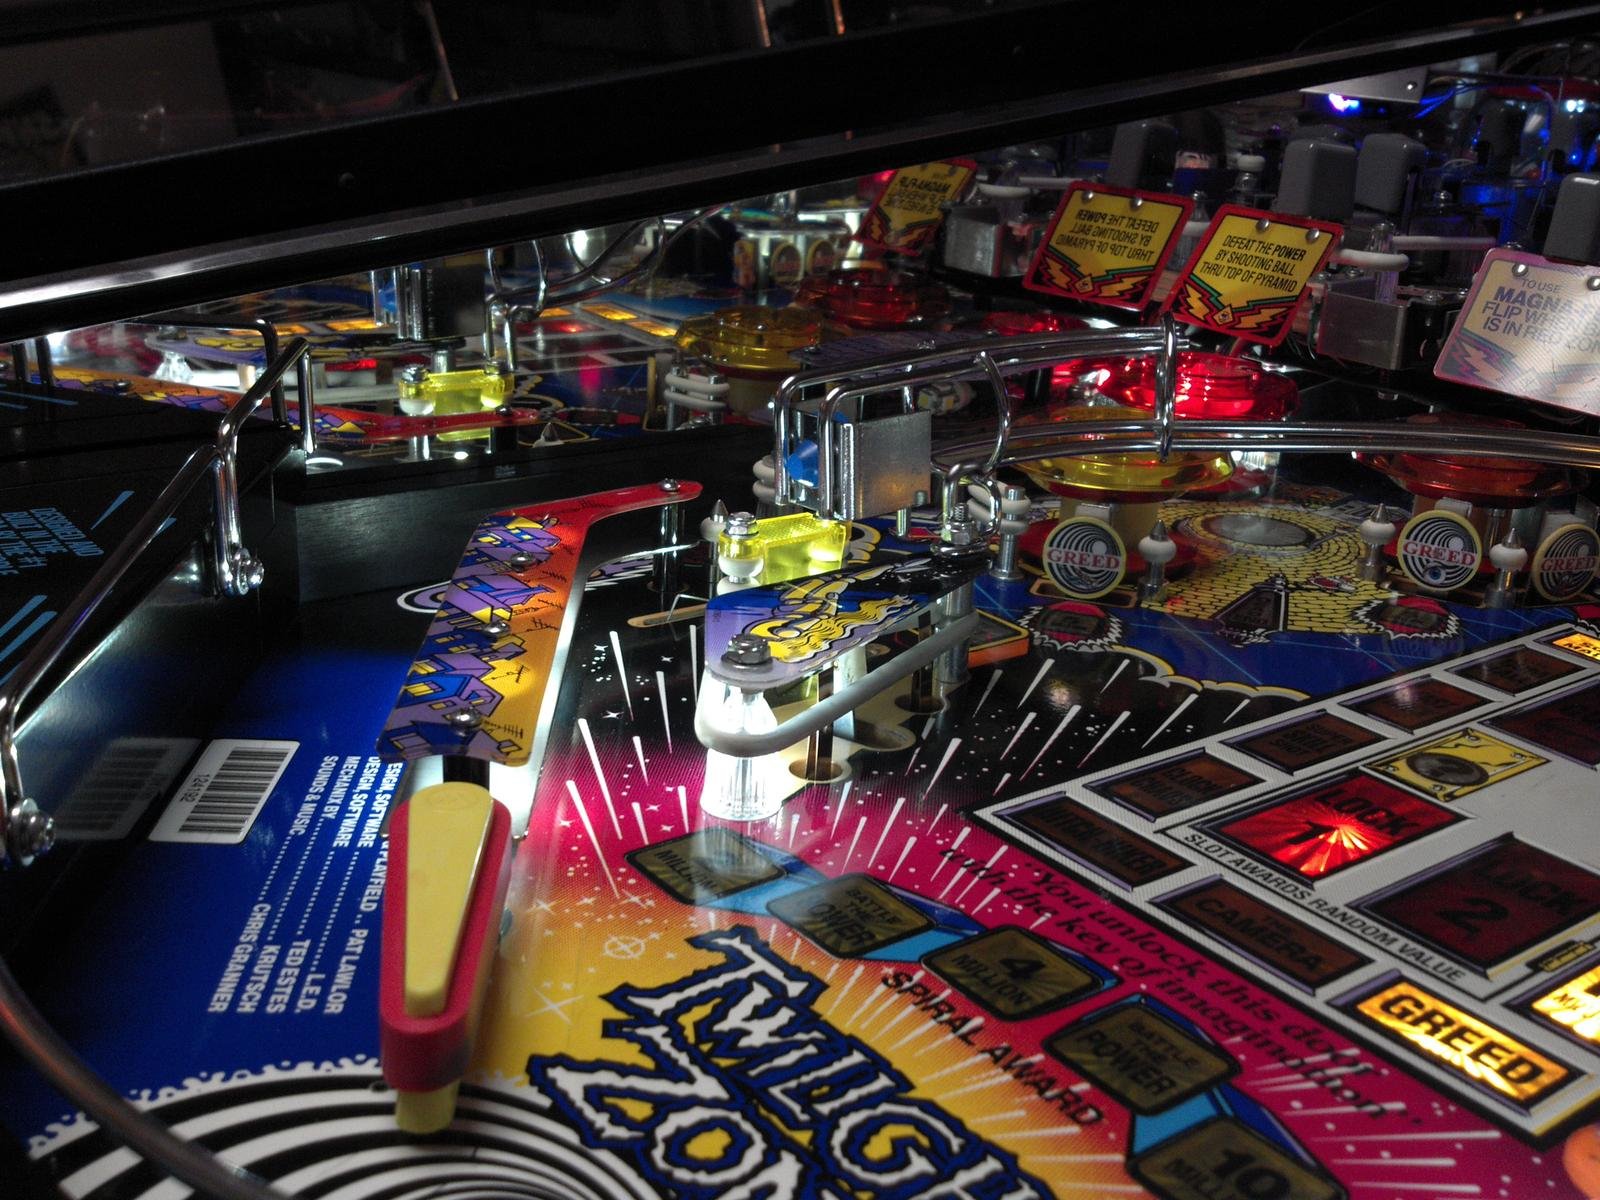
Quoted from bikefreak:Should these have washers between the playfield and the ball guides? They were there before but doing the lock gate it makes it sit goofy since not all mount points have washers.
[quoted image]
I did some more digging and found some signs point to yes. (at least for the lock gate) Sounds like it may only be some of the posts that get the washers. Not sure what that means for the inner part of the outer loop either. I have an early build (green lock; no 3rd mag) so I don't have the black spacers (but assume these washers were used before those were put into production)
https://pinside.com/pinball/forum/topic/a-newbie-restores-twilight-zone#post-2032446
Edit: I found some additional pictures pre-tear down. Some extra large zooming shows these spacer washers on all 4 legs of the lock assembly.
My theory on them (despite the threads about raising the lock to prevent bounce outs) is that when there is a threaded leg that gets bolted to the underside of the playfield gets a washer on both the top of the playfield and below. This prevents the top of the leg from digging into the playfield as the nut is tightened. That is why the inside wall of the outer loop also has them. There is no other reason to have that ball guide be raised.
I'm putting all 4 washers back on and will readdress if needed for any bounce outs if prevalent.
Quoted from Manny65:which then takes you back to the original question "why did they put washers on these ..." was it to improve the angle of the lock mech??
Thanks for the pics. If angle were most important I'd think just washers on the front two legs would help the most. Maybe they just wanted to screw with us 30 years later.
1 week later
I'm nearing the end of my 11 year rebuild of my TZ. Any pointers on the best (safest?) way to bring this thing back up. Any references on this would be great. I'm assuming there is a better way than just having everything plugged in, cross fingers, and hit the switch.
It has been taken down to just the playfield and rebuilt. No significant issues when taken apart and went back with no major issues. Soon it will be time to tell how good I am at doing my first full tear down.
Remaining to do list:
back box cables to connect (from playfield)
update the ROM chips
nvram install
solder in connections for gumball sparkle kit
jam the piano in place. (royal PITA expected)
Add the spotlights I got in the LED kit
close out 2 missing screws and a missing nut.
install new lamp over mini playfield (but will be a bit as lamp sockets are out of stock)
Does anyone know what kind of screws are used to connect the wire frame that goes over the slot machine to left inlane from the large plastic ramp. (left side exit). I think they are 8-32 machine screws 1/2" length with a lock washer. (I couldn't find reference to them in the manual) They connect to the hex posts on the wire frame.
Extras I have:
Two extra nuts (the smallest of the 3 used on the machine)
one extra screw 5/8" with lock washer (appears to be used for plastic (wood screw type threads). philips head)
1 washer (not worried about this one)
Still curious about where they are missing from.
Looking forward to my first game again.
Quoted from uncivil_engineer:I’ve finally gotten my restoration TZ to flip again, and now I’m trying to work the bugs out of the game playfield mechs. I’ve got them just about all figured except for the power diverted. The 26-1200 coil just doesn’t have enough power to pull the diverted down when there is a ball in the basket. It just sits there and buzzes. Does anyone have any suggestions as to how to address this problem?
[quoted image][quoted image]
Do you have a picture of it from the left side. (showing the linkage rod connection)
Assuming the coil sleeve is clean and slides through the coil easily?
Coil in the right direction?
Quoted from uncivil_engineer:I guess the first problem is that I have the rod going into the diverted on the opposite side. I didn’t think that would make a difference.
[quoted image]
Other ideas:
Reseat connectors
Reflow solder
You could also swap a coil (there are a few other places that type is used and see if the problem follows the coil)
3 months later
Quoted from jawjaw:I bend the wire leads out on led bulbs (basically make a 'V' pattern). This insures a good connection. I find that a third or even half of the bulbs will not light without adjusting. You can also use incandescent bulbs to test those sockets to make sure it's not the led bulbs. It looks like you have a string out so check for burnt connectors or bad fuses.
I pulled the LEDs and put in bulbs. no light either. With the LEDs I have a very faint glow on a few.
I've read some of what emsrph linked (but need to spend much more time there).
What I've done so far:
- determined it is the orange / white-ora string
- Swapped J121 and J120 connections. (same issue as expected since I think they are just connected pins)
- Continuity test passed for Orange wire from connector to end of line (last lamp socket)
- Continuity test passed for White-Orange wire from connector to end of line (last lamp socket)
- 5v tp = 4.91v (12v and 18v also tested okay +/-. I didn't write them down but they seemed close enough and I don't think they are involved in this issue)
- Fuse F109 pulled out and continuity test passed
- put in regular bulbs and they don't work. LEDs bulbs are new and have tested as working.
Decided to see what J120 pin 2&8 let to. Well, about as far away as possible. ![]() Ended at mini-playfield lamp flasher (x2) (two flasher bulbs of 3 in the silver "street lamp" looking thing over the mini PF) Did a test of those flashers and no workie.
Ended at mini-playfield lamp flasher (x2) (two flasher bulbs of 3 in the silver "street lamp" looking thing over the mini PF) Did a test of those flashers and no workie. ![]() So...
So...
...at this point it seems it is upstream of the J121/120 connection and not the fuse since that tested okay.
What voltage should I be expecting at J121 (pin 2&8) Orange (do I connect DMM red lead to pin2 and black lead to pin8?)
What voltage should I expect at the last backboard socket of that orange string?
What voltage should I be expecting at J121 (pin 3&9) Yellow (this set of lights works)
What voltage should I be expecting at J121 (pin 5&10) Green (this set of lights works)
Quoted from Mad_Dog_Coin_Op:Sounds to me like a problem on the Power / Driver board. Most likely a bad trace. You should be able to tone test J115 to J120 / J121. There should be 5 sets of pins that tone out (1 set for each light string). If one is missing you have a bad trace or solder joint. This is a very common failure due to the heat associated with these circuits.
Thanks Mad Dog! I did the beep test. 4 of 5 beeps. ya. I unplugged everything (what a pain) and pulled the board. Put it on my bench upside down and decided to retest to confirm what I found when it was installed. 4 of 5 beeps. pin 8 on J121 (if I recall) = no beep. Runs through F109 as expected. Time to trace the trace... no trace on back of board. Flips board over... Trace is on front and runs under other fuses... joy. For some reason I decide to test the fuses in place again. beep, beep, beep, no beep.... wait.... no beep? I pulled an tested F109 earlier and it worked. Pulled the fuse out still no beep. Smack on work bench, test... beep. Stupid fuse.
Dug in tool box for a new fuse. Reinstalled board. Lights for the win! Thanks all for the help. On to the next issue.
Do I go the flaky DMD or the double flipper = reset? (ordered the KAHR daughter board which will potentially differ needing to do the double flipper reset)
Quoted from bikefreak:On to the next issue.
Do I go the flaky DMD or the double flipper = reset? (ordered the KAHR daughter board which will potentially differ needing to do the double flipper reset)
My KAHR board comes today. But still managed to go through pinwiki and troubleshoot the double flipper reset problem. Did most of the easy stuff and things checked out ok enough. I didn't change pins/connectors and fully expect them to be the issue. (or at least a strong contributor to it) Kept plugging through the list and read about the Z connector. Then kept going down the list. Getting done/checking all the easy stuff. No fixes found yet... Now needed to consider doing the harder steps... Then recalled I never reset the Z connector. Did that and "fixed" the issue. I know connector resets are temporary fixes. Removing the Z connector would fix it for good.
Here are some of the readings I got.
TP1 14.14v (12vu) (what does the vu stand for? unregulated voltage? if so, what does that mean?)
TP2 4.912v (5v)
TP3 11.96v (12v)
TP6 75.5v (50v but 75 is "normal" per wiki)
TP7 22.45v (20v)
TP8 17.6-18.2 (18v) this floated around quite a bit. Not sure if that is normal or not.
CPU pin 32 4.872v (5v)
BR2 8.5v (top left lead) I didn't know how to hook DMM up for other BR test(s)
My understanding is 5v feed is main driver for double flipper resets and 4.9+/- is probably cutting it close to the cutoff which is why it has been resetting.
Some solder joints were touched up on driver board so those are looking good.
So, based on the above, anything I should check out further? My thoughts are:
1) Replacing pins/connectors would be a good course of action
2) Remove Z connector and hardwire
3) Reassess
4) Replacing the LM323K 5V regulator with more modern one sounds like a good idea
5) I do have some of the blue capacitors (Philips) (not on MPU board but on Power driver (and sound? board)) Sounds like they are a common failure point but I don't know what failure behavior results in.
With this all said and about to put in the KAHR board, is any of this necessary? (sounds like no based on my reading)
1 week later
Quoted from RobbyIRL5:Busted off again on the 9 o'clock opto. Is the position of the optos adjustable on the clock PCB?
Not supposed to be. My guess is an opto is bent and the flap on the hand hits one of the optos and the hand loses.
Found another oddity.
When launching a ball (or not I guess technically but that is the most likely case when it happens). Hit any of the skill shots (red/orange/yellow) switches. Then hold up the ball and 4 seconds later the slot coil fires twice. This will happen mid-ball as well.
If the ball gets to the rocket (it normally would in < 4sec) the slot coil doesn't fire at all. If the ball goes in the slot the slot fires normally. Slot is only acting up in this situation.
Skill shots & slot don't appear to be on the same row/col in the switch matrix. Not sure where to start.
Two other things on my list that I haven't looked at yet. (may or may not be related)
1) diverter (on ramp before the power field) flips twice sometimes. (when the ball is there) Flip to clear ball, then flip again 1-2sec later.
2) left sling during play will fire. Usually when other things around there are banging. (my guess but haven't checked yet is the switch gap may be too small and vibration is causing it)
Quoted from Alby87:The slot double fires if skill shot is made but not rocket switch is hit. If you skill and the ball goes in the playfield without being rocket-launched, the software fears that the ball went to the slot machine via skill scoop, then positioned not to hit the slot switch. In case, slot fires to clean the scoop. No need soren to fix anything
Thanks everyone. Awesome that the fix is to do nothing. I found it because my rocket switch wasn't closing with the ball. Then fire fire goes the slot.
So, new question, should the diverter to the mini pf dump twice? Always? If sometimes, then when vs when not?
Quoted from Coyote:Because, for money.
These games were made for a COMMERCIAL environment. That is, hey were made to MAKE MONEY. In case the slot machine scoop switch was bad, every time the ball would end up in the slot machine, the user would have to wait for the ball-search to start before getting the ball served back to them. They would get pissed off really quickly - every shot to Dead End, Camera, defeating The Power, Skillshot, and Piano. They would have to wait. And likely either walk away, or tell their friends not to play it.
There's no reason NOT to fire it if we know the ball is going to end up in the slot machine. (Like.. all those shots I just mentioned above.) This way, at least, the only time the player really has to wait is when they shoot the ball into the slot machine. ... As opposed.. every OTHER time.
Why does it fire twice? (good measure? lol)
Quoted from bikefreak:Two other things on my list that I haven't looked at yet. (may or may not be related)
1) diverter (on ramp before the power field) flips twice sometimes. (when the ball is there) Flip to clear ball, then flip again 1-2sec later.
2) left sling during play will fire. Usually when other things around there are banging. (my guess but haven't checked yet is the switch gap may be too small and vibration is causing it)
Item 1) diverter flips twice if another switch isn't hit in 2 seconds. (or approx) So another 'not a bug but a feature'. ![]()
Item 2) adjusted switches and working fine. (as suspected)
I'm running out of things that need to be fixed. ![]()
Quoted from Seatmandan:I just purchased this one a few months ago, and I'm not regretting it at all- Best one I've seen in my opinion. the stupid metal one from PDI that's like 300 bucks is a rip-off.
This sign is very similar to the original deleted one,
ebay.com link » Twilight Zone Pinball Spiral Sign[quoted image]
How is the sign mounted? looking at the back of the sign I don't see a mount point. Does it just hang on the bulb? Seems like it would fall off if that were the case.
Quoted from yzfguy:It is just held on by the bulb, and it does fall off occasionally. I haven't had time, but I'm going to figure out a better way, as it is pretty annoying to have it fall off mid multiball.
Thanks for the reply. It does look nice but needs a better mounting solution to be feasible.
Quoted from Seatmandan:Mines been on for a while and has not fallen off. I used a jewelers screwdriver to bend in the metal tabs in the wedge socket to tighten it up and that works fine. Like I said- tons of plays, has not fallen off for me
Well, the sign seemed to find the way to my amazon cart, then my house, then into the game. It looks good and was a tight fit for the bulb so hopefully it hangs in there. ![]()
I need to clean the glass, put in the backglass, move it into the line up and plug it in. My full tear down and rebuild is about to be done. Started Oct 28th 2009. Yep, over 11 years ago.
Quoted from brobra:I think the assembly calls for hour hand, washer, minute hand, locking ring.
Perhaps a new minute hand would help. I don’t think the minute hand needs to reach that far into the opto. You definitely want to eliminate hands touching your optos when the hand rolls through them. Perhaps you could extend your tip depth with glue or epoxy to compensate for the depth you need.
Try using heat shrink tubing to the blade that is already there. Heat it to shrink to that part, flatten the extra and cut to length. not sure if it will work but might look the best too.
Quoted from bikefreak:I've been slowly working on my TZ restore. (currently everything is off and reassembly is about to start) I purchased Ingo's clock board (looks awesome but will be a while before it see it lit up) I also have a blue housing so swapped everything over to the new.
Found a odd screw that needed to be replaced on the back of the clock. It is a #6 sheet metal + pan head 1-3/4" long screw. Was a bugger to find. I now have 99 extras. If you are looking for 1-4 let me know and I can ship some out for the cost of postage. (USA only/Paypal) It doesn't have the little cut at the tip of the screw but I don't think that would matter much.
I still have extra screws. Send me a message if you are in the US.
My 11 year, 2 month+ tear down and rebuild is complete. Glad I took so many pictures. I guess I rewarded myself with not only moving it into my lineup (which has had the space for it waiting) but also with buying a new machine. Wasn't planning on getting something new at this point but ran across a local Total Nuclear Annihilation. That meant
Pinball needed to move out. (and will be put up for others to enjoy) Long term plan was/is for a
Medieval Madness. TNA will stick around for at least a bit. Back to TZ... Stripped everything from the PF and cleaned/reassembled. I didn't make any cabinet repairs (painting/touch ups) Sides are printed to cabinet and no fade so didn't see the point. The inside of the cabinet could have used some work but I'm good with it as is.
Bunch of work and included a move and two kids. ![]() They actually helped (once they were old enough) which was fun. I'm super happy with how it turned out. It is an early production build. (Green lock, April 93 build if I recall, no 3rd mag, has flip here on mini) Not that it matters much.
They actually helped (once they were old enough) which was fun. I'm super happy with how it turned out. It is an early production build. (Green lock, April 93 build if I recall, no 3rd mag, has flip here on mini) Not that it matters much.
Looking forward to doing my best to getting LITZ!
TZ2 (resized).jpgTZ3 (resized).jpgTZ4 (resized).jpggame room (resized).jpgSo we have all seen the diverter magnet mod, right? Pick up at HD or hardware store (or pay more for the "mod"). I never liked the look of the big black block magnet (BBBM). I needed a better solution. I think it is a worthy change to TZ that improves the game play.
Things I was looking for that were "better" solutions:
1) less obvious that you stuck a magnet to your machine (looks)
2) works effectively and consistently (works)
3) cost (cost)
LOOKS:
Enter Neodymium Magnets. Silver so the color matches. Available in a variety of sizes and thicknesses. Things heading in the right direction. #1 done.
WORKS:
Did some digging on the BBBM I was able to find it had a pull strength of about 5.5lbs (if I recall). I never used one so I wasn't sure how well it worked but have heard of others that bounce outs were still taking place. So 5.5lbs is close but stronger would probably be better. The BBBM usually has a white two sided (thick) tape that further weakens the magnetic pull on the coming ball.
I needed a pull strength that would be best for the "right" amount of sticky-ness. (turned out to be approximately between 5 and 8 lbs) I didn't test the full range so I'm not sure how close to 8lbs or beyond you can get before it sticks too well. Other things to consider is how you attach the magnet. The more material between the magnet and the ball the lower the magnetic field. So think about how you would want to mount the magnet.
I considered purchasing in bulk and selling my own "deluxe diverter magnet mod" but figured it was more work that I wanted to get into. Mailing magnets, postal rules, collecting money, blah, blah, blah. Instead I'm going to show you what I got and you can just get it yourself. I'm actually surprised this wasn't being marketed yet.
What did I get? The BEE1 (7/8 x 7/8 x 1/16 - 6.67lb) https://www.kjmagnetics.com/proddetail.asp?prod=BEE1 Fits and works extremely well. I've had zero problems with bounce outs. (but still putting on the games post rebuild) It is only 1/16th of an inch thick! Can you see it? ![]() #2 done.
#2 done.
For mounting I used contact cement. It seemed like the best way and haven't had any issues at this point but long term durability is TBD. Two sided tape should work fine too but is as thick as the magnet which makes #1 not as good.
COST:
I got the magnet for $2.03 and $5.00 shipping (and tax). (obviously these will vary for you based on location and when you order) So for about $7.50 shipped you could have your own "deluxe diverter magnet mod". #3 done.
What might be better? I'm not sure how well it would work but putting on a longer magnet may (should) ensure your ball follows the diverter side all the way down getting a more consistent "drop" to the playfield. The BY081 (1/2" x 2" x 1/16 - 7.01lb) seems like it would be a good one. (I think the diverter is <2" long)
https://www.kjmagnetics.com/proddetail.asp?prod=BY081
They have an excellent table for finding magnet dimensions and pull strength. https://www.kjmagnetics.com/selectasize.asp?grade=N42&show=2&shape=block&thick=0.0625
PS: I have no affiliation with kjmagnetics. They just offered a cheap product (and shipping) where I could buy individual magnets that meet my needs. Also insanely great information on magnets on their site.
mag1 (resized).jpgmag2 (resized).jpg 2 weeks later
Quoted from Coyote:Looks like it's mounted at the Dead End hole under the powerfield. Either that, or it's mounted at the hole to the gumball subway. (Not at game, just going from memory.)
Dead end. Mounts from under the playfield.
P1040354 (resized).JPGI did the small screws option. Super easy and still looks great. I ordered new bulb holders then desoldered the old lamp wiring and moved it over. Then screwed them down. I used nut 4-40 ESN and Machine Screw 4-40 x 1/4" p-ph (or 3/8" I don't recall which I used on this one) (from Marco)
If you order from pinballmod.com they have a 5% discount. (vs ebay costs) That is where I got mine (and piano) in 2018.
1 week later
Quoted from DeeGor:I tried the neodymium magnets and found them to be way too strong. I would advise using a less powerful magnet like the ones doostur referenced in that thread.
http://www.homedepot.com/p/Empire-All-Purpose-Magnets-2-Pack-2708/203121065
If you get the correct Neo Magnet they are not too strong. See my post from last month. https://pinside.com/pinball/forum/topic/twilight-zone-owners-club/page/191#post-6044066 Which I think is the best solution for bounce outs.
Quoted from yzfguy:I used a small drill bit and drilled out the rivets. It was a pain in the neck, but stick with it, it looks awesome when you're done. It was challenging not to scratch the chrome when trying to reassemble, so be careful and take your time.
Why not just buy new lamp holders? Three of them is like $5 or less.
Quoted from yzfguy:I just used the existing harness and all.
I agree either works. Getting new sockets and unsoldering the harness from the old doesn't require a drill and makes moving back to (or selling or reusing) the old lamp possible. Again both work, just sharing my experience.
2 months later
Quoted from Manny65:I've not seen the 03-8835 face plate remade with the 4 legs - the replacement versions I have seen have a flat face plate with 4 separate plastic tube spaces that you slip onto the screw when assembling the clock. I bought mine from Pinbits but they are currently out of stock - maybe reach out to them and see if they are planning to restock? https://www.pinbits.com/index.php?main_page=product_info&cPath=13_2&products_id=160&zenid=801112576e9d75853242d89aab4f69c3
Alternatively you could buy the face plate here https://pinball-parts.shop/kategoriesuche/spielfeldteile/plastics/30931/clock-face-twilight-zone?c=270 although it doesn't look like it comes with the spacers, so you could attempt to cut them off your old face plate or look into whether you could make them or something suitable
This is what I did instead of using that plastic piece with standoffs. https://pinside.com/pinball/forum/topic/twilight-zone-owners-club/page/114#post-4331472
Quoted from Manny65:This is a common issue - you can stop the metal balls bouncing by adding a magnet to the diverter (won't stop the power ball bouncing back). You'll find posts in this thread showing what people have done themselves or you can buy this one https://pinballpro.net/shop/twilight-zone-diverter-magnet-tz-dm/
Here is a cheaper and better looking alternative magnet. https://pinside.com/pinball/forum/topic/twilight-zone-owners-club/page/191#post-6044066
1 month later
Quoted from Manny65:There are 2 proximity sensors, one in the trough (A-16534 switch 26) that senses the next ball to be kickout out into the shooter lane and the second one in the subway (A-16535 switch 57) that senses the ball as it passes from the dead end/gumball and camera shots down to the slot machine kickout. Note shots to the piano and slot machine won't go past the sensor. Also if the game hasn't detected the PB in a certain number of games, it assumes the senors aren't working and will automatically play a powerball every 6th (??) ball that is plunged.
Does anyone know if the led on the larger board is supposed to be on or not? Mine switch 26 is failing. resetting the connections isn't fixing.
Isn't there a better fix out there? (and maybe a replacement product)
Promoted items from Pinside Marketplace and Pinside Shops!
 Seaside, OR
You're currently viewing posts by Pinsider bikefreak.
Click here to go back to viewing the entire thread.
Reply
Wanna join the discussion? Please sign in to reply to this topic.

Hey there! Welcome to Pinside!
Donate to PinsideGreat to see you're enjoying Pinside! Did you know Pinside is able to run without any 3rd-party banners or ads, thanks to the support from our visitors? Please consider a donation to Pinside and get anext to your username to show for it! Or better yet, subscribe to Pinside+!
