(Topic ID: 280562)

The Crate TWD & Elvira HoH

By Vimtoman

3 years ago


Topic Heartbeat

Topic Stats

  • 167 posts
  • 64 Pinsiders participating
  • Latest reply 6 days ago by Viperbsd
  • Topic is favorited by 39 Pinsiders

You

Topic Gallery

View topic image gallery

Chaing binding (resized).png
6DBECDB6-3C9D-4A43-AC2C-1F8E47637B36 (resized).jpeg
A4B7344A-A60E-4947-B2A5-B86A0B5E2C3D (resized).jpeg
elvira connector (resized).jpg
4B16D4EB-472F-416A-9B33-3DF523AEDA86 (resized).jpeg
9608CC6F-7FAA-48A8-A0EA-3170AB234DD8 (resized).jpeg
7CC78D88-23AC-4F41-9223-BF09AC481117.gif
C746567B-28FF-49FA-86EC-C2DAE61290B4 (resized).jpeg
935E4D33-1EC5-4D85-B3A6-9CC5E296F244 (resized).jpeg
4BC01EDB-9F7A-4904-A8A5-8EA381AEC497 (resized).jpeg
DA0D2E0B-9709-4079-8061-337797C2542F (resized).jpeg
20211124_142458 (resized).jpg
20211124_142454 (resized).jpg
20211124_142503 (resized).jpg
toonz (resized).JPG
zombie2 (resized).JPG

You're currently viewing posts by Pinsider Vimtoman.
Click here to go back to viewing the entire thread.

10
#1 3 years ago

*NOTE TWD and Elvira models are not the same build and only fit those pinballs.

Thought I would start a thread on my progress on the mod.

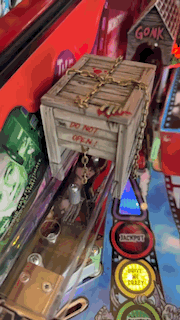
The Crate slides onto the hump section of the left ramp and is triggered by the pinball rolling underneath.
Easy install.
It has textured wood detail, emphasized with hand painting and has decals added.
Chains all round with red hook on the playfield side for added movement.
Zombie is painted and has reflective opaque eyes...May change to red jewel eyes to stand out.

Each one will be slightly different.

Zombie inside will raise the lid and try and break the chains.
At the moment Its pretty fast so you only get a glimpse of him due to the speed of the ball.
So this is now going to be servo driven which I am working on at this moment.
Will post on progress.
I'm going to have him shake the lid and chains and lift the lid and look out for a while.
Also whilst in game he will randomly shake chains,lift lid or do both etc.

I will also be looking at lighting the interior.
Not sure exactly what Im doing regarding the lighting side so please post your thoughts on this.

Limited numbers being made so contact me to be placed on a list should you want one.
Being made bespoke for each person.

PM me for contact details

Pictures and video below


P1050424 (resized).jpgP1050424 (resized).jpgP1050428 (resized).jpgP1050428 (resized).jpg

#2 3 years ago
#8 3 years ago

I'm going to add a few versions of the behaviour.
Creeping open for a sneak look etc.
Lighting wise ,strobe effects when shaking, dimming colour when sneaking a peak at you

Just coding up the control side.
Have pcb to design etc.

Wont be too long .

#16 3 years ago

Crate test 2 with random behaviour and lighting.
So far 7 versions.
Also you can select a color from White to Red in rainbow colors.
There will be a brightness control also.
Crate will be solid and Zombie lit from underneath.

#26 3 years ago

Waiting for the proto pcb's to come in so have been experimenting with the painting of the zombie.
Have remodled the face and arm for smoother look and more detail.
This chap is pretty small so trying to squeeze detail in .
Have settled for a green goul will be tweaking a bit.
zombie (resized).JPGzombie (resized).JPGzombie2 (resized).JPGzombie2 (resized).JPG

#30 3 years ago
Quoted from FatPanda:

Great...now I'll never be able to unsee it as one [quoted image]

I like that

#31 3 years ago

Update for my useless box

For all that have emailed me, you have two choices of crate colour.
Light wood and dark wood shown in pictures below

Zombies you have a five color choices.
These are quickies so should be slightly better.

Email me which box you want and zombie color you would like.
Once I get the info I will start print tops.

The main crate body is yet to be finalised due to fitting servo and pcb etc.

Software is finished with brightness and color selection via pots on the unviewable side.
Still waiting for proto pcb's to arrive. So will be a delay till I get the full batch.

Crate colors (resized).JPGCrate colors (resized).JPGzombie selection (resized).JPGzombie selection (resized).JPG
#37 3 years ago
Quoted from roar:

Hope you didn't take my useless box comment as a dig... it genuinely was a compliment, I think useless boxes are awesome. I think this is a really cool mod!

Nah no offence taken Thought it was funny and quite liked the useless box.

1 week later
#38 3 years ago

Still waiting for pcb's to arrive but have started painting lids

painting (resized).JPGpainting (resized).JPG
#42 3 years ago
Quoted from Lostcause:

Zombie crate horde is coming!!!
Will the crate help me play better as the machine was kicking my arse last night? Probably not but sure will put a smile on my face

#45 3 years ago

PCB's turned up today and so far looks good.
Just tweaking the main crate body to fit pcb and servo motor.
Will take a day or so to adjust but will post a video of a proper test in a few days time.

Really please how its working out considering how much is being squeezed in there with the Zombie.

Have a fast interupt trigger so its almost instant.

The CPU board has a red led which I may leave on as its nice to see a red glow through the crack of the lid.

Anyway almost there.....

#47 3 years ago

Question for all buyers.

Theres going to be a random show of the zombie when not activated by the ball.

A peak and tease etc

What sort of duration between peeks do you want ?

5mins 10mins ?

Or is a random peek going to make it look broke

#50 3 years ago
Quoted from Lostcause:

What would happen when the ball hits the switch and a random/timed activation happens at roughly the same time?

Yep that would happen in attract mode and it could conflict will ball trigger, well spotted. My comment of would look broke was due to that

Quoted from hoby1:

Because TWD has short ball times I’m going to be in the minority saying no random.
If you must I would say 5 minutes so the may be a possibility of one a game
My vote is for none .

I'm half hearted on the idea of having it .
Quite like the idea of it popping up in attract mode.

Regrets are that I didnt include a switch so that it could be a selectable mode.

Will try a few ways of activating it and see how it works out

Thanks guys

#53 3 years ago

OK I'm going to bin the idea of the peek mode. Easier for me also

UPDATE...

Just waiting for the "hopefully" last test print of the main body. Takes 10 to 14hrs to print depending on which one I choose.

So if these print Ok it will be a test in the pin one last time and then a full crate body print and paint.
Still waiting for connectors for pcb's and cables but nearly there for completion.

If anyone from now on wants one there may be a delay whilst I finsh this batch off.

Here are a few pics of the pcb ,servo and led fitted plus the external color and brightness adjustment. Oh and power connector.
Ive included a connector for the led strip so should you have a failure in the future all you need to do is to pull it out and replace.
control (resized).JPGcontrol (resized).JPGinside (resized).JPGinside (resized).JPGpower (resized).JPGpower (resized).JPG

#56 3 years ago

OK another question guys

At the moment some light bleeds through the crate body and it glows in the color set.
Some colors more than others.

Do you want the parts of the interior painted so that no light bleeds through and only through the crack of the lid.

Or would like the top part of the crate to glow?

You could paint inside yourself or add black tape to mask off.

UPDATE

The paint really does not work that well so it looks like its going to be no paint and glow ....

#58 3 years ago
Quoted from mbwalker:

Looking your videos. I almost think just having the one light under the zombie would look the best (just my 2 cents worth). The other LED is out in the open and really lights up everything up a bit much, but the one under the zombie - the zombie sort of mutes the brightness until the zombie starts to come up. Then the light appears to be fairly uncovered, making it brighter then when you see the zombie. That's kind of a neat effect, even if by accident. .

You have a brightness control so can turn it down.
In fact you can turn it off should you want to

I'm running out of time to tweak anymore as want to have these delivered before Christmas...

LIGHT CRATE COLOR

Now theres a possibility I may not make the lighter crate colour as the print is not going as well as the darker version.
Seems to be a weaker filament and pretty brittle.
I will know later as I'm experimenting in different temps and quality .
If it does not work out will contact all that asked for that lighter version.

#61 3 years ago
Quoted from mbwalker:

Just curious...What type of filament are you using?

The light colour is Multicomp and comes in 500kg rolls. Not convinced its Wood.
The darker is Sunlu .

Quoted from hoby1:

If its brittle its old and has moisture in it try a new roll. I like Sunlu and seem to have consistent results. When the rol.lgets old I turn the temp up to about 215C

Yep Im turning it up in temp to 205C and printing in 0.2 on the next test.

#62 3 years ago

Ok Ive shelved the light crate version as its not printing well.

Sorry guys

16
#63 3 years ago

Crate installed and tested. All working great.
This model is not completed and missing decals and hook.

#67 3 years ago

Almost have the lids finished. All bespoke and non the same.

DSC_1131 (resized).JPGDSC_1131 (resized).JPG
#69 3 years ago
Quoted from Rensh:

I see my choice is also the most popular choice
Looks great. Nice gift for under the Christmas tree I hope

I think it maybe so

#70 3 years ago

Almost there........looking at posting end of week for all that have been in contact etc.

DSC_1133 (resized).JPGDSC_1133 (resized).JPGDSC_1135 (resized).JPGDSC_1135 (resized).JPG
#71 3 years ago

No 1 has left the ship.

More to follow .... Maybe tomorrow

#73 3 years ago

UPDATE

All but a few sent.

I have removed the front chains for a clearer view of the Zombie.
There are two links left on for you to attach the rest should you want to.
If you do, make sure the lid is left open so that you know how much to add.
I have supplied extra chain for you to do so.

I have also added a red hook should you want to change the side chain to a loose hook.

Also a spare led strip should it fail in the future.

I have added chain on the blind side of the crate to shield the adjustment pots but they are not needed if you dont have mirror blades.
You can remove this section.

Chains are easy to take off but you will need to use a long nosed pair of pliers to do so.

Ive set most crates to Red and brightness to mid way.

Hope you all enjoy your mod.

2 weeks later
#74 3 years ago
merry christmass crate (resized).pngmerry christmass crate (resized).png
#77 3 years ago

Thanks Guys

Happy new year

Super exclusive ad from the Pinside Marketplace!
1 month later
#80 3 years ago

I am going to reduce the number of colors available to three.

First is Green

Green (resized).JPGGreen (resized).JPG Added over 3 years ago:

Colors may vary slightly from pictures. Some may also be darker or lighter.
These are all done by hand so will not be exactly the same as the pictures.

#81 3 years ago

Second is Flesh

flesh3adj (resized).jpgflesh3adj (resized).jpg
2 weeks later
#82 3 years ago

Third brown

Brown small (resized).JPGBrown small (resized).JPG
#84 3 years ago
Quoted from mikeflan:

Ho do you order the crate? And how much?
Thanks

Just PM

2 weeks later
#91 3 years ago
Quoted from Medisinyl:

Just got the mod (super fast shipping). Will install it Sunday most likely and update with a photo.
Top notch quality. Very impressive!

Wow thumbs up to UPS.

Thanks pictures and videos very welcome

#94 3 years ago
Quoted from Medisinyl:

Will get a pic up later tonight most likely. Just got the mod in the game, but finishing another project on the game before buttoning it all back up.
I had to modify the barbed wire fence mod to get the mod to fit (forgot to mention that mod I have, and Hassanchop's alternate translite [crazy amount of modders represented in it now that I think about it]).
Otherwise, looking like the perfect balance to fill out the left ramp against the railroad mod on the right (burning barn option never quite grabbed me enough).

Medisinyl Can you point me in the right direct for the barbwire mod you mentioned. Quite like the sound of that. Noticed someone placing some on the prison roof.
I've installed a couple of barns for friends in the past. It has a nice feel. Never bought one for myself as always had the intention of making a mod on that hump section of the ramp.

#99 3 years ago

Thanks Medisinyl for posting the pics a smashing selection. Really appreciated.
Wow that fence looks menacing.
Not sure I can fit that on mine as the gap is really small.
The mirror blades I have in are just clearing.

Thanks guys for the support hope you all like the mod.

#101 3 years ago
Quoted from Indypin:

[quoted image] Here is mine. You can see where I had to move the burning barn mod in the pro and I kinda like it there. The only boo boo I had was one of the “skinny hair” wires broke off on the barn, so I have to fix it. Still, I kinda like it the way it is. Thanks mate for the excellent mod!

Thanks for the pic, glad you like the mod.

That is a great place for the barn. Will check those out.

3 months later
#109 2 years ago

An attract mode of sorts has been now added to future builds.

Brightness control now incorporates an option to activate a 2min peekaboo attract mode.
4 types of peekaboo behaviour.

Brightness is low in centre position.
Adjusting anticlockwise increases led brightness and sets attract mode.
Adjusting clockwise increases led brightness with no attract mode.
Adjustment attract mode (resized).jpgAdjustment attract mode (resized).jpg

#111 2 years ago
Quoted from Gogojohnnyquack:

Any way to retrofit?

For the older versions may be a hard one to do.

A couple of buyers have swapped pcb's/motors but in the process they have broken the hinge section of the lid.
I have since bulked that section up in the 3d print.

Also the originals had pins in the lid and lever which would be fiddly to remove.

#113 2 years ago
Quoted from Rensh:

That’s a pitty but no worries, life continues and this mod was a great one and is still a great one. A must for any Twd owner.

Thanks Rensh

2 weeks later
#116 2 years ago

Flesh and new green flesh

zombie2 (resized).JPGzombie2 (resized).JPG
2 months later
#119 2 years ago

I have held back for a long time in making The Crate fit Elvira HOH due to Medisinyl 's epic collection for the pin.
You can purchase that mod in the link below.
https://pinside.com/pinball/forum/topic/elvira-3-interactive-casket-gargoyle-vuk-cover-medisinyl-mods

Should you want The Crate then PM me to be added to list.

Thanks to Rensh , Toon & John aka Pinwiz55

toonz (resized).JPGtoonz (resized).JPG
1 month later
#125 2 years ago

Thanks for the great pictures PeterG

1 week later
#126 2 years ago

Thanks for the video Ron.

7 months later
#130 1 year ago
Quoted from pb456:

Are these still being made/sold?

Yep both the TWD and Elvira HoH

3 months later
#133 1 year ago
Quoted from scottr:

Shout out to Vimtoman for the amazing crate mod in Elvira - the quality and workmanship is truly amazing.
I have his house mod in our Halloween CE as well, and it’s just awesome. Both mods are a must if you own these pins imo.
Thanks Vimtoman for sharing your talent and producing these terrific mods!

Thanks for the shout really appretiated.

1 month later
#135 1 year ago
Quoted from DVDA:

I need this mod. any left?

Have PM'd

1 week later
#138 1 year ago
Quoted from Damonator:

I installed my useless box today in EHoH and it is awesome! There were no instructions with the mod (or in this thread), so I thought I would post them. Initially I removed the Medisinyl Gonk house, but I ended up leaving it as the ramp flasher looks rather naked without it.
1) The mod is held in place by pressure from the ramp sides. Simply slide the Useless Box onto the end of the ramp starting above the crate. I needed to gently apply pressure with a screwdriver head to flex the ramp into the slots at the front of the box. Once inserted, slide the box into its final position.
2) Remove the plastic under the ramp (two nuts). It's tight - if you don't have a Titan flat wrench, buy one now!
https://www.titanpinball.com/index.php?route=product/product&product_id=152
3) I placed a couple of lexan washers on the posts so that the wires don't get smashed when putting the plastic back on:
[quoted image]
4) Route the power wire through the hole in the playfield and plug into the Useless Box. I chose to route the wire to the left side of the plastic as this hides it well, just be mindful when raising the playfield. Mine doesn't even touch the sidewall after positioning:
[quoted image]
5) Zip tie the wire and route the other end to the backbox, tucking it into the cable clamps on the back wall so that it stays out of the way.
[quoted image]
6) You'll be plugging it into CN1 on the power board in the backbox. If you already have speaker lights plugged into CN1, you'll need to unplug those (I find unplugging CN3 gives my fingers more room to safely remove CN1). The included Useless Box cable has a secondary connector for plugging in another mod, but it's a female plug so you'll need either a Z-pin male to male or one of these:
https://www.pinballlife.com/mm5/merchant.mvc?Screen=PROD&Product_Code=PBL-600-0489-00&Category_Code=
The 4-way splitter from Pinball Life is cheap and installs magnetically - this is the route I went.
[quoted image]
That's it![quoted image]

Thanks Damon for the post.
If you look in your emails there will be one from me that has a Google drive link for the instructions.

2 months later
#148 1 year ago

Concretehardt CN6 connector
elvira connector (resized).jpgelvira connector (resized).jpg

3 months later
#150 9 months ago
Quoted from wizard1:

Thank Andrew,
Installed it in 10 minutes today.
1 of the best mods what i‘ve ever seen!
A must have for Elvira.
Cheers

Thanks for the nice comments. Great to have feedback

1 month later
#152 8 months ago
Quoted from tomypin:

Yes, installed in 10 minutes, very easy. Best Mod for Elvira, love it . Thanks Andrew for your awesome Work
[quoted image][quoted image]

Thanks tomypin , Crisp photos mate

3 months later
#154 4 months ago
Quoted from BeeGeeMtl:

Love the mod but as of late, the ball is getting "stuck" on the left ramp coming down to the crate, as something seems to be "sticking out" the back of the crate. I have no choice but to stop the game, open the door, pull down the glass and manually PUSH the ball past the crate, anyone know a way to fix this, so it doesn't happen anymore? Seems to happen every 10 games or so and obviously can be very annoying in the middle of a game.
Thx!

I think you should check the chain is not binding.
Add some silicone grease to the chains especially at the connections to the crate body.
Its probably dry so needs a bit of lube

The other thing to check is the lever and switch section.
Just place your finger and activate the lever and see if its free or sticking.

Just checked my email .. Looks like you purchased it two years ago.
So check the chain.

#155 4 months ago
Quoted from BeeGeeMtl:

Love the mod but as of late, the ball is getting "stuck" on the left ramp coming down to the crate, as something seems to be "sticking out" the back of the crate. I have no choice but to stop the game, open the door, pull down the glass and manually PUSH the ball past the crate, anyone know a way to fix this, so it doesn't happen anymore? Seems to happen every 10 games or so and obviously can be very annoying in the middle of a game.
Thx!

Looking at your pictures I can see the chain binding on the bottom link.
At some lubrictaions here.

Chaing binding (resized).pngChaing binding (resized).png
#157 4 months ago
Quoted from Sixtieskid:

are these still available for Elvira?

Yes they are. Will PM you.

1 month later
#159 3 months ago
Quoted from JayLar:

Received and installed this mod today. All I can say is WOW, what an amazing mod. I've been modding pinball machines a lot for a long time and this is easily one of my top five mods ever. So well executed from start to finish. Absolutely LOVE it. Thank you Andrew for your great work!

Thanks JayLar for your comments, much appreciated.

2 months later
#162 6 days ago
Quoted from big-c66:

Is this still available my Elvira comes in 2 weeks

Yep I still make these up will PM you

Promoted items from Pinside Marketplace and Pinside Shops!
$ 19.99
Cabinet - Other
Bent Mods
 
$ 49.99
Playfield - Toys/Add-ons
Cento Creations
 
$ 45.00
Cabinet - Decals
Inscribed Solutions
 
From: $ 5.00
Cabinet - Other
Filament Printing
 
$ 26.00
Lighting - Other
Pin Monk
 
18,500 (OBO)
From: $ 7.00
Playfield - Plastics
SilverBall Designs
 
$ 10,499.00
Pinball Machine
Classic Game Rooms
 
$ 36.00
Lighting - Other
Pin Monk
 
$ 29.99
Playfield - Decals
Cento Creations
 
$ 12.00
Playfield - Toys/Add-ons
UpKick Pinball
 
Wanted
Machine - Wanted
Moravia, NY
$ 259.99
Cabinet - Toppers
Lighted Pinball Mods
 
$ 160.00
Cabinet - Toppers
Sparky Pinball
 
11,855 (OBO)
$ 26.95
$ 200.00
Playfield - Toys/Add-ons
Led Pinball
 
$ 89.99
Playfield - Toys/Add-ons
Lighted Pinball Mods
 
$ 69.99
Cabinet - Decals
Inscribed Solutions
 
$ 50.00
Playfield - Protection
Duke Pinball
 
$ 159.00
Playfield - Toys/Add-ons
Sparky Pinball
 
$ 18.00
Lighting - Other
Pin Monk
 
$ 30.00
Cabinet - Other
Rocket City Pinball
 
Hey modders!
Your shop name here

You're currently viewing posts by Pinsider Vimtoman.
Click here to go back to viewing the entire thread.

Reply

Wanna join the discussion? Please sign in to reply to this topic.

Hey there! Welcome to Pinside!

Donate to Pinside

Great to see you're enjoying Pinside! Did you know Pinside is able to run without any 3rd-party banners or ads, thanks to the support from our visitors? Please consider a donation to Pinside and get anext to your username to show for it! Or better yet, subscribe to Pinside+!


This page was printed from https://pinside.com/pinball/forum/topic/twd-the-crate?tu=Vimtoman and we tried optimising it for printing. Some page elements may have been deliberately hidden.

Scan the QR code on the left to jump to the URL this document was printed from.