Are there going to be some added switches, or benefit in the gameplay to hitting the ramps?
(Topic ID: 288845)
 Total Nuclear Annihilation
Spooky Pinball, 2017
Total Nuclear Annihilation
Spooky Pinball, 2017I am moving and converting the stand up destroy targets into the ramp, to ramp style switches. The draw back being a good shot would trigger them both on the loop. I think it would be better to have only one in it, but I see no other option?
Why don’t you make it a double switch but an entry from the left can only activate the left standup and an entry from the right only the right standup.
Seems like an interesting challenge? ![]()
I’m think like adding a lever in the middle of the ramp which can swing both left/right but has two switches to detect the direction it swings?
Quoted from Bingovit:Why don’t you make it a double switch but an entry from the left can only activate the left standup and an entry from the right only the right standup.
Seems like an interesting challenge?
I’m think like adding a lever in the middle of the ramp which can swing both left/right but has two switches to detect the direction it swings?
Thank you! That does sound like a great idea! I will try that for sure.
Quoted from Loganpinball:Thank you! That does sound like a great idea! I will try that for sure.
If left then right, left
If right then left, right
Shot shouldn’t be awarded if only one switch is triggered ie goes up the ramp halfway then back out.
Are you going to try to edit the code or just keep all the same code and only change hardware?
Quoted from Amarillopinball:If left then right, left
If right then left, right
Shot shouldn’t be awarded if only one switch is triggered ie goes up the ramp halfway then back out.
Are you going to try to edit the code or just keep all the same code and only change hardware?
Not altering the code. I agree with shot. I will put the switches at the top middle of horshoe for that very reason. Thanks to Bingovit’s idea I will try his suggestion of a pivot type switch that hits both but only one switch gets triggered. Great idea! I just need to get that done.
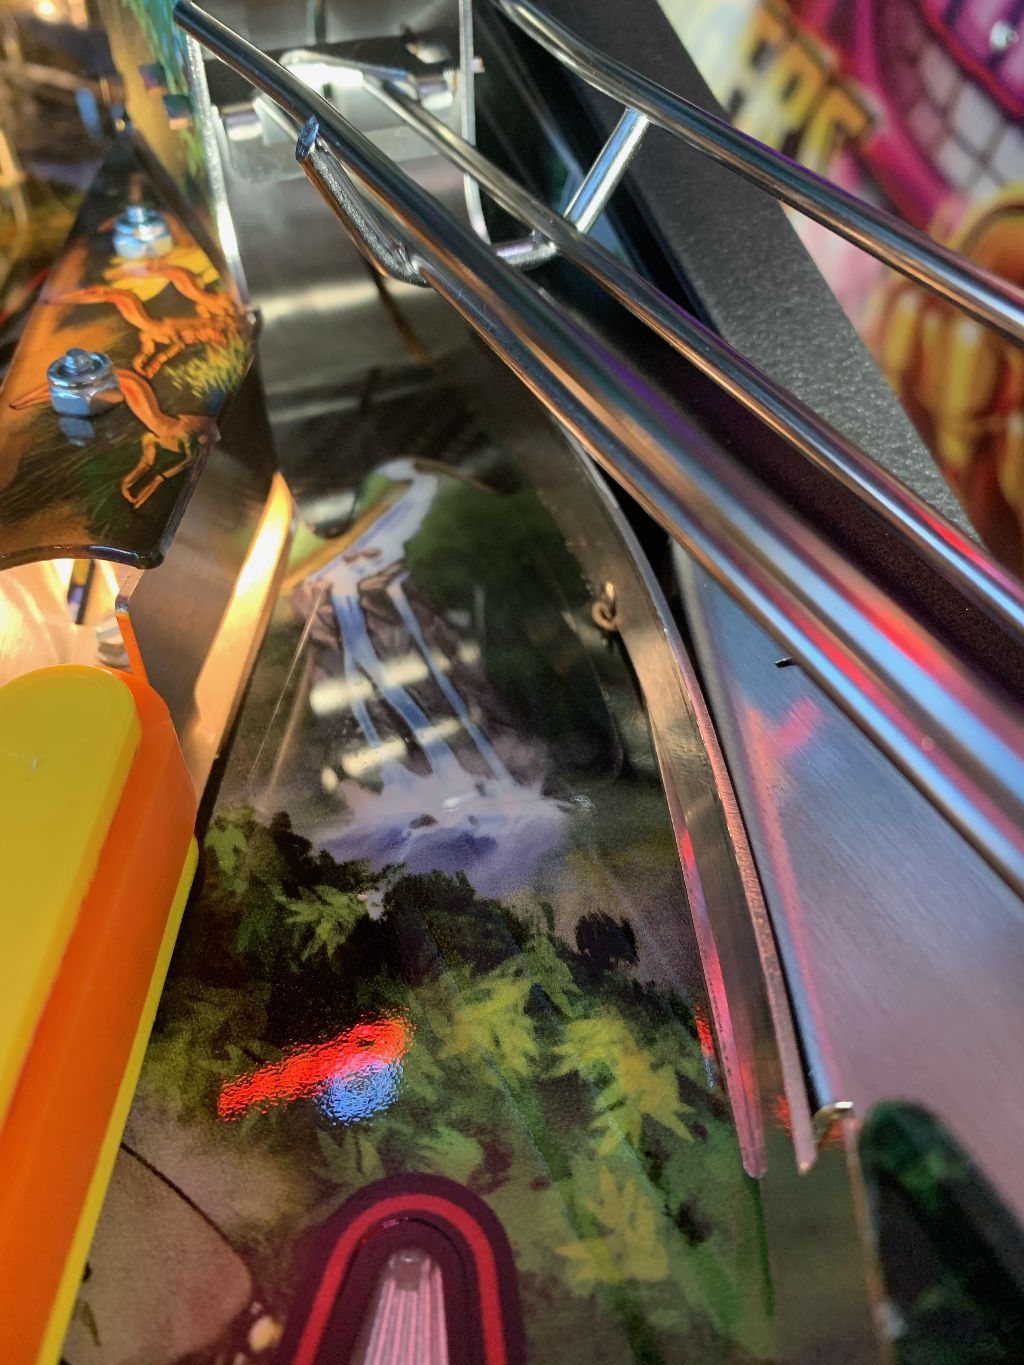
Not final, but these are my solutions to ramps to wireforms. Poly with cut outs. The right side one works, now on to left. If they work on both sides I will ad metal flap to playfield to poly for smoothness. Last thing I will even do is screw them to playfield, but thats only if they work well enough. We will see..
5B1C073E-6F85-4897-85AE-450E57C38773 (resized).jpegA3FE18F1-BD35-4D48-B1E0-304A7962133E (resized).jpegBD9E3DD6-9CEB-4509-BA85-2354A1B0D478 (resized).jpegFF539E19-DC31-425A-AD80-1CEDCB86E88C (resized).jpeg
Booooooooom!!! Works great! I still have some tweaks, but it works! Forgive the tape, not ready to screw it down to playfield yet. I need to make adjustments and mods. But damn it its alive.
Thanks! I am stunned as it fits in spooky cabinet. I will try and figure out the horse shoe switch design and that will complete this. I have to cut out plastics to cover things up. I just dont have any left, so next weekend. Very happy where this ended up. I really enjoy the game as is, this just added some more fun shots.
F2AF4E0C-E08B-46B7-AF2C-E8D1D89A42C6 (resized).jpegFA21BFE7-0C00-4102-B9A9-C70114540CD4 (resized).jpegPart of me wants to hate the idea of messing with the design of the game. But part of me wants to come over and play it.
Quoted from yzfguy:Part of me wants to hate the idea of messing with the design of the game. But part of me wants to come over and play it.
I feel same way. Its a perfect game. I love it because I am a mode guy. Wait until I get it painted. She is going to kill it. Once this covid thing is handled I will bring it to Allentown pinfest. I will say this again, I mean absolutely no disrespect to Scott or Spooky in doing this. People mod games, this has to qualify as a mod!
Great job! Something about that wire form also makes the game just a bit more aesthetically pleasing as well! Side of Cyberpunk!
I don't see the point in this mod. Slows the game down and changes the fast action. That said, I give you huge props for pulling it off and trying something different. Like someone said above... There is indeed a lot of talent on pinside. Well done for maybe one of the wackiest mods of 2021! I would totally play this if I'm at a show and its there.
Jay this is a very interesting mod. Im impressed with your skills, maybe it’s time for a full blown home brew.
For the ramp flaps, you could use adhesive carbon fiber flaps instead of metal. There are many people replacing these parts on games like JP2 to make the ramps play more smoothly. This would also avoid any new screw holes in your playfield.
https://www.passionforpinball.com/WIP/JP3-CF-Heliflap-inst.jpg
Quoted from Coz:Jay this is a very interesting mod. Im impressed with your skills, maybe it’s time for a full blown home brew.
How are you doing Sir! Been a long time. You are the last long distance trip for a machine I have made. I don’t have it in me anymore. I am down to 4 hours max one way. I have to program my star trek discovery machine, but I hope this counts as a homebrew. Thanks for the compliment. Not sure if you have seen the Discovery machine. Took a year, but it came out great. Still have a bunch of stuff to complete on it and I got distracted with tna in a trade.
354ABDB0-FD2A-40A4-A796-DF75AFE2A289 (resized).jpegF57DEC5C-9C6F-432D-BDD8-185EB61534A3 (resized).jpeg
Quoted from rapidflipper:For the ramp flaps, you could use adhesive carbon fiber flaps instead of metal. There are many people replacing these parts on games like JP2 to make the ramps play more smoothly. This would also avoid any new screw holes in your playfield.
https://www.passionforpinball.com/WIP/JP3-CF-Heliflap-inst.jpg
Thank you Sir. That is perfect and I had no idea that was an option. I appreciate the heads up.
Quoted from drypaint:I don't see the point in this mod. Slows the game down and changes the fast action. That said, I give you huge props for pulling it off and trying something different. Like someone said above... There is indeed a lot of talent on pinside. Well done for maybe one of the wackiest mods of 2021! I would totally play this if I'm at a show and its there.
I understand. I did not plan on the ramps. I was only swapping the cabinet and doing better art on it. When it was in the deeper cabinet I saw alot of cosmetic opportunities. Then I walked by it and it just hit me. I could see the wireforms working and not killing the other shots in the game. I will make a bettter horseshoe as I rushed this one just to see if it worked or if I was going to make return to flipper ones. I will also be adding some more details like cooling rods and I will be painting the bare wood. I got the poly stuff today so I can cut and shape new plastics. If I can get adheasive carbon fiber ramps it is perfect as I wont drill holes in the playfield. I emailed them today. Thanks again for any tips, I really appreciate the help.
I did make a Star Trek Discovery pinball machine using a proc boardset with stern driver boards. It is also on pinside, I am still coding it in now. Very long boring process.. I like making pinball related things as a result. I did not plan on this horseshoe it just looked doable. No other reasons. I dont want to recode Scotts machine. The switch I am trying to make will only trigger left or right target as suggested, so a ramp shot wont trigger both targets. It started as getting the game into a modern cabinet with better artwork on it and then just went from there.
Working on the triangle made up time device....It will make sense when its done..
I have to trim back the spine, but it will be inline to create the same effect of the front.
0CEAB7C7-163B-42F9-81F3-F5C06BFC1DCA (resized).jpeg5AA6DBE7-C0E0-4E56-899E-5A6FEE2CBA2A (resized).jpeg853F8667-39A0-4D0E-BA4D-24DD384E4306 (resized).jpegB2F9788B-D9C7-4023-AC0F-053098AEA6DC (resized).jpeg
776C4A3F-C471-439D-9CE6-4ABC4D1B211F (resized).jpeg18CF4A0A-8550-422E-BBB5-CAD962D46D9D (resized).jpeg
D4AC6A35-3723-4185-8F81-4F25B94EB5BC (resized).jpegD914498E-570E-48E4-89F4-81EA7D9AA9BF (resized).jpeg1AA6F6BC-A0C5-48A4-A069-37214D482832 (resized).jpegCut new plastics and cut out triangle. I am still pondering on that. Wtf do you do with it? The rear switch I am going to try a make a housing that looks like the meter pictured below and have needle move with switch hits.
09543045-B57E-4D46-AB92-17E357135E56 (resized).jpeg15317488-2E1C-4464-BC0A-8EA8E0EC5D0B (resized).jpeg21EDE97B-A9EC-4CD9-A8EC-F49822A337FD (resized).pngB38775CC-E644-4B53-B7AC-EC9F1D6B39E4 (resized).jpegLabeled the boards and wiring to them as it will be apart until arstist paints it. I had pictures last time I pulled the head and it took a bit of effort on pictures alone. The labels will cut that effort down alot. I will be removing the strobe light and replacing it with something more modern. Today is all about prepping the cabinet for the new paint work. I have no problems with people saying I am crazy or stupid to mess with the game. I enjoy reading other projects on pinside and figure I would share this one. I got drained by Brian! Very weird listening to a podcast and hearing that I am doing something that is stupid. I am hoping that when its all together with new artwork and finished you will see what I am trying to do. I dont like the cabinet and I really think a different art package on it will go a long way.
FCBAFFBB-1A1E-455A-BE19-F4D86DB3AA55 (resized).jpegB5C849D3-1FF5-4A41-94A7-CC1572B61FBB (resized).jpegAEF59113-50DE-46A6-8A10-8599F8456699 (resized).jpeg01F92B11-56F5-4E87-A499-B2863582281C (resized).jpeg8CF7D87A-6997-4B9E-B28D-7DC10B81214E (resized).jpegEF7DC83B-3E10-494E-81D4-185DB94030A6 (resized).jpegQuoted from LargemouthAss:I hope the right ramp does not make it impossible to backhand the lock shot. Also hope that when the lock releases the ramp doesn't make all the balls go SDTM.
Late to this party and following, but just got to this post and have to say that I’d love to see backhanding the lock made harder or not possible. The ease of backhanding that shot significantly reduces my enjoyment of TNA. Exploitable easy shots suck, especially when they give significant progress/rewards (see also left flipper to castle >left inline >repeat for MM).
Fantastic work so far. I admire your abilities and ambition. I understand messing with beat up average games. Messing with a pristine, awesome game is a whole other level of balls. Also appreciate your thick skin. Bravo!
Killed another Striker Xtreme cabinet, that has to count as a positive contribution to pinball. Filling imperfections and smoothing out for paint. I did learn from Discovery cabinet to make sure I point out the over lap of coin door and legs. And I am having her paint inner cabinet (where artblades would go). Trying to find a good graphic text font that will be on the inner cab “ To save the planet, she must destroy it first”. Or some other way of saying that same message. I have a great concept for backbox side art and will post it when she paints it.
7AD8CBAA-6F09-4577-9084-05009A839D8E (resized).jpeg3E592CE9-2F6C-48ED-9DF0-2D6FC7154FBC (resized).jpeg87B1770F-77C7-44A2-B4B5-E08A01C79F90 (resized).jpegE9FC62A3-0D16-49C7-AFE8-087E12FFDDC0 (resized).jpeg
One more coat of primer and its off. I did buy a complete set of cabinet decals and I am keeping the spooky cabinet. Everything I am doing can be undone, which is also why I have no problem attempting this project. It would be easy to put back together and simple to sand and prep head box for the decals.
And thanks Pinheadpierre. I appreciate the comments.
140965DF-6B37-48DD-BE8A-52580055CDE0 (resized).jpeg597E546D-48C3-4F6C-B58E-0ED61DD44A3D (resized).jpegWith the added height in cabinet I can add a rear panel. On that panel I am having the picture of the global grid painted as seen below. The blue is perfect. The connection dots will have micro led bulbs in the grid and they will be blue. The meter will be functional and triggered by voltage not ohms. I will swing the ramp switch over to an angle on the side not to block the meter. I am still sketching artwork ideas on paper and these are the latest.
855F81F4-901B-4D65-AF22-03C5E90E2735 (resized).jpeg9C26DC17-1DC2-4EBA-9803-AD414C7B99B6 (resized).jpegA2C77AB6-12F6-4197-BC3E-86DEAAA5010F (resized).jpegD9F91640-601D-40E0-90FF-537A50DA9F34 (resized).jpegF7F75AE0-229A-47EA-B86B-6E2D4263697C (resized).jpeg
Quoted from cooked71:Love it - cant understand why anywone would get upset at you modifying your own game. Go for it.
Love the back panel AND the horseshoe.
Thanks! I don’t get it either? I would never bash someone for modding or trying to be creative with something in this hobby.
However I am this type of guy, I bought a never fired winchester lever action .410 shotgun from a museum collection. It was the last year it was made in the united states and in perfect condition. It was shown to me by a guy wearing white gloves. Within 2 days I shot 250 rounds through it. That is stupid! And I would do it again!
Quoted from Loganpinball:However I am this type of guy, I bought a never fired winchester lever action .410 shotgun from a museum collection. It was the last year it was made in the united states and in perfect condition. It was shown to me by a guy wearing white gloves. Within 2 days I shot 250 rounds through it. That is stupid! And I would do it again!
Haha. I do this sort of stuff as well. It's been several now, but I bought a whole bunch of factory sealed NES games on eBay, and many of them were super rare and expensive then, and would be worth a small fortune now, but I opened every one and played them.
I simply wanted really nice and complete examples of those games, and of course I take good care of them, but I didn't buy them as an investment or to be museum pieces. I bet some of the sellers of those games woud freak if they knew they were opened. ![]()
Anyway, good work on the game. It looks great!
Hey Loganpinball I want to apologize for the unfriendly words I said on a podcast about this project. As a maker, and advocate of others creating, this was a mistake on my part. I honestly think that modifying your own stuff is a very fun thing to do. In this case, I was a bit defensive over seeing the pictures of my friend's art being pulled off the game and replaced. It wasn't my place to react that way and I am sorry.
I have also done my fair share of modifying. I had Earthshaker Prototype #2 and gutted the electronics on it to install a P-ROC system in it. Nothing is safe in my house. ![]()
I look forward to seeing what you do with this and how this turns out.
--Scott Danesi
Quoted from TheNoTrashCougar:Hey Loganpinball I want to apologize for the unfriendly words I said on a podcast about this project. As a maker, and advocate of others creating, this was a mistake on my part. I honestly think that modifying your own stuff is a very fun thing to do. In this case, I was a bit defensive over seeing the pictures of my friend's art being pulled off the game and replaced. It wasn't my place to react that way and I am sorry.
I have also done my fair share of modifying. I had Earthshaker Prototype #2 and gutted the electronics on it to install a P-ROC system in it. Nothing is safe in my house.
I look forward to seeing what you do with this and how this turns out.
--Scott Danesi
Well, Scott, in your defense, it IS your wife on the backglass. That makes it a little more personal when somebody removes it. It's pretty cool what Loganpinball is doing with his game, but I find it to be pretty perfect just as it is. (That said, when I finally decide to do my Electric Light Orchestra homebrew, I know who to contact for ideas and to help with parts...and he's local!)
![]()
Quoted from TheNoTrashCougar:Hey Loganpinball I want to apologize for the unfriendly words I said on a podcast about this project. As a maker, and advocate of others creating, this was a mistake on my part. I honestly think that modifying your own stuff is a very fun thing to do. In this case, I was a bit defensive over seeing the pictures of my friend's art being pulled off the game and replaced. It wasn't my place to react that way and I am sorry.
I have also done my fair share of modifying. I had Earthshaker Prototype #2 and gutted the electronics on it to install a P-ROC system in it. Nothing is safe in my house.
I look forward to seeing what you do with this and how this turns out.
--Scott Danesi
Not needed Sir, were good. I will say this again. Tna is amazing as is. I will never sell it. The backglass is staying on the machine. I am only dropping the cabinet artwork as I am porting it over to a Stern cabinet. I can change my smoke detector batteries and lights in my house without a ladder and I can touch the net on a basket ball hoop without stretching. I was at an auction in Winston Salem and the auctioneer paused and said wow your tall when I bid. Spookys cabinet is way too small for me. I am only doing artwork because I would not want the game to sit in a black painted cabinet. I am an art guy, that can draw out what I would like painted. I found a great painter and it just works for us. She sees exactly what I am trying to do and she kills it.
The added space above the rear playfield would look weird without something above or around it. I was going to do cosmetic stuff to fill it. I really just walked by the tna playfield in the Stern cabinet and I saw that a wireform ramp would be possible. Did not plan it, but made a rough set to see if it work. It does and I will make a better one soon.
Quoted from TheNoTrashCougar:Hey Loganpinball I want to apologize for the unfriendly words I said on a podcast about this project. As a maker, and advocate of others creating, this was a mistake on my part. I honestly think that modifying your own stuff is a very fun thing to do. In this case, I was a bit defensive over seeing the pictures of my friend's art being pulled off the game and replaced. It wasn't my place to react that way and I am sorry.
I have also done my fair share of modifying. I had Earthshaker Prototype #2 and gutted the electronics on it to install a P-ROC system in it. Nothing is safe in my house.
I look forward to seeing what you do with this and how this turns out.
--Scott Danesi
Scott, if you want to stick it to me feel free to program my Star Trek Discovery machine... Apparently I will do anything to avoid sitting in front of that computer! Including upsetting a great designer!
The left side cabinet is a substation exploding with electrical streamers. Its hard to show what I am going for all in same color. But, see the lightning skyline picture with another good color hue for this game as the background and the substation in front with electrical chaos! I will have a hard time explaining this layout to artist as its multi layer.
7F05F36B-4171-4C29-9B81-DB6A6FFB7F7E (resized).jpegA405CF9C-7F8C-4137-AD6C-6C0390A2B80E (resized).jpegB641222F-556C-46ED-B5BB-F09B972B37A3 (resized).jpeg
Today I am trying to replace coin door with a breaker box panel. If I can do it cleanly it will have functioning circuit breakers! I hope I can get this to work! As I said in a earlier post, I enjoy reading other projects so hopefully some of you are entertained by my lunacy.
C747F7A2-0E4B-4089-B132-91F6990DBDEE (resized).jpegF98485DA-EA1D-4ADC-8D53-1BC0EF43F9F0 (resized).jpegJust need to bondo and paint. I think it looks good. The power on will be one of the breakers. I will spend more on the breakers then I did on the panel!
5858C779-93AF-404B-BE8E-DA7041F8A82D (resized).jpeg7A4702E2-EC96-42C7-86B1-69DC1D25753E (resized).jpeg
FBCC7E2A-6EF7-4C6F-A9F4-48A4667F52AF (resized).jpegVery impressive work- I’m excited to see the completed game. Will you bring this to a show once you’re finished?
Quoted from Loganpinball:Not done, but I am really digging the look.
[quoted image][quoted image][quoted image][quoted image]
The breaker board is an awesome idea, but wondering if it would look better with all slots populated with breakers?
Wanna join the discussion? Please sign in to reply to this topic.

Great to see you're enjoying Pinside! Did you know Pinside is able to run without any 3rd-party banners or ads, thanks to the support from our visitors? Please consider a donation to Pinside and get anext to your username to show for it! Or better yet, subscribe to Pinside+!

This page was printed from https://pinside.com/pinball/forum/topic/tna-changing-artwork-and-cabinet/page/2?hl=jigz and we tried optimising it for printing. Some page elements may have been deliberately hidden.
Scan the QR code on the left to jump to the URL this document was printed from.
 Sint-niklaas
 Cave Creek, AZ
 Sydney