(Topic ID: 126588)

Things to look for on Pin*Bot

By Insane

8 years ago


Topic Heartbeat

Topic Stats

  • 142 posts
  • 9 Pinsiders participating
  • Latest reply 8 years ago by spfxted
  • Topic is favorited by 8 Pinsiders

You

Linked Games

Topic Gallery

View topic image gallery

cracking_sun_007.jpg
cracking_sun_004.jpg
cracking_sun_003.jpg
cracking_sun_002.jpg
cracking_sun_001.jpg
cracking_sun_008.jpg
circuit.jpg
Untitled.png
u49.jpg
planning-javascript-and-ajax-for-larger-teams-14-728.jpg
rules.gif
untitled.jpg
s11ssol1.gif
Untitled.jpg
629475772_6f18229db7_z-436x270.jpg
7402_tt.png
There are 142 posts in this topic. You are on page 3 of 3.
#101 8 years ago

makes sense.. Shouldn't i get 4.7k from sr20-8 to ground also though? with me not getting 4.7k even when checking pin 8 to pin 1 and getting 4.7k on the others to pin 1 couldn't this be part of the issue. Isn't sr20-1 the same as ground?

#102 8 years ago
Quoted from Insane:

makes sense.. Shouldn't i get 4.7k from sr20-8 to ground also though? with me not getting 4.7k even when checking pin 8 to pin 1 and getting 4.7k on the others to pin 1 couldn't this be part of the issue. Isn't sr20-1 the same as ground?

When not installed in a circuit sr20-1 to any of the other pins should be 4.7k ohms (you checked it when out of the circuit, correct?)

But, when a bussed resistor is installed in circuit as a pullup resistor, pin 1 is tied to Vcc, not ground. If there are any components that interfere with this measurement, such as some other low resistance to Vcc, then the measurement in circuit will not be accurate. This is why you have to lift one leg of a standard resistor *most of the time *. In this particular circuit, the component does measure it's rated resistance in a correctly working game. Since yours did not, some other component that is tied to Vcc is not right, and it's causing your measured pullup resistance to be incorrect.

#103 8 years ago

I put a new Sr20 in I don't remember if I checked it first. I will. Should I have any reading from Sr20-1 to ground, because I do' also since I don't have the correct reading from pin 8 - 1 like you said something in the circuit is giving it an easier path without going through the resistor. What components are there and I can start checking them. With the transistor being cracked in half when I started, I'm sure this whole circuit area could have other bad components.

#104 8 years ago
Quoted from Insane:

I put a new Sr20 in I don't remember if I checked it first. I will. Should I have any reading from Sr20-1 to ground, because I do' also since I don't have the correct reading from pin 8 - 1 like you said something in the circuit is giving it an easier path without going through the resistor. What components are there and I can start checking them. With the transistor being cracked in half when I started, I'm sure this whole circuit area could have other bad components.

Reading from SR20-1 to ground is measuring Vcc to ground. That's basically a useless measurement for what we are trying to accomplish. You would be measuring EVERY component on the entire MPU board attached to 5VDC and ground.

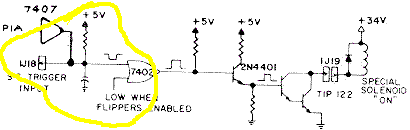
We know where the signal is fine - up to the U49 buffer. Then we have eliminated it's path downstream by removing U45. There's just a few components in this local area: the pullup resistor on SR20, the cap 71 to ground, and the output of U49 (we know it's input is good, I am trying to help you figure out why its output signal is not)

Since we have a bad measurement to Vcc on your pullup resistor, someone is conflicting with the pullup. It's not U45, as that is out of circuit. You had a pin not in the socket on the pullup, now if SR20 is installed correctly, and was measured fine before installing then you can eliminate that. Cap 71 to ground doesn't figure into the equation since it is connected to ground and you are measuring from the circuit to Vcc (unless it was somehow magically shorted to Vcc) so forget about that one for now. All that would be left would be U49 (failed output, shorted internally)

That's what I am interpreting from the previous posts.

#106 8 years ago

Make sure you are using the correct type TTL logic. I had the wrong type TTL logic installed when I was debugging a sys11 MPU a couple years back that presented itself in a similar way. Crazy interaction between U49 & U56 that was all due to using a low-power LS version of a 74xx series logic IC. Just throwing some random ideas out there.

#107 8 years ago

Just wanted to say thanks for helping with this.
OP is a good guy trying to fix this game for someone else.
I know he appreciates the help and is trying to get things done right.
Hopefully this info helps others in the future as well.

#108 8 years ago
Quoted from RCA1:

Just wanted to say thanks for helping with this.
OP is a good guy trying to fix this game for someone else.
I know he appreciates the help and is trying to get things done right.
Hopefully this info helps others in the future as well.

Lol...I knew the emoticon would get interpreted as my frustration. Really it is not, I accidentally hit some keys wrong and duplicated my post, so I just threw that on there as an edit. I'm still here to help...if I can.

#109 8 years ago

Trust me i completely understand, i want to do the same thing..Head, meet wall.... Every time i think hey this is wrong, this has to be the problem, it turns out not to be. I will pull SR20 tomorrow, also verify what chips i have installed. I know the new U45 is SN74F02N. All the other components i was checking was because i had the board in my panavice right in front of me and nothing to do at that time, so i was trying to find something that didnt measure correctly in that pop circuit. Which i did find, but they aren't in this particular area of the circuit. I really appreciate all the help. And thanks for the kind words Rob..

#110 8 years ago

U49 is SN7407J... i'll check the other items at lunch..

#111 8 years ago

Out of Circuit SR20 pin 1 to all is 4.7K. Also when i said i had a leg out of the hole, it was pin 1 of U45 not SR20.
Also since ZR4 is inline between u45-12 and SR20-8 couldn't it be a problem? It measured different than ZR3 and ZR6 which should be an identical circuit.
i also have more SN7404J chips, i bought extra...

#112 8 years ago

Also when we were checking U49-8 and U49-9 they weren't the same signal on the logic probe. 9 was high, pulse low, 8 was low all the time. Is there anyway to check that chip out of circuit to see if it is bad?

#113 8 years ago
Quoted from Insane:

should i have continuity between U49-9 and U45-12 without U45 or SR20 installed?

No. Pin 9 is the input side of the IC U49. You should have continuity from pin 8 of U49 to U45-12 regardless iff U45 or SR20 is installed

#114 8 years ago
Quoted from wayout440:

No. Pin 9 is the input side of the IC U49. You should have continuity from pin 8 of U49 to U45-12 regardless iff U45 or SR20 is installed

yeah, i corrected myself, you must have seen the post before i edited it. i do have between U49-8 and U45-12.

#115 8 years ago

ok, what is it we need to try next...

#116 8 years ago
Quoted from Insane:

Also when we were checking U49-8 and U49-9 they weren't the same signal on the logic probe. 9 was high, pulse low, 8 was low all the time. Is there anyway to check that chip out of circuit to see if it is bad?

Right. This is where we stand. Signal good up to U49 in, but stuck low. Can't go further downstream because U45 removed. Intersection includes pullup resistor, but poor pullup resistance reading. Verified pullup resistor.

You can't really check out of circuit except for putting on a breadboard, wiring it up and sending a signal in, then examining it's output to see if the IC works elsewhere than the game. kind of a lot of work if you don't have all this setup.

One thing to note, with the IC removed, measure your pullup resistance now. If this chip was bad, your pullup resistance should measure correct now. If it still doesn't, then you still have a problem elsewhere.

#117 8 years ago

check sr20 with u45 or u49 removed?

#118 8 years ago

Yes, with both removed

#119 8 years ago

ok, will put sr20 back in and pull both u45 and 49 and post results. probably tomorrow.

#120 8 years ago

ok, SR20 back in, U45 and 49 both pulled. sr20-1 to -8 700ohm, sr20-8 to Vcc 700 ohm. all other sr20 1 - measure 4.7k except 3 which measures 2.51. so out of curiosity i pulled one leg of ZR4, now i have 4.7k to pin 1 and to Vcc. so bad ZR4?

#121 8 years ago

put u45 back in and measured again, 4.7K sr20-8 to Vcc, then put in U49, same measurement.

#122 8 years ago
Quoted from Insane:

ok, SR20 back in, U45 and 49 both pulled. sr20-1 to -8 700ohm, sr20-8 to Vcc 700 ohm. all other sr20 1 - measure 4.7k except 3 which measures 2.51. so out of curiosity i pulled one leg of ZR4, now i have 4.7k to pin 1 and to Vcc. so bad ZR4?

Sure looks that way. I'd just swap it, but you can also try a basic resistance check of the diode. Positive probe on the anode of the diode and the negative probe on the cathode of the diode. You should read a moderately low resistance, maybe a few hundred thousands of ohms. For example, you may read around 450KΩ. Then swap the probes around and you should read a very high resistance, 1Meg ohms or more, possibly OL.

#123 8 years ago

i get 598 ohms and 657 respectively. testing the others ZR7 and 8 in circuit, i get 4.8K each direction. for knowledge, how do i know the anode from the cathode?

#124 8 years ago

Those were on an auto ranging meter, on mine set on 20 k i get 650 ohms, both ways. do you know the value or pn on the zener. Its #121 on the parts list, hand written on both my hard copy and the online copy i found it says 6.2v .5w. Is it this? https://www.greatplainselectronics.com/proddetail.asp?prod=1N5234B

#125 8 years ago
Quoted from Insane:

i get 598 ohms and 657 respectively. testing the others ZR7 and 8 in circuit, i get 4.8K each direction. for knowledge, how do i know the anode from the cathode?

Cathode is the side with a stripe.

Quoted from Insane:

Those were on an auto ranging meter, on mine set on 20 k i get 650 ohms, both ways. do you know the value or pn on the zener. Its #121 on the parts list, hand written on both my hard copy and the online copy i found it says 6.2v .5w. Is it this? https://www.greatplainselectronics.com/proddetail.asp?prod=1N5234B

That would be the correct part

#127 8 years ago

ok, now to see if anyone local has one, or if i need to put together another order. Thanks again for your help, will advise when i get one in and installed.

#128 8 years ago

Saw that, its really nice, but my friend doesn't want to spend that much. And really the playfield in this is in pretty good shape.

#129 8 years ago

I figured. I was really just making a joke. But if he wants. I do have another Pinbot playfield. New repo one, that I did a crackling technique to the sun insert to give it more of a smoldering effect. Turned out pretty good. But i'd let that one go for $500 if he's intersted. It also has the multilayers of professional clearcoat as well.

#130 8 years ago

Do you have a picture of the crackling sun. You have triggered my interest.

#132 8 years ago
Quoted from Out-West:

Do you have a picture of the crackling sun. You have triggered my interest.

Here's pics of that cracking sun insert. I used a special technique on the insert to do the cracking effect. It's not in the clearcoat. Turned out ok, but the clearcoat made a lot of the effect disappear once it hit the cracking stuff. I was trying to get rid of the transparent effect to hide the insert jeweling. Which is did but only partially. When backlit it gives off a sparkly look, kinda like glitter. It was a test sample technique I wanted to try. Rest of the playfield is perfect and original. With 4 extra layers of clearcoat (2 sanded off during leveling) and no warp in the field. Whoever wants it, can have it for $500 + shipping (free to pickuP) If you are interested.

cracking_sun_008.jpgcracking_sun_008.jpg

cracking_sun_001.jpgcracking_sun_001.jpg

cracking_sun_002.jpgcracking_sun_002.jpg

cracking_sun_003.jpgcracking_sun_003.jpg

cracking_sun_004.jpgcracking_sun_004.jpg

cracking_sun_007.jpgcracking_sun_007.jpg

#133 8 years ago

that looks really sharp.

#134 8 years ago

I am supposed to get my order in on Saturday, so hopefully will post next results this weekend.

#135 8 years ago

got the zeners in and installed. SR20-8 to Vcc 4.7K with both chips installed U45 and U49. Whats next?

#136 8 years ago
Quoted from Insane:

got the zeners in and installed. SR20-8 to Vcc 4.7K with both chips installed U45 and U49. Whats next?

I'd give it a whirl - without the output connector installed - and check for the proper pulses through the chain.

#137 8 years ago

ok, U38-39, U49-9, U49-8 and U45-12 all high, pulse low. Next?

#138 8 years ago

U45-13 is low and the low light flashes off when it hits the lower jet bumper in coil test. I don't see the high light flash, and can't tell if I hear the high pitch. But it definitely does something in coil test.
1J18 and 9 both still disconnected.

#139 8 years ago
Quoted from Insane:

ok, U38-39, U49-9, U49-8 and U45-12 all high, pulse low. Next?

good, that looks correct

Quoted from Insane:

U45-13 is low and the low light flashes off when it hits the lower jet bumper in coil test. I don't see the high light flash, and can't tell if I hear the high pitch. But it definitely does something in coil test.
1J18 and 9 both still disconnected.

Good, supposed to be low and pulse high at the coil trigger. Maybe just too fast for your meter. I'd hook up the connectors now.

#140 8 years ago

SUCCESS!!! 1J18 and 9 connected, new fuse installed. Coil test, lower jet bumper fires....Thanks for all your help on this issue, seems like this is one for the repair log. I know there are a couple of other issue, I think one of the snubber boards isn't working, will post when I get that far, now I can pull the pops off the pf and finish cleaning and trying to get rid of a couple of mylar bubbles. Also have to replace almost all of the target rivets with screws, they have all pulled out of the brackets. #5 machine screws anyone..

#141 8 years ago

Woo Hooo!!
Nice work!
Way to go Shane, this is awesome. Like I said, I admire your persistence.
Thanks to everyone who helped with info and advice, Wayout in particular.
You guys are awesome!

Promoted items from Pinside Marketplace and Pinside Shops!
$ 35.99
Eproms
Matt's Basement Arcade
 
From: $ 17.00
Lighting - Backbox
Twisted Tokens
 
2,800
Machine - For Sale
West Chester, PA
$ 12.50
Lighting - Led
RoyGBev Pinball
 
4,800 (Firm)
Machine - For Sale
Kingston, OK
$ 18.00
Electronics
Yorktown Arcade Supply
 
$ 54.99
Cabinet - Shooter Rods
Lighted Pinball Mods
 
From: $ 8.99
Cabinet - Other
NO GOUGE PINBALL™
 
3,152 (OBO)
Machine - For Sale
Pulaski, PA
$ 95.00
Cabinet - Sound/Speakers
Pinball Mod Co.
 
$ 175.00
Lighting - Interactive
Professor Pinball
 
$ 36.95
Eproms
Pinballrom
 
$ 39.99
Eproms
Matt's Basement Arcade
 
$ 29.95
Playfield - Toys/Add-ons
PinBoss Mods
 
3,750 (Firm)
Machine - For Sale
Clovis, CA
$ 2.50
Lighting - Led
Pinballrom
 
$ 69.00
Gameroom - Decorations
Pinball Pimp
 
From: $ 1.25
Playfield - Other
Rocket City Pinball
 
$ 18.95
Eproms
Pinballrom
 
There are 142 posts in this topic. You are on page 3 of 3.

Reply

Wanna join the discussion? Please sign in to reply to this topic.

Hey there! Welcome to Pinside!

Donate to Pinside

Great to see you're enjoying Pinside! Did you know Pinside is able to run without any 3rd-party banners or ads, thanks to the support from our visitors? Please consider a donation to Pinside and get anext to your username to show for it! Or better yet, subscribe to Pinside+!


This page was printed from https://pinside.com/pinball/forum/topic/things-to-look-for-on-pinbot/page/3 and we tried optimising it for printing. Some page elements may have been deliberately hidden.

Scan the QR code on the left to jump to the URL this document was printed from.