 Fort Worth, TX
Looking forward to see all of these installs. Looks like mine is a day or two away still.
(Topic ID: 279236)
 Jurassic Park (Limited Edition)
Stern, 2019
Jurassic Park (Premium)
Stern, 2019
Jurassic Park (Pro)
Stern, 2019
Jurassic Park (Limited Edition)
Stern, 2019
Jurassic Park (Premium)
Stern, 2019
Jurassic Park (Pro)
Stern, 2019its looks like a rain of T-REX'S happening in USA right now lol. over 40 just delivered today!
Guys feel free to call me in Instagram and Facebook in video if you need any help with the installation!
me and my team will be very happy to guide you and help you by video chat ![]()
Thanks for the photos keep them coming!
and ENJOY!!!!
So my install was going very smoothly until it came time to put on the new lower jaw on. It seems my unit wouldn't allow the screws to sit deep enough in the countersinked hole. this prevented them from screwing into the metal jaw plate.
I fixed this by using a drill bit to carefully remove away of the plastic hole thickness. Be very careful as taking away too much will cause the screw from falling through to the other side. I used a 3/16 bit and turned it by hand. Dont use a drill! only one turn at a time.
Also, the button screw (single closest to the tongue) doesn't need to stick out as far as the left and right holes. If you screw the bottom hole in too much, it will poke through the other side and put a hole in the tongue sticker.
Also, My JP was made late last year and I have 3/4" spacer between plastic and metal plate. I didnt need to put shorter ones in like what it said in the video.
Dont panic if yours are 3/4". If your machine wasnt made in the first 6-12 months, you may be fine with them.
IMG_4779 (resized).JPGIMG_4780 (resized).JPGIMG_4783 (resized).JPGIMG_4778 (resized).JPGIMG_4782 (resized).JPGIMG_4784 (resized).JPGIMG_4781 (resized).JPG
Quoted from bent98:So my install was going very smoothly until it came time to put on the new lower jaw on. It seems my unit wouldn't allow the screws to sit deep enough in the countersinked hole. this prevented them from screwing into the metal jaw plate.
I fixed this by using a drill bit to carefully remove away of the plastic hole thickness. Be very careful as taking away too much will cause the screw from falling through to the other side. I used a 3/16 bit and turned it by handle. Dont use a drill! only one turn at a time.
Also, the button screw (single closest to the tongue) doesn't need to stick out as far as the left and right holes. If you screw the bottom hole in too much, it will poke through the other side and put a hole in the tongue sticker.
Also, My JP was made late last year and I have 3/4" spacer between plastic and metal plate. I didnt need to put shorter ones in like what it said in the video.
Dont panic if yours are 3/4". If your machine wasnt made in the first 6-12 months, you may be fine with them.[quoted image][quoted image][quoted image][quoted image][quoted image][quoted image][quoted image]
Wow Thanks for the tip and the help. really appreciate that!
im cleaning the screw holes by myself before shipping but yes but we can miss some because it all made by hand.
your tip is great and the right thing to do. i recommend to do it with smaller drill head.
i still recommend to check the spacers also if your game is late built
Thank you again and enjoy ![]()
And she is finally installed!
Unfortunately, I had the 3/4" spacers. My hardware store didn't have 5/8" so I bought a 3/8" and two 1/8" to make it work. Had to make a second trip back to the hardware store as one of my E-Clips (securing the jaw) flew off in some direction as I applied some pressure to pull it off. I have no idea where it landed, probably embedded in the carpet somewhere only to be found by the vacuum cleaner at some point. I hate E-Clips! Oh well, I got it all fixed up. Seems to be testing okay so far.
The JJPOTC HMS Endeavor Ship mod was/is one of the best mods ever produced....until this. Lior is the king of all pinball mods.
Quoted from evh347:And she is finally installed!
Unfortunately, I had the 3/4" spacers. My hardware store didn't have 5/8" so I bought a 3/8" and two 1/8" to make it work. Had to make a second trip back to the hardware store as one of my C-Clips (securing the jaw) flew off in some direction as I applied some pressure to pull it off. I have no idea where it landed, probably embedded in the carpet somewhere only to be found by the vacuum cleaner at some point. I hate C-Clips! Oh well, I got it all fixed up. Seems to be testing okay so far.
The JJPOTC HMS Endeavor Ship mod was/is one of the best mods ever produced....until this. Lior is the king of all pinball mods.
[quoted image]
She looks ferocious!
Quoted from evh347:And she is finally installed!
Unfortunately, I had the 3/4" spacers. My hardware store didn't have 5/8" so I bought a 3/8" and two 1/8" to make it work. Had to make a second trip back to the hardware store as one of my C-Clips (securing the jaw) flew off in some direction as I applied some pressure to pull it off. I have no idea where it landed, probably embedded in the carpet somewhere only to be found by the vacuum cleaner at some point. I hate C-Clips! Oh well, I got it all fixed up. Seems to be testing okay so far.
The JJPOTC HMS Endeavor Ship mod was/is one of the best mods ever produced....until this. Lior is the king of all pinball mods.
[quoted image]
Thank you very much! i also hate E clips LOL
i totally agree with you its really a huge upgrade the game!
HMS was good creation but to be honest im not a fan of getting the HMS under my name because most of the parts was made by 3d printer but after the HMS ALL of my creations was made by hand only!
Enjoy ![]()
Quoted from bent98:Also, My JP was made late last year and I have 3/4" spacer between plastic and metal plate. I didnt need to put shorter ones in like what it said in the video.
Dont panic if yours are 3/4". If your machine wasnt made in the first 6-12 months, you may be fine with them.
Correct, please don't panic! To reiterate, me putting that spacers length precaution into the video was not intended for anyone to go worrying and measuring them in advance. It's something to address only if you have issues post install (described in the video). Most people will likely not have this issue. I happened to on my machine and shorter 5/8" spacers was the fix/workaround for me. I put the caution into the video because it took me a while to figure out root cause and I wanted to make sure no one else had the same problem.
Quoted from liorillusion:Wow Thanks for the tip and the help. really appreciate that!
im cleaning the screw holes by myself before shipping but yes but we can miss some because it all made by hand.
your tip is great and the right thing to do. i recommend to do it with smaller drill head.
i still recommend to check the spacers also if your game is late built
Thank you again and enjoy
Toda
These look terrific! I am ready to place an order for a T-Rex and the signs, however, I will be moving in three weeks. Is it safe to assume that I can use my new address and both will not arrive until after July 12? Just want to make sure.
Quoted from TheBeefSupreme:These look terrific! I am ready to place an order for a T-Rex and the signs, however, I will be moving in three weeks. Is it safe to assume that I can use my new address and both will not arrive until after July 12? Just want to make sure.
Thank you ![]()
yes. new orders can be done only here
https://littleshopofgames.com/product-category/the-art-of-pinball/
and it will be shipped only in August - September
signs are very limited quantity. we are not casting more so make sure to order them ASAP!
Quoted from liorillusion:Thank you
yes. new orders can be done only here
https://littleshopofgames.com/product-category/the-art-of-pinball/
and it will be shipped only in August - September
signs are very limited quantity. we are not casting more so make sure to order them ASAP!
Perfect, just placed my order for both!
Quoted from evh347:The JJPOTC HMS Endeavor Ship mod was/is one of the best mods ever produced....until this. Lior is the king of all pinball mods.
Wait a minute... Does Lior's T-Rex head mod's "king" status now make my JP mod (which I can't talk about ![]() ) "prince" now? Or do I still retain my crown in JP mod land and Lior's is now "queen" (since all of the dinosaurs in Jurassic Park are female)?
) "prince" now? Or do I still retain my crown in JP mod land and Lior's is now "queen" (since all of the dinosaurs in Jurassic Park are female)? ![]()
![]() Joking of course. Lior's T-Rex is a feat of engineering and design with an unmatched attention to detail. I couldn't help but throw a little lighthearted reply into this thread.
Joking of course. Lior's T-Rex is a feat of engineering and design with an unmatched attention to detail. I couldn't help but throw a little lighthearted reply into this thread. ![]()
Quoted from timlah79:Wait a minute... Does Lior's T-Rex head mod's "king" status now make my JP mod (which I can't talk about ) "prince" now? Or do I still retain my crown in JP mod land and Lior's is now "queen" (since all of the dinosaurs in Jurassic Park are female)? Joking of course. Lior's T-Rex is a feat of engineering and design with an unmatched attention to detail. I couldn't help but throw a little lighthearted reply into this thread.
LOL, your mod is F ing awesome too. Honestly timlah79 i think would’ve sold my JPLE long ago if not for your mod. It totally puts the game on another level. I know you didn’t want me to, but I still voted you for a TWIPY. The game is now one of our favorites.
I really appreciated the T-Rex install video. I was thinking at one point, how did he get such good shots of the stuff I practically had to be a contortionist to get to? I put several games on it tonight and have had no issues to report. Very wise to include it and grant access like you both did. I’m grateful for the coordination. That was my first time taking the T-Rex apart, the video was super helpful. I’d say it took me an hour if you subtract the trips to the hardware store and the usual distractions I endured from the time I opened the box.
Now, if I could just get past at least the first three paddocks more consistently…geez, this game is brutal. ![]()
Quoted from Otto110:Received mine yesterday and I’m completely blown away. The entire package is just first class and over the top. The sculpt and paint is perfect.
Thank you Lior. Unbelievable
[quoted image][quoted image][quoted image][quoted image][quoted image]
Wow, looks incredible..
Awesome package and extras!
Put mine in yesterday, I didn't watch the video but the install only took about 40 mins, probably 10 of which was trying to get the holes in the lower jaw to line up..
It wasn't a hard install at all.
I did have to print some smaller spacers for the plastic behind it.
It looks f'n awesome!!
Beautiful work Lior!
Only concern is how much the new rex makes contact with the left fence post.
Is that covered in the video?
It doesn't look like there is much you can do about it.
Quoted from J-Freeze:Awesome package and extras!
Put mine in yesterday, I didn't watch the video but the install only took about 40 mins, probably 10 of which was trying to get the holes in the lower jaw to line up..
It wasn't a hard install at all.
I did have to print some smaller spacers for the plastic behind it.
It looks f'n awesome!!
Beautiful work Lior!
Only concern is how much the new rex makes contact with the left fence post.
Is that covered in the video?
It doesn't look like there is much you can do about it.
I recommend everyone to ignore your post!
DO NOT TRY TO INSTALL IT WITHOUT WATCHING THE VIDEO!!!!
there is many steps that you MUST do in specific order and also there is few things you need to change and replace. I recommend you to take out all of what you did and install it with the video! Not need to line the screws if you was watching the video... we didn't made the video for fun....
Again DO NOT TRY TO INSTALL IT WITHOUT WATCHING THE VIDEO! THERE IS MANY THINGS THAT YOU CAN'T FIGURE WITHOUT THE VIDEO!!!!
Quoted from liorillusion:I recommend everyone to ignore your post!
DO NOT TRY TO INSTALL IT WITHOUT WATCHING THE VIDEO!!!!
there is many steps that you MUST do in specific order and also there is few things you need to change and replace. I recommend you to take out all of what you did and install it with the video! Not need to line the screws if you was watching the video... we didn't made the video for fun....
Again DO NOT TRY TO INSTALL IT WITHOUT WATCHING THE VIDEO! THERE IS MANY THINGS THAT YOU CAN'T FIGURE WITHOUT THE VIDEO!!!!
Sorry not recommending anyone skips the video, I'll give it a watch later.
Received notice that mine in on the truck for delivery tonight. I plan on watching the video first, but when the time comes for install I'm wearing a blindfold and turning out the lights. ![]()
DHL here waited til mid-morning to let me know I had to pay fees. Paid them but delivery will only happen tomorrow now. ![]()
Quoted from Mr_Tantrum:Received notice that mine in on the truck for delivery tonight. I plan on watching the video first, but when the time comes for install I'm wearing a blindfold and turning out the lights.
Know your weapon!
Quoted from Jayzerblade:Mine made it to Boston yesterday which is 3 1/2hrs from me but now says it’s “on hold” whatever that means.
Mine show delivered .... but last tracking shows Phoenix....and needs to be in NM.... not home... someone going to check...
Quoted from liorillusion:I recommend everyone to ignore your post!
DO NOT TRY TO INSTALL IT WITHOUT WATCHING THE VIDEO!!!!
there is many steps that you MUST do in specific order and also there is few things you need to change and replace. I recommend you to take out all of what you did and install it with the video! Not need to line the screws if you was watching the video... we didn't made the video for fun....
Again DO NOT TRY TO INSTALL IT WITHOUT WATCHING THE VIDEO! THERE IS MANY THINGS THAT YOU CAN'T FIGURE WITHOUT THE VIDEO!!!!
Ok I watched the video (kudos to Tim, it is a nice straight forward install video, very well done), he didn't do anything that I didn't do.
Again, I AM NOT RECOMMENDING THAT ANYONE SKIPS THE VIDEO but I definitely did not install it wrong, I'm pretty adept when it comes to servicing my machines.
The problem with the lower jaw was not anything I did wrong it was that the rear holes were off by a mm or two so I had to get the rear screws started but loose first and then fully seat the jaw and install the front screw, then tighten the rear 2.
There was no way that I would've been able to seat the jaw and then put all 3 screws in, the holes just simply did not line up.
Quoted from JMCFAN:Mine is in Phoenix....
Mine shows deliverd....no package email into DHL.....crap
Quoted from J-Freeze:The problem with the lower jaw was not anything I did wrong it was that the rear holes were off by a mm or two so I had to get the rear screws started but loose first and then fully seat the jaw and install the front screw, then tighten the rear 2.
There was no way that I would've been able to seat the jaw and then put all 3 screws in, the holes just simply did not line up.
That's interesting, I didn't have any issues with the jaw hole alignment but I think you're the 2nd person who has. My only issue is that when I first slid the jaw on and went to find the screw holes, I realized I didn't actually have the mold and metal jaw "settled" correctly. I hadn't pressed the metal flat against the mold and I hadn't slid the mold down far enough either (my own user error). I imagine you assured you had, but it is important (like I mention in the video) for the jaw inner mold cutout and metal jaw to be "flush" with one another. The mold should have the perfect sized "cutout" to where it feels obvious once you have it in correctly, feels like it "fits like a glove" per se. The way even the stock jaw attaches is simply not a great design IMO. Given that all you're working with are super tiny screws and just plain ol' holes in the jaw metal leaves lots of room for error. Just be careful and use your fingers as feelers on both sides to ensure everything is in position. Then yes probably a good idea to not make any given screw too tight at first. Only once everything feels aligned then should you do the final tightening of all 3, but NOT TOO TIGHT. It's a plastic vs. metal war down there no matter how you look at it. Just be careful to only screw in as far as needed, not so much that you start lifting the tongue sticker on the metal above either. Use your god given feelers!
Quoted from timlah79:That's interesting, I didn't have any issues with the jaw hole alignment but I think you're the 2nd person who has. My only issue is that when I first slid the jaw one and went to find the screw holes I realized I didn't actually have the mold and metal jaw "settled" correctly. I hadn't pressed the metal flat against the mold and I hadn't slid the mold down far enough either I imagine you assured you had, but it is important (like mention in the video) for the jaw inner mold cutout and metal jaw to be "flush" with one another. The mold should have the perfect sized "cutout" to where it feels obvious once you have it in correctly, feels like it "fits like a glove" per se. The way even the stock jaw attaches is simply not a great design IMO. Given that all you're working with are super tiny screws and just plain ol' holes in the jaw metal leaves lots of room for error. Just be careful at this near final step is all I can really say.
Yeah, I seated and re-seated it multiple times to make sure. The front of the jaw plate was as tight as it can get to the lip of the mold.
I checked and double checked but there was no way that all 3 holes could align at the same time, it was either the two rear at once or just the one front.
They weren't off by much but it was just enough that with the holes as deep set as they are there wasn't enough wiggle room to get the screws started.
It just took a little finessing to get it to go.
Its on and tested, it works as it should.
Belthazar is gobbling up pinballs properly.
This rex is dope.
Quoted from J-Freeze:Ok I watched the video (kudos to Tim, it is a nice straight forward install video, very well done), he didn't do anything that I didn't do.
Again, I AM NOT RECOMMENDING THAT ANYONE SKIPS THE VIDEO but I definitely did not install it wrong, I'm pretty adept when it comes to servicing my machines.
The problem with the lower jaw was not anything I did wrong it was that the rear holes were off by a mm or two so I had to get the rear screws started but loose first and then fully seat the jaw and install the front screw, then tighten the rear 2.
There was no way that I would've been able to seat the jaw and then put all 3 screws in, the holes just simply did not line up.
I had the same experience with my lower jaw. The holes were off just a little. It took a few attempts but I was able to install it the same way you did. I put the rear 2 in loosely and then screwed in the front one before tightening them all down.
Quoted from J-Freeze:Belthazar is gobbling up pinballs properly.
Quoted from Mr_Tantrum:Now I'm off to release Sarx into her habitat.
Loving people calling out names for her! My girlfriend named my stock one Elma. Bertha is on the menu for the new one but that's still a decision in the making. I suppose Sue is an obvious choice (watch your dino documentaries, people!) but your guys' names are far more clever.
Quoted from timlah79:Loving people calling out names for her! My girlfriend named my stock one Elma. Bertha is on the menu for the new one but that's still a decision in the making. I suppose Sue is an obvious choice (watch your dino documentaries, people!) but your guys' names are far more clever.
Yeah Sue was too obvious for me, can't name them all Sue!
Thought I would offer a note about the spacers. I completed the installation and everything seemed great when I manually tested side-to-side movement, so I left the original white spacers in (mine are the longer version). Turned the pin on, and then heard gears grinding. Wasn't sure why since T-Rex had clearance in my manual testing then I realized it was when the head would raise and then swing side to side that it was hitting the plastic. I had some shorter black spacers in my stash, so I installed those, retested, and everything worked perfectly with plenty of clearance in all positions now.
IMG_6203 (resized).JPG
IMG_6204 (resized).JPG
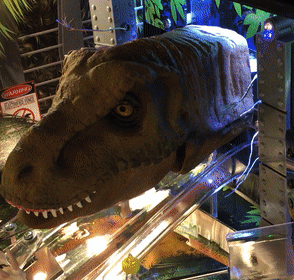
Next, I thought I would show a comparison of Lior's T-Rex directly next to Stern's T-Rex. There is so much more depth, texture, and detail on Lior's version. I also like that it has more of a brown tint than green.
IMG_6190 (resized).JPG
IMG_6192 (resized).JPG
IMG_6193 (resized).JPG
IMG_6194 (resized).JPG
IMG_6195 (resized).JPG
My install went well with zero glitches along the way other than having to change out the spacers. Kudo's to timlah79 for an excellent instructional video with easy to follow directions, great camera work, and overall nice production (not to mention I really appreciated the manicured finger nails).
She looks absolutely amazing! Thank you, Lior for your beautiful work! I was even able to install and fully operate without having to relocate or remove my trees and goat as there is plenty of clearance all the way around.
It's a jungle out there . . .
IMG_6197.JPG
IMG_6206.JPG
IMG_6205.JPG
Quoted from delt31:Received mine as well. Haven’t had time to install but as a buyer of multiple lior mods, this is his best work to date. The detail on the trex is incredible. For me, this beats the hms mod easily. Good job
Watch the video ahead of time then give yourself about 30 minutes for the install and you’ll be golden.
Quoted from Mr_Tantrum:Thought I would offer a note about the spacers. I completed the installation and everything seemed great when I manually tested side-to-side movement, so I left the original white spacers in (mine are the longer version). Turned the pin on, and then heard gears grinding. Wasn't sure why since T-Rex had clearance in my manual testing then I realized it was when the head would raise and then swing side to side that it was hitting the plastic. I had some shorter black spacers in my stash, so I installed those, retested, and everything worked perfectly with plenty of clearance in all positions now.
Sorry we figured hardly anyone else would have this issue therefore one of the last steps in the video just quickly says to go into the test modes. If you have the "grinding" problem" it will be immediately noticed upon t-rex MB start when her head "thrashes". It is not easily tested from just the HORIZONTAL +/- test alone. You need to:
1. Go into VERTICAL test
2. Raise the T-Rex as high as it can be with the '+' button
3. Switch to HORIZONTAL test (and allow the t-rex to find horizontal home again while her head is raised)
4. Hit the SELECT button (the far right button that makes her thrash side to side, NOT the +/- which simply moves her to her general L/R positions)
5. Watch and listen as she thrashes back and forth
If the stepper motor freaks out/grinds and/or she gets stuck to the L/R position, that is the indication that you may need to adjust those spacers. If anyone has ever replaced post rubbers with anything else, you should still have the stock ones. Those just so happen to be 5/8" so you can use those to replace the 3/4" ones. Note that the LEFT and RIGHT BIAS settings DO NOTHING when it comes to this "thrashing" motion, so don't go messing with those settings to try to work around/fix the issue. Please keep those at factory 0.
Received my Trex yesterday, damn that’s fast.
Of course I got nailed with taxes and fees.
Well worth it though.
Too bad my JPLE is on location.
This mod won’t be going in until I take it back home.
Great detail Lior, love your work.
Thank you very much guys for the feedback's and the photos.
Thank you Tim for the great responds and support when im sleeping lol
the signs are sold out and we will not make more. the only option tog et them is to buy it direct from Freddy's pinball paradise.
trust me guys these signs are awesome and will upgrade your game A LOT!!!!
The T-REX is almost sold out in USA. distributors will get it in August - September. we barley have stock for USA
keep them coming!!!!
Quoted from JMCFAN:Mine shows deliverd....no package email into DHL.....crap
As I suspected Package was transferred to USPS in Phoenix and is at the post office in NM whewwww
Quoted from timlah79:Sorry we figured hardly anyone else would have this issue therefore one of the last steps in the video just quickly says to go into the test modes.
No apologies necessary. The video clearly outlined the possibility, and I watched it in full before attempting the install. I didn't want to change the spacers out if I didn't have to which I why I completed the install and tested everything before swapping them.
Wanna join the discussion? Please sign in to reply to this topic.

Great to see you're enjoying Pinside! Did you know Pinside is able to run without any 3rd-party banners or ads, thanks to the support from our visitors? Please consider a donation to Pinside and get anext to your username to show for it! Or better yet, subscribe to Pinside+!

This page was printed from https://pinside.com/pinball/forum/topic/stern-jurassic-park-sculpted-mods-by-the-art-of-pinball/page/8?hl=jayzerblade and we tried optimising it for printing. Some page elements may have been deliberately hidden.
Scan the QR code on the left to jump to the URL this document was printed from.
 Duisburg
 Calgary, AB