(Topic ID: 58120)

Space Station Club... Members Only!

By mof

10 years ago


Topic Heartbeat

Topic Stats

  • 4,188 posts
  • 286 Pinsiders participating
  • Latest reply 7 days ago by DanMarino
  • Topic is favorited by 126 Pinsiders

You

Linked Games

Topic Gallery

View topic image gallery

IMG_4462 (resized).jpeg
IMG_4469 (resized).jpeg
20240305_145604 (resized).jpg
20240305_145600 (resized).jpg
1941DBD2-1C48-4289-9E47-37008985DE16 (resized).jpeg
20240226_191654 (resized).jpg
20240226_191620 (resized).jpg
20240226_184934 (resized).jpg
20240226_184548 (resized).jpg
20240226_191733 (resized).jpg
20240226_191625 (resized).jpg
20240226_191654 (resized).jpg
20240226_191755 (resized).jpg
20240226_192004 (resized).jpg
20240226_191843 (resized).jpg
20240219_220145 (resized).jpg

You're currently viewing posts by Pinsider goingincirclez.
Click here to go back to viewing the entire thread.

#536 8 years ago

That astronaut holding the wire is AWESOME! Love the creativity there.

Now we just need one holding a pinball like the one under the ramp

(sorry, I'm not actually in the club... but I just missed out on one of these, and hope to correct that error sometime soon)

#539 8 years ago
Quoted from mof:

Now we just need something like inside-cabinet side decals with reflective sparkly dust for stars...

When I was working on mine, I found a Space Shuttle restore thread where someone painted the inside of the cabinet with metal flake blended in, and it looked absolutely incredible, really fit the theme. I attempted the same in my more limited means and was pleased, but it needs more gloss to be effective.

I just installed some metal-flake (er, glitter) poster board in the lightning panel on Whirlwind... I recall several colors were available; if dark blue or black was one that would be a cheap and easy mockup.

10 months later
#920 8 years ago

Well this game was on my short list of "must plays" for quite a while, and at Louisville Expo not just one, but TWO showed up this time! One was gorgeously restored but didn't have the correct plunger spring installed and so just getting a ball started was aggravating. The other was rougher, but played great even with some prone inserts, otherwise good bones there....

So I went to expo with one pin, and came back with its sibling...

ShuttleStation_(resized).jpgShuttleStation_(resized).jpg

Love love love this game. The "Condition Green" start sequence has got to be one of the coolest things I've seen in any game - talk about tension building. We're also calling it our "Boards of Canada pin" since the basic soundtrack is so ambient awesome as well.

In fact this is probably the most expensive single song I've ever bought...

I figure if I can get better at managing the lack of inlanes, I should become a better player overall as well

#923 8 years ago

So I'm cleaning up the new Station and just getting a feel for the long-term plans and needs. The ramp is shot but solutions are plenty. There's some minor through-the-paint wear near the pop bumpers (which also have some chips in the skirts) and one flasher dome is kinda melty looking. The worst problems are the lifting "Shuttle / Station" value inserts, and the mylar has some ugly blotches over the inserts where air bubbles have dried the adhesive and turned white... doesn't distract when lit but looks ugly.

Long term, I'm not sure how badly I want to remove the mylar, but OTOH to fix the pops, they have to be disassembled, and so....

...I think for now I'm just going to clean everything that's reasonably accessible, level the inserts as best I can, fix the ramp, and enjoy playing it until I get my Firepower project finished and out of the shop. Then I'll tear this one apart and work on some mods. There are some really great machines and ideas in this thread!

~~~~~~~~~~~~

Now some questions for you guys:

- Looks like I am missing the art plastic that covers the lower pop bumper. Does anyone have a spare?
- Are all the amber flasher domes riveted to your plastics? Mine are, and this surprises me. Seems like screws or even the twist-lock domes would have been easier.

- What bugs me the most about this machine, is the Space Station toy itself looks like a nondescript piece of bleached crap. I used to get better looking things out of cereal boxes. Now the light mods here are awesome. But would anybody be interested in a decal set to spiff it up a little? What would you like to see on it? I design and print custom decals for model railroads so this is something I should be able to do.

- Speaking of decals, the clear ramps that are available got me thinking about how Whirlwind uses decals beneath its own clear ramps... So maybe some clear decals to tie into that galaxy / vortex at the base of the ramp, and/or coordinate with the light mods, would be cool. Any interest there? What would you like to see?

Finally, at some point in its life, someone covered the coil under the ramp with a section of cigar box lid. Funniest op-mod I've ever seen! Any particular reason this might have been done? Surely the ball doesn't usually get caught under there, or was a factory part crudely replaced?

#928 8 years ago
Quoted from RCA1:

Both would be cool if the price is fairly cheap. I got no specific ideas though.

Cool; I've got a few ideas myself, just want to make sure I'm not missing something "obvious"

Quoted from RCA1:

There was a match box wrapped in electrical tape jammed under the ramp on mine to provide support to the semi-broken ramp. Maybe they were trying to support the ramp a bit?

Hmm, now that makes sense, though I'm not sure it makes enough contact to lend meaningful support. But it can't hurt at any rate; until I get a clear ramp I'll leave it as-is, since cigars remind me of my dearly late grampa...

Stagar.jpg_(resized).jpgStagar.jpg_(resized).jpg

Throwback question: when were swishers 2 for 15 cents? I want to say I've never seen them cheaper than maybe 5 for a dollar, but I don't smoke.

Oh, another question about the game: I feel I should know what that black slab/obelisk in the VUK lane behind the astronaut is referencing: Superman? 2001? Spock's casket? Something else? It seems sci-fi familiar but I can't place it for certain...

#930 8 years ago
Quoted from TecumsehPlissken:

I think it is in reference to Stanly Kubrick's "2001 A Space Odyssey"

That was my first thought, but it's been so long since I've seen the movie I thought I might be confusing it with something else. Regardless methinks I'm officially overdue for another viewing (I know Spock's casket was more rounded, but that almost works too...)

#938 8 years ago

It's amazing what a basic cleaning and "half-shop" can do!

The 'station I picked up ran non-stop for 3 days at Louisville Expo - with my family and friends and I accounted for a good number of plays - so I knew it was generally solid. All lamps, flashers and mechs work, no board hacks, good displays, etc. But man, was it dirty! And while I noticed some prone inserts at the show, I didn't realize just how bad they (green and orange arrows, mostly) were until I got it home. And when I saw the ramp I realized why it was so hard to climb!

So I cleaned the pf, including under ramps, trails, and pops... removed and cleaned the upper pf... repaired the ramp (basically rebuilt a whole new 2" right-side entry wall from epoxy)... leveled the inserts, especially those disrupting the ramp shot and prone all over the bonus grid...

...then rubbed the mylar down with Novus 3, then 2, then wax... reassembled the works...

...and as soon as I turned on the machine to play test, I proceeded to blow my best Expo game away. So did my wife. Ha!

Still a lot of work to do long term. The mylar is actually very rough so it will all have to come off at some point, and that just terrifies me. But at least the game is solid and enjoyable and shouldn't wear much worse until I have the time and space to do it right. Meanwhile I'm tempted to install some custom LEDs and rubber rings... it's such a pretty game

#939 8 years ago

Just a quick shout-out to EdisonArcade: BIG THANKS for the missing pop plastic. Looks great and makes another small step! Hopefully I can pay the favor forward someday

#944 8 years ago

Sharpies can be wiped off that polycrylic with alcohol, so I've been using some to rough in some general ideas using the texture already there, as well as implying additional details. I used colored sharpies that complement the game's general palette: metallic blue and green, a bit of purple, and of course silver and some "faded black".

It really is amazing how much better it looks, to me at least. But even my daughter remarked... she of course played a few games on it at Expo. But her first game after I test-painted the station, she said "Whoa! I had no idea that thing actually MOVES! That's awesome!"

It really is more noticeable during gameplay...

...I still have to refine my ideas further, though. I have an ALPS that actually can print decals in most of those colors, but it would probably be easiest (and more "realistic") in black-on-white.

20160315_181221_(resized).jpg20160315_181221_(resized).jpg

20160315_181204_(resized).jpg20160315_181204_(resized).jpg

20160315_181241_(resized).jpg20160315_181241_(resized).jpg

#953 8 years ago

I just payed an even $1K for one that ran with no issues for 3 days at a show. Hack-free original boards, No LEDs, playfield dirty but cleanable, nice cabinet with a little easy-touch-up wear (glass was awful but I had a better one to swap in). Previous owner already replaced the station motor. Ramp needed repairs (I did it myself for $10 worth of epoxy; I'll spring for a Freeplay40 ramp when I tear down the whole machine); PF cleaned great but I had to level about a dozen inserts and will have to replace the mylar as it has worn badly in spots, and the pops need some work to be perfect. Was also missing one pop plastic but they are out there.

At any rate, if I'm understanding the market of late, $1K for a turnkey System11 in solid playable and presentable shape is almost a no-brainer regardless of title and specific nitpicks. I think mine was well worth that price.

#955 8 years ago

That astronaut is awesome Platypus! Where did you get it? Great job on the station too... the originals really are just too plain. Where can we get one of yours?

#965 8 years ago

Can someone tell me what the gaps between the station diverter and right ramp should be? The gap from my ramp's "feed" portion to the diverter, is maybe 1/8 inch. But from the diverter to the exit/lock portion of the ramp, is nearly a full 1/2 inch. The ramp edge is smooth and round and does not appear that anything is broken there... could someone post a pic of theirs?

As it is, the ball tends to get hung up in the wider gap, so a full ramp shot with the diverter aligned for the right lock is almost impossible. But there does not appear to be any way to adjust the alignments of either the station or ramp since their mounts are pretty well fixed positions.

The only adjustment I can see is the height of the diverter. Right now it's perfectly level to both parts of the ramp. If I raised it a tad, gravity should help the ball "drop" to the exit and not get hung. But then the ball's entrance would be less smooth, and it striking and hopping over the raised edge as it enters would probably invite damage as well.

Or are my flippers maybe just a tad weak?

#968 8 years ago

Thank you Dennis! Funny thing is my gaps don't look too much different than yours at first glance... but my exit gap is not consistent and is wider toward the back of the game. Again, I don't see any way to adjust this. I think I have some similar rubber dots though, so maybe I'll give those a shot.

#969 8 years ago

Got some parts in today... flipper and pop rebuilds await me completing my Firepower Rescue Project, but for now I did some "quick and easy" mods.

"Quick" of course is in quotes because I got a new orange dome to replace the lone melty one... and had to disassemble the rear half of the game to get at it.

But since I had to order that one dome I ordered a few more. I personally found the orange lights behind the station to distracting and not visually cohesive with the aesthetic back there. And the red flashers are out of place if you realize that one of the few times they ever go off is during "condition GREEN"! So I replaced them with blue and green domes, respectively. They look awesome IMHO...

BGlitesoff_(resized).jpgBGlitesoff_(resized).jpg

...but for some reason the blue washes out more "white" when illuminated. Still looks more appropriately "spacey" to me like this.

BGliteson2_(resized).jpgBGliteson2_(resized).jpg

I'd previously put a Comet LED strip along the VUK lane below the station; the way it interacts with the green domes really makes them pop!

BGliteson_(resized).jpgBGliteson_(resized).jpg

At any rate, the only time orange domes grab your attention is when something important happens

Finally, I couldn't find any apron cards I liked, so I made my own. Not near as good as some of the incredible custom jobs around here, but I like 'em well enough.

StationCardsGIC_(resized).jpgStationCardsGIC_(resized).jpg

Oh and I raised the diverter body just a tad, and that seems to have solved my ball hang problem

1 week later
#1002 8 years ago

Nice one Hougie! I see you got bit at Expo too As long as the bones are good, I wouldn't worry about the cabinet too much. The Firepower I picked up last year was almost that bad, and now it looks great. Some basic woodworking can smooth things out and if you were going to restencil / redecal anyway given the left side, you don't even need to worry about preserving the good art - which might actually make things a little easier. It's a great game and worth the effort. That one I picked up is playing great, if you're ever back in the area look us up... I could use an excuse to earn cred to play that Centaur again

#1018 8 years ago
Quoted from tslayer71:

It doesn't register with the ball. Adjusting doesn't work - I'll replace the switch....

If there is a bit of side-to-side play in the wire actuator, that may be the problem. Sometimes the ball can deflect the actuator to the side, so that instead of fully depressing it beneath the ball's roll path, the actuator is only pushed by the "side" of the ball and therefore not all the way in.

This is why it works with your finger (because you push it directly in) but not the ball (because a ball deflection doesn't push it as far, but sometimes you still get a clean roll and it works)

You can alleviate this by bending the actuator a little bit - either the trigger above the path, or the tang below that engages the switch. You basically need to give it more length to increase the odds that a deflected roll will push the actuator all the way in to close the switch.

1 week later
#1046 8 years ago

Because there simply aren't enough space shuttles in this game, I added a couple more:

ShooterShuttle_(resized).jpgShooterShuttle_(resized).jpg

StationShuttle_(resized).jpgStationShuttle_(resized).jpg

I'm especially fond of the one "leaving the station" as it really does appear to be floating as it hides the end of the habitrail there.

#1048 8 years ago

Volk those rails look awesome! Please do show more... I might be inspired to copy this when the time comes

#1053 8 years ago
Quoted from Budman:

Space Station or Space Shuttle...... Convince me that Station is the better choice.
Kris

"Better" is subjective, so what do you consider "better"?

Gameplay on both can be fast, with simple objectives yet unforgiving aspects.

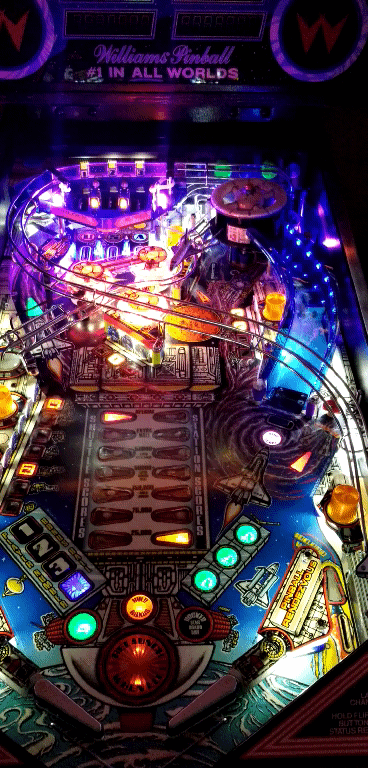
Station is the official sequel to Shuttle. It borrows concepts like the a 3-drop target bank strafing a lane, "stop & score" ramp guarded by a single drop, and prominent bonus scoring grid. But Station's are more difficult than Shuttle's.

Station has an amazing amount of features / mechs / tech packed into it, and is intricate to look at. Shuttle is almost elegant in its simplicity. Station is System 11b so parts/service are easy to come by. Shuttle is System9 which is rarer and perhaps a bit more fragile.

Station has objectively superior sound, music, and vocals, as well as animated alpha displays and incredible light shows. Shuttle's sound palette works but its sound/display profile is more similar to early 80's games like Firepower.

Gameplay-wise, Shuttle is easily understood and definitely has that one-more-go aspect to it, so newcomers seem to grasp it easily and stick around. You can have a 10-minute monster game followed up by a 10-second ass-kicking. Station is more complex, and unlike Shuttle the mini-pf and diverter shots can seem to interrupt speed and flow a little bit. It requires a slightly different style of play owing to its lack of inlanes, which tends to put people in a love or hate camp. Neither game has a very deep ruleset and both well predate the "mode era", so you're relying on skill to keep working up multpliers and cashing out multiballs when the time comes.

Historically, Shuttle was the game that saved pinball in the 80's and for good reason. Station's lack of inlanes, bonus round, bi-level lane change, and color-change GI are fairly unique in pinball. Seems like they threw everything at it, not sure why it didn't quite catch.

Over 7,000 Shuttles were made. A little over half that many Stations were built. A lot of Shuttles were beat to hell but CPR made reproductions in recent years so nice ones are out there. Station had factory mylar which preserved them much better, generally. That said, the pricing is closer than one might guess but Station should and usually does cost more. OTOH I haven't priced any Shuttles lately, seems they may have increased in price since I got mine. Apparently I got a good deal on my Station as well, so who knows.

Personally, owning both, it would be hard to choose just one. Nice thing is you can get both for the price of a many single "B" list games.

#1063 8 years ago

Here are the cards I made; kind of a "quick and dirty" job so there are some rough edges and artifacts on full-res zoom, but when printed at size they look fine. I tried to adapt the sales flyer for the rules, and the cab art for the info. I'm not as good as most of the other artists around here, but I figure these are better than what few Station cards are out there.

SSCard_1_(resized).jpgSSCard_1_(resized).jpg

SSCard_2_(resized).jpgSSCard_2_(resized).jpg

#1066 8 years ago

How did I read this whole thread (I thought?) and miss the Chosen ones? I like that info card!

Here you go Paul, let me know if these are better for you. I was trying to use green for "Condition Green" but even though I see it fine, you're right, it might be a little tough.

SSCard_Red_(resized).jpgSSCard_Red_(resized).jpg

SSCard_Green_(resized).jpgSSCard_Green_(resized).jpg

#1073 8 years ago

Wow, that's a strange one. Could that be a symptom of a weakening display and/or power supply? Literally the weakest segment as the first to go out? How many other segments are on when that one goes out? If it comes on when relatively few others are also lit, and taps out when there's a lot of segment activity, maybe that's a clue.

I'd check your PS voltages just to be sure. If you can swap displays / with another game you would see if the problem stays with the display, or the game.

#1079 8 years ago

I didn't think the orange ones flash, but the red ones do. Either way they are odd 27V bulbs. I had to replace mine as well. A 10pk from Marco was not too expensive, especially if added to an order.

3 weeks later
#1105 7 years ago

I got this idea from someone's post in a Firepower thread: I added some Comet LED strips under the cabinet tied to the condition green GI. The effect is MUCH better in person than these crappy potatocam pics imply!

Green1_(resized).jpgGreen1_(resized).jpg

Green2_(resized).jpgGreen2_(resized).jpg

I showed my Station some LED love throughout, actually (Comet 1smd all around, except for 2smd on Conidition Green GI). It might be a tad *too* bright, but the colors are phenomenal. I accidentally ordered the wrong sockets for the bonus ball inserts though, I really did like the "ice" blue better.

#1107 7 years ago

Believe it or not, those are just the 3-inchers! I got the frosted versions. The light they throw is almost overpowering, but of course being in a corner like it is helps somewhat given the wall reflection.

I installed one each side, a little forward of center (toward the player). I clipped them to individual GI sockets near the back of the pf; you'll want a wire extension of about 4 to 5 feet or so (I made my own eyeballed to fit with slack but did not measure the exact length).

3 weeks later
#1131 7 years ago

Actually the right lock DOES have a one-way gate and there should only ever just be one ball allowed to enter. Without the gate, a second ball could get stuck (by entering below the station) and cause a ball search.

Sometimes there's confusion as to what folks mean by "lock" and "dock" owing to all the stuff in that area, like the "locks" (VUKs) that divert to either side via the station...

Read this thread, it should help clarify things.

https://pinside.com/pinball/forum/topic/space-station-multiple-balls-in-right-dock-area

1 month later
#1187 7 years ago

So the Station I picked up earlier this year finally had its first major breakdown, and it's a pretty big one. Basically a Rescue Jackpot to end all jackpots before the station blew up!

If any of you are familiar with the electrical peculiarities of Space Station, or Sys11 Aux Power circuits in general, please help?

https://pinside.com/pinball/forum/topic/space-station-sys-11-aux-power-meltdown-where-to-begin

#1196 7 years ago

Would someone be so kind as to do me a quick 5-minute favor?

Remove fuse F3 on your Auxiliary Power Driver board, then go into the Solenoid Test and tell me which coils are inoperative?

According to the schematics, the pop bumpers (coils 19, 21, and 22) should be affected. But on my game, coil 17 (the right dock kickout) is also affected.

I'm not sure that should be the case with the right kickout.... but there are some discrepancies and contradictions in the original manual diagrams, so I'm trying to narrow down my troubleshooting paths and understand the schematics.

----EDIT----

Nevermind, I thought to search "Space Station F3" and sure enough, all four solenoids are affected. A few others have had this problem (F3 blowing randomly mid-game), but there doesn't seem to be a clear resolution.

Think I'm going to disconnect coils one at a time and see if I can narrow it down. I hate burning through fuses, though! One pop has a coil wrapper that's dried and flaking off like it's been getting too hot, even though the resistance is fine... maybe I'll start there and hope I get lucky.

#1206 7 years ago

Well I found out the cause of my F3 (pops and kickout quit working at random) fuse problem. This maddening head-scratcher turned out to be a real hidden gremlin. Essentially a pop switch leaf would only occasionally just barely nick the center lug of the coil plunger. But I mean barely, and not all the time, which made it very difficult to spot! Adjusted that and all has been fine.

The full details of how I found it are here

https://pinside.com/pinball/forum/topic/space-station-sys-11-aux-power-meltdown-where-to-begin#post-3253782

1 week later
#1217 7 years ago
Quoted from Platypus:

I might swap the five in the back to blue and green.

I did that on my game and not only does it look awesome, IMHO it's the way the game should have been made. The original orange / red was too distracting and out of place. The blue looks more spacey even when it washes out more white when lit, and of course the inner two light up a more appropriate color for Condition Green

SS_BG_(resized).jpgSS_BG_(resized).jpg

SS_BGon2_(resized).jpgSS_BGon2_(resized).jpg

SS_BGon_(resized).jpgSS_BGon_(resized).jpg

#1219 7 years ago

I think they are supposed to be the weird 28V, #1251 bulbs. That is what I ordered and used for mine, though I can't remember where I found that info. Can't find a ref in the manual but I know I've seen stickers somewhere in the cabinet.

#1225 7 years ago
Quoted from Tsskinne:

flawfless playfield

I'd love to see that playfield. You're not far from me and I love this game... if you were interested in parting I wouldn't mind swapping playfields, I've pimped out the rest of mine.

As for value, hard to say. There's been a nice one for sale here for about a month, apparently no takers @ 1700

#1226 7 years ago
Quoted from Chosen_S:

Yo, I want to say cointaker carries the LED version now, search around for the LED 1251, they're out there now

How bright are they? Those 5 in the back face the player, and three of them are on all the time... seeing as how filaments alone are bright enough to wash out the blue, LEDs might impart a serious case of retina burn... might need an authentic shield-visor helmet to play

1 week later
#1241 7 years ago

When I was preparing to convert, I had to make a chart because this game has a ton of colors in both 47 and 555 variants; easy to lose track.

Here's my chart in case anyone finds it handy:

https://docs.google.com/spreadsheets/d/1tLb0gKRV39yO0fKVcZbQzoK0zoPIIZRpbURsx4-acKQ

5 months later
#1474 7 years ago
Quoted from TicTacSeth:

At the bottom of the ramp, there's enough space between the left post and the drop target in front of the ramp for the ball to sneak through. The target doesn't drop when it gets behind there, so the ball just gets stuck and I have to remove the glass or full tilt the machine to get it out. Anyone else have this happen?

That happens a lot on mine, but I've never had the ball get stuck. It always rolls down the ramp behind the target and pops out through the gap between the target and the ramp's right wall, dribbling back to the flippers (or more likely getting launched by the right sling, arrgh).

I'd check your pf level and target mech alignment. Maybe the target mech needs to be moved to the left just a bit, to enlarge the gap on the right. Or maybe you have too fat a post on the right?

#1482 7 years ago

Yes, the upper PF is the true unicorn part for this machine. Freeplay40 has stated that the way that pf was made, it's uneconomical to reproduce unless the original molds turn up. I proposed a couple ideas to redesign it for function within his capabilities, but it seems he's overwhelmed with demand for other easier parts so... don't hold your breath.

Do you have the Upper PF in whatever shape it's in? There may be ways to repair and reinforce it. Mine was cracked in several places and prone to further damage. But I repaired what I could using reasonable techniques and adhesives, and reinforced the fragile areas with discreet mylar. Including pieces that chipped off at edge of the drain hole. So far it's held up great over a few hundred subsequent plays and you really can't tell much was done without looking very closely.

#1484 7 years ago
Quoted from Its_me_aj:

Yes I have it and it's...

Um. Wh-- wha-- hu---

my-brain-is-full-of-fuck (resized).jpgmy-brain-is-full-of-fuck (resized).jpg

I guess that was one way of preserving it...? But man, what that must do for ball travel and dirt... just... wow.

Is it coated on both sides? I wonder how that stuff can be removed, if a plastic-safe solvent bath might do it like removing paint. I wonder how bad it is beneath. Wow. I feel your pain!!

#1488 7 years ago
Quoted from Its_me_aj:

I thought about trying to make something similar to the mini pf in the pinbot series games but I'm not sure if it will work or not.

Yeah, I personally think a multi-piece part is the only way these could be remade.

The advantage you have in this part is that it's not a complex / arcane curve subject to high velocity or force from the ball, and it's pretty geometrically simple. By the time the ball dumps out of the wireforms, it's relatively slow. So it merely bounces around the lanes, rolls through, then falls through the hole. The walls are relatively straight and don't need to interact with or guide the ball much.

So in theory you might get by with a stiff piece of flat plastic for the base. The trickiest part would be attaching the wireforms so that they are flush with the surface (as provided by the recesses in the original upper pf). You could mount standard lane guides in place of the original's molded, shaped ones. Add side walls (and switches and bulbs) and that's basically it.

Not easy in the strictest sense... but not impossible either...

#1504 7 years ago
Quoted from Its_me_aj:

Found a couple more cut wires with no clue where they go. They are orange in color. So I have no clue where they go and the missing wires off the pop bumpers. Any help would be much appreciated

Here's a pic of my working Space Station pop nest:

20170215_222702 (resized).jpg20170215_222702 (resized).jpg

Now I'm not sure what happened on yours, other than to say it looks like there is some SERIOUS shennaigans going on. That second picture you posted...

...4fbb0335cf6efd7d315c964c2a458bb71b347deb (resized).jpg4fbb0335cf6efd7d315c964c2a458bb71b347deb (resized).jpg

...it looks like an orange wire is going directly from a switch to the coil?! No bueno! Oddly enough it looks like the remnants of the original blue wire(s) are still on the coils... so where are the rest of those wires? THOSE, and ONLY those (in addition to the red ones on the other terminals, which appear to be correct) are what you need to power the coils.

16286e3768a6d91f1e3f76c0d881b6ee3eb7cbd5 (resized).jpg16286e3768a6d91f1e3f76c0d881b6ee3eb7cbd5 (resized).jpg

#1507 7 years ago
Quoted from Its_me_aj:

t looks like the blues are one of the power wires to the coils and the Orange are for the switches?

My basic understanding (I might be wrong, if someone else feels compelled to clarify) is that, in this case (because other games and coils may be different):

- the RED wires are the input power to the coils,
- the Blue and/or gray wires are the "ground path" to complete that power circuit. The board transistors are what turns this circuit on or off.
- Switch wires can be all manner of different colors throughout a game so there's no hard and fast rule per se. Schematics help. But looking at my game it appears there are orange wires connecting to pop trigger switches.

The basic operation theory is, the trigger switch sends input to the MPU via one discreet path; the MPU registers this signal and says "OK, time to turn on this transistor" [which then completes the coil power circuit allowing the coil to fire]; when the coil fires it pulls the plunger in, which closes the second switch in the pop stack, which sends a signal to the MPU to score the hit and tell the coil to turn off and reset.

So, wiring the switches directly to the coil accomplishes nothing. The MPU is always the middleman. You have to sort that out before doing anything else.

#1509 7 years ago
Quoted from Its_me_aj:

I was looking at the pop bumpers on taxi, pinbot, and rollergames and they are all different. I think I'm going to have to just do some testing and hope to figure it out.

The wire colors, and their relative meandering paths from "end 1, around obstacles and pf up to wherever end 2 is" are very likely to be different.

But Taxi, Pinbot, and I think even Rollergames are all built on the same basic operational platform as Space Station: Williams System 11.

So yes, start testing one of those games - preferably one you have the manual and schematics for. As you come to understand how and why things are connected as they are, and how the total functioning system works, you'll be able to apply that basic conceptual knowledge to your project.

Start with the pop bumpers and compare how the switches and coils are wired. Like I said: even if the colors and paths are all different, *functionally* and *logically* they are wired the same to an extent, to operate the same things.

11 months later
#2105 6 years ago

Allegedly, the problem with the upper playfield is that it was tooled as a one-piece injection mold. This much IS true: if you examine the part, you can see that it couldn't be simply vacu-formed like a traditional ramp. I believe the vented lamp domes for the lanes are where most of this complexity comes from.

Personally I have to think if the original mold existed somewhere, Planetary would have remade these by now. So let's presume it doesn't. New injection molds are boku bucks.... notgonnahappen.

But with that said, I personally wouldn't mind a vacu-formed replacement that is close enough to be serviceable. I mean if you take the lane domes out, what you're left with is really no more complex than a traditional ramp. Possibly even less so, since it's smaller and flatter. You might have some differences in the joint of the back wall to the floor (rounded instead of square corner) potentially, but that wouldn't affect functionality. Vacu-form the flat platform, with new holes to add traditional lane guides (or maybe Gottlieb's pyramid style so that you can keep the solid ends... or perhaps newly vacu-formed individual lane guides like the original Station ones)... just screw them in. Boom. Done.

Basically if a one-piece is cost-prohibitive, fine. Make it multi-piece. Beggars can't be choosers for original look, but if you want something that works, I think this could, um, work.

#2131 6 years ago

Looks like you have a looming UFO invasion in your translite, Scarybeard

As for testing bulb colors in the station translite, I used twist-off lids from applesauce pouches. You can get a variety of colors, they fit perfectly over the bulbs, and they also fill the cutout voids with a vivid dose of color even when off. Looks really cool, and a cheap way to test colors before purchasing bulbs.

Pretty clever design attempt on that laser playfield. I agree a latticed lower ball wall might look pretty sweet. Eager to see how it develops! Nice drawing skills too

1 week later
#2185 6 years ago

Yeah, with the layered structural beams that thing somehow LOOKS like it belongs on a space station! Great job! I wonder if/how the clear acrylic will pipe the bulb lighting through the back wall? Could be an interesting effect.

My original is in decent to nice shape, but I'd consider this one an upgrade. I hope the lane guides work out well!

2 months later
#2322 5 years ago

scarybeard ... it's been a few weeks, the anticipation kills: anything new to report on the replacement upper pf concepts?

1 month later
#2367 5 years ago

Welcome to Pinside!

I'm still / always learning myself so someone may feel free to correct me if I'm wrong.

During attract, the "game logic" that looks for most switch inputs is not running. The game is looking for start, diag, and ball-locating switch inputs, but should ignore all else in "attract mode". When you start a game, the "game mode program" logic runs so now all switches are read, and any stuck switches are fair game to fire all at once.

If you have stuck coils during attract mode, that means the driving circuit(s) for the affected coil is defective "always on" at the board level. But that doesn't seem to be what's happening here, so that's good. It's far easier for a newbie like yourself to look for the visible mechanical issues than to troubleshoot boards.

So yes, you may have a stuck switch telling the game to fire the coil as soon as "game mode" starts. (It's also possible in some cases for the switch-reading circuitry on the boards to go defective, but that's relatively uncommon so let's not worry about that for now).

Do you have the manual for the game? It will be very useful, even if the diagrams don't make any sense at first glance. If you don't have it, go to ipdb.org and look up your game, you can download most manuals from there.

One thing you can try, is unplug connector 1J19 from the MPU board (upper right corner of the board, 2nd connector down from the top). With that connector removed, the coils for the pop bumpers and slingshots will not lock on. You can then put the game into test mode, go into the "switch test", and see which switches are stuck. If the pop bumper switch shows up in test, investigate further.

That left pop bumper is especially tricky because of how tightly everything is crammed nearby. I rebuilt it once and would suffer intermittent meltdowns due to a sporadic, intermittent short in the switch that was almost invisible to the naked eye. I could tell it had been troublesome in the game's previous history due to hints of other repairs. Make sure there is no way that any metal from the switch can EVER touch ANY metal on the pop mechanism... even a "few hairs' width" is too close. Also make sure you have the trigger leaf on the switch on the proper side of the pawl... it's an easy / common thing to mess up.

Space Station is a great game, worth debugging for sure.

1 week later
#2393 5 years ago
Quoted from Ive:

It's nice to have an alternative - but personally I do think I would prefer it matching the backglass style a little more ...white colour, 4 struts.

I agree. I love the surface detail and resolution, and even the overall "21st century / aggro-scifi" aesthetic is cool... but it unfortunately clashes with what's most prominently featured on the backglass. It would be easy enough to repaint silver to white, but the 3-spoke design is too incongruent.

Still, I'd love to see a proper 4-spoke version in the same updated style.

2 years later
#3202 3 years ago
Quoted from PPS:

Ok! The Space Station Mini-Playfield / Ramp is now available - we have a small amount now and will get more in January with a larger run. Thanks to pin-pimp these are outstanding and an expensive endeavor but clearly needed. The product initially will be the BLUE Transparent ramp with Decals and Hardware....

This is EXCELLENT news! I was getting set to order from the link when I noticed mention of the clear ones forthcoming... do you know when those might be available? Any pics of the clear ones installed on the game?

I'm good with the OG blue option but... it might be neat to have an unobstructed view of the pf beneath, and/or make the ball seem more like it's floating in space a bit... would love to see both before choosing if possible.

#3205 3 years ago
Quoted from pin-pimp:

we have clear samples but i didnt install one in a game. Rick is planning on running some clear with the production run. they would be ran this month

If you're looking for someone to demo the clear sample on a game I'm happy to assist, so let me know. My game is in nice shape, and I can take decent pics without "LED blowout".

#3208 3 years ago
Quoted from pin-pimp:

youd have to ask Rick, Ive got a game here at the shop too and could post pics if needed

Ah, the way you described it I thought you didn't have access to the game anymore. Otherwise I guess I could ask Rick but he's not in the business of freebies... so, presuming I wouldn't get to be a "free test guinea pig", it's probably quicker / easier if you could test and show how the clear looks... which would be really appreciated.

2 months later
#3325 3 years ago
Quoted from dmieczko:

Make sure a full plunge goes through the spiral ramp and down to the main playfield. This is what makes a real skill shot. You have to half to 3/4 plunge to make the lanes...

Wha? I'm not sure I follow this. From a plunge, the ball goes through the "spiral" (more an S-curve) ramp to the upper playfield. A full plunge will hit the right-side one-way gate where the station mech enters the upper PF... so from there, the ball richochets captive on the upper pf. There's no direct way to go to the main/lower pf until the ball travels the upper inlanes and down to the upper PF's drain hole...

Quoted from MrAztec:

Anyone had this problem and solved it? [quoted image]

This happens a lot in my game but the ball always rolls out after a moment; never have to wait for search. The target is aligned to let the ball roll off after all. Make sure your right side ramp entry post rubber isn't too thick? Or re-align the target mech and/or ramp (post) to open the gap just a tad?

1 week later
#3337 3 years ago

I once read that with regards to that U10 issue on System 11 in general, replacing the small capacitor at the bottom of the MPU (is it C25? Why does that number come to mind...) would solve it. So I did so and it *helped* but did not *100% eliminate* the problem: it reduced that "U10 PIA Failure" message from probably 75% incidence rate, to maybe about 25%.

Funny enough that PIA was socketed when I got my machine, so somebody had obviously tried to solve it before. I replaced the PIA too and that didn't affect it. No other board issues or obvious damage.

Like others have said, a second immediate "reboot" always gets it going... I always thought it was a quirk of my machine, so it's interesting to now hear so many others have this issue with Space Station! I wonder if there was some other issue unique to this game / boardset? It's been discovered WMS made other very subtle sneaky changes to Sys11 boards from game to game (not just the major A/B/C revs).

1 month later
#3341 2 years ago

So it's been a few months; are the upper playfields going to come back in stock again? None of the clear were ever shown.

I've been asked to bring my station to a show later this year and would like to replace the upper pf before doing so.

4 weeks later
#3363 2 years ago

You can also try shifting the ramp entrance a little bit too the right. Also make sure the post rubber there isn't too thick - for example if it were replaced with a "bell" post, that would cause problems.

As others have said there are a few tweaks and adjustments that may be necessary, but yes it's very common for the ball to sneak back there and ideally it should be able to roll out.

4 months later
#3511 2 years ago
Quoted from PPS:

After many months of waiting - we just got the Space Station Mini playfields back in - both in BLUE as well as CLEAR
They will be on the store in a day or two - need to get pics of the clear.
Planetary Pinball
www.planetarypinball.com

PPS any update as to when they'll be in the store? After missing out earlier this year (blue sold in in days while I was waiting on the promised clear pics), I'd like to ensure I get one in time for Pincinnati in a few weeks...!

#3518 2 years ago

Clear still isn't showing but I'm not making the same mistake twice; I ordered blue. If clear shows up soon/later I may list my blue one here ha ha.

4 weeks later
#3553 2 years ago

I have some 12v LED strips left over from other projects and was thinking they would work great to light the sides of the Freeplay40 (transparent) ramp. Especially if synced to the target is down / ramp is open for a shot, such as Stop-N-Score or shoot-for-lock. Unfortunately I was rather shocked to discover there are no 12V bulbs under the playfield - it's all controlled 6V!

I could easily tie into the 12V flashers elsewhere, but they're not synced to the ramp.

Yeah yeah I know some 6V strips would probably work but my issue there is 1) trying to use what I already have on hand, ha, and 2) I'm afraid if I tie a lengthy 6V strip to a single controlled lamp, that might overload the transistor...?

Anyone ever do this or have any insights to share?

#3557 2 years ago

Thanks all. Been a while since I shopped for LED strips; I found a battery-powered 6V set on Amazon for $10 that should ably to the trick (won't be using the battery pack & controller, obviously). As a bonus the face of the strips are shown as black, which should hide well. Looking forward to seeing how this turns out!

#3558 2 years ago

For all its intent as the main toy, I always felt the rotating station is a bit too subtle and easily missed. I know there are different station models out there but haven't bought one. Meanwhile, something I'm working on is stickers for the ball guide underneath the rotating station, to help call more visual attention that it's actually moving! I imagine the portals as "docks" and came up with some quick generic graphics to that effect. Might refine them a bit yet, but for Rev 1 they don't look bad, I think. And they are DEFINITELY effective - you really see them move in / out of place

I have some other ideas in mind but haven't drawn them up yet. I hope to do so soon.

20211118_192641 (resized).jpg20211118_192641 (resized).jpg20211118_192655 (resized).jpg20211118_192655 (resized).jpg20211118_192706 (resized).jpg20211118_192706 (resized).jpg20211118_192844 (resized).jpg20211118_192844 (resized).jpg
#3562 2 years ago

Next thing I'm working on is actually something I mused about for a while, but only replacing the upper playfield made it finally click into "necessity".

My original upper PF was so worn, the ball would immediately drop out though the hole. "Big deal" you say, as I did: "It's a hole. The ball is *supposed* to drop out of it!".

Well it turns out, on a nice new repro the hole is - "as originally, before wear" - a bit smaller. So the ball sort of swishes and vibrates and centers itself for a couple seconds before dropping through. This is almost annoying compared to the instant-drop speed I was used to on the old upper pf. But the effect on the new one is not without its charm...

...so I labeled it appropriately.

20211120_130106 (resized).jpg20211120_130106 (resized).jpg

20211120_130134 (resized).jpg20211120_130134 (resized).jpg

The color saturation is off because my home inkjet sucks, apparently. And I might need to tweak scale, but that's subjective

I originally considered text-only on a clear background (waterslide decal) but that requires significantly more effort! So I wanted to get an idea of the overall effect first, but faded color aside, I think I like this (gray background / hashed border) better than plain text. The other issue with plain text on a decal would be getting the opacity of a light color (contrasted against the blue plastic) with the intense backlighting. I have an ALPS decal printer but layering light colors for opacity-thickness is asking for trouble sometimes.

#3564 2 years ago
Quoted from goingincirclez:

Thanks all. Been a while since I shopped for LED strips; I found a battery-powered 6V set on Amazon for $10 that should ably to the trick (won't be using the battery pack & controller, obviously). As a bonus the face of the strips are shown as black, which should hide well. Looking forward to seeing how this turns out!

OK so my LED strip arrived and I'm running into something that says I still don't know jack $#!^ about electronics. It's an RGB strip but I'm using only one color. I cut the battery pack and effects controller off, and soldered connections to the strip such that + goes to the strip's 5V feed, and - goes to the R/G/B color(s) of choice. Connect this to a test pack, it lights up. Easy enough right?

So I connect it to the game, controlled by the stop-n-score light. I tapped the column (yellow & green) wire for -, and the row (red & brown) for +. This "works" as expected (indeed, if I reverse my connections the strip does not light at all)... But sadly, when connected, every other lamp in same the matrix row / column flickers lit also! If I disconnect the strip, all returns to normal.

OK so maybe I need to add a diode... But I'm not sure where/how. When I add a single diode inline on my LED strip, whether on the + or - side, the strip either does not light at all or exhibits the same interfering behavior (depending on the orientation of the diode). I read somewhere that two diodes (one on each lead) might be needed but when I tried this I still can only get the same result.

I have to think I'm missing something stupidly simple here but I've spent too much time already and haven't figured it out yet. Anyone care to set me straight?

#3567 2 years ago

I actually thought of that earlier, but didn't want to "cross the streams" by connecting controlled input to GI. But I just now gave it a shot and it doesn't work (+ feed still coming from the stop-n-score row feed, and - went to the GI ground).

And of course now that I type all that out, OF COURSE that would not give me the desired result... because the strip would light up any time the row signal is triggered by other lamps on that same row, not just the stop-n-score.

So... do I need to tie both the row and column to +, and send the - to standard ground? Suddenly that makes sense. But I'm afraid to fry a transistor if I'm wrong.

Man, this would have been "done" if I tied the strip to GI but NOOOOOoooo I just HAD to be difficult and go controlled! Those pinball socket plug-in strips you get from Comet, et al must have something in them to accommodate this.

#3568 2 years ago

I figured it out... and in fairness, it was indeed something simple as I suspected BUT this game's unique particulars juked me into making it more complex

Anyway, I tapped into the row/column wires because the controlled lamp I wanted to use, is a 555 on a circuit board, and the sole one blocked by the drop target. It seemed much easier to tap into the feed wires since I had splice taps for a nice clean install.

But as I typed out my previous post it finally "clicked" that this wouldn't work: Unlike bayonet sockets, where the leads and diodes are exposed right there in front of your eyes so just connect right to those wires at their mounting tabs and don't think about it... The matrix diodes in this case are on that circuit board underside, AFTER the row/column feeds!

To test my suspicion, I removed the board from the PF and touched the strip leads to the pads for SNS lamp: BINGO! It worked! So I soldered some leads to the pads, careful to position them to allow removal of the 555 socket when needed. And it is now in business! Looks great for the whole ramp to flash while SNS is ticking down - nothing more frenetic than when you finally have a good multiplier built and open the ramp but can't get the @*^@ ball to settle down to line the shot before it ticks away

20211121_215116 (resized).jpg20211121_215116 (resized).jpg

20211121_220652 (resized).jpg20211121_220652 (resized).jpg

I'll work on refining the Airlock Eject next

#3569 2 years ago

I do think this one looks better:

20211122_094510 (resized).jpg20211122_094510 (resized).jpg

Changed font (to one I use for seemingly everything including my freelance railroad, ha!), shrunk it slightly, and integrated warning striping into the directional indicators.

I like the thought behind traditional portal / warning iconography, but IMO (subjective) that didn't seem unified with the rest of the game's artwork which is mostly textures and text; figures are otherwise full-suit astronauts and there's already pinball puns in the art. And with the prominent location, I didn't want *BRIGHT YELLOW ACTION* to distract or hold the player's focus. Plus, my wife suggested that it's more fun to see the ball spin-wobble as it settles and prepares to drop, so I made that section transparent anyway.

For similar reasons, I'm not completely sure I will keep the !CAUTION! on the hole recess, but this is separate and can be removed if I change my mind. OTOH, you need to be ready for the high odds of the pop nest hopelessly flinging the ball directly to the outlane so, CAUTION is actually warranted

#3570 2 years ago

The revelation about needing lead wires from each 555 socket on that board, made me realize I can put the multi-colored LED feature to use! I added a lead from the green "dock" light, connected to the green input on the strip. So now when that's lit alone, the ramp is green; when SNS is lit the ramp is "blue" (I combined R and B for violet, but it's pale and becomes blue thru the ramp plastic)... And if both are lit / flashing, the ramp does some cool effects. Really happy with how this turned out!

20211122_115930_2.gif20211122_115930_2.gif
3 weeks later
#3571 2 years ago

I had a couple PMs asking if I would make the graphics available. So I recently went to a print shop to ask about having actual professional laminated pre-cut decals made, and it could be pretty reasonable depending on quantity and interest. So I'd like to ask who is seriously interested enough to purchase a set that would include the 4 station docks and the "airlock eject" as shown above? I can't imagine charging more than $5-10 a set... but I'm just wondering if there's enough interest to merit the hassle of me revising the art a bit for the printshop (I'd have to modify my layers, vectorize text, etc. And if I want to hand-trace and rescan them to better match the hand-drawn look of the rest of the PF, this gets even *more* troublesome).

If you are seriously interested in purchasing a set please let me know in this thread or by PM. However please know that even if there is enough interest, I *WON'T* have time to pursue "next steps" toward revision / printing until after the holidays! But I wouldn't ask for payment until they're ready anyway.

Thanks to those who expressed interest thus far!

1 week later
#3587 2 years ago

Happy Holidays, SpaceStationites! I finally managed to get my Airlock and Station dock graphics professionally printed and could not be happier! The colors and gradients are deep and rich, printed on adhesive vinyl with a thin matte laminate to look just like other pinball plastics and decals. I also revised the dock graphics slightly. Take a look...

20211229_180024 (resized).jpg20211229_180024 (resized).jpg

20211229_180035 (resized).jpg20211229_180035 (resized).jpg

20211229_180040 (resized).jpg20211229_180040 (resized).jpg

They are edge cut and ready to peel and stick. Cost was very reasonable so I can offer these for $6.50 per set, shipping included as a first class letter within the US. Send me a PM if you want a set and we'll go from there. Thanks for the interest!

20211229_180224 (resized).jpg20211229_180224 (resized).jpg
7 months later
#3698 1 year ago
Quoted from danczaz:

Anyone make a decal to go under this ramp? I got one of these but have yet to install as I don’t like seeing through to an area you were not designed to see.

I've thought about doing that but everytime I draft one in my head, I can't decide if it should be "spacey", or more like the "station mechanicals" (as in the other plastics). I generally lean toward "spacey"... and then can't decide if I should tie it into the vortex-thingy at the ramp entry, or something apart. And that kind of indecision has kept me from going further. I found making decals for the dock and UPF a bit easier. But I agree, the ramp could use something too.

6 months later
#3839 1 year ago
Quoted from Zablon:

I keep thinking I need to start moving some things around to make room for new blood. I always think SS will be on the chopping block, but then I play it, and get condition green and that changes. I'm not sure what the actual draw is, it's not my favorite game by any means, but of my older games it gets the most play.

Yeah, it's a weird game like that. I'm at that "out of room" threshold and every time I think "hmm, out of them all, maybe Space Station is the lesser-keeper" but then I play it and it's just so damn unique I want to keep it, even for not being an high lister or one of my sentimental reworks. I think if the shots were more obvious and aim-able (the lack of inlanes works against this) it would probably get more love. But to be honest, a lot of them seem more prescribed to luck. Then you have today's fan-trained flow players already hating waiting for things like VUKs and diverters and an upper pf which is essentially a long wait just to do a lane change (but I personally love how two of them are stacked; it almost reminds me of Star Light).

So I get why it's a mid-tier game: the shots, pace, and flow are never going to be universally acclaimed. But of its time, I think it's fantastic: it was different, the lights and sounds easily rank among the best Sys11, and it does have a lot of shots and fun rewards to offer IF you can adopt your strategy to a lack of inlanes.

Perhaps some new rules would help it out.

1 week later
#3874 1 year ago

Wow, that 2001 model kit is actually pretty awesome, even outside of "topper" use. Too bad the stand doesn't come with it. And when I read the info and saw that it comes from a guy named "Mirco" I actually shuddered, oof.

But as far as toppers: mine is mostly found objects, as one does:

20230314_095936 (resized).jpg20230314_095936 (resized).jpg

20230314_100004 (resized).jpg20230314_100004 (resized).jpg

Soon after acquiring the game in 2016, the Lego launchpad turned up at a local thrift shop: *highly unusual* for Legos to turn up around here, let alone complete sets, so that seemed like fate. Modern Legos look more realistic of course but that particular set is one of the first attempts, from within a year or two of the pin.

At any rate, instead of being an oversized redundant copy of a main translite feature, I like that it shows how one would have built / arrived at said Space Station, ha. The only thing I don't like about it is I've had to reassemble/reinforce it after some aggressive nudging, more than once... but I don't have the heart to permanently glue it all together.

The beer bottle is self-explanatory given what that @^&%@& pop nest does with frequency That original label for was awesome but they changed it a short time later so it's fairly rare. The new ones from 2016+ are not nearly as cool. Do note, the lettering highlights "condition green"!

And yes I've thought about putting it on the pad in place of the shuttle but... let's control ourselves a bit ha ha.

1 month later
#3885 1 year ago

The drops are a callback to Space Shuttle, placed where they are to entice / reward a sweep shot as Shuttle made famous. It's trickier on Station for some reason, but always awesome when you do it. You couldn’t sweep the center bank. So that lane needs to stay drops; standups there just wouldn't be as captivating or interesting.

I wonder if a bank swap in the center would work, like how Firepower is coded to support drops if you put them in? But unlike Firepower, I don't think Station was ever prototyped that way... so probably not.

4 weeks later
#3922 11 months ago
Quoted from chuckwurt:

Did not realize how good the music was in this!! Pleasantly surprised.

Dude I brought yhis game to your own show, even when it had power! How'd you miss it?

Great pickup tho! Station is suuuuch a unique game. Not an A lister but one I just have to keep around and always enjoy. A very chill game until Condition Green, which can get frenetic at times.

9 months later
#4151 46 days ago
Quoted from Blackbeard:

What’s the shop like on ss?
Easy? Hard? In comparison w other system 11s.
I’ve shopped many system 11 games. But just wondering on this one.

The upper PF area can be a little fiddly to take apart, and you need to be careful re-aligning the station and the ramps so that the ball does not get hung. Other than that, it's pretty straightforward. The most troublesome area IIRC/IMO is under the playfield, the pop nest is pretty tight quarters more so than other games for some reason.

Promoted items from Pinside Marketplace and Pinside Shops!
$ 27.95
Eproms
Pinballrom
 
From: $ 35.00
Cabinet - Other
Rocket City Pinball
 
$ 18.95
Eproms
Pinballrom
 
$ 2.50
Lighting - Led
Pinballrom
 
$ 44.99
Cabinet - Shooter Rods
Pinball Shark
 
From: $ 19.99
Eproms
Matt's Basement Arcade
 
$ 12.50
Lighting - Led
RoyGBev Pinball
 
$ 95.00
Cabinet - Sound/Speakers
Pinball Mod Co.
 
2,200
Machine - For Sale
Olympia, WA
$ 170.00
Displays
Digipinball Shop
 
$ 27.00
Electronics
Yorktown Arcade Supply
 
$ 50.00
Cabinet - Toppers
Slipstream Mod Shop
 

You're currently viewing posts by Pinsider goingincirclez.
Click here to go back to viewing the entire thread.

Reply

Wanna join the discussion? Please sign in to reply to this topic.

Hey there! Welcome to Pinside!

Donate to Pinside

Great to see you're enjoying Pinside! Did you know Pinside is able to run without any 3rd-party banners or ads, thanks to the support from our visitors? Please consider a donation to Pinside and get anext to your username to show for it! Or better yet, subscribe to Pinside+!


This page was printed from https://pinside.com/pinball/forum/topic/space-station-club-members-only?tu=goingincirclez and we tried optimising it for printing. Some page elements may have been deliberately hidden.

Scan the QR code on the left to jump to the URL this document was printed from.