(Topic ID: 298861)

Seawitch from scratch, Allentown edition (Bally/Stern multi-game platform)

By gdonovan

2 years ago


Topic Heartbeat

Topic Stats

  • 1,882 posts
  • 61 Pinsiders participating
  • Latest reply 3 days ago by gdonovan
  • Topic is favorited by 57 Pinsiders

You

Linked Games

Topic Gallery

View topic image gallery

20240421_122121 (resized).jpg
20240421_112528 (resized).jpg
20240417_063054 (resized).jpg
20240417_062508 (resized).jpg
Pinside_forum_8128739_3858925 (resized).jpg
Pinside_forum_8128739_3858924 (resized).jpg
20240414_120632 (resized).jpg
20240414_120610 (resized).jpg
20240407_132248 (resized).jpg
20240405_065536 (resized).jpg
20240407_124243 (resized).jpg
20240407_123430 (resized).jpg
20240407_122531 (resized).jpg
20240405_065541 (resized).jpg
20240404_182152 (resized).jpg
20240404_065347 (resized).jpg

Topic index (key posts)

33 key posts have been marked in this topic, showing the first 10 items. (Show topic index)

There are 1,882 posts in this topic. You are on page 7 of 38.
#301 2 years ago
Quoted from gdonovan:

Connector J4 on the MPU is done, 100%
[quoted image]

I like where you have located your SB-300 sound board. All I would need to do is extend the 4 or 5 wires that plug into the sound board and get some longer ribbon cables ( Amazon has all lengths of ribbon cables ) and make the move. It is too late for my current build but for the next I am going to make that move with SB-300.

#302 2 years ago

"Seawitch has been added to your collection "

#303 2 years ago

She fired up sweet as pie, voltages were spot on.

20210910_191118_1.gif20210910_191118_1.gif
#304 2 years ago
Quoted from cottonm4:

I like where you have located your SB-300 sound board. All I would need to do is extend the 4 or 5 wires that plug into the sound board and get some longer ribbon cables ( Amazon has all lengths of ribbon cables ) and make the move. It is too late for my current build but for the next I am going to make that move with SB-300.

1) I'm actually going to rotate it 90 degrees and move it over to the right so there is room for a Bally sound card to the left since this is a dual purpose machine.

2) Display wiring gave me fits tonight. Decided to highjack the display wiring from Mr. and Mrs. Pacman since I was going to use the display wiring from the Star Trek head I acquired for Flash Gordon as it is closer in fitment. Very carefully removed just the display wiring I needed without disturbing anything else from the harness. Started pinning the MPU -> Display interface and ended up with an extra wire, WTH! After looking at four different diagrams figured out Bally added an extra wire that goes from A4J1-7 (unused on Space Invaders and Seawitch) to Display Pin 12. Since the wire was there in the harness added it to the MPU connector.

3) Finished wiring MPU J1 plug and the LDB strobe lines and power feed. Double checked all the connectors to make sure all the wiring was present and where it was suppose to be.

4) Powered up with just the wounded -35 (waiting for parts) I was using to do wiring runs. Did voltages checks, everything was spot on.

5) Powered up with Weebly board, we have 8 flashes!

6) Powered up with displays, scrambled but there! I'll assemble an LED display unit tomorrow.

7) Powered up with playfield lamp matrix plugged in, WOOP!

Game plan tomorrow is to move soundboard and wire, cabinet wiring for flippers, mpu buttons, credit button, etc and assemble at least one LED display.

Gary

#305 2 years ago

Garage cleaning and organizing this morning.

20210911_065547 (resized).jpg20210911_065547 (resized).jpg
#306 2 years ago

Watching what some of you guys are able to do is amazing and very inspiring. Its great following along and learning things that I would like to try to do myself in the future.
Great work!

#307 2 years ago

All I had time for this morning before taking off with the Mrs. Have to go over the display strobe lines and figure out what is crossed. Mr. and Mrs. pacman does have some odd display wiring and I think this is biting me on the ass now. I'll get it!

Display works fine in Fireball Classic.

Great kit from @Pinitech!

20210911_103100 (resized).jpg20210911_103100 (resized).jpg20210911_103432 (resized).jpg20210911_103432 (resized).jpg20210911_103506 (resized).jpg20210911_103506 (resized).jpg

#308 2 years ago
Quoted from cosmokramer:

Watching what some of you guys are able to do is amazing and very inspiring. Its great following along and learning things that I would like to try to do myself in the future.
Great work!

Thank you sir! Hoping to have the rest of the harness done tonight and hear some sound and enable diagnostics.

#309 2 years ago
Quoted from gdonovan:

All I had time for this morning before taking off with the Mrs. Have to go over the display strobe lines and figure out what is crossed. Mr. and Mrs. pacman does have some odd display wiring and I think this is biting me on the ass now. I'll get it!
Display works fine in Fireball Classic.
Great kit from @Pinitech!
[quoted image][quoted image][quoted image]

Those UNO displays rule.

#310 2 years ago
Quoted from cottonm4:

Those UNO displays rule.

I'm baffled.

Toned out the MPU connector to display one and everything is fine but the display is dead. Display works perfect in Fireball.

Going to change the jumpers to Star Trek and pop in a 6 digit display and see if I get anything.

#311 2 years ago

Ok, MPU not having any issue driving 6 digit plasma display while set to Star Trek.

20210911_143333 (resized).jpg20210911_143333 (resized).jpg
#312 2 years ago

Ok, after that I set MPU to Fireball to enable 7 digit Bally mode and was missing the first digit. Replacing the black wire with yellow tracer brought that up.

Now time to swap MPU back to Stern mode and see what happens.

20210911_144543 (resized).jpg20210911_144543 (resized).jpg
#313 2 years ago

I think were in business!

20210911_145300_1.gif20210911_145300_1.gif
#314 2 years ago

Question for Stern owners- If the audits are cleared will the displays show anything in attract mode? I think this is what threw me off because aside from the digit walk when the MPU test button is pressed the displays are blank when in attract.

#315 2 years ago

If you reset the hstd it will show 00. Until you play a game the players scores may or may not show anything if the memory was cleared to$ff it will be blank

#316 2 years ago

Started work on the cabinet switch wiring this afternoon and installed the tilt bob. Knocker will be in lower cab after all. Quick disconnect at the solenoid board so playfield can be pulled without having to pull cab harness too.

20210911_172001 (resized).jpg20210911_172001 (resized).jpg
#317 2 years ago
Quoted from slochar:

If you reset the hstd it will show 00. Until you play a game the players scores may or may not show anything if the memory was cleared to$ff it will be blank

Weebly indicates hitting test and clear memory at the same time wipes all stored data so I'll guess I'll find out in a few days when I finish the harness.

The display and harness are correct, you can clearly see it operate in test mode so that's good.

#318 2 years ago
Quoted from gdonovan:

Started work on the cabinet switch wiring this afternoon and installed the tilt bob. Knocker will be in lower cab after all. Quick disconnect at the solenoid board so playfield can be pulled without having to pull cab harness too.
[quoted image]

I'd like to see the quick disconnect you are using, please.

#319 2 years ago
Quoted from cottonm4:

I'd like to see the quick disconnect you are using, please.

Just a 6 pin molex with key, DE style. You can see in picture above, lower left of SDB.

Has 2 wires for flipper buttons, 1 wire for knocker and 1 wire for test switch and memory switch return. All go to A3J2 connector.

#320 2 years ago

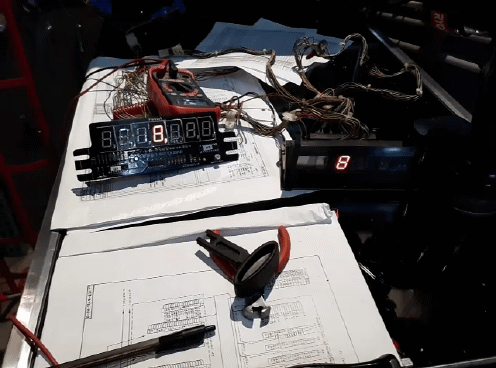
Today's plan is to wrap the cabinet wiring up and find a chunk of cardboard so I can start mocking up a lighting/display backboard. Amused that I'm now using wiring from a FORTH machine now, Laser War in this case. The cabinet was empty aside from the flipper/credit button/tilt/slam/speaker wiring so its being utilized.

Been giving a lot of thought to game interchange. Some games would be difficult because of the radical amount of wiring they have.

Take Flash Gordon for example; I was considering doing the FG playfield wiring using this cabinet as a setup platform but there is so much going on with FG playfield lamps and interfacing with the FG A9 Auxiliary lamp board that it might not be practical.

Other games like Star Trek, Night Rider, Super Sonic or even Xenon would be fairly easy though.

Bally sound doesn't look to be an issue, the wiring looks fairly straightforward.. Mostly power and grounds and a few address lines from the MPU.

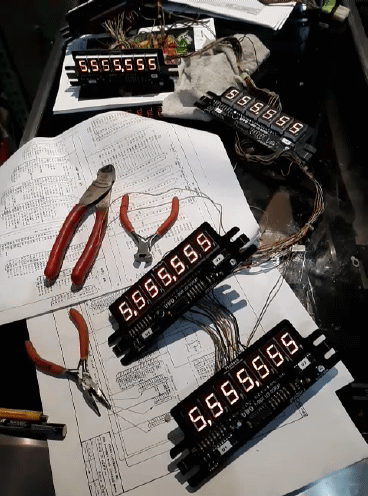
That leaves the backglass which I'm kicking around a few ideas. Changing and making a lamp board sounds like a PITA. One thought I had was to move the displays out as far as you could and get a translight made to fill in the "art area" This is just a crude Photoshop I ran off in a few minutes to get some idea of what I was thinking.

The other thought is to move the displays just above the playfield, since I have to make a cosmetic plug there regardless. Then you could use a stock backglass, but then you have blank openings.

I third idea just game to mind- The Uno display is pretty flat, perhaps some velcro mounting and ribbon cables you could could simply move them around as you see fit. Hmm, I like this idea.

This gives me a further idea with "Yoppcicles"

A plan is forming gents.

BG mockup (resized).jpgBG mockup (resized).jpg

#321 2 years ago

20210912_151244 (resized).jpg20210912_151244 (resized).jpg

Credit button, Test button, Memory clear button and Stern volume control.

#322 2 years ago

have you seen what this guy is doing on interchanging playfields? https://www.facebook.com/howtobuildapinballmachine/?ref=page_internal

#323 2 years ago
Quoted from BorgDog:

have you seen what this guy is doing on interchanging playfields? https://www.facebook.com/howtobuildapinballmachine/?ref=page_internal

Cant say I have, avoid FB like my life depends on it.

#324 2 years ago

Rough sledding today for some reason, everything just seemed to take longer than it should.

1) The bracket; Credit button (coin #1) MPU Test, MPU clear and volume control and a few extra holes for future expansion.

For some reason the clear button does nothing, I'll have to re-tone that one out again. Not sure if something to do with the Weebly MPU or not as it has its own button which works fine.

2) Credit button and tilt panel are 100% Switches #1, #6 and #7 work like a charm.

3) Displays were not displaying HSTD as the data was corrupt. Stepping through audits and clearing them one by one with the Weebly audit clearing button and they work fine now (displaying 00)

4) Sound is now functional, Speaker sounds fine. Sound does sound choppy on coin up, I'll post a clip later. Speaker and volume are hard wired but I still have to wire up power, currently running off Test Point 5 and a ground jumper.

All I got for the day, some progress though.

20210912_165011 (resized).jpg20210912_165011 (resized).jpg

#325 2 years ago

Some earlier weebly boards do not bring the door clear button to the mpu.

#326 2 years ago
Quoted from slochar:

Some earlier weebly boards do not bring the door clear button to the mpu.

I sent BarackandI a note inquiring, I'll let you know what he says.

#327 2 years ago

all that work and keeping old capacitors on the SDB?

#328 2 years ago
Quoted from gdonovan:

2) Credit button and tilt panel are 100% Switches #1, #6 and #7 work like a charm.

Did you mock up a simple way to switch the strobe lines for the coin/tilt/slam switches?

#329 2 years ago
Quoted from flynnibus:

all that work and keeping old capacitors on the SDB?

Placeholder board for the moment, new parts are on the bench waiting for a less hectic moment of time.

#330 2 years ago
Quoted from Quench:

Did you mock up a simple way to switch the strobe lines for the coin/tilt/slam switches?

In audits and shown on displays, switches are functional and the connector is complete. The only thing I have left to do in cabinet wiring is power for the flipper buttons, wire the knocker and wire the coin mechs.

Home use but why not wire the mechs? Gone this far.

#331 2 years ago
Quoted from BorgDog:

have you seen what this guy is doing on interchanging playfields? https://www.facebook.com/howtobuildapinballmachine/?ref=page_internal

Peeked in from work computer, that fellow is quite the fabricator with a nice shop =)

Running these old tables with some stout new hardware.

Only work this morning was half assembling one 7 digit UNO display, I doubt it will be finished tonight as I have a road trip after work and there will be two more pins crowding the garage spaces. Sometimes I will just move over to something "brainless" when I have a few minutes to spare as the neurons are not always firing first thing in the morning.

Doing the wiring definitely requires all the neurons working.

#332 2 years ago
Quoted from gdonovan:

Home use but why not wire the mechs? Gone this far.

Don't forget the switch strobe lines change between Bally and Stern which is what I was getting at.

#333 2 years ago
Quoted from Quench:

Don't forget the switch strobe lines change between Bally and Stern which is what I was getting at.

Everything off that Mpu connector is wired per Stern diagram and working aside from mpu reset.

Could be a bad switch or being ignored

#334 2 years ago
Quoted from gdonovan:

Everything off that Mpu connector is wired per Stern diagram and working aside from mpu reset.
Could be a bad switch or being ignored

I think it's missing from that board. If pin 5 on J3 isn't marked with it then it's not traced.

#335 2 years ago
Quoted from Quench:

I think it's missing from that board. If pin 5 on J3 isn't marked with it then it's not traced.

I'll try to check when I get home, but were going to be in a hurry to get out the door for a pin(s) pickup.

#336 2 years ago
Quoted from slochar:

Some earlier weebly boards do not bring the door clear button to the mpu.

I think you called it.

Don't mind doing the extra wire, always a chance any number of different MPU will be installed for testing.

20210913_151245 (resized).jpg20210913_151245 (resized).jpg

#337 2 years ago

I know because I reported it to Andrew a while ago and he confirmed it

#338 2 years ago
Quoted from slochar:

I know because I reported it to Andrew a while ago and he confirmed it
//<![CDATA[
window.__mirage2 = {petok:"0fcc35a1af15ba6d1fa7d1785d21aed2b8cfa4d0-1631574029-1800"};
//]]>

A notice on his site would be nice.

#339 2 years ago

Displays done, Pacman wiring a PITA till the bitter end but finally under control.

20210914_185350_1.gif20210914_185350_1.gif
#340 2 years ago

Well another evening where I'm not where I want to be progress wise but the ball is moved downfield. Displays are done and tested, display wiring sorted out finally and the lower harness has several pieces pre-positioned for tomorrows work.

Should finally be wrapped up there after work or if I wake up early in the morning.

#341 2 years ago

Like my improvised knocker? It hits with AUTHORITY.

As a Data East VUK unit I may have to de-rate the coil for this application, the DE knockers do typically sound like gunshots when they go off though.

Flipper grounding circuit is done as well this morning along with the GI power and ground feeds run to coin door so work at the A2 board is now 100% complete.

All I have to do tonight is wire coin door switches and GI bulbs and lower cab is complete. In the upper I have to move SB300 to final location, permanent power and ground for it along with fabrication Z brackets.

20210915_054928 (resized).jpg20210915_054928 (resized).jpg20210915_054945 (resized).jpg20210915_054945 (resized).jpg
#342 2 years ago
Quoted from gdonovan:

As a Data East VUK unit I may have to de-rate the coil for this application, the DE knockers do typically sound like gunshots when they go off though.

The knocker might accidentally trip the tilt plumb-bob!

#343 2 years ago
Quoted from Quench:

The knocker might accidentally trip the tilt plumb-bob!

That actually gave me a well needed laugh at work.

#344 2 years ago

Back at it..

20210915_171753 (resized).jpg20210915_171753 (resized).jpg
#345 2 years ago

Mechs from my stash are older than dirt but work perfect.

20210915_190218 (resized).jpg20210915_190218 (resized).jpg
#346 2 years ago

Getting serious when the shop vac gets deployed.

20210915_191728 (resized).jpg20210915_191728 (resized).jpg
#347 2 years ago
20210915_192427 (resized).jpg20210915_192427 (resized).jpg
#348 2 years ago

More scrap becomes SB300 brackets and the sound board finds its final destination. Plenty of room for a Bally sound board next to it.

20210915_200920 (resized).jpg20210915_200920 (resized).jpg20210915_200944 (resized).jpg20210915_200944 (resized).jpg
#349 2 years ago

Final sound board wiring.

Stern looks to power the SB300 by having power and ground pass through the board before continuing on to the MPU. I elected to power the board by grabbing unregulated 11.9V power and ground directly at the A3-J3 connector as it comes from the A2 power board.

20210916_070856 (resized).jpg20210916_070856 (resized).jpg
#350 2 years ago
Quoted from gdonovan:

Final sound board wiring.
Stern looks to power the SB300 by having power and ground pass through the board before continuing on to the MPU. I elected to power the board by grabbing unregulated 11.9V power and ground directly at the A3-J3 connector as it comes from the A2 power board.
[quoted image]

Do you have a degree in electronic engineering? You sure seem to know your way around some obscure wiring challenges with regards to building a pinball machine.

I'm about ready to grab a prayer rug and worship at your feet.

Promoted items from Pinside Marketplace and Pinside Shops!
$ 12.00
Playfield - Toys/Add-ons
UpKick Pinball
 
$ 9.95
Eproms
Pinballrom
 
$ 29.00
Boards
RoyGBev Pinball
 
$ 45.00
Pinball Machine
Wall To Wall Pinball
 
6,200
Machine - For Sale
Mt Zion, IL
$ 18.95
Eproms
Pinballrom
 
$ 20.00
Hardware
Volcano Pinball
 
$ 25.00
Playfield - Plastics
20eyes
 
$ 179.00
$ 69.00
Gameroom - Decorations
Pinball Pimp
 
7,995 (OBO)
$ 10.00
Playfield - Decals
Metal-Mods
 
$ 22.95
Eproms
Pinballrom
 
$ 33.95
Eproms
Pinballrom
 
From: $ 130.00
Boards
Troxel Repair
 
1,500 (Firm)
Machine - For Sale
New Brighton, PA
$ 69.00
Gameroom - Decorations
Pinball Pimp
 
From: $ 20.00
Playfield - Protection
UpKick Pinball
 
From: $ 30.00
Cabinet Parts
Rocket City Pinball
 
$ 11.00
Electronics
Third Coast Pinball
 
From: $ 20.00
Various Novelties
Pinball Photos LLC
 
$ 10.00
Playfield - Decals
Metal-Mods
 
From: £ 135.00
Electronics
Retro Electro Designs
 
6,195 (OBO)
Machine - For Sale
West Chicago, IL
$ 69.00
Gameroom - Decorations
Pinball Pimp
 
$ 169.00
There are 1,882 posts in this topic. You are on page 7 of 38.

Reply

Wanna join the discussion? Please sign in to reply to this topic.

Hey there! Welcome to Pinside!

Donate to Pinside

Great to see you're enjoying Pinside! Did you know Pinside is able to run without any 3rd-party banners or ads, thanks to the support from our visitors? Please consider a donation to Pinside and get anext to your username to show for it! Or better yet, subscribe to Pinside+!


This page was printed from https://pinside.com/pinball/forum/topic/seawitch-from-scratch-allentown-edition/page/7 and we tried optimising it for printing. Some page elements may have been deliberately hidden.

Scan the QR code on the left to jump to the URL this document was printed from.