(Topic ID: 298861)
Linked Games
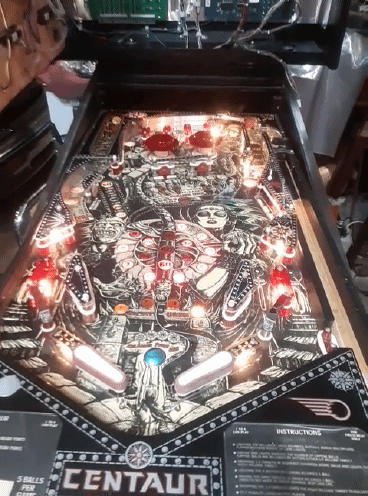
 Centaur
Bally, 1981
Centaur
Bally, 1981-
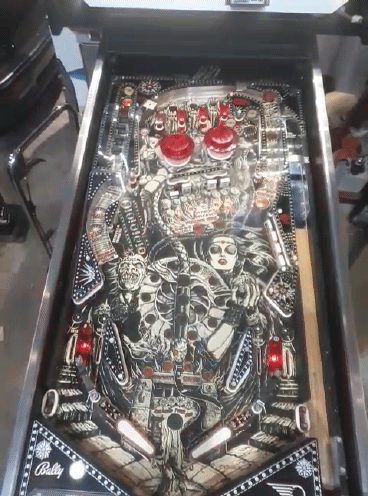
Fathom
Bally, 1981
-
Flash Gordon
Bally, 1981
-
Nitro Ground Shaker
Bally, 1980
-
Quicksilver
Stern Electronics, 1980
-
Seawitch
Stern Electronics, 1980
-
Silverball Mania
Bally, 1980
-
Skateball
Bally, 1980
There are more than 8 games linked to this topic.
Click here to show all linked games
Click here to show all linked games
Topic Gallery
Quoted from gdonovan:Improved leg attachment plates.
Nice work, been planning to do the same thing when I get to some of my games. Did you thread the plate aswell?
Quoted from Quench:Nice work, been planning to do the same thing when I get to some of my games. Did you thread the plate aswell?
Yes and the fasteners were welded into place shortly after picture taken.
Quoted from gdonovan:More goodness in the mail today! Actual Stern apron for Quicksilver. Just need to find a Stern 4 bank drop target assembly now.
[quoted image]
Nice haul of parts!
Not sure if you’re still looking fit stern 4 bank target. I’m in a similar situation and started looking at options.
Marco does sell some of the stern drip target components like the bottom and backs to the target body. You may be able to convert a 3 to a 4.
The other option that I’m looking into is to adapt a Bally 4 bank into a stern. Not a lot on details out there on this but it appears to be a fairly simple conversion.
Quoted from jgreene:Nice haul of parts!
Not sure if you’re still looking fit stern 4 bank target. I’m in a similar situation and started looking at options.
Marco does sell some of the stern drip target components like the bottom and backs to the target body. You may be able to convert a 3 to a 4.
The other option that I’m looking into is to adapt a Bally 4 bank into a stern. Not a lot on details out there on this but it appears to be a fairly simple conversion.
I have already covered converting a Bally to Stern "spec" during the Seawitch build in some detail, maybe I'll key post it.
https://pinside.com/pinball/forum/topic/seawitch-from-scratch-allentown-edition/page/3#post-6468294
Already key posted!
Quoted from gdonovan:I have already covered converting a Bally to Stern "spec" during the Seawitch build in some detail, maybe I'll key post it.
https://pinside.com/pinball/forum/topic/seawitch-from-scratch-allentown-edition/page/3#post-6468294
Already key posted!
Thanks for linking to the post, I mist have missed that in previous reads of this thread.
Almost done for day and then cab wiring is done. Added switched on outlet and right flipper switch wiring for switch matrix (lane shift for Centaur)
Working with FOUR wiring schematics simultaneously, be glad when the power supply upgrade is complete.
20220123_155949 (resized).jpg20220123_162534 (resized).jpg Moe
Moe
Quoted from gdonovan:Almost done for day and then cab wiring is done. Added switched on outlet and right flipper switch wiring for switch matrix (lane shift for Centaur)
Working with FOUR wiring schematics simultaneously, be glad when the power supply upgrade is complete.
[quoted image][quoted image]
You will be powering your Seawitch from a Bally transformer and powersupply board?
 Algonac, MI
Quoted from Pinballer73:You will be powering your Seawitch from a Bally transformer and powersupply board?
Yes.
There is no differences in supply voltage and the larger transformer will actually be closer to being correct for a 4 flipper pin. I'll get less voltage drop in heavy play.
To run the Seawitch playfield with the new A2 board I'll make an adapter harness to go between the two.
Quoted from gdonovan:Yes.
There is no differences in supply voltage and the larger transformer will actually be closer to being correct for a 4 flipper pin. I'll get less voltage drop in heavy play.
To run the Seawitch playfield with the new A2 board I'll make an adapter harness to go between the two.
Great idea! Perhaps you could make a few more adapter harnesses to sell and offset your costs? I would be interested in two if possible. One for Quicksilver and a future Nine Ball if the planets align.
Ok wiring is done here aside from replacing the backbox connector. Even got the polarity correct on the outlet. Reason for it being switched?
Getting a Laser War prototype topper with upgrades
The 3 small additional connectors are for the triac for the GI flasher control and the harness plug for lane shift.
Oh and the extra plug off the transformer? That's 120v isolated, perfect for a Flash Gordon strobe feed.
Quoted from Pinballer73:Great idea! Perhaps you could make a few more adapter harnesses to sell and offset your costs? I would be interested in two if possible. One for Quicksilver and a future Nine Ball if the planets align.
Touching base on this to flesh things out a bit more;
I'm converting to this setup for a number of reasons, just having the right size transformer being a single facet. Another being that since playfields I'm going to be running are Bally of this vintage it makes sense to jump to the A2 board that utilizes the same plugs (Centaur & Flash Gordon)
The cabinet wiring will have to be converted (lower cabinet and backbox connectors) but from now on to run an early Bally or Stern playfield, I'll have to plug in an adapter harness that converts the newer playfield A2 output to a old style connection.
I'm not willing to simply convert Seawitch to the later connector since at some point I may wish to sell the playfield as an assembly and having an oddball connector might make it a harder sell. Better to have a standard connector so it can be dropped into any Stern cabinet.
Edit- Just an FYI; there is nothing really stopping you from cutting the plugs off the later Bally transformer and soldering them onto the early Bally/Stern bridge board or even making a simple adapter harness that plugs into the Bally transformer connectors and ends in an attachable harness to the early bridge board.
Punch list of work to do which itself is divided into two sections.
Section one is updates related to Bally transformer and A2 rectifier board while maintaining backward compatibility with Seawitch, Quicksilver and early Bally titles like Star Trek, Silverball and Skateball.
The last things to do here is:
1) Adapter harness to go between the early playfield rectifier board connector and the newer rectifier board. (DONE)
2) Move the J2 connector from the Seawitch harness to the playfield harness and add a small connector for playfield hook up. This way is factory and I have it backwards as I didn't have a harness to work with. Just changing it so it factory spec, no functional difference. (DONE)
Things to do before Centaur is operational:
1) Add harness and lane change switch to cabinet (DONE)
2) TRIAC for GI flashing circuit (DONE)
3) Repair TRIAC connector for Centaur harness. (DONE)
4) Install Aux Driver board, wiring for power and MPU control.(DONE)
5) Install Squawk and Talk Board, power and control lines.
6) Check lower cabinet harness related to MPU (slight strobe line difference between Stern and Bally)
7) Speaker wiring- Different between Bally and Stern and have to figure out how to manage that smoothly.
8) Extra strobe line (ST-5) for Centaur switch matrix, have to install bypass switch as line is used by SDB on some games.
9) Clearance cabinet playfield support rails.
And we are live! No sparks, no flames.
First impression is the flippers are only marginally stronger but the poppers and slings are notably stronger.
The was some playfield GI flashing before which is no longer present, also curious.
Still have to swap out the J2 SDB connector before digging into additional Centaur wiring.
20220125_173205 (resized).jpgYou're missing a couple of wires on that playfield power adapter:
Bally split the G.I circuits in two for load sharing. So for your Star Trek, Skateball, etc, you need the extra G.I wires at pins 2 and 5.
For whatever reason, Stern swapped the G.I wire colors with reference to Bally at pins 1 and 8 (just FYI).
Some Stern games use the switched illumination bus at pin 3 (Flight 2000 for sure, not sure which others).
Bally instead added the 9th pin for the extra switched illumination bus (Kiss, Space Invaders, Future Spa).
If I were you I'd make up a PCB with the three pin headers and wiring to the -54 rectifier board attached and screw it down to the base. That 20 pin J3 connector (with trifurcons) will be especially difficult to release as a floating connector.
Quoted from Quench:You're missing a couple of wires on that playfield power adapter:
Not for a Stern! I left it that way when I built the harness as I'm running LEDs.
Bally split the G.I circuits in two for load sharing. So for your Star Trek, Skateball, etc, you need the extra G.I wires at pins 2 and 5.
Yes and I'll add them in once I get to those titles.
For whatever reason, Stern swapped the G.I wire colors with reference to Bally at pins 1 and 8 (just FYI).
Oh I very much ran into that which caused me much concern and slowed down progress considerably. I looked as 3 harnesses and 3 rectifier boards before I was satisfied the adapter wasn't going to cause an issue.
That little harness took me over 2 hours to assemble. Act in haste, repent in leisure as Ben Franklin would say. No reason to be hasty.
If I were you I'd make up a PCB with the three pin headers and wiring to the -54 rectifier board attached and screw it down to the base. That 20 pin J3 connector (with trifurcons) will be especially difficult to release as a floating connector.
No need, there is no A2 20 pin backbox connector required as long as the cabinet is married to the Bally transformer and -54 board. The 20 pin has been replaced by a 9 pin and 12 pin MLX. When swapping early playfields the only connector of concern is the 9 pin power supply to the playfield.
Hence the playfield adapter for pre -54 rectifier board games.
Quoted from gdonovan:No need, there is no A2 20 pin backbox connector required as long as the cabinet is married to the Bally transformer and -54 board.
When swapping early playfields the only connector of concern is the 9 pin power supply to the playfield.
Doh! you're right. No need for the cabinet/backbox power connectors.
Getting VERY busy in there.
The larger Aux driver board isn't going to stay there for a number of reasons, number one being that I won't be able to run a stock MPU when tinkering with Nano modules. I'm planning on making a bracket for the back of the lamp board to hold both aux driver boards. Flash Gordon requires the larger one, Centaur the smaller.
And yes I'm resigned to having this setup for Flash Gordon, the strobe unit clears the voltage regulator shield on the SDB by 1/4" Figured since I was deep in the wiring, best map out everything possible.
Quoted from gdonovan:The backbox wiring is going to be a bear. Have to touch base with Ed over at GPE to find out where I can get these connectors and terminals.
[quoted image][quoted image]
See this thread. I just asked about that style connector.
https://pinside.com/pinball/forum/topic/bally-molex-connector-question-
Quoted from Skidave:See this thread. I just asked about that style connector.
https://pinside.com/pinball/forum/topic/bally-molex-connector-question-
Much obliged! Good timing.
Quoted from gdonovan:Much obliged! Good timing.
Happy to help. I don't want to see the moment slow!
Quoted from Skidave:Happy to help. I don't want to see the moment slow!
Ordered a bunch of parts from Ed @ GPE, need to find female contacts though.
Quoted from gdonovan:Ordered a bunch of parts from Ed @ GPE, need to find female contacts though.
Jameco has them as I recall.
Quoted from Skidave:Jameco has them as I recall.
I can grab a bag off Ebay if need be. (DONE)
Reset the MPU to Centaur and after fiddling about was able to bring up a game, minus sound of course.
All poppers, bank reset coils, flippers, slings, outhole mechs and magnet seem to be operating.
Major work to be done is wire up sound and AUX driver boards, trim support rails and finish wiring matrix for 5th strobe line.
The flashing GI is eerie, I'm so used to Data East it's odd to not hear a relay clacking with the lights.

That reminds me, need to install ZIF sockets on the Squawk & Talk when I burn the Centaur sound roms.
Quick update from work- Robin is working on some board issues, for the moment I'm locked out of the board using Firefox or the Chrome version on Samsung phone. Robin is working on a work around, something to do with an update to the board software the other day. Posting will be sporadic due to this, I despise Edge as a browser.
Centaur is 80% operational- All coil functions are working as are 75% of the lights. Still have to wire the sound, last switch column and aux board, just waiting on package from Ed over at GPE which is on the way. Fun game even in this state and can't wait till the rest is up and operational.
Gary
Looks like Robin has handle on it! Work computer Firefox is working again as is Samsung phone Chrome browser.
Promoted items from Pinside Marketplace and Pinside Shops!
 Toronto, ON
 Zemst
Zemst
Reply
Wanna join the discussion? Please sign in to reply to this topic.

Hey there! Welcome to Pinside!
Donate to PinsideGreat to see you're enjoying Pinside! Did you know Pinside is able to run without any 3rd-party banners or ads, thanks to the support from our visitors? Please consider a donation to Pinside and get anext to your username to show for it! Or better yet, subscribe to Pinside+!
