(Topic ID: 298861)
Linked Games
 Centaur
Bally, 1981
Centaur
Bally, 1981-
Fathom
Bally, 1981
-
Flash Gordon
Bally, 1981
-
Nitro Ground Shaker
Bally, 1980
-
Quicksilver
Stern Electronics, 1980
-
Seawitch
Stern Electronics, 1980
-
Silverball Mania
Bally, 1980
-
Skateball
Bally, 1980
There are more than 8 games linked to this topic.
Click here to show all linked games
Click here to show all linked games
Topic Gallery
Quoted from Grizlyrig:Beautiful day to do painting, weather is on your side.
-Mike
Wish I had the backbox ready, pushing forward as best able. I'll work on that tomorrow.
Quoted from Grizlyrig:Beautiful day to do painting, weather is on your side.
-Mike
Its 5AM and I just headed out to the shop, very pleased with results! I nice dry, smooth semi-gloss surface as a blank canvas!
I was even able to wetsand and buff out the handprints my wife left on the front while still soft.
After church I'll tackle the head, there are a few corner spots that need an application of resin and I didn't want to rush.
Also spent some time last night sanding down the playfield in the areas I filled inserts.
Good Morning, supposed to be another nice day like yesterday. Would like to see some before/after buffing pics if you could.
-Mike
Quoted from Grizlyrig:Good Morning, supposed to be another nice day like yesterday. Would like to see some before/after buffing pics if you could.
-Mike
Here is a before.
20211003_055417 (resized).jpgQuoted from gdonovan:2 chips left to do in backbox, tomorrow is another day.
Filled them this morning, I'll be sanding and primering after work!
Weather looks like hell though so doubt any painting will happen unless I move some stuffs around the garage.
 Wichita, KS
Quoted from cottonm4:What did you put on the corner? Is that water hardener?
Fiberglass resin.
Forgot to mention the one leg shown in the picture with the cabinet protector was pretty bent up but with a large ball peen hammer and 4 x 4 block of wood looks somewhat presentable now.
Everything is blocked and masked off; tomorrow after work ready to hook up the gun and lay down some paint.
Really, really tempted to route off those lower corners of the head so it looks like a more conventional Bally/Stern head but the outer line looks like it intersects 1/4" behind the bottom lip so thought discretion is the better part of valor and leave it be.
Maybe in the future I'll do it and put some fancy trim around the perimeter.
Thanks to pinheadpierre I dont have to worry about touching up the backglass further!
20211007_125749 (resized).jpg Ottawa, ON
Quoted from gdonovan:Thanks to pinheadpierre I dont have to worry about touching up the backglass further!
[quoted image]
Is that a repro, or just a nearly perfect original? I looked into purchasing a used repro from someone, but when I got the chance to inspect in person found the blues & greens were way off from the original. In the end I found a decent survivor to replace my "Sun going Nova" flaked-reds copy, but curious if there are good quality repros around.
Quoted from Dr_Dude:Is that a repro, or just a nearly perfect original? I looked into purchasing a used repro from someone, but when I got the chance to inspect in person found the blues & greens were way off from the original. In the end I found a decent survivor to replace my "Sun going Nova" flaked-reds copy, but curious if there are good quality repros around.
This is a reproduction, I can take a picture of the two side by side but not sure if you will get much from that considering the original is flaking and faded slightly.
Quoted from cottonm4:Is that a Greatwich repro or a BG Resto repro? Is there any way to tell?
Greatwich.
Quoted from cottonm4:Tell us about this transformer. What volts and amps?
Larger Bally unit from Mr and Mrs Pacman. E121-161
Most excellent!
Looking at the wiring schematic it looks like the 161 transformer has a 120v isolation output for the backglass lamp.
In a nutshell you know how Flash Gordon has a separate 120 v isolation transformer for the strobe unit? Bally just incorporated that feature into the main transformer. Otherwise the transformer looks to be the same as any E-122-142, used from Xenon to the end of the -35 era.
Sweet! So it will pretty much power anything I can drop in with gusto.
For Pintastic I'm going to run the current setup before swapping over, time is getting short.
Quoted from A_Bord:Pretty!
Wet sanded it last night and dropped some more clear in a few more low spots. It wont be perfect but it will be mostly flat!
In other news my vinyl cutter arrived and I'm looking forward to doing some graphics work.
20211013_172213 (resized).jpgQuoted from gdonovan:Wet sanded it last night and dropped some more clear in a few more low spots. It wont be perfect but it will be mostly flat!
In other news my vinyl cutter arrived and I'm looking forward to doing some graphics work.
[quoted image]
Can that vinyl cutter cut out a circle inside a square. Can it cut 2 circles but leave some material to keep the inner circle in position?
What I am driving at: A masking tool to paint killer keylines with. Once the masking tool is stuck on the play field and outlining a keyline then the 3 connecting areas between th e2 circles can be cut away and now you have the almost perfect masking tool for painting perfect keylines?
Work with me here. I am not an artist. Can you cut something like this?
Quoted from cottonm4:Can that vinyl cutter cut out a circle inside a square. Can it cut 2 circles but leave some material to keep the inner circle in position?
What I am driving at: A masking tool to paint killer keylines with. Once the masking tool is stuck on the play field and outlining a keyline then the 3 connecting areas between th e2 circles can be cut away and now you have the almost perfect masking tool for painting perfect keylines?
Work with me here. I am not an artist. Can you cut something like this?
[quoted image]
Looking at the manual, I think so.
With transfer material you dont have to do that though. You simply cut out the two circles you need with sticker paper (kiss cut) and then attach the transfer paper to the front to lock position and then remove the sticker backing.
Quoted from gdonovan:Looking at the manual, I think so.
With transfer material you dont have to do that though. You simply cut out the two circles you need with sticker paper (kiss cut) and then attach the transfer paper to the front to lock position and then remove the sticker backing.
I think I understand what you are saying but hope we are not talking past each other.
I had something similar to what I drew made up at a local sign shop. The problem I ran into was the the paper backing that needed to be removed after the "masking tool " was stuck the the play field. With that paper still there doing its job I could not see the play field keylines to get the masking tool lined up. It needs to be like a sticker where you pull the paper backing and then apply the sticker. Then after the sticker is applied you would cut the 3 connecting lines between the inner and outer circle.
I'll try a simpler explanation: Pinball Pimp could make the same thing I drew up. But with Pinball Pimp's paper backing there is no way to align the sticker with the keyline. What I just drew needs to be like working a bumper sticker: Pull the backing, line the mask tool up and stick it to the play field, cut the 3 areas joining the inner circle and outer circle, paint keyline, removing mask tool.
I hope what I wrote made sense.
Quoted from cottonm4:But with Pinball Pimp's paper backing there is no way to align the sticker with the keyline.
You can use translucent transfer paper, some with alignment grid. I'll take a picture of what I have at home after work.
Quoted from cottonm4:I think I understand what you are saying but hope we are not talking past each other.
I had something similar to what I drew made up at a local sign shop. The problem I ran into was the the paper backing that needed to be removed after the "masking tool " was stuck the the play field. With that paper still there doing its job I could not see the play field keylines to get the masking tool lined up. It needs to be like a sticker where you pull the paper backing and then apply the sticker. Then after the sticker is applied you would cut the 3 connecting lines between the inner and outer circle.
I'll try a simpler explanation: Pinball Pimp could make the same thing I drew up. But with Pinball Pimp's paper backing there is no way to align the sticker with the keyline. What I just drew needs to be like working a bumper sticker: Pull the backing, line the mask tool up and stick it to the play field, cut the 3 areas joining the inner circle and outer circle, paint keyline, removing mask tool.
I hope what I wrote made sense.
Check out this guys home made stencils, really got my gears turning on several ideas.
https://pinside.com/pinball/forum/topic/silhouette-cameo-pinball-restorers-club/page/11#post-6535213
I'm actually going to be painting some inserts and keylines with this so have some interest myself.
See this post-
a89525ef8141c20ad28e9f7b3fa1daaacb4fe28f (resized).jpgQuoted from gdonovan:Check out this guys home made stencils, really got my gears turning on several ideas.
https://pinside.com/pinball/forum/topic/silhouette-cameo-pinball-restorers-club/page/11#post-6535213
I'm actually going to be painting some inserts and keylines with this so have some interest myself.
See this post-
https://pinside.com/pinball/forum/topic/vids-guide-to-ultimate-playfield-restoration/page/152#post-6421025[quoted image]
Yes. this is exactly what I am talking about. Clear tape transfers with keylines.
I wish I had that guy's Cyclopes play field.
--------------------------------------------
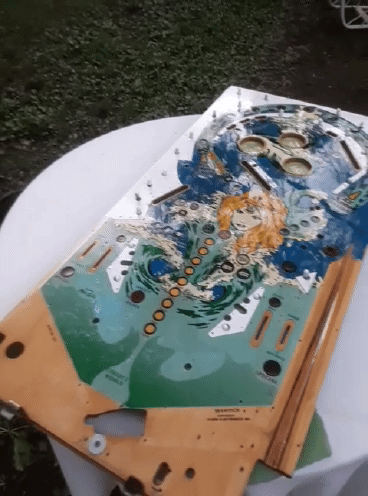
Question: I have one of the purple repro Seawitch play fields. You are inspiring me to try to do what you have been doing with my OG play field.
With your recent experience with restoring your Seawitch play field, would you even have made the attempt with the condition of my Seawitch play field? Or is this a deeper skill set?
This is where some keyline transfers would come in real handy, IMO.
Thanks
Quoted from cottonm4:Yes. this is exactly what I am talking about. Clear tape transfers with keylines.
I wish I had that guy's Cyclopes play field.
--------------------------------------------
Question: I have one of the purple repro Seawitch play fields. You are inspiring me to try to do what you have been doing with my OG play field.
With your recent experience with restoring your Seawitch play field, would you even have made the attempt with the condition of my Seawitch play field? Or is this a deeper skill set?
This is where some keyline transfers would come in real handy, IMO.
Thanks
[quoted image]
To be honest, I think I would have rather started with your playfield!
The ball swirl was so ground into mine that it can't be removed without losing wholesale layers of artwork, it was a well loved or a little maintained game for sure. The whites are noticeably better on yours and there is less ball swirl. I tried wetsanding down the upper layer of grime to almost the wood.
On mine I'd not call it restored, more like a Maaco paint job! If I had more time I would have better matched some of the paint colors if possible, not my strongest suit. It will look decent and play fast, I'm good with that. Flash Gordon is coming out well but then again I have spent months on it. All the keyline and numbers for inserts are going to be done like the Cyclops, painted with stencils done by the Silhouette machine.
So I think you could save the playfield you have but you would have a great deal of time into it. I learned several things doing this one, some of which will be applied to Flash Gordon and future projects.
2d58d1ff71da674127f398cc2144a2ab19a0fd30 (resized).jpg
Promoted items from Pinside Marketplace and Pinside Shops!
 Zemst
Zemst
Reply
Wanna join the discussion? Please sign in to reply to this topic.

Hey there! Welcome to Pinside!
Donate to PinsideGreat to see you're enjoying Pinside! Did you know Pinside is able to run without any 3rd-party banners or ads, thanks to the support from our visitors? Please consider a donation to Pinside and get anext to your username to show for it! Or better yet, subscribe to Pinside+!
