(Topic ID: 247068)

Removing set screws on later style Gottlieb flipper shaft

By Gotemwill

4 years ago


Topic Heartbeat

Topic Stats

  • 30 posts
  • 14 Pinsiders participating
  • Latest reply 4 years ago by RWH
  • No one calls this topic a favorite

You

Linked Games

No games have been linked to this topic.

    Topic Gallery

    View topic image gallery

    000cutoff wheel (resized).jpg
    F4F82137-EF53-4E0B-A294-936BA547AD99 (resized).jpeg
    9FCACD1E-075A-42F2-B305-37EF15529930 (resized).jpeg
    6EEAAAF6-F707-4227-B5D2-2060419D2F42 (resized).jpeg
    55FBD0A6-D277-4792-A096-C068B65E4933 (resized).jpeg
    CEF8B4E6-5792-472D-B09E-CBDA95595B16 (resized).jpeg
    #1 4 years ago

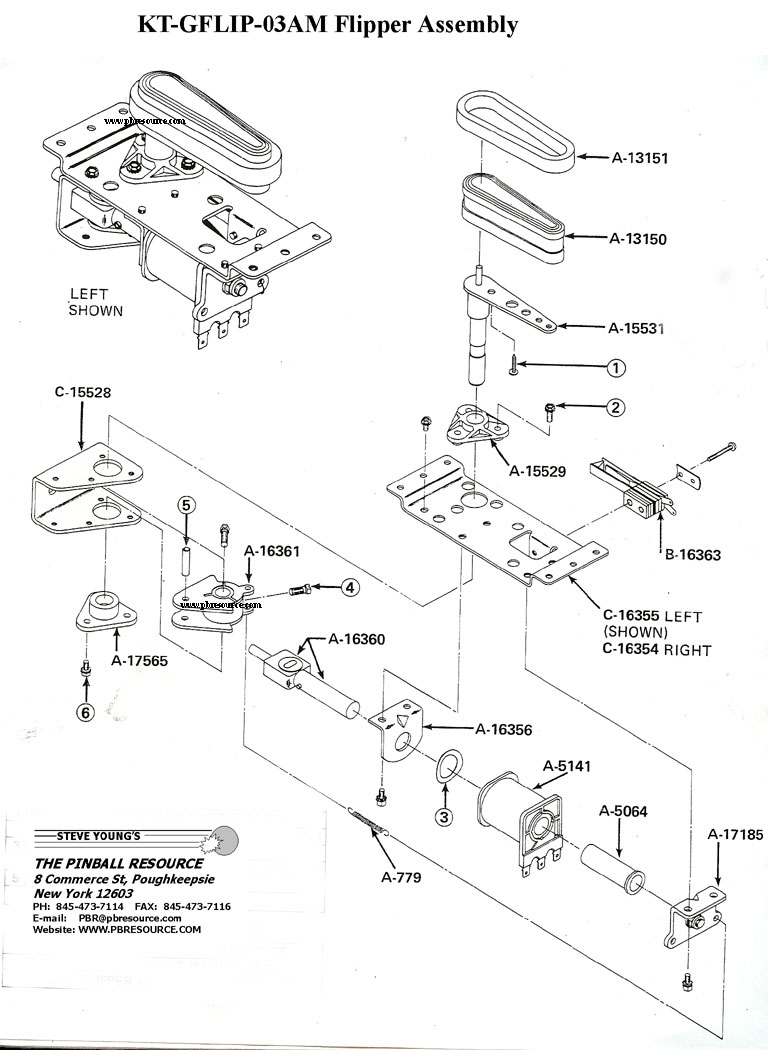
    I am rebuilding the flipper assemblies on a 1976 Gottlieb Buccaneer. I am having a lot of difficulty removing the set screws which hold the flipper shaft in place. Even if I decided to not replace the plunger (which I do want to do) I cannot get to the upper bushing without being able to disconnect the flipper shaft.

    What is the best tool and method to get on these square shaped set screws to loosen them? I tried an ignition combination wrench but can get enough leverage on them.

    55FBD0A6-D277-4792-A096-C068B65E4933 (resized).jpeg55FBD0A6-D277-4792-A096-C068B65E4933 (resized).jpegCEF8B4E6-5792-472D-B09E-CBDA95595B16 (resized).jpegCEF8B4E6-5792-472D-B09E-CBDA95595B16 (resized).jpeg
    #2 4 years ago
    Quoted from Gotemwill:

    What is the best tool and method to get on these square shaped set screws to loosen them?

    If you don't have a socket that fits that you could use a breaker bar or big ratchet on. I'd clamp a small vice grip on it, and a big vice grip to that, and crank it. And hope you don't break it off.

    LTG : )

    #3 4 years ago

    Those square-head screws are not original.
    I'd let some penetrating oil do it's job for a while before attempting to remove them. I'd say the possibility of breaking one off is high.
    Good Luck!
    --
    Chris Hibler - CARGPB #31
    http://www.ChrisHiblerPinball.com/Contact
    http://www.PinWiki.com - The Place to go for Pinball Repair Info

    #4 4 years ago

    What should be there instead of the square head set screws? This game is not supposed to even have this style of flipper assembly according to PBR’s dating information. It is a Sample game.

    The other side is the same.

    It’ll get the Aero Kroil treatment tonight.
    6EEAAAF6-F707-4227-B5D2-2060419D2F42 (resized).jpeg6EEAAAF6-F707-4227-B5D2-2060419D2F42 (resized).jpeg

    #5 4 years ago

    Certainly looks like the right set screws in this exploded view.

    http://www.pbresource.com/rebuildk/kt-gflip-03amfa.jpg

    #6 4 years ago

    Your "set screws" are square-head. OEM screws were either hex-head or, later, allen key. The hex-head set screws were too easily snapped off which causes a huge problem. It is my theory that Gottlieb transitioned to allen key screws because you can't snap them off.

    I wouldn't be surprised if those screws aren't set screws at all but instead something a prior owner had laying around and came in handy.
    --
    Chris Hibler - CARGPB #31
    http://www.ChrisHiblerPinball.com/Contact
    http://www.PinWiki.com - The Place to go for Pinball Repair Info

    #7 4 years ago

    BTW, those flipper mechs are far superior to the mechs that "should" be on the game.
    --
    Chris Hibler - CARGPB #31
    http://www.ChrisHiblerPinball.com/Contact
    http://www.PinWiki.com - The Place to go for Pinball Repair Info

    #8 4 years ago
    Quoted from ChrisHibler:

    BTW, those flipper mechs are far superior to the mechs that "should" be on the game.
    --
    Chris Hibler - CARGPB #31
    http://www.ChrisHiblerPinball.com/Contact
    http://www.PinWiki.com - The Place to go for Pinball Repair Info

    Opinions vary on that. Those linear assemblies can lack feel and feel clunky at times. Harder to rebuild than the generation before them too.

    I concur those are not original setscrews. Get rid of them

    #9 4 years ago

    I've never seen square head screws on a Gottlieb flipper assembly. What should have been there is Allen socket head screws. Before the Allen heads were decided on, Gottlieb was using some chintzy hex head screws which they over-tightened at the factory. When you needed to remove them, the heads snapped off!

    #10 4 years ago

    If they snap off, that's when the fun begins. Not too long ago on a EM Bally I had to break out the angle grinder with a cut off wheel and totally cut off both flippers mid shaft destroying the cranks in the process. Shooting a ten foot shower of sparks should never be part of a flipper rebuild!

    #11 4 years ago
    Quoted from John_I:

    If they snap off, that's when the fun begins. Not too long ago on a EM Bally I had to break out the angle grinder with a cut off wheel and totally cut off both flippers mid shaft destroying the cranks in the process. Shooting a ten foot shower of sparks should never be part of a flipper rebuild!

    4th of July!

    #12 4 years ago

    They’re getting the Kroil treatment now in the hopes that they’ll budge. If they do snap off, any suggestions on the plan of attack? There is not much room to do much of anything and as you know, you can’t remove the assembly from the playfield to get more access without having removed the flipper shaft.

    I can’t believe how tight they are.

    #13 4 years ago

    You could try heating it with a heat gun on low power, or a hair dryer. It might have Loctite on the threads that may soften after heating. Be careful not to melt anything in the area.

    #14 4 years ago
    Quoted from Gotemwill:

    They’re getting the Kroil treatment now in the hopes that they’ll budge. If they do snap off, any suggestions on the plan of attack? There is not much room to do much of anything and as you know, you can’t remove the assembly from the playfield to get more access without having removed the flipper shaft.
    I can’t believe how tight they are.

    Look up "8 point socket" for use removing square bolts. Sears even sold them at one time.

    I can confirm they are suppose to be Allen head, just rebuilt flippers on a 1986 Gottlieb last night.

    #15 4 years ago

    As someone said earlier I'd just spray PB Blaster on it and then give it a turn in an hour.

    #16 4 years ago

    Well, I gave the set screws the old Kroil and time treatment and was able to coax them loose with a small ignition wrench. Thanks for all of the help and encouragement. I replaced them with Allen head set screws.

    Everyone has their own go-to for penetrating lubricants, but Aero Kroil truly is amazing stuff.

    http://www.kanolabs.com/

    9FCACD1E-075A-42F2-B305-37EF15529930 (resized).jpeg9FCACD1E-075A-42F2-B305-37EF15529930 (resized).jpeg
    #17 4 years ago

    My 76 Volley has the hex head screws as well as a friend's Joker Poker so the use of Allen heads was not the only thing out there.

    #18 4 years ago

    I do have one additional question. After reassembling the flipper assembly with all new bushings, I was surprised to find that the flipper itself is still very close to the playfield. It does not appear to be touching but it’s also not gapped off the playfield like I’m used to seeing on my 2” flipper games. Those are gapped off the playfield by a good 1/8”.

    Should the flipper shaft be set right down onto the top bushing? That’s how it’s shown on this exploded view. There’s also a groove in the shaft where the set screws go which make it appear that there’s about 1/4” of play up and down.

    F4F82137-EF53-4E0B-A294-936BA547AD99 (resized).jpegF4F82137-EF53-4E0B-A294-936BA547AD99 (resized).jpeg
    #19 4 years ago
    Quoted from Gotemwill:

    I do have one additional question. After reassembling the flipper assembly with all new bushings, I was surprised to find that the flipper itself is still very close to the playfield. It does not appear to be touching but it’s also not gapped off the playfield like I’m used to seeing on my 2” flipper games. Those are gapped off the playfield by a good 1/8”.
    Should the flipper shaft be set right down onto the top bushing? That’s how it’s shown on this exploded view. There’s also a groove in the shaft where the set screws go which make it appear that there’s about 1/4” of play up and down.[quoted image]

    Your explanation is how I learned to set this style of flipper up. The flange of the flipper shaft sitting on the top bearing/bushing.

    The crank arm is then clamped to the flipper shaft without contacting either the upper or lower bearing/bushing.

    I have found the flipper bat covers close to the playfield also. My solution is to take the bottom edge of the flipper bat cover to a sanding block and remove some of the edges that extend close to the playfield. You can easily take 1/32+ off and make it a comfortable clearance.

    #20 4 years ago
    Quoted from ChrisHibler:

    The hex-head set screws were too easily snapped off which causes a huge problem.

    If the hex head does snap off what is the best way of getting the rest of the screw out of the shaft because i am working on a machine that needs a flipper batton changed.
    Raff

    #21 4 years ago
    Quoted from Raff:

    If the hex head does snap off what is the best way of getting the rest of the screw out of the shaft because i am working on a machine that needs a flipper batton changed.
    Raff

    You could try vampliers if the threads have some movement to them.

    Or, cut a notch in the screw and try to use that to help turn it.

    #22 4 years ago
    Quoted from ForceFlow:

    Or, cut a notch in the screw and try to use that to help turn it.
    Have cut a notch with a dremal but no luck its too tight.
    Raff

    #23 4 years ago

    Have cut a notch with a dremal but no luck its too tight.
    Raff

    #24 4 years ago
    Quoted from Gotemwill:

    I do have one additional question. After reassembling the flipper assembly with all new bushings, I was surprised to find that the flipper itself is still very close to the playfield.

    On my Gottliebs I used a standard credit/bank card slid between flipper bat and PF then tighten my shaft screws. I have a gap of about 3/16 doing this and I think it keeps every thing at the same height from flipper to flipper.

    #25 4 years ago

    Looks like you may be closer to using my method.

    000cutoff wheel (resized).jpg000cutoff wheel (resized).jpg
    #26 4 years ago

    Drill out the broken piece and plan on getting a new flipper bat and maybe lower piece. Less chance of debris flying than grinding.

    #27 4 years ago
    Quoted from John_I:

    Looks like you may be closer to using my method.[quoted image]

    That is what I have had to do several times on Gottliebs which had the hex head screws. I end up destroying the shaft, pawl, and bushing.

    #28 4 years ago

    JB Weld an extension onto the broken screw? Desperate times call for desperate measures.

    #29 4 years ago
    Quoted from Gotemwill:

    JB Weld an extension onto the broken screw? Desperate times call for desperate measures.

    Waste of time.

    LTG : )

    #30 4 years ago

    PB Blaster, then let it set for 2-3 hrs.. Come back wipe it down then heat it with a blow dryer before you try to break it loose. Don't use any type of flame as PB is highly volatile. Also you don't have to spray it on you can spray it in a cup and then use Q-tips to apply.

    Reply

    Wanna join the discussion? Please sign in to reply to this topic.

    Hey there! Welcome to Pinside!

    Donate to Pinside

    Great to see you're enjoying Pinside! Did you know Pinside is able to run without any 3rd-party banners or ads, thanks to the support from our visitors? Please consider a donation to Pinside and get anext to your username to show for it! Or better yet, subscribe to Pinside+!


    This page was printed from https://pinside.com/pinball/forum/topic/removing-set-screws-on-later-style-gottlieb-flipper-shaft?hl=gotemwill and we tried optimising it for printing. Some page elements may have been deliberately hidden.

    Scan the QR code on the left to jump to the URL this document was printed from.