 Wichita, KS
Quoted from Joydivision:Seems to be very common with the original Stern housings to have corners broken off where the screw holes are
I had/have some cracked units. Thin bodied, low viscosity super glue "welded" back together.
 Ali
Stern Electronics, 1980
Big Game
Stern Electronics, 1980
Catacomb
Stern Electronics, 1981
Cheetah
Stern Electronics, 1980
Cosmic Princess
Stern Electronics, 1979
Dracula
Stern Electronics, 1979
Dragonfist
Stern Electronics, 1981
Flight 2000
Stern Electronics, 1980
Ali
Stern Electronics, 1980
Big Game
Stern Electronics, 1980
Catacomb
Stern Electronics, 1981
Cheetah
Stern Electronics, 1980
Cosmic Princess
Stern Electronics, 1979
Dracula
Stern Electronics, 1979
Dragonfist
Stern Electronics, 1981
Flight 2000
Stern Electronics, 1980Quoted from Joydivision:Seems to be very common with the original Stern housings to have corners broken off where the screw holes are
I had/have some cracked units. Thin bodied, low viscosity super glue "welded" back together.
Quoted from snyper2099:You can’t complain or wonder about something that doesn’t quite work right when it was never made to fit that game in the first place.
I have never had a complaint with them. The first set of 3 I bought worked and worked well. Same for the 2nd set. And same for the 3rd. IIRC, I had to open up the holes in the play field on Big Game but on Seawitch the holes were large enough with room to spare.
Quoted from Joydivision:Sounds like the shorter collar/lower skirt doesn’t really create a switch problem if set up correctly
I remember this now with Star Gazer. Greatwich's Star Gazers were made on 7/16" thick play wood. Not 1/2" thick plywood as the factory used. This resulted in the collar sitting above the play field surface. To correct for that I bonded some shims ( tongue depressors were the right thickness ) to the lower side of the play field and mounted the pop assembly on top of the shims.
Quoted from evanc:If I back them off, the assembly raises a bit and the spring isn’t getting compressed just a smidgeon like it does if the body is screwed tight down.
You should not have to do that. Remove the spoon and the switch and see how the skirt acts with no switch/spoon in the way.
Quoted from cottonm4:You should not have to do that. Remove the spoon and the switch and see how the skirt acts with no switch/spoon in the way.
I did, Without the spoon in the way, it sits exactly as shown when the skirt is tightened down. So it wasn't the spoon sticking it off center. It sits right dead center of the spoon when installed.
Quoted from cottonm4:I have not tried the plastic pop rings and cannot comment. What is the design difference? Will a plastic pop ring not fit in the PBL unit?
You have to drill out the holes to provide a wider diameter needed for the plastic rods. It only takes a few seconds to get done.
Different subject:
Have you ever seen factory documentation on how to set playfield pitch on these early Sterns? I know we each have our own preference, but what did the factory recommend?
Quoted from clodpole:Different subject:
Have you ever seen factory documentation on how to set playfield pitch on these early Sterns? I know we each have our own preference, but what did the factory recommend?
Between 6.0-6.5 I believe.
Quoted from clodpole:Different subject:
Have you ever seen factory documentation on how to set playfield pitch on these early Sterns? I know we each have our own preference, but what did the factory recommend?
a lot of people just go all the way down in the front (some people even remove the nut from the leveler) and all the way up on the back with a 3" leveler, whatever pitch that ends up being ![]()
Quoted from hisokajp:a lot of people just go all the way down in the front (some people even remove the nut from the leveler) and all the way up on the back with a 3" leveler, whatever pitch that ends up being
This is the way.
Quoted from chuckwurt:Between 6.0-6.5 I believe.
I'm gonna get one of those clinometers that cover 0 to 10 degrees. I know when my games play the way I like 'em to, but I'm curious what pitch(es) that may be.
Clinometer (resized).jpgQuoted from clodpole:I'm gonna get one of those clinometers that cover 0 to 10 degrees. I know when my games play the way I like 'em to, but I'm curious what pitch(es) that may be.
[quoted image]
The pinguy app on your phone will do the same thing and it’s free. Take off the glass and place the phone on the center of the playfield. It’ll measure the pitch front to back and left to right.
Quoted from hisokajp:a lot of people just go all the way down in the front (some people even remove the nut from the leveler) and all the way up on the back
I used to carry a crescent wrench with me to the local bars or bowling alleys that had pins, to “fix” the ones that were set up flat as a pancake ![]()
Also been known back in the day to stick a 2x4 under the legs if the levelers were too short in back ![]()
Trident pop bumper all fixed! The classic stern pop bumper body didn’t want to sit too flush with the assembly the previous owner used. I think maybe they accidentally shaved a bit of one of the lamp socket posts when shaving down the assembly to fit. I replaced the assembly itself with the new one I put pics of and swapped over the coil, spoon, body, ring etc and all was good with the new assembly. After confirming that I filled the hole and got it mounted flush with all four screws as well.
Just in time too! Got the Trident 2020 kit in today. Excited to dive into that as soon as I locate a good set of cheapish cabinet speakers.
Quoted from evanc:Trident pop bumper all fixed! The classic stern pop bumper body didn’t want to sit too flush with the assembly the previous owner used. I think maybe they accidentally shaved a bit of one of the lamp socket posts when shaving down the assembly to fit. I replaced the assembly itself with the new one I put pics of and swapped over the coil, spoon, body, ring etc and all was good with the new assembly. After confirming that I filled the hole and got it mounted flush with all four screws as well.
Just in time too! Got the Trident 2020 kit in today. Excited to dive into that as soon as I locate a good set of cheapish cabinet speakers.
Thanks for posting the solution.
Quoted from evanc:Trident pop bumper all fixed! The classic stern pop bumper body didn’t want to sit too flush with the assembly the previous owner used. I think maybe they accidentally shaved a bit of one of the lamp socket posts when shaving down the assembly to fit. I replaced the assembly itself with the new one I put pics of and swapped over the coil, spoon, body, ring etc and all was good with the new assembly. After confirming that I filled the hole and got it mounted flush with all four screws as well.
Just in time too! Got the Trident 2020 kit in today. Excited to dive into that as soon as I locate a good set of cheapish cabinet speakers.
Hellz yeah, Trident 2020 is killer!
Ask Dick about the version with the Multiball update. You have to add a WPC style ball trough but holy cow, it’s cool!
Cleaning up the thickest nicotine stains off my German re-import Stars. This Crazy Clean stuff is great. Found it in from an old thread about cleaning up smoke and nicotine stains. Just sprays on and wipes off immediately. I don't recommend letting it soak in, just spray and wipe.
1660DC5D-77FD-4A99-AF73-F4F047B97EB6_1_105_c (resized).jpegFDDE0F12-920C-4F8D-935B-1B7BC94F8212_1_105_c (resized).jpeg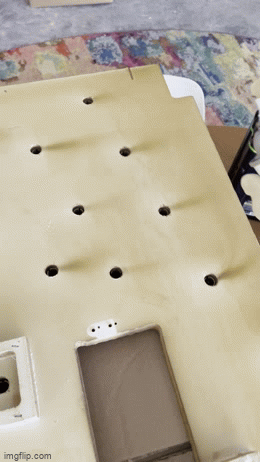 7heoo1.gif693D5E8B-F078-4AC9-A311-1989591363DF_1_105_c (resized).jpeg
Quoted from play_pinball:Cleaning up the thickest nicotine stains off my German re-import Stars. This Crazy Clean stuff is great. Found it in from an old thread about cleaning up smoke and nicotine stains. Just sprays on and wipes off immediately. I don't recommend letting it soak in, just spray and wipe.
[quoted image][quoted image][quoted image][quoted image]
Wow!
Quoted from cottonm4:Thanks for posting the solution.
Thanks for all your help figuring it out!
Quoted from play_pinball:This Crazy Clean stuff is great.
Just bought a can from Amazon - thanks for the lead!
I have been wanting to create this for a while to help you guys that want to convert a Gen 1 Classic Stern steel bumper bracket to a more model bolt in kit by easily modifying a standard stern pop bumper bracket. The reason for doing this is the diameter of the modern stern pop bracket is approx 2.5mm larger in diameter than the hole in the playfield on a few games. So you either have to grind the pop bracket body away or remove the excess from you playfield which is quite permanent approach.
This is a jig that comes in 2 parts which you would 3D print up and then if you have access to a lathe (3 jaw) you can clamp the jig around the body and then centre it in the lathe and carefully machine the ring diameter down to approx 61mm diameter.
If anyone wants these jig parts just send me a pm with your email and then I can email them to you.
Print up at 0.2mm layers and about 40-50% fill in PLA or equivalent.
They are 16mm thick and you use 2 M4 bolts or imperial equivalent and 2 nuts to clamp the parts together. Bolts would be about 25-30mm long.
hope this helps.
I am not worried about not selling the modified pop bumper brackets - this option lets you or someone you know machine a batch of modern stern pop bodies down ready.
jig 1 (resized).pngjig 2 (resized).png
hopefully this clamp jig for a lathe would allow you to machine a clean reduced diameter instead of hand grinding like what play_pinball had to do.
Pinside_forum_7499447_0 (resized).jpgPinside_forum_7499447_1 (resized).jpg
When I saw that Stars in the back of the truck, I thought it was in a fire from all the smoke. Just a long life in
bar.... I'll have to get a can of the crazy clean!
Quoted from play_pinball:Cleaning up the thickest nicotine stains off my German re-import Stars. This Crazy Clean stuff is great. Found it in from an old thread about cleaning up smoke and nicotine stains. Just sprays on and wipes off immediately. I don't recommend letting it soak in, just spray and wipe.
[quoted image][quoted image][quoted image][quoted image]
Quoted from mikeflan:When I saw that Stars in the back of the truck, I thought it was in a fire from all the smoke. Just a long life in
bar.... I'll have to get a can of the crazy clean!
I took the head harness completely out to clean it and the lamp panel. Note I was wearing gloves in the cleaning gif because after handling that crap, my fingertips were fully stained. It took 2 days and countless aggressive hand washings to finally clear up. Super gnarly. I ran the harness through the dishwasher and must have put part close to a heating element (I’ve run like 10 harnesses through this dishwasher and never had a problem). Had to do a bunch of surgery and heat shrink to fix it up.
IMG_0436 (resized).jpeg
I’m not sure it really needed repinning, outside of the usual rectifier connector burnt ends, but figured I already had it out. Did the whole thing while it was easier. Preventative maintenance.
Quoted from swinks:I have been wanting to create this for a while to help you guys that want to convert a Gen 1 Classic Stern steel bumper bracket to a more model bolt in kit by easily modifying a standard stern pop bumper bracket. The reason for doing this is the diameter of the modern stern pop bracket is approx 2.5mm larger in diameter than the hole in the playfield on a few games. So you either have to grind the pop bracket body away or remove the excess from you playfield which is quite permanent approach.
This is a jig that comes in 2 parts which you would 3D print up and then if you have access to a lathe (3 jaw) you can clamp the jig around the body and then centre it in the lathe and carefully machine the ring diameter down to approx 61mm diameter.
If anyone wants these jig parts just send me a pm with your email and then I can email them to you.
Print up at 0.2mm layers and about 40-50% fill in PLA or equivalent.
They are 16mm thick and you use 2 M4 bolts or imperial equivalent and 2 nuts to clamp the parts together. Bolts would be about 25-30mm long.
hope this helps.
I am not worried about not selling the modified pop bumper brackets - this option lets you or someone you know machine a batch of modern stern pop bodies down ready.
[quoted image][quoted image]
hopefully this clamp jig for a lathe would allow you to machine a clean reduced diameter instead of hand grinding like what play_pinball had to do.
[quoted image][quoted image]
swinks I have wanted a lathe for a long time but don’t have a good spot for one. Dang, tempting with a new purpose. I’m gonna be ordering a set of conversion pops for my Ali soon!
Quoted from play_pinball:I ran the harness through the dishwasher and must have put part close to a heating element (I’ve run like 10 harnesses through this dishwasher and never had a problem).
Wow, the insulation melted off just from the heating element?? That sucks. (I despise those dishwasher heating elements, mine has a switch that's easy to get flipped on and if I don't notice it kicks in when I run it)
Yeah this dishwasher doesn’t have the best options. It’s pretty low end but it’s one at work that hasn’t been used otherwise since probably 2019. Continuity seems good on everything now. Got it all back together and will put the lamp panel back in this weekend.
Stars 2020 is going to be my first foray into the Arduino updates. Waiting on some of those parts to arrive still. I have a confirmed working Bally -35 MPU that conveniently has Stars roms installed (since this one seems to have Strikes & Spares roms in it for some reason). I picked it up cheap with the intent to burn roms and install it in another game but that project went away. Fate! Also have a transformer already wired to a new rectifier, so I might try to power it on this weekend, time permitting.
Quoted from play_pinball:I took the head harness completely out to clean it and the lamp panel. Note I was wearing gloves in the cleaning gif because after handling that crap, my fingertips were fully stained. It took 2 days and countless aggressive hand washings to finally clear up. Super gnarly. I ran the harness through the dishwasher and must have put part close to a heating element (I’ve run like 10 harnesses through this dishwasher and never had a problem). Had to do a bunch of surgery and heat shrink to fix it up.
[quoted image]
I’m not sure it really needed repinning, outside of the usual rectifier connector burnt ends, but figured I already had it out. Did the whole thing while it was easier. Preventative maintenance.swinks I have wanted a lathe for a long time but don’t have a good spot for one. Dang, tempting with a new purpose. I’m gonna be ordering a set of conversion pops for my Ali soon!
I don't have a dishwasher. I tie wrap my wiring into a circle and place it over the agitator in my washing machine.
I get this Purple Power. It's cheap. And works good for me. I pour some into my wash tub and add some water, cycle the machine, and let the harness soak for awhile. It does a great job on the wiring.
But if you are going to use it for hand scrubbing, wear gloves, or your finger skin will dry out and start peeling.
https://www.amazon.com/4320P-Industrial-Strength-Cleaner-Degreaser/dp/B002HU5N4O/ref=sr_1_3
Quoted from cottonm4:I don't have a dishwasher. I tie wrap my wiring into a circle and place it over the agitator in my washing machine.
I get this Purple Power. It's cheap. And works good for me. I pour some into my wash tub and add some water, cycle the machine, and let the harness soak for awhile. It does a great job on the wiring.
But if you are going to use it for hand scrubbing, wear gloves, or your finger skin will dry out and start peeling.
amazon.com link »
[quoted image]
Oh haha I saw your post in the What Machine Did You Bring Home Today before I saw this one. I use this stuff in my ultrasonic cleaner and just ran out last night. You accidentally pasted the link there and I thanked you for it. It was $3 cheaper on Amazon, so no trip to Home Depot for me.
Quoted from play_pinball:Oh haha I saw your post in the What Machine Did You Bring Home Today before I saw this one. I use this stuff in my ultrasonic cleaner and just ran out last night. You accidentally pasted the link there and I thanked you for it. It was $3 cheaper on Amazon, so no trip to Home Depot for me.
What kind of ultrasonic cleaner do you have? And you use Purple Power in it?
Not sure of the brand. Some Chinese one off Amazon that was like $60 (3 or 4 years ago… I’m sure it’s more expensive now). It’s not big but works well for small parts. My brother has a nice bigger one that he uses the Comet dust in: https://www.cometpinball.com/products/ultradust-ultrasonic-cleaner
Hey all. I sadly have to report another setback with my playfield production. The problem I encountered will impact the wide body playfields including Big Game. The problem is that plywood, by its nature, has warps and twists in it. When fully assembled and in the machine the playfield is held flat and straight, but in the printer it can have a raised area. The playfield must be held perfectly flat during printing because the print head passes a few millimetres above the surface. If the print head strikes the surface it can cause tens of thousands dollars damage.
We already had one close call and so I built jigs to hold the playfields flat. For standard size playfields I had a metal jig made. It was very expensive. For the wide playfields I made a wooden jig and we have printed some Big Game playfields.
During another print job there was a power surge and outage that caused damage to the printer. The repair bill was $60,000 and the owner is justifiably pissed off. After that he became very protective of the printer and now he is insisting that I produce a metal jig for the large playfields like the one I have for the standard playfields. This is going to take time and money, thus more delay in Big Game production.
So that is the bad news. I will update when I have more news.
Fantastic Pinball Inc
Quoted from FantasticPinball:Hey all. I sadly have to report another setback with my playfield production. The problem I encountered will impact the wide body playfields including Big Game. The problem is that plywood, by its nature, has warps and twists in it. When fully assembled and in the machine the playfield is held flat and straight, but in the printer it can have a raised area. The playfield must be held perfectly flat during printing because the print head passes a few millimetres above the surface. If the print head strikes the surface it can cause tens of thousands dollars damage.
We already had one close call and so I built jigs to hold the playfields flat. For standard size playfields I had a metal jig made. It was very expensive. For the wide playfields I made a wooden jig and we have printed some Big Game playfields.
During another print job there was a power surge and outage that caused damage to the printer. The repair bill was $60,000 and the owner is justifiably pissed off. After that he became very protective of the printer and now he is insisting that I produce a metal jig for the large playfields like the one I have for the standard playfields. This is going to take time and money, thus more delay in Big Game production.
So that is the bad news. I will update when I have more news.
Fantastic Pinball Inc
thanks for your dedication to this and good luck in your next steps!
My printer would tape down problem ones, & always masked the bottom fully to help out the vacuum table. Only had a few have the printer head skip on a raised playfield area.
Quoted from FantasticPinball:During another print job there was a power surge and outage that caused damage to the printer.
I hope you are not being blamed for a power surge.
Just double checking before I choose powder coat colors. Correct for a Stern Freefall is the darker grey same as Bally? Gunmetal grey? I’ve seen a couple pictures with a lighter grey but those could be replacements?
For the legs? AFAIK, all classic sterns had legs that matched the coin door silver (except maybe Orbitor 1, since it used the Stern Video Game style black coin door). I'd assume anything that matches Bally would be the replacement, pulled from a Bally.
Quoted from PantherCityPins:Just double checking before I choose powder coat colors. Correct for a Stern Freefall is the darker grey same as Bally? Gunmetal grey? I’ve seen a couple pictures with a lighter grey but those could be replacements?
I think the Rustoleum light gray hammertone finish is fairly close to the shade of gray you want. Key words: " I think".
Quoted from PantherCityPins:Just double checking before I choose powder coat colors. Correct for a Stern Freefall is the darker grey same as Bally? Gunmetal grey? I’ve seen a couple pictures with a lighter grey but those could be replacements?
Strangely there are 2 pics on IPDB with the Bally color but I would GUESS those are incorrect? Possible Freefall was diff'rent but I wouldn't know why and would go with the standard Hammering personally.
Quoted from TheLaw:Strangely there are 2 pics on IPDB with the Bally color but I would GUESS those are incorrect?
You are correct. The legs should match the coin door.
Quoted from FantasticPinball:Hey all. I sadly have to report another setback with my playfield production. The problem I encountered will impact the wide body playfields including Big Game. The problem is that plywood, by its nature, has warps and twists in it. When fully assembled and in the machine the playfield is held flat and straight, but in the printer it can have a raised area. The playfield must be held perfectly flat during printing because the print head passes a few millimetres above the surface. If the print head strikes the surface it can cause tens of thousands dollars damage.
We already had one close call and so I built jigs to hold the playfields flat. For standard size playfields I had a metal jig made. It was very expensive. For the wide playfields I made a wooden jig and we have printed some Big Game playfields.
During another print job there was a power surge and outage that caused damage to the printer. The repair bill was $60,000 and the owner is justifiably pissed off. After that he became very protective of the printer and now he is insisting that I produce a metal jig for the large playfields like the one I have for the standard playfields. This is going to take time and money, thus more delay in Big Game production.
So that is the bad news. I will update when I have more news.
Fantastic Pinball Inc
Bummer. How about you use the delay to print up some star gazers so I can build one from scratch? Pretty please? ![]()
Sup dudes? A couple questions. Looking for opinions on yoppsicles and yoppsicles vs the ones pinball life has:
https://www.pinballlife.com/classic-bally-stern-insert-led-pcb.html
Also looking for some new pop caps for star gazer and seawitch. They dont have to look like the originals and I would prefer something diffuse vs translucent as I am using the 4smd lens-less comets.
Thanks!
RB
Quoted from rcbrown316:Sup dudes? A couple questions. Looking for opinions on yoppsicles and yoppsicles vs the ones pinball life has:
https://www.pinballlife.com/classic-bally-stern-insert-led-pcb.html
Also looking for some new pop caps for star gazer and seawitch. They dont have to look like the originals and I would prefer something diffuse vs translucent as I am using the 4smd lens-less comets.
Thanks!
RB
I bought 5 of Terry's lights at Pinball Life to try out in my Bally Star Trek to replace some flaky sockets. They were super easy to install, and habe a great warm white color that looks natural. They are brighter than the original incandescent too of course. I'm happy with his product and will be ordering more to do the entire game.
Quoted from rcbrown316:... Looking for opinions on yoppsicles and yoppsicles vs the ones pinball life has:
https://www.pinballlife.com/classic-bally-stern-insert-led-pcb.html
Both work great and the same
Quoted from rcbrown316:Sup dudes? A couple questions. Looking for opinions on yoppsicles and yoppsicles vs the ones pinball life has:
https://www.pinballlife.com/classic-bally-stern-insert-led-pcb.html
Also looking for some new pop caps for star gazer and seawitch. They dont have to look like the originals and I would prefer something diffuse vs translucent as I am using the 4smd lens-less comets.
Thanks!
RB
There are these from PBL. But with 4smds I think you will not like the glare.
I have moved to these EVOs PBL sells.
https://www.pinballlife.com/britecaps-evo-pop-bumper-lighting.html?Category_Code=
Pinball Resourse sells the mushroom caps and the EVOs look great under these.
My camera is not good enough to get good pics, but the EVOS on Seawitch look great.
On Star Gazer, the EVOs under the white Star Gazer pop caps ruled.
EVOS: Cool white looks great. Warm white looks good. Blue looks good on Robocop. Yellow EVOs are fugly. They make Quicksilver yellow mushroom caps like like a crappy shade of orange.
Quoted from cottonm4:There are these from PBL. But with 4smds I think you will not like the glare.
[quoted image]
I have moved to these EVOs PBL sells.
https://www.pinballlife.com/britecaps-evo-pop-bumper-lighting.html?Category_Code=
[quoted image]
Pinball Resourse sells the mushroom caps and the EVOs look great under these.
[quoted image]
My camera is not good enough to get good pics, but the EVOS on Seawitch look great.
[quoted image]
On Star Gazer, the EVOs under the white Star Gazer pop caps ruled.
[quoted image]
EVOS: Cool white looks great. Warm white looks good. Blue looks good on Robocop. Yellow EVOs are fugly. They make Quicksilver yellow mushroom caps like like a crappy shade of orange.
Thanks a bunch man. Much appreciated. I ordered the caps for SG and SW from PBR. I just switched the lamp sockets in both to the wedge type with the centering screw down deal from PBL but those evo ones do look cool. I will definitely try them down the road.
From what I can tell most every single "yellow" LED has been god-awful. I'm curious to see how the new "yellow" LEDs I sent turn out in Quicksilver. They supposedly are actually yellow, unlike previous offerings.
Quoted from KSUWildcatFan:From what I can tell most every single "yellow" LED has been god-awful. I'm curious to see how the new "yellow" LEDs I sent turn out in Quicksilver. They supposedly are actually yellow, unlike previous offerings.
I color match my LEDs in the play field. Under the inserts, my experience with yellow LED is good. It is just the yellow EVOs that suck wind. All IMO.
Quoted from cottonm4:There are these from PBL. But with 4smds I think you will not like the glare.
[quoted image]
I have moved to these EVOs PBL sells.
https://www.pinballlife.com/britecaps-evo-pop-bumper-lighting.html?Category_Code=
[quoted image]
Pinball Resourse sells the mushroom caps and the EVOs look great under these.
[quoted image]
My camera is not good enough to get good pics, but the EVOS on Seawitch look great.
[quoted image]
On Star Gazer, the EVOs under the white Star Gazer pop caps ruled.
[quoted image]
EVOS: Cool white looks great. Warm white looks good. Blue looks good on Robocop. Yellow EVOs are fugly. They make Quicksilver yellow mushroom caps like like a crappy shade of orange.
i really like how the Comet Pop Bumper disc LEDs looks for my classic restore
Quoted from swinks:I have been wanting to create this for a while to help you guys that want to convert a Gen 1 Classic Stern steel bumper bracket to a more model bolt in kit by easily modifying a standard stern pop bumper bracket. The reason for doing this is the diameter of the modern stern pop bracket is approx 2.5mm larger in diameter than the hole in the playfield on a few games. So you either have to grind the pop bracket body away or remove the excess from you playfield which is quite permanent approach.
This is a jig that comes in 2 parts which you would 3D print up and then if you have access to a lathe (3 jaw) you can clamp the jig around the body and then centre it in the lathe and carefully machine the ring diameter down to approx 61mm diameter.
If anyone wants these jig parts just send me a pm with your email and then I can email them to you.
Print up at 0.2mm layers and about 40-50% fill in PLA or equivalent.
They are 16mm thick and you use 2 M4 bolts or imperial equivalent and 2 nuts to clamp the parts together. Bolts would be about 25-30mm long.
hope this helps.
I am not worried about not selling the modified pop bumper brackets - this option lets you or someone you know machine a batch of modern stern pop bodies down ready.
[quoted image][quoted image]
hopefully this clamp jig for a lathe would allow you to machine a clean reduced diameter instead of hand grinding like what play_pinball had to do.
[quoted image][quoted image]
PM sent!
Quoted from play_pinball:Cleaning up the thickest nicotine stains off my German re-import Stars. This Crazy Clean stuff is great. Found it in from an old thread about cleaning up smoke and nicotine stains. Just sprays on and wipes off immediately. I don't recommend letting it soak in, just spray and wipe.
[quoted image][quoted image][quoted image][quoted image]
I saw that Stars at TPF, It needed some love for sure. I’m excited to see it cleaned up. Stars is one of my favorite Classic Sterns. Did you figure out what the whole in the side was for?
Wanna join the discussion? Please sign in to reply to this topic.

Great to see you're enjoying Pinside! Did you know Pinside is able to run without any 3rd-party banners or ads, thanks to the support from our visitors? Please consider a donation to Pinside and get anext to your username to show for it! Or better yet, subscribe to Pinside+!

This page was printed from https://pinside.com/pinball/forum/topic/price-check-1980-sterns-quicksilver-stargazer-seawitch/page/167 and we tried optimising it for printing. Some page elements may have been deliberately hidden.
Scan the QR code on the left to jump to the URL this document was printed from.
 Ottawa, ON