--------------------------------------------------
>>> Poor Man's Stadium Lighting FAQ <<<
--------------------------------------------------
--------------------------------------------------
What is "Stadium" lighting?
--------------------------------------------------
Stadium lighting refers to the technique of adding supplementary GI (and sometimes flasher) lighting to a PF by mounting LED strips above and on either side of the PF. The effect provided is that the entire PF area is evenly lit similar to how actual stadium lights provide a consistent level of brightness across the length of a stadium.
- Stadium lights are created by mounting LED light strips onto plastic or aluminum corner channel (typically 1/2" x 1/2").
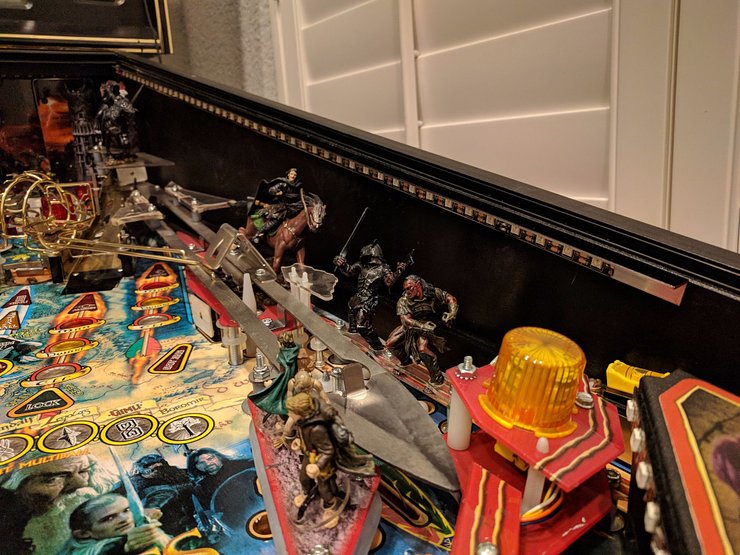
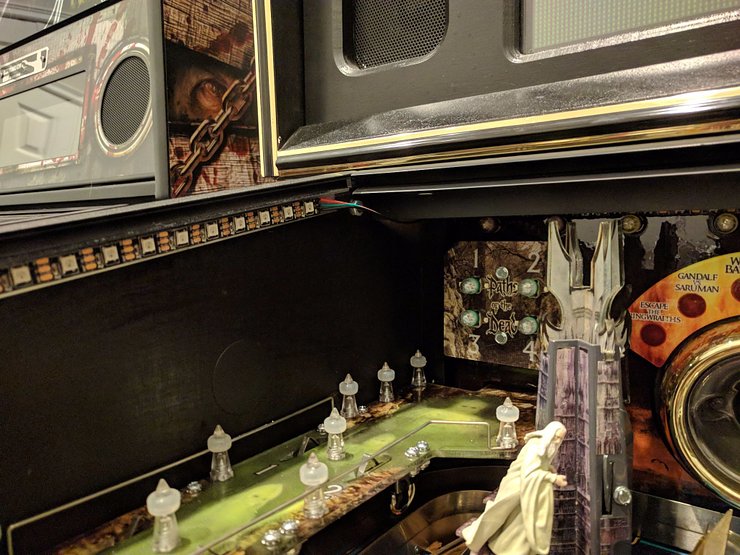
- The channel is then mounted to the top of each sidewall of the cabinet just under the PG glass channel using some variant of magnets or velcro. Note that the LEDs must use a temporary mounting technique so they can be removed (and remounted) easily each time the PF is lifted as they extend over the PF area.
- The channel is mounted with one side flat against the cabinet sidewall and the other side extending over the PF. This is to shield the LEDs from the players eyes.
- For GI lighting the LEDs face straight out over the playfield.
- You can also optionally add Flasher-enabled LEDs mounted to the underside of the channel pointing straight down towards the PF.
--------------------------------------------------
Types of Stadium Lighting
--------------------------------------------------
Stadium lighting projects span the spectrum from basic installs that simply provide even, constant light all the way to sophisticated builds that include integration with the game GI (turns on/off with game GI), ability to customize the color tint and brightness via a wireless bluetooth connection to a smart-phone app, and possibly flasher effects.
Some typical build configurations from simplest to more sophisticated:
- 5v white (W) or warm-white (WW) LED directly connected to the game GI circuit.
- 5v white (W) or warm-white (WW) LED directly connected to a USB power adaptor.
- 12v W/WW LEDs powered by external adaptor w/ IR LED Controller for brightness control.
- 12v W/WW LEDs powered by external adaptor w/ IR LED Controller for brightness control + relay with GI Integration to flash lights in sync with GI lights.
- 12v RGBW/RGBWW LEDs powered by external adaptor w/ bluetooth LED controller for color brightness and tint control via smartphone app, with or without GI integration.
- Pinduino board with programmable LEDs for fully programmable lighting effects (or both 12v RGBW with bluetooth control, etc. AND Pinduino Flasher effects).
--------------------------------------------------
Buy vs. Build
--------------------------------------------------
This thread is for folks with limited budgets and/or a do-it-yourself spirit. The full gamut of Stadium lighting features and possibilities are available to those of us that are reasonably handy with a soldering iron and don't mind "lifting the hood" on our games, all for a fraction of the cost of the commercial offerings.
However, if you like the idea of Stadium lights but don't feel comfortable building them yourself there is a highly popular commercial product line available, see: https://pinside.com/pinball/forum/topic/new-pin-stadium-lights-official-announcement
References:
- Buy vs. build considerations: https://pinside.com/pinball/forum/topic/poor-mans-stadium-lighting#post-4163157
MANDATORY DISCLAIMER: Any modifications you make to your own games are at your own risk. It is possible to damage your game by mis-wiring or overloading the GI or Flasher circuits. I cannot and do not guarantee or warranty the advice provided below. Proceed with caution!
--------------------------------------------------
Reference Builds
--------------------------------------------------
These links take you to some example builds that include explanations or instructions on what was used, etc. during the build. Many more before/after posts exist in this thread but I've only included ones that provide some details on how it was done below for reference:
- HurryUpPinball 's amazing video tutorial for assembling the LED strip channels. I recommend the "Full Version", it's chock full of useful tips: https://pinside.com/pinball/forum/topic/poor-mans-stadium-lighting/page/14#post-5390749
- My original Medusa build using WW 12v LED strips with an IR remote LED Controller for brightness only (see bottom of this post).
- Basic WW 5v install on WCS: https://pinside.com/pinball/forum/topic/poor-mans-stadium-lighting/page/5#post-4315568
- Full Pinstadium equivalent including flashers.
Parts list: https://pinside.com/pinball/forum/topic/poor-mans-stadium-lighting/page/2#post-4164645
Details: https://pinside.com/pinball/forum/topic/poor-mans-stadium-lighting/page/2#post-4164866
- Full 12v RGBWW with GI integration and bluetooth controller on Metallica: https://pinside.com/pinball/forum/topic/poor-mans-stadium-lighting/page/6#post-4352998
- Using 6.3v 20-LED Comet strips to add lighting to specific areas of the PF:
https://pinside.com/pinball/forum/topic/poor-mans-stadium-lighting/page/2#post-4164002
https://pinside.com/pinball/forum/topic/poor-mans-stadium-lighting/page/2#post-4164038
- A comprehensive How-To thread using Pinduino with programmable LEDs for Stadium lighting with lots of information that applies to any build: https://pinside.com/pinball/forum/topic/diy-cabinet-side-aka-stadium-lighting
--------------------------------------------------
What Kind of Mounting Channel Can I Use?
--------------------------------------------------
You can use either plastic or aluminum channel with a 90 deg. corner (corner channel). Typically 1/2" x 1/2" is used.
Aluminum is sturdier, can be less expensive, but also a bit heavier.
Plastic is lighter.
It can sometimes be difficult to source black color channel locally, but painting them yourself an option. Some people use gray plastic or even silver aluminum.
References:
- "I actually prefer using aluminum angle strips from Home Depot and spray painting them black. Cheaper than the PVC too."
- "In Canada Home Depot stocks black anodized aluminum channel that works well."
- "...any angle strip will work and remember that the only visible part of the strip is the top edge. On some of my games the silver aluminum looks nice blended in with stainless steel siderails. On other games with black siderails then I paint the aluminum strips silver. If you can find black angle strips with a 1/4" to 5/8" edge than that saves you some spray painting."
- "I get 1/2 angle at Lowe's for about $4 each for 3' pieces, then spray them satin black."
- "You are looking for the 1/2" x 1/2" Aluminum angle strips in the hardware-raw material section. They are $2.18 at my location for a 3' piece, or you can get an 8' piece for about $5.50." - https://pinside.com/pinball/forum/topic/poor-mans-stadium-lighting/page/6#post-4330658
- Gray PVC angle strips: https://pinside.com/pinball/forum/topic/poor-mans-stadium-lighting/page/3#post-4238512
- https://www.lowes.com/pd/Steelworks-3-ft-x-1-2-in-Aluminum-Solid-Angle/3053617
- Black anodized angle channel and good magnetic tape: https://pinside.com/pinball/forum/topic/poor-mans-stadium-lighting/page/6#post-4374558
- "Using black plastic corner guard from Koffers. Comet Sunlight 50 and 20 strips per side": https://pinside.com/pinball/forum/topic/poor-mans-stadium-lighting/page/8#post-4807677
An interesting alternative mounting tecnique is to mount the LED strips using 57/64" x 9/16" aluminum "U" channel and 3M "permanent" double sided tape and attach it to the top of the playfield rails. The advantage of this approach is that the LED strips can remain attached to the PF when the PF is lifted. Potential disadvantages are that you may not have access to the entire length of the PF on top of the rails, and the LEDs are mounted lower/closer to the PF which may hinder the ability of the light to cover the PF adequately.
See: https://pinside.com/pinball/forum/topic/poor-mans-stadium-lighting/page/5#post-4316822
--------------------------------------------------
What Can I Use to Mount the Channels to the Cabinet?
--------------------------------------------------
You can use good quality magnetic tape, velcro strips, or even rare-earth magnets embedded into the side of the cabinet (for games with very little clearance between the PF and the cabinet).
References:
- "Magnetic strips falling off: I bought one roll of magnet tape that didn't have as sticky a backing as other rolls I used. So now I superglue the magnet strip to the channel and I'll use a little Elmer's white glue on the magnet strips on the sidewalls."
- Magnetic strip: https://pinside.com/pinball/forum/topic/poor-mans-stadium-lighting/page/7#post-4443359
- Thin magnetic strip: https://pinside.com/pinball/forum/topic/poor-mans-stadium-lighting/page/8#post-4808064
- Link to magnetic tape reference: https://pinside.com/pinball/forum/topic/poor-mans-stadium-lighting/page/7#post-4433790
- Detailed postings on using rare earth magnets embedded into the sidewall of the cabinet for games with very limited clearance between the cab wall and PF: https://pinside.com/pinball/forum/topic/poor-mans-stadium-lighting/page/5#post-4316623
and https://pinside.com/pinball/forum/topic/poor-mans-stadium-lighting/page/7#post-4474843
- Using TimeBandit’s ramp clasps to mount sections of angle channel to plastic ramps on a game:
https://pinside.com/pinball/forum/topic/poor-mans-stadium-lighting/page/2#post-4187243
--------------------------------------------------
What Color LED Strips Should I Use?
--------------------------------------------------
Does your PF art feature predominately "warm" colors such as Red, Orange, and Yellow? Or more "cool" colors such as Black, White, Blue, Green and Purple?
Warm - Use warm-white (WW) LED strips.
Cool - Use cool-white (or just "white") (W) LED strips.
Both - If your game features a variety of colors across the warm and cool spectrum it is usually best to use RGBWW LED strips along with a WIFI or Bluetooth controller module that will allow you to precisely select the levels white and color tinted light to use. Using this technique you can make a PF art "pop" while still preserving the natural colors.
It is STRONGLY advised NOT to use colored LED strips for Stadium lighting purposes as these will inevitably color-wash the entire playfield resulting in skewed art appearance and difficulty in tracking the ball. Colored LED strips, however, are suitable for use a Flasher enhancement mounted to the top edge (facing down) of the corner channel. Purple or "U/V" is often used for this purpose.
--------------------------------------------------
Should I use 5v or 12v LED strips?
--------------------------------------------------
5v LED Strips
In cases where you have an older game (EM or early SS) that only requires a small amount of supplemental GI lighting you may be able to use 5V White or Warm-white LED strips that connect directly to the GI circuit or plugged into a USB power adaptor.
- Can be used for smaller length segments of lighting (up to 20 LEDs, depending on the game) when directly connected to the games GI circuit.
- Don't provide as bright a light or the controller options that 12v do.
12v LED Strips
For all but the simplest builds 12v strips are recommended. Advantages of 12v LED strips include:
- Plenty of brightness available and can run the strips on both sides of the playfield (or more) without concern.
- Works with a wide variety of LED strip controllers to control the brightness and/or tint.
- Uses a an external power adaptor (connected to the cabinets service outlet or to a suitable 12v source such as the coin door bill acceptor connector) to avoid possibility of overloading game GI circuits.
--------------------------------------------------
Where Can I Buy LED Strips?
--------------------------------------------------
LED strips can be readily and inexpensively purchased from online sources such as Amazon and Ebay.
It is often more economical to purchase a complete LED strip kit which includes the 5m (15 ft.) of LED strips, the 12v power adaptor, and the controller module in one package.
Prices for these products can vary wildly so it is worth a few minutes to search on Ebay, Amazon, etc. for the best deals.
References:
- 12V W/WW LED Strips (with power adapter and IR controller options): ebay.com link: 5050 RGB LED Strip DC 12V 5M 300LED RGBW WW LED Light Strip with 3A Power Remote
- 12V RGBW/RGBWW LED Strips: ebay.com link: DC12V 5M SMD 5050 RGB LED Strip Waterproof 300LED RGBW RGBWW LED Light Strips
- 5v WW LED strips: https://pinside.com/pinball/forum/topic/poor-mans-stadium-lighting/page/5#post-4316902 and
https://pinside.com/pinball/forum/topic/poor-mans-stadium-lighting/page/8#post-4627283
- 6.3v 20" (and shorter) strips are available from Comet Pinball: https://pinside.com/pinball/forum/topic/poor-mans-stadium-lighting/page/2#post-4164002
- "$4.88 each @ Walmart, Monster makes white LED strips, USB powered and includes a remote to change 4 different shades of white (cool, day, warm, ice) and the brightness. I have a lots of USB wall adapters, so I get one for each strip and plug them into a 4' extension cord plugged into the service outlet. I turn my games on/off with a powerstrip, so the lights turn on and off with my games."
- LED strip wire/cable (22-gauge):
5-pin for RGBW/WW LEDs: https://www.amazon.com/RGBSIGHT-Gauge-Extension-Ribbon-Lighting/dp/B0154H7BLE/ref=sr_1_3
4-pin for RGB LEDs: https://www.amazon.com/SoundOriginal-Extension-Strips-Single-Colour/dp/B01M21MPB7
- LED strip wiring connectors: https://pinside.com/pinball/forum/topic/poor-mans-stadium-lighting/page/6#post-4328505
--------------------------------------------------
What Kind of LED Controller Do I Need?
--------------------------------------------------
For all but the most basic projects you will want some kind of LED controller module (12V) to control the brightness and/or color tint of your lights.
Keep in mind the wiring requirements of your project when purchasing your controller. Some have connections that are easier to work with when combining the wiring for 2 LED strips together into the controller, etc.
For simple brightness control a controller with an included IR remote control unit is sufficient.
References:
- Complete kit: https://www.amazon.com/SUPERNIGHT-Changing-16-4ft-40-Keys-Controller/dp/B07CHGJNXG/ref=sr_1_5
To control RGBW/RGBWW LEDs you will want a wifi or bluetooth controller that uses an app on your smartphone to configure the color tint and white brightness, etc.
Some examples of readily available options are:
- https://www.amazon.com/HaoDeng-Bluetooth-Controller-Strips-Android/dp/B07CN1BKM7/ref=sr_1_3
- https://www.amazon.com/Topled-Light-Controller-Waterproof-Controlled/dp/B06Y27GMVY/ref=sr_1_15
- https://www.amazon.com/EPBOWPT-Bluetooth-Controller-Control-Suitable/dp/B01MAUQS3R/ref=sr_1_17
- https://www.amazon.com/Sanwo-Bluetooth-Wireless-Controller-Striping/dp/B0788L3F26/ref=sr_1_5
- RGBW BT Controller reference: https://pinside.com/pinball/forum/topic/poor-mans-stadium-lighting/page/6#post-4375903
- Kit: https://www.amazon.com/Bluetooth-Controlled-Waterproof-Lighting-Adhesive/dp/B07G7WWMRV/ref=sr_1_5
- RGBW Controller that doesn't require a smart-phone app: https://www.amazon.com/Channel-Controller-Dimming-Multfunction-12-24VDC/dp/B075ZQ73ZD/ref=sr_1_17
--------------------------------------------------
How Can I Power the LED Strips?
--------------------------------------------------
The LEDs trips and optional controller module can be either be powered by direct connection to the games 6.3v AC GI circuit (5v LED only) or via an external 12v power adaptor (12v LED - RECOMMENDED for most projects).
12V References:
- Why can't I connect 12v LED directly to a 12v Flasher?: https://pinside.com/pinball/forum/topic/poor-mans-stadium-lighting/page/8#post-4502375
- "Make sure you get a 12v, minimum 2A (amp) or greater power adapter. You will need at least 1.5a to power the RBGW strips + bluetooth controller module."
- Many LED strip kits come with the required power adaptor (and controller).
- Easiest is to plug the 12v adaptor into the service plug inside the game cabinet, though this is constantly powered even when the game is off.
- "One way to get controlled 110V AC (turns on/off with the game power) is tapping into the dollar bill acceptor wire harness. All Whitestar/SAM games have them and I believe most WPC. Not sure about earlier games." See: https://pinside.com/pinball/forum/topic/diy-adding-an-external-power-supply-to-a-stern-samwhitestar
- Reference to using smart outlet to turn off entire game’s power including the service outlet: https://pinside.com/pinball/forum/topic/poor-mans-stadium-lighting/page/8#post-4527805
- Reference to a commercial product to provide required power only when game is on called "Game On": https://pinside.com/pinball/market/shops/1015-rock-custom-pinball/02206-game-on-interactive-power-supply
5v References:
- Strobing can be caused by GI fade effects which can sometimes be disabled in game settings (or possibly overloading the GI circuit): https://pinside.com/pinball/forum/topic/poor-mans-stadium-lighting/page/8#post-4500301
- Solution to 5v light strobing issue when connected directly to GI: https://pinside.com/pinball/forum/topic/poor-mans-stadium-lighting/page/7#post-4440676
--------------------------------------------------
Do I Need "GI Integration"?
--------------------------------------------------
If your game turns the GI lighting on/off during gameplay for effects you may want to add a GI integration to your project so that the stadium lights will also turn on/off along with the GI lights.
The GI integration requires using a relay of some kind to control the flow of the 12v power coming from the external power adaptor to the LED controller. The relay will power the LED controller when the GI is powered, and turn off the LED controller when the GI is off. The relay is controlled by the presence of power taken from the GI circuit, or by detecting that a GI light is lit using an optical sensor connected to the relay.
- A useful hack that uses a modified LED bulb to convert GI AC current to DC current to feed into the relay (See step #5): https://pinside.com/pinball/forum/topic/poor-mans-stadium-lighting/page/6#post-4352998
- Custom optocoupler board design to control power to controller from GI: https://pinside.com/pinball/forum/topic/poor-mans-stadium-lighting/page/8#post-4634907
https://pinside.com/pinball/forum/topic/poor-mans-stadium-lighting/page/8#post-4638294
--------------------------------------------------
Adding Enhanced Flasher Effects
--------------------------------------------------
You can easily add an additional 12v colored LED strip to the top edge of each channel to provide an enhanced flasher effect for your game.
Generally you simply connect the colored LED strips directly to a 12v Flasher socket on your game that you wish to have trigger them (Be cautious though on some modern games this could damage the flasher circuit).
Any color can be used but Purple or "U/V" is often an excellent choice for this purpose.
--------------------------------------------------
Adding Mind-blowing Next Level Flasher Effects!
--------------------------------------------------
The Pinduino project provides a very powerful kit to add fully programmable LEDs to your game. It provides a specialized board that can detect when any flasher on the game goes off and react accordingly - like "Onion's Belt" ![]() .
.
Many games already have existing code integrations that you can use off the shelf (or tweak as you like if you have basic coding capabilities).
References:
- Pinduino thread: https://pinside.com/pinball/forum/topic/pinduino-v03-interactive-control-of-leds
- Pinduino as Stadium lighting thread: https://pinside.com/pinball/forum/topic/diy-cabinet-side-aka-stadium-lighting
**********************************************************************
(ORIGINAL POST...)
I was inspired by the impressive before/after pics of many games that have installed the PinStadium LED lighting modand wanted to add similar lighting to my Medusa to really allow the amazing playfield art to show.
Being notoriously, uh, "cheap" ![]() and the kind that likes to craft my own fixes/mods when feasible I decided to see what I could come up with myself.
and the kind that likes to craft my own fixes/mods when feasible I decided to see what I could come up with myself.
Since Medusa is a 1980 Bally there are no flashers to incorporate, nor GI lighting effects to consider, so all that was required were simple Warm-White LED strips along either side of the playfield. Warm white was chosen to keep the warm playfield colors showing as they should via the games original incandescent lighting. The light strips can stay lit whenever the game is on, and only a simple brightness adjustment is required to fine-tune the amount of light being provided.
Here is the parts list I put together (from Amazon):
- SMD5630 LEDs,IP20 Non-Waterproof,Warm White 2800K, 16.4Ft, LED Strip Light + 12V,5A Power Supply: $22 Cdn
https://www.amazon.ca/gp/product/B01FHEJ6PI/ref=oh_aui_detailpage_o00_s00
- Mini Remote RF Controller for Single Color LED Strip Lights Dimmer for 12 V DC LED Light Strips: $7 Cdn
https://www.amazon.ca/TianNorth%C2%AE-Controller-Wireless-Control-Dimmable/dp/B01KTT3BSE/ref=sr_1_fkmr2_1
- 8ft. length of pre-finished black aluminum "outside corner trim", 1/4" width per side from Home Depot, approx. cost $15 Cdn.
- Velcro 7/8 in. Sticky Back Squares 12 Pack from Home Depot, approx. cost $5 Cdn.
Total cost: $49 Cdn.
1. Cut the aluminum corner trim to 33" lengths with a hacksaw, then filed the cut edges smooth to avoid unsightly or sharp edges.
2. Then I cut the LED strip to the same lengths and attached them to one inside edge of the corner trip via the included glue strips on the back of the LEDs.
 IMG_2753 (resized).JPG
3. I added additional wire lengths to the ends of each LED strips to allow enough for the bars to be mounted and the wires to run behind the back of the PF and back up near the front of the cabinet (under the PF). It was a bit tricky to solder the wires to the LED strip connectors due to their small size. I connected the wire from both strips to the single plug that would connect to the remote control adaptor.
IMG_2748 (resized).JPG
4. I applied the velcro strips down the side of the corner trim evenly spaced down the length of each piece of trim. By attached both sides of the velcro to the bar and then removing the backing to uncover the glue it is straighforward to attach the bar to the side of the game cabinet, pressing firmly to ensure the velcro glue makes a solid connection. The light bars are mounted directly below the pf glass channels.
IMG_2751 (resized).JPG
5. Plug the included 12v power adaptor into the Aux. power plug inside the cabinet, and plug it into the remote control adaptor. Plug the light bar wires into the other end of the remote control adaptor.
6. Plug the game in, and use the remote control to adjust the brightness of the strips to taste.
Overall, this took me about 2 hours to complete, most of the time cutting the bars and and soldering the wires.
I was a bit concerned that the light bars wouldn't be very effective on a classic Bally cabinet due to the shallow space between the pf glass and the top of the pf (vs. a modern DMD or LCD game), but the lighting is very effective.
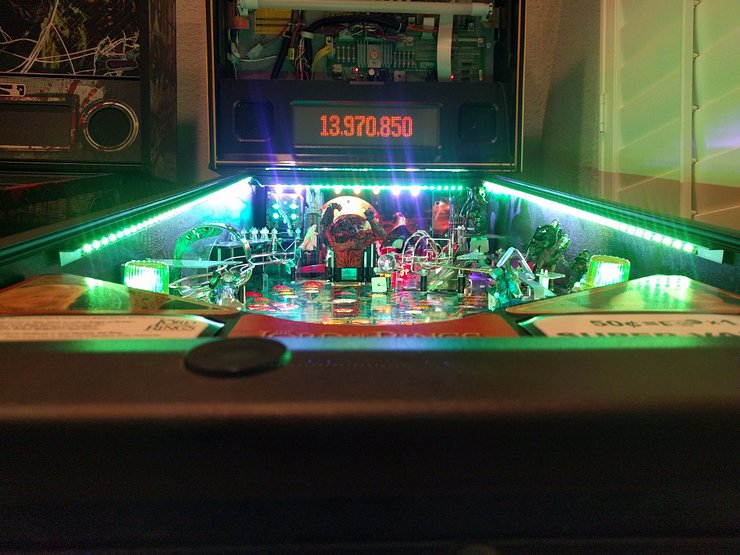
I'm very pleased with this mod on Medusa. The incredible PF art is now very much on display. An additional benefit is that the PF plastics really light up now showing all the detail of their art and providing the game an overall "golden"/glowing effect that really makes it pop and goes well with the theme. For example, see how the gold/white drop targets at the top shine with the lighting.
Before
After
In the picture, there is a noticeable dimming in the lower center of the PF, but in person it is much more subtle and not really noticeable (looks even better in person).
In order to raise the pf, it is necessary to first remove the light bars via their velcro attachments, which is easily done.
A further improvement would be to source the 12v for the LED strips from the game itself so it would turn on/off with the game. I may or may not pursue this as my game is connected to a switched power plug, so I turn on my games at once with a wall switch, which will also turn the LED lights/on off with the game.
 Edmonton, AB
 Algonquin, IL

