Quoted from Bublehead:Willing to part with both. Make me an offer I can't refuse.
Quoted from paynemic:I have three out of four score displays and the alpha numeric. I too put in a pinscore
Would either of you sell me a credit display?
 Pinbot
Williams, 1986
Pinbot
Williams, 1986You're currently viewing posts by Pinsider GRUMPY.
Click here to go back to viewing the entire thread.
Quoted from Bublehead:Willing to part with both. Make me an offer I can't refuse.
Quoted from paynemic:I have three out of four score displays and the alpha numeric. I too put in a pinscore
Would either of you sell me a credit display?
This is telling you that switch 39 is broken, the wire fell off, the diode went bad, the screws holding the switch are loose or the switch just needs to be adjusted.
Take a cardboard tube @ 1 1/4 in diameter and cut a piece 7/8 long. Spray paint it white and hot glue it to the insert board between the N and B of Pinbot to stop the white bulb from bleeding into the red and blue.
Quoted from pinheadpierre:This is also a great place for a slow color changing RGB bulb.
I will have to give this a try.
Quoted from paynemic:Do they even make those any more?
Yes they do. You can also rebuild the one you have with all new parts.
Use the 10 watt resistor for # 89 incandescent bulbs. Use the 3 watt resistor for #89 leds.
http://www.marcospecialties.com/pinball-parts/R10W5
Quoted from sethbenjamin:Anybody got a link?
Quoted from TheOnlyest:I would like to know how you came up with the specs for using those resistors, specifically with 89 LED's.
The f-14 manual.
Quoted from TheOnlyest:The F-14 manual explains how to modify the lighting
No, its just shows a diagram that Williams engineers came up with for Pinbot flasher bulbs. They didn't put it into print until F-14 manual on page 59.
Quoted from TheOnlyest:Even for LED's that weren't invented yet
Yes there were as they are installed on the CPU board of your Pinbot, open your backbox and take a look. Its the big board in there. Hope this helps.
Quoted from TheOnlyest:Your interpretation of that schematic as being one resistor soldered across a bulb socket is just scary!
Where did i say across the bulb.
Quoted from TheOnlyest:that is a schematic for the pre-heater board circuit installed in the machine for the ACTUAL 89 bulbs!
And a voltage drop. Or are you saying that #89 bulbs can handle B+ voltage which is 34 volts DC.
Quoted from TheOnlyest:Your interpretation of that schematic
Not an interpretation, just facts. The only difference between the visor bulb circuit and the F-14 circuit is the 5 ohm resistor. Add the resistor to Pinbot and run 12 volt #89 bulbs.
Quoted from TheOnlyest:please don't talk to me like i'm a moron...
I treat people as they treat me. If you talk down to me I can return the favor...
Quoted from goingincirclez:Could this be a mere symptom of needing to replace those other TIP122s outright, or something else
Transistors don't lock on then work fine, once they short they stay shorted. I am working on something similar to your problem, mine will randomly lock on transistors Q-6,7,8,9,14,15,16 and Q-17 one at a time in attract mode. I have checked everything and I am going to replace PIA U10. I cut it off and the transistors stopped locking on, but have not installed a new chip as of yet. Never enough time for everything.
Quoted from goingincirclez:I'll have to get a standard 7402 and see if that solves the issue.
You will have to find NOS as these aren't being made any more. You can try a 74HCT02.
Quoted from goingincirclez:So this poor ol' PinBot beseeches thee:
Electrically they are the same. Both sets are wired in parallel as they should be. Positive and negative connections don't come into play because these bulbs are not in a matrix with diodes. Now just because you rebuilt the transistor portion of CPU doesn't mean you have fixed your problem. You should have a logic probe to test this further.
I can scan that for you, sent me your Email. Have you checked the +5, +12 and -12 volts. The board wont work without all three voltages.
Quoted from FiatsRUs:There is activity on the board (when using the probe)
You have an O scope for testing? Check for an audio signal at C-3.
Quoted from goingincirclez:and other hacks so hopefully you understand where I was suspicious and ultimately confused!
Most problems that I find on a new to me pin are owner induced, so I am always very suspicious of any old repairs.
Quoted from goingincirclez:The left visor lights are locked on, BUT the transistor does not get warm or fry in the way we're used to with coils.
Do you know if the transistor (Q-30) is shorted or if there is a short in the wire going back to the CPU. Remove 1J11 from the CPU and turn on the power, does the left visor come on now?
Quoted from goingincirclez:When I rebuilt the solenoid section for the left visor, I was unaware that U45 was also bad. Could that bad 7402 have nuked the downstream transistors again?
Yes this could have done damage if a coil locked on. In the future you may want to remove the fuses for the solenoids until you correct your problems on the CPU.
Quoted from goingincirclez:The left visor lights are locked on, BUT the transistor does not get warm or fry in the way we're used to with coils
My mistake 1J11 is for the #89 bulbs, 1J19 is for the #1251 bulbs.
Quoted from goingincirclez:And as for the right visors being locked on, but still flashing (like a combo brake light and turn signal on a car)... what gives there? How could they be locked on AND flash?
Could be either chip acting up, But I would change U-18 as its easier and cheaper. Did you check for continuity from U18 to the PIA chip with the power off to make sure that U-18 pin 12 is not just floating? A fracture could be opening up when the board warms up.
Quoted from goingincirclez:But here's a weirder part. For gits and shiggles I removed U18 (socketed now) and turned the machine on.... the problem remains! So it must not be U18 after all...
With the chip removed solenoid 9,10,11 and 12 locked on because of the pull up resistors.
Quoted from goingincirclez:But instead of power-off continuity from U18 Pin 12 to U10 pin 11... it's going to U10 Pin12...!?
I just checked a couple of system 11a boards I'm working on and it goes from U10 pin 11 to U18 pin12. This is a problem.
Quoted from goingincirclez:Remember, I confirmed the proper behavior of U10 by probing pin 11 when the coil test flashes the visor, and that pin blipped as expected.
This is good but if it isn't getting to U-18 pin 12 your input will float causing the output to go high.
Quoted from goingincirclez:I know the pin numbers go on around counter-clockwise... I don't know HOW or WHEN I slipped into this stupid mistake but... sigh.
No big, shit happens.
Quoted from goingincirclez:What would make the PIA itself act weird like that?
This sounds very very familiar as I bought a box of boards to repair for spares and the CPU had no prior work done but had a shorted Q-9. Upon powering it up on my bench I noticed that the blanking led was a little slow in lighting. When I checked the blanking voltage it was low so I cut pin 14 of U-18 which fixed the blanking voltage. I assumed that U-18 went bad and locked on Q-9 and burned up something on the play field. So I changed U-18, Q-5 and Q-9 and thought this was going to be an easy fix. When I powered it back up notice something strange, random transistors would turn on and then off. Sometimes they would be on for ten minutes and then turn off for a hour. So U-10 PIA did not have a socket so I cut it off the board. Now I haven't have any time to finish this board as I only do this kind of stuff in the winter.
It was next on my list. Since you tried different PIA chips with no luck you may try swapping the 6802 processor chips.
Quoted from goingincirclez:but the blanking LED follows a second or two later. Is this normal?
Normally a little less than a second. If yours seems slow do voltage check of the blanking. Should be 4.85 and up. I'm hoping to get back to my problem this weekend. I am still hoping for a simple bad PIA. ![]()
Quoted from goingincirclez:Here's what the red ramp looked like after painting
Well, I like it a lot and going to do this to mine when I get it going. I think it would look good with a red flasher cover also instead of orange.
Quoted from goingincirclez:I did measure the blanking voltage and while it's 4.97 at the source, it's only 3.68 at U18.
This is real low, but I'm a fix what's broke kind of person. So when it acts up again you have a starting point at least.
Quoted from SunMonkeyAZ:I found one of the 330 ohm resistors is registering about 30 ohms in testing
This is the warming resistor and will only make the bulbs last longer. The larger 10 watt 5 ohm resistor is the one that would cause the bulbs to not flash. Unless you have a different issue with this circuit.
Quoted from SunMonkeyAZ:Are each set of resistors for a side each?
Yes they are.
Quoted from Spindly22:What else can I check to see what the problem is?
Check the fuse on the power supply first. Then with an DMM check for the +100 volts and the -100 volts at the power supply.
Quoted from pacman11:Anyone know why this would happen?
The contacts in the relay on the CPU board may have welded together or the transistor that controls the relay may have shorted. Do you have a DMM or a logic probe? This is a easy circuit to test.
Quoted from pacman11:Wouldn't it look fried?
Maybe, maybe not. Use a ohm meter and measure the outside legs of Q-67. Low reading is bad.
Quoted from pacman11:it looks like Q59 is the problem.
Q-59 is for the lamp matrix.
Quoted from ZeldaOoT:Is there a commonality in what is causing the ball to go airborne in that direction? That's what I would focus on addressing.
For me it's when the ball goes up the ramp and then the ramp raises at the same time. It tosses the ball into the glass and to the side landing on top of the plastic then it rolls down and gets stuck on the flasher lens.
Quoted from TZpinboter:Pinbot bulb question, question 1 1251 bulbs or 89 question 2 89 or 1251 bulbs
All 6 are 1251 bulbs.
Quoted from TZpinboter:I see that #9 and #10 on the list say 1251 bulbs but why is #9 and #10 not show the location in the manual? Thinking they should be 1251 bulbs but still not 100% sure.
#9 is the 2 1251 bulbs in the backbox.
#10 is the 3 1251 bulbs on the right side.
#18 is the 3 1251 bulbs on the left side.
These are the only 1251 bulbs in the game.
Quoted from Milltown:a friend of mine
If he is your friend then use the high score reset button. ![]()
You also need to remember that 8 of the flashers are not the same voltage and can't be replaced with #89 flashers unless you modify the circuit that powers them.
Quoted from MoSeS_1592:For anyone interested I made a few mods to my PinBot, one of them adding another ramp/habitrail to the upper playfield.
Some of these mods are very ingenious and well incorporated in the game. ![]()
![]()
Quoted from jmountjoy111:Speaking of pinbot. I have an issue with the voice and sounds.
Is this because you installed a RD CPU?
Quoted from jmountjoy111:No it has all stock boards
Then 1 or 2 op amps have failed. It will helpful if you have a O scope for testing.
Common and cheap.
ebay.com link: 10PCS LM1458 LM1458N IC OP AMP DUAL 8 DIP NEW
Quoted from jmountjoy111:I don't have a scope
I'm not suggesting that you just replace them with out some testing first. The shotgun approach is not recommended.
Quoted from jmountjoy111:I understand that. I know shot gunning parts can be costly and lead to other issues. I was just curious if it were a part that would be worth just replacing anyway. I am proficient at board work and they are 10 cents a piece. I need to just buy a scope as many machines as I work on. So do you have a recommendation on an affordable oscilloscope
I have found a lot of great testing equipment second hand from schools selling off there stuff. I bought a second Oscope for 35.00 and a adjustable duel output power supply for 10.00.
Quoted from Plumonium:I swear I did not mess with this wire during my restoration and it was working fine before...
No you did not do this, an operator did this as a hack and it has been done many times before. I'm sure it worked fine before, but you need to have both fuses in at the same time. If one fuse blows they both blow. You may have done something that is causing your problem now like a small nut or washer in a lamp socket and them inserted a bulb on top of it causing a short. For now remove the wire as it doesn't belong and troubleshoot from there.
Quoted from Plumonium:Do you guys have this wire connecting both GI strings together
Did you notice that it isn't zip tied to the harness. The operator was in a hurry to go home. ![]()
Quoted from Pinball-Pat:Thanks for the options guys!!!
You can add a resistor in series with the bulb and then run a #89 led if you have some of that type.
Quoted from Pinball-Pat:what size resistor?
Williams did the math for you already. Look at the large resistor on your resistor board in the backbox. ![]()
Quoted from pacman11:Could someone take a picture of the right flipper mech underneath the playfield for me thanks. I am having a few issues with my right flipper, just want to makesure it's wired up correctly. My right flipper is staying activated in the up position when you start a game.
Check the cabinet switch, maybe stuck closed or the p\f maybe pushing it closed when down. Sometimes the cap on the switch shorts causing this to happen.
Quoted from chaskett:Do you think a new board will solve this? Marco is out though it looks like they may
Just install a new resistor on the board.
Quoted from chaskett:Impzilla & Grumpy ,Ya'll are the bee knees. Red eject holes and a 10w 5ohm resistor ordered from Marco.
If the new resistor has a bump on each end, place bump side of resistor against the board. This leaves a space for air to circulate. If there is no bumps then insert a 1\4 spacer between the board and the resistor before soldering and remove spacer when done.
Quoted from pacman11:Thanks! I wonder what pushes down on that switch to shut it off/on.
The shaft on part #1 goes thru the plunger link and sticks out far enough to activate the switch lever.
Quoted from Blitzburgh99:What size head bolts fit it in the backbox? I had a few wing nut top bolts, but they aren’t long enough. Thanks in advance!
Older system 11 game uses 3\8 x 2 3/4 long NC thread.
Remove both screws holding part # 23b L Crank Lock in place and oval the holes in part #23b. Reinstall and adjust it further up. If it still isn't enough then bend it so that it's @ 80 degrees instead of 90 degrees. Other wise you need to buy new parts so that there is less play.
Quoted from chaskett:Get your backbox Visor Light Baffle here:
You should have a divider in the middle because some of us use red and blue flasher bulbs.
Quoted from CollinT:I need to replace some of the lamp sockets for the planets. Having a hard time finding the correct one with the diode, they seem to be sold out everywhere.
You can add the diode yourself.
Quoted from Azfalconfixer:I don't have the -100v off the power supply. Guess I need to dig into the power supply.
Check R-4 for resistance, should be 39k ohms.
Quoted from Pintor:Ok I just want to make sure I got it right
You got it correct, but when done bend the tab that the green wire is on back down so it doesn't short out to the metal plate and nuts.
Quoted from Strummy:Does anyone know or is there a way to find out which resistors go in the correct spots?
The only thing not correct with the resistors on the board is that the bottom resistor is 10 watt, it should be 7 watt. They are in the correct spots. The two inner resistors can cause the lamps to not light, Each resistor is for 2 flash bulbs. You either have a bad solder joint on the resistor lead or a bad resistor itself.
Quoted from Strummy:I replaced the top three that look newer
These newer low quality parts don't last very long. ![]()
Quoted from Strummy:What do the other 2 do?
They are part of the warming circuit, this allows a small amount of current to flow thru the bulb filament. Not enough current to light the the bulb, but enough to warm the filament. This makes the bulb light up quicker more light a flash. It also extends the bulb life. When installing led flash bulbs the warming circuit needs to be disconnected otherwise the the small amount of current will make them light all the time.
Quoted from ChrisPINk25:I have some used parts.
Wow, that is one dirty start button. Looking good now! ![]()
Quoted from Tomass:Ok. I will clean it up tomorrow and see what it looks like with the solder removed.
You will find that 1J-8 header pins will be corroded under the white plastic.
Quoted from ChrisPINk25:Maybe just poor quality because they wouldn't work in my pinbot
The wires on the bulb socket maybe reversed.
Quoted from Tomass:Is it odd that my Pinbot mpu has 1j15 installed?
No. Things at Williams were changing very fast at this time. They corrected it by the next couple of games.
Quoted from Tomass:So does this mean the brown black is the ground? And the diode band goes away from this wire? The 2 wires are orange and brown black. Thanks
Orange is power wire, install next to the band of the diode. Brown/black is the ground wire, install away from the band.
Quoted from Tomass:Are there any connectors I should leave off on the first powerup, and pins I should test before risking damage?
You can leave the brown/black wire off then start a game. Then touch the wire to the coil lug, if it doesn't fire shut off the game and solder on the wire. Then test knocker in coil test.
Quoted from Tomass:I was thinking more along the lines of mpu connectors. Not sure if I should test anything before fully hooking up and turning on the mpu.
You can disconnect 1J-11, 1J-12 and 1J-19. Turn on power and carefully connect each connector one at a time while listening for a coil locking on. Then disconnect 1J-19 again and start a game and reconnect it again while listening for a special solenoid locking.
Quoted from Tomass:All 8 pass through u28 but not sure what is directly upstream from there.
The data bus lines are upstream of U-28. The game roms,CPU and Pia chips are all connected to the data bus lines.
Quoted from Rat:Also does anyone know where I can buy red / blue #1251 bulbs for my visor eyes
I have only seen them in white or warm white. You can add a resistor or rewire the 3 bulbs in series and then use colored #89 led bulbs.
Quoted from Aniraf:you see my flipper solenoids have capacitors attached to them.
Capacitors are used on parallel coils, you have series coils in your pic. Series coils are what came from the factory. So the caps are not needed but are not hurting anything.
Quoted from Aniraf:In the second picture, you see one of the lamp boards which seems to be missing a few of those “cement resistors”.
Someone was or has installed leds in two of the flasher locations. They removed the warming resistors to make the leds work correctly.
Quoted from Aniraf:Does anyone sell the clear plastic cover for the spiral ramp?
Just cut a new one out of Lexan. Use the old one as a guide, cut it with a router and a template bit.
If you use a router, it cuts it to the correct size and polishes the edge in one operation. But if the original part has damage like a broken corner then the router will copy the damage exactly. So you must free hand around the bad corner and touch up later. Using a router takes some practice but is faster overall.
Quoted from Aniraf:I should ask, do I need it? My game will be at a bar.
Yes it keeps the ball from getting stuck.
Quoted from Aniraf:Would it be possible to update the wiring harnesses on this coin door to work with he pinbot one
Yes, but why not fix the one you have?
Quoted from Aniraf:Someone ripped all of the wiring and switches out of it. I don’t know exactly how to assemble it and didn’t want a coin door restoration project on top of my pinbot restoration project .
Unless the door you have is smashed beyond repair, I think it will be quicker to repair what you have. For HUO you only need to get the 3 test switches working.
Quoted from chaskett:Right. I understand the concept, just wasn't sure what to do with the loose wires. Do i wire nut them together, solder the wires together, or what? Just want to see what the finished modification looks like.
Just put a wire on the wire, if there's two wires then twist together and wire nut.
Quoted from chaskett:I am not sure what this means. Is this a typo?
Insert (nut) in the correct spot. Sorry I'm a dumbass. ![]()
Quoted from Aniraf:It is going to a friends bar. If it is cheaper to fix, I am in, but honestly it looks like a stretch to get these wires into switches. I was feeling lazy and just figured I could switch it.
[quoted image]
If it needs the coin mechs to function you will need to talk to someone who runs a route as I am not sure what brand of door that is. But for sure you will need two coin mechs and two coin switches at a minimum.
Quoted from Robotworkshop:It is a Wico coin door. I've been looking for a set of the plastic retainers and coin mechs for mine too. I think the coin mechs are standard but even after years of searching on and off I still haven't found the retainers to hold them in place.
My games have Coinco doors and are a bit different.
Quoted from Aniraf:It is going to a friends bar. If it is cheaper to fix, I am in, but honestly it looks like a stretch to get these wires into switches. I was feeling lazy and just figured I could switch it.
[quoted image]
Since its a Wico coin door and parts are non existence then you will have to replace it with a good used one or a new one. Either way you will need to transfer your old wiring to the new door. Let me know when you get the new parts and I can help with the rewire.
Quoted from topkat:Thank you!
it looks like they head upper right which Marvin mentioned is the knocker...thanks again
Orange is a power wire for the "c" side of the solenoids. The black wire has a color stripe on it. Match that to the solenoid table and you will see it goes to the knocker.
Quoted from Aniraf:“pulsing” when I start the game?
When you start a game or is it when you first turn on the machine?
http://www.pinscore.com/products/pinball-displays/35-ps-10877-p-led-display-for-williams-system-11
http://bigdaddy-enterprises.com/images/XP-WMS10877-B.jpg
One of these will work, DIS079 will not work in a Pinbot.
Quoted from PantherCityPins:what would you use to heat it with?
Heat gun, just keep it moving.
Quoted from cngizbleevng:What is the purpose of this upgrade?
Early system 11 pins didn't have fuses on the input of the 2 bridge rectifiers in the backbox. This can melt the wiring between the transformer and bridge rectifiers and maybe start a fire. It is recommended to add a fuse for each bridge rectifier to stop this from happening. Inkochnito Bridge Board is a nice way to add the fuses and replace the bridge rectifiers and the big cap below in one easy step.
Quoted from PantherCityPins:The capacitor on my board is 63v 47uF and the one provided that is closest is a 50v 47uF. I was under the impression that you didn't want to go down in voltage?
This is not a problem on this particular cap.
Quoted from PantherCityPins:Lastly, I cannot tell where the 50v 100uF vertical capacitor goes. Anyone?
To the right of the F-6 fuse.
Quoted from PantherCityPins:The 25v 1000uF capacitor on my board is vertical, the one in the kit is horizontal. I'm assuming this isn't a big issue, just install the horizontal leads in the slots.
There is a + hole in the circuit board to mount it horizontal, but it is filled with solder. Unsolder it and solder closed the old + hole.
Quoted from CoitusMysterioso:I've wanted to get one of these units for my F-14 and Pin-bot but just wish the wiring instructions were better. I am no slouch when it comes to working with wiring diagrams and schematics and the instructions on the site just confuse me.
If you have troubles, just ask for help. ![]()
Quoted from cngizbleevng:and that middle connection on the 3-pin block that isn't used at all-
The board was made with 4 different sized connector blocks so that they would never be connected incorrectly. Smart thinking!
Quoted from RichWolfson:I am still on the fence about whether I should replace anything other than the ZR2 and ZR4 Diodes
How many hours per day do you have the game on?
Quoted from RichWolfson:No more than an hour a day. Most days a lot less and many days it's not turned on at all. Occasionally when the grandkids are here, it's on for a couple of hours.
Then leave them alone.
Quoted from RichWolfson:The Power Supply board capacitors degrade over time and should be replaced.
Yes the electrolytic capacitors dry out and degrade over time not the disc capacitors.
Quoted from RichWolfson:The transistors, diodes, rectifiers and resistors for the high voltage outputs don't degrade and unless there is a problem, there is no need to replace them.
Yes they degrade but in a different way, but no need to replace them until a problem. 1980-2000 electronics may also be of a better quality then China replacements of today.
Quoted from RichWolfson:unless your machine is on for hours each day, there is nothing to be gained from replacing the ZR2 and ZR4 Diodes with the 1N4763A to add a little life to the displays.
This is what I believe, also if you have a tired display in your machine and you drop the voltage it may not light up on the lower voltage.
Quoted from RichWolfson:Bottom line, for the high side of the power supply, don't fix it if it ain't broke.
PS-Not even lifting the Q1 and Q3, cleaning the pad and redoing the heat transfer compound?
Yes. Again this is what I believe, also I don't care for LED displays and all my machines are still running plasma displays on standard voltages.
Quoted from RichWolfson:PSS-Please just tell me to let it go and get to rebuilding the drop targets and cleaning and waxing the playfield.
Waxing the PF and using new balls is the single most important thing you can do for your machine.
![]()
Quoted from MoSeS_1592:Just curious what type of wax do you use?
Quoted from RichWolfson:His opinion has weight.
I can't tell you which wax is better, because I have only used the same can of wax that I got when I purchased my first pinball ( High Speed ) machine. I don't even think that is still made anymore. Most likely some sort of synthetic wax today. Anyway I still have that same pin and I have to admit it hasn't gotten any worse then when I first got it. I pulled the mylar off when I shopped it in 1990 because it had bubbles, lost some key lines around some inserts where it was bubbled but after 29 years with just wax and new balls it don't look to bad.
IMG_20190329_010517 (resized).jpgIMG_20190329_010554 (resized).jpgQuoted from Blackbeard:I’m not sure if it’s factory or not.
Its not, but someone did a nice clean job.
Now install some fuses on the bridge rectifiers and recap the power supply.
Quoted from Vandy89:This is my first System 11 and I’m confused why the capacitors for the flippers are mounted this way. I assume this is a hack. How is it supposed to look?
Pinbot came with series wound flipper coils. Series wound coils use one diode and no capacitor. Someone upgraded the flippers to parallel coils which have 2 diodes and need capacitors to help with EOS switch arcing. Normally the flipper base brackets for parallel flippers have a taller EOS switch bracket and the cap is mounted on this bracket. The person doing the coil upgrade used the original flipper base brackets which have no place to mount the caps so they remote mounted them. Is it a hack? I wouldn't call it a hack. Its reversible if you want to.
Quoted from Vandy89:I see the original brackets are too small.
You can replace the base brackets with a later version like this.
https://www.pinballlife.com/williamsbally-left-staked-flipper-base-sub-assembly.html
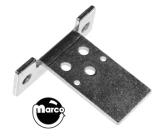
flip (resized).jpgMarcos sells just the bracket. You can drill out the spot welds on the original bracket and tap the holes and install the new brackets.
https://www.marcospecialties.com//images/products/01-9375/medium.jpg
medium (1) (resized).jpgQuoted from Chochi_ca:But I can’t get my energy flashers to work?
Check for voltage on the orange wire at the flasher socket during coil test #6c.
Quoted from Chochi_ca:Also my robot face is stays lit always?
Quoted from Chochi_ca:Should it?
No, did you install Leds ? If you disconnect 1J-12 from the CPU do they turn off?
Quoted from Chochi_ca:I found q17 drive transistor for the robot face to bad.
Quoted from Chochi_ca:I swapped the transistor(2n6532) with a tip122.
Quoted from Chochi_ca:Guess I gotta order the correct transistor?
Tip 122 is the correct transistor, If you like to upgrade then use a TIP102.
When a drive transistor is shorted on it stresses the predriver (2n4401) transistor. I normally replace both the first time so I don't have to remove the board again.
Quoted from Chochi_ca:Lol and for the energy flashers I do have 23vac at the orange wires on the sockets. I checked the resistor boards. They look good.
Place a jumper across the larger 5 ohm resistor and retest this again in coil test, if they flash with the jumper then shut them off right away to keep the bulbs form burning out and replace the resistor. If they don't flash then remove the jumper and diode test the diodes for A6 and B6 on the diode board.
pb (resized).PNGQuoted from SantaEatsCheese:is there an adjustment somewhere I'm missing?
Check the ball switches for both balls.
Quoted from SantaEatsCheese:Both work in the test menu.
Place in switch test, then remove the balls. Does any switches show up on the display?
Quoted from Tomass:I am trying to figure out why my left side GI is out and saw this.
This is your A/C relay, not a GI relay.
Quoted from Tomass:Except you have a capacitor soldered in there.
Blackbeard has a snubber relay in place of the A/C relay, the lower pic is the GI relay.
Quoted from Tomass:Thanks! Threw me off when I saw the 2 solder pads jumped.
This is normal for an A/C relay.
Quoted from Blackbeard:Is there something wrong w this?
No, not a problem if the cap is installed reversed. But the cap and resistor are not needed.
Quoted from Blackbeard:I’m all belts and suspenders over here Grumpy.
???
If it was me I would just cut off the cap. It's not needed in this case.
Quoted from Blackbeard:Does it do any damage? Only thing I could think of is leakage>
The leakage is just as bad as battery leakage.
Quoted from Blackbeard:Any idea why someone would put that on here if it's not factory??
Because they didn't have an A/C relay and they know a snubber relay will work. Snubber relays were more prevalent on some machines like F-14.
Quoted from Blackbeard:Would there be any benefit to me switching it out for an ac?
No.
Quoted from Aniraf:Could worn EOS switches be responsible for blowing the flipper fuse? Users are blowing that 4Amp fuse by holding the flippers. I think these need replaced, but I don’t know if this is a possible root cause.[quoted image]
Yes.
Quoted from Tomass:So how exactly do you get the million plunge?
Score the 100000 point skill shot on the 10th. ball plunge of the same ball.
Quoted from fabsj82:Link fixed. Thanks impzilla
Look on the back side of the relay board for cracked solder joints.
Quoted from Blackbeard:I have the caps, but no info on what cap goes where.
Remove one cap/replace one cap, and so on and so on. Don't forget the diodes too.
Quoted from lecter:Do you guys have any idea how to start looking for the reason of the problem and solve it?
Check the diode for this lamp.
Quoted from Blackbeard:Grumpy: it looks like some
Of the caps on my ps are new. Is there a way to test them? I’d rather not replace them if not needed.
You can buy a capacitor tester for 150.00 or a set of caps for 16.00. I think it's best to just replace the whole set and not have any worries.
Quoted from Blackbeard:One or two of the caps on the board already had NO + or - signs on them, AND the board itself didn't as well. One of the caps was even marked on the board with both sides as + !!
Picture please.
Quoted from Blackbeard:It does look old.
Any idea what would be malfunctioning if it were failing?
This for the 5 volts and should be replaced. You will see the plus mark when removed, and it is also marked on the other side of the board.
Quoted from Blackbeard:The marking must be under it then.
I looked very carefully ON and all around the cap, and nothing. And def nothing on the back of the board.
It is very small but it's marked.
Quoted from RichWolfson:PS-Grumpy, before I fire this up again, do you see a problem with any parts downstream or just replace the resistors and see what happens?
You put a lot of current thru ZR-1 and ZR-3 until the fuse popped. Like 1000 times what it should have been. On the other hand, it was only for a few miliseconds. Your call.
Quoted from RichWolfson:I spoke too quickly. The parts arrived today and the value is correct but it looks like the new ones are not 2 watts. These parts are cheap compared to the time putting them in so, in your infinite wisdom, get the 2 watt ones or install these?
Thanks in advance as always.
///Rich[quoted image]
Do you think you got a 1/2 watt resistor?
Quoted from RichWolfson:That is what it looks like to me. But there is really no way to tell other than it's about 25% of the mass of the 2 watt one.
You should get some new 2 watt ones.
Quoted from wolffcub:all are out. F1 was fine.
Check the power supply for the positive and negative 100 volts.
Quoted from lecter:What kind of diode should I look for and buy?
These can be used for any 1n400x diode on the game, so buy one kind and done.
Quoted from wolffcub:im getting wacky numbers at the orange and brown pins at the control board.
Make sure your DMM is set to DC volts and the black lead is on ground. Then test pins 3 and 4 for voltage.
Quoted from Aniraf:Does anyone have an idea what may have failed?
Bad bridge rectifier in the backbox.
Quoted from Aniraf:Do you happen to know which one? I have the Inkochnito's Bridge Board for the power. Could that be failing?
Check for voltage on the purple and black wires that come off of the board. Should have @ 18 volts dc.
Quoted from Aniraf:Are you talking about these wires? I am getting 3.2 and 3.3 bolts on the purple wires circled.[quoted image]
No the purple wire that come from Inkochnito's bridge rectifier board.
Quoted from Aniraf:You were 100% correct. I had another bridge board and that fixed it right away. I need to contact inkochnito and let him know this nord failed. I bet I can get replacement rectifiers.
Ty very much!
Did you check the fuses on the board?
Quoted from Aniraf:I checked them for continuity but nothing else. I’ll get an ohm meter on them.
Did you remove them before checking?
Quoted from Aniraf:I removed them both. They both pass continuity and show 0 ohms on my meter.
Most likely the bridge rectifier went bad. It can be fixed tho.
Quoted from Aniraf:Now if only I can figure out where to buy these.
https://www.greatplainselectronics.com/proddetail.asp?prod=GBPC3504W
Quoted from Aniraf:Is it possible for anything upstream to be blowing it?
This rectifier is good for 35 amps with the proper heat sink. It's fused at 8 amps. You should blow the fuse before any damage has occurred. Even if all the lamps in the lamp matrix were to be on at the same time it would only draw 16 amps. If you had a dead short, that may cause damage to the bridge. But if you have a short the lamps wouldn't come on at all.
Quoted from Aniraf:Ok, I should have tested it. I forgot to do that while I was there. Good to know that they probably don’t fail. Nothing else on the board looked visibly off.
If that resistor went bad the game won't work at all. Crazy that 2 bridge rectifiers went bad like this.
Quoted from Aniraf:Ok, just got over to the bar…same issue with this bridge board. Same exact rectifier on this bridge board.
Why don't you check the 2 connectors for the 18 volt side of the board. Make sure that you didn't clamp down on part of the insulation of the wire. This could cause a intermittent connection.
Quoted from Aniraf:One day later, all of the lights went out. So I started testing the rectifiers directly. On both bridge boards, the 18V rectifier shows a continuously climbing value of 1.7 on my diode test for the AC to AC poles of the 18V rectifier.
Quoted from Aniraf:The 34V side and the new rectifiers I bought do not show any value for AC to AC poles. In fact, the rectifier I removed (which was “failing”) now does not show a value for those poles.
This is caused by the 2 caps on the 18 volt bridge, there are no caps for the 34 volt bridge.
Quoted from GRUMPY:Why don't you check the 2 connectors for the 18 volt side of the board. Make sure that you didn't clamp down on part of the insulation of the wire. This could cause a intermittent connection.
You should also look at the molex connector in the lower cabinet near the transformer for a pin that is not fully seated in the connector.
Quoted from Aniraf:I’m going to head over there this evening and I’ll go digging. I don’t know that it would explain the switching to a new board fixing it.
The switching of the connectors may have fixed it for awhile. Look carefully to make sure you didn't clamp down on the insulation of the wires.
Quoted from Aniraf:and made sure to strip back all of the shielding on the 18v line and ground.
Did you do the AC input side too?
Quoted from Aniraf:That said, switching the board shouldn’t have fixed it.
Anytime you move a intermittent connection it may start working again.
Quoted from emubird:i should be looking for that might cause u45 to rapidly disassemble?
Miss adjusted pop/sling activation switch. Shorted zener diode on a activation switch circuit.
Quoted from Aniraf:All of the switches are registering in switch test.
When the game is turned on does the visor do its test?
Quoted from Aniraf:It makes the sound but does not seem to run the motor.
This is a start up self test, if it does not complete the test it will not start a game.
Quoted from Aniraf:inkochnito if I meter the 34v line on the bridge board any only see 28.6v, does that seem like a problem to you?
Measure the AC input, take that number multiply by 1.414. Then subtract .6 volts. This should be the same as your output. Working in reverse would be 28.6 + .6 = 29.2 ÷ 1.414 = 20.6 input.
Quoted from Aniraf:My bigger question is around this being a potential cause for the solenoids failing to fire.
No, unless there is a poor connection somewhere that is causing the lower voltage which then opens up not allowing current flow for the coil.
Quoted from Aniraf:I’ve never seen coils fire in a test mode but not during play.
Usually this a program issue, I have only seen this on Pinbot when the Visor self test failed during boot up. The motor has to run and open/close both switches.
28.6 volts is within specs and will fire coils with plenty of power.
Quoted from Aniraf:Program as in my main board could be having issues?
More likely visor switch issues.
Quoted from Aniraf:That would cause the game not to fire the solenoids?
Yes because it did not pass a self test of the visor mechanism. No point to play the game if the visor doesn't open.
You either have a coincidence or a short on the 28 volt lamps. When you were working on the visor switch wires could you have bumped one of the 28 volt bulb sockets thus shorting out and melting the transistor?
The tabs where the wires are soldered to can rotate and touch each other which will short out the 28 volt circuit and burn the fuse. The transistor is rated for 5 amps and the fuse is a 7 amps slow blow. It is real easy to lean against a wire while working on something causing the tab on the bulb socket to rotate and touch the other one.
pasted_image (resized).pngQuoted from Aniraf:If I replace the Q9 with one of these
Use a TIP 102 instead as its 60% stronger.
Quoted from Aniraf:do I have to be concerned that I lost that solder pad on the back of the PCB for the right leg? It doesn’t seem to connect to anything, so I’m not sure if it is important.
It helps hold the transistor in place but shouldn't be a big issue
Quoted from Aniraf:I guess I should ask, is this the correct other transistor for Q5.
Yep.
Quoted from Aniraf:Is it just experience that leads you to that, or is there a way to search for properties of an IC?
Yes there are data sheets available for electronic components. After repairing pins and videos for 30+ years you pick up some things.
Quoted from Aniraf:Should I have ordered TIP122s?
BDX53c, Tip 120, Tip 122, Tip 102 will all work. Tip 102 is the strongest transistor of the 4.
2n3904 and 2n4401 will both work but the 2n4401 is the strongest of the 2.
Quoted from Aniraf:I’ve been trying to trace this schematic and figure out how in the hell you guys knew Q9 drives the high voltage lamps.
Here is a very important page in the manual. You pic showed Q-9 smoked. I looked at this page in the manual for Q-9. It tells me that solenoid #10 is the right side visor general illumination, that it is a controlled solenoid which means that it is powered 100% of the time and be a red power wire. The control wire is brown/red and connects to the CPU board at J-12 pin 2. Also the control wire goes to the play field thru plug 8P3 pin 10, Q-9 is the control transistor and that it controls #1251 flash lamps. If you look up #1251 lamps on line you will find they are 28 volt bulbs, and since this is the same voltage as the B+ then you would know there are no dropping resistors in series.
pin (resized).PNGQuoted from Aniraf:I don’t even see those lights on the lamp matrix.
You will only see 6 volt lamps on the lamp matrix, #63, #89, #906 and #1251 are high powered flash lamps which need to controlled by a high powered transistor.
Quoted from FLASHBALL:GRUMPY If he cant find the short, can he install some kind of a circuit breaker on the line while he troubleshoots?
Shorts on circuits with lamps are hard to test with a DMM because the lamps when cold act as if they are wire with zero resistance. For testing he can remove J-12 from the CPU board and connect pin 2 to a fuse and then to ground by using a Z connector and a couple of jumper wires. Since there are 3 #1251 bulbs you would need a 3/4 slow blow fuse or circuit breaker minimum. Power on the game and all 3 bulbs should light, and the fuse shouldn't burn if the short is fixed.
This can be tested like this with out the CPU board installed untill it's fixed.
Quoted from Aniraf:I was actually thinking of putting an in-line fuse on that red line,
There is a fuse on the power supply for the red wire F-2. You may want to see if it is correct 2.5 amp slow blow.
You could add a fuse to the left and right visor lamps, 1 amp each. I use these crimp on fuse holders.
pasted_image (resized).pngQuoted from someotherguy:I've always relied on the 100W bulb with alligator clips
You could solder the wires to a burnt fuse, then it would pop right in.
Quoted from Aniraf:Colors are like solid white, orange-black and black-orange.
The white wire is ground. Orange/black is the special solenoid switch wire.
Quoted from Aniraf:I am confused how these switches are not in the switch matrix. Are they a different style of switch?
Special solenoids have switches directly connected to the transistor and by pass the switch matrix.
You will need to disconnect J-18 and J-19 and then test the pins of J-18 with a volt meter.
Quoted from Aniraf:Ok, everything is 2.1VDC
They should be 5 volts, then when you press the corresponding switch it will drop the zero volts.
Quoted from Aniraf:Should I test the voltage at the switches?
There will not be any voltage at the switches with the connector removed.
Quoted from Aniraf:So what might be limiting the power?
A bad U-45, U-50 or U49 chip. Are any of these chips socketed?
You could cut pin 6 of U-49 and then retest J-18 pin 5 to see if it has gone from 2.1 volts to 5 volts.
The part is a hex buffer,
https://www.jameco.com/z/7407-Major-Brands-IC-7407-HEX-BUFFER-DRIVER_49120.html?CID=MERCH
Quoted from Aniraf:Also, if it makes sense I have a logic probe and I could do a test on the IC.
The problem is the output of U-49 is connected to the inputs of U-45 and U-50 and the connector J-18. You can't test one chip with out separating it from the other chip.
Quoted from Aniraf:Is there a way to cut it without destroying it?
Yes. Use some anvil cutters to cut the chip lead, it can be repaired with a dot of solder.
https://www.amazon.com/Xuron-170-II-Micro-Shear-Flush-Cutter/dp/B000IBSFAI
I usually have some AND chips 7408, NOR chips 7402, some predrivers 2n4401, some drivers TIP 102 and some zener diodes 1n4735a and lastly some 1n4007 diodes.
Quoted from metalkatt:I put up a post looking for help to trouble shoot my flashers issue.
Sounds like the AC relay isn't working very good. Dirty contacts. Could also be cracked pins on the relay.
Quoted from metalkatt:I’ll check it out. Fingers crossed.
Something like this will cause problems.
cracked pins (resized).jpgQuoted from metalkatt:They all look good to me.
The first relay is for the visor motor.
The second relay is for the GI lamps.
The last relay is the A/C relay. The solder connections look fine.
If you put the game in coil test and stop on solenoid #14. Do you hear/feel this relay clicking?
Quoted from metalkatt:Do you think it maybe something at the MPU, that controls the ac relay?
Nope, it will the relay it's self. If you can get the cover off to look the contacts, is there any dirt or dead bugs in there?
Quoted from metalkatt:I’ll let you know how I make out. Thank you for the help!!
Just the relay or the whole board?
Quoted from Aniraf:I still get 2.1VDC once it is severed.
Was this the lead still attached to the chip or the circuit board?
Quoted from Aniraf:Also I read 2.1VDC on the cut leg (input).
You read this on pin 5?
pasted_image (resized).pngQuoted from Aniraf:Pin 5 was reading 0 I believe.
If U-49 pin 5 is Low (0.8 volts and below) then pin 6 should read the same. Check this upper part of the cut lead to know if the chip is good. The lower part of the cut lead is connected to the circuit board and U-45 and SR-20. If you read 2.1 volts when it should be 5 volts, then cut the lead #2 on U-45. Then retest the voltage.
Quoted from Aniraf:I’ll take pictures to confirm I am cutting the right leads.
All chip pins are counted the same way. Find the notch and count counter clockwise around the chip.
cp (resized).pngQuoted from Aniraf:I cut lead 2 on U45 and nothing changed over on U49.
Here is one of the 6 special solenoids circuits. The 7407 is U-49, the 7402 is U-45. The red stars are the cut pins you have made. So when you test the circuit board trace, it should read at 5 volts if SR-20 is good.
ss (resized).PNGQuoted from Aniraf:What is SR-20?
It is a number of resistors contained in a SIP package. The one pictured is a bussed resistor pack where one side of each resistor is connected to a common pin marked with a dot most of the time.
pasted_image (resized).pngQuoted from Aniraf:Also, is there a way to test the 5 volt line
Find SR-20 and test pin 1 the common pin. It should read 5 volts.
Quoted from Aniraf:I should also ask, where are you seeing that schematic
The top of page 28 in the manual.
Quoted from Aniraf:5
.1
.1
3.6
2.1
2.1
2.1
2.1
2.1
2.1
All of these are bad but pin 1. Either SR-20 is bad or something crazy is going on here.
With the power off measure the resistance from pin one to pin two. Then measure the resistance from pin one to pin three, and so on. What do you get.
Quoted from Aniraf:I put the other chips and the new resistor back in, no change.
You got something strange going on there. You may have to send it to me.
Quoted from Aniraf:I’m going to go over there and have him take a look.
Keep everyone informed.
Quoted from Aniraf:It is not the board. Everything tested correctly.
Very strange.
Quoted from MasterBlaster:.still same problems.
When you turn on the power switch, does the visor open and close? If yes run a switch test on the visor switches.
Quoted from MasterBlaster:nada when I push credit button to start game.
Then you lost your freeplay setting. This can happen if the batteries went dead or were changed. This can also happen if there was a short that pulled the five volts down briefly, like a CPU reset or cracked header pin on the power cable. Drop a quarter in and try to start a game.
Pics not the best but I can see that the HS supply has newer caps and a bridge rectifier. The Pinbot supply is original but is a system 9 power supply not a system 11. If it was me I would put HS back in HS and rebuild the system 9 supply and modify it to work in a system 11. Save the RD supply for a spare.
Quoted from WhiskeyTango:Does anyone have the correct part number and accurate count of Snubber boards? These have been modded so much over the years I want to be certain.
There are 4 relays. 3 relays are the same. One is set up as an A/C relay.
aaa (resized).PNGQuoted from imadork8:I have tried to gently sand inbetween the contacts
There are 3 types of switches in pinball machines, gold, silver and tungsten. For high current switches like these EOS switches and flipper cabinet switches the contacts are tungsten. Tungsten is a very hard material and needs to be cleaned with a file and a lot of effort. Gently sanding wont do much to fix them.
Quoted from Croppie1Kenobi:Interesting! I put in 89s and they are not on all the time but right still didn’t light?
So you have 2 issues then. Time for some testing.
First issue is that you need to remove the warming resistors (330 ohm) or remove the ground wire from the resistor board.
Second issue is the right side insert flashers don't light, does the drop targets reset? Yes so Q-24 is working. Do other flash lamps work? Yes so the A/C relay is working. You say that you are getting power at the socket, under what conditions? There shouldn't be power at the socket until the A/C is turned on, this way if the A/C relay fails the coils will continue to work. To check for power on the orange wire at the flash socket you will need to use a jumper wire tied to ground and connect the other end to the metal tab of Q-7. This will hold the A/C relay on energizing the C side solenoids. You should be able to test for power at both wires of the bulb sockets. If this is good then test for power on the resistor board on the lamp and driver terminals. If this checks out then find the diode board under the playfield. Then test for power on both sides of the diode marked C-4. Since the drop targets work then you know that A-4 diode and wiring back to the CPU is fine. Let me know what you find.
Quoted from FLASHBALL:But oddly enough the middle LEDs stay on
There is a resistor board in the back box that needs the warming resistors removed to correct this.
Quoted from FLASHBALL:Is there also one for Pinbot's eyes?
The eye do not have a resistor, because they are #1251 28 volt bulbs. The other bulbs are #89 12 volt and need the resistors.
Quoted from Blitzburgh99:Is there a detailed turtorial on how to convert the topper lights to LED?
Find the 2 resistor boards (purple circle) in the back box. Cut off the 4 outer smaller resistors from the boards. Install the leds, enjoy.
aaa (resized).jpgQuoted from sethbenjamin:Also, the fuse at the relay daughter board blew.
I'm not sure of this daughter board you speak of, could you post a pic of it.
Quoted from sethbenjamin:and the one I ended up replacing, which diverts power. In the first pic, it’s the relay that is *not* in my hand:
That is known as an A/C relay, and you have it wired correctly. So this isn't the issue.
Somewhere you have a dead short on either the drop coil or the flasher bulbs in the back box. Most likely it was the coil that is shorted as you just worked on the play field. Not sure of the extent of your swap. Did you install new coils? The diode on the coil maybe bad. The wires might be installed on the coil reversed. If you post a pic of the coil area in question, someone may see something out of place.
Quoted from sethbenjamin:so this got transferred over from the old playfield.
This could just be a coincidence that the diode on the coil shorted. Cut off the diode and test the diode and the coil and then replace the diode.
Also check the 2 flasher sockets to be sure that the wire lugs haven't rotated and are touching each other causing a short across the bulb.
Quoted from sethbenjamin:Any take on why the visor motor seems to have crapped out?
This can be a lot of things like a burnt fuse on the power supply from the other coil locking on. Cracked pins on the motor relay board. Something maybe bound up on the target mechanism. A miss wired motor limit switch. I would start with testing for positive and negative voltage at the motor relay board, then I would use a jumper and ground the metal tab of Q-15 to engage the motor relay. Then I would test the motor for positive and negative voltage. Let us know what you find.
Quoted from sethbenjamin:the A/C relay is not working at all.
Is this the relay you replaced with new?
Grounding the corresponding tip metal tab didn't even make the relay click?
Quoted from sethbenjamin:Grounding the visor motor relay also results in nothing.
Grounding the corresponding tip metal tab didn't even make the relay click?
Quoted from sethbenjamin:This was a mistake. Dumb, dumb, dumb.
Don't be that hard on yourself, this is really Williams fault for being soooo cheap and using one board for 4 different uses. They didn't even relabel the terminals to make any sense.
Quoted from sethbenjamin:Freshly clear coated playfield, new vortex ramp, new lift ramp, new solar value ramp, rebuilt pop bumpers, rebuilt flippers (with parallel coils and capacitors)...this game is playing like an absolute DREAM.
Sounds very nice indeed.
Quoted from sethbenjamin:Grumpy, if you’re ever in western MA, come on by; the machines are on free play, and I’ll have all the cheap beer and bourbon you want.
Maybe one day when I retire I may take a road trip, I have had a few invites over the years. It would be a blast for sure. For now,
Playball!
![]()
Quoted from dq13:Can anyone please confirm the wiring of orange and white on the flasher
The orange wire is the positive voltage, it should go to the center pin of the socket.
Quoted from Aniraf:I’m having an issue with fuse F2 (4amp) on the power board. It blows as soon as the game starts up. I ran through a switch test and visually validated that nothing is locked on. I also do not see anything weird with the wiring or any obvious blown caps or anything. Does anyone have a suggestion I could chase down?
[quoted image]
Check for a shorted transistor.
Quoted from Aniraf:I thought about the two old flasher bulbs I still had in there. I removed those, just wondering if something in that circuit was wonky. Now with those removed the fuse does not blow, but also none of the solenoids work (except flippers).
Are you thinking it would be a transistor on the power board? I cannot for the life of me remember how to test that board properly or the solenoid voltage coming out of it.
You need to test the fuse with a meter, it is most likely blown again. Before you turn on the power again, disconnect 1J-11, 1J-12 and 1J-19 from the cpu board. When you turn it on now use a meter and check for dc volts at both sides of F-2 and F-4 fuses. If you have 32-34 volts on both fuses then you can reconnect one of the 3 connectors back while watching the fuses. If there was no sparking, then connect another connector. Let me know which connector causes the fuse to blow.
Quoted from Aniraf:As suspected, the flashers are somehow messed up. I don’t see any faulty/burned transistors or any crossed wires? I removed the two old flash bulbs (the rest are LED) and basically cut that circuit under the sockets. It still blows the fuse. I’m confused :/.
[quoted image]
Here is a quick easy way to test. Turn on the game, black lead under the ground braid. DMM set to ohms, J-12 removed. Touch each pin of J-12 on the CPU board with the red lead. Does any pin show zero ohms? No, then change DMM to DC volts and use red lead and test each pin of the J-12 connector harness. Replace the bulbs you removed. Does any pin not have 34 volts?
Quoted from Aniraf:Awesome, thank you both! I’ll test ASAP!
GRUMPY do I do the ohm test with the bulbs out? With the bulbs in I get 0 ohms on every pin except for 3 and 4 (left to right).
None of the pins off the board show any voltage except pin 3 which shows .6 VDC.
I may have not been clear on the test. J-12 removed from the cpu. Then test the cpu board J-12 pins for ohms. Zero ohms is bad, OL or .6 meg or greater is fine.
Quoted from Aniraf:Ahh, got it. I had OL on all pins except for 3 and 4 where I had .6 or greater. I tried to test the legs of those transistors, but I am not confident I got in there properly. I think I need to pull the board out a little bit and ensure I am making good contact with each of the legs.
Are there any other things I could be testing? I keep hoping that it will start working again, but it blows that fuse every time I plug it back in. :/
So that test worked well. The cpu board seems to be good. So with J-12 disconnected, and a new fuse installed, and all the flasher bulbs installed, turn on the power. Does the fuse burn now?
Quoted from GRUMPY:So that test worked well. The cpu board seems to be good. So with J-12 disconnected, and a new fuse installed, and all the flasher bulbs installed, turn on the power. Does the fuse burn now?
Since the fuse doesn't burn, you have a playfield issue. My guess is the visor motor circuit is the issue. I say this because the visor motor needs to run at start up for the game to function. I would find the relay that activates the visor motor, I would then unsolder the brown/green wire from the relay and insulate. I would then reconnect J-12 connector and power on the game. Does the fuse burn now?
Quoted from Aniraf:I’m not sure which relay it is yet, but I would not be surprised if it was the one that has had a broken cover since I bought the game.
Does anyone think the jumper to ground is weird on this?
[quoted image]
This is correct for a AC relay. But your relay cover is broken. Whatever broke the cover may have done internal damage too.
Quoted from Aniraf:Do you think I just need to replace that relay and I might be back in business? It has actually been broken since I bought the game, it always functioned fine, but I figure they don’t put the cover on there for nothing. It probably cannot take dust and dirt very well. So certainly something that would possibly break over time.
I ordered a few replacements from Marco. I can pop one in and get testing again. If you think I might be on the right track?
Lastly, do you have a suggestion for a punch down tool for those stupid plugs in the back box? I had to remove the wires one at a time to find which one was killing the game. I can’t get them back very easily.
When this relay activates, it powers up all 8 C side solenoids. It can be that the relay is bad, the diode on the relay board is shorted or one of the 8 C side solenoids is shorted.
As far as a IDC punch down tool, I got a very nice tool from Swinks Pinball. It will last a lifetime.
Quoted from WhiskeyTango:Disconnected J11, J12 and J19 - does not trip breaker, so i'm going to assume the MPU is good for now.
Connect only J11 - breaker trips
Connect only J12 - breaker does not trip
Connect only J19 - breaker does not trip
Connect any two - breaker trips
There is something bridged/shared between these and I'm having a hell of a time finding it.
The left eye bulbs are on J-11. Pull all 3 bulbs and retest.
Quoted from WhiskeyTango:Reinstalled Sun flashers and trips breaker.
This is because the breaker is 1 amp. 3 #89 bulbs pull 1.8 amps. Put in the 2.5 fuse and it will be fine.
Quoted from WhiskeyTango:- Removed the flashers from both eyes and it completed the sequence without tripping the breaker.
I think one of the bulb filaments is shorted out. Test each one with jumpers and a 12 volt battery.
Quoted from WhiskeyTango:Not one, not two, but three bulbs were shorted. I assumed they were good and immediately was drawn into looking for a more complicated solution.
Remember kids, start with the easy stuff first. lol
These bulbs need to be #1251s. not #89s.
Quoted from WhiskeyTango:One in the eye and two in the Sun, so one 1251 and 2 89s.
![]()
Quoted from Aniraf:I am still stuck.
So take a DMM and test the screw terminals, GND should read 32 volts, 28 volts should read 32 volts, DRV should read 32 volts, NC should read 32 volts, Coil should read zero until the relay closes.
Let me know what you get.
Quoted from thetylander:Pinbot…. Yeah we have one now so that’s good. It was the wifey-poo’s fault though. She loves Pinbot so we overpaid for a very beat up one. $3300!!! Yikes!!! Well, it works… not very well, but it works. Marco Pinball got a $200 order from us the same day… just for starters!
Poor old Pinbot needs major repairs. The main damage is the front of the cabinet. It looks as if someone had spilled one or more 44oz drinks down the front of the machine many years ago. The Coin door, lock bar, and front cabinet panel all have damage. Everything else is nice but needs refurbishment. It has never been serviced, was running AA’s on the board and the big 30,000uf cap is original!!!
Really!!!
And the machine boots and works.
One day after the wife bought this one, another Pinbot appeared on Craigslist locally for $2750 in much much MUCH better shape.
All you can say is “So it goes!” and laugh at yourself.
I intend to bring this beat to snot Pinbot back to life. I should cut my losses, part it out and buy the cheaper one that’s already fixed but I am rather stupid!
All Pinbots deserve to live. My wife said.
She wanted to play it one more time before we start stripping it down for repairs.
While she was changing a few burned out bulbs in the back box, she inserted a new shorted bulb.
The upper half of the backbox lights went out for good. No more light where it says PINBOT.
I was grumpy and tired and couldn’t figure out what burned up. “Probably a transistor?” I said unconvincingly.
I told her I’ll probably figure this out as I will be taking out all the boards for recap and reflow, but it really bugged her. She looked like Charlie Brown when he thought he killed the Christmas tree.
I haven’t been able to cheer her up.
Does hallmark make pinball sympathy cards?
If anyone can give her advice on how to fix the lights it would be appreciated, she broke them and she wants to fix them with no help from me.
I’ll be outside welding patches on the 73 Spitfire.
The 5 amp SB fuse burnt for that string of lights.
Quoted from Aniraf:I’m getting:
35.9 on GND, +28, and NC. I get .6 on DRV and zero on coil. When I put it into the coil test cycle I get this weird array of voltages (video) on DRV while it cycles through the tests. The coil lug will get .1v pulses in line with when working coils fire.
Voltage is fine, not too high.
Now for the DRV terminal, even with the wire removed the terminal should read 32 volts unless there is something wrong with the relay board. The red wires bring in the 32 volts to the relay coil and diode. After going thru the relay coil windings this voltage comes out to the DRV terminal and then the CPU grounds it to turn it on. So since you have no voltage, there must be a break on the board traces or a bad coil winding. Do so ohm testing to find the issue.
Quoted from Aniraf:I tried to show that in the video.
Most likely noise on the line because of the broken trace or relay coil. Take the relay board off a take a pic of the backside.
Quoted from Aniraf:Hard to get detailed pictures. Here is the board.
[quoted image][quoted image]
I was meaning the relay board, sorry for the miss understanding.
Quoted from thetylander:Yeah, I wish it was the fuse! I was thinking the relay snubber on the backlight board got zapped or the short caused something that was already damaged to burn out on the main board. Might even be the all original power supply board stopped putting out enough delicious voltage. When my wife turned it on today for the last time before starting disassembly, she said the lower backlights slowly faded out and went dark as well. This made her feel like it wasn’t her fault after all.
I think the shorted bulb just pushed a tired old component over the edge.
As I said to my wife, fuses are essential, but they don’t always blow before damage can be done. They “reduce the risk of damage” but are not designed to completely prevent damage. That’s why the 5 amp Slowblow is still working but the backbox GI isn’t.
If you see any future Pinbot questions posted by my account on here it will be my wife. She’s really insistent about doing most of the work on Pinbot and I really am going to go back to welding floor patches on the Triumph Spitfire until she needs me.
Did you remove the fuse when you tested it? The GI fuses will read good on an ohm meter while the fuse is in the fuse holder because they are connected to the transformer.
Quoted from Aniraf:GRUMPY if you have a few minutes, maybe you could check it out and let me know if this looks like anything you’ve ever seen.
I smoked a buck on the way to work the other day, so I have been a bit busy.
IMG_20211029_124345 (resized).jpgQuoted from Aniraf:Interestingly, now it is “working” although wrong. That leads me to this video where you can see how it is firing the outhole and knocker with every a/c side change.
It looks like the Q-33 transistor is shorted, but if it was shorted then the outhole coil would stay locked in attract mode. The video shows the outhole not locked during attract mode which is interesting.
Has there been any battery acid damage?
Quoted from RCA1:Hope you're OK!
I spilled my coffee! ![]()
Quoted from ChrisPINk25:Oh no! Fix it up, or get a new one?
8100.00 estimate. I think they are going to total it. ![]()
You're currently viewing posts by Pinsider GRUMPY.
Click here to go back to viewing the entire thread.
Wanna join the discussion? Please sign in to reply to this topic.

Great to see you're enjoying Pinside! Did you know Pinside is able to run without any 3rd-party banners or ads, thanks to the support from our visitors? Please consider a donation to Pinside and get anext to your username to show for it! Or better yet, subscribe to Pinside+!

This page was printed from https://pinside.com/pinball/forum/topic/pinbot-fans-and-owners-club?tu=GRUMPY and we tried optimising it for printing. Some page elements may have been deliberately hidden.
Scan the QR code on the left to jump to the URL this document was printed from.
 Fargo, ND