(Topic ID: 70838)

Pinbot Fans and Owners Club!

By wayout440

10 years ago


Topic Heartbeat

Topic Stats

  • 6,058 posts
  • 464 Pinsiders participating
  • Latest reply 19 days ago by Neight
  • Topic is favorited by 232 Pinsiders

You

Linked Games

Topic Gallery

View topic image gallery

IMG_20240402_190322638 (resized).jpg
IMG_20240402_190531478 (resized).jpg
PXL_20240327_233803509 (resized).jpg
PXL_20240304_030924874 (resized).jpg
diode (resized).PNG
PXL_20240304_005552435 (resized).jpg
IMG_0445 (resized).jpeg
20240112_135819 (resized).jpg
20240112_135811 (resized).jpg
IMG_5901 (resized).jpeg
IMG_5902 (resized).jpeg
IMG_7922 (resized).jpeg
IMG_7923 (resized).jpeg
IMG_7921 (resized).jpeg
541EBD6A-2CA4-43E0-AB4B-B18C7FF31AF0 (resized).jpeg
Pinside_forum_7003307_0 (resized).jpg
There are 6,058 posts in this topic. You are on page 24 of 122.
#1151 7 years ago
Quoted from Plumonium:

Any chance you can snap a picture of it? I'd like to see.
A see in the gallery that someone did it using black skirts and I think it contrasts well and looks bad ass.

Not an easy pic to take bro, and as much as I wanna help a brotha out, i'm not ready to tear down my PF to get a better shot.

IMG_3496 (resized).JPGIMG_3496 (resized).JPG

#1152 7 years ago

Thanks man! No worries. I see you went all out with Titan's rings.

#1153 7 years ago

I love looking through pictures of this beauty! I've been looking for one of these for a while! Strangely enough they made a Nes game about the machine pinbot back in the day and I got it and played it, it's definitely Not as good as the real deal hahaha!

#1154 7 years ago
Quoted from TheOnlyest:

I believe I used 2 orange and 1 red to match the graphics under them.

This is what I'm gonna do as well... thanks for the tip

#1156 7 years ago
Quoted from wayout440:

Yeah, lube is a no-no. Dust sticks to anything moist, and shortly you will be looking at cleaning and reapplying - over and over frequently. Replace the nylon bushing.

Yep, I made the "lube the plunger" mistake myself. A little gasoline (!) got rid of it and suddenly the plunger worked smoothly again.
Also, try a red spring if you don't have one already.

#1157 7 years ago
Quoted from erak:

There are 1251 leds. But if you want to do a bit of modding to your machine and want to use the more common (cheaper) #89 leds.
You can use #89 Led flashers instead, if you solider a 1 watt 350ohm resistor across each 1251 flasher socket.

Why this never occurred to me I'll never be able to figure out. Well, not that I could have identified what resistor to use off hand, but the concept of adding resistors to the actual bulb sockets - of course! I can't wait to do this on mine ASAP.
However, damn, I'm having trouble finding these in my online searches. Great Plains doesn't seem to offer them (or their site is hard to navigate?). Anybody got a link?
Thanks.

#1158 7 years ago
Quoted from tilted81:

. Ok..... So this pinbot is quite the project! I'm missing the stainless guide that goes on the right side of the lift ramp. Didn't know if anyone might have one? If someone had the spare time a picture of one that's taken off would be ok too... I might be able to make one.... It looks like just 2 screws attached it to playfield

There's u dude in the for sale forum parting out a pinbot.. I scored a few needed parts

#1159 7 years ago

Use the 10 watt resistor for # 89 incandescent bulbs. Use the 3 watt resistor for #89 leds.

http://www.marcospecialties.com/pinball-parts/R10W5

Quoted from sethbenjamin:Anybody got a link?

http://www.marcospecialties.com/pinball-parts/R3W100

#1160 7 years ago

Anybody got a sun decal they aren't gonna use? I'll gladly hand over some cash for it. It's the only one I need so not sure I can justify the whole set

#1161 7 years ago
Quoted from GRUMPY:

Use the 10 watt resistor for # 89 incandescent bulbs. Use the 3 watt resistor for #89 leds.
http://www.marcospecialties.com/pinball-parts/R10W5

http://www.marcospecialties.com/pinball-parts/R3W100

I hate to dispute stuff like this, so i'll just say this... I highly suggest that you do not use this method, based on simple electronic theory alone, these resistors (if they dont explode immediately) will run so hot, you'd be able to light a cigarette with it. I would like to know how you came up with the specs for using those resistors, specifically with 89 LED's.

#1162 7 years ago
Quoted from TheOnlyest:

I would like to know how you came up with the specs for using those resistors, specifically with 89 LED's.

The f-14 manual.

#1163 7 years ago
Quoted from GRUMPY:

The f-14 manual.

The F-14 manual explains how to modify the lighting?!!? Even for LED's that weren't invented yet?? Could you scan and post that?

#1164 7 years ago
Quoted from TheOnlyest:

The F-14 manual explains how to modify the lighting

No, its just shows a diagram that Williams engineers came up with for Pinbot flasher bulbs. They didn't put it into print until F-14 manual on page 59.

Quoted from TheOnlyest:Even for LED's that weren't invented yet

Yes there were as they are installed on the CPU board of your Pinbot, open your backbox and take a look. Its the big board in there. Hope this helps.

#1165 7 years ago
Quoted from GRUMPY:

Yes there were as they are installed on the CPU board of your Pinbot, open your backbox and take a look. Its the big board in there. Hope this helps.

C'mon dude, Ive been a factory certified Williams pinball tech since 1990, please don't talk to me like i'm a moron... Obviously what I meant was "super bright" LED technology that allows for an LED replacement for an incandescent 89 bulb... Not invented yet in 1987!

So I looked at the manual, that is NOT a modification for 1251 bulbs, that is a schematic for the pre-heater board circuit installed in the machine for the ACTUAL 89 bulbs! Your interpretation of that schematic as being one resistor soldered across a bulb socket is just scary!
All assuming of course that THIS is what you're referring too...

Image1 (resized).jpgImage1 (resized).jpg

#1166 7 years ago
Quoted from TheOnlyest:

Your interpretation of that schematic as being one resistor soldered across a bulb socket is just scary!

Where did i say across the bulb.

Quoted from TheOnlyest:that is a schematic for the pre-heater board circuit installed in the machine for the ACTUAL 89 bulbs!

And a voltage drop. Or are you saying that #89 bulbs can handle B+ voltage which is 34 volts DC.

Quoted from TheOnlyest:Your interpretation of that schematic

Not an interpretation, just facts. The only difference between the visor bulb circuit and the F-14 circuit is the 5 ohm resistor. Add the resistor to Pinbot and run 12 volt #89 bulbs.

Quoted from TheOnlyest:please don't talk to me like i'm a moron...

I treat people as they treat me. If you talk down to me I can return the favor...

#1167 7 years ago

Ok, rather than continue this pointless pissing contest, I got up this morning and tried an experiment to resolve this issue once and for all.
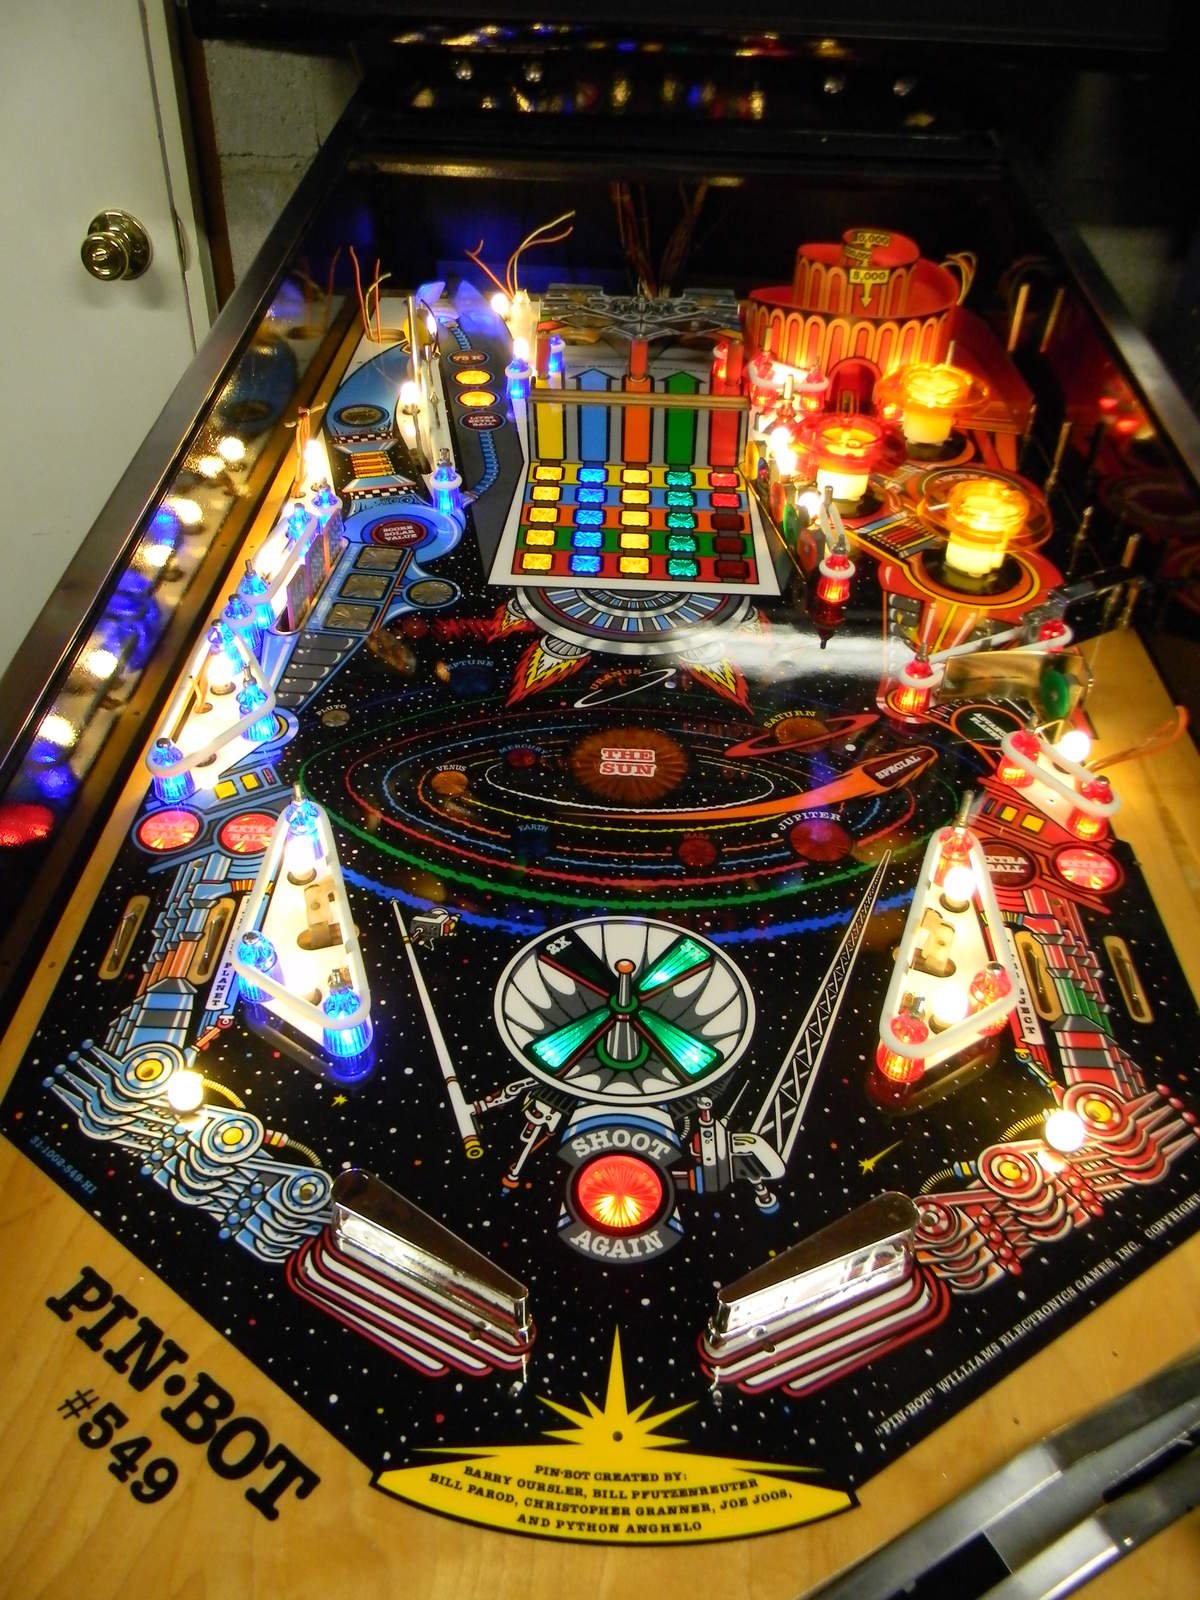
I addressed all three circuits using 1251 bulbs:
Backbox insert eyes (2 bulbs)
Left visor and eject base (3 bulbs)
Right visor and eject base (3 bulbs)
My experiment was simple, since were dealing with 28-32v, simply rewire the bulbs in series, and see what results I get... My only concern was that the LED's were not made in a way that would complete the circuit internally (like 120v standard household LED bulbs), but surprisingly they are!!
I am using Comet 8-SMD flasher bulbs, rated at 9-13.8v in red (right) and blue (left) and natural white for the backbox eyes.
http://www.cometpinball.com/product-p/8smdg18tower.htm

The backbox insert was a no-brainer since there are only 2 bulbs... Wired in series, I ended up with 13.2v at each bulb, problem solved!

With the visor bulbs, I was concerned that by dividing the voltage by 3, each LED wouldn't be very bright, but I was pleasantly surprised that with a voltage of 10.4v at each bulb, they were still quite bright, problem solved!
I considered another option with regard to the visor bulbs, which was to eliminate the eject plate bulbs under the PF (you really can see them anyway) and just wire the 2 topside flashers in series, but I decided not to go that way just now, the flashers are totally bright enough, even at 10.4v.

As a final test, I started a game and pushed the color targets to open the visor, then left the ball in the shooter lane with the red/blue flashers flashing back and forth for 30 minutes. I also set the backbox eyes flashing on/off in test mode for 30 mins. Then I played 4 full games continuously (4 player game, 5-balls per game, plus several extra balls. At least another 40 mins).
Result... To the touch, I was barely able to feel any warmth on all 8 bulbs.

Downside: If one bulb is removed or fails in one of the 3 circuits, the other bulb(s) in that circuit will not work.

WARNING: if you do NOT know what I am talking about when I say things like "rewire in series", please do not attempt to rewire your game until you acquire a complete understanding of this theory!! Below are pics of the backbox insert wiring before (top) and after (bottom). Feel free to replicate what you see, and replace your "eye" bulbs with 89 LED's and see for yourself. I cannot attest to any results for using incandescent 89 bulbs, as they draw far more amperage than LED's. But in theory, they should work just fine.

Original.JPGOriginal.JPG
Series.JPGSeries.JPG

1 week later
#1168 7 years ago
Quoted from TheOnlyest:

WARNING: if you do NOT know what I am talking about when I say things like "rewire in series", please do not attempt to rewire your game until you acquire a complete understanding of this theory!!

Wow. Thanks for the in-depth analysis! I'm a cabinetmaker, not an electrician (if you could hear me, you'd be impressed at my spot-on DeForest Kelley voice), so I surely do *not* have even a partial understanding of the theory. I've always wanted to put UV flashers in the visor, but you can only get 12v ones. On the other hand, it probably isn't so important as to risk messing up my wiring in a way I can't fix. Would love to get a good grasp of how to go about it, is there a good source or should I just wait until you are in New England sometime and entice you to mod mine for me in exchange for copious beer and bourbon?

#1169 7 years ago

I hosed this mini-PF royally but it started out brand new and might be an improvement on somebody's PB. PM me if anyone wants it for the cost of shipping.

20161023_160216 (resized).jpg20161023_160216 (resized).jpg

#1170 7 years ago
Quoted from Leeb18509:

I hosed this mini-PF royally but it started out brand new and might be an improvement on somebody's PB. PM me if anyone wants it for the cost of shipping.

Yikers! Please tell us how you managed that level of destruction, so those if us with replacement mini-pf's can avoid it.

#1171 7 years ago
Quoted from jibmums:

Yikers! Please tell us how you managed that level of destruction, so those if us with replacement mini-pf's can avoid it.

What are we looking at here?

#1172 7 years ago
Quoted from Plumonium:

What are we looking at here?

It took me a while, but I'm thinking the holes on the right-hand side with the cracks coming off of them. Could be much worse.

#1173 7 years ago

Mine had some of those cracks in the Mimi post mounting holes, I just assumed it was from age.

#1174 7 years ago
Quoted from wayout440:

Mine had some of those cracks in the Mimi post mounting holes, I just assumed it was from age.

Yeah, I'm wondering if the posts will cover the damage anyway. It's a pretty clear mini with the art intact imho.

#1175 7 years ago

Just purchased my Pinbot on Monday. Got it home and it's DOA. Didn't have much time to look at it, but it looks like it was "shopped" in the last few years. If I had to guess, I don't think I'm getting power to the boards at all. Hopefully it's just the replacement plug has become disconnected. Had a similar issue on another machine. Machine is clean with a really nice playfield. Missing the topper but everything else looks good.

#1176 7 years ago
Quoted from Jason1413:

Just purchased my Pinbot on Monday. Got it home and it's DOA. Didn't have much time to look at it, but it looks like it was "shopped" in the last few years. If I had to guess, I don't think I'm getting power to the boards at all. Hopefully it's just the replacement plug has become disconnected. Had a similar issue on another machine. Machine is clean with a really nice playfield. Missing the topper but everything else looks good.

There like cats.. they hate car rides ..

#1177 7 years ago
Quoted from Milltown:

There like cats.. they hate car rides ..

Funny but very true. My only consolation is that it wasn't working from the person I got it from. I was at least able to keep the price down that way. Apparently he bought it silly cheap at a non-arcade auction knew zilch about games. He also snagged a Pac-Man machine for $100 completely working. Person he got it from said it worked fine when he got it. So I'm hoping for the best when I finally look at it this weekend.

#1178 7 years ago

I recently picked up my first pin and it's a Pinbot <3

It's in pretty great shape other than some cleaning, bulb replacements, and fixing the up/down ramp mechanics. However, the most glaring issue is that the clear plastic cover over the skill shot vortex is half missing. Anyone here have an spare lying around? I'm happy to pay a fair price for it

It's odd that none of the plastic repro sets come with this piece...

IMG_5776 (resized).JPGIMG_5776 (resized).JPG

#1179 7 years ago

Hey everyone. I just joined the club! So excited to finally own this machine. I am having a few issues that I was hoping you more experienced guys help me with. Here is the link to the thread:
https://pinside.com/pinball/forum/topic/system-11-noob-help-me-realize-my-holy-grail

#1180 7 years ago
Quoted from shesmovedon:

I recently picked up my first pin and it's a Pinbot <3
It's in pretty great shape other than some cleaning, bulb replacements, and fixing the up/down ramp mechanics. However, the most glaring issue is that the clear plastic cover over the skill shot vortex is half missing. Anyone here have an spare lying around? I'm happy to pay a fair price for it
It's odd that none of the plastic repro sets come with this piece...

Do you have the broken off piece? There is a standoff bracket at the top end of the ramp you are missing if you don't have that piece.
I made one of these for myself as mine was cracked and badly scratched. I have a good cleaned up scan of the rocket ship to print onto sticker paper of you decide to fashion one yourself.

#1181 7 years ago

I think_ I found pieces of the metal standoff floating around inside the cabinet. I'm certainly looking at building a new one if I can't source a replacement. I don't have all of the plastic so I'd have to see what I can do for getting new plastic. I'd be delighted to try to fashion one myself with the help of your scan. Thank you!

#1182 7 years ago
Quoted from shesmovedon:

I think_ I found pieces of the metal standoff floating around inside the cabinet. I'm certainly looking at building a new one if I can't source a replacement. I don't have all of the plastic so I'd have to see what I can do for getting new plastic. I'd be delighted to try to fashion one myself with the help of your scan. Thank you!

When I get a chance I will dig through my stuff and see if I saved my old one. It's easy to cut a new one if you have an intact piece to use as a template.

#1183 7 years ago
Quoted from pinheadpierre:

When I get a chance I will dig through my stuff and see if I saved my old one. It's easy to cut a new one if you have an intact piece to use as a template.

Okay - I still have my old one. It's broken in three pieces but still usable as a template. Let me know if you decide to go the homemade route. I could send you a tracing of the profile and rivet hole locations and email you the scan for the sticker.

#1184 7 years ago

Greetings Pinbot fans. Does anyone have an ' ADV. "X" ' sticker that I could buy? Mine is really faded.

This is my son's favorite game and I recently acquired one and started depopulating the playfield, removing mylar, and cleaning. It's pretty gross and I may try stepping into the world of paint touch-up around the ball lock area too.

My first part that I'm looking for is the ' ADV. "X" ' sticker on the clear plastic moving ramp. I see that it is on the available complete sheet of decals but it is the only one I need on the whole sheet. My original sticker is on the underside of the ramp, and it appears that from the way that the replacement is printed it sticks on the topside of the ramp - true? Here is a pic of my faded sticker:

Pinbot ADV X sticker (resized).JPGPinbot ADV X sticker (resized).JPG

And a pic of the general filth I'm digging through:

Pinbot filth (resized).JPGPinbot filth (resized).JPG

And the paint in my ball lock area (any advice is appreciated, I have a starter set of acrylic paint):

Pinbot ball lock paint chips (resized).JPGPinbot ball lock paint chips (resized).JPG

#1185 7 years ago
Quoted from Gogojohnnyquack:

Greetings Pinbot fans. Does anyone have an ' ADV. "X" ' sticker that I could buy? Mine is really faded.
This is my son's favorite game and I recently acquired one and started depopulating the playfield, removing mylar, and cleaning. It's pretty gross and I may try stepping into the world of paint touch-up around the ball lock area too.
My first part that I'm looking for is the ' ADV. "X" ' sticker on the clear plastic moving ramp. I see that it is on the available complete sheet of decals but it is the only one I need on the whole sheet. My original sticker is on the underside of the ramp, and it appears that from the way that the replacement is printed it sticks on the topside of the ramp - true? Here is a pic of my faded sticker:

And a pic of the general filth I'm digging through:

And the paint in my ball lock area (any advice is appreciated, I have a starter set of acrylic paint):

I don't have the sticker but I strongly recommend reading Vid's guide to playfield restoration if you haven't already done so. There are invaluable cleaning and touch up tips to be had there.

https://pinside.com/pinball/forum/topic/vids-guide-to-ultimate-playfield-restoration

#1187 7 years ago
Quoted from Jason1413:

Just purchased my Pinbot on Monday. Got it home and it's DOA. Didn't have much time to look at it, but it looks like it was "shopped" in the last few years. If I had to guess, I don't think I'm getting power to the boards at all. Hopefully it's just the replacement plug has become disconnected. Had a similar issue on another machine. Machine is clean with a really nice playfield. Missing the topper but everything else looks good.

Finally got a chance to work on mine yesterday. Just as I suspected, hot wire on the plug was loose. Fixed it and game fired right up. Aside from a couple loose pieces and a few bulbs out, it works great. Played for at least an hour last night

20161029_155658 (resized).jpg20161029_155658 (resized).jpg

#1188 7 years ago

Got a question about Pinbot flashers. Not the eyes flashers, the other playfield flashers.

https://pinside.com/pinball/forum/topic/flasher-bulb-question

Any info appreciated.

#1189 7 years ago

How many of you removed the factory mylar on your Pinbot? How did it go? How was the playfield prior. Most importantly, how much ART/paint came off?

Did you paint touch-up afterwards or left as-is?

I'm almost done with my PF tear down and now wondering about the mylar. Do or not not, there is no try... The rest of the game is going through a full restoration btw.

#1190 7 years ago
Quoted from Jason1413:

Fixed it and game fired right up.

Nice catch, well done!

#1191 7 years ago
Quoted from Plumonium:

How many of you removed the factory mylar on your Pinbot? How did it go? How was the playfield prior. Most importantly, how much ART/paint came off?
Did you paint touch-up afterwards or left as-is?
I'm almost done with my PF tear down and now wondering about the mylar. Do or not not, there is no try... The rest of the game is going through a full restoration btw.

I did not personally remove the Mylar on my pinbot, but it was done by a previous owner (which is beyond me). The artwork on mine wasn't damaged in the process. I'm sure the more time that goes by, the more you run a risk of that happening but I'm no expert on that. Because of luck either way!

#1192 7 years ago

I just acquired a Pinbot and I am in the process of bringing it back to life. Does anyone have (or is willing to make) a drawing of their playfield and the locations and colors of the various LEDs they installed?

#1193 7 years ago
Quoted from FiatsRUs:

I just acquired a Pinbot and I am in the process of bringing it back to life. Does anyone have (or is willing to make) a drawing of their playfield and the locations and colors of the various LEDs they installed?

<soapbox>Not being an LED fan at all, could I make a suggestion? Use white for GI and colors for inserts. Classic games NEVER used anything but white lights for GI. Every game I've seen with colors in GI look wrong. Even Stern doesn't do this now. </soapbox>

#1194 7 years ago
Quoted from awarner:

<soapbox>Not being an LED fan at all, could I make a suggestion? Use white for GI and colors for inserts. Classic games NEVER used anything but white lights for GI. Every game I've seen with colors in GI look wrong. Even Stern doesn't do this now. </soapbox>

Well said!

#1195 7 years ago

Funny you guys say that because my Pinbot came with the red/blue theme going (a classic) but I'm considering to go back to white for GI to brighten up the game. May be leave a couple colored for show but only a few. I know for example that I want both slingshot lower bulbs to be white to match the plastic above it. It was discussed before, images can be found.

#1196 7 years ago
Quoted from awarner:

<soapbox>Not being an LED fan at all, could I make a suggestion? Use white for GI and colors for inserts. Classic games NEVER used anything but white lights for GI. Every game I've seen with colors in GI look wrong. Even Stern doesn't do this now. </soapbox>

I never even realized that the red and blue coloring on the playfield art defined Pinbots "arms" running down the sides of the playfield until I saw this game with red and blue in the GI at a show. It also had the split red/blue displays. It was quite stunning, and that is why I also did mine that way. I don't know who started it, but it seems to be a contagious and common color selection for this game.

I do prefer white in the GI and colors in the inserts for most games. That is how I did my Maverick. I actually have a majority of my classic games incandescent bulbs and now I tend to keep them stock. I just can't stand Bally Space Invaders with anything but classic bulbs in it. Some games can look good with colorized GI when picked appropriately, but a vast majority are slapped together looking like rainbow puke. The nice thing is, it's an easy mod to alter if you want to freshen things up...or return to a classic look.

Pinbot_NES_gameplay (resized).pngPinbot_NES_gameplay (resized).png

#1197 7 years ago

I had the best luck on the chest panel color matching the inserts. But I used white on the yellow and yellow on the orange, I think. That got me the best color. I also found a diagram for the head, but I changed the ones on the "bride" to purple and they looked much better than the red that the diagram called for. Play around with it. I bought a master kit from Comet, and went from there.

#1198 7 years ago
Quoted from Plumonium:

Funny you guys say that because my Pinbot came with the red/blue theme going (a classic) but I'm considering to go back to white for GI to brighten up the game. May be leave a couple colored for show but only a few. I know for example that I want both slingshot lower bulbs to be white to match the plastic above it. It was discussed before, images can be found.

I did the blue and red Led's and thought it looked good. Kept him that way for probably a year and then went to all white Led's and liked it much better.

Before and after. Sorry...after and before. Pinside doesn't like my phone.

20150904_182600 (resized).jpg20150904_182600 (resized).jpg
20150904_092114 (resized).jpg20150904_092114 (resized).jpg

#1199 7 years ago
Quoted from rottenrobert1313:

I did the blue and red Led's and thought it looked good. Kept him that way for probably a year and then went to all white Led's and liked it much better.
Before and after. Sorry...after and before. Pinside doesn't like my phone.

I really think the White GI really helps show off the playfield a lot better. Thanks for posting this.

#1200 7 years ago
Quoted from awarner:

I really think the White GI really helps show off the playfield a lot better. Thanks for posting this.

I agree. Plus you can actually see the art on the playfield plastics.

Promoted items from Pinside Marketplace and Pinside Shops!
$ 2.50
Lighting - Led
Pinballrom
 
$ 35.99
Eproms
Matt's Basement Arcade
 
$ 12.50
Lighting - Led
RoyGBev Pinball
 
$ 39.99
Eproms
Matt's Basement Arcade
 
$ 69.00
Gameroom - Decorations
Pinball Pimp
 
$ 18.00
Electronics
Yorktown Arcade Supply
 
$ 36.95
Eproms
Pinballrom
 
$ 175.00
Lighting - Interactive
Professor Pinball
 
From: $ 8.99
Cabinet - Other
NO GOUGE PINBALL™
 
$ 18.95
Eproms
Pinballrom
 
3,750 (Firm)
Machine - For Sale
Clovis, CA
$ 29.95
Playfield - Toys/Add-ons
PinBoss Mods
 
3,152 (OBO)
Machine - For Sale
Pulaski, PA
4,800 (Firm)
Machine - For Sale
Kingston, OK
From: $ 17.00
Lighting - Backbox
Twisted Tokens
 
From: $ 1.25
Playfield - Other
Rocket City Pinball
 
3,000 (OBO)
Machine - For Sale
Fargo, ND
Great pinball charity
Pinball Edu
There are 6,058 posts in this topic. You are on page 24 of 122.

Reply

Wanna join the discussion? Please sign in to reply to this topic.

Hey there! Welcome to Pinside!

Donate to Pinside

Great to see you're enjoying Pinside! Did you know Pinside is able to run without any 3rd-party banners or ads, thanks to the support from our visitors? Please consider a donation to Pinside and get anext to your username to show for it! Or better yet, subscribe to Pinside+!


This page was printed from https://pinside.com/pinball/forum/topic/pinbot-fans-and-owners-club/page/24?hl=fiatsrus and we tried optimising it for printing. Some page elements may have been deliberately hidden.

Scan the QR code on the left to jump to the URL this document was printed from.