(Topic ID: 130184)

My new Target pool project

By SteveFury

8 years ago


Topic Heartbeat

Topic Stats

  • 134 posts
  • 29 Pinsiders participating
  • Latest reply 8 years ago by SteveFury
  • Topic is favorited by 7 Pinsiders

You

Linked Games

Topic Gallery

View topic image gallery

VAUnit_Animation.gif
Value_Add_Unit.png
20150905_102605.jpg
Lineup.jpg
Armature.jpg
pup.jpg
bath.jpg
pf.jpg
14363643846223.jpg
14363643653802.jpg
Cleaner.jpg
Inserts.jpg
Board.jpg
Targets.jpg
Mech.jpg
Door.jpg

You're currently viewing posts by Pinsider SteveFury.
Click here to go back to viewing the entire thread.

#1 8 years ago

The Pinsider's who are familiar with my past projects know I love a challenge.

Target Pool has been on my wish list for a good long time. I've seen them appear on Craigs List but always out of my reach. Too far away or too much.

Then yesterday I noticed a -real- project pin appear. I got it for a fair price for condition. I drove 7 hours round trip to get it today.

The owner said his dad bought it about 30 years ago when he was 8 and had it ever since. I told him I also had one as a teen in the mid-late 70's and always regretted selling it. I gave the seller the link to Pinside with an invitation to follow this thread.

The elements have done a lot of damage to the cabinet and exterior parts. Bottom board is rotten, parts of the head are split and de-laminating. Needs new cabinet paint. Back glass needs Tripple Thick and air brush.

5.png5.png

This is the first pin I've had that won't need major PF paint restoration or Varathane sealer. Planking is minimum.
PF looks like it was in a smoky bar, but the grunge cleans up nicely. (See my pic where I cleaned around the "6" ball insert/roll over lane (Did a quick spot-clean).

2.png2.png
1.png1.png

No worn-through paint. It's a first for me!
4.png4.png

I need to go through every aspect of this pin to bring it up to snuff. The game won't start, I need to talk to PBR for a schematic once I get a list of materials.

The outside door shell is solid rust... and WOW they want a ***TON*** for a replacement. More than I paid for the whole game! I'll try my luck with wire-wheel cleaning, then go to a series of smaller graduated sand paper before buffing with steel wool and then sealing it with a few coats of Miniwax paste wax. A lot of work for sure, but maybe the door, legs etc might turn out nice.

4.jpg4.jpg

Anyway this is my new project and is slated to begin in a few days. Lucky me on vacation all next week! I'll tackle the head first.

Looks right at home with the others, doesn't it? I finally have a wedge head. Yaay! I think the people in this community are about the only people I know who appreciate that. Can't wait till' it's shiny clean.

These seem to be multiplying:
3.png3.png

#6 8 years ago

Excellent advice. Thanks. What is the typical results of using one of those chemical products on such a door or legs? I suppose the question is probably arbitrary from person to person but does it turn out really well?

#12 8 years ago
Quoted from shimoda:

I could have brought that to you Steve, just minutes from my house. I passed on it, partly not having time, space, or enough EM experience but now seeing someone start with it kinda makes me wish I'd picked it up. Almost called the guy back really. Just a shame it had to sit outside so long. Good luck with it. Hope the mosquitos weren't too bad, they tore me up when I went to look.

No problem. Gee it took 2.5 hrs to get there and 5 going back. Hate Atlanta traffic!!!

Glad you found my thread. The Mrs. has a pinball and karaoke party this weekend then I'll be starting with breaking down the Target Pool head Monday.

That is removing the component board inside and all hardware. Then fixing the shell with reinforcing /gluing /clamping/filling/sanding/stencil making/priming.

Everyone likes pics and I'll be posting as I go.

#18 8 years ago

Thanks all.
I was shopping at hardware store and got this for when I get to the rust:
20150612_192415.jpg20150612_192415.jpg

I also "slipped" a paint sprayer in the shopping cart when the Mrs. wasn't looking
That way I can mix my own cabinet colours and not be limited to rattle cans. I will be going for the original colours (or close to it) and artwork.

My game wouldn't start and I don't have a TP schematic..... but I do have a MIBS schematic which is very similar and figured it out in a few minutes. Pesky shorted coin switches.

#19 8 years ago
Quoted from boilerman:

I might have a much nicer backglass if you don't want to get one from ron webb. it isn't perfect but not flaking like yours

Thank you for the offer- That's very thoughtful and I appreciate that. I am going to try to save this glass first with TrippleThick and my hand at airbrush.

#22 8 years ago
Quoted from pinhead52:

I has an extra Target pool Schematic, got another to trade for it?

Hi Pinhead52.
I tried to send a PM but it's apparently not working.

I don't have any extra printed schematics, however I could trade for this:
https://pinside.com/pinball/forum/topic/for-sale-1947-united-singapore-pinball-schematic-and-diagrams

If not then that's alright. I should have a list of materials for Steve Young in about a week and I can get a copy from him.
Let me know if you want to trade for the United schematic. High res image file(s) of the TP schematic would work, as long as they can be stitched together.
Thanks

#27 8 years ago

Wife's party is over so the rebuild starts with the head.
I first removed the circuit board, all hardware and glass. Then vacuum with a stiff brush to get the loose stuff.

The plywood delaminations need to be fixed first. The most obvious delamination is the top layer but is actually several layers and I glue and "clamp" them all. Call me cheap but about 200lbs of records clamps quite well. They are stacked on glass because the glue is less likely to stick to the head:

delamination.jpgdelamination.jpg

I need to tripple thick this glass ASAP as I am going to try to save it"

glass.jpgglass.jpg

#29 8 years ago

The delmaninations turned out great. I forced a bead of glue along and into the edge of the plywood facing to help prohibit future delaminations. Last thing I want is for something to catch on a loose edge and rip out a chunk.

Next to fix is the split side of the head. The broken board is severely twisted. No re-using that piece:

twist.jpgtwist.jpg

I will be making a new board to replace that section tomorrow.

The "split" edge on the good existing board is extremely straight which suggests the side was originally made in two pieces which surprise me:

board.jpgboard.jpg

The credit unit was froze up as they usually do. I used Never Dull polishing wads to remove the grunge. Someone had greased the reel's shaft that spins inside the nylon bearing (Should have no lubrication there) which was the main failure source. The unit came out pretty clean:

unit.jpgunit.jpg

#30 8 years ago

I placed this parts wanted post:
https://pinside.com/pinball/market/ad/21394

Match relay armature

I am working on a parts list for PBR and will ask Steve Young if he has one, thought I'd also check here.
Thanks.

Match.jpgMatch.jpg

#31 8 years ago

Here we go with a new replacement side. I used just a tablesaw to cut the joints. I can see this really wasn't one board, I can see the seam on the other side of the head.

I'll begin sanding when this is all dry:

repair.jpgrepair.jpg

#34 8 years ago

More pics.

I needed to make a stencil pattern before sanding. I used wax paper, marked its position on the box and drew it out with a sharpie for each panel and marked its color:

stencil.jpgstencil.jpg

Then I did a rough sanding to remove the loose stuff and expose any unseen issues.
I used wood filler, and filled ten zillion insect bore holes, small crack gaps etc:

filler.jpgfiller.jpg

Final sanding is scheduled for tomorrow morning, then a light coat of gray primer to check the finish.
Tonight I start cleaning score reels.

#35 8 years ago

Turned out pretty good.
I am leaving it gray until the main cabinet is ready for paint so everything matches.
Work on the head circuit board continues...
20150617_120154.jpg20150617_120154.jpg
20150617_120207.jpg20150617_120207.jpg

#36 8 years ago

I am finding these brass plated parts both blessing and curse.
It took about 4 hours to clean/polish the top and bottom score reel shelf/mounts. I started off using Never Dull wads which was good to remove superficial tarnish but too slow. So I tried Mothers which was a bit faster but not by much. I found the best combination that seems to work for me is a first rub down with Never Dull, and a line of Brasso squeezed on top of the wad then followed by Mothers.

Still, 3.5 hours per score reel is a long time but the results are good. 2 More reels to go. All score reel EOS switches are broken and coils burned crisp:
20150617_201814.jpg20150617_201814.jpg
20150617_201348.jpg20150617_201348.jpg

#39 8 years ago

Man I did a TON of work on this board but turned out pretty good.
All the plating and brass polished. Wires and board cleaned. Relays serviced and adjusted. All score reels & credit unit done and adjusted.

I scrubbed the white plastic parts of the relay armatures clean with water & a toothbrush.

I also used a toothbrush with water and a bit of dish soap to clean the score reels. The print on the score reels would come off with water+friction. So I used the corner of a dampened towel/rag to clean the white facing and avoided touching the print. Then I let the water briefly flow over the reel faces and carefully pat dry with a soft towel. A sharpie marker filled in the number imperfections.
It worked pretty good for me.

I'll have to revisit some items when I get parts from PBR (Switch, coil & sleeve replacements). I'll do the match unit when I get a new armature.
Only thing left is to repaint the opposite side white to improve light bulb reflectivity (Factory white is faded).

The shine on the score reels didn't show in this photo:

20150618_222200.jpg20150618_222200.jpg

I suppose I'll start on the main cabinet next.

#43 8 years ago

Thanks all.

Quoted from shimoda:

Are you going to SFGE this weekend by any chance?

I didn't know it was in town. I might stop by Sunday.

#44 8 years ago

This is my last full day to spend on this project.
I fixed the bottom board. Seems the bugs liked the glue it was made with. I used new 1/8" plywood that seems to be the same thickness as the original. I split the bottom lip on the cabinet sides so the new board would fit (I was too aggressive and need to do some bondo-fixing). I laid a thick bead of glue and drove a bunch of nails along the edge. Then I drilled two round power switch holes (Stuff happens when you're in a hurry and don't think).

I had some extra oak shoe molding so I built a frame around the edge, gluing and brad-nailing. This will be great for the fingers to grip when carrying the machine. New corner pieces for the bottom and I am really happy with the result. Thanks all for the suggestions:

Bottom.jpgBottom.jpg
Bottom2.jpgBottom2.jpg

I took the box outside for a good sanding. I sprayed with primer to identify the problem areas to fill. Darn those insect holes! I'm gonna have to research what may have done those. The cabinet sides must have been laminated with a different type glue, as the bugs didn't destroy them as they did the bottom panel. The head was full of these too:

Holes.jpgHoles.jpg

#45 8 years ago

Well it didn't take long to find out what caused those holes, and it is something I am going to have to keep a look-out.

It was likely caused by a beetle that lays eggs on exposed wood, and the hatched larva bore into and feed on the wood then become adult and emerge, creating the hole.

http://www2.ca.uky.edu/entomology/entfacts/ef616.asp

The destroyed bottom panel was loaded full of this dust, which I also found throughout the machine. Here's what I mean:
wood dust.jpgwood dust.jpg

The bugs can infest homes and furniture causing great damage.

Far as I can tell the bottom panel was their main interest on this machine and I have since destroyed all its remains. Seems they almost always infest new, moist wood. Not 46 year old wood. It is also evident the wood dust piles in the machine is very old indicating the colony is no more.

Still, I will need to keep an eye for any new piles of wood dust.

#47 8 years ago

Thanks for the compliments.
The original colors on this game are red, white and blue. It will be my 3rd pin using these colors. I was going to use an airgun for an off-white base but things didn't work out (Long story). I ended up using 4 rattle cans of semi-gloss white enamel.

I'll let this dry for a few days and begin on the main (bottom) control board tomorrow evening. This will be similar to the work done on the head. Individual unit disassembly/cleaning/polishing/lubricating/re-assembly/adjusting/testing.
Working on those long sequence relay banks will be a learning experience for sure!

Question for those who have used chemicals to remove heavy rust.
I have never used these chemicals before. I assume you pour the chemical in an old plastic basin and soak the parts (Such as the front door facing) for an hour? Any advice is very much appreciated.

The cabinet still has a few scattered insect holes but not bad as before. They show past history and overall it came out pretty good:

Thanks again!

20150621_144331.jpg20150621_144331.jpg
#48 8 years ago

20150621_144331.jpg20150621_144331.jpg

#51 8 years ago
Quoted from Dr_of_Style:

I have retired my burnishing sticks for a dremel tool with a BRASS brush.

Thanks for the compliments. I may use your Dremel idea on contact blades however I personally don't think the brass is a good idea. I've gone through a couple of those Dremel brass brushes over the years and the tiny wires get tossed when they break off the wheel. I got knocked on the head by the Mrs. a few times because I polished some Pachinko parts with the tool while sitting on the couch, and she got pricked a lot by broken wires. Microscopic hypodermic needles.

You've obviously had great success using the brass roto tool. For my luck those fragments will end up causing strange intermittent issues for short circuits. I can imagine it would be almost impossible to troubleshoot.

But the idea is good; They sell a similar roto tool that has a kind of synthetic non-conductive brush I might try on the blades, and I bet those cotton polishing disks may come in handy too.

#55 8 years ago

Well it's been a couple days of progress. Sorry to over-explain what I'm doing but maybe it might help noobs.

I have been focusing all week on the bottom control board.
My method of cleaning the wring harness is to first use a vacuum brush, followed by scrubbing with a stiff dry toothbrush then wiping with a clean square of cotton rag towel that is damp with (only) water. It seems to pull the dirt out pretty good.
I am cleaning the plated parts by scrubbing with Brasso. I tried a combination of various products and that works best for me. I complete the work on one unit before moving onto the next. The last thing to do on each unit is to verify switch gap and operation.
In every case I take a number of photos of the unit of interest from different angles just in case a cold solder joint breaks or to know which hole a spring goes in etc.

Interesting how someone thought all solenoid plungers should have a film of grease on them. They clean pretty easily and I polish them with MiniWax paste wax to make them good and slick.
Oh, and all springs get a drop of oil worked into them with the fingers then wiped off with a rag to prevent rust.

Once I have everything clean and working good I plan remove them all from the board itself, sand it and either polish with paste wax or seal in clear.

The Relay control bank looked the most intimidating so I tackled that one first. It wasn't too bad.
I removed the big reset solenoid and mounting bracket, removed the long pivoting arm by unhooking two underside springs and taking out two pivoting pins/bolts. I wanted to clean the grunge on the top of the main body so I removed all the relay coil screws (but left the coils in the unit) so I wouldn't have to scrub around the screws.

CTL Bank.jpgCTL Bank.jpg

Then onto the Ball Count Unit. The job is straight forward. Complete disassembly, cleaning, polishing, reassembling, adjusting, gapping switches and thorough testing.

BC Unit.jpgBC Unit.jpg

The tilt/fuse board was next. I removed all items, sanded down and polished with paste wax(Sorry no photo).

The score motor was pretty nasty with old grease, tarnish and grime.
I don't suggest such a tear down for complete noobs.... However I removed all switch stacks and wrapped them with tape and labelled their position. Removed the cam assembly, the frame, unsoldered the motor. Removed the mounting brackets. Did the usual cleaning process. Upon reassembly, I would mount a bottom switch stack first so I can see the switches more easily for adjusting and testing them. The broken brake is on my PBR list.
Before/after...Click to see detail:

Score.jpgScore.jpg

I am down to the last items on the board, the individual relays. I remove and polish the frame. I clean the armature plastic by scrubbing with a toothbrush and greased lightning soap. Time consuming and tedious it's not my favourite thing to do.

#56 8 years ago

You may have noticed on my previous post the control bank reset solenoid is missing a mounting screw. I've since replaced that twisted off head with a new screw.

I am also doing the cabinet little by little as I do the other stuff. Please pardon the messy storage building.

I did -a lot- of research on webbing on pinball websites, auto, motorcycle and other websites. I heard the webbing aerosol cans were terrible. I didn't want to sling paint with a wire brush. The most reasonable method seemed to be using thick unthinned lacquer in a spray gun with wide tip and low pressure. Some reports said to mix testers model glue in the paint for the strings.

So I got all my things together. New spray gun, tube of model glue, 1/2 pint of (expensive) lacquer and a can of aerosol webbing just in case.

I worked on it until about 3 this morning.

I first put the unthinned lacquer in the gun and did some tests with low pressure. I could not get it to string properly no matter what I did. The few strings I did get were accompanied by spits and blobs. I could only get a nice splatter pattern.
Then I squeezed in the tube of model glue and mixed. The glue did not mix, all it did was wrap itself around my mixing stick.

I tried more attempts at different pressures and flow adjustments but the stuff just wouldn't string... so I laid a real nice splatter pattern on the cabinet. I cleaned everything up and took a good long look at the cabinet.

I used a splatter pattern on two of my other pins (Which also use red, white and blue stencil colors) and I wanted something different.
Well, I got something different.

I did a few tests with the webbing can and it seemed I could move it quickly across the surface to control the flow. Well, it didn't work quite that way. It flowed real heavy as everyone said it does and the evenness is hard to control without applying more of the product.
In the end I thought "OMGosh what did I do".
But I let it dry and hand-sanded the cabinet and wiped it down. Doing so took a lot of the harshness and texture out of the finish. It didn't look quite so bad. I made the head front stencils for a test.

Sometimes the morning after is better (sometimes not). So I got up kinda early for an assessment. I don't want to sand and repaint if I -reeeeely- don't have to, don't have the time or budget.
It is not the result I was looking for. I think will look alright once the stenciling is in place and the hardware is attached. I know some here will hate this finish and that's alright... It's already growing on me and I think some sections came out better than others.

Either case it is vastly better than before:

I think the stencil and rails will break up this uneven side (I didn't want to spray any more webbing):
CabSide.jpgCabSide.jpg
Other side close-up:
CabSideB.jpgCabSideB.jpg
CabInside.jpgCabInside.jpg
The front is kinda heavy but there's a lot of hardware and stenciling to go here:
CabFront.jpgCabFront.jpg
Head with front stenciling. I wish the webbing were more even:
CabTop.jpgCabTop.jpg

#61 8 years ago
Quoted from Rat_Tomago:

Steve I know it would suck but you might want to look into what boilerman is saying and try repainting. Get a blank strip of wood or some cardboard and practice some more and then come back to this game and try it all over again.

Quoted from PinballFever:

I agree. I would repaint it if it was me.

Thank you both for the honest opinions. I one hundred percent agree.

I had tried again, spent some time trying just about all gun/air adjustments. I had thinned the lacquer a bit, opened the flow to max, tip is 2.2 (Also tried my 1.8). I can cut the air to zero, squeeze the trigger and slowly bring the air up until the gun spits. I get only a few fat strings at that time associated with big blobs and speckles.
I slowly increase the air and the few fat strings are no more but turns to a consistent splatter. Increase further and it begins to atomize. Adding thinner in small amounts didn't seem to make a difference.

I don't know. Maybe I got a bad can of lacquer. This is what I've been working with:
http://www.amazon.com/Black-ACRYLIC-LACQUER-Autobody-QUALITY/dp/B009G9R5CC/ref=sr_1_7

I'll have to live with it for now but will keep my patterns and stencils to revisit this and repaint hopefully this fall.

I couldn't stand looking at this blunder so I went ahead and applied the stencils. The cabinet is ugly but not as ugly with the colors:
20150628_112442.jpg20150628_112442.jpg

Regarding the head, it looks like some of the glass-paint destruction was caused by the fiberboard light mask being pressed hard against the glass. I mean it's *really tight. The fiberboard doesn't feel solid and seems to be a bit unstable so I plan to work wood glue around all the light cut-out edges.

There's a screw on the top of the head that is the pivot for locking in the wood circuit board inside. I plan to remove that pivot screw, fill the hole and move it a few sixteenth's toward the back of the cabinet to relieve the pressure against the glass. The glass, BTW has been tripplethicked.

#63 8 years ago
Quoted from shimoda:

I'd be willing to bet expansion is to blame for the tightness, if that is pressed wood it would account for the tightness, particularly with all the humidity that thing met.

Yes. Here's the Craigslist photo. I think it spent a few years outside:

00v0v_g0ZVnSRKPg3_600x450.jpg00v0v_g0ZVnSRKPg3_600x450.jpg

#70 8 years ago

Ok, bottom board is finished. After doing all the things described at the top of this page to each unit, I removed everything from the board itself, then vacuumed it with a brush.
Then power sanded (Avoided the existing labels) and sealed/polished with paste wax. Only thing left is to apply a few labels and a new power cord.
Board.jpgBoard.jpg

Tonight I tear apart the coin door. Got an extra gallon of the Prep and Etch. I am anxious to see what it can do. I plan to soak the coin door in it for about 11 hours. That, along with other various rusty parts.

Door.jpgDoor.jpg

Repainting the cab is on the to-do list.
I also need to repaint my Spirit of 76 as the stencils were a DISASTER, and I need to paint the sides of my Space Mission. A painting queue seems to be forming. I can live with this in the mean time:
Cab.jpgCab.jpg

#76 8 years ago

Fresh out of the 10hr bath, after a rinse and towel dry.

The rust is gone but there is a lot of work left to do. Looks like the door and hinge will still need a light buffing with the wire wheel. I am thinking I can do light deliberate runs full length left to right with the wheel and get it decent. Then followed by graduating higher number of sandpaper, steel wool and seal in wax. If I can't get it decent then I'll probably go with hammered paint.

Unless there is an alternative suggestion(s).

Most of the other parts I can get from PBR.

Thanks all!

20150630_070855.jpg20150630_070855.jpg

#81 8 years ago
Quoted from Rat_Tomago:

There are several used door shells to be had. Pinhead52 had like 20 used door shells at one point in various conditions.

Thanks. Buffing the parts were useless. I went with hammered paint. I'll also check for used doors.

#83 8 years ago

Update.
All the acid cleaned parts were very thoroughly wire wheeled and given a few coats of Rust Olium silver hammered paint. Then let to dry for 3 days and given a coat of TrippleThick glaze. I will be fitting a new red start button and new illuminated price labels. The rusty coin return buttons were put into a drill and ran with #300 sandpaper follwed by #0000 steel wool to polish. Then a thick layer of paste wax to help prevent rust:
Door.jpgDoor.jpg
There's a lot of plated parts and they all were cleaned with #0000 steel wool soaked in Brasso. Wire harness soaked in Tide soapy water for a day, then brushed and rinsed out. Everything cleaned and adjusted:
Mech.jpgMech.jpg

That finishes the cabinet except for the legs which I'll do last (Side rails are waiting for new twisty nails).

Work on the PF begins.
All the arrow targets are supposed to be red. I have no idea how this one contains a scattered mixture of red and black targets. 15 new red targets are too expensive so I am painting them with Testers enamel paint and a fine brush. These targets are super nasty so I first spray with Greased Lightning, scrub with a toothbrush and rinse in a cup:
Targets.jpgTargets.jpg

#84 8 years ago

Quick update.
Been very busy with the PF underside. Most of the time spent is polishing the plating. Not my favourite thing to do.
But it's nice to see progress. I first removed the board and placed it bottom side up, stood back and said "Eww". Everything was dark and dingy. I hate to work on dark, dirty and dingy pins hence my cleaning effort. Here you can see I've done the bottom half of the board (see the red line). Notice how "black", almost charred everything on the top half looks. The wood PF board gets a good light scrubbing with a cloth damp with water along with the harness and polish what I can. All the kickers are found to be super-excessively lubricated like sticky goo all over the place (what a mess) so I remove them, let them soak in thinner. Then clean, polish and properly lube:
Board.jpgBoard.jpg

I spent a lot of time today finishing my PBR list and cleaning the bottom side of the inserts. I am really curious what caused this bottom side insert dirt. It is water soluble and comes off rather easy with a soft cloth damped with water. See the before-after difference:
Inserts.jpgInserts.jpg

I made this quick and simple tool for cleaning these many inserts. A pine board with a tip made just small enough to allow a bit of side-wall pressure with a damp cloth wrapped around it. The tip is flat to fit the insert face. A few spins with the damp cloth and presto a clean insert:
Cleaner.jpgCleaner.jpg

I've never seen a parts order list here on PBR. Maybe I'll be the first so here's my list. Not too awfully bad:

(4) Score reel coils...........................................Coil A9154
(1) 24v Hold relay coil.....................................Coil A9738
(4) 1-1/4” sleeves (For score reels)
10) 1-5/8" coil sleeves
(4) Bell & Knocker sleeve..................................A-5142
(2) Flipper bushings
(1) Shooter sleeve
(1) Shooter barrel spring
(1) Match relay armature
(1) Pinball
(1) Red start button.......................................Red GTB-A4524A
(1) Ball in play card............................................A9995
(Pair) Flipper bodies...........................................A11242-3A
(54) White facetted posts...................................C11561W
(6) White lane guides 1.5".....A9394W......Is there A9393 in white?
(1)#455 Flasher lamp.....................................LAM0455A
(10) #44 Lamps..............................................LAM0044A
(1) 2 Nickels 1 play coin label........................A10724
(1) 10c 1 play coin label..................................A10725
(1) 25c 3 plays coin label................................A10728
(1) Rubber ring set
(20) Side rail twist nails..................................GTB-FA-701
(4) Leg levelers
(1) 100 Points wihen lit bumper cap (BLUE).....A-11426
(1) Pop bumper white body with red print............A-10436
(2) Bakelite Link material.....................................MAT-LINK
(1) Pop bumper bakelite.......................................A-2662

Switch blades:
(4) Score reel EOS switch blade
(4) Score reel EOS switch contact rivet
(5) Gottlieb relay switch blade
(5) Gottlieb relay switch contact rivet

(1) Score motor brake blade

(1) Copy of manual
(1) Metal contact file
(1) Rubber light bulb remover
(1) Power Cord...................................................CORD-SET-14

845-473-7114

#86 8 years ago

Question for anyone.
I plan to begin PF cleaning this evening using magic eraser and 91% alcohol.

The PF is really exceptionally filthy and I plan ton do small sections at a time.

The paint appears to be good under the dirt so I don't want to clear coat. The inserts are sunken and cupped. I plan to fill them with Polycrylic.

My question is, what is the best way to protect the PF after cleaning with ME and alcohol?
Paste wax? Canibou (sorry the spellen) wax?

#88 8 years ago
Quoted from stashyboy:

How are you planning to level this? (I clear with Varathane, then fill, then sand the polycrylic, then clear over that.)

Clean the insert, repaint the black ring if necessary, drip the polycrylic and let it bead along the edge then dry. Check if level and repeat the drips as needed.
I find the polycrylic is really tough to sand based on my last 3 pins so careful placement and quantity of drips is paramount since I want to avoid sanding. The result isn't factory or glass perfectly smooth but is fine. If done carefully then any imperfections on the surface won't effect the play in any appreciable manner.

#90 8 years ago

I began work on the PF. First is cleaning. This is the dirtiest one I've ever cleaned. I depopulated most of it and used Magic Eraser with a new bottle of 91% alcohol.
Most of the dirt came up pretty easily. The paint is very thirsty and thin. I stop an area with the first sign of paint on the ME.

Here you see I've done the upper half. Sorry for the low resolution pic, my cell phone picture resize app is crap:
14363643653802.jpg14363643653802.jpg

The old wax came loose with the alcohol leaving thick clouds scattered about. Wiping with Napthia helped but they would reappear as the chemical dried. The clouds seemed to be working into the paint itself.... which was thin already so I gently wipe a cloudy area and worked Miniwax paste wax down into the paint with my finger before the cloud reappear.
I did the whole PF that way.

I am not sure of the mechanics, but the ME and alcohol cleaning revealed a lot of minor planking but working the wax into the paint fixed almost all of it. Even the reds and other colors which surprise me. The wax semi- dried in a few minutes and I buffed it out with a soft cotton towel.

That is not the process I had planned, doing an emergency wax job that way. I only had a limited amount of rubbing the thin paint and had to work a permanent solution before the clouds became permanent unremoveable. I need to buff it out a few more times, let it completely dry then a couple applications of carnauba wax.

The paint is faded for years of neglect but is stabilized by the paste wax. I won't be doing any paint restoral except black enamel around the inserts, black lines and a bit of red by the flippers (rubbed too much). Inserts are not waxed so the polycrylic filler has something to stick to.

Here it is all cleaned and waxed:
14363643846223.jpg14363643846223.jpg

1 week later
#92 8 years ago

Update.
I let the Miniwax paste wax on the PF dry a few days, and populated the PF in the mean time. Set switches to proper gap etc. Played a bunch of games to test. The arrow scoring circuit has a minor strange bug I have yet to find. I spent a couple hours tracing it down before moving on.
Upon playing the games, I noticed the pinball was collecting ugly spots of the miniwax all over it, and you could see on the PF how it was not wearing well at all. So I did 3 applications of good Meguiars Carnauba paste wax.

That solved the wax problem and removed more dirt. You can see it looks pretty good, I am satisfied with the way this turned out:
pf.jpgpf.jpg

Next is fixing the heavily rusted legs.
I had a junk spare sheet of corrugated roofing plastic that I cut a 34x14 square. I tied the ends with twine to form a long "U" shaped channel, and added some support at the ends. Then I took 3 standard kitchen bags and opened their side seams to create 3 sheets of plastic lining and put it into the channel.

Then I put all 4 legs and 8 rusty bolts carefully into the channel being careful not to puncture the plastic.
Then poured two full bottles of the Prep and Etch into it, submerging the legs & bolts. The assembly is outside where any leaks won't make any difference.
I did this a few hours ago and the plastic trash bags are holding the contents. Tomorrow afternoon I plan to set a funnel & jugs under one end of the channel, and puncture the end to let it go back into the bottles.

Here is my setup:
bath.jpgbath.jpg

I have the top covered best I can.

Man, that Prep and Etch is NASTY stuff. Get it on your skin and worse than hydrochloric acid.

This whole project has been periodically delayed due to a new member of my family.
A 9 month old Great Pyrenees puppy:
pup.jpgpup.jpg

I think I have this pinball thing nailed down fairly well. Wish me luck with the puppy!

#93 8 years ago

I should say, she's a 9 *week* old pyrenees. 9 months from now she'll be big as a horse!

#96 8 years ago

I have a question for anyone.

I have a short in my lightbox which I've isolated to a string of 5 light sockets. It's not a dim-bulb open circuit but a fuse blowing short.
They are the kind that have their solder tabs stapled flat on the back.
Does anyone know if there is a common failure point to look for? I want to fix what I have rather than hassle with getting a new one. I'll be finding the bad individual socket tonight.
thanks!

#99 8 years ago
Quoted from EMsInKC:

Steve, again, Evaporust is superior to Prep and Etch and not harmful at all. I'm trying to understand why you're still using it.
Cute pup.

Because the 2 jugs of prep & Etch cost over $30 in my project.

However what ever solvent I used, the part(s) need repainting anyway. Too much loss of the original finish. The legs for example, has most of their chrome plating missing or flaking. I did some wire brush work on them not to remove rust but to break off / remove the flaked chrome. The plating on the door and door parts were also missing. What was left was deeply pitted.

#102 8 years ago
Quoted from singlezero:

is that the same issue that you are having?
Anyways keep up the tremendous bringing back from the dead!

Not quite.
Mine is strange.

As we know the arrow positions are controlled by a stepper unit under the PF. The more "billiard ball" targets that are hit enables more arrow positions to be enabled by the stepper.
Scoring is 50 pts for unlit arrows and 300 for lit arrows.

It all scores normally except when#11 is hit. It matters not the status of the other 14 ball relays. Only relay #11.
The stepper is arranged so 4 or 5 steps repeat the arrow positions. When relay 11 is tripped, any unlit arrow target scores as follows:
Stepper first position: 50 pts.
Stepper second position: 120 pts.
Stepper third position: 300 pts
stepper fourth position: 210 pts.
Stepper fifth position: 300 pts.
Those are all unlit arrow scores with #11 tripped.
The odd combination is caused by the 50 and 300 point relays going on simultaneously at different times. My score examples are not exactly what is produced but the pattern is consistent every time. Not random.

I spent a couple hours or so on it but I want to finish the restoration before digging further.

I plan to start the glass soon.
I'll open a new thread because I plan to go into detail as I go and see how it goes, better or worse.

2 weeks later
#105 8 years ago

Well, now that the backglass is done I can finish this TP project.

I tracked my strange 50/300PT moving arrow #11 pool ball target scoring issue to a single strand frayed wire on the #11 arrow target.
I've made a number of minor adjustments (flipper arbors, relay switches etc) and the refurb end is near.

Really all that's left is to replace missing component labels, fix the match unit and a final PF wax.

I took the match unit apart and soaked the harness/boards in a Tide solution last night. The armature is broken and I haven't found a replacement yet.
I have a 2 coin 1 play relay in the cabinet that I'll rob the armature from. I value the operation of that coin slot so I'll have to figure something out.

Has anyone fixed a broken match unit? I was thinking about riveting a new blank switch blade to it, and form the end of the blade to be the ratchet pawl. Not too sure if it would work though.

#106 8 years ago
Quoted from SteveFury:

Has anyone fixed a broken match unit?

I meant to say fix a broken match unit armature.

#108 8 years ago
Quoted from shimoda:

I finally got to play one of these at Pinburgh and am now even more sad to have passed this up!

Sure has been a lot of work though. Almost as much as my Singapore.

#111 8 years ago
Quoted from shimoda:

Hopefully I'll get to meet you sometime soon and play these games of yours. Do you ever go to any of the Atlanta tournaments just for fun?

I would like to go to an event but have not.

Hey-
If any Target Pool owners can shoot some photos of their replay score cards it would be very appreciated.

Anyone know what the 3 ball and 5 ball recommend replay scores are for this game?

#113 8 years ago

Thanks for the link however they only have 1 score card and the instruction cards.

Still seeking the other suggested high score settings.

#115 8 years ago

Thanks Boilerman, PM sent.

I worked hard the last couple nights doing a sprint to the finish line, getting this project done.
In my haste, my spare PF glass fell to the carpet floor in front of my Spirit of 76 shattering into zillions of bits. GEEZE what an awful mess to clean! At least it wasn't my new Target Pool glass!

I tried to make my broken match relay armature work. This is my modification.

-------->>>This is an utter failure:<<<---------
Armature.jpgArmature.jpg

It might have worked if I left the flat spring longer with a more pronounced curl. Maybe not.

I ended up robbing the almost new condition armature from my 2 coins per play relay to use in my match relay. Now my 2 Nickels 1 Play coin slot is a "One nickel one play" slot. Oh well, I'll just have to keep an eye out for a replacement armature.

Anyway I'm calling this project done.

This was a lot of fun to do (for the most part) and I got to do some new things. I fixed the cabinet bottom board for the first time, along with repairing a split side of the head and extensive BG repair. I wish the webbing was better and I might revisit the paint shop in the future but I can surely live with it in the mean time.
Mechanically, this game shows -a lot- of wear especially in the high duty objects like the start and reset relays (Deep grooves caused by moving armatures etc). The side rails are heavily worn where the lockdown bar is, evidence to lots of nudging.

But I'm confident in the refurb, that it will last for the next generation.

Here's my very humble lineup:
Lineup.jpgLineup.jpg

#119 8 years ago
Quoted from EM-PINMAN:

Nice lineup Steve!
Looking at the pic it makes me want to get a Jukebox if I ever get the garage converted to my arcade.
Have fun with your new toy!
Ken

Actually, that's a 2 car garage converted to a multi-use room.
I wanted to keep the outside looking original. When I removed the garage door tracks I left the 16' door in place but had to tack the upper folding segment of the big door to the frame (Otherwise it fold down without track support).
I tied all of the garage door tracks and associated parts to the inside of the garage door so I could restore the original if desired. I built a 2x4 frame right up against the inside of the garage door, strung some outlets and applied rolled insulated and sheet rocked.
Add some paint, carpet, furniture, games and beer.

Works out perfectly for our projector because there's no windows for light to bleed in. We've had the room that way for the last 10 or so years. Best cheap but useful modification I've ever done. Our home instantly grew 1/4 more living space for about $75 plus carpet.
We got a big carport out back to shelter the vehicles.

3 weeks later
#123 8 years ago

If anyone here has a Target pool and could either post pics of the suggested score cards or just post the replay values it is -very- much appreciated.
Thanks in advance!

#126 8 years ago
Quoted from boilerman:

I was going to scan those for you and TOTALLY forgot..... sorry
I can still do it if you want

That would be TOTALLY cool!
Either scans, photos or just posting score values would be super. I'll be printing new ones so perfect images isn't necessary.

The single existing score card I have is also 5800/6400/7000/7600. I've found those values fairly easy to achieve pretty consistently right from the start. It's why I'm interested in the "official" higher values.

Strange, I've probably played a couple games on this pin but have yet to break 10,000 points.

#128 8 years ago

All I have with my game is the 3/5 ball instruction card, a new ball in play card (PBR) and a schematic from another nice PBR member.

I'd really *love* to have a copy of the instructions such as rubber sizes and any other important info. The trouble of doing actual scans really isn't necessary as I can recreate everything in Gimp. A clear cellphone photo of the stuff would be truly wonderful.
stevefury61(at)gmail

Thanks!

#132 8 years ago
Quoted from boilerman:

sorry it took me so long..... I have so many irons in the fire I forget a few thing along the way. sometimes I just need a kick in the ass
here are the score cards, as relay, recommend scores and post adjustments
let me know if you need anything more than this stuff
link to the scans https://goo.gl/photos/CFXpQy8ZALk49zuu8

Yes those are wonderful thank you so much for taking the time.

#134 8 years ago

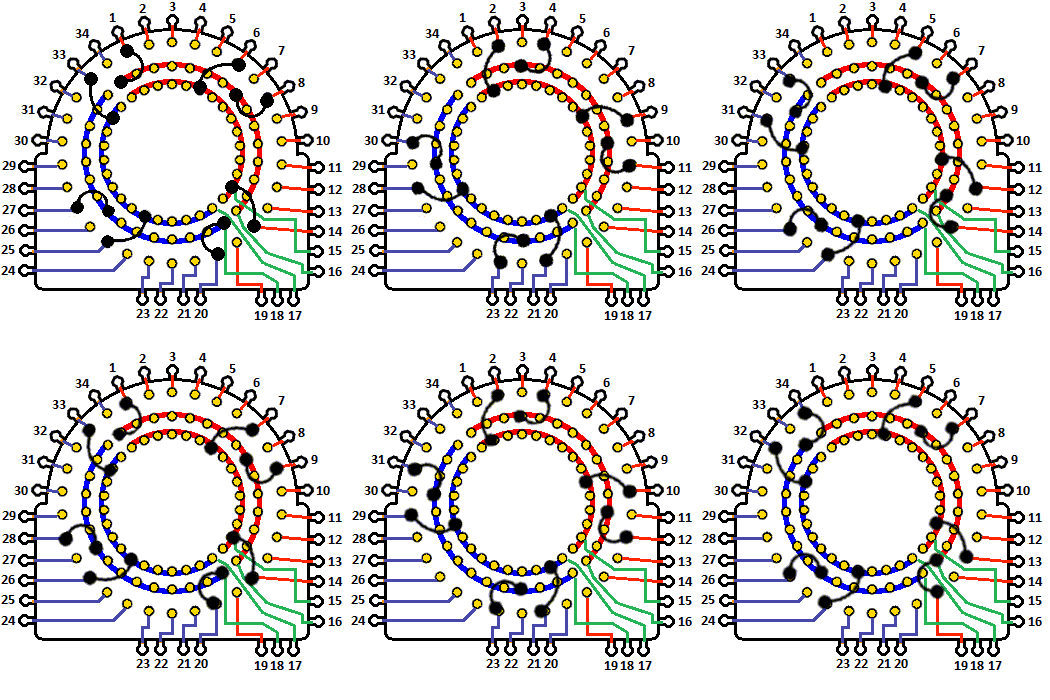
I recently had to to study the Value Add Unit and associated circuitry to help diagnose a strange problem.

I mapped out the VAUnit and wanted to also post it here, if it may help anyone with the Target Pool. If you think this may be helpful someday be sure to save a copy of it (Photos sometimes disappear from Pinside).
I had time to kill today so I did this boring shoe/rivet animation:
Value Add Unit.pngValue Add Unit.png
VAUnit_Animation.gifVAUnit_Animation.gif

Promoted items from Pinside Marketplace and Pinside Shops!
From: $ 10.00
Playfield - Protection
UpKick Pinball
 
From: $ 65.00
Cabinet - Shooter Rods
Super Skill Shot Shop
 
$ 15.00
Playfield - Toys/Add-ons
UpKick Pinball
 
Hey modders!
Your shop name here

You're currently viewing posts by Pinsider SteveFury.
Click here to go back to viewing the entire thread.

Reply

Wanna join the discussion? Please sign in to reply to this topic.

Hey there! Welcome to Pinside!

Donate to Pinside

Great to see you're enjoying Pinside! Did you know Pinside is able to run without any 3rd-party banners or ads, thanks to the support from our visitors? Please consider a donation to Pinside and get anext to your username to show for it! Or better yet, subscribe to Pinside+!


This page was printed from https://pinside.com/pinball/forum/topic/my-new-target-pool-project?tu=SteveFury and we tried optimising it for printing. Some page elements may have been deliberately hidden.

Scan the QR code on the left to jump to the URL this document was printed from.