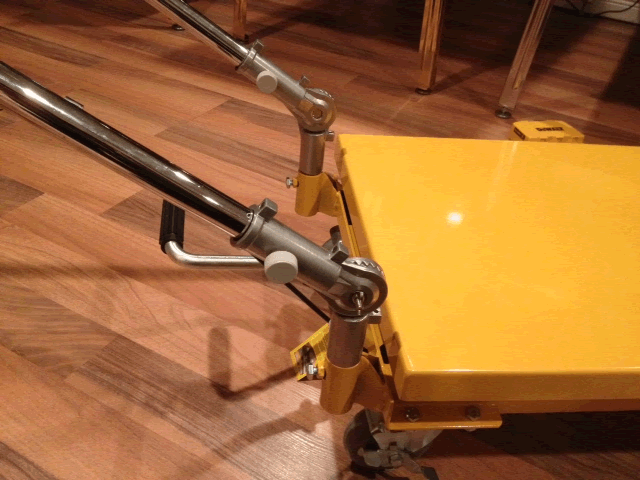
(Topic ID: 19065)

Modified Harbor Freight Lift Table

By wizzardz

11 years ago


Topic Heartbeat

Topic Stats

  • 1,219 posts
  • 373 Pinsiders participating
  • Latest reply 4 days ago by Ballderdash
  • Topic is favorited by 413 Pinsiders
  • Topic is sticky in its sub-forum

You

Linked Games

No games have been linked to this topic.

    Topic Gallery

    View topic image gallery

    IMG_1778 (resized).jpeg
    IMG_1271 (resized).jpeg
    IMG_1270 (resized).jpeg
    IMG_1268 (resized).jpeg
    IMG_1269 (resized).jpeg
    IMG_7624 (resized).jpeg
    pasted_image (resized).png
    IMG_6652 (resized).jpeg
    IMG_6520 (resized).jpeg
    IMG_3836 (resized).jpeg
    IMG_3839 (resized).jpeg
    IMG_3840 (resized).jpeg
    IMG_3834 (resized).jpeg
    IMG_3835 (resized).jpeg
    IMG_3833 (resized).jpeg
    PDC04705.JPG

    Topic index (key posts)

    9 key posts have been marked in this topic (Show topic index)

    There are 1,219 posts in this topic. You are on page 5 of 25.
    #201 9 years ago
    Quoted from toasterman04:

    well I looked at another store up here, Princess Auto, and it looks like the exact lift you guys get from HF, is $349.99 up here. so I think I am going another way - http://www.jeff-z.com/pinball/dolly/dolly.html
    wish me luck!!

    It is still cheaper to go HF. I checked EVERYWHERE! I modded mine....super easy! Don't trust Crappy Tire for anything!

    #202 9 years ago

    will HF ship to Canada?

    #203 9 years ago
    Quoted from toasterman04:

    we have Canadian tire up here and their carts are only rated for 330lbs. do you think that is enough??

    I'm not sure I'd trust it without another owner to vouch for it. Some pins can creep up to 350lbs.

    1 week later
    #204 9 years ago

    I just bout one from HF. Price on the tag was 159.00, but at the register it was 136.00 including tax

    #205 9 years ago

    I went with the flag pole bracket idea. I found some at Home Depot. They are plastic, so I'm a bit concerned, but time will tell.

    I also bought a long bicycle brake cable to reach when the handle is extended. The problem of course, is that it's too short to fold the handle level, and if you make the cable long enough so the handle folds flat, there is too much slack for it to work with the handle extended. I'm going to put in a cable splitter, that can be found at bicycle shops. That way I (you) can have the cable the correct length to work with the handle extended, and disconnect the splitter to fold the handle flat.

    Hmmm,

    I just had another thought while typing this....move the release handle to the side of the platform and set the cable to have the right length when the table is at the highest it will be used.

    Anyway......I should have done this years ago, it's already saving my back

    #206 9 years ago
    Quoted from DropTarget:

    I also bought a long bicycle brake cable to reach when the handle is extended. The problem of course, is that it's too short to fold the handle level, and if you make the cable long enough so the handle folds flat, there is too much slack for it to work with the handle extended.

    The length isn't the problem (bike brake cables are often just as long). You need more tension on the cable between the handle and the release lever. You need to pull it very tightly when you install and fasten it.

    #207 9 years ago

    I think my problem, is that I used a longer cable, but the old housing, which was too short to maintain tension with slack on it.

    I'll have to buy a new cable housing. Do you recall how long your cable is?

    THX

    #208 9 years ago
    Quoted from DropTarget:

    I think my problem, is that I used a longer cable, but the old housing, which was too short to maintain tension with slack on it.
    I'll have to buy a new cable housing. Do you recall how long your cable is?
    THX

    My parts list: https://pinside.com/pinball/forum/topic/modified-harbor-freight-lift-table/page/4#post-1758480

    I bought a 50" sheath and 60" steel cable. I ended up trimming the steel cable a bit after installing it.

    If you bought different flag pole mounts, you may need to measure your configuration.

    #209 9 years ago

    Thanks again

    4 weeks later
    #210 9 years ago

    Anyone got a coupon good in the next few days if they aren't discounted on Black Friday??

    I'm definitely keeping an eye out for getting one shortly. Would appreciate it if anyone knows or has something.

    Andretti

    2 weeks later
    #211 9 years ago

    So today I received a 25% off coupon, so I will be buying my lift table as soon as I can get a seconds worth of clarification from you all....

    My question: There are two 500lb lifts shown on the site....I'm confused...what is different between the two and which one is the one you all have typically been getting?

    Here is links to both:

    http://www.harborfreight.com/500-lb-capacity-hydraulic-table-cart-61405.html

    http://www.harborfreight.com/500-lb-capacity-hydraulic-table-cart-60730-10041.html

    I'd appreciate anyone with the time to let me know asap. I will DEFINITELY be purchasing one. From the price of $159.99 being knocked down to 119.99 makes this a done deal (for either one), but need to make sure I get the 'right' one.

    Andretti

    #212 9 years ago

    They look the same. They might have changed the model number.

    #213 9 years ago

    I just got one last week and had the same question, never got a definite answer but from the specs it appears the 61405 may have a longer table. I ended up with the 60730 as that's what they stocked in my local store, and WOZ needed to move now, to make room for the Christmas tree! It worked great, I placed a small piece of plywood on the lift to make it the same width as the WOZ.

    #214 9 years ago
    Quoted from Cheddar:

    They look the same. They might have changed the model number.

    There have been slightly different models of the cart. For instance, on one model, the release handle's bracket is removable like a bike brake handle, while on another model, the bracket is welded onto the cart's handle.

    #215 9 years ago

    Biggest difference I see of the two is the minimum and maximum height, which isn't much between the two. I believe whichever way you go it will be fine.
    I would go after the one with the lower minimum height to allow for storage (you would only gain an inch) but may be enough to put it under something such as a vehicle and out of the way.

    1 month later
    #216 9 years ago

    Here is my example:
    After grounding the pipe down to fit it into the risers, the cable was too short forcing me to hack off 2". Then I used a drill bit with tap to drill the top of the 45degree elbows. After marking where the hand bolts lined up on the bar, I drilled and tapped those as well. Now the hand bolt threads into both the elbow and handle giving me a strong base. When it's not needed I unscrew the bolts, fold the handle onto the table top and store it under a pinball machine.

    image-640.jpgimage-640.jpg

    image-603.jpgimage-603.jpg

    #217 9 years ago

    Remember to toss away that horrific ribbed mat that smells like a charred tire........

    #218 9 years ago
    Quoted from pinnation:

    Remember to toss away that horrific ribbed mat that smells like a charred tire........

    Yeah, the mat just slips around and doesn't actually grip onto anything

    #219 9 years ago

    I have the same lift. I took the handles off and had my electician bend them with his conduit bender.. Worked slick as a whistle.

    3 months later
    #220 8 years ago

    Harbor Freight is having a mothers day sale - 25% off - use coupon code 10385119. Shipping is only 6.99 so don't bother going to the store like I did to only find out it is not in stock.

    #221 8 years ago

    Just picked one up with the coupon,

    Good deal

    1 week later
    #222 8 years ago

    Did the hinge mod on two of these recently. Both were slightly different but pretty much same solution and parts required. Grand total $12

    2 - 6" strap hinges
    2 - M8-1.25 Hex Nuts
    2 - M8-1.25 x 20MM Hex Bolts
    4 - M8 Lock Washers
    4 - M8 Flat Washers

    You will need to drill out center hole (5/16") of hinge for handle then either drill out the other end or you may need to drill a new hole (this was different on the two carts). The idea is that the handle should lay flat on the cart when folded down. Remove the release cable. Cut off 3 inches from the bottom of the handle to allow the handle to fold up and down without binding the release cable . Drill new holes to line up with hinge hole. One table I had to remove the cable from the lower guide on the handle and other was fine with it in. Use the bolts that came with the cart along with the new nuts to mount the handle to the hinge. Use the new 20MM (short) bolts to mount hinge to the cart.

    Many thanks to the others who posted their solutions, this is simply what I ended up doing using their ideas.

    216.JPG216.JPG
    1 month later
    #223 8 years ago

    I just used one of these this weekend, totally sold on making one!

    #224 8 years ago

    I finally solved my release issue. I never cut down the handle so the release cable was too short to work effectively. I solved the problem this way:

    I pulled the cable completely out and threaded it through the release mech backwards.
    I then pulled the cable over the base until it reached the back of the unit.
    I made a hand sized loop in the cable to make a handle and twisted the rest of the cable to hold the handle.

    I still need to get a small piece of pvc and cut a channel in it to make the handle easier to grip. This will also allow me to push down on the handle with my foot.

    Not the best solution but I am happy with it.

    #225 8 years ago

    Another solution for the cable is just to go to a bike shop or other store and get a stand bicycle brake cable with housing, cut down to the size you need. Gave me lots more room to work with.

    #226 8 years ago
    Quoted from shimoda:

    Another solution for the cable is just to go to a bike shop or other store and get a stand bicycle brake cable with housing, cut down to the size you need. Gave me lots more room to work with.

    Exactly the same thing I did. Bike shops have spools of this stuff.

    Avoid the pre-packaged brake cables, though. They tend to be ridiculously expensive.

    2 months later
    #227 8 years ago
    Quoted from ForceFlow:

    I ended up going with the flagpole hinge method. It did not require any destructive modifications, however I did need to get a longer release cable (bike brake cable) since there wasn't enough slack in the original cable.
    The parts:
    -1" diamater wooden dowel; Two pieces 5-3/4" in length. (sourced from lowes)
    -Four flag poles: amazon.com link »
    -50" bike brake sheath/housing and 60" steel cable (sourced from a local bike shop. Note that prices varied wildly, so you may have to shop around. One bike shop had a similar cable for $45 )
    -(optional): Two short metric hex bolts; M8-1.25x16 (found at lowes in the specialty parts drawers). This is to avoid drilling the dowel and so that the bolts aren't sticking out several inches.
    Cost:
    1"x48" dowel: $4
    Flag poles: $35
    Bolts: $1.14
    Brake cable & sheath: $14.45
    Total: $54.59
    The verdict: This was a fairly easy mod that didn't take too long to do--however, if you've never worked on a bike or replaced a brake cable, the difficulty level would probably go up a couple notches. Either way, it was a bit more than I would've liked to have spent. Right now I have the teeth of one pole mount locked up against the flat side of the other pole mount. In this configuration, the little teeth have been popping off if you try to apply force to the handle without loosening the wingnut on bolt holding the hinged joint together. However, it does the job and folds down without any problems.
    20140705164917277-365.jpg 20140705165015141-16.jpg 20140705165053767-304.jpg 20140705165208289-253.jpg

    I went with the flagpole version and it does look nice! It is a bit woobly since the teeth don't really "bite" due to both side being concave... Also worried about "eating" the outside by screwing tight to make sure the handle don't move...
    I am thinking some large washers may help that but any way to help making the teeth sits better together?

    WP_20150908_17_49_55_Pro.jpgWP_20150908_17_49_55_Pro.jpg

    3 weeks later
    #228 8 years ago

    An old stale thread, but I am attempting a mod today.

    After looking at several of the mods, I like the look of the 'flag pole' mod by kungfucop. But I am concerned that it will stick up above the lowered table. This would make it impossible to lower the table all of the way down. Is that important?

    Also, the table as sized would put the entire weight of the pin in the rather flimsy center of the bottom of the box. I have visions of the bottom ripping free and jamming up through the pin. How important is it to put some sort of support so that the lift occurs on the side of the pin box? I see several have made wood attachments to the lift table.

    kungfucop.gifkungfucop.gif

    #229 8 years ago
    Quoted from pinnation:

    Remember to toss away that horrific ribbed mat that smells like a charred tire........

    What do you all use in place of the ribbed mat?

    #230 8 years ago
    Quoted from lhammer610:

    How important is it to put some sort of support so that the lift occurs on the side of the pin box?

    I've wondered the same thing. Maybe something to replace the mat? If the "support" was wider then it wouldn't fit if you slide it between the front legs.

    #231 8 years ago
    Quoted from hisokajp:

    I went with the flagpole version and it does look nice! It is a bit woobly since the teeth don't really "bite" due to both side being concave... Also worried about "eating" the outside by screwing tight to make sure the handle don't move...
    I am thinking some large washers may help that but any way to help making the teeth sits better together?
    WP_20150908_17_49_55_Pro.jpg

    The sides with the teeth are in contact with each other, and I don't actually tighten the wingnut very much on mine.

    Quoted from lhammer610:

    An old stale thread, but I am attempting a mod today.
    After looking at several of the mods, I like the look of the 'flag pole' mod by kungfucop. But I am concerned that it will stick up above the lowered table. This would make it impossible to lower the table all of the way down. Is that important?

    The only time I need to bring my cart all the way down is if I'm sliding the pin off the cart and tipping it on its end. In that case, I just take off the handle. However--I used a slightly different flagpole mod that makes that process easier since I just use the round thumb screws to remove the handle, rather than needing to unscrew the bolts. However, with your mod, the handle sits a little lower, so if you need to lower the table to tip the pin up on its end, the handle may actually help you a bit by putting the pin at a slight downward angle.

    Quoted from lhammer610:

    Also, the table as sized would put the entire weight of the pin in the rather flimsy center of the bottom of the box. I have visions of the bottom ripping free and jamming up through the pin. How important is it to put some sort of support so that the lift occurs on the side of the pin box? I see several have made wood attachments to the lift table.
    kungfucop.gif

    I usually put a thick piece of carboard under the pin--usually one of those large moving boxes from home depot. I haven't had a problem so far.

    Quoted from PinballFever:

    What do you all use in place of the ribbed mat?

    You can just throw that mat away. It's useless and smells awful.

    #232 8 years ago

    Just an fyi as it has been posted here earlier... You can simply stand on the Hf table and push/bend the handle down. Takes 2 seconds. You can then pull out the handle for storage if you'd like. Or go the fancy route for those looking for another project.

    #233 8 years ago
    Quoted from presqueisle:

    Just an fyi as it has been posted here earlier... You can simply stand on the Hf table and push/bend the handle down. Takes 2 seconds. You can then pull out the handle for storage if you'd like. Or go the fancy route for those looking for another project.

    I thought that was actually a joke? I can tell you there was 0 chance this would have worked with mine May be because I am 160lbs but the bar did not budge at all...

    #234 8 years ago

    I'm 200 lbs and not in too bad of shape, and maybe it did take 3-4 minutes...but I did two of them like this. Easy peasy. Have a bigger friend help.

    #235 8 years ago
    Quoted from PinballFever:

    What do you all use in place of the ribbed mat?

    I left mine in the sun on a concrete pad for about a month to help it off-gas more quickly.

    The smell was almost gone after a month.

    #236 8 years ago

    Mine keeps lowering with any weight on it. Any suggestions?

    #237 8 years ago
    Quoted from the96stang:

    Mine keeps lowering with any weight on it. Any suggestions?

    Is it still under warranty?

    #238 8 years ago

    This is how i rigged the handle mod so i could get it to fold down or back as needed.
    Got the hinge parts from HF and conduit joints and PP hose from HD.

    DSCF0377.jpgDSCF0377.jpg

    DSCF0378.jpgDSCF0378.jpg

    DSCF0379.jpgDSCF0379.jpg

    DSCF0373.jpgDSCF0373.jpg

    1 week later
    #239 8 years ago
    Quoted from wizzardz:

    Its a 3/4 x Close. Its about 1 inch of thread on each end (two inch total length) and no bare pipe. If I grind down the threads on one end to fit it in the handle mount, I'll likely need a nipple one inch longer.
    IMG_3309_(Custom).JPG

    I just did this exact mod, with a couple differences. I used the 1/2" pipe. The external diameter is 3/4" and it slides right inside the handle tubing with no issues. It's smaller than the handle mount, but with the tightening screws it is not a problem. I used 7" pieces for the handle side. All-in-all, it costs $10 and takes 2 minutes.

    2 weeks later
    #240 8 years ago

    When ordering the flag poles holder, be careful what you order. I ended up with the type shown below in my photo. I ground off all the 'nubs' and the center area, leaving two essentially flat disks. I am hoping they will hold when moving the cart. If not, I will have to drill small holes through the two and put a small bolt to hold it in place.

    http://www.amazon.com/gp/product/B0014SKUN4/ref=ox_sc_act_title_1

    2015-10-25_16.12.46.jpg2015-10-25_16.12.46.jpg

    #241 8 years ago
    Quoted from the96stang:

    Mine keeps lowering with any weight on it. Any suggestions?

    Bleed your hydraulic pump.

    #242 8 years ago

    "When ordering the flag poles holder, be careful what you order."

    I finished mine up. I am not sure the flag brackets are going to hold well enough, but it seems to work.

    The big downside for me is that my pin room is carpeted with thick cushioning which makes the cart hard to move under load. I might have to invest in the larger wheels mod. I was hoping to avoid welding....

    2015-10-26_14.17.38.jpg2015-10-26_14.17.38.jpg

    #243 8 years ago
    Quoted from PinballFever:

    What do you all use in place of the ribbed mat?

    I use that spongy drawer liner stuff, put a piece down the same size as the horrible mat, works just fine. Smells like nada!

    drawer-liner_01_LRG.jpgdrawer-liner_01_LRG.jpg

    #244 8 years ago
    Quoted from lhammer610:

    When ordering the flag poles holder, be careful what you order. I ended up with the type shown below in my photo. I ground off all the 'nubs' and the center area, leaving two essentially flat disks. I am hoping they will hold when moving the cart. If not, I will have to drill small holes through the two and put a small bolt to hold it in place.
    amazon.com link »

    2015-10-25_16.12.46.jpg

    This one would work without the need to grind anything. http://www.amazon.com/Valley-Forge-Flag-Multi-Position-Aluminum/dp/B0007KP9SG/ref=pd_sim_86_3 The problem again is that you need four, about $40.

    #245 8 years ago
    Quoted from lb1:

    This one would work without the need to grind anything. amazon.com link »

    Wish those were available when I put mine together. Oh well.

    #246 8 years ago
    Quoted from lb1:

    This one would work without the need to grind anything. amazon.com link »

    Actually I had to grind these quite a bit... Needed to order 2 sets, 4 pairs and use 2 of the long ones together so both side where convex. One had to be grinded so the teeth fit together...

    #247 8 years ago

    What are people using now for the cheap base dolly?

    #248 8 years ago

    My mod was pretty simple. I used a harbor freight cutting wheel (around $12) and a harbor freight welder (around $80) that I have had for too long to still be welding things as crappy as I do.

    I just cut out a wedge of metal from each side bent it down and test it for size...then re-cut out a bit more to get it perfect, then welded it.

    Also, I think it smart to cushion the handle to keep it from denting the your pin. If your not careful your pin can come down fast when you squeeze the lower grip too hard, the pin can come down on those rails very fast and hard. If I had it to do over again I would have positioned mine down a bit further than I did, then the pin dropping fast on the rails would be less of an issue.

    IMG_2106.jpgIMG_2106.jpg
    IMG_2108.jpgIMG_2108.jpg

    #249 8 years ago

    Mine. I went with the "lowrider" handle. Added carpet w/carpet tape to replace the stinky mat.
    image.jpegimage.jpegimage.jpegimage.jpegimage.jpegimage.jpegimage.jpegimage.jpeg

    #250 8 years ago
    Quoted from locdb:

    Mine. I went with the "lowrider" handle. Added carpet w/carpet tape to replace the stinky mat.
    image.jpeg image.jpeg image.jpeg image.jpeg

    Awesome. I did carpet as well, but opted for an indoor "welcome" mat. I didn't think to use carpet tape (and used duct tape..super classy). I'll have to buy some carpet tape.

    I also fee like the mat I'm using is a little too rough. It's a tough balance since you want to keep a good grip on the machine, but also don't want to scratch the hell out of the bottom if the machine shifts a bit while moving.

    All of this said, when I moved my last machine, I used 2x4s across the top to support the machine from the sides of the bottom and it felt much more stable.

    There are 1,219 posts in this topic. You are on page 5 of 25.

    Reply

    Wanna join the discussion? Please sign in to reply to this topic.

    Hey there! Welcome to Pinside!

    Donate to Pinside

    Great to see you're enjoying Pinside! Did you know Pinside is able to run without any 3rd-party banners or ads, thanks to the support from our visitors? Please consider a donation to Pinside and get anext to your username to show for it! Or better yet, subscribe to Pinside+!


    This page was printed from https://pinside.com/pinball/forum/topic/modified-harbor-freight-lift-table/page/5 and we tried optimising it for printing. Some page elements may have been deliberately hidden.

    Scan the QR code on the left to jump to the URL this document was printed from.