(Topic ID: 246337)

Metroid Pinball

By TheArrrrrcade

4 years ago


Topic Heartbeat

Topic Stats

  • 385 posts
  • 68 Pinsiders participating
  • Latest reply 28 days ago by gorgar007
  • Topic is favorited by 95 Pinsiders

You

Linked Games

No games have been linked to this topic.

    Topic Gallery

    View topic image gallery

    5q1abe (resized).jpg
    PXL_20210930_224942713.MP (resized).jpg
    PXL_20210930_202942308.MP (resized).jpg
    PXL_20210930_210224380.MP (resized).jpg
    PXL_20210930_202908770 (resized).jpg
    PXL_20210929_230256338 (resized).jpg
    PXL_20210926_145156599.MP (resized).jpg
    final_light_remap (resized).png
    PXL_20210916_180447416.MP (resized).jpg
    PXL_20210913_180300895.MP (resized).jpg
    PXL_20210913_195228274 (resized).jpg
    PXL_20210913_011300316.MP (resized).jpg
    PXL_20210913_014100643 (resized).jpg
    PXL_20210913_011308859 (resized).jpg
    PXL_20210909_182054683 (resized).jpg
    PXL_20210909_182119278 (resized).jpg
    There are 385 posts in this topic. You are on page 5 of 8.
    #201 3 years ago
    Quoted from TheArrrrrcade:

    Redesigned the upper flipper area. Added a target and changed out the rubber behind the flipper for a wireform rail.
    [quoted image]

    I recently added a similar target in front of my upper flipper. . I'd be interested to see if the wireform behind the flipper stops balls shot into the back of the flipper while it's held as well as a metal wall guide would.

    #202 3 years ago

    Looking great!

    #203 3 years ago
    Quoted from McSquid:

    I'd be interested to see if the wireform behind the flipper stops balls shot into the back of the flipper while it's held as well as a metal wall guide would.

    I based my decision on the fact that it seemed to work for Jurassic Park

    IMG_20200520_100009 (resized).jpgIMG_20200520_100009 (resized).jpg
    #204 3 years ago

    Finally made the center rail match what's on the physical game

    cad_correct_center_rail (resized).pngcad_correct_center_rail (resized).png
    1 week later
    #205 3 years ago

    I keep working on the code. Starting the ball rolling on art. Recording and uploading some videos of existing modes. Here's Goren's Lament, a secret flipper code that makes goren1818 complain about how bad you're doing.

    #206 3 years ago

    Started implementing bosses. Half of the map is now explorable.

    #207 3 years ago

    Started keeping track of game goals. Zero Suit Multiball is qualified when these 4 lights are lit. It currently keeps track of your progress but you can't start the multiball yet.

    IMG_20200511_230618 (resized).jpgIMG_20200511_230618 (resized).jpg
    #208 3 years ago

    And started addressing some lighting issues. Worked on a design for a spotlight that utilizes the same 7 LED light board as the center insert.

    cad_spotlight (resized).pngcad_spotlight (resized).png
    1 month later
    #209 3 years ago

    The original ramp molds were positive molds. They represent the area that the ramp occupies. Unfortunately that makes them very tall and difficult to vacuum form. The current ramps are a bad pull. They have round edges where the vacuum didn't have enough power to pull the plastic into the ramp path. This makes the ball roll around a like in a half pipe and the returns are a bit unpredictable.

    The solution is to use the original molds to cast a negative mold. A negative mold represents the area around the ramp. This has the advantage of being much smaller and should (maybe, hopefully) vacuum form better.

    For this project I use Bondo and wood block filler. I originally planned on wrapping the original molds in wax paper. This didn't work so I switched to covering them in masking tape.

    IMG_20200606_110747 (resized).jpgIMG_20200606_110747 (resized).jpg

    #210 3 years ago

    I started with the U turn ramp. It went mostly smoothly. I ended up with some giant bubbles where the Bondo didn't reach. It had a tight fit and took a bit of effort to get out of the other mold, but nothing too bad.

    IMG_20200606_121337 (resized).jpgIMG_20200606_121337 (resized).jpg

    IMG_20200606_140739 (resized).jpgIMG_20200606_140739 (resized).jpg

    #211 3 years ago

    Next up, the "ear" ramp. Ended up with less flaws on the first try. Learned some lessons from the first one.

    IMG_20200607_113321 (resized).jpgIMG_20200607_113321 (resized).jpg

    I used cardboard to create a basin to pour the Bondo into. That gave it a fairly smooth and accurate edge.

    IMG_20200607_123240 (resized).jpgIMG_20200607_123240 (resized).jpg

    #212 3 years ago

    It took the next few weekends to patch and sand the molds. Every flaw will probably show up once they are vacuum formed so I need to get them as smooth as possible.

    IMG_20200627_113111 (resized).jpgIMG_20200627_113111 (resized).jpg

    Ironing out the wrinkles...

    IMG_20200704_100822 (resized).jpgIMG_20200704_100822 (resized).jpg

    In the end they came out pretty good. Not perfect, but the flaws are not where the ball travels so I think I can live with them. I might give them one more pass and try to improve them.

    IMG_20200704_132623 (resized).jpgIMG_20200704_132623 (resized).jpg

    #213 3 years ago

    I continue to work on code during my Monday/Wednesday build streams. Here's an tutorial on getting to and playing Generator Multiball.

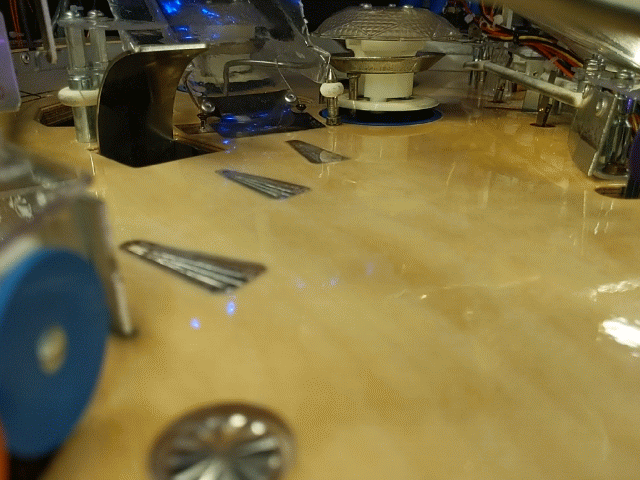
    The Wrecked Ship has no power when you first enter. To activate the ship (and increase shot values and opportunities) you must first enter the generator room behind the drop targets.

    Once in the generator room, start multiball by hitting the orange Energy target. A second ball will launch into play with a generous ball save.

    Lock the ball behind the drop target. This now becomes a second captive ball. The game will attempt to keep the ball into play by using the upkicker armature as a post. Before I had implemented this the ball would almost always get knocked into the VUK and the ball didn't remain captured very long.

    Hitting the captive balls builds up charge. The drop target captive ball awards charge based on opto hits. The regular captive ball will just build up a little charge at a time.

    The scoop will be lit once you drain down to one ball. Hitting it will activate the ship and open the exit door. You are now free to explore the powered up ship.

    Here's a video demonstration:

    4 months later
    #214 3 years ago

    Been mostly working on code recently, but have a couple of updates. First, my upkicker switch stopped working! It would only register intermittently. So a replacement was in order. The original was NOS that came with the mech.

    IMG_20200922_212918 (resized).jpgIMG_20200922_212918 (resized).jpgIMG_20200923_184717 (resized).jpgIMG_20200923_184717 (resized).jpg
    #215 3 years ago

    Next, finally broke my back ramp. This was not totally unexpected. I had planned on installing a post but was lazy. So an emergency post was installed. This actually improved gameplay slightly.

    PXL_20201110_032341966 (resized).jpgPXL_20201110_032341966 (resized).jpg
    #216 3 years ago

    Made this video for Virtual Pinball Expo. Code is much further along than shown here. I also cut about 7 minutes of content out of it to keep it at 10 minutes. Currently 2 bosses are coded, Kraid and Ridley. They actually have death animations and victory laps unlike the battle shown in the video.

    More individual rooms are coded now which brings the total room modes coded to 20 out of 50 (I think)

    #217 3 years ago

    Nice to be reminded that Metroid has a little Sonic in it. id put a rubber on that post unless you want hot metal on metal action. consider using a sleeve post instead?

    #218 3 years ago
    Quoted from TheArrrrrcade:

    Been mostly working on code recently, but have a couple of updates. First, my upkicker switch stopped working! It would only register intermittently. So a replacement was in order. The original was NOS that came with the mech.[quoted image][quoted image]

    That switch is officially untrustworthy then. I used the same mech on Undertale and had the EXACT same problem.

    #219 3 years ago
    Quoted from McSquid:

    Nice to be reminded that Metroid has a little Sonic in it. id put a rubber on that post unless you want hot metal on metal action. consider using a sleeve post instead?

    I think just adding a ring to this post would be enough. I started testing without it and decided it wasn't necessary. I'll probably do some testing with it on and see if there's any difference. I'm trying to avoid closing up the ramp shot, even if it's just 1/8". This spot is mostly only hit by a backhand from the left flipper but it's not impossible to nick the post from a right flipper shot.

    #220 3 years ago
    Quoted from Gornkleschnitzer:

    That switch is officially untrustworthy then. I used the same mech on Undertale and had the EXACT same problem.

    Hoping the newly manufactured one is more reliable! The weird thing was that the old one seemed to test fine. Reflowing the solder didn't help either. I noticed that the leg had a bit of wobble to it.

    #221 3 years ago
    Quoted from TheArrrrrcade:

    I think just adding a ring to this post would be enough. I started testing without it and decided it wasn't necessary. I'll probably do some testing with it on and see if there's any difference. I'm trying to avoid closing up the ramp shot, even if it's just 1/8". This spot is mostly only hit by a backhand from the left flipper but it's not impossible to nick the post from a right flipper shot.

    My bad, For some reason I thought this was the upper side ramp that is shot from very close when i made that comment. I was worried about the bounces off a traditional rubber hence the post suggestion. Id still put a rubber on it. if you hit your ramp edge enough times or hard enough to break it you will hit this for sure. maybe move it forward a bit and snuggle it up to the pop bumper to avoid closing the shot?

    1 week later
    #222 3 years ago
    Quoted from McSquid:

    Id still put a rubber on it.

    Done. Plays moderately better without interfering with the shot. Far right side rollbacks bounce left and are safer.

    PXL_20201124_025409191._exported_stabilized_1606186477821.gifPXL_20201124_025409191._exported_stabilized_1606186477821.gif
    #223 3 years ago

    And I added a post under the apron by the ball eject. I'm surprised I could tolerate the ball getting stuck there for as long as I did. Only took 2 tries to position it correctly.

    PXL_20201128_144704750.jpgPXL_20201128_144704750.jpg
    #224 3 years ago

    Ordered all the "final" guide rails with cut outs to let the general illumination through. The current solid version basically blocks all the light.

    CAD_guide_cutouts (resized).pngCAD_guide_cutouts (resized).pngPXL_20201123_233254375 (resized).jpgPXL_20201123_233254375 (resized).jpg
    #225 3 years ago

    And I've been updating the CAD model to correct all the mistakes I made. Like the fact that the apron clips were positioned incorrectly. Hoping to cut a new, most likely final, playfield in December.

    PXL_20201128_145438986 (resized).jpgPXL_20201128_145438986 (resized).jpg
    #226 3 years ago
    Quoted from TheArrrrrcade:

    And I added a post under the apron by the ball eject. I'm surprised I could tolerate the ball getting stuck there for as long as I did. Only took 2 tries to position it correctly.[quoted image]

    Huh... I put a post there too and thought I was being silly for doing so. Mine is loose so the post actually spins freely.

    #227 3 years ago

    I just read through the build thread I think this is fantastic! Very nice job, for me the Metroid franchise is my absolute dream theme for a pinball machine I have spent many hours playing Super Metroid. Super theme I will be watching. -Aaron

    #228 3 years ago
    Quoted from McSquid:

    I put a post there too and thought I was being silly for doing so.

    WPC-95 games used a post. I may not have needed it if I used a trough and apron from the same manufacturer.

    PXL_20201201_142714780 (resized).jpgPXL_20201201_142714780 (resized).jpg
    3 weeks later
    #229 3 years ago

    Final parts keep arriving. Here are the rails. 5 copies. Not sure why I thought that was a good idea...

    PXL_20201204_165234373 (1) (resized).jpgPXL_20201204_165234373 (1) (resized).jpg
    #230 3 years ago

    These have a dumb design. Always make sure your rail attachment points are tabs on the main rail that can be bent. I have to weld mine on. But first they need to be bent...

    PXL_20201211_164800157 (resized).jpgPXL_20201211_164800157 (resized).jpg

    #231 3 years ago

    A bit of sloppy welding and it's good enough

    PXL_20201216_235911989 (resized).jpgPXL_20201216_235911989 (resized).jpg
    #232 3 years ago

    And while I was at it, welded on some side guides to keep the ball from falling off the rail up here

    PXL_20201214_233830545 (resized).jpgPXL_20201214_233830545 (resized).jpg
    #233 3 years ago

    Next project is figuring out the vertical bridge diversion. I want the ball to return to the flipper when it is in the up position. I physically prototyped a catcher and played around with how the ball behaves when exiting the bridge. Went to CAD and made design attempt one. No welding. It screws together.

    cad_bridge_catcher_v2 (resized).pngcad_bridge_catcher_v2 (resized).png
    #234 3 years ago

    It all depends on if the ball can make the jump, then if it loses momentum or bounces. The bridge actually sits a bit lower in reality due to some spring compression caused by the weight of the mech. Might need to change around the height a bit too but the bridge sits really close to the glass right now.

    Or this may just be a total fail. At least it's easy to remove.

    cad_bridge_with_catcher (resized).pngcad_bridge_with_catcher (resized).png
    1 week later
    12
    #235 3 years ago

    It wasn't a total fail. Not perfect and the design needs to be tweaked, but overall it is still an improvement.

    PXL_20201229_052624955 (resized).jpgPXL_20201229_052624955 (resized).jpg
    #236 3 years ago

    Dude! that is super cool!

    #237 3 years ago
    Quoted from BorgDog:

    Dude! that is super cool!

    Thanks! It feels good to finally implement my original design instead of the ball flying off the end every time.

    #238 3 years ago

    Watched some of the Virtual Expo video today. Looking great!

    Looking forward to trying it now that it has rules and updates playfield. Looking forward to coming out to the Arrrrrcade when NEPL starts up again.

    #239 3 years ago

    This is so awesome!

    Aaron
    FAST Pinball

    #240 3 years ago
    Quoted from TheArrrrrcade:

    Next, finally broke my back ramp. This was not totally unexpected. I had planned on installing a post but was lazy. So an emergency post was installed. This actually improved gameplay slightly.[quoted image]

    A narrow standup target is not a better choice over the post?

    #241 3 years ago
    Quoted from PinballManiac40:

    A narrow standup target is not a better choice over the post?

    It absolutely is a better choice. There just isn't room below the playfield in this case:

    cad_ramp_posts_underside (resized).pngcad_ramp_posts_underside (resized).png
    #242 3 years ago
    Quoted from TheArrrrrcade:

    It absolutely is a better choice. There just isn't room below the playfield in this case:[quoted image]

    Not with that attitude!

    #243 3 years ago

    Someone needs to design a standup target that doesn't protrude under the playfield....

    #244 3 years ago
    Quoted from zacaj:

    Someone needs to design a standup target that doesn't protrude under the playfield....

    Could just invert them and hang them from a bracket. Wouldn't look that great but it would work.

    1 week later
    #245 3 years ago

    Updates! Received modified and new metal pieces. Ball catcher has been updated with a larger back plate. Still not perfect. Best course of action would be to add a one way gate to the front. It's above the playfield so no rush to do that before the final version is cut.

    PXL_20210111_155622799 (resized).jpgPXL_20210111_155622799 (resized).jpgPXL_20210112_011126225 (resized).jpgPXL_20210112_011126225 (resized).jpg
    #246 3 years ago

    And the final piece to complete the upper playfield is the ball feeder. No more wild 4 inch drops off the right side. Now it feeds the upper flipper fairly consistently and only has about a 2.5 inch drop. Drop position can be moved slightly by bending the tines.

    PXL_20210112_023102839 (resized).jpgPXL_20210112_023102839 (resized).jpgPXL_20210112_020406998 (resized).jpgPXL_20210112_020406998 (resized).jpgPXL_20210112_021004580 (resized).jpgPXL_20210112_021004580 (resized).jpgPXL_20210112_021013250 (resized).jpgPXL_20210112_021013250 (resized).jpg
    #247 3 years ago

    Really enjoying the update as both a pinball fan and a Metroid fan!

    #248 3 years ago
    Quoted from RVApinballer:

    Really enjoying the update as both a pinball fan and a Metroid fan!

    Thank you!

    #249 3 years ago

    And the big news! Aaron from fastpinball hooked me up with his father Mark, AKA Freeplay40 to get better ramps made. I sent the molds from post 212 off to him and he improved them and made some slick, high quality ramps. At this point most of the "final" parts have been manufactured and I just need to do a bit more CAD work and cut a new playfield.

    IMG_1712 (resized).JPGIMG_1712 (resized).JPGIMG_1713 (resized).JPGIMG_1713 (resized).JPGMS Done (resized).JPGMS Done (resized).JPGPXL_20210104_182957462 (resized).jpgPXL_20210104_182957462 (resized).jpg
    #250 3 years ago

    Someone get Freeplay40 a medal for all of his plastic contributions to pinball, that's awesome

    There are 385 posts in this topic. You are on page 5 of 8.

    Reply

    Wanna join the discussion? Please sign in to reply to this topic.

    Hey there! Welcome to Pinside!

    Donate to Pinside

    Great to see you're enjoying Pinside! Did you know Pinside is able to run without any 3rd-party banners or ads, thanks to the support from our visitors? Please consider a donation to Pinside and get anext to your username to show for it! Or better yet, subscribe to Pinside+!


    This page was printed from https://pinside.com/pinball/forum/topic/metroid-pinball/page/5?hl=foobeer and we tried optimising it for printing. Some page elements may have been deliberately hidden.

    Scan the QR code on the left to jump to the URL this document was printed from.