(Topic ID: 134253)

Meteor Club - "We will let you know when the danger is past"

By pinballholder

8 years ago


Topic Heartbeat

Topic Stats

You

Linked Games

  • Meteor Stern Electronics, 1979

Topic Gallery

View topic image gallery

0a78d113b2b99d36e26fddb76b8ac93ccebcb353 (resized).jpeg
IMG_7769 (resized).jpeg
IMG_4306 (resized).jpeg
IMG_0414 (resized).JPG
IMG_4196 (resized).jpeg
06 (resized).jpg
04 (resized).jpg
0  - Ball Stuck Right (resized).jpg
0B (resized).jpg
0C (resized).jpg
0A (resized).jpg
IMG_4179 (resized).jpeg
IMG_4176 (resized).jpeg
IMG_4174 (resized).jpeg
IMG_4175 (resized).jpeg
20231230_105158 (resized).jpg

Topic index (key posts)

3 key posts have been marked in this topic (Show topic index)

There are 2,930 posts in this topic. You are on page 2 of 59.
#51 8 years ago

The way mine is wired at least (though upon closer inspection, the wires are not color coded, so it may be a later mod...) is by adding the resistor in series to the EOS switch. So from the hot with 2 wires, there is a wire to the EOS, the other wire from the EOS goes to the resistor, with the other side of the resistor going to the center lug of the coil. I bumped this from a 5W to 10W, as the power dissipated would be too close to 5 for my taste, and it was easier to find a 10W.

But again, this on mine seems to be non-factory, though the forum does have mentions of other 3 flipper sterns with this resistor.

IMG_20160111_190845_(resized).jpgIMG_20160111_190845_(resized).jpg

#52 8 years ago

I'm having trouble with my 6 bank 'METEOR' drop target... does anyone make an aftermarket replacement for the 6 bank drop target mechanism? I see 3 bank and 4 bank mechanisms for sale but not 6. Is the 6 really just (2) 3 bank targets? Thanks.

#53 8 years ago

that didn't last long. I need to let my meteor go in NorCal to fund another purchase. If anybody is looking for one please let me know.

#54 8 years ago

I didn't see reference to the 25-500 and 25-600.
I'll order the 25-600 and hopefully I won't be "crushing" the new drops.

Anybody have suggestions for flipper rubber color? Orange, blue, purple?
Would a lightning flipper work for the upper flipper?

#55 8 years ago

The coil references are on page 21 of the manual available at IPDB. I think actionpinball has the right coil...Coil- J-25-600/34-4500 (Stern).

#56 8 years ago

Most all the club lives in ca. I was going say I own one I would be willing to sell. But game is not worth shipping.

1 week later
#57 8 years ago

I'm going to look at a meteor tomorrow, looks to be decent. I had one a while ago, but never had the time to get it working...

Hopefully I'll be joining the club tomorrow

#58 8 years ago
Quoted from setzkor:

For the flippers, you need both sets of numbers in the manual for the coils (one pair for each winding...in this case, I think the 34-4500 refers to the hold coil). The lower are J-25-500/34-4500, these are pretty common and available at Pinballlife etc. The top flipper coil is a J-25-600/34-4500 and is a little more difficult to source. When I redid mine, I left the original in place as it still worked. Also, many of these shipped with a 1 ohm 5W resistor in series with the top flipper coil, I replaced with a 1 ohm, 10W. Some may not have had it and you can adjust the EOS switch to lower the power on the top flipper if you think the plastics are in danger.

Talk to Terry, he can get whatever you need custom wound.

#59 8 years ago

Anyone know of repo back glasses or playfields? Mine needs both

-c

#60 8 years ago

CPR supposedly has the playfield artwork done but he is waiting on the artist for the backglass and plastics to be finished before he does the playfields. Wants to offer them all at once which makes sense as I bet he will sell more that way. Apparently the BG and plastics are behind schedule so who knows when they will be made.
I can't imagine these are hard to do compared to other games they have done, such as Paragon.

#61 8 years ago

Joined the Club TODAY!!

It works, but needs shopping and plastics flattened, triple thick on the back glass, cabinet touch up and a little wood sanded and repaired

Also needs touch ups and major cleaning on the playfield, I've been hoping one would pop up for a while, so glad it did

Has anyone done any sound mods, or added any music to theirs?

image_(resized).jpgimage_(resized).jpg

image_(resized).jpgimage_(resized).jpg

2 months later
#62 8 years ago

Anyone want this alternate backglass?

meatier_(resized).jpgmeatier_(resized).jpg

#63 8 years ago

Apparently I'm a member.

I'm not sure if I lucked out or not, but $300 for a game. Pretty much sight-unseen. The backglass is in *great* condition, and PF is good at worst. The MPU needs to be replaced, battery acid, I believe.

I pick it up this coming Thursday, so..

#64 8 years ago
Quoted from Coyote:

Apparently I'm a member.
I'm not sure if I lucked out or not, but $300 for a game. Pretty much sight-unseen. The backglass is in *great* condition, and PF is good at worst. The MPU needs to be replaced, battery acid, I believe.
I pick it up this coming Thursday, so..

Yup. Apparently, I bought a Meteor. The owner wanted $300, and I couldn't really say no, even sight-unseen.

Picked it up today, and nothing majorly destroyed - just *extremely* dirty. Backglass is an B+ or A, and the playfield has no bare-wood wear, only some dirt ground into the paint up at top and insert edge wear. Amazingly, my QA label is still on the playfield - my game's birthdate, Oct 19th, 1979..
YhwVWXP_(resized).jpgYhwVWXP_(resized).jpg

So, a couple questions - does everyone's game have this? 'Bat Power Control', hooked into the upper flipper:
svG7wB3_(resized).jpgsvG7wB3_(resized).jpg

And what am I missing down here on the transformer pad?
CtknpOm_(resized).jpgCtknpOm_(resized).jpg

And, finally, I'm not getting my MPU to boot up. However, readong online, I should have a 'flicker' before the flashes start. I don't get a flicker - my LED goes on as soon as I turn the game on, stays on for a half a second before going out. Is that a 'flash', or is that the flicker? (I'll post a video tomorrow of the LED..)

#65 8 years ago

Nice find. Mine was from January 1980 and I don't have the flipper control knob. In terms of what you are missing on the transformer board... The transformer is normally farther back on the spot that's faded... The rectangle in the back is the paper explaining the transformer wiring.

#66 8 years ago

I guess my switch matrix is screwed up... When the pop bumper hits the knocker fires, and the 1 bank of targets resets every one or so seconds...

Bummer, I just clearcoated the pf and restored everything else, was playing like a dream... I guess it's not pinball if there's nothing to fix

#68 8 years ago
Quoted from setzkor:

Nice find. Mine was from January 1980 and I don't have the flipper control knob. In terms of what you are missing on the transformer board... The transformer is normally farther back on the spot that's faded... The rectangle in the back is the paper explaining the transformer wiring.

Thank - Yeah, I'm in the mode right now of trying to figure out what was added by previous operators/owners, and what's original. There are some strange things (but nothing hugely wrong!)- like an empty lamp socket not screwed down, no bulb. No clue as to why it's like that - couldn't replace the bulb, or maybe the SCR's stuck on? So, the apparently 'flipper power control' is the biggest (possible) non-factory thing that was added. My driver board was replaced by a Bally-labeled one, though the MPU and other boards are Stern. Someone, at some point, removed the battery and added a 3-AA holder, but I do not think they added a diode to stop the charging. D'oh.

Until I get past the booting issues, I won't be able to check the lamps/switches etc. The rocket targets all seem to work fine by hand, the Meteor targets, however, are sticky and the mech will need to be cleaned.

And thden I'll need new rubbers, bulbs, *possibly* playfield glass and legs, at least.

#69 8 years ago

And here's a question for everyone -

Anyone know the two different sizes of star posts? Some (like slingshots and up by the 'METEOR' targets) are *slghtly* shorter than the ones out along the edges of the field. I needs to get a handful of new ones (or each size!), and would hate to get the wrong ones, or two handfuls of the same size..

#70 8 years ago

Can the lamp sockets in the bonus lights be replaced? I have a few that are flakey but don't see how they can be replaced. If so, does anyone sell the sockets? Or does anyone sell the whole bar with the sockets?

#71 8 years ago
Quoted from kguenther6:

Can the lamp sockets in the bonus lights be replaced? I have a few that are flakey but don't see how they can be replaced. If so, does anyone sell the sockets? Or does anyone sell the whole bar with the sockets?

I think those sockets can't be replaced on the bracket - would need to buy 6 or 7 individual sockets (which are still sold..). IMHO, i wouldn't replace the bracket, and go for individual sockets.

#72 8 years ago
Quoted from Coyote:

Anyone know the two different sizes of star posts?

All the longer ones are the ones that the plastics mount to. the shorter ones screw under the plastics.

#73 8 years ago
Quoted from kguenther6:

Can the lamp sockets in the bonus lights be replaced? I have a few that are flakey but don't see how they can be replaced. If so, does anyone sell the sockets? Or does anyone sell the whole bar with the sockets?

Not new. Need to daisy chain solder a wire to the outside of all the sockets to make an alternate ground. It is explained in http://www.pinwiki.com/wiki/index.php?title=Bally/Stern#Stern_Meteor Go down to lamp sockets.
Tedious, but replacing with all new sockets would be just as bad IMO. Mine are all solidly lit now.

#74 8 years ago
Quoted from SealClubber:

Not new. Need to daisy chain solder a wire to the outside of all the sockets to make an alternate ground. It is explained in http://www.pinwiki.com/wiki/index.php?title=Bally/Stern#Stern_Meteor Go down to lamp sockets.
Tedious, but replacing with all new sockets would be just as bad IMO. Mine are all solidly lit now.

I think I'll try the daisy chain before I replace all those sockets. Thanks for the tip.

#75 8 years ago

No problem. I wish someone would make a circuit board version like they did for the old KISS.

#76 8 years ago
Quoted from SealClubber:

No problem. I wish someone would make a circuit board version like they did for the old KISS.

I was actually considering this when I posted my reply. I may make up a board, for kicks. Don't think it'd be worth it in the end, though.

#77 8 years ago
Quoted from Coyote:

I was actually considering this when I posted my reply. I may make up a board, for kicks. Don't think it'd be worth it in the end, though.

Okay, question - since work is real slow, I threw together a board outline. But figured I'd ask ya'll - if you're interested, what you'd prefer:

(1) A single board for the three rockets, or a board that only handles one row of the rockets. (The latter, one extra board will get you the spinner lights, as well..!)

.. and ..

(2) How to connect the wires? I can either: (1) make simple solder pads for each wire, (2) give each connection a single-pin molex header, or (3) A single molex header for the whole board? (1 would require soldering wires in. 2 would require crimping on a header. 1 & 2 would require no wire cuts - meaning you could jump back to the old style easily. 3 would require trimming wires and crimping on a header.)

--Me.

#78 7 years ago

In! Picked up my game earlier tonight. I've been looking for another solid state for a while and a fast Stern like Meteor is right up my alley. Needs a little work on some of the playfield inserts but overall it's playing great.

m_(resized).jpgm_(resized).jpg

#79 7 years ago
Quoted from Coyote:

Okay, question - since work is real slow, I threw together a board outline. But figured I'd ask ya'll - if you're interested, what you'd prefer:
(1) A single board for the three rockets, or a board that only handles one row of the rockets. (The latter, one extra board will get you the spinner lights, as well..!)
.. and ..
(2) How to connect the wires? I can either: (1) make simple solder pads for each wire, (2) give each connection a single-pin molex header, or (3) A single molex header for the whole board? (1 would require soldering wires in. 2 would require crimping on a header. 1 & 2 would require no wire cuts - meaning you could jump back to the old style easily. 3 would require trimming wires and crimping on a header.)
--Me.

A PCB for the rocket lamps would be nice. I would prefer a header pin type connection. It would involve adding wires and crimping but I think it would look better when done. Only neg I see is that the PCB would have wedge base twist in sockets? Those are typically 555 lamps and they do run hotter than #44 lamps.

Going back to the beginning of when you posted pics of your transformer, It looks like the transformer was replaced with a different one. It should be stamped 16B on the top. This is where you need to start, check voltages at the rectifier board's test points and then the solenoid driver test points. The game will never boot if it doesn't get 5V and 12V. It also needs the coil voltage for the 7th flash. If the sound board is working, the game will chime with every flash of the MPU, the flicker doesn't chime and is very quick blink og the LED.

#80 7 years ago
Quoted from Lovef2k:

A PCB for the rocket lamps would be nice. I would prefer a header pin type connection. It would involve adding wires and crimping but I think it would look better when done. Only neg I see is that the PCB would have wedge base twist in sockets? Those are typically 555 lamps and they do run hotter than #44 lamps.

Yeah, that's one of the downsides. There are no 'screw-in' bayonet bases. There are a couple solder-in #44 bases, however, that would mean that: (1) Longer standoffs are used, which are harder to find unfortunately, and (2) when a bulb goes, you'd have to remove the whole thing. So, I went with the same ones used on WPC games, so that they'd be interchangeable.

Quoted from Lovef2k:

Going back to the beginning of when you posted pics of your transformer, It looks like the transformer was replaced with a different one. It should be stamped 16B on the top. This is where you need to start, check voltages at the rectifier board's test points and then the solenoid driver test points. The game will never boot if it doesn't get 5V and 12V. It also needs the coil voltage for the 7th flash. If the sound board is working, the game will chime with every flash of the MPU, the flicker doesn't chime and is very quick blink og the LED.

Well, I made progress since then. My MPU is a little strange in the fact that the first 'flicker' isn't a 'flicker'. It's more of a 1.5 to 2 second fade. Turn the game on, the LED instantly comes on and a hum eminates from speaker. After about 1.25 seconds, the LED will quickly fade off, and the hum will diminish. Then the first blink comes.
My problem was - I wasn't sure if that first on time was 'the flicker' or the first flash. If it was the flicker, it meant my 5101 chips were bad. So, I just got a used MPU off of here (I posted a wanted ad) and sure enough - if has a quick flicker and flashes. So, I snagged the 5101 chips, plugged them into my board, and yup, it powers up. So, I have a (mostly) working game. A *LOT* of bulbs out, broken drop targets... all rubbers were removed (waiting on new ones to arrive now). All coils worked, haven't gotten to the flippers yet.

#81 7 years ago
Quoted from Coyote:

Yeah, that's one of the downsides. There are no 'screw-in' bayonet bases. There are a couple solder-in #44 bases, however, that would mean that: (1) Longer standoffs are used, which are harder to find unfortunately, and (2) when a bulb goes, you'd have to remove the whole thing. So, I went with the same ones used on WPC games, so that they'd be interchangeable.

Well, I made progress since then. My MPU is a little strange in the fact that the first 'flicker' isn't a 'flicker'. It's more of a 1.5 to 2 second fade. Turn the game on, the LED instantly comes on and a hum eminates from speaker. After about 1.25 seconds, the LED will quickly fade off, and the hum will diminish. Then the first blink comes.
My problem was - I wasn't sure if that first on time was 'the flicker' or the first flash. If it was the flicker, it meant my 5101 chips were bad. So, I just got a used MPU off of here (I posted a wanted ad) and sure enough - if has a quick flicker and flashes. So, I snagged the 5101 chips, plugged them into my board, and yup, it powers up. So, I have a (mostly) working game. A *LOT* of bulbs out, broken drop targets... all rubbers were removed (waiting on new ones to arrive now). All coils worked, haven't gotten to the flippers yet.

One of my Meteors had the the lamp socket mod where you solder the control wire directly to the center tab of the socket. Look at pinwiki. It's a lot of work but it's reliable since the connection goes directly to the bulb, eliminating the current to flow from the solder tab to the bulb. This is where they fail because over the years, the insulator dries out and shrinks, causing the bulb to stay loose and not make good contact with bulb tip. Remember, controlled lamps are switched through the ground side of the circuit. The positive voltage comes from the trace wire under the pf. So basically the base of the socket is the hot side.

I'm glad your game is running now, yeah sometimes ya gotta spend some cash. It's odd that the you only got 1 flash. usually it's 2 flashes when 5101 is bad. The 5101 sockets are subject to corrosion if the battery leaked, it's a good idea to replace them as this may give you more trouble down the road, usually when you have people over for a pin party lol. Check out Pinball Life for the flipper mechs.

I'll be restoring my Meteor next year. The pf is currently getting restored, I have a NOS back glass and cab stencils. May try to have a cab reproduced since mine is rough.

#82 7 years ago
Quoted from Lovef2k:

One of my Meteors had the the lamp socket mod where you solder the control wire directly to the center tab of the socket. Look at pinwiki. It's a lot of work but it's reliable since the connection goes directly to the bulb, eliminating the current to flow from the solder tab to the bulb. This is where they fail because over the years, the insulator dries out and shrinks, causing the bulb to stay loose and not make good contact with bulb tip. Remember, controlled lamps are switched through the ground side of the circuit. The positive voltage comes from the trace wire under the pf. So basically the base of the socket is the hot side.

Yeah, I saw that. Honestly, I'd rather go the easy route (for me?) and make a small board to mount in there. Since I don't plan on LEDding it out (at least for now, I haven't seen any good LEDed Meteors yet..!) I would hate to have to unscrew that specific row to get to a single bulb.

Quoted from Lovef2k:

I'm glad your game is running now, yeah sometimes ya gotta spend some cash. It's odd that the you only got 1 flash. usually it's 2 flashes when 5101 is bad. The 5101 sockets are subject to corrosion if the battery leaked, it's a good idea to replace them as this may give you more trouble down the road, usually when you have people over for a pin party lol.

*Was* working. I swear, I have hte worst luck as a tech. Was great when I was getting paid for it, but now.. arg.

New rubbers showed up today, as well as the NVRAM card. Pop out my 5101's and pup in the NVRAM. Turn game on, confirm it boots, and all's good. Turn game off. Start putting in new rubbers. Most of them go in alright, but find out that dumb-arse me ordered too many 1.25" and no 1"'s. Luckily, the 1.25"s fit just well. (Does anyone's machine actually follow the manual layout for rubbers around the upper flipper?) Flip switch, and.. .nothing. No hum from speaker, no life whatsoever. Arg. Getting voltage at the cable, and the .. (crap, I can't remember the name of it - small silver box back at the back of the cabinet. Traffic control cabinets use them too, but they're muxh larger. I just can't remember the name right now..) Anyways, getting power at the power switch input. Nothing on the output side. Seriously. I somehow *broke my game's power switch*. Holy carp.

Quoted from Lovef2k:

Check out Pinball Life for the flipper mechs.
I'll be restoring my Meteor next year. The pf is currently getting restored, I have a NOS back glass and cab stencils. May try to have a cab reproduced since mine is rough.

My BG is in really good condition, with only a few scratches in it. My PF is useable - a small worn spot in one of the rocket's white exhaust, so it's not noticeable. However, a LOT of planking. I have it all waxed now, and it's smooth as butter - but you can feel the 'planks' as you draw your hand over. I was going to wait on getting PF done to see if CPR was going to reproduce them.

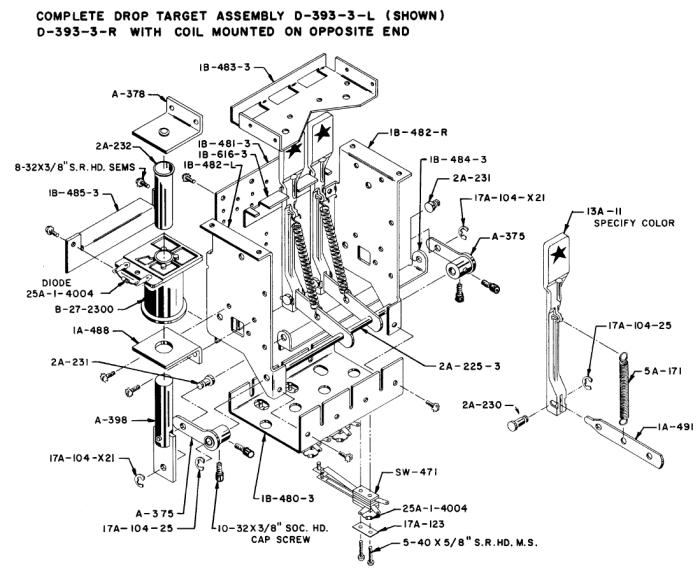
Next on the job is to rebuild all the drop targets & mechs. (New ones on order..) Then I'll attack flippers.

While I'm thinking about it, does your (or anyone's, again) game have an unused GI hole in the back of the playfield - one on either side under the large arch plastics? Mine have holes, but no sockets. Was curious if that was normal.

--Me.

#83 7 years ago

I actually prefer the 555 screw in sockets on a board like WPC. I run LEDs (using 2LED frosted) so it doesn't matter if they run hotter. I would like it if you added a resistor to the circuit. Or at least, the holes for them so people can do LED mod.
Would you do the METEOR lamps too?
I would prefer three separate boards. would be nice if they screwed in the same holes.
A single connector would be cleaner but not reversible.

Not sure if the METEOR and Spinner lamp banks are the same width (I think so), but if so, you could run a six lamp board and a 7 lamp board. Then you would need three of each for most of the lamps in the game.

#84 7 years ago
Quoted from SealClubber:

I actually prefer the 555 screw in sockets on a board like WPC. I run LEDs (using 2LED frosted) so it doesn't matter if they run hotter. I would like it if you added a resistor to the circuit. Or at least, the holes for them so people can do LED mod.
Would you do the METEOR lamps too?
I would prefer three separate boards. would be nice if they screwed in the same holes.
A single connector would be cleaner but not reversible.
Not sure if the METEOR and Spinner lamp banks are the same width (I think so), but if so, you could run a six lamp board and a 7 lamp board. Then you would need three of each for most of the lamps in the game.

The spinner and rocket lamps are all the same distance apart. (The spinner just wouldn't use the last socket, same as it is now with the metal brackets.) So one design of the board could be used 4 times and handle the rockets and spinner. Another board would need to be done to handle the Meteor targets - different light spacing. D'oh.
I thought about the resistor, but the difficult part is being able to fit the board next to each other - the space required would make them a very tight fit. I should have a drawing for a sample board tomorrow or Friday to show, in either case.

I'm swapping my time between actually working on my game, trying to get it up and operational, to my actual job and these boards. Fun!

#85 7 years ago

I think this could be a good switch replacement: ebay.com link: itm

The silver box is a line filter and the red thing on it is the MOV or surge suppressor. These rarely fail, I only replace them when doing a full resto.

#86 7 years ago
Quoted from Coyote:

Yeah, I saw that. Honestly, I'd rather go the easy route (for me?) and make a small board to mount in there. Since I don't plan on LEDding it out (at least for now, I haven't seen any good LEDed Meteors yet..!) I would hate to have to unscrew that specific row to get to a single bulb.

I'd like to see how these come out and will buy if you make extra. On my first Meteor, I just replaced all the rocket lamps with new single mount sockets and it was alot of work. Also tight with not much room to change a bulb.

#87 7 years ago
Quoted from SealClubber:

Not new. Need to daisy chain solder a wire to the outside of all the sockets to make an alternate ground. It is explained in http://www.pinwiki.com/wiki/index.php?title=Bally/Stern#Stern_Meteor Go down to lamp sockets.
Tedious, but replacing with all new sockets would be just as bad IMO. Mine are all solidly lit now.

Just to report back on mine. I soldered a wire to the outside of all the sockets and all the lights are shining bright now. It didn't take very long to do. Thanks for the tip.

#88 7 years ago

I just joined the club! yay! my play field looks real bad, other than that it plays great. from what I see in this thread, it looks like I will be having a hard time finding a new play field :-/

13120429_1163832296992243_246220804_o_(resized).jpg13120429_1163832296992243_246220804_o_(resized).jpg

#89 7 years ago
Quoted from Spamman2k:

I just joined the club! yay! my play field looks real bad, other than that it plays great. from what I see in this thread, it looks like I will be having a hard time finding a new play field :-/

13120429_1163832296992243_246220804_o_(resized).jpg

That looks like the one that was at the Gettysburg auction last weekend.

CPR *may* be doing a repro run of them; they're taking votes now - you can so submit your vote at:
http://www.classicplayfields.com/order.html

Quoted from Lovef2k:

I think this could be a good switch replacement: ebay.com link
The silver box is a line filter and the red thing on it is the MOV or surge suppressor. These rarely fail, I only replace them when doing a full resto.

Quoted from Lovef2k:

I'd like to see how these come out and will buy if you make extra. On my first Meteor, I just replaced all the rocket lamps with new single mount sockets and it was alot of work. Also tight with not much room to change a bulb.

Thanks, I'm seeing if I have a switch laying around, if not, I'll order that. Soimple switch. Just.. surprised and annoyed that.. somehow I broke *that*. Sheesh.
And yeah - seeing the other replies, yeah, I could just directly solder them. My main concern is having to remove the whole thing to replace a bulb, moving it may cause wires/solder points to fail again. So, I should have a drawing of a board up soon, and I may order a set for myself to try out first, then either make the PCB file public (so you can go make your own) or order them if folks want. I'm not planning on making any money off of them. (No need to..)

#90 7 years ago

Quick question -
Will these new drop targets work? (On right. Note the long ridge under the three, down the center of the shaft. My original doesn't have it, and the small half moon is what catches and keeps the target up.)

IMG_20160428_210058_(resized).jpgIMG_20160428_210058_(resized).jpg

#91 7 years ago

The left one looks like a Bally drop target and the one on the right a Stern.

#92 7 years ago
Quoted from SealClubber:

The left one looks like a Bally drop target and the one on the right a Stern.

You have GOT to be f*ckin' kidding me.
After I posted that pic, the top of the 'R' DT came out of the game (it was broken in half, one of the reasons I ordered new targets) and IT matches the one on the right - the new ones. I went online to look at other drop targets for 'stern' (i.e. Marco's) and they all match the one on the right as well. I also found a drawing of the assembly, and mine looks almost identical - the ONLY difference is that in the pic (ref, here: http://www.marcospecialties.com//images/products/D-393-3-L/large.jpg ) the switches seem to be mounted on the bottom. Mine are on the back. But all the brackets look to be the same.

Can anyone get a closeup pics of one (don't matter which rocket #..) of their assemblies? Would love to use it for reference.

I'll try reassembling it with the new targets, but I'm not sure what catches the target to hold it up. Currently, it's the small half-moon at the taper. If the small extension there is supposed to hold it up, that may be a little too high out of the playfield? I'm not sure. I'll give it a try tonight.

i swear, this game is gonna make me go bald.

#93 7 years ago
Quoted from Coyote:

i swear, this game is gonna make me go bald.

I spent about 10 hours on my drops about a month or so ago and replaced them with new ones that match the one on the right, they work just fine... this game is going to frustrate me as well, my switch matrix is crazy; when the pop bumper is hit, my knocker fires, and my #3 targets reset over and over about every second. so frustrating. I just cleared the pf and restored just about everything on the pf, and had it working 100%, now this after about 50 plays

#94 7 years ago
Quoted from Coyote:

Quick question -
Will these new drop targets work? (On right. Note the long ridge under the three, down the center of the shaft. My original doesn't have it, and the small half moon is what catches and keeps the target up.)

IMG_20160428_210058_(resized).jpg

The one on the right is the newer stern style, circa 1980, started on later run of meteor. Some of the later Meteor had these targets on the upper bank. To use the the newer (hooded style) you need to change all of them to match. The earlier flat targets is called "chicklet" style. What is the T you need? I have extras...

#95 7 years ago

All of my Stern Drop targets look like the one on the right with the long ridge. The chiclet/tombstone ones and the hooded. They rest on a metal ledge that is on the inside of the mechanism under the playfield.
Inside_Drop_targets_(resized).JPGInside_Drop_targets_(resized).JPG
Drop_switches_(resized).JPGDrop_switches_(resized).JPG

#96 7 years ago
Quoted from SealClubber:

All of my Stern Drop targets look like the one on the right with the long ridge. The chiclet/tombstone ones and the hooded. They rest on a metal ledge that is on the inside of the mechanism under the playfield.
Inside_Drop_targets_(resized).JPG
Drop_switches_(resized).JPG

AH! hah!
Thanks! That answers it.

On mine, that bracket that you say they rest on, is mounted the other way - the flat is up against the bottom of the playfield. And my switches look just like yours.

I can't even guess to say how this happened, and.. would probably just get a headache trying to figure it out.

Quoted from Lovef2k:

The one on the right is the newer stern style, circa 1980, started on later run of meteor. Some of the later Meteor had these targets on the upper bank. To use the the newer (hooded style) you need to change all of them to match. The earlier flat targets is called "chicklet" style. What is the T you need? I have extras...

Thanks for the information. My game's dated Oct '79, but there's no way of telling what previous owners/operators did. And thanks for the offer - I don't need any targets, I actually bought a complete set (all 15), since they all were horribly worn, replaced, or broken. I just was comparing the one I took out to the one I put in (before dismantling everything else) and then noticed the style/ridge difference.

--Mike

#97 7 years ago

Did the bally one work with the flipped ridge?

#98 7 years ago
Quoted from SealClubber:

Did the bally one work with the flipped ridge?

It's not Bally, rather early Stern. A Bally target will not work in a Stern DT bank. If you look at some earlier stern such as Hot Hand or Dracula, you will see these "chicklet" targets.

#99 7 years ago
Quoted from Lovef2k:

It's not Bally, rather early Stern. A Bally target will not work in a Stern DT bank. If you look at some earlier stern such as Hot Hand or Dracula, you will see these "chicklet" targets.

Interesting. What changes were made in the assembly to support these? Anything other than flipping the top plate?

I went ahead and reassebled my #3 Rocket assembly. I reversed the top plate and installed it. While it *technically* works, I do NOT like these targets. First off, they sit lower, so the artwork gets cut off. (And, if the artwork was higher, it'd be visually cut off by the top lip of the 'tombstone'.

Here's a shot of my new #3, and an shot of the existing #2 -
IMG_20160429_220703_(resized).jpgIMG_20160429_220703_(resized).jpg
IMG_20160429_220651_(resized).jpgIMG_20160429_220651_(resized).jpg

Unfortunately, I don't have a choice right now, as all the DT banks - except for #2 - had broken or missing targets. D'oh. So they'll all get replaced. But I'll be looking for new targets in the 'chicklet' style. Heh.

#100 7 years ago
Quoted from Coyote:

Interesting. What changes were made in the assembly to support these? Anything other than flipping the top plate?
I went ahead and reassebled my #3 Rocket assembly. I reversed the top plate and installed it. While it *technically* works, I do NOT like these targets. First off, they sit lower, so the artwork gets cut off. (And, if the artwork was higher, it'd be visually cut off by the top lip of the 'tombstone'.
Here's a shot of my new #3, and an shot of the existing #2 -
IMG_20160429_220703_(resized).jpg
IMG_20160429_220651_(resized).jpg
Unfortunately, I don't have a choice right now, as all the DT banks - except for #2 - had broken or missing targets. D'oh. So they'll all get replaced. But I'll be looking for new targets in the 'chicklet' style. Heh.

That's a good question, but sorry I don't have an answer. I'm not sure if they changed the mechanism along with the targets. My theory is that they made the later targets with the lip on top because the flat ones were often getting broken from hard hits. The hooded target seems more robust. Now the numbers sitting low on the pf could be another issue. Is it possible that the 3 is stamped too low? I have an NOS number 3 target here and the 3 is about 1/16 below the underside of the lip. When I have a chance I'm going to measure the 2 styles side by side and see what the difference is. Also where did you buy the repro targets from?

Promoted items from Pinside Marketplace and Pinside Shops!
$ 44.00
Boards
PinballReplacementParts
 
$ 29.00
Boards
RoyGBev Pinball
 
From: $ 150.00
$ 29.00
Boards
RoyGBev Pinball
 
$ 12.00
Electronics
Yorktown Arcade Supply
 
From: $ 115.00
Playfield - Protection
Beehive Pinball Co.
 
From: $ 130.00
Boards
Troxel Repair
 
$ 29.00
Cabinet - Sound/Speakers
RoyGBev Pinball
 
$ 12.00
Electronics
Third Coast Pinball
 
Wanted
Machine - Wanted
Middletown, OH
$ 25.00
Apparel - Men
Slipstream Mod Shop
 
$ 40.00
Gameroom - Decorations
The Flipper Room
 
From: $ 33.00
Gameroom - Decorations
Rocket City Pinball
 
There are 2,930 posts in this topic. You are on page 2 of 59.

Reply

Wanna join the discussion? Please sign in to reply to this topic.

Hey there! Welcome to Pinside!

Donate to Pinside

Great to see you're enjoying Pinside! Did you know Pinside is able to run without any 3rd-party banners or ads, thanks to the support from our visitors? Please consider a donation to Pinside and get anext to your username to show for it! Or better yet, subscribe to Pinside+!


This page was printed from https://pinside.com/pinball/forum/topic/meteor-club-we-will-let-you-know-when-the-danger-is-past/page/2?hl=spamman2k and we tried optimising it for printing. Some page elements may have been deliberately hidden.

Scan the QR code on the left to jump to the URL this document was printed from.