(Topic ID: 248582)

Jurassic Park (Stern 2019 & 30th) Owners Club. Welcome! To Jurassic park.....

By CoolCatPinball

4 years ago


Topic Heartbeat

Topic Stats

  • 21,323 posts
  • 1,409 Pinsiders participating
  • Latest reply 12 hours ago by evileye
  • Topic is favorited by 766 Pinsiders

You

Topic Gallery

View topic image gallery

IMG_5096 (resized).jpeg
IMG_1230 (resized).jpeg
IMG_1464 (resized).JPG
IMG_7368-ezgif.com-optimize.gif
IMG_7373 (resized).jpeg
IMG_7372 (resized).jpeg
IMG_7369 (resized).jpeg
pinside.a4cba3d6f022409119bc55bb9a4f9ec272c3d66d (resized).jpg
PXL_20240419_132957235.jpg
PXL_20240419_220243332.jpg
PXL_20240419_132948477.jpg
PXL_20240419_132932956.jpg
IMG_4992 (resized).jpeg
thumbnail_image5 (resized).jpg
thumbnail_image0 (resized).jpg
thumbnail_image1 (resized).jpg

Topic index (key posts)

17 key posts have been marked in this topic, showing the first 10 items.

Display key post list sorted by: Post date | Keypost summary | User name

Post #326 Rules tips and info on some wizard modes Posted by sk8ball (4 years ago)

Post #365 Printable Instruction cards for the pin Posted by PinballZach (4 years ago)

Post #366 The first Full Unboxing Video Posted by ZMeny (4 years ago)

Post #425 Feature Matrix of Pro vs Premium vs LE Posted by CoolCatPinball (4 years ago)

Post #468 How to qualify control room modes Posted by jonesjb (4 years ago)

Post #2298 Keith Elwin explains JP rules Posted by MRG (4 years ago)

Post #3040 Raptor target not registering or "ghost" registering, possible fix Posted by Jesder (4 years ago)

Post #5270 make the jeep work well Posted by CoolCatPinball (3 years ago)


Topic indices are generated from key posts and maintained by Pinside Editors. For more information, or to become an editor yourself read this post!

You're currently viewing posts by Pinsider Mr_Tantrum.
Click here to go back to viewing the entire thread.

622 posts in this topic match your search for posts by Mr_Tantrum. You are on page 1 of 3.
#1309 4 years ago

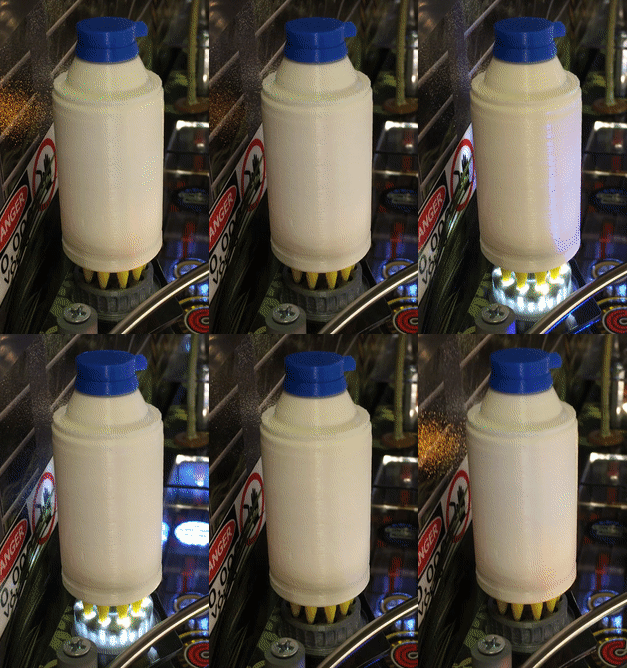
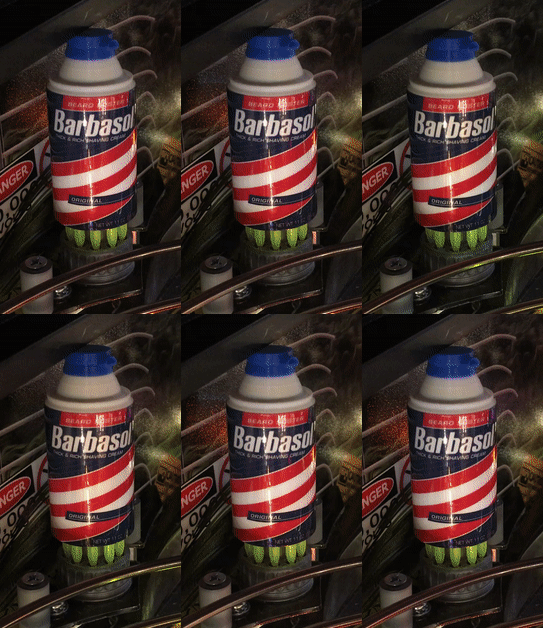
Well, I know a couple of others out there are also designing Barbasol shaving cream mods, but I wanted to share my design for the Data East version of Jurassic Park (https://pinside.com/pinball/forum/topic/jurassic-park-club/page/140#post-5193009)

The mod is currently 5-1/2" tall, but if there is any interest to use with the new Stern JP and it needs to be modified then I would be happy to do so. As stated at the link above, the model is 3D printed with multiple colors (no painting), the label is adhesive vinyl printed on a photo quality printer with a clear vinyl outer layer, the vials are 3D printed and permanently sealed with colored water inside, and the underlighting is a Comet Matrix LED strip (I include the lighting, cabling, and clips to connect the GI circuit somewhere on the bottom side of the playfield).

The mods are ready for purchase (takes about 1 week from time of order) for $60 which includes US shipping (will ship outside US on a per quote basis). Please PM me if interested, and I'm happy to answer any questions and provide payment details.

Barbasol.jpgBarbasol.jpg
10 months later
#6175 3 years ago

Okay, I need some help from the Stern JP owners club. For those of you who have the Mezel Mods Pinball Raptor Lookout Tower installed, I need to know the clearance from the peak of the roof to the underside of the playfield glass (in mm preferably, but I can handle decimal or fractional inches if that's all you can do).

Long story short, I'm designing a roof mod but I don't have access to the game. Also, the guy I'm doing it for lives over an hour away and I currently have his roof in my possession, so he can't help me either. Once of those things I meant to measure beforehand, but forgot to do it.

Any help would be greatly appreciated. You can either post here in the forum or PM me with the information.

1 week later
#6312 3 years ago

For those of you who don't care for the holes and 3D print quality of the roof of the Raptor Lookout Tower by Mezel Mods, you now have a new option. With the help of eightballtexas, I've designed this 3D printed straw style roof to fit directly on top of the existing one without any modification whatsoever required. The roof is secured with the loud speaker tower which fits snuggly into the existing front screw hole (no glue or tape required), and the back hole is hidden by the new roof.

The straw appearance goes perfectly with the overall theme of the game, the price for the mod is $35 which includes US shipping (will ship outside US on a per quote basis). Also, I'm happy to do custom colors for the loudspeaker tower (green is shown, but gray/silver like the tower color would be another good option). If interested in ordering, please PM me for payment details.

For those of you who are not familiar with my work, I've designed and sold hundreds of mods here on Pinside over the last few years. I mainly design things for the games I own (Getaway, DE JP, AFMr), but I've also done mods for a variety of other pins on request from satisfied customers. You can read feedback from some of my happy customers here: https://pinside.com/pinball/community/pinsiders/mr_tantrum/feedback

1.jpg1.jpg2.jpg2.jpg3.jpg3.jpg

1 month later
#6856 3 years ago
Quoted from zeldarioid:

I can disassemble and take pictures of mine, if you need some extra guidance

That would be very helpful to many of us if you could do so. Also, some good pics of install in different positions.

#6858 3 years ago
Quoted from PinballTilt:

I tried to find the cg of the Jeep and mount that over the rod assembly from the game.

Good note.

#6863 3 years ago
Quoted from Markharris2000:

NICE POST!!!! I am going to play with the mounting in your Step 4 a bit. While solid initially, I can't help but think that the jeep to bracket stability will change after 1000 whacks. Its metal to plastic which changes integrity over time. The main idea is to get the metal bracket in contact with the Jeep plastic underbody more, and reduce anything hanging in the air. To do so, I may try to drill another larger hole where the dark rod screw is in the center to allow the dark screw head to extend up into the jeep, allowing the bracket itself to sit 'more flush'. I may also look at add a few metal washers between the bracket and the body plastic to eliminate the remaining 'air' which is accurately called in the scenerio "wiggle room". Stay tuned...

Possibly an application for a 3D printed custom spacer. Light, strong, and custom fit.

#6866 3 years ago
Quoted from PinballTilt:

I'm so confused guys, I literally posted a few posts up you can buy spacers. I got mine at home depot. I can post a picture of the bag for the spacers and screws tonight.

Spacers are of course a simple and valid option (and probably what I would do if do decide to purchase the game), but that doesn't feed the 3D design beast inside of me!

#6869 3 years ago
Quoted from J-Freeze:

Did you end up going with the new JP to replace the old one?

I just waved goodbye to my DE JP a few minutes ago. I'm going to sleep on things, then make my decision but JP Premium is where I'm definitely leaning.

JP (resized).jpgJP (resized).jpg
#6872 3 years ago
Quoted from CoolCatPinball:

Thats a beautiful Data East JP bud. The new JP premium is definitely a great game, hopefully you'll enjoy it even more than the old one.

Thanks, I put a lot of time, creativity, and money into it in order to realize my vision for that game (not to mention everything under the hood you can't see - https://pinside.com/pinball/market/classifieds/archive/102107 if anyone is interested). I think the caution theme lent itself well to the cabinet coloring and art, but not so much the new Sterns (I'll have a few tasteful caution tape touches here and there if I end up purchasing one).

Even though I loved looking at every time I went into the game room, I found myself no longer being drawn to play it. I'm still a relatively newbie when it comes to pinball, but I think I've learned that I prefer games that flow rather than start and stop so much. From all of the reviews I've read, this forum, and videos I've watch, the new JP has good flow even though it does still have some similar basic objectives. Having never owned a Stern, however, the ruleset appears to me to be extremely deep and non-linear. DE JP objectives are fairly basic and rigid (a product of its time, I'm sure).

In looking at all of the newer Sterns, I suffer from having overall theme near the top of my list. I know they are all probably pretty great games, but I'm not into cartoons, comics or super heroes, I love the Stranger Things theme but that game is too close to my AFMr layout in just a 3 pin collection, BK would be an option but I already own probably the best Steve Richie design ever - Getaway (not to mention I find the sound track on that game annoying), and I'm not really into ghoul (Munsters & Elvira). That basically leaves me Guardians, Star Wars, and Jurassic Park (I realize Guardians is comics, but it at least has the sci-fi theme which I love). Of those three, from all the videos and reviews I've read, I think that JP is the best choice for me - innovative, timeless theme, and the way that experienced pinball owners speak of it so gushingly must mean something.

#6874 3 years ago
Quoted from Taygeta:

Hey guys - I have been pretty off put by this game because the lack of theme integration from the movie, however the recent TMNT custom 1987 firmware gave me hope that maybe someone was working on integrating scenes from the movie into the pin? Is anything in the works?

Have you not seen this thread (applies to Premium and LE):
https://pinside.com/pinball/forum/topic/stern-jurassic-park-2-custom-code-project

#6878 3 years ago
Quoted from Taygeta:

Browsing through a few pages that looks like it's just replacing the audio. Are they redoing the video as well?

Yes, start at the end and work backwards.

#6889 3 years ago

For those who have installed Pin Stadium lighting did you just adhere the mag strip on top of your blade art? I guess there's not really any other option unless you went with the currently backordered Hover Kit (but then again, I read somewhere those weren't compatible with the Omega's).

Also, do most think Omega is the way to go? I don't really see myself using any of the colors except white anyway. Of course, I must have the UV flashers - those are awesome on my AFMr.

#6900 3 years ago

Sounds like Omega is the best choice, thanks for the input.

#6901 3 years ago

It's official - I just put in my JP Premium order! Looking forward to joining the club in what is hopefully a few short days. Thanks for everyone's insight and support in helping me make my decision.

#6908 3 years ago
Quoted from Markharris2000:

So you have a week or so to compile a set of MUST DO's. Let me start you off by suggesting that you immediatly getting an order into Cliff to get his shooter-lane protector kit. Everything else can wait IMHO, but playfield damage is possible day-1. You could/should also turn down the coil strength for the ball trough coil (maybe just under 200 or so), but the stainless steel protector would be the right answer. Place the order today.
Then you can look at: 1) a washer under the left shooter ramp steel tong and lower the shooter autolauncher coil to 200 or so, 2) putting a non-metallic washer under the post at the tip of the third flipper. (Cliff has a new carbon fiber one for a couple of bucks you can get at the same time).
Lastly, over the next few days try to go find a mechanics ignition miniature open-end wrench set since you'll need that to adjust a few playfield posts and other items, INCLUDING the post I mentioned above in #2 which is mounted underneath the flipper assembly itself. Regular wrenches will NOT fit since the space between the playfield wood and the underside of the metal flipper bracker is very narrow! The aforementioned wrench sets actually fits in that space.

If only I could get off that easy. Here's what I'm already committed to besides the pin:
- Stern Topper
- Stern Shaker
- Backbox & Cabinet speakers
- Speaker Lights with 5.25" mounts
- Side Blades (Tilt Graphics)
- Cliffy Protectors + Carbon Fiber washer
- Pin Stadium Omega lights
- Safari Farms Nanny Goat with I will paint to look like the one in the movie
- JP Jeep to replace the one on the newton toy

I'll be doing a few of my own decals/graphics, custom apron cards, and 3D printed mods over time after the pin arrives. Also, I'm hunting down the Stern amber shooter rod as well as being on a backorder list with my distributor. I'm sure I'll outfit the pin with Titan rings (haven't decided on colors yet), trees, dino figures, etc. I'm on the fence with the fluorescent plastic protectors, but I have them on my AFMr and they look great - just not sure if that's the look I want on JP. Oh, and I've never done any lighting mods for Stern, but custom illuminated flipper buttons are on my DIY list.

#6912 3 years ago

It's an addiction of mine. Like many of us, these games stay in my home for years at a time, and I like putting my own personal touches on them. Of course, I always have to balance mods with budget. Fortunately, I'm able to sell all kinds of pinball mods I make for a variety of games and owners commission me on occasion for various pinball graphics and sound development. I put all of this money minus any expenses into my pinball fund, and use it to feed the monster.

I'm definitely down on the Cliffy's. I did the same thing when I acquired my AFMr LE. Even though I was the second owner, the came had like 35 plays on it or something. Man, that game is a beast - I think it took half a playfield teardown and literally 3-4 hours to get all of those Cliffy's installed.

#6913 3 years ago

Just bought a Papo Pteranodon for $10 (they make very nice figures). Link is here if anyone is interested: https://www.amazon.com/gp/product/B000GL1BHO/ref=ppx_yo_dt_b_asin_image_o00_s00

The goat I use for JP (made a few for DE JP owners) is also from Amazon. I paint on the black based upon the goat from the movie.
https://www.amazon.com/gp/product/B002GULG6Y/ref=ppx_yo_dt_b_asin_title_o03_s00
pasted_image (resized).pngpasted_image (resized).pnggoat (resized).jpggoat (resized).jpg

IMG_4494 (resized).JPGIMG_4494 (resized).JPG
#6929 3 years ago

Personally, I just use clear adhesive vinyl: https://www.amazon.com/gp/product/B07N1T6P4V/ref=ppx_yo_dt_b_asin_title_o00_s00

If you want to use the same, but don't want to buy a $20 roll, PM me and I'll send you a piece as large as a #10 envelope for $2 (or I'll even cut exact shapes required since I have a vinyl cutter).

I've used the PBL "Mylar" before, and it seems like similar material but it doesn't lay down as smoothly as what is in my link above (e.g. splotchy/foggy appearance comparatively).

#6933 3 years ago
Quoted from EaglePin:

Bummer about your experience with it. It’s worked great for me. Clear as day and went on smooth in my JP2 shooter lane.
[quoted image]

You know what, now that I think about it what I used in the past was the Mylar from Marco’s (I order items from both companies on a regular basis). Sorry for my misstatement.

#6934 3 years ago

BTW, “Mylar” is a brand name for plastic laminate (like Kleenex is to tissue). Many times what is referred to as Mylar is clear vinyl or some other comparable material.

#6944 3 years ago
Quoted from bent98:

When is Stern running more of the premiums? Seems like they are out of stock.

Currently there is a run scheduled for 3rd week of October according to two distributors I spoke with. Others said they weren't receiving any more until Q1 2021.

#6945 3 years ago

Received my Papo Pteranodon today. The detail is superb!

IMG_4506 (resized).JPGIMG_4506 (resized).JPGIMG_4509 (resized).JPGIMG_4509 (resized).JPG
#6947 3 years ago

For those who have added illuminated flipper buttons, what brand/color did you choose?

#6960 3 years ago
Quoted from JRay23:

Just joined the club this past week with a really nice used premium. Loving it so far. It does seem a little dark to me, what style of pin stadiums is everyone using? They have a bunch of options and some are pretty pricey!

Omega's baby!

Seriously, I have regular PinStadiums with UV flashers on my AFMr LE, and while my Premium is on order I've gone ahead and ordered Omegas for this game. I don't really use/want color GI, so the Omegas with diffused white light will be perfect and they still have the UV flashers.

#6962 3 years ago
Quoted from fooflighter:

[quoted image][quoted image][quoted image][quoted image]

I like it! So to connect the rod and button lights did you need anything extra or just the connectors that come standard with the mods?

#6966 3 years ago

So, I'm working on the colors for my rings, sleeves, etc. On my DE JP, I had green flipper rubbers, and the rings & sleeves were yellow which I thought looked great on that pin. My thoughts here are to maybe go orange on the bottom flippers and sling rings, green flipper on top, and yellow posts and rings everywhere else (might use a black sleeve below the upper flipper to kind of hide it).

Anyway, I've browsed through the photos and have seen a game with orange everywhere (I liked the look on the lower playfield), and I've seen some green too which I like in certain places. I also saw some closeups of some yellow post sleeves. Anyway, I was wondering if anyone has done yellow rings, and if so if you could post some pics (zoomed out and in).

I know that many like the clears, which I've used on pins before, but in the end I find them a little visually boring. On my Getaway, I had the OEM red posts and clear rings, but ended up reversing the look with clear post and red rings and really like it. On my AFM, I have all UV reactive which looks great for that game, but I'm not feeling the pale green color is right for this game.

#6967 3 years ago
Quoted from JRay23:

Nice thanks for the replies, I hadn’t thought about the omegas, but they may be my best option, I don’t think I would use the color feature either. You have to change the colors with the app correct? I’m guessing the only way to change colors is in the app, so the colors don’t change during gameplay right?

Yes, that is how the standard Pin Stadium lights work (at least on my AFMr). Basically, on that pin I've set the white to where I want them and adjusted the color bulbs to create the desired overall white temperature without any color tint to it.

#6979 3 years ago

A little entertaining JP music video for those of you who haven't seen it

#6982 3 years ago

Can someone please help me with the post sleeve count and position on this game (I don't own the game yet)? I'm not seeing them documented in the manual (may not know what I'm looking for). I visually see 7 in photos, but the kits that were built on Titan all have 12 in them.

Here are the 7 that are obvious to me:

2 x T-Rex Ramp
2 x Right Metal Ramp
2 x Raptor Pit
1 x Upper Flipper

#6985 3 years ago

For those who want to add trees, here is my solution for the base. I 3D print the disks with holes, use plastic model glue to adhere the base of tree, then after dried use flush cutters to remove the extra stem. I then us clear double sided mounting take cut to size and place tree on top of plastic in desired locations.

Had similar technique on my DE JP, and I never once had a tree fall except when I accidentally broke them with my arm while working on the playfield. The disks are 1.6mm tall and 7/8" in diameter.

https://www.amazon.com/gp/product/B07LFRN1K8/ref=ppx_yo_dt_b_search_asin_image

I'm happy to share the STL file with those who want to print their own, or for those who would like me to make them I'll sell them for 50 cents each plus $1 for postage (e.g. 20 disks = $11) - just PM me.

IMG_4516 (resized).JPGIMG_4516 (resized).JPGIMG_4518 (resized).JPGIMG_4518 (resized).JPGIMG_4517 (resized).JPGIMG_4517 (resized).JPG

Added 8 months ago:

FYI: I now offer the same disc tree bases, but in laser cut clear acrylic.

#6988 3 years ago

Look what just pulled into my driveway . . .

Man, I've got mods arriving nearly every day, but no pin until at least the end of October

IMG_4519 (resized).JPGIMG_4519 (resized).JPG

#6994 3 years ago
Quoted from Galvez1978:

These Jeep it's for replace the stock Jeep? Where can i buy it? Thanks!!

Yes, search this thread and you will see instructions. I got a deal on mine used from eBay, but it looks perfect.

#6995 3 years ago
Quoted from Green-Machine:

At least you’ll have plenty of toys to play with till you get your pin

You should hear all of the dinosaur noises I've been making.

#7007 3 years ago

For those interested, I just created my Titan rubber kit for JP Prem/LE: https://www.titanpinball.com/kits/index.php/view/id/1475

It is a mix of orange and yellow along with green for the upper flipper.

#7010 3 years ago
Quoted from mcvetyty:

I am interested! However, your link isn't working.. It just takes me to their homepage. Do you need to swap it out with one that is public-facing?

Sorry, please try updated link in my original post.

#7030 3 years ago

Whew! Finally finished reading every post in this thread. Now, I'm moving on to the Premium/LE thread, and then the custom audio/video thread. I have to do something to keep me going until late October (the next JP Premium production run).

#7031 3 years ago

Just received my custom built Titan ring kit for JP Premium: https://www.titanpinball.com/kits/index.php/view/id/1475

Stupid question, but I've never owned a Stern - I assume the post sleeves are to be installed where they taper from thicker at top to thinner at bottom?

I also highly recommend their clear cling on button protectors to protect the artwork around the buttons over time from wear due to rubbing with hands and oil transfer. https://www.titanpinball.com/index.php?route=product/product&path=63&product_id=138

The mod pile is growing! I'm going to be very busy once my game finally does arrive in late October.
IMG_4525 (resized).JPGIMG_4525 (resized).JPG

#7045 3 years ago
Quoted from ABE_FLIPS:

My autolaunches are getting worse to a point it really pisses me off and I do not know how to fix it.
I realigned the shooter fork, did the washer fix and lifted up the heli ramp a littlebit, since the ball sometimes touches it from below.
Yesterday I took alot of slomo videos. One big problem is the thin metal flap on the right side of the shooter lane. Its enough send the ball into the opposite direction, leading to massive rattling. However sometimes the ball launches perfectly straight and it still wont make it up the ramp. Any ideas?[quoted image][quoted image]

No help to offer, but that second video is a piece of art.

Also, the ball path looks sort of like a major league curve ball, or maybe a PBA bowler ball path.

#7067 3 years ago

My distributor emailed Stern today, and they told him that the next availability for amber shooter rods is slated for early November. I was interested in this one on eBay that just closed if it could be had for close to the MSRP ($139) + shipping, but somebody else was willing to pay just slightly more than I was. Wow, looks like they just had to have it!

pasted_image (resized).pngpasted_image (resized).png

#7075 3 years ago
Quoted from Green-Machine:

Looks like this guy bought it.

At least it was a fellow Pinsider.

Quoted from kidchrisso:

you can get them online at stern

No you can't. When you go to pay is states they are sold out.
pasted_image (resized).pngpasted_image (resized).png

However, Pinball Life does show to have them in stock for $200, but I don't know if they really do or not (usually they are good at keeping their site current). However, $200 is still too much when I can just wait 6-8 weeks for the $139 price (won't have my pin until late October at the earliest anyway): https://www.pinballlife.com/stern-jurassic-park-custom-shooter-rod.html

#7090 3 years ago

Here is my custom built Titan ring kit for JP Premium: https://www.titanpinball.com/kits/index.php/view/id/1475

I also highly recommend their clear cling on button protectors to protect the artwork around the buttons over time from wear due to rubbing with hands and oil transfer. https://www.titanpinball.com/index.php?route=product/product&path=63&product_id=138

I won't be able to offer real pics until I get my game in late October, but here is a Photoshop rendering (I may have missed a ring or two since some things are hard to see in this pic).
JurassicPark-LE-Playfield(colored).jpgJurassicPark-LE-Playfield(colored).jpg
44a4aba7494d7a57ff8a54f50770a00d133f2d46 (resized).jpg44a4aba7494d7a57ff8a54f50770a00d133f2d46 (resized).jpg

#7106 3 years ago
Quoted from Markharris2000:

I wasn't sure how to post video but here is a short clip MP4 of the shooter running...
https://tinyurl.com/shooterLED

Well done. So, I assume you may have had some of those parts on hand. If not, and you had to order separately that puts you a little closer to the $139 Stern version price, assuming there would ever be enough supply to meet demand. Nice to know there is a DIY option that gives identical results for a few bucks less. Thanks for detailing this.

I've created for myself and sold a ton of DIY mods (even electrical ones) on Williams, DE, and CGC games, but I'm all new to Stern/Spike 2, so things like this help accelerate my learning curve.

#7108 3 years ago
Quoted from Kjarkur:

I like my jp very much. But I must admit that I'm not a pro player, so I was thinking of a center post that ease the gameplay for me.
This is a prototype done with my home cnc machine. I'll make some with a laser cutter. Leave me a pm if you are interested. [quoted image][quoted image]

Sort of reminds me of removable training wheels on a bicycle or gutter blockers at the bowling alley. Are you sure you want to do this? While you've integrated nicely, I would encourage you work on your skills a little more. You can adjust the outlane gaps, learn to side nudge a little, and even set balls per game to 5 instead of 3 to help as you learn the game while improving. For me personally this is a step too far, but not going to criticize you if it's what you want to do.

For me, learning a new game and dealing with it's particular challenges is most of the fun. I don't want to be able to walk up to a pin and immediately set a high score. Heck, I've owned my AFMr LE for a year now and still haven't ruled the universe (gotten very close on several occasions). This is one of the challenges that keeps me coming back to that game, and I plan on enjoying learning and reaching new milestones on JP once I finally have possession of it.

#7109 3 years ago
Quoted from bent98:

I am looking for the Barbasol Mod - Flashinstinct had made. If anyone has one to sell, please PM me.
Thanks

Was this a one-time run with him or is he still making them? I produce a similar mod for DE JP that I sell for $60 shipped. I wasn't going to modify for Stern JP, but if he is no longer is producing his then I might reconsider if there is some demand.
barbasol.jpgbarbasol.jpg

I also make a flasher cover version for $35 shipped that I could adapt for the control room plastic.

flasher.gifflasher.gif

#7122 3 years ago
Quoted from Kjarkur:

Thanks for your in depth answer and advice. I owe this machine about 5 months roughly and going through exactly what you said, turn to 5 balls for some testing and stuff, get back to 3 and so on. Just to explore the machine. I have half a dozen good pins, but currently I'm playing only this one. . (regularly scoring about 300 to 400, high 700 mil)
I made this mod minimal invasive to have the opportunity to assemble or dissamble in few minutes. My kids enjoy dinosaur and of course this machine very much. But nudging is way out of scope for them (4y, 6y). Especially the 6y old is making great progress. So this mod is helping them a lot.
Since I clean the table regularly, I plan to remove it when friends come to play or if I want to play without this helper.
Sometimes the table is played by friends which are not into pinball at all. Perhaps I keep then the mod assembled.

If other family members play (i.e. little kids), I definitely see how your mod would make things more fun for them. I do complement you on your design and execution. Hey, you could have taken the brute force approach . . . I've seen plenty of pins here on Pinside where people drilled holes and mounted posts there - argh!

#7138 3 years ago

Can someone please tell me with the inside width of the metal ramp at its base is? I like the Tilt Graphics decal, but they did not use velociraptor tracks (what I want), so in preparation of receiving my JP that is on order I want to design my own decal.

ramp.jpgramp.jpg

#7140 3 years ago
Quoted from Markharris2000:

I recently sold a set of decals from Tilt which included the ramp. You can see the decal with velo tracks on theirs. Is that what you are looking for, or WITHOUT the velo tracks? Also, the decal is not rectangle. It has a curve on both edges. Probably easier for you to cut one out of paper, trim it to fit, matching the curve of the sides, and then on your PC design tool, smooth out all of the edges to feed the shape geometery into a cutter.
[quoted image]

Maybe those are Velociraptor tracks, but I'm seeing different shapes online. Also, I think I have the basic shape from a photo, just not to scale. I've made several different ramp decals in the past for people, but was just looking to get a head start on this one for myself.

17100106312_fca3839f26_n (resized).jpg17100106312_fca3839f26_n (resized).jpgs-l300 (resized).jpgs-l300 (resized).jpg

#7142 3 years ago
Quoted from Markharris2000:

I found apicture of the actual set I receivced from Tilt. You can see the tracks ...[quoted image]

After doing more searching it appears those are raptor tracks, just not velociraptor. I want to make my own using velociraptor tracks - just need the width at bottom so I can scale the shape accordingly. If nobody can provide the measurement, then I'll just have to wait.

#7156 3 years ago
Quoted from Manny65:

The width of the ramp at the top of the ramp flap is 56mm - sorry no inches on the tape measure but converting it is 2.205 inches
Let me know if you need any other measurements[quoted image][quoted image]

Thanks (actually, I prefer mm for measurements like this).

So, here is my idea of what I want the decal to look like for my pin with velociraptor tracks (the original looks too much like bird tracks to me)
Ramp Decal (Raptor Tracks) (resized).jpgRamp Decal (Raptor Tracks) (resized).jpg

#7159 3 years ago
Quoted from Markharris2000:

I like the new tracks. The original does look like bird tracks a little bit. My only concern with this whole decal is how it will look after the ball travels over it 1000 times. Seems like it might start to look worn or the ink might come off in some places over time. Any thoughts on that?

Like most of my decals, I will print on white adhesive vinyl then clear coat with a clear gloss vinyl. The ones I've done for others up to this point have lasted well over a year with no signs of wear. Also, I've done similar graphics for my Getaway to cover up some playfield wear, and those look as good as new 4+ years after the fact. This would be the first ramp decal that I've done for myself, so we'll see how it holds up.

#7164 3 years ago
Quoted from J-Freeze:

But it IS the pteronadon ramp.

Hmmm, that's a good point which I didn't realize. Plus I do plan on mounting my pteranodon above the wire loop in that area.

Looks like the fossil record of pterosaur tracks is quite rare, so difficult to tell what their tracks actually look like. The few articles/pics I have found show they were quadrupedal with 5 flanges on their feet - 4 main ones (here's a pic where you can see a crooked forelimb print and a hindfoot print).

pasted_image (resized).pngpasted_image (resized).png

Here is my updated version with pteranodon tracks. I just went with the hind feet in a layout that suggests the animal had more of a "hoppping" walk instead of having an even gate.
Ramp Decal (Raptor Tracks).jpgRamp Decal (Raptor Tracks).jpg

#7167 3 years ago
Quoted from bbulkley:

And the velociraptor was small and feathered - you guys might be overthinking the paleontological accuracy of JP.

Quoted from FatPanda:

it's kind of awesome that you're actually looking at the fossil record to accurately depict a flying animals' footprints and movement patterns.

Definitely overthinking it, but what else am I going to do from now until the 4-5 weeks when I actually have a JP in my possession?

#7168 3 years ago
Quoted from bbulkley:

And the velociraptor was small and feathered - you guys might be overthinking the paleontological accuracy of JP.

Probably, but in somewhat fairness the movie did come out in 1993 before a variety of new discoveries were made (plus they were cross-engineered with frog DNA, so who knows what impact that had on their size & appearance). In 2015 a skeleton of a "cousin" of a VR was found well preserved with quill pen feathers. It was 5' long and the largest feathered dino found to date. Based on discoveries thus far, VRs grew up to about 7' long but less than 2' at the hip tall & estimated weight of up to 30-35 lbs (not quite how JP portrays them, for sure).

Regardless, I still wouldn't want to come face-to-face with the 3" claws on that little booger.

D7PCEVRCPPEBXZKVF26LGR3TDI (resized).jpgD7PCEVRCPPEBXZKVF26LGR3TDI (resized).jpg

#7187 3 years ago

SOLD - PLEASE NO MORE PMs ASKING ABOUT THEM

I accidentally purchased an extra set of Pinball Life clear slingshot & return lane protectors. The protectors cost $10 and with shipping they are over $20 (assuming you are not ordering other items to split the shipping cost allocation). I'm offering this brand new, never used, still has the protective film on both sides set of 4 protectors for $12 which includes US shipping.

https://www.pinballlife.com/mm5/merchant.mvc?Screen=PROD&Product_Code=PBL-300-0141-00

If anyone is interested, please PM me. I will sell to the first person who PMs me and commits to paying the same day. I will ship the pieces either the same or next day depending upon when payment is received.
IMG_4554.JPGIMG_4554.JPG

#7190 3 years ago

I almost checked my PMs . . . made me chuckle.

#7196 3 years ago
Quoted from zh2oson:

Yup. Finally got one and when I opened the package...scratched like a mo-fo. *Shakes fist at 2020*

I don't see scratches from your photo, but I trust they are there. Surely there is a way to polish them out?

#7198 3 years ago
Quoted from zh2oson:

I'm open to suggestions.
The scratches are fairly deep, like someone dragged it against a brick wall.

Probably depends on what kind of tools you have. I would suggest you Google/YouTube "polishing resin"

#7200 3 years ago
Quoted from freddy:

I’d suggest returning it!

I just assumed that wasn’t an option, but if it is then I concur.

#7250 3 years ago

I purchased 3 new coil stops from PBL in preparation for my JP coming in late October. My question is if anyone thinks Stern will have fixed their coil stop issues in the upcoming production run or should I just replace them day 1 as a preventative measure?

I've been in the hobby for about 5 years, and have never had one fail (never owned a Stern). Is this something common with them, or did they just have a bad batch?

#7276 3 years ago
Quoted from Indusguys:

I put Titan rubbers on my game and I think it has made my game much harder to shoot. The slings seem especially active now and controlling the ball is a struggle. The ball used to come out of the right orbit and get kicked to my left flipper, now it is getting kicked to the left sling? Does anyone else think this game plays terrible with titan rubbers?

I can't speak to JP as I don't have my pin yet, but I've heard this same argument in other forums for pins I own. Personally, I love Titans on all my games, and one of the first mods I do. I will say that I always go with the thin flipper rings as the thick ones are too bouncy for me. I find the thin ones offer much better control (they have a completely different feel).

Not sure how long you've had them, but when you get a few games on them they do seem to settle down a little. For me one of the biggest benefits of Titans (or other silicon rings) is that they don't degrade and leave residue all over the playfield.

Also, sometimes for slings you need to go with a slightly larger or smaller size than what the rubber ones are. With different stretch comes different performance. Can be somewhat of a pain on newer games to figure out what sizes are best for how you want the game to play if nobody else has already done the work to compare them.

#7283 3 years ago

Wondering if anyone has installed BriteCaps EVO Pop Bumper Lights on their Stern JP pops (https://www.pinballlife.com/britecaps-evo-pop-bumper-lighting.html)? I really like these and have them on my other games. If so, which color did you go with (I'm thinking the orange look best with the OEM amber caps)?

For those not familiar, these include the following:
- Underside lighting (cool white)
- Top side outer ring lighting (the top outer ring and underside lighting have a singular brightness control)
- Top side inner ring lighting (these can be set to always on or, what I prefer, they can be set to flash based upon vibration - e.g. when the bumper is tripped)

bc_evo-2 (resized).jpgbc_evo-2 (resized).jpg

Added over 3 years ago:

FYI, BrightMods BriteCaps EVO Pop Bumper lighting will not work in these games.

#7290 3 years ago
Quoted from madmack:

Playfield protector ordered!
I hady to remove the backbox to enterthe pinball in the gameroom... [quoted image][quoted image]

I am considering doing this to take mine upstairs (just to lighten things some). Was wondering what all is involved to remove the backbox?

#7292 3 years ago

It's been out for a year, but I just came across this JP short:

#7297 3 years ago
Quoted from Jarbyjibbo:

A few hinge bolts and cat6 cables, it's the easiest to remove a head as it's ever been. What a pain it was back in the Williams/Bally days with all those darn connections to remove and remember what went where. If you want an idea, just take out your translite, fold your display down, and look at what travels from the head to the cab. That's all it is.

So is it best to disconnect everything in the backbox or in the cabinet (by your photo it looks like you did it in the backbox)?

#7377 3 years ago

How about a more realistic replacement for the bowing velociraptor on Prem/LE?

#7382 3 years ago
Quoted from pingod:

Check out this T rex head, by Lior
You will want this for your Jurassic Park, Stern Pinball
Detail is amazing.
Must have mod for sure.

I'm not going to reveal anything from my private conversation with Lior, but be on the lookout sometime today/tomorrow for a new thread where he will be highlighting what he is doing for JP.

#7465 3 years ago
Quoted from robey99:

Does anyone make under cabinet lighting for JP. I’ve asked a Rock Custom a couple times but no answer which means no. Thanks.

I don’t know, but when I get mine that is one of the things I want to DIY.

1 week later
#7590 3 years ago
Quoted from JodyG:

I just spent entirely too much time looking at the topic gallery and google for photos of the Stern art blades installed in a game. I came up dry- does anyone have a photo of the Stern art blades installed in their game? (not the LE, obviously)

https://pinside.com/pinball/forum/topic/jurassic-park-stern-2019-owners-club-welcome-to-jurassic-park/page/151#post-5917998

#7594 3 years ago
Quoted from JodyG:

Thank you both...I saw that post and didn't realize they were the same ones. They look a lot different in the machine than they do by themselves.

Yeah, I'm not really a fan of them installed (I've had the same opinion on some other pin blades). Just because the art looks great, doesn't mean it is well scaled or positioned when installed.

#7618 3 years ago
Quoted from Ponzie:

Hey all!
I ordered a NIB JP Premium at the start of September and was told machines would be on the line the 3rd week of October.
My distributor seems to be getting zero dates on shipping.
(Typical "supply chain and COVID delays" reasoning given...just not sure if that is legit or just a "line" being sent out)
Anyone here have an idea on when Stern may get some fresh premiums off the line and in the hands of customers?
I'd love to get it in and setup before the snow flies!

Same feedback here at this point. Regardless of true or not, it seems many in every industry are using covid as an excuse for delays.

#7623 3 years ago
Quoted from wcbrandes:

can any one point me in the direction of the alternative code or enhancement code that was done by a pinsider? I checked the key posts nothing cheers!

Search is your friend, my friend: https://pinside.com/pinball/forum/topic/stern-jurassic-park-2-custom-code-project/page/12#post-5834474

#7631 3 years ago
Quoted from FatPanda:

If you didn't know, a tittle is the dot on the lower case letter i and j or other markings over other letters
[quoted image]

It's also a very small part or quantity; a particle, jot, or whit.

#7753 3 years ago
Quoted from fooflighter:

I haven't replaced mine as it's not an issue but:
Although it may be easier just to remove it and do a slight grind/polish on a dremel
You are looking for a "Pancake Head" screw - size, not sure..you'd have to take out the current one and get a sizing, they may be in the specialized fastener department of a store like Lowe's or Home Depot

Actually, I find that Lowe's/HD rarely have specialty fasteners like this. However, I can usually find what I'm looking for at Ace Hardware in their fastener department, and you can buy just one.

#7788 3 years ago
Quoted from Happy81724:

The shooter rod on sterns website for 139. Does it actually light up? I see pics of some lit and some that are not lit

Yes, it lights. Also, they are sold out but don't show you that until you actually get to the payment screen.

#7825 3 years ago
Quoted from JMCFAN:

I wont get my Prem until Feb....but buying mods now. Where to get the pteradon? Raptors?

I would say just use the search feature in this thread, and you will see numerous posts about the types/brands of each that owners have purchased (also, correct spelling is "pteranodon").

#7828 3 years ago

Just got notice from my distributor that JP Premiums are hitting his dock today. Paid my balance, and the pin (along with topper and shaker) should be on it's way to me later today. I don't know how many he received (told me Stern was only partially fulfilling his order), but thankfully I was first on the list!

I'm giddy!

#7883 3 years ago
Quoted from Hop721:

I stand by my statement, but would like to clarify that I think it is unprofessional that the part numbers are where you can see them. You can’t put that part number on the bottom? I’m sitting in my car typing this right now, and looking at every piece in here. I assume they all have a part number. I assume that part number is somewhere on that piece. I can’t see any of them. My point is that it’s unsightly. Particularly being that it’s on the art pieces.

I don't think "unprofessional" is the right word. Every pinball manufacturer prints the part numbers on their plastics. By definition, the companies that produce them set the methodology and standards, thereby making it "professional". You may think it is tacky, but definitely not distracting. When you stare at a plastic and look for it is it visually pleasing - no. While you're playing a game have you ever been distracted by a part number on a plastic, decal, or playfield as you eyes are tracking the ball - I seriously doubt it.

Do I wish that artist wouldn't mark their art by printing their signature over the top of it - sure. Is it unprofessional - quite the contrary.

#7885 3 years ago
Quoted from Hop721:

Point taken. I’ll go with tacky as HELL then lol

I think the main issue is that pins are thought of as products by those that manufacture them, but for many of us home buyers they are decor and works of art.

#7898 3 years ago
Quoted from Metroshica:

Ignore me, I'm an idiot. Thank you all.

cluelessnessdemotivator.jpgcluelessnessdemotivator.jpg
#7903 3 years ago
Quoted from sepins:

Just received My JP Topper but haven't installed it.
Was this a stupid purchase? Was an impulse purchase.
Just read some of the posts and now thinking don't install it and sell it???
Anyone installed one and are You happy?

I’d check the LE/Prem thread. I saw one in person and it looks nice. The owner loved it, and as a result I have one on order with my pin which should arrive any day. Don’t worry about what others think. If you like it, keep it. You can always sell it down the line, but I doubt you will want to.

#7916 3 years ago

Phase 1 is complete - the game is in the house! First impressions are that this games is even more beautiful in person.

Next it's going upstairs and setup will begin tonight.

IMG_4634 (resized).JPGIMG_4634 (resized).JPGIMG_4635 (resized).JPGIMG_4635 (resized).JPGIMG_4636 (resized).JPGIMG_4636 (resized).JPGIMG_4640 (resized).JPGIMG_4640 (resized).JPG

#7918 3 years ago
Quoted from zeldarioid:

Hell yeah! Happy for you that it finally arrived! Welcome to the park

I'm excited for all sorts of reasons. Silly, but one of the big ones is that this is my first game that actually has a manual plunger and a spinner in it.

#7924 3 years ago

Just noticed this latest batch of Premiums shipped with green spring. I guess us newbies will see how it goes, and hopefully there won't be a run on orange ones.

#7927 3 years ago

Needed some plastic washers to protect the metal washers from scratching the finish on the legs before I installed them, so here is what I came up with. The plastic washer perfectly cups the standard metal washer, and only adds 2mm to the thickness and overall diameter of the original washer. I'm using Galaxy black filament (one of my favorites) which resembles the finish on the legs.

Printing the other 7 now, so I'll see how they work and look when installed soon.

FYI, I'm happy to share the STL on this one for free if you would like to print your own.

IMG_4644.JPGIMG_4644.JPGIMG_4645.JPGIMG_4645.JPGIMG_4646.JPGIMG_4646.JPG

IMG_4648 (resized).JPGIMG_4648 (resized).JPG
#7931 3 years ago
Quoted from CoolCatPinball:

Good idea, but readily available in lots of nice colors Definitely a must have on powder coated legs. I cringe every time I see powdered legs with bolts making direct contact.
[quoted image]

I know there are similar things out there (I’ve used them on other games of mine), but I needed something today, and I’m happy to share my STL file for others who like to DIY things.

#7952 3 years ago

I needed to do some decals for customers today, so thought I would also work on my own version of the ramp decal with Pteranodon tracks. Took several shape adjustments, but I think the final product came out quite nice. I printed on adhesive vinyl, overlaid with a clear gloss vinyl, then cutout shape using my craft cutter.

IMG_4647.JPGIMG_4647.JPG

#7953 3 years ago

For those of you who have replaced all of the rings/rubbers, at first glance it looks like a fairly daunting task. I've already bought my Titan's, so it's definitely going to happen. However, I was wondering from those with experience what challenges to look for, and maybe areas that are a bit tricky along with any disassembly tips.

#7976 3 years ago

So, I'm installing my rings and I ordered 8 7/16" OD based upon the manual (#6). However, the game is missing the one shown on the schematic that goes to the left of the raptor pit. Is this for Pro only? I have the Premium/LE manual (I own a Premium) so maybe an oversight on Stern's part?

pasted_image (resized).pngpasted_image (resized).png
#7988 3 years ago

Cliffy install complete.

IMG_4673 (resized).JPGIMG_4673 (resized).JPGIMG_4674 (resized).JPGIMG_4674 (resized).JPGIMG_4675 (resized).JPGIMG_4675 (resized).JPG
#7989 3 years ago

Plastic protectors and Titan install complete. If you like my ring selection, you can order it here (scroll down to Chris Z. entry): https://www.titanpinball.com/kits/index.php/browse/bygame/5738

All orange in the sling/flipper/return area, orange in the pops area, green for upper flipper and post, and yellow everywhere else.

IMG_4664 (resized).JPGIMG_4664 (resized).JPGIMG_4665 (resized).JPGIMG_4665 (resized).JPG
IMG_4667 (resized).JPGIMG_4667 (resized).JPGIMG_4668 (resized).JPGIMG_4668 (resized).JPGIMG_4669 (resized).JPGIMG_4669 (resized).JPGIMG_4670 (resized).JPGIMG_4670 (resized).JPGIMG_4671 (resized).JPGIMG_4671 (resized).JPG

#7990 3 years ago

Just played my inaugural game after installing Cliffy protectors and Titan rings. This is my first Stern, and there's just something about the look and feel of it that is different from the other brands, and I really like it. I already had the ball get stuck on the upper gate, so I'll need to make that adjustment. Hit the smart missile on my first opportunity ever, and that was fun. Also, it is going to take some time for me to het use to hitting the ball off the helix. I just kept starring at it go by my flipper before I remembered to try to hit it.

Now off to do Christmas lights, and maybe I'll get a few games in tonight before I resume with the mod installation.

#7994 3 years ago
Quoted from Manny65:

Yep common problem. You don't need to remove the one way gate, just raise the left hand side marginally up (the circled end of the bracket should be just above the top of the ball guide). There is no need to loosen where the bracket attaches on the right side, as there is enough flex in the bracket to lift it the 1-2mms you need.[quoted image]

Thanks, saves me from having to search back through the thread.

FYI, I ended up having to bend the top of mine inward in addition to adjusting the height. After a couple of tweaks and testing everything is perfect up there now.

#8002 3 years ago

Next mods are done: upgraded speakers throughout and speaker lights.

IMG_4680 (resized).JPGIMG_4680 (resized).JPGIMG_4684 (resized).JPGIMG_4684 (resized).JPG

IMG_4681 (resized).JPGIMG_4681 (resized).JPGIMG_4682 (resized).JPGIMG_4682 (resized).JPG
#8006 3 years ago

I know it's been addressed a few times already, but I wanted to bring it up again. The pins are still coming with the green plunger spring. I've only got a few games under my belt, but I'd say that I make the loop about 75% of the time. Shouldn't this be an every time if the shooter rod is pulled all the way back before release?

Anyway, I wanted to see what the overall change/success rate is for those of you who have changed to an orange plunger spring? Very frustrating if I have to buy an orange one when that is what is specified in the manual.

pasted_image (resized).pngpasted_image (resized).png
#8008 3 years ago
Quoted from Manny65:

100% on my game with the orange spring.
If you get 100% with your auto-plunger but only 75% on the manual plunger - check that the manual plunger is striking the ball in the centre, if so then I'd suggest replacing your spring with an orange one

Auto plunger is money every time. Alignment looks perfect to me, so I think that the orange spring is in my future. Would be nice to have it when my amber shooter rod arrives, so I'm only taking it apart once. BTW, never pulled apart a shooter rod, but I assume it is fairly simple?

#8011 3 years ago

Time to shake some booty!

IMG_4686 (resized).JPGIMG_4686 (resized).JPGgiphy.gifgiphy.gif

#8012 3 years ago

I thought he was saying "Get to the topper!" Oh well, at least I got it installed, and it looks great!

IMG_4688.JPGIMG_4688.JPGgiphy (1).gifgiphy (1).gif

#8015 3 years ago

Decided to create a magnetic decal that fits over the bill taker slot.

If anyone is interested in purchasing one, please PM me. I'll sell them for $12 including US Postage ($14 international). The one I decided to go with on my game (premium) features the dino from the premium backglass. I'm happy to use different graphics if anyone would like something different.

The images are printed on photo paper with a photo printer, a clear gloss vinyl is applied on top, decal is then adhered to a magnet sheet, cut to size, corners rounded, and all edges colored black to hide the white edge of the paper.

IMG_4690.JPGIMG_4690.JPGIMG_4691.JPGIMG_4691.JPG

#8016 3 years ago

I'll eventually get around to designing some coin reject inserts (I hate the 25 cent ones), and was wondering if anyone has done any already? I designed several for DE JP which is a different shape, but probably will go with similar designs (JP logo, dinosaurs, etc.) The

#8022 3 years ago
Quoted from Huggers:

I have a slight jeep mech issue. It's become slightly less fluid in its movement and when the jeep swings gently to the left side there can at times be no contact between the jeep ball and the Newton ball meaning hits don't register and the jeep can't be turned. If the ball goes in the pops or the Newton ball is hit a few times it goes into place and registers hits again. Any advice on how to fix? I don't even know how to take the mech apart...

Wondering if you are have an issue with your bearing ring between the two washers on topside of playfield? Also, if you’ve adjusted the set screw on the underside recently, maybe the collar is too close to the bushing. You could loosen the set screw and slide the collar down a mm or less and retighten screw.

I'm a JP newbie, but just went through this yesterday when installing new rings on the mech. At first I didn't realize it but the bearing washer fell down into the cabinet when I took it apart. Put it all back together and the rotation wouldn't actually make it all the way around. Found the washer, buts still had a little issue when I realized the collar was on too tight. Just a slight adjustment, and now it rotates quite freely.

#8034 3 years ago
Quoted from 2manyhobbies:

Love the lights. Wish they had a kit like this for the smaller standard speakers.

Thanks. They do all kinds of fancy stuff, but quite honestly I like them set to white along with the yellow surrounds I bought with them (matches the yellow stroke around the JP logo). The white cones of the Kenwood speakers are perfect for this use (probably why Stern chose them for their LE models).

#8039 3 years ago

PBL BrightButtons are installed. These are not really yellow (photo doesn't do the real color justice), but an amber color which is an exact match to the color of the pop caps.

https://www.pinballlife.com/britebuttons-illuminated-flipper-button-set-for-jjp-wizard-of-oz-and-hobbit-pinball-machines.html

IMG_4695 (resized).JPGIMG_4695 (resized).JPG

#8040 3 years ago

The clear dome lens by the control room was blinding. I've seen others replace it with green, but I went with yellow and like it much better. Still bright, but muted enough to keep you from seeing spots after looking at it.

IMG_4700 (resized).JPGIMG_4700 (resized).JPG

#8042 3 years ago

It's goat time!

IMG_4701 (resized).JPGIMG_4701 (resized).JPG
#8043 3 years ago

And you thought bird poop in the eye was bad.

IMG_4704 (resized).JPGIMG_4704 (resized).JPG
#8045 3 years ago
Quoted from Royale-W-Cheese:

HAHA.....Lockbar accent from tilt ??

Not yet, trying to decide if I like anything in that spot or not. Is it just a decal or does it have some kind of dimension to it? The more I think about it, it's not my favorite. However, I'm coming up blank for an alternative design that I could create. Any ideas from anyone?

#8047 3 years ago
Quoted from DugFreez:

I'm not sure why Stern went with the Kenwood 5.25" speakers in the LE games. Maybe it is because of their light colored speaker cones. Though....that just allows the light bleeding from the backboix to half assed shine through them and it makes the LE games look like something isn't working right on them as far as their non-existant speaker lighting goes. As it is....if I had and LE and didn't put a Speaker Light Kit in it....I would be looking for a way to block the backbox light from bleeding through the top part of the speaker cones.
...and as you have stated, there is no mandate that you have to have the light kits set to auto with the brightness turned up all the way. You can put them on white with the brightness turned down and at the very least....make them look as they should have from the factory instead of like something is not working right with them.
Doug (SpeakerLightKits.com)[quoted image]

Everything the lights do is really cool, I just found the animations a little distracting for my taste (I tried the same with my flipper buttons, but in the end I went with solid lit at all times on those too). However, I absolutely love the product. Installation was straightforward and well document, the kit is well built and comes with everything you need, and the finished look speaks for itself. After you mentioned brightness adjustments, I messed around with my setup a little more. I landed on white as I had before, but 4 clicks down from max brightness.

#8049 3 years ago
Quoted from J-Freeze:

They match the amber shooter rod pretty well too!

I was hoping so. I'll get to see in a few days when mine arrives.

#8051 3 years ago
Quoted from Royale-W-Cheese:

Here’s what I went with .[quoted image]

I considered that option, but the coloring just seems a little off to me. Ideally, this is where I was going to design my Barbasol can to be and use the light to illuminate the vials, but I don't know if there is enough room right there.

#8055 3 years ago
Quoted from 2manyhobbies:

Where did you get that MOD?

That's the Papo Pteranodon from Amazon, and I formed the support myself using .032" music wire. You could just wrap the wire around the legs of the model (what I did in my DE JP), but this time I drilled a small hole about 1.5" through the body of the model, and superglued it in. Personally, I like the thin wire because it is fairly simple to work with and allows the model to have some movement to it when the area vibrates (which I like). You could use a thicker wire like a coat hanger but it would be more visible and would limit the movement/shake of the model.

#8056 3 years ago
Quoted from 2manyhobbies:

One side have a missile blowing up in front of a dinosaur (maybe Trex) other side dart plugging into blue’s neck

That's seems like a lot of action for a small space, and not sure if I can pull it off or not. I did come up with an idea that is iconic to the original movie, but not sure how if might look. I'll try to work on it this week, and if I like how it turns out then I'll offer it for others to purchase.

#8058 3 years ago
Quoted from jawjaw:

Don't forget cost of any tax, shipping, and/or delivery for nib. Instead of routed, look for a huo. It will look brand new and you will be able to inspect before buying. Cost savings will be significant.

Good points, but for me I was able to purchase from an out of state reputable authorized distributor (no sales tax and free shipping). I was going to purchase pre-owned (what I've done for my previous 3 pins), but after looking for several weeks the NIB purchase actually ended up being less expensive than any advertised JP Premiums with in driving distance (my limit is about 6-8 hours one way so I can do it in a single day - but of course then there is the cost of fuel).

I would exhaust both means before deciding new or pre-owned, then weighing all of the factors make my decision. With this pin, there will most likely be a wait until Jan-Feb for NIB given the ongoing demand verses picking it up now for HUO which may be a factor in your decision making.

#8063 3 years ago

Guess what I'm doing after work tonight! Beautiful amber, great detailed insect, and orange plunger spring - pure awesomeness!

IMG_4709 (resized).JPGIMG_4709 (resized).JPGIMG_4710 (resized).JPGIMG_4710 (resized).JPG
#8068 3 years ago
Quoted from zeldarioid:

It seems to occur when set to Free Play, too! Is a bit obnoxious, but oh well

I just referenced the manual. Take a look at Standard Adjustments / SPI / #19 (Match Percentage). Try setting this to 0 (if an option) to see what happens.

For fun, you could set it to 100% (not sure if that is even an option).

#8069 3 years ago

Just added my Stern JP 3D printed flipper toppers to the market place: https://pinside.com/pinball/market/classifieds/ad/105741

These are a remake of the ones I did for DE JP a few years ago that were fairly popular. Please PM me if interested.

#8072 3 years ago

Amber is a thing of beauty, I tell ya.

IMG_4716.JPGIMG_4716.JPGamber.gifamber.gif
#8079 3 years ago
Quoted from Freakyguy666:

Is that supposed to be a mosquito or a dragon fly! Lol

Suspend your disbelief - insects were bigger back then.

#8080 3 years ago

By the way, the amber plunger came with the orange spring on it, and now my manual plunges make the loop 100% of the time thus far. This feels like how the original plunger should have been. Also, it was a little bit of a bear to install. The main issue is one screw that is really close to the cabinet but takes all kinds of torque to remove from the old and to screw down with the new. You need a longer large phillips head, but even then you may tear up your hand with some little metal bracket that is mounted just in the wrong spot on the inside of the cabinet. I ended up removing the bracket, then having to push on the screwdriver as hard as I could to get it to bite I was able to turn it about 1/8th of a revolution each time. My forearm is sore, but I was determined and really like the results.

45
#8082 3 years ago

I just finished my Jeep conversion, and thought I would share. I know there are others who have shown how to do it, but I thought I would walk everyone through my process which was quite simple and yielded perfect results.

With that stated, here we go...

First of all, you need the Jada 1/43 scale Jeep. You can typically find these on Ebay, but may have to come from China depending upon current auctions. Even thought the body is wider, the Jeep has pretty much an identical footprint of the OEM one. Also, you will want to hot glue the doors shut or use some other method to secure them. I opened the door, lined the jam with hot glue, then held it closed for several seconds while the glue firmed.
IMG_4742 (resized).JPGIMG_4742 (resized).JPGIMG_4743 (resized).JPGIMG_4743 (resized).JPG

To remove the Jeep FIRST REMOVE THE BALLS then lift the playfield and you'll use a 3/32" hex wrench to loosen the locks screw on the shaft (pay attention to the orientation of the metal tab as this is what triggers the optos). When removing this be sure to hold onto the Jeep on the topside or it may slide out and damage something. Also, there are 3 washers on the topside including a ball bearing washer. If you lose or break this, your jeep will not rotate properly.
IMG_4747 (resized).JPGIMG_4747 (resized).JPG

Carefully pull out the jeep assembly from the topside, again paying careful attention to catch the 3 washers. When removed set the washers aside, remove the 4 screws holding the jeep to the shaft plate, and also remove the nut & washer holding the newton ball on the shaft to get it out of the way.
IMG_4736 (resized).JPGIMG_4736 (resized).JPG

Now you will want to test position the jeep on the plate so that you know where it needs to sit. This is important for both balance and clearance from the helix when the Jeep is rotating. The proper alignment is where the washer from the center posts is touching the extended plastic around the rear axle of jeep.
IMG_4734 (resized).JPGIMG_4734 (resized).JPG

Turn the Jeep over and position the plate where the extension is towards the rear of the model. The plate will need to be centered horizontally with the two rear holes straddling the raised piece, and again the washer should be touching the base of the raised rear axle plastic.
IMG_4737 (resized).JPGIMG_4737 (resized).JPG

Holding the bracket in place you will want to drill a pilot hole for one of the back screws (do not drill all 4 holes at once. Do them one at a time to ensure proper alignment). I used a 1/16" bit for the pilot holes which worked perfect with the original screws. Once a rear hole is drilled, then insert a screw an tighten to where it is just snug. Don't over do this or you will strip the plastic.
IMG_4738 (resized).JPGIMG_4738 (resized).JPG

Next, drill the pilot hole for the screw that is catty-corner to the first one you did (e.g. if you started with the back right, next will be the front left). When doing the front screws don't over tighten them. You want the metal plate to be parallel to the bottom of the Jeep instead of slanting towards the front. Ideally you would use spacers on the front (I didn't have any, but will probably retrofit them later).
IMG_4739 (resized).JPGIMG_4739 (resized).JPG

Repeat the process with the remaining two screws.
IMG_4740 (resized).JPGIMG_4740 (resized).JPG

When finished, the underside of the assembly should look like this.
IMG_4741 (resized).JPGIMG_4741 (resized).JPG

Reattach the newton ball to the shaft, put the 3 washer assembly back on the shaft, then insert the shaft into the hole on the topside of the playfield. On the bottom side of the playfield slide the collar back on paying attention to the orientation, then tighten the set screw. You will want to leave about 1 mm of clearance between the collar and the bushing, otherwise the Jeep will not rotate freely. However, don't make this gap too large or the metal tab may scrape the lower optos causing less than ideal rotation or worse yet hit the side of the optos and not make the full rotation.
IMG_4748 (resized).JPGIMG_4748 (resized).JPG

Lower the playfield and rotate the Jeep both ways by hand and even by manually slamming the stationary ball with a pinball. You should have a nice smooth full rotation with good clearance at both front and rear.
IMG_4746 (resized).JPGIMG_4746 (resized).JPGIMG_4745 (resized).JPGIMG_4745 (resized).JPG

Finally, add all of the balls back into the game and play a few practice balls. When you are happy with your installation replace the glass and your ready to enjoy your new Jeep!
IMG_4751 (resized).JPGIMG_4751 (resized).JPG

I also wanted to mention that while I've not done it yet I may paint the metal bracket that sticks out from behind the jeep black in order to make it less noticeable.

Another thought is to put a dab of glue where the screws meet the underside plastic of the Jeep to help prevent them from working loose.

Added 94 days ago:

As a follow-up, it's been 3 years since I've installed my Jeep and it still continues to work perfectly. I did paint the back of the bracket black as you can see in the last photo I posted which looks better than the silver sticking out. Also, I never installed spacers for the two screws that could have used them and still nothing has come loose or shifted, so I don't think they are necessary if you choose not to use them.

#8086 3 years ago
Quoted from beelzeboob:

THIS NEEDS TO BE A KEY POST! Thank you, as I was just about to do this and the helicopter. Now, if somebody could do this for the helicopter installation, I'd be golden. I'll wait.

Well, the chopper is still on my “to do” list, so maybe that will be something I can document soon.

#8087 3 years ago
Quoted from Manny65:

I learnt a new word "cattycorner" - it's not a phrase used down under

It is important to do it that way because you don’t want your Jeep to be cattywampus.

#8090 3 years ago
Quoted from Manny65:

Yes that would be a cattyastrophe

Now you're just making up words.

#8091 3 years ago
Quoted from beelzeboob:

THIS NEEDS TO BE A KEY POST!

I don't know who the Pinside editor(s) is/are for this thread, but if they deem it to be worthy then I'm sure they will mark it as key.

#8093 3 years ago
Quoted from Gogdog:

Thanks for this. Though....about I added my jeep about 4 hours before your post following the original instructions, though yours were clearer and made note of the potential pitfalls of the installation. Mine would have gone much faster/better if I had simply waited a bit!
Now...you have a premium JP....so which helicopter mod are you looking to add on next?

Hey, you’re a leader, not a follower.

As far as the chopper goes, the matchbox one that several have done. There are some decent write ups, but I’ll see when I get into it what the challenges may be.

#8099 3 years ago
Quoted from Markharris2000:

Perhaps there is a way to mimic the use of LEDs found in the sole of some kids tennis shoes? They are ON for a split second during motion, and they are battery powered. Hummm... sounds like something that could be engineering into the JADA Jeep? I know it must just be a battery, an LED and a resistor, and some kind of motion sensor contacts, but small and lightweight. Also, the battery would need to be accessible for a year or two down the road when it needs to be changed. But that seems like a lot of work to just get tiny flashes when the newton ball is hit... but I don't see any great way to get power up there otherwise.

That was my thought, but I still have a few mods to install then I plan on actually playing and enjoying the game for sometime before I worry about engineering more mods for it (at lease ones that require research). Would definitely be cool, however!

#8100 3 years ago
Quoted from yzfguy:

Yeah, I don't think that little hump on top would allow that one to fit under the spinner on a premium, so I think the other jurassic world matchbox is the closest fit
[quoted image][quoted image]

This is the helicopter I purchased and plan on installing. I know there are a few writeups in the thread currently, but I haven't seen a step-by-step with photos. I'm a little less confident on how to do this one, but I'll read everything there is about it before I undertake it. I'll do my best to document my process and share what I can.

34
#8114 3 years ago

"Get to the Choppa!"

After my Jeep installation success and positive reviews here in the forum, I was feeling confident and proud of myself so I decided to take on the helicopter install. Unfortunately for me, I was somewhat humbled. On a difficulty scale of 1-10 I would be the Jeep around a 4, but the helicopter is a solid 8 – not impossible, but it takes a little skill, patience, and lots of test fitting. Also, this post is not intended to be the only way to do the helicopter mod. This is the way that I did it. It worked well for me, so I thought I would share as a guide for others who wish to incorporate the same mod.

So with that stated, here I go. To begin with this is the helicopter you will need for modifying the horizontal spinner on your Premium/LE. In addition, the following tools would be ideal for this installation: a drill press, a step bit, a belt or disk sander, misc. drill bits, a Dremel tool with grinding/sanding bits, a hammer, a punch, and a Philips screwdriver. Unfortunately, I don’t own a drill press, step bit, or belt/disk sander, so I made due with some alternative tools: an electric hand drill, various sized drill bits, an electric block sander, and a pneumatic right angle grinder. I’m sure you can make do with other tools, but these are what I used. Also, be sure to wear work gloves when drilling, sanding, etc.
00.JPG00.JPG

Here is what the OEM setup looks like on Premium/LE
01.JPG01.JPG
01b.JPG01b.JPG

To begin, remove the lockbar and glass then raise the playfield and rest it the black rubber feet on the lockbar receiver. Next carefully remove the screw holding the spinning blades while paying attention to the washer stack and catching it when you remove the screw. Be aware that when you remove the screw completely the metal rod will fall down through the playfield. This is okay as it will not actually fully separate and fall down into the cabinet. Once removed, set everything aside.
02.JPG02.JPG
02b.JPG02b.JPG

The next step is to separate the plastic bottom from the metal shell of the chopper by drilling out the two rivets that hold them together on the underside of the model. I used a 9/64” bit to do this, but anything close to that will work. When positioning the chopper to drill the rivets be mindful of not breaking the rear rotor. When drilling the front rivet I hung the back off the table, and will drilling the back I supported the tail.
03.JPG03.JPG
03b.JPG03b.JPG

Unfortunately, the rivets didn’t drill clean for me so I finished the job with a hammer and punch, and I was able to separate the two pieces. When separated you can easily remove the landing gear which you will dispose of. Also, you may want to file or trim the metal piece sticking down in the front that received the rivet. I had to trim mine slightly, otherwise it was sticking below the bottom plastic piece after I sanded it down in the steps to come.
04.JPG04.JPG
04b.JPG04b.JPG

Next is to begin drilling the hole in the top of the chopper for the shaft to fit through. Ultimately this hole needs to be 11.5mm (29/64”) in diameter, but you can’t get there all at once. Start by turning the part upside down and marking the spot where you want to drill (this exact center of the current post that the blades are attached to. Of course you will have to estimate, but it is pretty simple to get it right. Then punch the mark to prepare for drilling the pilot hole.
05.JPG05.JPG

For the initial pilot hole I used a 3/16” drill bit which was the perfect size for drilling through and popping off the blade post. You’ll see that my hole wasn’t exactly centered nor a perfect circle, but that’s fine as there is opportunity to fix that as I enlarged the hole.
06.JPG06.JPG

I next used my angle grinder with a tapered stone bit to enlarge and true the hole in the top of the chopper.
07.JPG07.JPG

I then progressively used incremental sized drill bits to enlarge the hole working my way up to 11.5mm (29/64”), and then used my grinder to smooth the rough edges of the drilled hole.
08.JPG08.JPG
08b.JPG08b.JPG

Next, I attached the bottom and marked down through the hole where I needed to drill out the base. Again, I started with a pilot hole but then went straight to the 29/64” bit. Be sure to do this on a block and not just holding it in midair as you want to drill the hole cleanly and centered.
09.JPG09.JPG
09b.JPG09b.JPG

Now it’s time for the first of many test fits. Slide the joined chopper down over the post and see what your clearance looks like. You need the top of the cylinder to be just exactly or a hair above the roof line of the chopper. Obviously, at this point it won’t be.
10.JPG10.JPG
10b.JPG10b.JPG

Next comes sanding with some fairly course sandpaper to take off some of the plastic from the base. I can’t imagine doing this by hand, but I’m sure it is possible with enough effort. When sanding don’t overdo it.
11.JPG11.JPG

Sand a little, test fit, sand some more. Also, have the chopper together so that you have something to hold on to, and while sanding keep it flat at the point of the hole (the nose will arc up some). You can see in the photos how much I ended up having to sand off the base. When test fitting, you’ll want the top of the chopper to be just slightly above the top of the shaft
12.JPG12.JPG
12b.JPG12b.JPG

The next step is to cut out holes/slots for the 3 screws on the helipad so that the chopper sits down around them. Place the chopper over the shaft and use a Sharpie to mark on the base where you need to cutout plastic for the 3 screws. I used my angle grinder here, but a Dremel too would also be a good tool for the job. Note the 3 spots where I had to cut away plastic for the base to fit over the screws. When I did this it took several test fits as I only wanted to cutaway as little material as necessary. You’ll notice that a large piece of my bottom is missing, and this occurred with sanding as it became very thin. No worries, I just removed it and since the chopper sits down flush I’ll never see it.
13.JPG13.JPG
13b.JPG13b.JPG
13c.JPG13c.JPG

Upon test fitting after the screws were accounted for, I was still 1-2 mm too tall. Instead of sanding away more plastic and risk destroying that piece, my solution was to lower the top of the chopper. I covered it with a cloth then used a wood block and hammer to beat it down slightly.
14.JPG14.JPG

Again, I was very careful and test fitted between whacks 2 or 3 times until the shaft was just flush with the top of the chopper.
15.JPG15.JPG

I then reinstalled the spinner. To do this you’ll need to have all of your parts nearby. Use one hand to reach under the pin and push the metal rod up, and use the other hand to put the washer stack and the blades back onto the rod and then start the screw and washer into the threads so that the rod doesn’t fall back down. Tighten the screw as best as you can. You can’t really grip the rod under the playfield very well, but I did my best with a pair of long needle nose pliers.

Now’s the time to test the spinner by hand to see how well you’ve done, and if you need to make any adjustments. In my case I soon realize that the blades were hitting the tail rotor on occasion. My solution here was to position the tail rotor where the blades did not hit it and apply a dab of hot melt glue to secure it in place.
16.JPG16.JPG
16b.JPG16b.JPG

Finally, the job was complete. I chose not to use any adhesive to secure the chopper as it is really not necessary and it would raise it a little. Now that I know everything fits and works perfectly, I may install a red LED inside the chopper and tie it to the adjacent dome light. Also, I’ll probably use a few spots of superglue on the inside to secure the base to the top of the chopper. Oh, and don't forget to put the two screws that were holding the helicopter plastic back on the posts (I put my helicopter plastic in the coin box so I'll be able to find it if/when that day ever comes).
17.JPG17.JPG
17_chopper.gif17_chopper.gif

Well, there you have it. Good luck with the mod, and feel free to offer any insights you gained while installing this mod that I didn’t address.

#8121 3 years ago

"Get to the Choppa! Part Deux"

Well, I couldn't help myself as the helicopter is just screaming to be lit up inside. My lighting of choice is Comet Matrix and I have tons of extra parts around from mods that I build and sell, so I used some things I had on hand to light the chopper. However, you can order everything you need from Comet or do your own way if you are accustomed to other lighting.

To do this mod the tools you need are a soldering iron (along with knowing how to use it), a nut driver or socket, a Phillips screwdriver, and a drill with a 1/8" bit. As far as the Comet lighting goes, I recommend a frosted LED strip since they diffuse light better than the clear ones. You would need to buy a 4" 10SMD strip, but you are going to cut it down to just 1 SMD. Also, this would come with the male connector that you would desolder from one of the included adapters to use in the wiring of the chopper. You'd probably also want to get a 6" Matrix extension to ensure you had enough wiring.

Begin the installation by lifting the playfield and resting it fully extended on the lockbar receiver. Next remove the screw holding the blades above the chopper, and remember to catch not only the screw and washer above the blades, but the 3 washer assembly below it. Let the rod fall as it will fall out at this point (it will in the next step).

Next, if using a Matrix strip, cut it down to just one SMD and one chip (you must have a pair of the black chip and SMD for a light to work), stick it to the nose of the chopper base as forward as you can leaving enough room for the tab from the top part of the chopper to still sit all the way down (I actually cust a little slit between the two leads on the LED strip for the tab to fit between). Then drill a hole out the towards the back on the hidden side of the base when installed. FYI, you can slide the white Matrix connector off the wires, run the wires through the hole, and then slide the white connector back on (just pay attention to orientation)
IMG_4794 (resized).JPGIMG_4794 (resized).JPG
IMG_4795 (resized).JPGIMG_4795 (resized).JPG

Next you need to remove the right wireframe which is very simple (only two fasteners). Pay attention and note how it slides into the C ramp at the top because you'll need to put it back the same way.
IMG_4798 (resized).JPGIMG_4798 (resized).JPG

Remove the screw and washer securing the wireframe just above the helipad.
IMG_4796 (resized).JPGIMG_4796 (resized).JPG

Remove the locknut and top washer securing the wireframe to the right sling.
IMG_4797 (resized).JPGIMG_4797 (resized).JPG

Now carefully lift the ramp off its mount, rotate it inward, and gently set it on the playfield. Do not tug or pull up on it as it contains a switch that is still wired under the playfield.
IMG_4799 (resized).JPGIMG_4799 (resized).JPG

Next remove the fasteners holding the large green plastic in place. There are 3: from there perspective of standing at the side of the pin . . .

The locknut at left.
IMG_4800 (resized).JPGIMG_4800 (resized).JPG

The standoff at center to the left of the helipad.
IMG_4801 (resized).JPGIMG_4801 (resized).JPG

The standoff at right.
IMG_4802 (resized).JPGIMG_4802 (resized).JPG

Now, lift the plastic up and rotate it inward. Please note that the chopper rod will fall into the cabinet at this point unless you reach under the playfield to catch it when lifting the plastic.

Next you will want to disconnect the LED board by unscrewing from top and holding the nut tight with plyers or some other tool. Not how everything is arranged as the dome is also attached by these fasteners.
IMG_4805 (resized).JPGIMG_4805 (resized).JPG

Detach the LED board and set the other pieces aside. Turn it over and note the 2 leads and which is + & -.
IMG_4806 (resized).JPGIMG_4806 (resized).JPG

Now, having desoldered the male connector and wire from one of the pieces that came with your Comet strip, solder it to the pads on the light board (red is + and black is -)
IMG_4807 (resized).JPGIMG_4807 (resized).JPG

Plug your chopper in and test that it lights when the lightboard is on. If not, your polarity is backwards and you'll need to revers black and red wires (even if you have them wired "correctly". Turn pin off and now it's time to reassemble. At this point you might want to put a couple of dots of superglue at key points (front, center, rear) of the chopper two secure the two parts together. Screw the light board and dome back onto the plastic as they were originally, and then put the large green plastic in place while running the chopper wire through the same opening as the switch wire.
IMG_4808 (resized).JPGIMG_4808 (resized).JPG

Secure the plastic by reattaching the 3 fasteners: the two posts and the locknut. Then reinstall the wireframe by first putting the top end into the mount, then screwing down the bracket above the helipad, then position the end at the sling directly centered above the lane and put the washer and lock nut back on.
IMG_4810 (resized).JPGIMG_4810 (resized).JPG

Reinstall your chopper as before, lower playfield, power-up and you should be read to play with a lit chopper cockpit.
IMG_4813 (resized).JPGIMG_4813 (resized).JPG
chopper.gifchopper.gif

#8126 3 years ago
Quoted from RetroGamerJP:

You sir, are killing it with the write ups. Many thanks for the effort, looks fantastic!

Thanks. I think that a lot of people hesitate to do stuff to their pins because of the unknown, even though they would really like to. I like to mod and tinker, and since I'm going to do it anyway then I might as well help out others at the same time on some of these more unintuitive mods.

#8127 3 years ago

Just got a ball stuck and had to remove it by hand. It wasn't wedged but resting on the rings of the newton ball shaft.

IMG_4818.JPGIMG_4818.JPG

#8128 3 years ago

I wanted to respond openly since I've already had a couple of people ask me if I would do the chopper modifications for them. First of all, I'm flattered that people would entrust me to making this mod for their pins. However, I've been thinking about it and I've decided that I don't want to offer a JP chopper service. Even thought I know people would pay, there are a few factors that led me to my decision. First, the helicopters are getting harder and harder to track down, and the price can escalate. I don't want to have to spend time researching and ordering, only to have to raise prices based upon what I can track them down for. Next, is just the time involved. I wasn't tracking how long it took me to make mine, but it was a couple of hours, and several trips between the garage and my upstairs game room. Finally, the wear and tear on my own pin. For each build I would have to disassemble my chopper assembly, and risk losing/breaking parts, scratching plastics, etc. I'm also a little concerned that the tolerances may not be exactly the same, so what fits perfectly on my pin may not fit as well or even correctly on someone else's.

I tried to be as detailed as possible in my "how to", but I'm always happy to answer questions in the open forum or PM related to it. Also, as more and more perform this mod there will be greater insight, tips and tricks, etc. on how to accomplish it.

Again, I appreciate people reaching out to me for this mod, but it is just not one that I want to undertake.

#8131 3 years ago
Quoted from yzfguy:

Not only is that a wise decision, it's nice that you took the time to do the write up not expecting to profit.

I've never been mistaken for not being a capitalist, but I do still like to contribute to the pinball community when I can whenever I may be able to help at times.

#8132 3 years ago
Quoted from jawjaw:

That happens with the stock jeep. It happened to me several times when I first got my pin but not since.

Yeah, I didn't see how it could be related to whatever model was mounted on top of the metal bracket. Was kind of funny when it happened because I didn't see exactly where it went and had to search for the ball.

#8136 3 years ago

FYI, I just placed my new Jurassic Park lockbar mod in the Pinside market: https://pinside.com/pinball/market/classifieds/ad/105886

The banner was one of my favorite things on the DE JP, so I wanted to carry it over to this pin somehow.

IMG_4819 (resized).JPGIMG_4819 (resized).JPGIMG_4820 (resized).JPGIMG_4820 (resized).JPG
#8141 3 years ago
Quoted from Eskaybee:

He does seem to be offset slightly to the left. Is that the same for you guys?[quoted image]

This is how mine is positioned.

#8149 3 years ago

It was “Plant a Tree” day at the park, and things look a little greener now. Here is my original post explaining my planting methodology:

https://pinside.com/pinball/forum/topic/jurassic-park-stern-2019-owners-club-welcome-to-jurassic-park/page/140#post-5863800

C1A8CB55-FE16-4626-9638-843033774A84.jpegC1A8CB55-FE16-4626-9638-843033774A84.jpeg55E56DBC-F53C-4B00-A89C-69319FAEC339.jpeg55E56DBC-F53C-4B00-A89C-69319FAEC339.jpeg638DAA12-68A4-4882-AC88-322F2BEFF267.jpeg638DAA12-68A4-4882-AC88-322F2BEFF267.jpegC7AF1298-27DD-47E8-A4FA-E635C43210AE.jpegC7AF1298-27DD-47E8-A4FA-E635C43210AE.jpegDB814E5C-A973-49DB-AF79-7999CB67FCDA.jpegDB814E5C-A973-49DB-AF79-7999CB67FCDA.jpegECAB1CC1-43D0-4F19-AF2D-8D1C88523022.jpegECAB1CC1-43D0-4F19-AF2D-8D1C88523022.jpegF92A23D3-5440-41FD-AC7B-D3BAEA4931D0.jpegF92A23D3-5440-41FD-AC7B-D3BAEA4931D0.jpeg

#8150 3 years ago

Nanny goat got turned around. I like it better in the same orientation as the one in the movie.

295BA810-FEDD-4671-99DA-9E30DE545F9F (resized).jpeg295BA810-FEDD-4671-99DA-9E30DE545F9F (resized).jpeg
#8151 3 years ago
Quoted from bent98:

I just picked up a JP and wanted to ask about the people who are replacing the raptor figure with a aftermarket one. I noticed the stock raptor has a hammer style piece screwed to the underbelly and the figure itself pivots up and down. How are the making the aftermarket figure emulate that behavior?
[quoted image]

To my knowledge, they are installing the aftermarket raptors on the pro model which does not have the articulating feature like premium/LE.

#8155 3 years ago

Just finished installing my Tilt side blades, and I think they came out great. Couple of pointers for those of you who still have this on your "to do" list.

1 - I've done this to my other pins to help protect the sides, so I decided to put adhesive felt strips along the sides of the playfield. You can buy these sheets at Hobby Lobby (or probably Amazon) for $1-$2. Just cut them into 1/2" strips and apply to the sides.

2 - Have someone help. I'm bacheloring it for a few days, so I did it on my own. I finally got it done, but it was kind of a bear and a couple of times I was really close to messing up the decal. The help is where someone else can hold the playfield in different vertical positions while you apply the graphics.

3 - I wish I would have noticed before I started applying the decals, but you'll need to remove the flipper button washer holder and the little metal bracket on each side (not sure what this is) as they are both in the way. After you apply the blades just reinstall them.

Many more little details, but this isn't intended to be a "how to" this time. Bottom line is that just about anyone can do this. The breathable vinyl allows you to easily work out bubbles and as long as your sides are clean you can peel and unpeel several times when starting until you get it exactly aligned with the bottom edge of the glass slot. Also, start at the back where the blade just touches or comes close to touching the rail at the back of the cabinet.

IMG_4836 (resized).JPGIMG_4836 (resized).JPGIMG_4837 (resized).JPGIMG_4837 (resized).JPGIMG_4838 (resized).JPGIMG_4838 (resized).JPGIMG_4839 (resized).JPGIMG_4839 (resized).JPGIMG_4840 (resized).JPGIMG_4840 (resized).JPGIMG_4842 (resized).JPGIMG_4842 (resized).JPG
#8157 3 years ago
Quoted from Gogdog:

Just curious....lots of different companies make model train trees....though I like the look of yours. Which ones did you buy/what link?

I bought these, but see they are not available right now.

https://www.amazon.com/gp/product/B07CKMVVX8/ref=ppx_yo_dt_b_search_asin_title

#8161 3 years ago

I just finished my Pin Stadium Omega installation, and wow what a difference. I'm not a color GI fan, so I went with the Omegas which only have white GI (selectable from 0 to 100% brightness) and UV flashers. These also have diffusers so the light is soft, and you don't see light dots all over your metals. I landed on setting the brightness to 50% and I tied the flashers into the shaker so every time it goes off the UVs flash with it. I know Pin Stadium lighting isn't for everyone, but I must say these really brighten up the playfield and make the artwork pop.

Pin Stadiums OFF (really much darker, but the camera overexposed it)
IMG_4847 (resized).JPGIMG_4847 (resized).JPG

Pin Stadiums 50% (this is the truest representation of the three photos)
IMG_4848 (resized).JPGIMG_4848 (resized).JPG

Pin Stadiums 100% (really much brighter, but the camera underexposed it)
IMG_4849 (resized).JPGIMG_4849 (resized).JPG

I'm thinking I may still need a trough light to brighten things up in the flipper area, but that's a project for another day.

#8164 3 years ago
Quoted from Arcade:

Had to clean the rod the other day on our Jeep because it was starting to get sluggish.
Raised the playfield and loosened the set screw on the metal tab that breaks the opto beam.
However unlike everyone else mine would not just pull off. Could not get it off with pliers or even a flat heat screwdriver wedged between it and the plastic bushing. The only way to get it out was to use a philips screwdriver and a hammer and knock the rod out. And even then it took a lot of force to move.
I am guessing whoever used the locktite on the set screw at the factory really got carried away with the amount.

Wow, mine slides off like it’s coated in butter.

#8170 3 years ago

Now that I have the amber shooting rod, those glow yellow coin rejects were really bugging me - I know, it's a curse. Anyway, I opened the coin door and observed they are using standard 6V 2SMD clear lens bulbs that are cool white. I swapped them out with a couple of 2 SMD Comet clear lens warm whites I had on hand, and I really like the results. They are now much more "amber" looking and match my shooter rod and illuminated flipper buttons much better. Next is getting rid of those ugly 25 cent reject inserts.

OEM cool white bulbs
IMG_4851 (resized).JPGIMG_4851 (resized).JPG

Right side with warm white and left with cool white
IMG_4852 (resized).JPGIMG_4852 (resized).JPG

Both with warm white bulbs
IMG_4853 (resized).JPGIMG_4853 (resized).JPG

#8171 3 years ago

I really liked the results of my new Pin Stadium Omega lights, but the trough was still a little dark for my liking. I had some Comet cool white LED strips, wires, and clips on hand so I thought I'd give it a go. I clipped onto the left sling GI bulb, ran my wires, and attached the light strip to the top of the metal piece inside the trough. 5 minute install and I really like the results. In my next Comet order I'm going to get a sunlight white strip which better matches the existing lighting and swap out my cool white one.

Parts List
1 x Comet Matrix 10 SMD 4" Sunlight White Frosted LED Strip (comes with alligator clips)
1 x Comet Matrix 12" Extension
1 x Comet Matrix 6" Extension
Total cost before shipping: Under $5

Where I clipped
IMG_4854 (resized).JPGIMG_4854 (resized).JPG

View from behind
IMG_4855 (resized).JPGIMG_4855 (resized).JPG

View from front
IMG_4857 (resized).JPGIMG_4857 (resized).JPG

The before
IMG_4860 (resized).JPGIMG_4860 (resized).JPG

The after
IMG_4856 (resized).JPGIMG_4856 (resized).JPG

#8175 3 years ago
Quoted from PeterG:

I like the idea but it is a bit 'flat' for me. I think giving it more dynamic look would be better. Like the banner in the movie. It can curl around the button.
[quoted image]

This is more of what I was thinking, but I like your idea. When I get some time, I'll see what I can do.

pasted_image (resized).pngpasted_image (resized).png
#8176 3 years ago

Thought I would design and 3D print some side rail pieces that match the colors and caution tape pattern of my 3D printed flipper toppers. I had to do the right side in 3 pieces for the long rail, but I still really like how they came out.

IMG_4861.JPGIMG_4861.JPGIMG_4862.JPGIMG_4862.JPGIMG_4863.JPGIMG_4863.JPG

#8181 3 years ago
Quoted from MrMikeman:

I know a lot of folks like the caution tape look but I really dislike it.

Did you ever see my DE JP?

4b618b1d2282c804a86b24d8399887fbd0f259fb (resized).jpg4b618b1d2282c804a86b24d8399887fbd0f259fb (resized).jpg
#8185 3 years ago
Quoted from yzfguy:

Wait... Did you just call him a JO?

Well, I was actually getting my car inspected and trying to type on my phone which can be challenging with my fat fingers. Right when I was typing they called my name so I posted w/o proofing. I did just go back and fix it, however.

#8186 3 years ago
Quoted from MrMikeman:

I guess you really like the caution tape look then!!!
That's the joy of collecting these things. Make it the way YOU like it!!

When I bought the pin it already had yellow legs. Felt like I needed to do something to bring it all together.

Also, many will be glad to know that this is all the caution theme I plan on integrating into this one. The cabinet art on the DE lent itself better to a dominant yellow/black color scheme IMO. BTW, I really like the black finish on this pin (Premium), and I don't ever see myself changing it.

Except for the caution pattern on the side rails (one could always repaint it), everything I did to that pin was reversible . When I sold it, I gave the buyer all of the original parts, backglass & lightboard, etc. in case he ever wanted to revert back to the way it was.

#8187 3 years ago
Quoted from MrMikeman:

I guess you really like the caution tape look then!!!
That's the joy of collecting these things. Make it the way YOU like it!!

Maybe it's not so much the theme I like (which I do), but I really like yellow as you can see by what I drive when I'm not out tooling around in my '04 Titan pickup. It's a fun car, but a T-Rex could take it out in one bite.

IMG_6475 (resized).JPGIMG_6475 (resized).JPG

#8189 3 years ago
Quoted from Markharris2000:

This is what I imagine an afternoon could bring to you...
[quoted image]

Maybe if you angled the stripes a bit? Ha!

It is kind of funny. I bought the car new in 2017, but have done a ton of custom things to it outside, inside, and under the hood. One day my wife came out in the garage and asked what I was doing? I told her whatever I was working on at the time, and here retort was, "It's not a pinball machine, you know."

#8196 3 years ago
Quoted from embryon:

Those stern amber shooter rods. What's the warning stern has on these about cancer etc. Some Californian legal thing. Is it an over reaction or not

Just don’t lick it and you’ll be alright.

Seriously, I must have blown right by whatever label/sticker you saw. What did it say exactly?

#8200 3 years ago
Quoted from embryon:

My bad looks like this warning is just in the checkout phase. I changed the rod to one for Elvira and it had the same crap. Here it is anyway.
[quoted image]

So there's lead used in the plunger assembly somewhere. Maybe a trace element in the metal plate? I doubt in the steel rod, spring, clips, rubber tip, acrylic amber, or other parts.

#8201 3 years ago
Quoted from ScottyC:

Need to just replace them entirely with some orange coin rejects [quoted image]

I need to check my stash as I may have a couple of those. I swapped the original on my AFMr so they would be green when illuminated, and I think the old ones were orange.

#8205 3 years ago

On my agenda this morning was designing and installing some custom coin reject inserts. I've done this before on all my other games and there's a little more to it than you would think, so I thought I would document the process for everyone. This is a fairly simple install, but a couple of things you need to be aware of to save yourself some time and frustration. You'll see that I swapped the OEM yellow buttons with a set of orange which I happened to have on hand (you can order them if you like). Whether you are doing a full button swap or just the inserts, the process is exactly the same.

Tools required:
- small tip Phillips head screwdriver
- 3/16" nut driver
- needle nose pliers

To begin with, I've attached a PDF of the inserts for anyone to print. If you prefer to order them, please PM me and I'll mail you a pair for $2. I print mine on thick gloss photo paper using a photo printer so the blacks are solid and dark, and the whites are bright and non-splotchy like with regular paper. To download the PDF, click on it then click the blue download button at the bottom right of the window. When printing make sure you are printing full size and not scaling, enlarging or fitting to paper.
IMG_4888.JPGIMG_4888.JPG
Stern Coin Reject 4.pdfStern Coin Reject 4.pdf

To begin the installation, power off the pin and open the coin door. You'll first want to remove the two coin mechs by loosening the 2 thumb screws on each, sliding the guides up/down, then removing them. Pay attention to the orientation of the mechs as you'll need to put them back exactly how you removed them. Also, go ahead and pop the LED mounts off the coin door as they will be in the way otherwise.
IMG_4899.JPGIMG_4899.JPG

The next step is to remove the two insert assemblies. I chose to do mine one at a time, but you could do both simultaneously if you like. First, you will need to remove the 4 hex screws that secure each coin reject button assembly. There are 2 the left and 2 the right of the upper coin mech bracket. For some unknown reason, the 2 the left are Phillips head but the 2 the right are not. To remove the upper right screw, I really had to bear down on it since it had recessed into the plastic bracket some. To remove the lower left screw, you will need to hold the red tension piece back with your other hand so that you can get to it with the screwdriver. Note that when you remove the last screw, be sure to put your hand on the outside of the coin door to catch all of the parts, otherwise they will fall to the floor and potentially crack/break.
IMG_4890.JPGIMG_4890.JPG

Once apart you will need to remove the actual button that depresses by removing the c-clamp off the post at back with needle nose pliers. When doing this be sure to pay attention to the springs orientation and the orientation of the button (the tabs at the top are shorter). The inserts go in via the top, but to remove them you can use another insert or piece of paper to push up from the bottom corners which have open slots in them. When done, replace the button with spring, and put the c-clamp back on.
IMG_4898.JPGIMG_4898.JPG

Next put the button assembly back together ready for installation. Again, note the orientation of both the button and the slot plastic (it goes with the taps facing towards the outside and only fits one way when the button is installed. Hold the assembly in it's place, and put the 4 screws back in to secure it.
IMG_4897.JPGIMG_4897.JPG

When you are done with both buttons reinstall the coin mechs and tighten the thumbscrews, reattach the LED mounts, close the coin door, and you're done.

Here are some photos that show the differences with varying insert and bulb colors.

Original yellow button on right, orange button on left, and original cool white LEDs
IMG_4893.JPGIMG_4893.JPG
IMG_4895.JPGIMG_4895.JPG

Original yellow button on right, orange button on left, and warm white LEDs
IMG_4891.JPGIMG_4891.JPG

Both orange buttons with original cool white LEDs (the warm white made thins too orange/less amber IMO)
IMG_4900.JPGIMG_4900.JPG
IMG_4903.JPGIMG_4903.JPG

#8207 3 years ago
Quoted from finnflash:

I thought you were going to finally say you played the game!

I posted that in the other thread. Last night was the first time since the game arrived over a week ago that I actually put the glass on and secured the lockbar. I really like the look, feel, and shots. Now I need to start learning rules and how to play. I’m also going to install Tim’s custom firmware today sometime.

#8209 3 years ago
Quoted from bent98:

I dont play my games until after i mod them. I took my machine out of the box, turned it on to make sure it works, hit the ball once and turn it off. I ripped the whole thing apart to get powder coated. ramps, arpon, speaker grill, etc. now installing mods, rubbers, wax, etc..

I'm definately down with that. I'm just not happy playing with a pile of mods laying around that I know I need to get to. I've finally installed everything I purchased as well as a few simple ideas I had. Put the glass on and secured the lockbar last night, and have enjoyed several games since then. I went ahead and installed Tim's remix, and it is great - really puts the game over the top IMO (those non-movie voices saying actual lines from the movie was driving me crazy).

#8212 3 years ago
Quoted from Green-Machine:

I play the crap out of my nib pins before I put anymore jack into them. Make sure they are a keeper. Then after playing for awhile I kinda know what artistic touches I want to make.

That probably makes a difference. I have a very small collection (3 pins), and I don't know that I could ever have more due to space constraints. The pins I buy will stay with me for several years at a minimum.

#8213 3 years ago

Saw a couple of posts where people adhered those little clear rubber feet above the 3 raptor pit lights, and I kind of liked it. I searched around, but discovered I was out of them. So, I did a quick design and 3D printed one. Then I remembered I had a small sample of translucent orange filament and thought that might look good. Well, I think the orange looks fantastic and I have just enough filament to make a few of them.

Original w/o lens (on right)
IMG_4908 (resized).JPGIMG_4908 (resized).JPG

My 3D printed clear version (bottom left)
IMG_4907 (resized).JPGIMG_4907 (resized).JPG

My 3D printed translucent orange version (top left)
IMG_4906 (resized).JPGIMG_4906 (resized).JPG

All 3 orange in action
ezgif.com-gif-maker.gifezgif.com-gif-maker.gif

PS: I also just realized that the LEDs for the signs with shots to make have the same exact circles on them. I may add clear pads to those to make them illuminate a little better and to be more noticeable.

#8215 3 years ago

Is there a way to set the game so that when the coin door opens the power to the game doesn't shut down? I know this is a "safety measure", but it is a pain. If you want to test a light or a solenoid you have to hold the white switch in with one and and work the service buttons with the other. I tried looking through the settings, but being my first Stern I can't seem to navigate to where I need to be (assuming such a setting exist).

#8221 3 years ago
Quoted from Manny65:

You just pull the coin door switch button out until it clicks - this will re-enable power and it returns it to normal when you next close the coin door

Thanks, I'll give that a try.

#8222 3 years ago

FYI, I just updated the design of my 3D printed apron accent. Someone suggested that I try doing a wavy version like when it is falling in the movie, but after spending some time on it I just wasn't successful. However, I did modify/improve my current version. It is now wider and a little larger which gives it a better height to width ratio making it look more the shape of a banner. For those of you who have ordered, I haven't shipped any yet so you will be receiving the updated version.

https://pinside.com/pinball/market/classifieds/ad/105886
IMG_4913 (resized).JPGIMG_4913 (resized).JPGIMG_4914 (resized).JPGIMG_4914 (resized).JPG

#8224 3 years ago
Quoted from Ponzie:

Dude, you are on FIRE!
Machine looks great!!
How much are you selling the action button accent for?
I must have missed it!
Can't wait to get my premium and I'll be borrowing some of your mod ideas for sure!!

Thanks.

The apron accent in the store here: https://pinside.com/pinball/market/classifieds/ad/105886

However, shipping to Canada is usually more expensive. We could take the risk and I could send it in an envelope with some reinforcement (I think it is light enough). This way I could pay letter rates instead of packages. If a letter I would absorb the extra postage, but if package I would need to charge an additional $8.

#8226 3 years ago
Quoted from Parkshow30:

I really like those! I think they would look great on the signs too. They aren’t very noticeable, whenever I show someone new how to play and I try to point out the raptor lights or the extra ball light or trex modes etc they never can see them. How much would you sell a set for the raptor pit and the signs for?

I would do $1 each plus a $1 for postage. They are 3D printed with solid core using ultra clear PLA (which prints slightly opaque), and I apply an adhesive backing. I tried several infills, but 100% delivered the best results. Where I got my idea was from similar rubber disks you can buy from Amazon. I usually have some around the house but couldn't find them. You could probably order 50 or so for around $7-$8 if you wanted to go that route.

#8233 3 years ago
Quoted from mbrave77:

So my shooter rod kit came in. But it came with the regular shooter rod instructions that says “do not remove the inside plate thats already mounted.”
I guess for this one i need to remove that mount and use the new provided one so the wire can get through? Anyone have pics and video as it says i could mess up the alignment?

Throw away the instructions, they are not for this game.

Remove the screws that secure the rod then remove the screws that secure the plate. Replace the plate with the one you received paying attention to orientation then install the new rod. Run the cable over to the other side of the pin and plug into CN15 on board (only place it will fit correctly).

#8234 3 years ago
Quoted from BC_Gambit:

I am in Canada and would pay extra for shipping / hassle.
Are you thinking of doing a full set for all of the signs? How have you (or hoe are you) planning on adhering them?
I think this is a really cool, "budget" way to better highlight these signs. I like the fancier ones that "the art of pinball" fellow made, but did not want to go all in on those.

Was this intended for me? If so, the lenses come with an adhesive backing already installed. However, instead of ordering these from me I suggest you give the clear rubber feet version a try for the signs: https://www.amazon.com/gp/product/B0891X97MM/ref=ppx_yo_dt_b_asin_title_o00_s00

Unfortunately, I don't have enough translucent orange filament to offer the ones I did for the raptor pit.

#8237 3 years ago
Quoted from Mr_Tantrum:

I also just realized that the LEDs for the signs with shots to make have the same exact circles on them. I may add clear pads to those to make them illuminate a little better and to be more noticeable.

I made some clear ones for the signs, and they definitely help visually to see them when lit. However, I also ordered some of these yesterday and tested them. I actually like them better than the 3D printed ones I made. A couple of you ordered some lenses from me, so when I send them to you I'm also going to include the same number of rubber ones so that you can decide and apply whichever you like best.

https://www.amazon.com/gp/product/B0891X97MM/ref=ppx_yo_dt_b_asin_title_o00_s00
IMG_4924 (resized).JPGIMG_4924 (resized).JPGIMG_4926 (resized).JPGIMG_4926 (resized).JPGIMG_4927 (resized).JPGIMG_4927 (resized).JPGIMG_4928 (resized).JPGIMG_4928 (resized).JPG

Also, I may have enough orange to print 1 or 2 sets of 3 lenses for the raptor pit ($4 including US postage). If a couple of people are interested I'll see how many I can print and them offer them to however many I can based upon response order.

#8238 3 years ago
Quoted from Manny65:

You just pull the coin door switch button out until it clicks - this will re-enable power and it returns it to normal when you next close the coin door

It works, you're a genius (or I'm a moron, it's all relative)!

#8240 3 years ago

I had just enough filament to make 2 sets of these orange lenses for the raptor pit, and 1 is already spoken for. The first person to reply to this post that they want them, gets them for $4.

1.gif1.gifIMG_4929.JPGIMG_4929.JPG
#8241 3 years ago
Quoted from Gogdog:

I love mods from common household items! I just happened to have some already at the house and can confirm that they work great. Really highlights them since it makes them 3d, and the round edges become raised and lit.

Somebody else had the idea earlier, so credit them. It is a simple mod, doesn't look out of place, and actually improves the lights.

#8245 3 years ago
Quoted from Metroshica:

I'll happily take them off your hands. DM me your Paypal info.

They are yours. Thanks.

#8246 3 years ago
Quoted from EaglePin:

Could you point me to where you ordered this yellow dome from? I searched online but for some reason I'm not finding the right part.

https://www.pinballlife.com/plastic-mini-light-domes-with-screw-tabs.html

You have to cut/grind one of the tabs off.

#8249 3 years ago
Quoted from BC_Gambit:

Looks like they are taken, but if you end up making more please let me know!
Regardless, thank you for the link to the clear bumpers!

Unfortunately, this was from a short length of promo filament, so I won’t be making more. I could buy a whole spool for $20, but unless I could break even with at least 6+ buyers it isn’t worth it to me as I have no use for this color other than these lenses.

#8265 3 years ago

I've had a couple of more people ask me about making the 3D printed orange lenses to add to the top of the raptor pit lights. I did this with a special semi-translucent orange filament that I had a very limited sample of, so I cannot make any more at this time.

However, I've since had a couple of people ask for them, so here is my proposal: If at least 5 people will commit at $5 each in order to cover my cost, then I would be happy to order a spool of the semi-translucent orange filament and begin offering these to anyone who wishes to purchase. If at least 5 people are interested in this initial offering, moving forward I'm going to be selling them for $7 per set of 3 instead of $5.

The lenses will be printed using PETG, have 100% infill for best light diffusion, and will come with adhesive on the bottom ready to stick to the raptor pit plastic. The price also includes US postage (for international add $2).

Please post in this thread or PM me, and if/when I reach 5 commitments I will let everyone know.

1.gif1.gif
#8269 3 years ago

That makes 5 - a lot quicker than I expected, thanks everyone. I'll be sending PMs to each of you for payment info. Also, I'll keep the $5 offer open until the end of today if anyone else wants to get in on it.

#8275 3 years ago
Quoted from yzfguy:

I have the raptor pit mod, which has the 3d molded light domes built in, but I'd be into a set of the ones for the stock signs.

For the stock signs, I recommend these (what I am using): https://www.amazon.com/gp/product/B0891X97MM/ref=ppx_yo_dt_b_asin_title_o03_s00

#8279 3 years ago
Quoted from billsfanmd:

Do you have the amber shooter rod? If so who sells them?

Classic Game Rooms had some very recently. I would try them.

#8280 3 years ago
Quoted from rapidflipper:

3D Printer aficionados! Just learned that my area library has an excellent 3D printer where they charge .10 cents per gram produced. Thinking about trying a few DIY mods. Does anyone have any files for mods that they care to share? Particularly interested in custom signs, dinos, or logos that will fit a Pro machine.

Start by looking on Thingiverse. Also, did you mean 10 cents per gram (.10 is 10 grams for a cent). Anyway, plan on spending a lot of time in the library depending on what you are printing. If you get the bug, it won’t be long until you buy your own.

#8292 3 years ago
Quoted from RobbyIRL5:

Does the Stern topper work on a Premium? Does it come with a control board or is the Premium already compatible, says it adds a game mode? Pretty lame looking for $600.

Yes, it woks on Premium, and no additional board required.

#8296 3 years ago

For those of you who ordered the orange raptor pit lenses, look what just showed up at my door.

I need to get this filament dialed in since I haven't used it before, then production will start (might be after Thanksgiving sometime).

IMG_4964 (resized).JPGIMG_4964 (resized).JPG
#8300 3 years ago

As some of you may know, I created a couple of Barbasol can mods for the DE Jurassic Park. Around the same time, a couple of versions were being developed for the new Stern JP. One was interactive with exposed vials by flashinstinct and another was a flasher cover by Mezel (I developed and sold both styles for DE JP). Unfortunately, I know that @flashistinct had a limited run and is no longer producing his version. As a new owner of the Stern Jurassic Park, I wanted to work this element into the game somehow. As a courtesy to flashinstinct , before I started down this path I first communicated with him to see if he was okay with me designing a mod that was similar to his, and he gave me the thumbs up.

While I've been thinking about the mod for a couple of weeks now, I finally started modelling today. I wanted to do something smaller in scale so that it wasn't visually overpowering, yet still representative of the Barbasol can in the movie, and proportional to the real can. My idea ended up being to replace the Control Room dome flasher with the Barbasol can while maintaining the OEM flasher to illuminate its exposed vials.

I just finished 3D printing prototype alpha (i.e. my very first trial print of my first design), so I wanted to share it with everyone. This version is not the final, but just a proof of concept.

Based upon this trial, here are the updates I'm going to make to the model:
- Increase size so that diameter is the same as the hole in the plastic
- Add some additional height at the based so that the threads are visible and not completely hidden under the plastic
- This will make the overall model 1cm taller than what is pictured
- Add tab to base so that it will be mounted to the same screw as the current dome is
- Print the vials in a semi-translucent chartreuse color (filament is on order) so that they actually have the appearance of illuminating and will be close to the color of the liquid in the movie
- Can abnormalities will be fixed
- Barbasol label will be applied
- I may (or may not) experiment with doing something with the inside of the base to make it less illuminated - man that flasher is bright

I'll be making myself one of these mods regardless, but before moving forward too much I wanted to gauge interest from the JP ownership group. I know some of you already have the flashinstinct original and some have purchased the Mezel version too, so this mod wouldn't be for you. However, with the recent new wave of JP owners I thought their might be a market for a Barbasol can with exposed vials. My estimated selling price will be around $45 including US shipping (international shipping will be on a per quote basis). My target date to have the mod finalized and ready to show/sell is within the next couple of weeks. I'm not taking pre-orders or requiring any payments at this time, but please let me know if you might be interested. When the time comes, I will offer these "on demand", so there will be no limits set on the quantities I will be selling.

IMG_4968.JPGIMG_4968.JPGIMG_4970.JPGIMG_4970.JPGcan.gifcan.gif

#8305 3 years ago
Quoted from Parkshow30:

Mystery deepens with my truck problems. It won’t sense a hit at all but if there is a ball search it registers a hit. Tried it a few times to make sure it wasn’t a fluke and sure enough 2 more ball searches give me 2 more T. rex letters but no amount of hitting the truck will give me a letter.

How about a photo of under the playfield showing the optos and collar on the Jeep shaft that trips them?

What happens in switch test mode if you manually rotate Jeep from one extreme to the other by hand?

#8307 3 years ago
Quoted from Parkshow30:

Switch test performed perfect. Played a game right after and it won’t register a hit. Went into switch test mode again and Jeep won’t register.
[quoted image][quoted image][quoted image]

In that middle pic, is the tab going between both pairs of optos at the same time (I don't think that's right)?

Is there any play in the collar on the shaft?

Loosen the set screw, and make 100% sure that the set screw is positioned against the flat portion of the shaft and not on a rounded part.

#8310 3 years ago
Quoted from Parkshow30:

Yes it looks like when I spin the truck one way it covers more than one opto and when I spin it the other way it doesn’t cover one all the way. There is very little play not much. I will loosen the set screw and try to align it better and see if that helps, thanks.

I’m betting the set screw is not on the flat part of the shaft.

#8312 3 years ago

So, if you start a game and turn the Jeep by hand does it advance T-Rex?

#8314 3 years ago
Quoted from Parkshow30:

It does not. Will not turn the map either.
Also was trying to align it again and the washers fell off and I didn’t see what order they fell off in. Does it go Regular washer, bearing washer then regular washer again then the paddle thing with the set screws?

The bearings sit between two washers.

#8316 3 years ago

My next idea would be to test the optos on there own in switch test to see if they perform consistently. You could remove the collar and block optos with a card or something. The should respond every time you break the beam. If not, maybe there is a hardware issue. I don’t think it would matter, but you could try reloading firmware. Reaching the end of my troubleshooting. You may need to report issue and diagnostics to Stern.

#8319 3 years ago

I would disconnect and reconnect the cable at the opto board for kicks. Maybe clean the Optos too.

#8322 3 years ago
Quoted from Parkshow30:

Pulled the cable and plugged it back in no change. How would you clean the optos? Spray with compressed air? Wipe with a cloth?
Found an old post about cleaning optos. They said use a q tip dipped in a little windex. No change

Sorry, but looks like it needs to be in Stern's hands now (or at least someone who knows more about it than I do).

#8324 3 years ago

To all of those who ordered the orange raptor pit lenses (13 of you), I have them printed and ready to mail. Those things stuck like crazy to the heat bed, but I was able to print as many as I needed and they look really good installed (I tested them on my own pin). I have Thanksgiving plans starting today, but will get everything mailed early next week.

Installation is pretty simple: clean the spot where you will stick them, peel the backing off, carefully position the lens and stick to the plastic, apply pressure from above and below to secure adhesion.

If you missed out, I'm still making them to order for $7 for a set of 3 (includes US posted - add $2 for international)

IMG_4972 (resized).JPGIMG_4972 (resized).JPG

#8325 3 years ago

Does anyone here actually possess a can of Barbasol shaving cream? I'm looking for the exact dimensions so that the can on my mod will be proportional to the real thing. If so, here is what I need (mm are best, but I can deal with fractional inches):

- Diameter of can at center (not the bottom ring)
- Overall height from bottom to top of cap
- Height of bottom cylinder only including the rings at top & bottom of cylinder
- Height of vertical taper (the white part) - i.e. ruler is vertical and not slanted on the taper (from top of can to bottom of nozzle)
- Diameter of taper at top
- Diameter of blue nozzle/cap at bottom
- Diameter of blue nozzle/cap at top
- Height of blue nozzle/cap

As long as things are close, everything will look right. I think my cylinder is a little too tall right now. Anyway, if someone can provide the measurements that would be great. Otherwise, I'll just have to pickup a can at the store sometime soon.

#8329 3 years ago
Quoted from freegame450:

Here are your numbers Mr.T
Does anyone here actually possess a can of Barbasol shaving cream? I'm looking for the exact dimensions so that the can on my mod will be proportional to the real thing. If so, here is what I need (mm are best, but I can deal with fractional inches):
- Diameter of can at center (not the bottom ring) 2.27”
- Overall height from bottom to top of cap 6.45”
- Height of bottom cylinder only including the rings at top & bottom of cylinder 4.78”
- Height of vertical taper (the white part) - i.e. ruler is vertical and not slanted on the taper (from top of can to bottom of nozzle) .53”
- Diameter of taper at top 1.47”
- Diameter of blue nozzle/cap at bottom 1.37”
- Diameter of blue nozzle/cap at top 1.13”
- Height of blue nozzle/cap .61”[quoted image]

Thank you!

#8343 3 years ago
Quoted from freegame450:

Here are your numbers Mr.T
Does anyone here actually possess a can of Barbasol shaving cream? I'm looking for the exact dimensions so that the can on my mod will be proportional to the real thing. If so, here is what I need (mm are best, but I can deal with fractional inches):
- Diameter of can at center (not the bottom ring) 2.27”
- Overall height from bottom to top of cap 6.45”
- Height of bottom cylinder only including the rings at top & bottom of cylinder 4.78”
- Height of vertical taper (the white part) - i.e. ruler is vertical and not slanted on the taper (from top of can to bottom of nozzle) .53”
- Diameter of taper at top 1.47”
- Diameter of blue nozzle/cap at bottom 1.37”
- Diameter of blue nozzle/cap at top 1.13”
- Height of blue nozzle/cap .61”[quoted image]

Just got home and am looking at this. I don't know if it is your angle or what, but your can looks like it's diameter to height ratio is significantly smaller than the traditional can, making your can look more slender and taller. When I run the calculations, your can's diameter is 35.2% of the height. When use a profile pic of a can I captured online, the can's diameter is 41.6% of the height (i.e. fatter and shorter).
can (resized).pngcan (resized).png

Just found this too which differs from the can you have. Look at the white tapered part below the cap and see how different it is from your can. I really appreciate you taking the effort, but it looks like I'll need to run by the store and see if I can find a can that is more the "traditional" size.

pasted_image (resized).pngpasted_image (resized).png

This is killing me. Just went to store, but they only have the new can size. Then when looking at the pic I posted with the can height I realized they messed up (6.13" does not equal 12.56cm - it is 15.56cm)

#8348 3 years ago

To everyone who ordered the orange raptor pit lenses, I thought it would be easier to post here instead of sending 20 individual PMs. All the lenses are ready to go, stuffed into envelopes, and the envelopes have been addressed. I'll will be mailing them all out tomorrow in plain white envelopes, so be on the lookout over the next few days (international orders will take longer, of course).

Installation is simple:
- Wipe the area where the lenses will go with alcohol or some other non-residue cleaner that is safe to use on plastic.
- Test position a lens, peel backing and carefully put into place
- When you are happy with position, press on lens tightly while giving support below plastic as best you can to secure in place
- Do the other two the same, and you're all done

#8350 3 years ago
Quoted from Eskaybee:

Here’s a better one. [quoted image]

I really like these, and they would make for good gameroom art. You need to post them in the pinball photography thread: https://pinside.com/pinball/forum/topic/pinball-photography-post-your-best-photos-here

#8364 3 years ago

Barbasol mod is coming along . . .

IMG_4989 (resized).JPGIMG_4989 (resized).JPG
#8374 3 years ago

Glad to see the ingenuity and that people now have a couple of options. I think this alternative way would definitely be easier and quicker to do, but in the end it probably comes down to where you want your modifications to show and what tools you have to do the job.

Also, you could still potentially follow my guide for illuminating the chopper mounted this way, but I think you would need to drill out the rivets in order to separate the parts to properly mount the LED and run the wires. Again, might be an alternative way to do this too (e.g. drilling a hole in the nose from the bottom and running the wires externally), but I'll leave that up to someone else to figure out.

#8387 3 years ago

Just installed my "new yellow" Titan rings (replaced the old yellow that had a green tint to them) on my Jeep (I did the others yesterday). While I was at it I painted the back of the plate black and cut up a couple of the original black post sleeves and used them for spacers for the front two screws that mount the plate to the underside of the Jeep.

IMG_5023.JPGIMG_5023.JPG
#8388 3 years ago

I just finalized my Barbasol flasher cover, and it's ready for purchase: https://pinside.com/pinball/market/classifieds/ad/106545

I will be making these "on demand" as ordered, so there will be no extended wait and no limit on the quantity I produce. The mod replaces the existing clear dome flasher cover just below the control room, and utilizes the same mount and lighting. I designed it to fit with or without Pinstadium lighting since I have them.

I'll be working on step-by-step instructions for those who purchase the mod, but I would literally rate this about a 2-3 on a 10 point scale of complexity - anybody can easily add it to their JP pin.

IMG_5011 (resized).JPGIMG_5011 (resized).JPGIMG_5027 (resized).JPGIMG_5027 (resized).JPG

barbasol.gifbarbasol.gif

#8401 3 years ago

Lior's new T-Rex looks beautiful, and extremely well done. I know the time and effort that is put into creating such a mod (not to mention this is his day job), so I understand the pricing. I'm now teetering on ordering one or not.

Update: I'm teetering no longer - I just put down my deposit.

#8402 3 years ago

Update 12/3 - 2:10 pm Central | All choppers are spoken for. If/when the time comes and someone passes, I'll let everyone know how many are available.

I was perusing the internet last night (I know, it can be dangerous), and came across a lot of the matchbox dino transport choppers. Since they are getting nearly impossible to find, I ended up buying 6 of them at a good price. Of course I don't need them, but thought I would snatch them for the group. I'd be happy to resell them for $18 each (including US shipping).

Even though I paid, I'm still a little skeptical if they will actually make it to me as the site where I bought them is rather obscure. Anyway, please PM me if you are interested in one and I'll put you on the list. The first 6 to respond will have one reserved for them. If/when they do arrive, I will then contact each person on the list for first right of refusal and payment.

FYI, the choppers (and the truck) are new and unopened in original packaging. BTW, I will only sell to those that meet the suggested age requirement on the packaging (see bottom left corner).

pasted_image (resized).pngpasted_image (resized).png

#8405 3 years ago
Quoted from RC_like_the_cola:

When I was considering this mod, I was seeing this set for $10 shipped. Have they become hard to find or something? Haven't searched in a few months.

Yes, they have become difficult to find, especially for a fair price now (I think all of us JP owners have been buying them up).

#8413 3 years ago

Got my amber start button installed along with replacing the black plug with an amber flush mount tournament button from bent98

https://pinside.com/pinball/market/shops/1074-bent-mods/03066-spike-flush-mount-custom-tournament-button-

IMG_5043 (resized).JPGIMG_5043 (resized).JPG

#8414 3 years ago

I also went with a yellow frame for the badge.

IMG_5044 (resized).JPGIMG_5044 (resized).JPG
#8415 3 years ago

Question: Once you start a game, how can you reset without cycling power? I often have this need when testing various things. On my Williams, DE, and CGC pins, just by entering service mode and exiting you kill the current game and the pin is back to an attract mode state.

#8424 3 years ago
Quoted from EaglePin:

Restart back into attract mode by pressing in the left flipper and hitting start. This kicks the ball out of the shooter lane to restart the game.

This is what I was looking for, and works as you describe (I had to hold start in for a couple of seconds) - thanks!

#8428 3 years ago
Quoted from JMCFAN:

I need to quit using that function......I tend to use when I have 2 crap 1st balls......lol

Sometimes I'm working on the pin, so I start a game to see my changes, go and make another change, etc. When done I didn't actually want to play a game and I don't want to start a new one right then, but I want to leave the pin on. Was just looking for a quicker way to get the pin back into attract mode instead of cycling power.

#8430 3 years ago
Quoted from JMCFAN:

The start button trick does notput it back in attract mode....restarts the game....

While holding in left flipper then holding in start button cancels game and puts pin back into attract mode.

#8433 3 years ago
Quoted from MikeS:

You may have to enable it in the menu options.

I just tried it w/o making any adjustments and it worked for me.

#8435 3 years ago

It's not the voltage that kills ya, it's the amps!

pasted_image (resized).pngpasted_image (resized).png
#8457 3 years ago
Quoted from RetroGamerJP:

I just finished up doing the die cast Jeep mod but also decided to mount it opposite of the factory placement. I never liked looking at the back of the truck all the time. Easy install and works perfect.
[quoted image][quoted image]

I thought about doing this too, but the driving away from instead of towards orientation threw my mind off a little. I do think it looks good, but we need to figure a way to illuminate the headlights and taillights.

#8460 3 years ago
Quoted from jorro:

Maybe print a ring with a dragging contact that drags possitive and negative "wires" over another ring ? Or use the shaft for negative?

I'm actually exploring another option, but it may take some time. I'll keep everyone posted if I make any progress. In the meantime, if you want to pursue your idea that would be great too.

#8468 3 years ago

Will a nut fit on the backside, or do you have a longer screw where you could use a nut?

#8480 3 years ago

Just scored my first 100,000,000 million game . . . wait a minute, everyone else posting has an extra "0" in their number.

Nevermind.

Seriously, I'm just starting to learn the rules a little on this game and trying to accomplish various goals. I've never owned a pin with so much to it, and I can already tell it's going to take me some time to fully understand it. I'm really loving everything about this game!

#8487 3 years ago
Quoted from RetroGamerJP:

Can someone explain to me what you are supposed to do during start missile attack?

This?

Smart Missile: When the left inlane is lit for “Smart Missile”, the inlane up-post will hold the ball and call for a shot to the pops standup target. Once the Smart Missile is activated, you will have 3 seconds to choose what you want the Smart Missile to award using the action button to cycle through the awards; the award chosen when the timer goes to 0 will be given for a successful shot to the target, in addition to 10 million (+5m) for each successful Smart Missile launch. The pops target only remains lit for the Smart Missile award on a very short timer, but it is possible to initially miss it and still get a quick successful second shot. There’s even a tiny grace period to collect the award after the “Smart Missile missed!” callout.

#8488 3 years ago
Quoted from Limdul:

Hello, new JP owner and overall pinball newbie here. I'm about 300 games in and my one of my supply drop decals fell off onto the playfield. I tried to remove it by hand, but it's fairly stuck. Any suggestions to remove it without ruining the playfield?
[quoted image]

It will peel by hand, but if you do mess it up there should be an extra in the bag stapled inside the cabinet by the speaker. Also, before re-applying clean the target surface with alcohol.

#8497 3 years ago
Quoted from RetroGamerJP:

Thanks, and what contributes to a successful smart middle hit? Seems every time I’ve done that the missile never hits anything

Hitting this target (you only have a few seconds to do it).

1 (resized).jpg1 (resized).jpg

#8518 3 years ago
Quoted from Markharris2000:

Please read top posts. It's even got it's own thread. Search for "Jurassic Park 2 Custom Code"
https://pinside.com/pinball/forum/topic/stern-jurassic-park-2-custom-code-project

Sarcasm by beelzeboob , I do think.

Anyway, while we're on the topic, can somebody please tell me how to get the music and video clips from the movie on my pin?

#8526 3 years ago
Quoted from Dr_Gonzo:

I'd hit a billion pre covid at the pinball bar...

tenor.giftenor.gif
#8528 3 years ago

The more I play this pin, the more I love it!

#8535 3 years ago

I've been tinkering with my own version of a raptor pit mod, and the first prototype came out pretty good. I have a few tweaks to make, but thought I would share my progress thus far. I wanted mine to be more of the coloration and style of the movie version which is a light gray smooth concrete and gray steel columns.

Capture (resized).JPGCapture (resized).JPG

IMG_5085 (resized).JPGIMG_5085 (resized).JPG

#8545 3 years ago

Accidentally posted my raptor pit update in the other thread (I confuse the two sometimes). Anyway, I thought I was finished but I ended up snapping off one of the posts when installing the wire. Did some additional testing, and figured out adding a small base to the posts makes them significantly stronger. Working on reprints today, then I should be done.

Still contemplating if I will sell the mod to others. I know it duplicated Mezel Mod's idea, but I really wanted something more the coloration and style of the one in the movie for my pin.

IMG_5095 (resized).JPGIMG_5095 (resized).JPG

#8546 3 years ago

Here's my "mod of the day" . . .

Orange illuminated sling star posts - because you can never have too much orange. Unfortunately, the camera is having a hard time capturing the orange light well.
IMG_5106.JPGIMG_5106.JPGIMG_5108.JPGIMG_5108.JPG

For those interested, here is how you do it:

Parts List:
2 x Orange star posts (from your vendor of choice - Titan, Pinball Life, Marcos, etc.)
2 x Comet sunlight white Matrix star post LEDs
2 x Comet 6" Matrix extensions
2 x Comet Matrix alligator clips
Optionally, you can add Comet Matrix brightness adjusters if you want to tone the brightness down a little.
IMG_5102 (resized).JPGIMG_5102 (resized).JPG

Turn off the pin (you can leave the balls in).

Remove the right sling plastic assembly by removing the screw securing the right wireframe (next to the helicopter pad), the nut securing the wireframe to the sling, and the small nut at the base of the sling plastic. Repeat same process for left sling by removing the left wireframe screw by the raptor pit, the nut securing the wireframe to the sling, and the nut at the base of the sling plastic. Now you should have both sling areas fully exposed. Go ahead and remove the rings at this point.
IMG_5104 (resized).JPGIMG_5104 (resized).JPG

Remove the long screws securing each of the clear star posts. Attach the 6" extensions to the post LEDs and feed the wire down through the adjacent hole on left and right sides. On one side, insert post screw through orange post and LED, position on playfield you you like it, then tighten the post screw. Repeat for other side, and reinstall the rings.
IMG_5103 (resized).JPGIMG_5103 (resized).JPG

Lift and extend playfield resting it where the rubber feet are on the lockbar rail. From the underside of the playfield, find each of the wires you fed from the top, attach a set of alligator clips to the wires. Pull down the shrink wrap on the lower sling LED socket leads then affix the alligator clips (not sure if polarity matters, but I put red on red wire and black on other). Do this for both sides.
IMG_5105 (resized).JPGIMG_5105 (resized).JPG

Before putting everything back together, close coin door if open, and turn the pin on to see if everything works. If not, check your wiring and make sure your alligator clips are making contact to the metal leads on the lamp sockets (make sure they are touching nothing else).

When tested, turn off pin, put playfield back in place, install glass, turn on pin and enjoy!

#8547 3 years ago

Just finished my final version of the raptor pit mod. Came out great, IMO.

2B47DC93-C9F7-421C-8707-470F5F0A39FB (resized).jpeg2B47DC93-C9F7-421C-8707-470F5F0A39FB (resized).jpeg53B5860D-6E85-45EF-875D-B673F12740DD (resized).jpeg53B5860D-6E85-45EF-875D-B673F12740DD (resized).jpegA1389F68-D0F8-407A-A368-513EBA56AB6C (resized).jpegA1389F68-D0F8-407A-A368-513EBA56AB6C (resized).jpeg
#8553 3 years ago
Quoted from embryon:

Looks great and will consider if you decide to sell. I'm wondering how it or even the mezel one goes for the chances of ball hang ups. Is the chance of an air ball extremely remote for this to be an issue?

Well, I’ve never seen anyone here posting any issues with the Mezel version. There’s also already a post on the right side of the plastic for what I can only assume is to prevent air balls, not to mention the raptor at back and the wireframe at front.

#8556 3 years ago

Since I've already had a few people express interest, I've decided to offer my raptor pit mod to others. It is made of quality 3D printed filaments, and includes the following:
- The two side rails with posts
- The 3 orange inserts
- 2 lengths of wire
- The sign that is secured by the wire

Price for the mod is $45 which includes US shipping (international orders on a per quote basis). If interested, please PM me and I'll also provide you a link to all of my available JP mods. Installation is straight forward, and I will provide a link with instructions when purchased.

1 (resized).jpeg1 (resized).jpeg
2 (resized).jpeg2 (resized).jpeg

Again, my desire was to have something that more closely resembled the coloring and styling of the version in the movie. You should consider the Mezel Mods version first, but for those of you prefer mine then I'm happy to sell the mod to you.
3 (resized).jpg3 (resized).jpg

#8574 3 years ago
Quoted from billsfanmd:

where is the bubble at 6.5? I don't have an inclinometer

Do you have a cell phone? There are free apps.

#8582 3 years ago
Quoted from Markharris2000:

To remove the screw: remove the single tower plastic right above it (one screw), then use a 8-inch PH1 type screwdriver and you'll see the screw can be accessed from directly above easily.

Is that the screwdriver you bought just for this screw? Have you found another use for the tool yet?

#8584 3 years ago
Quoted from JMCFAN:

Recommendation?

Just use PinGuy (free app) on your mobile phone.

It's great because you can be under the pin leveling and setting slope while a voice calls out what adjustments need to be made and when you are all set.

#8586 3 years ago
Quoted from JMCFAN:

Looks like its a Apple app..... Android here...??

Oh, sorry. Wasn't aware it's not available on Android.

However, you can always buy a digital level at apple.com (they list them under the phone section)

#8588 3 years ago
Quoted from Markharris2000:

YES, I bought this screwdriver just for use on this screw, and NO I haven't had to use it anywhere else... LOL

Well, you could have just asked me and I would have loaned mine to you. You just would have needed to drive to Texas to pick it up then back again to return it.

IMG_5126 (resized).JPGIMG_5126 (resized).JPG
#8598 3 years ago

Early on I upgraded my 4" Premium speakers to the same 5.25" Kenwood KFC-1366S speakers that Stern includes with the LE, along with a lighted speaker mod kit. I really liked the look of them and they sound great, but recently another JP owner showed me a pair of Kicker speakers with black cones and a yellow/gold center. I really liked the look of the Kicker pair, so I deciding do buy a set and install those. Personally, I like the black with the center yellow accent a little better than the light silver of the Kenwoods, so I'm keeping the Kicker speakers installed.
IMG_5136 (resized).JPGIMG_5136 (resized).JPG
IMG_5137 (resized).JPGIMG_5137 (resized).JPG

Here is what the Kenwood speakers look like with the same speaker light mod.
IMG_5134 (resized).JPGIMG_5134 (resized).JPG

#8600 3 years ago

Oh man, I just hit my first ever Super Skill Shot. It's really fun and rewarding hitting the 3 ramps in a row off ball launch!

Now I have to go after a double and triple super skill shot (like I'll ever achieve that).

#8603 3 years ago

Wait, I was a little confused. According to the JP Rulesheet on Tilt Forums, here is what they say regarding the shots after plunge:

- Skill Shot = Left/T-Rex Ramp
- Super Skill Shot = Right/Pteranodon Ramp
- Double Super Skill Shot = Side/Raptor Tower Ramp
- Triple Super Skill Shot = Right Orbit

That means I achieved the Double Super Skill Shot - now I'm feeling even better about myself!

UPDATE: I'm on a roll, just achieved Double for my second time. I think I've figured out how the skill shot works, now on to learn the next thing.

#8613 3 years ago
Quoted from Green-Machine:

One is a short plunge to a shot to the control room. Accidentally figured that one out

Okay, I just got this one and was excited. However, the very next ball I got another one without knowing what I was doing. I launched short then immediately hit the amber target from the left flipper. It announced "secret skill shot" then launched into a multi-ball.

#8614 3 years ago

For those of you who have replaced the raptor tower ramp left flap screw, I just discovered something. While I've not noticed an issue on my new JP, I thought I would proactively check after seeing so many comments about it. So, I manually rolled a ball over that screw, and indeed the ball makes contact with it.

While I've not read all of the posts, I've read where people get rid of it altogether, grind it down, etc. My first option was to replace it with another screw that I had in my spare screw bin. After looking through everything, I couldn't find anything with a different head in that size, but I did find a screw exactly like the OEM (only a few mm longer) and I noticed the head looked to be just slightly smaller in diameter even thought it was the same height. My idea was to grind the head down on this test screw to see how it worked, but before I did I installed it just to make sure being a little longer that it would still fit correctly.

To my surprise, after I put the new screw in the ball no longer made contact with it. This leads me to believe that the issue with the OEM screw may not be its height, rather, the diameter of the head. My suggestion to others would be to take a little diameter off the head with a grinder/file/Dremmel tool and see what your results are. Alternatively, make sure the screw is fully secured, mark the inner edge with a pencil or Sharpie, then grind off that edge a little to make the diameter at that point smaller. The good thing about this is that you maintain the full depth of the slot for if/when you ever need to remove the screw in the future.

Here you can see the OEM screw on the right, and my replacement is on the left. It's really hard to tell from the pic since they look pretty much identical. However, I broke out the calipers to measure them and the OEM screw measures 5.5 mm in diameter while my replacement is 5.3 mm (height was exactly the same). Hard to believe, but in my case just 0.2 mm in diameter was the difference between the ball hitting the screw and clearing it.

IMG_5143.JPGIMG_5143.JPG

#8620 3 years ago
Quoted from Mr-Worf:

Mr_Tantrum please can tell the exactly dimensions for your replacement Screws or a link to the shop how you ordered. I have the same Problem on the Tower-Ramp and on the entrance the Helipad-Ramp.
Thanks

I don't really know. Like I said, I found a screw in the hundreds of all mixed up screws in my screw bin in the garage. It was exactly the same thread size of the OEM screw but slightly longer. Lucky for me the head was smaller in diameter. Do you have a way just to file/sand/grind the head of your screw a little?

If I wasn't explaining myself well, basically you want to go from the picture on the left to the one on the right where the flat edge is aligned to the middle of the ramp (you should tighten the screw all the way, mark it, remove it, grind it, then reinstall it).

philips_head_screw (resized).jpgphilips_head_screw (resized).jpg

#8634 3 years ago
Quoted from extraballingtmc:

Anyone have 1.02 pro code? Can’t get 1.03 to install. Downloaded it 3 times, 3 different sticks, won’t update.

As Markharris2000 stated, use the SD Card version.

#8650 3 years ago
Quoted from colbster:

Just put in an order for a pro, it will be my first (non-virtual) pin! Super excited, got the cliffy protection pack as well based on recommendation of this thread. My 5 year old will want to play, are there any settings in the system options to make the game a bit friendlier to new pinballers?
Cheers

Set game from 3 balls to 5 balls, extend time for ball saves, and physically adjust the outlane guide posts to be more closed.

#8667 3 years ago
Quoted from colbster:

Oh that is fantastic, if he has 10 balls and can start some modes I think he will be set!
Cheers

10 Balls would be never-ending, especially in a multi-player game. Start with 5 and work your way up from there if needed. Also, you don't want to create too false of a sense of accomplishment.

To quote Ishmael from Kingpin, "Well, my grandpa always taught me to bowl 15 frames. It's like I told you before, we Amish, we do everything half again as hard as you do."
pasted_image (resized).pngpasted_image (resized).png

#8717 3 years ago
Quoted from yzfguy:

"stick a bumps"

Can you please explain in more detail for those of us who don't know what those are?

Promoted items from Pinside Marketplace and Pinside Shops!
6,200
Machine - For Sale
Hutto, TX
$ 16.00
$ 8.95
Playfield - Toys/Add-ons
ULEKstore
 
$ 6,999.00
Pinball Machine
JURASSIC PARK PRO Pre-order!
The Pinball Place
 
€ 99.00
Lighting - Under Cabinet
Watssapen shop
 
$ 29.95
Playfield - Toys/Add-ons
ULEKstore
 
From: $ 45.00
Cabinet - Decals
arcade-cabinets.com
 
From: $ 11.95
Playfield - Toys/Add-ons
ULEKstore
 
8,700 (OBO)
Machine - For Sale
Monument, CO
$ 15.00
Playfield - Protection
SilverBall Designs
 
€ 50.00
Playfield - Toys/Add-ons
Pino Pinball Mods Shop
 
From: $ 30.00
Cabinet - Other
Rocket City Pinball
 
From: $ 50.00
Cabinet - Armor And Blades
arcade-cabinets.com
 
$ 130.00
Gameroom - Decorations
Dijohn
 
From: $ 31.50
$ 32.00
Playfield - Other
Pin Monk
 
9,000
Machine - For Sale
Warner Robins, GA
$ 45.00
Cabinet - Decals
Inscribed Solutions
 
$ 25.00
Cabinet - Sound/Speakers
PinEffects
 
$ 28.50
Playfield - Toys/Add-ons
ULEKstore
 
$ 17.00
Lighting - Other
Pin Monk
 
$ 12,999.99
From: $ 29.95
Cabinet - Shooter Rods
Hookedonpinball.com
 
From: $ 130.00
Lighting - Backbox
Myth Pinball Parts Shop
 
Hey modders!
Your shop name here
622 posts in this topic match your search for posts by Mr_Tantrum. You are on page 1 of 3.

You're currently viewing posts by Pinsider Mr_Tantrum.
Click here to go back to viewing the entire thread.

Reply

Wanna join the discussion? Please sign in to reply to this topic.

Hey there! Welcome to Pinside!

Donate to Pinside

Great to see you're enjoying Pinside! Did you know Pinside is able to run without any 3rd-party banners or ads, thanks to the support from our visitors? Please consider a donation to Pinside and get anext to your username to show for it! Or better yet, subscribe to Pinside+!


This page was printed from https://pinside.com/pinball/forum/topic/jurassic-park-stern-2019-owners-club-welcome-to-jurassic-park?tu=Mr_Tantrum and we tried optimising it for printing. Some page elements may have been deliberately hidden.

Scan the QR code on the left to jump to the URL this document was printed from.