(Topic ID: 248582)

Jurassic Park (Stern 2019 & 30th) Owners Club. Welcome! To Jurassic park.....

By CoolCatPinball

4 years ago


Topic Heartbeat

Topic Stats

  • 21,321 posts
  • 1,409 Pinsiders participating
  • Latest reply 4 hours ago by jackd104
  • Topic is favorited by 766 Pinsiders

You

Topic Gallery

View topic image gallery

IMG_1230 (resized).jpeg
IMG_7377 (resized).jpeg
IMG_1464 (resized).JPG
IMG_7368-ezgif.com-optimize.gif
IMG_7373 (resized).jpeg
IMG_7372 (resized).jpeg
IMG_7369 (resized).jpeg
pinside.a4cba3d6f022409119bc55bb9a4f9ec272c3d66d (resized).jpg
PXL_20240419_132957235.jpg
PXL_20240419_220243332.jpg
PXL_20240419_132948477.jpg
PXL_20240419_132932956.jpg
IMG_4992 (resized).jpeg
thumbnail_image5 (resized).jpg
thumbnail_image0 (resized).jpg
thumbnail_image1 (resized).jpg

Topic index (key posts)

17 key posts have been marked in this topic, showing the first 10 items. (Show topic index)

There are 21,321 posts in this topic. You are on page 168 of 427.
#8351 3 years ago
Quoted from Pinball-Pat:

Bonus Question:
At the end of the ball, scenes flash calculating bonuses. The final is a bonus multiplier and mine is always x 1 it seems. I believe this may be a supply drop award? Is there another way to increase this final bonus multiplier?

Capturing dangerous dinos (playing and beating their paddocks) is the main way to increase your bonus multiplier (Dilophosaurus, T-Rex, probably one or two others).

Edit: Looks like Dilo, T-Rex, and Spinosaurus are the three Super Predators that include a +bonus X perk for being captured. These, like other Jurassic Perks, are permanently applied for the rest of your game, I believe, too!

#8352 3 years ago
Quoted from Mr_Tantrum:

I really like these, and they would make for good gameroom art. You need to post them in the pinball photography thread: https://pinside.com/pinball/forum/topic/pinball-photography-post-your-best-photos-here

Thanks. Added!

#8353 3 years ago
Quoted from zeldarioid:

Capturing dangerous dinos (playing and beating their paddocks) are the main way to increase your bonus multiplier (Dilophosaurus, T-Rex, probably one or two others).
Edit: Looks like Dilo, T-Rex, and Spinosaurus are the three Super Predators that include a +bonus X perk for being captured. These, like other Jurassic Perks, are permanently applied for the rest of your game, I believe, too!

Are there other ways to increase bonus X? Guess I could look at the tiltforums rule set, but conversing is more fun

#8354 3 years ago
Quoted from Eskaybee:

Are there other ways to increase bonus X? Guess I could look at the tiltforums rule set, but conversing is more fun

13 Rescues will give you an extra multiplier but for that ball only. The other way is the Triple Bonus (3x your current multiplied bonus) Super Supply Drop award

#8355 3 years ago
Quoted from fooflighter:

That one is an easy fix, lift up the rail (remove nut obviously) and prop it up with a rag or something. Flow some water thin super glue and then mask off with painters tape to match the black outline coming from the post, you can skip the super glue, but this will really bond the chipping clear, but be careful and cover any areas not to risk dripping (your screwed if that happens), paint with black model paint acrylic, let dry, brush on some clear to seal. Buff lightly and cover with mylar, insert fiber washer under rail. Will look good as new. Even if your not artistic, the painters tape will help you with the black line, and once you put the rail back down, you'll barely see it.
Another less timely, fix is to black sharpie the line on the bare wood, cover with clear, then mylar, insert washer
The other trouble areas are, under the rail near the raptor tower entry on the left, under the rail under the shooter lane gap before the 180 turn

I have to do some repair to a chip along the raptor tower ramp ball guide on the upper left area of the playfield. I’ve read a number of posts about JP2, Deadpool, and AIQ for these ball guide/playfield chipping and pooling repairs(So frustrating that this is still an issue on NIB games.) Just a few questions to be “clear” -har har- as I begin my repair to the playfield:

- I have the vinyl repair round iron mentioned by Yelobird to apply to any pooling areas. But I assume if it’s already chipped I should not use this 3 second iron method?

- So, for the chipped area I apply/flow a small amount of the water thin super glue(purchased on amazon) BEFORE applying the acrylic paint pen for aesthetic matching to the artwork? I understand this is for helping to bond the clear to the chipped area.

- Then I apply the acrylic pen to match colors to the art and let dry. After this I have the clear coat brush applicator pen you get at automotive stores, and I apply this over the acrylic painted area?

- Fooflighter, you mention buffing this area. What do you recommend for buffing? I assume a fine grade sandpaper? Any clarification on this buffing step would be so appreciated.

-Finally Mylar, and then a washer if necessary under and guide posts, etc to lift off the playfield I assume.

Thx for any additional advice/clarification! Wish me luck on this unfortunate repair!

#8356 3 years ago

Just a reality check. So, how smooth is everyone's spitter spinner to orbit? I swear most of the time when taking a center shot, that it is really clunky and dribbles when hitting the orbit ball guide, and more often than not goes into the pops instead of going around the orbit to the right flipper.

Should it go to right flipper most (80%+) of the time on successful center shot or is this a known clunky shot?

#8357 3 years ago
Quoted from Gogdog:

Just a reality check. So, how smooth is everyone's spitter spinner to orbit? I swear most of the time when taking a center shot, that it is really clunky and dribbles when hitting the orbit ball guide, and more often than not goes into the pops instead of going around the orbit to the right flipper.
Should it go to right flipper most (80%+) of the time on successful center shot or is this a known clunky shot?

Mine is definitely not as smooth as most spinners. It seems it needs to be a super clean shot. Very much like all the shots on my pin

#8358 3 years ago
Quoted from Gogdog:

Just a reality check. So, how smooth is everyone's spitter spinner to orbit? I swear most of the time when taking a center shot, that it is really clunky and dribbles when hitting the orbit ball guide, and more often than not goes into the pops instead of going around the orbit to the right flipper.
Should it go to right flipper most (80%+) of the time on successful center shot or is this a known clunky shot?

Mine is smooth. Almost always comes around to my upper right flipper.

#8359 3 years ago
Quoted from Gogdog:

Just a reality check. So, how smooth is everyone's spitter spinner to orbit? I swear most of the time when taking a center shot, that it is really clunky and dribbles when hitting the orbit ball guide, and more often than not goes into the pops instead of going around the orbit to the right flipper.
Should it go to right flipper most (80%+) of the time on successful center shot or is this a known clunky shot?

If I hit the spinner with the right flipper it'll have a lot more power in the shot and go around the orbit to the right spinner, however the left flipper will have less power in the shot and is more likely to drop into the pops (in doing so lighting the Lite escape target). So I can pick & choose what I want

Also check that your up post in the orbit is flush with the PF

#8360 3 years ago
Quoted from Manny65:

If I hit the spinner with the right flipper it'll have a lot more power in the shot and go around the orbit to the right spinner, however the left flipper will have less power in the shot and is more likely to drop into the pops (in doing so lighting the Lite escape target). So I can pick & choose what I want
Also check that your up post in the orbit is flush with the PF

Yeah, I just adjusted it to be a tiny bit higher, but initial thoughts seem like it didn't matter much. I think with just how the guide is shaped and how the orbit guide is fairly flat, it has a lot more variance in how different shots behave. Some will go around to the orbit, some will hit the orbit guide at a bad angle and go to pops....etc. Its just a randomizer type center shot.

#8361 3 years ago
Quoted from Gogdog:

Just a reality check. So, how smooth is everyone's spitter spinner to orbit? I swear most of the time when taking a center shot, that it is really clunky and dribbles when hitting the orbit ball guide, and more often than not goes into the pops instead of going around the orbit to the right flipper.
Should it go to right flipper most (80%+) of the time on successful center shot or is this a known clunky shot?

Mine seems pretty smooth. Like anything with this game needs to be a good shot but to me the spinner shot is one that is very satisfying, as the sound and rotation seems to go for ever on a good clean shot. I think a few people have had to bend up slightly on the spinner, maybe yours needs a little adjustment.

#8362 3 years ago
Quoted from Mr_Tantrum:

To everyone who ordered the orange raptor pit lenses, I thought it would be easier to post here instead of sending 20 individual PMs. All the lenses are ready to go, stuffed into envelopes, and the envelopes have been addressed. I'll will be mailing them all out tomorrow in plain white envelopes, so be on the lookout over the next few days (international orders will take longer, of course).
Installation is simple:
- Wipe the area where the lenses will go with alcohol or some other non-residue cleaner that is safe to use on plastic.
- Test position a lens, peel backing and carefully put into place
- When you are happy with position, press on lens tightly while giving support below plastic as best you can to secure in place
- Do the other two the same, and you're all done

Thank you! I just put my silicone bumpers on this weekend. Well worth it.

14
#8363 3 years ago

EDIT - I managed to find a few copters on Amazon so if you are interested in getting one of these pre-modded and ready to drop into your machine, send me a PM.

Alternate process for Helicopter mod install (no grinding or sanding)

I got my helicopter in over the weekend and decided to install today. Many thanks to the brave souls before me who originally figured this out and shared with all of us... I wanted to see if I could find a way to install without having to grind away the bottom or deform the top in order for it to fit. Good news is, it can be done quite easily, and without having to take apart the copter. (unless you are trying to also do the cockpit light mod.

Basically with a pair of large needle-nose pliers, I grabbed the original rotor and with a couple of rocks back and forth, you can snap it off leaving a perfect guide hole. I also use the same pliers to snap off the lander gears. The remaining part of the landing gears may fall into the body of copter but they will come out later when you drill the larger holes.

Then on my drill press I used a 5/32" bit to go through the guide hole at top and straight down to create guide hole in bottom. Next, using a stepper bit on drill press I make a 1/2" hole through bottom plastic, this is the size of the shaft in the game you will be sliding copter over.

The trick to this method is to go with a larger hole on the top. Using the same stepper bit, I drill out top hole to a 5/8" hole, this allows for the washers and bearing to sit inside of the copter (instead of above it) and gives us the clearance needed without having to grind off the bottom of the copter.

You can see in the final pictures that the copter sits in perfectly with just enough clearance for the blades to spin and all without grinding away any material. You don't need to do anything to secure the copter, it naturally sits in the perfect spot and doesn't move at all. I also decided to remove the remaining hex posts (since they were only there to hold original helicopter plastic) and just put 6-32 nuts in place to clean that area up. I also did as others have done and placed a small dab of hot glue on the rear propeller to hold it in the perfect position to make sure the main rotor misses it during rotation.

Everything spins and functions as it should and it truly looks like it could have come from the factory this way.
11 (resized).jpg11 (resized).jpg12 (resized).jpg12 (resized).jpg13 (resized).jpg13 (resized).jpg14 (resized).jpg14 (resized).jpg8 (resized).jpg8 (resized).jpg9 (resized).jpg9 (resized).jpg1 (resized).jpg1 (resized).jpg3 (resized).jpg3 (resized).jpg6 (resized).jpg6 (resized).jpg16 (resized).jpg16 (resized).jpg

#8364 3 years ago

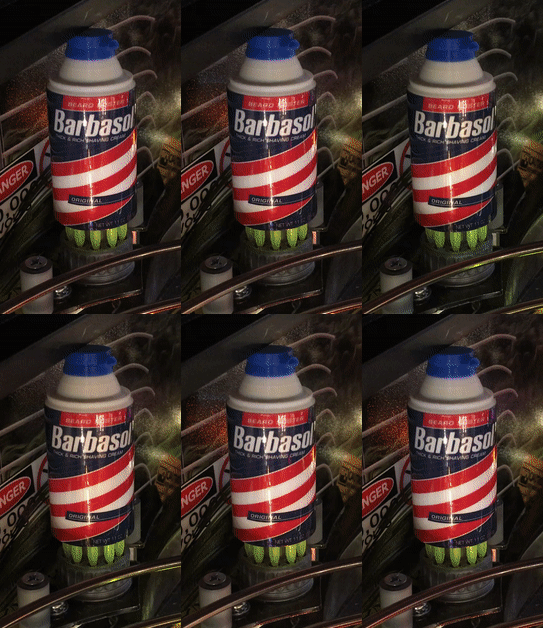
Barbasol mod is coming along . . .

IMG_4989 (resized).JPGIMG_4989 (resized).JPG
#8365 3 years ago
Quoted from Mr_Tantrum:

Barbasol mod is coming along . . .[quoted image]

coming along nicely. Thanks for working on this!

#8366 3 years ago
Quoted from RetroGamerJP:

Alternate process for Helicopter mod install (no grinding or sanding)
I got my helicopter in over the weekend and decided to install today. Many thanks to the brave souls before me who originally figured this out and shared with all of us... I wanted to see if I could find a way to install without having to grind away the bottom or deform the top in order for it to fit. Good news is, it can be done quite easily, and without having to take apart the copter. (unless you are trying to also do the cockpit light mod.
Basically with a pair of large needle-nose pliers, I grabbed the original rotor and with a couple of rocks back and forth, you can snap it off leaving a perfect guide hole. I also use the same pliers to snap off the lander gears. The remaining part of the landing gears may fall into the body of copter but they will come out later when you drill the larger holes.
Then on my drill press I used a 5/32" bit to go through the guide hole at top and straight down to create guide hole in bottom. Next, using a stepper bit on drill press I make a 1/2" hole through bottom plastic, this is the size of the shaft in the game you will be sliding copter over.
The trick to this method is to go with a larger hole on the top. Using the same stepper bit, I drill out top hole to a 5/8" hole, this allows for the washers and bearing to sit inside of the copter (instead of above it) and gives us the clearance needed without having to grind off the bottom of the copter.
You can see in the final pictures that the copter sits in perfectly with just enough clearance for the blades to spin and all without grinding away any material. You don't need to do anything to secure the copter, it naturally sits in the perfect spot and doesn't move at all. I also decided to remove the remaining hex posts (since they were only there to hold original helicopter plastic) and just put 6-32 nuts in place to clean that area up. I also did as others have done and placed a small dab of hot glue on the rear propeller to hold it in the perfect position to make sure the main rotor misses it during rotation.
Everything spins and functions as it should and it truly looks like it could have come from the factory this way. [quoted image][quoted image][quoted image][quoted image][quoted image][quoted image][quoted image][quoted image][quoted image][quoted image]

I'm liking it. And my helicopter just arrived so I was just about to start working on this.

So, with your system, we are just making a larger hole at the top, which does put a small "gap" on the side of the helicopter which is a downside. But....you now get a full bottom to the helicopter and the blades are more flush with the top of the helicopter.

Your way: (note full bottom, blades closer to top of helicopter, though a cut out (missing plastic) at the top.

edc0313837e09dbc0ed525c420b2e50c3aaf4601 (resized).jpgedc0313837e09dbc0ed525c420b2e50c3aaf4601 (resized).jpg

Verse Mr tantrum way: (lose part of bottom, blades sit higher off the helicopter)

6edb171d3dca8f1192ec016662f8a16b9fedf9d5 (resized).jpg6edb171d3dca8f1192ec016662f8a16b9fedf9d5 (resized).jpg

ddd0dcc75c2ceff8be1f10eb62d44e9ff96aa570 (resized).jpgddd0dcc75c2ceff8be1f10eb62d44e9ff96aa570 (resized).jpg

Ease of install definitely goes to the new way.

And you took off the aluminum long spacers, but does that create a ball trap?

#8367 3 years ago
Quoted from Gogdog:

and you took off the aluminum long spacers, but does that create a ball trap?

I don't see a ball getting stuck there with the dome and other protrusions, but if it happens, adding the hex spacers back in is an easy fix.

... and yes, the larger whole at top does create an opening on the side but you have to look hard for it when viewing from players perspective.

#8368 3 years ago

I haven't had a ball go up near the copter since removing my hex posts. I prefer the bottom shaved off to the opening on the side. You are looking at this from the top, and the blades don't look too far from the body to me.

#8369 3 years ago
Quoted from yzfguy:

I haven't had a ball go up near the copter since removing my hex posts. I prefer the bottom shaved off to the opening on the side. You are looking at this from the top, and the blades don't look too far from the body to me.

I think I'm the opposite, and would rather have a full bottom. Another difference is that yes...the new one has part of the plastic missing up top, but shaving the bottom means you have to create a hole at the bottom for the screw, so really you are just changing one hole location for another.

hole (resized).pnghole (resized).png

#8370 3 years ago
Quoted from Gogdog:

I think I'm the opposite, and would rather have a full bottom. Another difference is that yes...the new one has part of the plastic missing up top, but shaving the bottom means you have to create a hole at the bottom for the screw, so really you are just changing one hole location for another.
[quoted image]

I have no hole there for the screw.

** Yes I do.... Not intentionally, but the way I ground off the base left an opening in just the right spot!

#8371 3 years ago

The extra material missing from up top is not really noticeable when installed. Personally I just prefer this method vs. Cracking open the copter, having to grind down the bottom and/or hammering down the top for the necessary clearance. Just feels cleaner and less intrusive to me BUT the whole point of sharing is so that people see options and can be comfortable doing, whichever path they choose.

27 (resized).jpg27 (resized).jpg

#8372 3 years ago
Quoted from RetroGamerJP:

The extra material missing from up top is not really noticeable when installed. Personally I just prefer this method vs. Cracking open the copter, having to grind down the bottom and/or hammering down the top for the necessary clearance. Just feels cleaner and less intrusive to me BUT the whole point of sharing is so that people see options and can be comfortable doing, whichever path they choose.
[quoted image]

And you said that the helicopter just "fits" in place...but what is keeping it from rotating/turning? Did you apply a tiny bit of hot glue so it doesn't move at all?

#8373 3 years ago
Quoted from Gogdog:

And you said that the helicopter just "fits" in place...but what is keeping it from rotating/turning? Did you apply a tiny bit of hot glue so it doesn't move at all?

No glue required, it cannot rotate because the switch for the ramp rests right behind the tail and keeps it from moving. If you try to move by hand it can rotate about 1/8" in either direction but in normal gameplay it does not move at all, even when blades are spinning.

30 (resized).jpg30 (resized).jpg
#8374 3 years ago

Glad to see the ingenuity and that people now have a couple of options. I think this alternative way would definitely be easier and quicker to do, but in the end it probably comes down to where you want your modifications to show and what tools you have to do the job.

Also, you could still potentially follow my guide for illuminating the chopper mounted this way, but I think you would need to drill out the rivets in order to separate the parts to properly mount the LED and run the wires. Again, might be an alternative way to do this too (e.g. drilling a hole in the nose from the bottom and running the wires externally), but I'll leave that up to someone else to figure out.

#8375 3 years ago
Quoted from Parkshow30:

Turned game off and then back on again and it worked in switch test mode 20 times or more. I start up a game and it works fine goes into T Rex multiball after I get out of T. rex multiball the first ball hit gives me a letter and then it stops working again. Every other part of the game works completely fine. Maybe Stern will be able to send me a new set of optos.

Truck opto works perfect every time now. Looked at the manual and saw that the opto board plugs into node board 9. The connector did not seem loose at all but after pushing on it it’s Working. About a dozen games in and it registers every time.
Stern emailed me back this morning after I fixed it recommending reseating the connector at the opto and of that didn’t solve the problem they would send me a replacement opto board. I’ve heard not so great things about Sterns support after the untimely death of Chas who I had never talked to but had read nothing but great things about, so it was nice to see them reply back about the problem and ready to help.

#8376 3 years ago
Quoted from Mr_Tantrum:

Glad to see the ingenuity and that people now have a couple of options. I think this alternative way would definitely be easier and quicker to do, but in the end it probably comes down to where you want your modifications to show and what tools you have to do the job.
Also, you could still potentially follow my guide for illuminating the chopper mounted this way, but I think you would need to drill out the rivets in order to separate the parts to properly mount the LED and run the wires. Again, might be an alternative way to do this too (e.g. drilling a hole in the nose from the bottom and running the wires externally), but I'll leave that up to someone else to figure out.

Since you are directly soldering to the led boards, I think an easier way would be to use a pico or micro LED instead of the 1 SMD comet matrix strip. Much smaller head on them, so would only need a tiny hole. I'm thinking Micro LED for a bit more light, and in yellow, tied to the helipad LED. Most come with resistors already soldered on (but resistors are super cheap anyway), and the leds from aliexpress (super cheap).

#8377 3 years ago
Quoted from BeeGee6533:

I have to do some repair to a chip along the raptor tower ramp ball guide on the upper left area of the playfield. I’ve read a number of posts about JP2, Deadpool, and AIQ for these ball guide/playfield chipping and pooling repairs(So frustrating that this is still an issue on NIB games.) Just a few questions to be “clear” -har har- as I begin my repair to the playfield:
- I have the vinyl repair round iron mentioned by Yelobird to apply to any pooling areas. But I assume if it’s already chipped I should not use this 3 second iron method?
- So, for the chipped area I apply/flow a small amount of the water thin super glue(purchased on amazon) BEFORE applying the acrylic paint pen for aesthetic matching to the artwork? I understand this is for helping to bond the clear to the chipped area.
- Then I apply the acrylic pen to match colors to the art and let dry. After this I have the clear coat brush applicator pen you get at automotive stores, and I apply this over the acrylic painted area?
- Fooflighter, you mention buffing this area. What do you recommend for buffing? I assume a fine grade sandpaper? Any clarification on this buffing step would be so appreciated.
-Finally Mylar, and then a washer if necessary under and guide posts, etc to lift off the playfield I assume.
Thx for any additional advice/clarification! Wish me luck on this unfortunate repair!

I used novus 2, very lightly, in addition, i used a small buffing wheel on a dremel (NOT a felt pad but the small cotton buffing attachment) using small passes with novus 2 and a very very light pressure and a medium speed...this shined these areas up very nicely with minimal elbow grease. You can use a microfiber with novus but I've found novus 2 will dull the clear by hand more than a mechanical advantage of a buffing wheel, in this case a dremel tool. If you're nervous soing this, then just use a microfibe and novus followed by a very light wax and then mylar

#8378 3 years ago

Trying to update a friends Premium. Ive done a few newer sterns with no issues...I click on the file to download. I click save and I get failed bsckblaze2 in my downloads folder. I see the green bar start to go across my firefox icon along the bottom then it stops after a few seconds...

Not sure what I am doing wrong. Is their server ever down?

#8379 3 years ago
Quoted from billsfanmd:

Trying to update a friends Premium. Ive done a few newer sterns with no issues...I click on the file to download. I click save and I get failed bsckblaze2 in my downloads folder. I see the green bar start to go across my firefox icon along the bottom then it stops after a few seconds...
Not sure what I am doing wrong. Is their server ever down?

Same thing happened to me yesterday. I gave up.

#8380 3 years ago
Quoted from Green-Machine:

Same thing happened to me yesterday. I gave up.

I am quite certain they have been having issues with their server over the past few weeks. I saw the same partial download and then fail issues a couple of weeks ago on a weekend around 11pm, went to bed, and when I woke up the next morning, just repeated the exact same click, and it worked fine.

#8381 3 years ago
Quoted from Markharris2000:

I am quite certain they have been having issues with their server over the past few weeks. I saw the same partial download and then fail issues a couple of weeks ago on a weekend around 11pm, went to bed, and when I woke up the next morning, just repeated the exact same click, and it worked fine.

Okay. Thanks for the heads up. I’ll give it a whirl another day. I have Tim’s mod on there now but wanted to put 1.03 on original SD

#8382 3 years ago

my win10 laptop was doing that, so i tried on my win7 work lt and it downloaded fine.

#8383 3 years ago
Quoted from billsfanmd:

Trying to update a friends Premium. Ive done a few newer sterns with no issues...I click on the file to download. I click save and I get failed bsckblaze2 in my downloads folder. I see the green bar start to go across my firefox icon along the bottom then it stops after a few seconds...
Not sure what I am doing wrong. Is their server ever down?

Try disabling your anti-virus or windows firewall and give it a go.

#8384 3 years ago

turned off windows firewall and my anti virus...same issue

#8385 3 years ago

if you have space on your phone, you could it there then transfer it to your computer.

#8386 3 years ago
Quoted from fooflighter:

I used novus 2, very lightly, in addition, i used a small buffing wheel on a dremel (NOT a felt pad but the small cotton buffing attachment) using small passes with novus 2 and a very very light pressure and a medium speed...this shined these areas up very nicely with minimal elbow grease. You can use a microfiber with novus but I've found novus 2 will dull the clear by hand more than a mechanical advantage of a buffing wheel, in this case a dremel tool. If you're nervous soing this, then just use a microfibe and novus followed by a very light wax and then mylar

Thx so much for your response! I happen to have a Dremel tool so all good there. Did my other steps in that post seem correct about applying the water thin glue before the acrylic paint pen, etc.? I think I have a plan of attack to repair that chip and keep it from getting any worse. Thx again for your advice and help on this!

#8387 3 years ago

Just installed my "new yellow" Titan rings (replaced the old yellow that had a green tint to them) on my Jeep (I did the others yesterday). While I was at it I painted the back of the plate black and cut up a couple of the original black post sleeves and used them for spacers for the front two screws that mount the plate to the underside of the Jeep.

IMG_5023.JPGIMG_5023.JPG
#8388 3 years ago

I just finalized my Barbasol flasher cover, and it's ready for purchase: https://pinside.com/pinball/market/classifieds/ad/106545

I will be making these "on demand" as ordered, so there will be no extended wait and no limit on the quantity I produce. The mod replaces the existing clear dome flasher cover just below the control room, and utilizes the same mount and lighting. I designed it to fit with or without Pinstadium lighting since I have them.

I'll be working on step-by-step instructions for those who purchase the mod, but I would literally rate this about a 2-3 on a 10 point scale of complexity - anybody can easily add it to their JP pin.

IMG_5011 (resized).JPGIMG_5011 (resized).JPGIMG_5027 (resized).JPGIMG_5027 (resized).JPG

barbasol.gifbarbasol.gif

#8389 3 years ago
Quoted from BeeGee6533:

Thx so much for your response! I happen to have a Dremel tool so all good there. Did my other steps in that post seem correct about applying the water thin glue before the acrylic paint pen, etc.? I think I have a plan of attack to repair that chip and keep it from getting any worse. Thx again for your advice and help on this!

Sure thing...again with the glue the caution is with the prep, I would use painters tape and cover every area of the playfield with some painters plastic, you don't want that stuff dripping on the playfield. Most of those water thin glues have a small applicator nozzle, you literally just barely touch the surface and it will flow so practice before you actually do it. You may see the glue form a bubble, if this happens, just wait, it may seep into the wood, if not, let it harden, don't press into it or it will smudge and become tacky. you can use a razor blade and shave down the bubble when it hardens.

I would buff the glued area to take down any rough areas also before applying the touchup paint.

Then paint, clear, buff, mylar...

Again, your work depends on your skill level but it can be done to look good as new. Just take your time

#8390 3 years ago
Quoted from fooflighter:

Sure thing...again with the glue the caution is with the prep, I would use painters tape and cover every area of the playfield with some painters plastic, you don't want that stuff dripping on the playfield. Most of those water thin glues have a small applicator nozzle, you literally just barely touch the surface and it will flow so practice before you actually do it. You may see the glue form a bubble, if this happens, just wait, it may seep into the wood, if not, let it harden, don't press into it or it will smudge and become tacky. you can use a razor blade and shave down the bubble when it hardens.
I would buff the glued area to take down any rough areas also before applying the touchup paint.
Then paint, clear, buff, mylar...
Again, your work depends on your skill level but it can be done to look good as new. Just take your time

Thank you so much for the detailed advice! It’s truly helpful. I’m new to ownership just this year and I have to admit it’s super disappointing for these things to happen on new machines. But, I want to play and enjoy them and this will hopefully be a good mend for a small area that isn’t in plain sight while playing. Thx again!

#8391 3 years ago
Quoted from Mr_Tantrum:

I just finalized my Barbasol flasher cover, and it's ready for purchase: https://pinside.com/pinball/market/classifieds/ad/106545

i'm usually not into the cosmetic mods, but that does look pretty cool. good job, man.

#8392 3 years ago
Quoted from Mr_Tantrum:

I just finalized my Barbasol flasher cover, and it's ready for purchase: https://pinside.com/pinball/market/classifieds/ad/106545
I will be making these "on demand" as ordered, so there will be no extended wait and no limit on the quantity I produce. The mod replaces the existing clear dome flasher cover just below the control room, and utilizes the same mount and lighting. I designed it to fit with or without Pinstadium lighting since I have them.
I'll be working on step-by-step instructions for those who purchase the mod, but I would literally rate this about a 2-3 on a 10 point scale of complexity - anybody can easily add it to their JP pin.
[quoted image][quoted image]
[quoted image]

Incredible work.

#8393 3 years ago
Quoted from CoolCatPinball:

Good point, then I shall remove the screw, leave the metal flap, and put mylar down

I'm having same issue with the rejects due to that screw. I want to just remove it and put some mylar tape on that area. Does anyone know a source for good quality thin mylar tape that sticks reliably?

#8394 3 years ago
Quoted from StoneyCreek:

I'm having same issue with the rejects due to that screw. I want to just remove it and put some mylar tape on that area. Does anyone know a source for good quality thin mylar tape that sticks reliably?

Cliffy made up a special carbon fiber flap with adhesive on one side for the tower ramp entry. Drop Cliff a note. (You might also have him send you a carbon fiber washer for the third flipper end post.) Get the set...

#8395 3 years ago
Quoted from StoneyCreek:

I'm having same issue with the rejects due to that screw. I want to just remove it and put some mylar tape on that area. Does anyone know a source for good quality thin mylar tape that sticks reliably?

I think that removing the screw and “taping” the flap down is a good option, but you may want to consider this option as well.
Take a black sharpie and mark a small dot on the screw were the ball is contacting it. Then remove that screw and use a hand file or dremmel to shave just a small amount off the screw (were the sharpie dot is) on a bit of an angle as shown in the picture. (Leaving enough material on the head of the screw so a Phillips head screwdriver still works) Put the screw back in being super careful to re-engage the threads just as it was before removal......I rotate the screw backwards while putting slight downward pressure. With a sensitive touch you can feel the screw threads “drop into” the existing threads in the playfield. So now the screw will end up being rotated to the same position that it was prior to removal and the small amount that was filed off the screw eliminates the ball hop that caused ramp shot failures.

40FB9FA5-37E1-4663-9A1B-58B44D69C45A (resized).jpeg40FB9FA5-37E1-4663-9A1B-58B44D69C45A (resized).jpeg6770B8F8-4202-435A-943B-75E4210CF892 (resized).jpeg6770B8F8-4202-435A-943B-75E4210CF892 (resized).jpegA81D534E-A317-4B89-B5BC-9FA000D5476F (resized).jpegA81D534E-A317-4B89-B5BC-9FA000D5476F (resized).jpeg
#8396 3 years ago
Quoted from Markharris2000:

Cliffy made up a special carbon fiber flap with adhesive on one side for the tower ramp entry. Drop Cliff a note. (You might also have him send you a carbon fiber washer for the third flipper end post.) Get the set...

Thanks Mark, I got a set and have installed it already....but at the time I don't think he'd made the tower ramp fix...

#8397 3 years ago
Quoted from freegame450:

I think that removing the screw and “taping” the flap down is a good option, but you may want to consider this option as well.
Take a black sharpie and mark a small dot on the screw were the ball is contacting it. Then remove that screw and use a hand file or dremmel to shave just a small amount off the screw (were the sharpie dot is) on a bit of an angle as shown in the picture. (Leaving enough material on the head of the screw so a Phillips head screwdriver still works) Put the screw back in being super careful to re-engage the threads just as it was before removal......I rotate the screw backwards while putting slight downward pressure. With a sensitive touch you can feel the screw threads “drop into” the existing threads in the playfield. So now the screw will end up being rotated to the same position that it was prior to removal and the small amount that was filed off the screw eliminates the ball hop that caused ramp shot failures.
[quoted image][quoted image][quoted image]

Actually that looks fairly straightforward. I think I'm gonna give it a try. Thanks!

#8398 3 years ago

I have a spike 8 way splitter without an internal power supply. Would adding speaker lighting and under cab lighting and maybe some led lighting for a custom topper be too much stress on the stern power supply etc. What have people installed using such a splitter?

#8399 3 years ago
Quoted from embryon:

I have a spike 8 way splitter without an internal power supply. Would adding speaker lighting and under cab lighting and maybe some led lighting for a custom topper be too much stress on the stern power supply etc. What have people installed using such a splitter?

I have (I believe) the same one and I have led backlighting, one playfield spot and led trough lighting installed on it so far. No issues.

Promoted items from Pinside Marketplace and Pinside Shops!
8,599 (OBO)
Machine - For Sale
Hudson, MA
$ 20.00
Playfield - Protection
SilverBall Designs
 
$ 130.00
Gameroom - Decorations
Dijohn
 
€ 50.00
Playfield - Toys/Add-ons
Pino Pinball Mods Shop
 
$ 9,499.00
Pinball Machine
Classic Game Rooms
 
From: $ 15.95
$ 69.99
Cabinet - Decals
Inscribed Solutions
 
From: $ 6,999.99
6,500 (Firm)
Machine - For Sale
Sherrill, NY
$ 29.99
Playfield - Decals
Cento Creations
 
$ 12,995.00
Pinball Machine
Pinball Alley
 
$ 45.00
Cabinet - Decals
Inscribed Solutions
 
From: $ 9,499.00
Pinball Machine
Paradise Distribution
 
From: $ 129.95
Lighting - Interactive
Hookedonpinball.com
 
From: € 60.00
Playfield - Toys/Add-ons
Pino Pinball Mods Shop
 
$ 10,899.00
Pinball Machine
Maine Home Recreation
 
$ 5.00
Playfield - Protection
UpKick Pinball
 
$ 16.00
From: $ 50.00
Cabinet - Armor And Blades
arcade-cabinets.com
 
$ 19.50
Cabinet - Other
NO GOUGE PINBALL™
 
$ 89.99
Cabinet - Decals
Maine Home Recreation
 
$ 50.00
Playfield - Protection
Duke Pinball
 
From: $ 159.00
Playfield - Toys/Add-ons
Sparky Pinball
 
There are 21,321 posts in this topic. You are on page 168 of 427.

Reply

Wanna join the discussion? Please sign in to reply to this topic.

Hey there! Welcome to Pinside!

Donate to Pinside

Great to see you're enjoying Pinside! Did you know Pinside is able to run without any 3rd-party banners or ads, thanks to the support from our visitors? Please consider a donation to Pinside and get anext to your username to show for it! Or better yet, subscribe to Pinside+!


This page was printed from https://pinside.com/pinball/forum/topic/jurassic-park-stern-2019-owners-club-welcome-to-jurassic-park/page/168 and we tried optimising it for printing. Some page elements may have been deliberately hidden.

Scan the QR code on the left to jump to the URL this document was printed from.