(Topic ID: 80267)

Jurassic Park (DATA EAST) club

By louknees

10 years ago


Topic Heartbeat

Topic Stats

  • 10,131 posts
  • 575 Pinsiders participating
  • Latest reply 13 hours ago by Garrett
  • Topic is favorited by 237 Pinsiders

You

Linked Games

Topic Gallery

View topic image gallery

IMG_4177 (resized).jpeg
IMG_4176 (resized).jpeg
IMG_0413 (resized).jpeg
Capture5 (resized).PNG
pasted_image (resized).png
20240321_175612 (resized).jpg
IMG_2307 (resized).jpeg
65CAB543-E774-4E3F-BE43-41A065718418 (resized).jpeg
172457CB-CDD8-4220-83F8-23B672578DD2 (resized).jpeg
IMG_4932 (resized).jpeg
IMG_4931 (resized).jpeg
71ZSWlVWEuL._AC_UF1000,1000_QL80_ (resized).jpg
IMG_2207 (resized).jpeg
unnamed (2) (resized).jpg
IMG_1976 (resized).jpeg

Topic index (key posts)

59 key posts have been marked in this topic, showing the first 10 items. (Show topic index)

There are 10,131 posts in this topic. You are on page 140 of 203.
#6951 4 years ago
Quoted from jorro:

Yes thats normal, the resistors get verry warm.
Or do you mean extreme?
They are from a ceramic material so it can withstand high temperatures.
Judging by the pictures youre fine, but if you have doubts about the heat/ functionality you can easely replace them.

thanks. They are not warm, they are extremely hot. But I was told that was normal. But when I say hot I mean touch it and u have a permanent tattoo. After only 20 min of playing

#6952 4 years ago

Help! Another T-Rex issue.

I have been reading up op T-Rex Left-Right issues and have yet to find an answer for my issues.

So I got this game the T-Rex was rigged up to stay in the middle. Wire and zip ties. Yeah I know sound crazy instead of just turning it off and unplugging the cables this is how someone decided to fix it.

After initial testing there was no power to the motor. I fixed this by replacing some bad components on the driver board, couple transistor and a chip where bad.

Now I have power to the motor and can make the head move in test mode just it moves very slow left and right.

Things I have done so far..

Tested motor as good with a 9-volt battery, it moves both ways no problem, will move the T-Rex head very good like this as well so gears and stuff should be ok.

I can ground the driving transistor at the power driver board and the head moves just fine both ways as well.

I have tested the relay board and the shaker motor board in another JP machine. Both work great.

I am kind of stuck at this point, not really sure what to check next.

Any help would be greatly appreciated.

Thanks

#6953 4 years ago
Quoted from Leachdude:

Help! Another T-Rex issue.
I have been reading up op T-Rex Left-Right issues and have yet to find an answer for my issues.
So I got this game the T-Rex was rigged up to stay in the middle. Wire and zip ties. Yeah I know sound crazy instead of just turning it off and unplugging the cables this is how someone decided to fix it.
After initial testing there was no power to the motor. I fixed this by replacing some bad components on the driver board, couple transistor and a chip where bad.
Now I have power to the motor and can make the head move in test mode just it moves very slow left and right.
Things I have done so far..
Tested motor as good with a 9-volt battery, it moves both ways no problem, will move the T-Rex head very good like this as well so gears and stuff should be ok.
I can ground the driving transistor at the power driver board and the head moves just fine both ways as well.
I have tested the relay board and the shaker motor board in another JP machine. Both work great.
I am kind of stuck at this point, not really sure what to check next.
Any help would be greatly appreciated.
Thanks

Can't say that your issue is exact as mine was, but have you read through this thread?
https://pinside.com/pinball/forum/topic/jurassic-park-t-rex-side-to-side-motor-issues

#6954 4 years ago

Got my 10000volts sign in today by mr Tantrum.
He also made me a JP visitors center decal.

20190905_121019 (resized).jpg20190905_121019 (resized).jpg20190905_121039 (resized).jpg20190905_121039 (resized).jpg20190905_121057 (resized).jpg20190905_121057 (resized).jpg20190905_121302 (resized).jpg20190905_121302 (resized).jpg20190905_121310 (resized).jpg20190905_121310 (resized).jpg
#6955 4 years ago
Quoted from jorro:

Got my 10000volts sign in today by mr Tantrum.
He also made me a JP visitors center decal.[quoted image][quoted image][quoted image][quoted image][quoted image]

Pics look great. I need to send you one of my new decals that I've since developed for the ball launch gate: https://pinside.com/pinball/forum/topic/jurassic-park-club/page/139#post-5177673

#6956 4 years ago

Since we're talking about the Danger Voltage sign, has anyone had this problem, and solved it?

Maybe 1 or 2 times out of 10 ball launches, the ball passes completely through the one-way gate, hits the pop bumper and passes back through the one way gate to the playfield, instead of staying in the pop bumpers.

At first I thought it was just an odd shot that just never made it through the gate, but I watched it once, and it actually clears the gate, but guessing the ball hits it so hard, that the ball is able to pass back underneath it as the gate closes and bounces back open a little.

I haven't messed with it yet, but curious if anyone else had the same issue and if you've solved it. I've thought about putting a little counter weight on the gate to help keep it closed. Or possibly shaving some of the metal from the other side, to create less of a balance point.

#6957 4 years ago
Quoted from Mr_Tantrum:

Can't say that your issue is exact as mine was, but have you read through this thread?
https://pinside.com/pinball/forum/topic/jurassic-park-t-rex-side-to-side-motor-issues

Yes that is one of the threads I did find. Everything test test good, it is weird I can ground the transistor and it is great. But the game function is sluggish.

On to more testing.

#6958 4 years ago
Quoted from woody24:

Since we're talking about the Danger Voltage sign, has anyone had this problem, and solved it?
Maybe 1 or 2 times out of 10 ball launches, the ball passes completely through the one-way gate, hits the pop bumper and passes back through the one way gate to the playfield, instead of staying in the pop bumpers.
At first I thought it was just an odd shot that just never made it through the gate, but I watched it once, and it actually clears the gate, but guessing the ball hits it so hard, that the ball is able to pass back underneath it as the gate closes and bounces back open a little.
I haven't messed with it yet, but curious if anyone else had the same issue and if you've solved it. I've thought about putting a little counter weight on the gate to help keep it closed. Or possibly shaving some of the metal from the other side, to create less of a balance point.

Interesting . . . I've never had a ball bounce out. I assume you've tested by hand to make sure that the gate is moving as freely as possible and not getting hung up or slowly descending? If this were the case, maybe cleaning/blowing out the tabs/holes and applying a little lubricant where the hinges are would fix the issue? These gates are used in countless pins, and I can't imagine that adding a little weight to the flap would be required to have it perform correctly (although a good idea).

If you do decide to add a little weight, maybe a creative decal would do the job. I designed this one for Getaway just as a theme decal (flap performed perfectly with and without it), and something similar might be just enough weight for your JP flap while adding to the overall theme.

4f20d26a98b599cec789ada179b4ead5712d231a (resized).jpg4f20d26a98b599cec789ada179b4ead5712d231a (resized).jpg
#6959 4 years ago
Quoted from Leachdude:

Yes that is one of the threads I did find. Everything test test good, it is weird I can ground the transistor and it is great. But the game function is sluggish.
On to more testing.

I wish you well. My issue was extremely frustrating and took weeks to figure out. I scoured Pinside and the entire internet, and it seems like I was the first to ever encounter my exact issue. Sounds like you might be in a similar situation.

#6960 4 years ago
Quoted from jorro:

Got my 10000volts sign in today by mr Tantrum.
He also made me a JP visitors center decal.[quoted image][quoted image][quoted image][quoted image][quoted image]

Your Barbasol can has me thinking. I know others are working on a 3D printed version, but what if it was designed in such a way to replace the red flasher dome in the back left by the dock (seems to be the most logical place to put one)?

I think I may take a crack at designing one. The mod would just be the can and won't have the hidden embryo vials exposed, but will be illuminated by flasher bulb. Would anyone else have interested in such a mod?

#6961 4 years ago
Quoted from Mr_Tantrum:

Your Barbasol can has me thinking. I know others are working on a 3D printed version, but what if it was designed in such a way to replace the red flasher dome in the back left by the dock (seems to be the most logical place to put one)?
I think I may take a crack at designing one. The mod would just be the can and won't have the hidden embryo vials exposed, but will be illuminated by flasher bulb. Would anyone else have interested in such a mod?

I think that would be pretty cool

#6962 4 years ago
Quoted from Lonzo:

I think that would be pretty cool

Actually, I'm already tinkering with having the vials showing. I'll have to do some measuring and prototyping to see if possible, but looking good so far.

#6963 4 years ago

Here is concept (minus the label being on the can) Going to have to experiment once I get home to see what kind of height is available in that area to see if it can be opened & how far, and also figure out what size the can should be w/o being overly large. Also, I'll have to see if it is even possible to make that small and still keep detail.

Another thought is that even though base is silver/aluminum in the movie, this would not allow for much light to pass through. I might make part of it white, or at least the internal cylinder that the vials surround.
pasted_image (resized).pngpasted_image (resized).pngBarbasol Label.jpgBarbasol Label.jpg

#6964 4 years ago
Quoted from Mr_Tantrum:

Interesting . . . I've never had a ball bounce out. I assume you've tested by hand to make sure that the gate is moving as freely as possible and not getting hung up or slowly descending? If this were the case, maybe cleaning/blowing out the tabs/holes and applying a little lubricant where the hinges are would fix the issue? These gates are used in countless pins, and I can't imagine that adding a little weight to the flap would be required to have it perform correctly (although a good idea).
If you do decide to add a little weight, maybe a creative decal would do the job. I designed this one for Getaway just as a theme decal (flap performed perfectly with and without it), and something similar might be just enough weight for your JP flap while adding to the overall theme.[quoted image]

I haven't opened up to test yet to see how freely the gate moves. It's pretty much done it since day 1 of my teardown and clean though. I've just kinda just tolerated it, but now getting in the mood to see if I can solve it. Should be freely moving since I cleaned that part up good when I did the teardown. Polished it up nice and smooth. I'm 99% sure the gate bounces back up because I do know for sure the ball does hit the pop bumper and doesn't get caught by the gate.

#6965 4 years ago
Quoted from woody24:

I haven't opened up to test yet to see how freely the gate moves. It's pretty much done it since day 1 of my teardown and clean though. I've just kinda just tolerated it, but now getting in the mood to see if I can solve it. Should be freely moving since I cleaned that part up good when I did the teardown. Polished it up nice and smooth. I'm 99% sure the gate bounces back up because I do know for sure the ball does hit the pop bumper and doesn't get caught by the gate.

Makes it sound like you have the opposite problem - like it is so well cleaned it moves too freely.

#6966 4 years ago

Well, unfortunately, the open can idea isn't going to work for that location. There just isn't enough height at about 3.5". The diameter of the flasher would be significantly larger (wider & taller) than what the mechanism would support.

However, my original idea of just the can as the cover over the flasher should work just fine. I'm designing & printing a prototype now. I could still do the other style, just would need an area with much more height (I might mess around with this later).

#6967 4 years ago
Quoted from Mr_Tantrum:

Pics look great. I need to send you one of my new decals that I've since developed for the ball launch gate: https://pinside.com/pinball/forum/topic/jurassic-park-club/page/139#post-5177673

Dam that post sliped by me
Thats nice man, love yor stuff!!

Maybe if you make the can, a led flasher would be better for fitting and size?

#6968 4 years ago
Quoted from jorro:

Dam that post sliped by me
Thats nice man, love yor stuff!!
Maybe if you make the can, a led flasher would be better for fitting and size?

Unfortunately, I created that decal after I had already sent your other stuff. The can needs to sit over the extended socket anyway - just not a good fit there with the open version. However, I've designed and am printing just the can right now, and I think it is going to work great.

#6969 4 years ago

Just wanted to let everyone know that I'm adding the Visitors Center decal to my JP offerings. Cost is $12 with postage ($14 for international postage). You can apply the decal to either the insides of the cabinet or on the backboard as shown. As always, if interested please PM me and I'll provide a link to the list and pricing of all my JP related mods.

The decal is pre-cut and measures 7.5" x 3.5" (190.5mm x 90mm)

JPVC.pngJPVC.png977c97957ca1f9250bdb290b26e35c7170b93d84.jpg977c97957ca1f9250bdb290b26e35c7170b93d84.jpg
#6970 4 years ago

looks good!

I would focus on those trex teeth ; )

#6971 4 years ago
Quoted from delt31:

looks good!
I would focus on those trex teeth ; )

I’ve been working on it, but not much luck yet. It is actually harder than you would think.

#6972 4 years ago

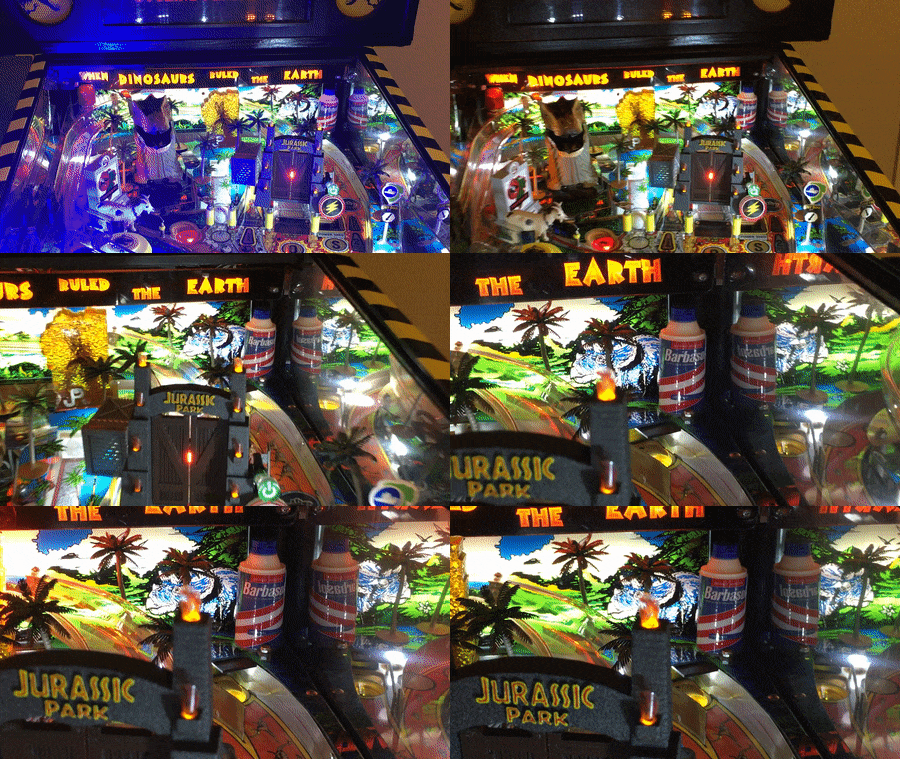
Well, I must say that I'm really pleased with how my Barbasol flasher cover came out. The shaving cream can is designed to replace the red cover at the back right of the pin near the dock eject shield. Installation is simple - just take the two nuts off of the current flasher cover, replace the cover with my Barbasol can, put the nuts back on, and viola!

In my case I left the red flasher in, but I might decide to replace it with white (FYI, I use the 13SMD towers from Comet - https://www.cometpinball.com/products/13smd-tower-flasher). I'm making the Barbasol flasher covers available for purchase for $35 including US shipping (as always, I will ship outside US but will need to quote based upon destination). As always, please PM me if interested, and be sure to check out all of my other JP mods as well at http://thezumwaltfamily.com/jppinball
IMG_2672.JPGIMG_2672.JPGIMG_2673.JPGIMG_2673.JPGIMG_2674.JPGIMG_2674.JPGIMG_2675.JPGIMG_2675.JPG

optimize.gifoptimize.gif
#6973 4 years ago
Quoted from Mr_Tantrum:

Well, I must say that I'm really pleased with how my Barbasol flasher cover came out. The shaving cream can is designed to replace the red cover at the back right of the pin near the dock eject shield. Installation is simple - just take the two nuts off of the current flasher cover, replace the cover with my Barbasol can, put the nuts back on, and viola!
In my case I left the red flasher in, but I might decide to replace it with white (FYI, I use the 13SMD towers from Comet - https://www.cometpinball.com/products/13smd-tower-flasher). I'm making the Barbasol flasher covers available for purchase for $35 including US shipping (as always, I will ship outside US but will need to quote based upon destination). As always, please PM me if interested, and be sure to check out all of my other JP mods as well at http://thezumwaltfamily.com/jppinball
[quoted image][quoted image][quoted image][quoted image][quoted image]

Looks great! Nice work as always.

#6974 4 years ago

What if you included the vials inside (or maybe an outline) so when it flashes they are shown?

#6975 4 years ago

Death to LED flashers

#6976 4 years ago
Quoted from Chitownpinball:

Death to LED flashers

I love them, but I can still get along with the incandescent crowd.

Looks like we’re one step closer to world peace now.

#6977 4 years ago
Quoted from shepP:

What if you included the vials inside (or maybe an outline) so when it flashes they are shown?

I tested this and it doesn't work. The flash is so quick that your eyes can't adjust to make out any specific pattern. Pretty much just looks normal. If it was illuminated by GI or on for an extended period of time, then it might work better.

I also pretty much have my open can version design done, just not sure were the fit for it would be on this pin.

#6978 4 years ago
Quoted from Mr_Tantrum:

Makes it sound like you have the opposite problem - like it is so well cleaned it moves too freely.

Ha. probably so. Just like the optics in my ball through. It was so shiny, it always thought there were balls in the through. Had to cover the insides up with electrical tape.

#6979 4 years ago
Quoted from woody24:

Ha. probably so. Just like the optics in my ball through. It was so shiny, it always thought there were balls in the through. Had to cover the insides up with electrical tape.

Try sticking some electrical tape or something across the back, just to see if that is enough weight to solve your problem. If so, you could then either apply and trip tape to match shape or create a decal like I mentioned.

#6980 4 years ago
Quoted from Mr_Tantrum:

I love them, but I can still get along with the incandescent crowd.
Looks like we’re one step closer to world peace now.

LOL!

#6981 4 years ago

I post a few back about my offering plug-n-play light box mods featuring the 3D light box designed by @davi, so I thought I would show some pics of the assembly since I've sold a couple of them. For $50 (if you want to order from me instead of making your own), I print the 3D box, provide the lighting, provide the cabling and clips to connect to GI, and provide the 2 longer screws you will need (you use your current banner plastic).

I did mine with amber LEDs, but others prefer white (this one is warm white by request).

IMG_2681.JPGIMG_2681.JPGIMG_2679.JPGIMG_2679.JPG
#6982 4 years ago

I just finished installing my new EnerGI Maestro (https://sites.google.com/site/energimaestro/home), and I really like it. The install was very simple with good directions (hardest part was getting screws started into back of cabinet). Once installed, for now I just programmed all of the lights the same where they can be full bright, very soft instead of going off, and I made the transition from off to on & on to off quick but smooth.

I highly recommend if you have LED'd your JP as the game is now much easier on the eyes during all of the light switching, flashing, etc.

#6983 4 years ago

Looking for a set of side rails for JP in good condition anyone have an extra set laying around that could help me out? Thank you

#6984 4 years ago

For those of you who have purchased and will be purchasing the banner light box kit from me, I've discovered a better way to wire it. At first, my instruction was to run the cable down through the cable shield at back left then clamp on to GI on underside of playfield.

What I now recommend instead is to run the cable up through the shield into the backbox. From here you should clip onto the backboard GI circuit. This way you don't have to worry about the cable when sliding out the playfield, and now the sign will illuminate in concert with the backglass/translite.

Please note that my cable is different than the one I'm including with my kit (this homemade cable with dual connectors was already in my machine, so no need to replace it - the one I include will only have a single connector which is all that is needed). Also, I have soldered onto the circuit since I did not have a connector on that end of the cable to plug the alligator clips into. However, clips will work just fine in this scenario (I have a similar connection on my Getaway).
IMG_2685.JPGIMG_2685.JPGIMG_2686.JPGIMG_2686.JPG

IMG_2688.JPGIMG_2688.JPGIMG_2690.JPGIMG_2690.JPGIMG_2694.JPGIMG_2694.JPG
#6985 4 years ago

That's what I posted when I installed my aluminum light bar. I feel that when you lift the playfield any wiring that is attached to the GI could make it difficult to manage.....

20190810_153340 (resized).jpg20190810_153340 (resized).jpg20190811_075413 (resized).jpg20190811_075413 (resized).jpg
#6986 4 years ago
Quoted from hawkeyexx:

That's what I posted when I installed my aluminum light bar. I feel that when you lift the playfield any wiring that is attached to the GI could make it difficult to manage.....[quoted image][quoted image]

Wish I would have seen your original post, would have saved me some angst.

#6987 4 years ago

Mr_Tantrum since you don’t run a Pinside store. Where can I get a list of everything you offer for JP? I feel like you’re just blowing up this thread and I can’t keep track

#6988 4 years ago

Yes, I’d like to see a list too. Thanks!

#6989 4 years ago
Quoted from ypurchn:

mr_tantrum since you don’t run a Pinside store. Where can I get a list of everything you offer for JP? I feel like you’re just blowing up this thread and I can’t keep track

http://thezumwaltfamily.com/jppinball

#6990 4 years ago

As an alternative to my Barbasol flasher cover (https://pinside.com/pinball/forum/topic/jurassic-park-club/page/140#post-5188418), I've also made this option that has exposed vials. This mod is 5-1/2" tall and is designed to be fastened to the same front bolt as the back right flasher.

The model features multi-colored 3D printed parts, actual liquid filled 3D printed vials (colored water), a vinyl decal printed on a photo printer along with a clear gloss vinyl top layer, a Comet Matrix LED strip inside the bottom for illumination, and all wiring & clips required for connecting to GI socket directly underneath the playfield at the back right corner of the pin.

Cost for the mod is $60 and includes US shipping (will ship outside US on a per quote basis). As always, if you are interested in purchasing, please PM me for purchasing details.
IMG_2701.JPGIMG_2701.JPGIMG_2700.JPGIMG_2700.JPGIMG_2699.JPGIMG_2699.JPGIMG_2698.JPGIMG_2698.JPG

#6991 4 years ago

Been working on T-Bone's teeth. I think I have the lowers pretty much done. They are sharp . . . literally. I feel like my fingers should be bleeding after installing them. Also, the first couple of print layers are black so that you don't see a big white band for the gums inside the mouth.

I tested ball pickup about 20 times, and zero issues. Not sure how to tackle the uppers yet.
IMG_2705.JPGIMG_2705.JPGIMG_2706.JPGIMG_2706.JPGIMG_2707.JPGIMG_2707.JPG

#6992 4 years ago

Wow those look great!

#6993 4 years ago

Friggin awesome!

#6994 4 years ago

Very nice what are you using to hold them in place?

#6995 4 years ago
Quoted from hawkeyexx:

Very nice what are you using to hold them in place?

For now, mounting tape. I was hoping I could use something thinner, but I need to work on shaping them a little better. I cleaned the inside surface of the metal really well, but with my other taping options they still came loose. However, I think the force of the curved shape of the teeth might have been causing that (was acting like a spring).

My plan is to try later with heating the plastic to where it is malleable, and then quickly inserting in the mouth to form the shape. If this works, then I might be able to use a thinner adhesive since they won't be trying to pop themselves out.

#6996 4 years ago

@mr_tantrum The DNA vile can turned out really nice. I was battling with the can being as big as the trex head, but I think I can get over it to have such a cool add on.

Ill have to wait until funds fall into my pinball account. Maybe in the winter. I want this, your TREX decals for the apron...the whole deal. Some day. Just dont stop one day like Tim.

#6997 4 years ago
Quoted from Chitownpinball:

@mr_tantrum The DNA vile can turned out really nice. I was battling with the can being as big as the trex head, but I think I can get over it to have such a cool add on.
Ill have to wait until funds fall into my pinball account. Maybe in the winter. I want this, your TREX decals for the apron...the whole deal. Some day. Just dont stop one day like Tim.

I have no plans of stopping as long as I can fog a mirror. I don't do this as a business, rather, I just see it as part of the pinball hobby that I enjoy. As I get busier it might take me a little longer to get things made (right now my OCD requires that I do it NOW).

While I've done several commissioned graphics work and mods for a multitude of pins, I primarily focus on he two I own. I do have one other idea for JP once I get the teeth done that is inspired by the new Stern JP, but not ready to share that yet as it is just a thought at this time.

#6998 4 years ago

It's difficult getting teeth in that work and look good. Just look at the t-rex in the new Stern game...

#6999 4 years ago
Quoted from winteriscoming:

It's difficult getting teeth in that work and look good. Just look at the t-rex in the new Stern game...

Yes it is. I had an idea for the uppers, but complete fail . . . back to the drawing board.

#7000 4 years ago
Quoted from Mr_Tantrum:

Yes it is. I had an idea for the uppers, but complete fail . . . back to the drawing board.

You do decal printing. Do you have a plotter to cut out the shapes? Something like a decent quality laminated print that's cut out and installed between the frame and the plastic shell should be possible. I was a potential route for my 3d printed t-rex.

Promoted items from Pinside Marketplace and Pinside Shops!
$ 49.99
Playfield - Toys/Add-ons
FlipMods
 
$ 25.00
Playfield - Protection
UpKick Pinball
 
From: $ 35.00
Cabinet - Other
Rocket City Pinball
 
Trade
Machine - For Trade
Mariposa, CA
$ 6,999.00
Pinball Machine
Classic Game Rooms
 
Trade
Machine - For Trade
Needville, TX
$ 12,999.00
Pinball Machine
Classic Game Rooms
 
From: $ 11.95
Playfield - Toys/Add-ons
ULEKstore
 
$ 10.00
Playfield - Protection
UpKick Pinball
 
$ 79.99
Cabinet - Armor And Blades
PinGraffix Pinside Shop
 
From: $ 9,499.00
Pinball Machine
Paradise Distribution
 
$ 185.00
Cabinet - Toppers
Sparky Pinball
 
$ 29.95
Playfield - Toys/Add-ons
ULEKstore
 
From: $ 75.00
Playfield - Protection
UpKick Pinball
 
$ 65.00
Playfield - Toys/Add-ons
G-Money Mods
 
$ 1.25
Lighting - Led
Mitchell Lighting
 
$ 49.99
Cabinet - Toppers
Lighted Pinball Mods
 
From: $ 35.00
Cabinet - Other
Rocket City Pinball
 
From: $ 12.00
Cabinet - Decals
arcade-cabinets.com
 
4,500 (Firm)
Machine - For Sale
Ronkonkoma, NY
$ 99.00
Playfield - Toys/Add-ons
Loop Combo Pinball
 
$ 15.95
Playfield - Toys/Add-ons
ULEKstore
 
$ 259.99
Cabinet - Toppers
Lighted Pinball Mods
 
$ 45.00
Playfield - Toys/Add-ons
G-Money Mods
 
$ 250.00
Playfield - Other
Avid Creations Wireforms
 
$ 1.00
Lighting - Other
Rocket City Pinball
 
4,400
Machine - For Sale
Livermore, CA
$ 18.95
Eproms
Pinballrom
 
$ 10.00
Playfield - Other
Loop Combo Pinball
 
There are 10,131 posts in this topic. You are on page 140 of 203.

Reply

Wanna join the discussion? Please sign in to reply to this topic.

Hey there! Welcome to Pinside!

Donate to Pinside

Great to see you're enjoying Pinside! Did you know Pinside is able to run without any 3rd-party banners or ads, thanks to the support from our visitors? Please consider a donation to Pinside and get anext to your username to show for it! Or better yet, subscribe to Pinside+!


This page was printed from https://pinside.com/pinball/forum/topic/jurassic-park-club/page/140?hl=etnfrd67 and we tried optimising it for printing. Some page elements may have been deliberately hidden.

Scan the QR code on the left to jump to the URL this document was printed from.