(Topic ID: 8924)

Johnny Mnemonic - Insert Graphics Repair

By EchoVictor

12 years ago


Topic Stats

  • 6 posts
  • 4 Pinsiders participating
  • Latest reply 11 years ago by EchoVictor
  • No one calls this topic a favorite

You

Linked Games

#1 12 years ago

Hey all,

I have a repair question on my first pin, a Johnny Mnemonic.

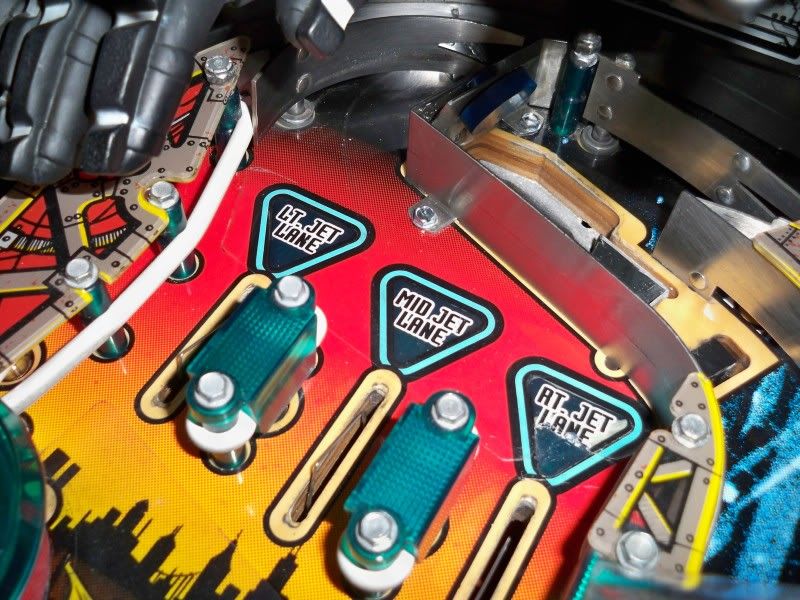
The playfield is absolutely gorgeous, except for one issue that I'd
like to fix. On the top rollover lanes, one of the inserts (RH jet lane) has some
of its graphics worn off/chewed up;

http://i73.photobucket.com/albums/i204/EchoVictor/Pinball/101_0848.jpg

I've looked around on the web for a replacement decal, but there doesn't seem to be
much out there. Any ideas on how I would fix this?

Thanks,
EV

6 months later
#2 11 years ago

Here's what I would do......

1. take high res photos of all 3 inserts making sure the camera is directly above the insert.
2. Save image to your PC and use photoshop (or similar) to create the text you require - looks like you only need to recreate the word 'LANE'
3. get your sizing correct by printing the image you created onto a transparency sheet and laying the image directly over the insert being repaired. This might take a few goes to get it right
4. Once you are happy with the image, print as many images as you can fit onto a sheet of white waterslide decal paper - it must be white (not clear) for this particular job. Also, depending on how much light gets through on the waterslide you may need to experiment a bit - these are very thin and may need to be doubled/tripled up for the desired transparency. It is trial and error.
5. carefully cut around the text leaving the white border
6. When you are happy with the decal(s) you have made, remove the insert by gently heating from below the PF and tapping it out
7. Sand off the existing text - I use 400 grit then 800, then 1200 etc.
8. Apply the waterslide decal(s) to the insert - if using more than 1, make sure the one already applied is fully dry.
9. Apply clearcoat to seal the graphics (such a small area - just water based spray clear would do) or just mix a couple of mls of automotive clear (2pack) if you have it and brush it on.
10. Allow it to dry accordingly
11. Replace your repaired insert into the PF (don't forget to glue it!)
12. Play your game.

#3 11 years ago

The first 2 steps of the above suggestion should be easy.

Take a nice above, straight over pic of the left lane insert and the right lan insert. Get both pics as level and the same size as possable. Then just cut the R from the right lane pic and paste it over the L on the left lane insert pic. Your touch up is finished.

#4 11 years ago

Good suggestion on repair but 2 part automotive urethane will go on too "hot" with a brush - the decal will shrivel and be destroyed.

If using 2 part urethane, mist on the driest coat you can make for 3 passes about 5 minutes apart. Then go ahead and shoot the clear like you normally do.

Do a test run on a piece of scrap and make sure your technique is solid before experiencing the panic of the decal shriveling on your playfield, LOL.

#5 11 years ago
Quoted from vid1900:

Good suggestion on repair but 2 part automotive urethane will go on too "hot" with a brush - the decal will shrivel and be destroyed.
If using 2 part urethane, mist on the driest coat you can make for 3 passes about 5 minutes apart. Then go ahead and shoot the clear like you normally do.
Do a test run on a piece of scrap and make sure your technique is solid before experiencing the panic of the decal shriveling on your playfield, LOL.

Good call on the shrivel potential! I always spray mine but it seemed like a massive overkill to prep everything for one little insert.

#6 11 years ago

Wow, holy delayed response, Batman!

Thanks and appreciation for the info guys. I've been playing the machine all these past 6 months, and just living with the damaged insert. I forgot to mention in the original post that a previous owner had put a strip of mylar over all three inserts, so it's been protected. I just haven't gotten around to messing with it yet.

Your advice just might be the kick-start I needed.....

Later,
EV

Promoted items from Pinside Marketplace and Pinside Shops!
$ 18.95
Eproms
Pinballrom
 
5,000
Machine - For Sale
Oakley, CA
4,500
Machine - For Sale
New Castle, CO
3,500
Machine - For Sale
Merritt Island, FL
$ 63.95
Eproms
Pinballrom
 
$ 11.95
Playfield - Toys/Add-ons
ULEKstore
 
$ 29.00
From: $ 9.99
Eproms
Matt's Basement Arcade
 
€ 150.00
Cabinet - Decals
Pin-Decals
 
From: $ 27.00
Boards
KAHR.US Circuits
 
$ 37.50
$ 95.00
Cabinet - Sound/Speakers
Pinball Mod Co.
 
$ 22.50
$ 1.00
Pinball Machine
Pinball Alley
 
From: $ 9.99
Eproms
Matt's Basement Arcade
 
$ 16.00
Boards
Lermods
 
3,000 (OBO)
Machine - For Sale
West Chester, PA
Great pinball charity
Pinball Edu

Reply

Wanna join the discussion? Please sign in to reply to this topic.

Hey there! Welcome to Pinside!

Donate to Pinside

Great to see you're enjoying Pinside! Did you know Pinside is able to run without any 3rd-party banners or ads, thanks to the support from our visitors? Please consider a donation to Pinside and get anext to your username to show for it! Or better yet, subscribe to Pinside+!


This page was printed from https://pinside.com/pinball/forum/topic/johnny-mnemonic-insert-graphics-repair and we tried optimising it for printing. Some page elements may have been deliberately hidden.

Scan the QR code on the left to jump to the URL this document was printed from.