(Topic ID: 223872)

Indiana Jones plane rescue service

By KornFreak28

5 years ago


Topic Heartbeat

Topic Stats

  • 3,705 posts
  • 260 Pinsiders participating
  • Latest reply 13 hours ago by KornFreak28
  • Topic is favorited by 133 Pinsiders

You

Linked Games

Topic poll

“How important to you are the Biplane tension wires?”

  • Really important! They improve the look so much! 26 votes
    72%
  • They look great but wouldn’t care if they are not installed 10 votes
    28%
  • Don’t care for them/Don’t even notice them 0 votes

(36 votes)

This poll has been closed.

Topic Gallery

View topic image gallery

IMG_4998 (resized).jpeg
Before1 (resized).jpg
After1 (resized).jpg
After2 (resized).jpg
After3 (resized).jpg
IMG_1617 (resized).jpeg
IMG_1616 (resized).jpeg
IMG_1613 (resized).jpeg
IMG_1615 (resized).jpeg
IMG_1614 (resized).jpeg
IMG_0908 (resized).jpeg
Tom Petty (resized).jpg
IMG_0815 (resized).jpeg
IMG_0907 (resized).jpeg
IMG_1150 (resized).jpeg
IMG_1148 (resized).jpeg
There are 3,705 posts in this topic. You are on page 14 of 75.
#651 5 years ago
Quoted from KornFreak28:

Check out Mike’s awesome fighter plane with original light board and pilot mod!
Mike brass plated his biplane and fighter mounting brackets and I must say, they look really nice
You may be my second guinea pig this weekend. We’ll see!
[quoted image][quoted image][quoted image][quoted image]

Interesting to see how you reused the original board.

I ended up cutting out the middle sections so it was in the middle of the wing. Totally impractical when making more than one as it took ages.

How did you solve the problem of the fighter prop getting hit by the ball when using a stock prop? I had to glue mine into a position that couldn't be hit (you can see one of my blades os bent).

B6CD2B42-507B-4A10-BC94-35CC9417F38F (resized).jpegB6CD2B42-507B-4A10-BC94-35CC9417F38F (resized).jpeg25A13EE8-CEC2-4B52-8AFF-06B6CFF1787D (resized).jpeg25A13EE8-CEC2-4B52-8AFF-06B6CFF1787D (resized).jpeg

#652 5 years ago
Quoted from KornFreak28:

Attention PACMAN, gac and RobertWinter: You guys need to pay Ricochet for your harness asap

gac has paid Ricochet.

#653 5 years ago
Quoted from koops:

Interesting to see how you reused the original board.
I ended up cutting out the middle sections so it was in the middle of the wing. Totally impractical when making more than one as it took ages.
How did you solve the problem of the fighter prop getting hit by the ball when using a stock prop? I had to glue mine into a position that couldn't be hit.

What do you mean? Fighter prop getting hit by the ball?

#654 5 years ago
Quoted from gac:

gac has paid Ricochet.

As have I.

#655 5 years ago

CoPinFan and MikeHogue please check your PMs for payment info....

#656 5 years ago
Quoted from koops:

Interesting to see how you reused the original board.
I ended up cutting out the middle sections so it was in the middle of the wing. Totally impractical when making more than one as it took ages.
How did you solve the problem of the fighter prop getting hit by the ball when using a stock prop? I had to glue mine into a position that couldn't be hit (you can see one of my blades os bent).
[quoted image][quoted image]

Your bracket should be on the other side! Remove the front screw, loosen the rear screw, lift plane up, tighten screw, done

You don’t need both screws. One is fine. This allows you to move the plane up and down. You also probably drilled the holes too low...

#657 5 years ago

Payment sent. Love my planes!

Thanks George!

#658 5 years ago
Quoted from MikeHogue:

Payment sent. Love my planes!
Thanks George!

Thanks! I’ll give you the tracking number tomorrow

#659 5 years ago
Quoted from KornFreak28:

Your bracket should be on the other side! Remove the front screw, loosen the rear screw, lift plane up, tighten screw, done
You don’t need both screws. One is fine. This allows you to move the plane up and down. You also probably drilled the holes too low...

Thanks. Do you mean the screw between the bracket and ramp?

My bracket is connected to the plane internally but to the left (when looking head on). I did it exactly the same as the original as that was the only way i could get it to clear the glass. I think because I made it connect internally that was enough for a prop edge to be low enough to be hit by a ball coming up the right ramp.

#660 5 years ago
Quoted from koops:

Thanks. Do you mean the screw between the bracket and ramp?
My bracket is connected to the plane internally but to the left (when looking head on). I did it exactly the same as the original as that was the only way i could get it to clear the glass. I think because I made it connect internally that was enough for a prop edge to be low enough to be hit by a ball coming up the right ramp.

Post pics of your bracket

#661 5 years ago
Quoted from KornFreak28:

Post pics of your bracket

I don’t want to derail your mod thread but here they are.

Now I’m making an assumption that the bracket to the ramp is right however the previous owner did replace the planes.

876C857E-9B84-4435-B6D4-F9B81EE17805 (resized).jpeg876C857E-9B84-4435-B6D4-F9B81EE17805 (resized).jpeg7F5E4B2A-8457-497A-8D98-196FBD6EA287 (resized).jpeg7F5E4B2A-8457-497A-8D98-196FBD6EA287 (resized).jpeg409491A4-37C3-4B39-80BC-F64CD64A40D4 (resized).jpeg409491A4-37C3-4B39-80BC-F64CD64A40D4 (resized).jpeg10C67767-8F99-4532-9937-3C4991E63D08 (resized).jpeg10C67767-8F99-4532-9937-3C4991E63D08 (resized).jpeg

#662 5 years ago
Quoted from koops:

I don’t want to derail your mod thread but here they are.
Now I’m making an assumption that the bracket to the ramp is right however the previous owner did replace the planes.
[quoted image][quoted image][quoted image][quoted image]

You are not derailing anything. I’ll show you what I think you are doing wrong but first tell me, What was hitting your glass? The tail or the prop?

#663 5 years ago
Quoted from KornFreak28:

You are not derailing anything. I’ll show you what I think you are doing wrong but first tell me, What was hitting your glass? The tail or the prop?

Both clear so it all fits. Tail is close. Right wing is close. prop (when it was free spinning) was able to be hit by a ball if it was in the right position. If i revisited doing this plane I was considering redoing the prop to make it move.

ok I can see from your installed plane that my bracket is actually backwards (like you said). *facepalm* I'll blame the previous owner

https://images.pinside.com/5/5b/55b83706373057d4855628a7d1daf10cf1509e06/resized/large/55b83706373057d4855628a7d1daf10cf1509e06.jpeg

makes sense that it should be aiming at the biplane!

#664 5 years ago

Ok so right now your tail is close but doesn’t hit the glass correct?

There are several thing I see that are incorrect in my opinion....

1. The bracket should be facing the other way. See pic.

2. Your bracket is screwed on the very bottom of the plane’s belly which makes the plane sit higher and hitting the glass. I drilled holes for the bracket on the top half making the plane sit lower and allowing you to tilt the prop up or down if you are using one screw to hold the plane. Using 2 screws is more restrictive.

3. Your bracket is inside the plane (yes I know that is just like factory but this is not a factory plane) You need ti drill the bracket on the outside. See pic...

Typing more and posing pics....

#665 5 years ago

There are endless possibilities when installing this plane! You can loosen the screw that holds the bracket to the ramp, move the plane left or right and tighten the screw.

You can also drill different holes on the outside of the plane just like I did. This allows you to move the plane forward, backward, up or down to make it fit...

Check it out...This is what you have right now correct? The same thing, only your bracket is on the inside of the plane

5A3D9B16-25FB-4525-8E52-941B7648D1A1 (resized).jpeg5A3D9B16-25FB-4525-8E52-941B7648D1A1 (resized).jpegA91FF632-15A0-4F7D-8801-95C18691E7FF (resized).jpegA91FF632-15A0-4F7D-8801-95C18691E7FF (resized).jpeg
#666 5 years ago

This is what I recommend:

Turn the bracket around, drill a few more holes a bit higher and adjust the plane until it fits. My suggestion is to use one screw to hold the plane if possible. This allows you greater movement. Once you have the perfect fit, you can mark where the second screw goes and drill another hole for it so that the plane is secured with both screws.

You can also add a little hot glue between the bracket and the plane to secure it.

This is what you should do, see pics....In some pics, I have 2 screws holding the plane, then I removed one screw. Then I moved the plane forward and secured it with one screw. Then I loosened the bracket from the ramp to move the plane left and right. So many possibilities

1DE51B49-6C9E-48C1-8D70-F22AE61D8EBF (resized).jpeg1DE51B49-6C9E-48C1-8D70-F22AE61D8EBF (resized).jpeg89D8BEF8-9979-4B8B-AC34-BCF34FCFE4C8 (resized).jpeg89D8BEF8-9979-4B8B-AC34-BCF34FCFE4C8 (resized).jpeg97ACCC6B-523F-420E-90C7-A04064C9BA2D (resized).jpeg97ACCC6B-523F-420E-90C7-A04064C9BA2D (resized).jpeg9E28E945-8DDF-41F1-92EA-85B1B37CF8FE (resized).jpeg9E28E945-8DDF-41F1-92EA-85B1B37CF8FE (resized).jpegB03A3CC0-84A8-4ADF-9744-B335D0F6F517 (resized).jpegB03A3CC0-84A8-4ADF-9744-B335D0F6F517 (resized).jpegDDA7B1AB-B493-494C-B78F-AC25E45B19B4 (resized).jpegDDA7B1AB-B493-494C-B78F-AC25E45B19B4 (resized).jpeg
#667 5 years ago

No the prop is not hitting the ramp in that picture, not even close!

#668 5 years ago

When the bracket is outside, this looks strange to me. Is there any reason to install it outside? See Koops's solution, the bracket is inside.

#669 5 years ago
Quoted from Davi:

When the bracket is outside, this looks strange to me. Is there any reason to install it outside? See Koops's solution, the bracket is inside.

This is a modded plane not the factory plane. There is no room with all the cables and resistor. Besides, you never ever see the bracket from the players view. Why is that strange? What difference does it make? All you need is for the bracket to hold the plane

#670 5 years ago
Quoted from Davi:

When the bracket is outside, this looks strange to me. Is there any reason to install it outside? See Koops's solution, the bracket is inside.

Koops “solution” doesn’t involve wires and resistors inside the plane does it?

#671 5 years ago

Trust me, I tried to install it inside but there is no room with all the cables, and resistor inside. I have posted countless pics of the planes. I assume this is the first time you noticed the bracket being on the outside? And why? Because the bracket is not visible from a players perspective

#672 5 years ago

You know what Koops? You did derail my thread!

#673 5 years ago

I’m so sorry.

In Korns defence my plane doesn’t have the motor or resistors as he said. So yeah it probably wouldn’t fit.

I only really asked here as he had done sooo many of these he could easily look at mine and see what I’d done wrong (I made this plane mod myself 12 months ago!). I made it fit (just) and then forgotten about it.

I then saw this thread and saw how different they looked.

And now back to your regularly schedule rescuing

#674 5 years ago
Quoted from koops:

I’m so sorry.
In Korns defence my plane doesn’t have the motor or resistors as he said. So yeah it probably wouldn’t fit.
I only really asked here as he had done sooo many of these he could easily look at mine and see what I’d done wrong (I made this plane mod myself 12 months ago!). I made it fit (just) and then forgotten about it.
I then saw this thread and saw how different they looked.
And now back to your regularly schedule rescuing

It was a joke! What do you think of my solutions? Do you think they could work for you?

#675 5 years ago

Yeah absolutely. I’ll pull the machine from the line and have a go tonight.

#676 5 years ago
Quoted from koops:

Yeah absolutely. I’ll pull the machine from the line and have a go tonight.

Do you agree with me that the bracket inside is not any better (probably worse) than on the outside?

#677 5 years ago
Quoted from KornFreak28:

Do you agree with me that the bracket inside is not any better (probably worse) than on the outside?

Yeah I’d agree. Made the creation of it a real pain and is hidden from view anyway.

My correctly positioned fighter thanks to Korn!

0DF77666-AE64-40C9-925F-6A80407CA173 (resized).jpeg0DF77666-AE64-40C9-925F-6A80407CA173 (resized).jpeg

#678 5 years ago
Quoted from koops:

Yeah I’d agree. Made the creation of it a real pain and is hidden from view anyway.
My correctly positioned fighter thanks to Korn!
[quoted image]

Told ya! Glad I was able to help you out koops!!! How much space between ball and prop would you say?

#679 5 years ago

~20mm. Tons of space.

215527BC-C873-43B9-A15D-EB517B17A793 (resized).jpeg215527BC-C873-43B9-A15D-EB517B17A793 (resized).jpeg

#680 5 years ago

“The first transport is away!” “ The first transport is away!”

825D14F7-8294-439E-A997-2B4B78A19395 (resized).jpeg825D14F7-8294-439E-A997-2B4B78A19395 (resized).jpeg

#681 5 years ago

Mula $ent.

#682 5 years ago

Tiger moth’s and Batch 2 in full swing now! Batch 1, I’ll ship this weekend once Mike confirms the biplane prop fits under the glass. I think it will but we better make sure....

1EF1172E-EE04-4DEB-A1D3-30256F48FF51 (resized).jpeg1EF1172E-EE04-4DEB-A1D3-30256F48FF51 (resized).jpegD41EAD5B-B1AF-4717-BB11-846DBEA46C0B (resized).jpegD41EAD5B-B1AF-4717-BB11-846DBEA46C0B (resized).jpeg
#683 5 years ago

Thanks for the update... looking Good!

#684 5 years ago

Hard to catch with an IPhone but here’s the comparison between regular decals and reflective decals. The reflective decals will make your plane pop!

05393102-EFED-42CE-8B14-45273B7D8A23 (resized).jpeg05393102-EFED-42CE-8B14-45273B7D8A23 (resized).jpegD3EC9BBA-6C8A-49D7-B45D-1330B16BBD8F (resized).jpegD3EC9BBA-6C8A-49D7-B45D-1330B16BBD8F (resized).jpeg

#685 5 years ago
Quoted from KornFreak28:

Hard to catch with an IPhone but here the comparison between regular decals vs reflective decals. The reflective decals will make your plane pop!
[quoted image][quoted image]

OK, Yes.

#686 5 years ago

The following is are the installation instructions:

As I said from the very beginning, you will have to do some work to install these planes.

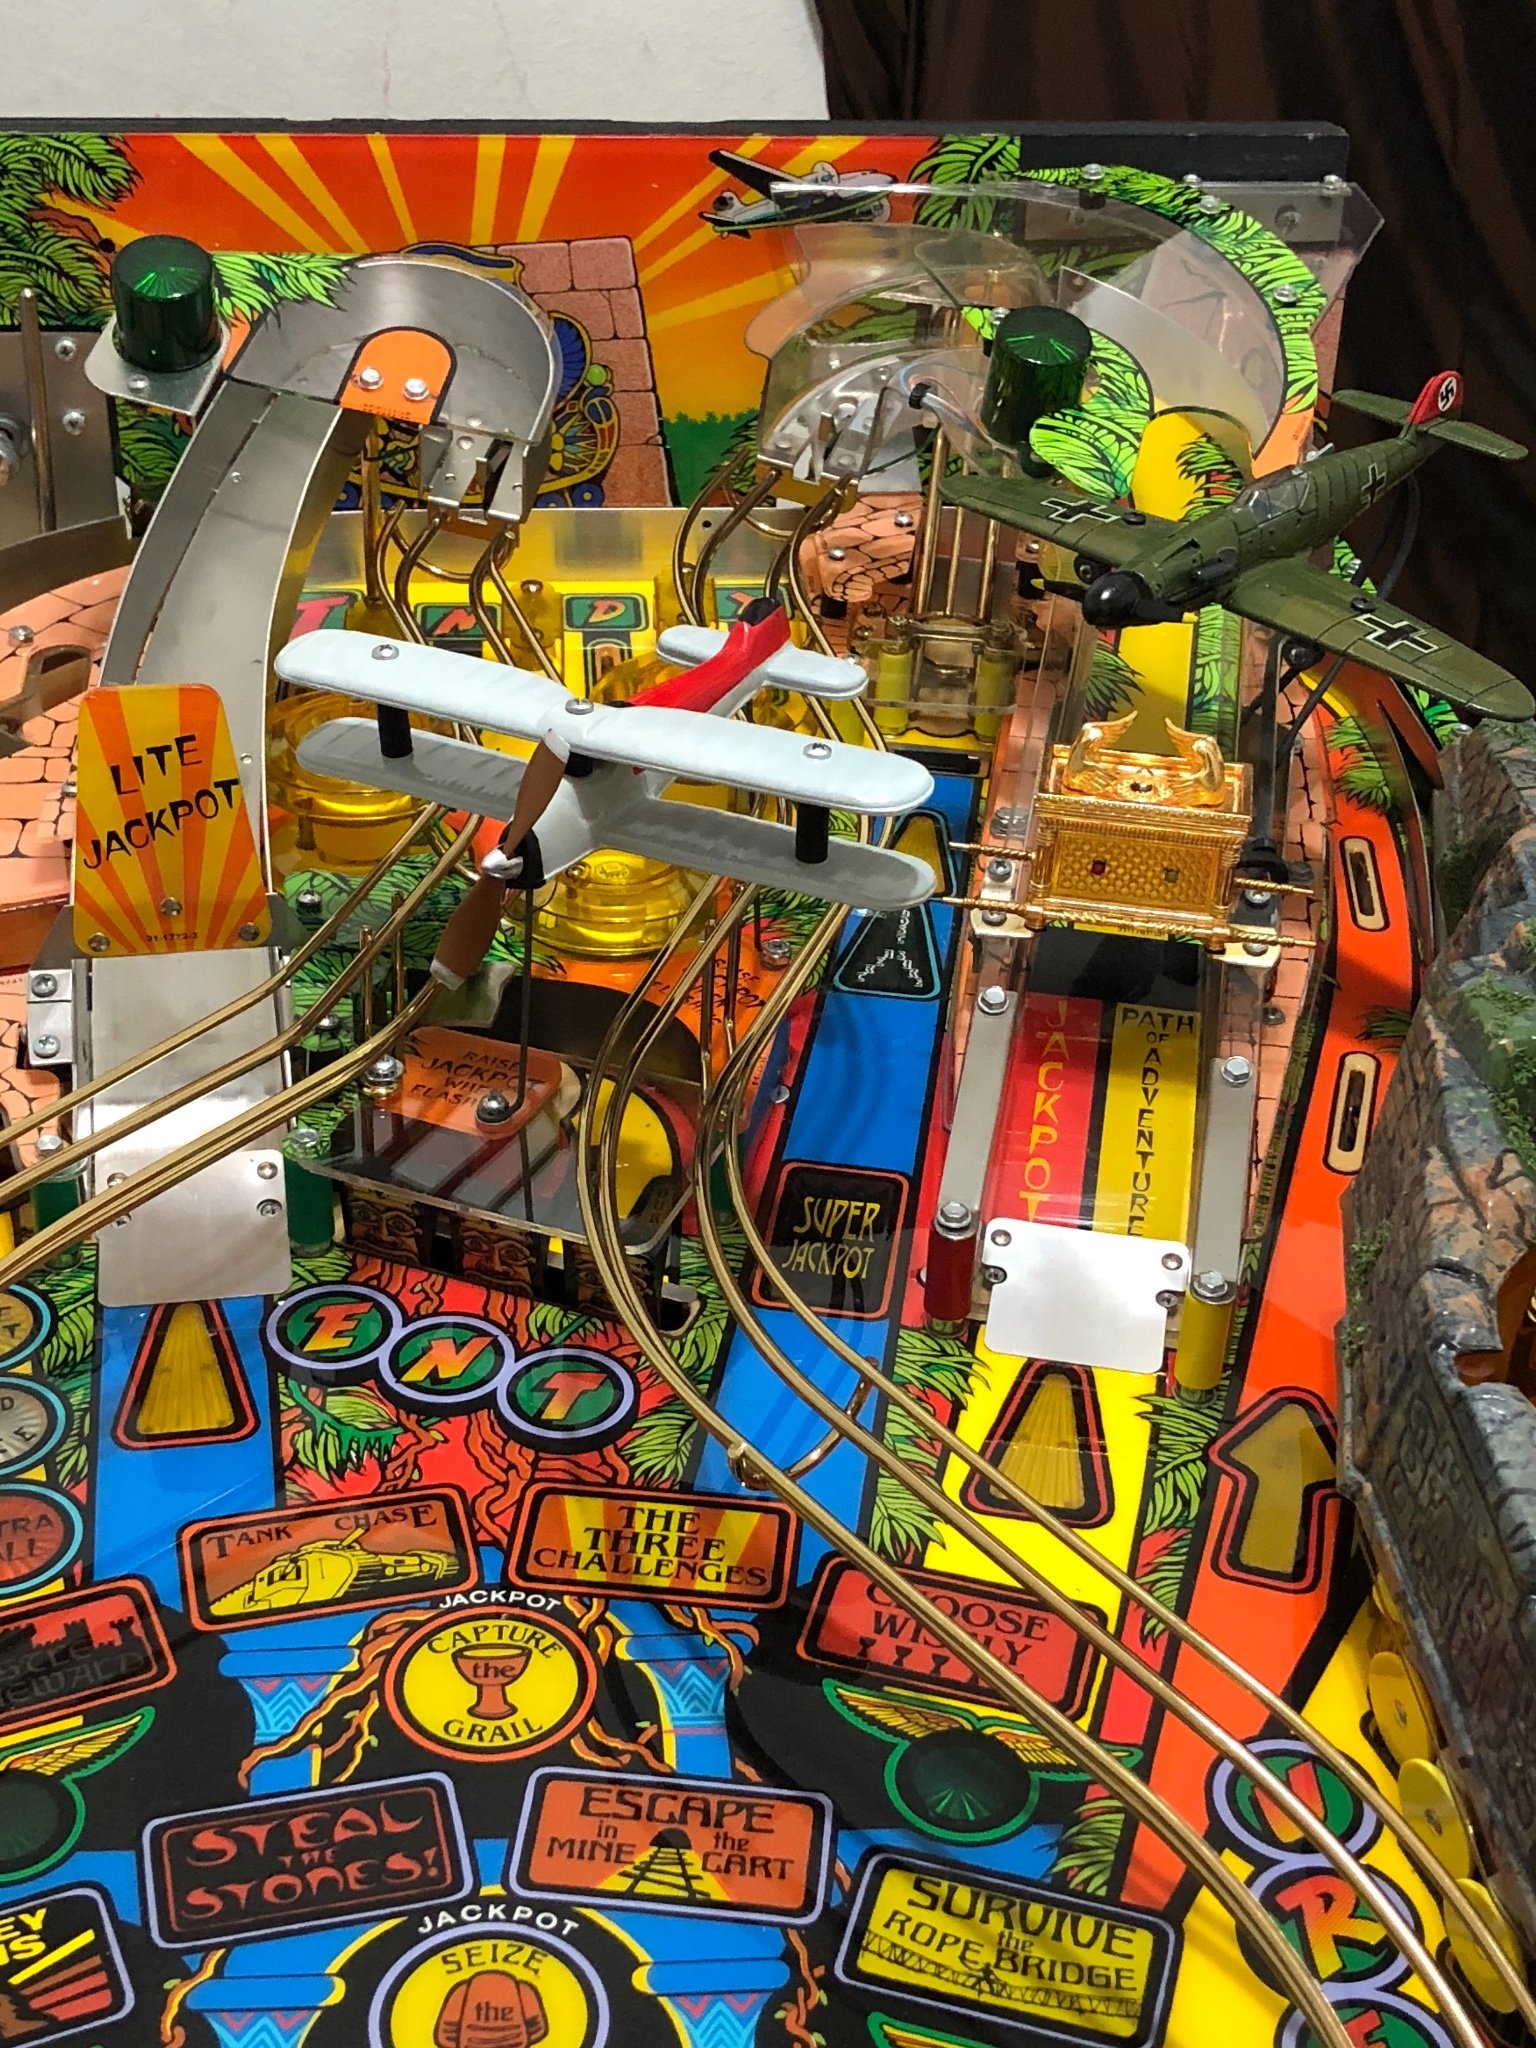
The easiest plane to install is the fighter plane. Why? because you can fish the wires rather easily to the underside of the playfield. You must secure the plane to your mounting bracket by using the holes I drilled for you. You can also drill new holes for better positioning but BE CAREFUL!!!! There are wires inside the plane! If you want to drill new holes, ask me first and I can guide you. You must remove your right ramp wire form. Then remove or lift your right ramp just enough for you to run the wires into the underside of the playfield. You can secure the fighter wires (shrink wrapped section) to the right ramp by using wire ties. See picture

The biplane: The hard part about this plane is running the wires into the underside of the playfield. The wires go under the left ramp. You must do whatever it takes to fish the wires into the underside. You can remove or lift the left ramp, you can remove or lift the jackpot plastic in order to run the wires in a neatly fashion. You can wrap/hide the wires around the pop bumper cap for a more professional looking installation. Install your biplane and run the wires into the underside of the playfield and that is all there is to it. This plane is probably the hardest one to install.

Once that's done, you are almost home! Now it's time to hook your planes into the connector!

Some planes will have Red and White wires. Some will have Red and Black wires and some Will have Black and white wires. If you get a Red wire, that means RED (duhhh). If you get a Black with white, Black is RED. Is you get Red with Black, Red is Red!

The wires are solid and are meant to be inserted into the connector pins. Red with Red and the other wire (white or black) goes to the other wire in the connector, color may vary. You must find the sweet spot and insert the wire so it's snug. You can can install both planes into the same connector (so they spin at the same time) or into different connectors.

I recommend you use the Ruins connector, or the dogfight (plane leds) connector only. These seem to get the most action during the game. You can install the planes into any other flasher connector of your choosing.

Once the wires are inserted, you can secure them with wire ties or electrical tape so they don't move on ya.

You must ONLY connect the planes into a FLASHER power source. Under no circumstances can you hook them to the GI or Lamp matrix! You have been warned!!!

You can insert the wires or solder them into a flasher socket. It's all up to you.

You must make sure you get a good connection when inserting the wires into the connector. The planes will not work if you get a so so or bad connection. That's it! Let me know if you have any questions.....Enjoy!

*****Pics coming******

#687 5 years ago

You can also use one screw to secure your fighter plane for freedom of movement. I recommend you use both screws though. Not sure how well one screw only will hold the plane over time. You can pivot the plane left and right by screwing the mounting bracket to the ramp in different positions. You can also move the plane up or down by using one screw to secure the plane. Once you find the perfect spot, you can drill another hole into the plane if the current holes are not where you want them. Contact me before doing this.

#688 5 years ago
2B8C3FD8-8A4E-4F47-B2DA-3117B91F2D10 (resized).jpeg2B8C3FD8-8A4E-4F47-B2DA-3117B91F2D10 (resized).jpeg5064B468-E57F-43E5-8C5B-C62A96AD1AF6 (resized).jpeg5064B468-E57F-43E5-8C5B-C62A96AD1AF6 (resized).jpeg6E4351FF-5FB7-4E4F-8046-73C4B7BF41AF (resized).jpeg6E4351FF-5FB7-4E4F-8046-73C4B7BF41AF (resized).jpeg71329CA8-21B1-4440-AD12-D8B829E1608A (resized).jpeg71329CA8-21B1-4440-AD12-D8B829E1608A (resized).jpeg94CC8644-5DF0-4CEF-8D6A-66360AE03F6D (resized).jpeg94CC8644-5DF0-4CEF-8D6A-66360AE03F6D (resized).jpeg99AAA3EC-FBA3-4933-A221-0B17181A9A7C (resized).jpeg99AAA3EC-FBA3-4933-A221-0B17181A9A7C (resized).jpegE94645E0-E480-4A23-8A14-A464B1A785E9 (resized).jpegE94645E0-E480-4A23-8A14-A464B1A785E9 (resized).jpegF09658E5-3E8E-4A65-967C-A16F47269723 (resized).jpegF09658E5-3E8E-4A65-967C-A16F47269723 (resized).jpegF212F2C9-E512-46EA-9D72-769D7F61F4E8 (resized).jpegF212F2C9-E512-46EA-9D72-769D7F61F4E8 (resized).jpeg
#689 5 years ago

Great news! Mike’s planes arrived safely and the biplane prop has about a 1/4” of clearance!

#690 5 years ago

Check out the beautiful tiger moth tail!

13F062E0-9763-42AE-AE57-CAA99A53F000 (resized).jpeg13F062E0-9763-42AE-AE57-CAA99A53F000 (resized).jpeg
#691 5 years ago
Screen Shot 2018-10-24 at 10.36.41 PM (resized).pngScreen Shot 2018-10-24 at 10.36.41 PM (resized).pngScreen Shot 2018-10-24 at 10.37.11 PM (resized).pngScreen Shot 2018-10-24 at 10.37.11 PM (resized).png
#692 5 years ago
Quoted from PACMAN:

[quoted image][quoted image]

Really?

#696 5 years ago
Quoted from PACMAN:

[quoted image][quoted image]

This is what can happen if you only use one screw to mount the fighter to the ramp.

#697 5 years ago
Quoted from PACMAN:

[quoted image][quoted image]

Is this is why everyone was so concerned about clearance for the prop?

#698 5 years ago
Quoted from gac:

Is this is why everyone was so concerned about clearance for the prop?

Please note that was the original unit, NOT the beautiful product that KornFreak28 has been producing.

#699 5 years ago

Batch 1 please check your PMs for payment information. Will be sending individual invoices throughout the day. I would like to ship all the planes this Saturday

#700 5 years ago

While you're swapping out your fighter planes, can someone be so kind as to provide the missing dimensions in the attached sketch so that I can fabricate a mounting bracket for my own fighter plane.

Much thanks!

ef06c80a8075bc4a4adefc50806142d08f5bc3d1.jpgef06c80a8075bc4a4adefc50806142d08f5bc3d1.jpg
Promoted items from Pinside Marketplace and Pinside Shops!
From: $ 9.99
Eproms
Matt's Basement Arcade
 
$ 0.00
Playfield - Other
PinJewels
 
$ 399.00
Cabinet - Decals
Mircoplayfields
 
From: $ 55.00
Gameroom - Decorations
Pinball Photos LLC
 
$ 1,159.00
Flipper Parts
Mircoplayfields
 
$ 59.95
Playfield - Toys/Add-ons
pinballmod
 
$ 69.99
Playfield - Toys/Add-ons
Lighted Pinball Mods
 
$ 1,059.00
Flipper Parts
Mircoplayfields
 
$ 35.00
Cabinet - Other
Rocket City Pinball
 
€ 50.00
Playfield - Toys/Add-ons
Pino Pinball Mods Shop
 
$ 0.00
Lighting - Backbox
Creekside Hideaway, LLC
 
Wanted
$ 49.99
Playfield - Toys/Add-ons
Lighted Pinball Mods
 
$ 69.99
Playfield - Toys/Add-ons
Lighted Pinball Mods
 
From: $ 55.00
Gameroom - Decorations
Pinball Photos LLC
 
From: $ 33.00
Gameroom - Decorations
Rocket City Pinball
 
From: $ 20.00
Various Novelties
Pinball Photos LLC
 
14,000 (OBO)
12,500 (OBO)
$ 59.95
Playfield - Toys/Add-ons
pinballmod
 
10,500
Machine - For Sale
Las Vegas, NV
$ 18.00
Playfield - Protection
Volcano Pinball
 
$ 41.99
Lighting - Interactive
Lee's Parts
 
$ 85.00
$ 79.99
Cabinet - Armor And Blades
PinGraffix Pinside Shop
 
$ 69.99
Playfield - Toys/Add-ons
Lighted Pinball Mods
 
$ 1,319.00
Flipper Parts
Mircoplayfields
 
There are 3,705 posts in this topic. You are on page 14 of 75.

Reply

Wanna join the discussion? Please sign in to reply to this topic.

Hey there! Welcome to Pinside!

Donate to Pinside

Great to see you're enjoying Pinside! Did you know Pinside is able to run without any 3rd-party banners or ads, thanks to the support from our visitors? Please consider a donation to Pinside and get anext to your username to show for it! Or better yet, subscribe to Pinside+!


This page was printed from https://pinside.com/pinball/forum/topic/indiana-jones-plane-rescue-service/page/14 and we tried optimising it for printing. Some page elements may have been deliberately hidden.

Scan the QR code on the left to jump to the URL this document was printed from.