(Topic ID: 89701)

How to weaken a coil

By flashinstinct

9 years ago


Topic Heartbeat

Topic Stats

  • 64 posts
  • 22 Pinsiders participating
  • Latest reply 4 years ago by Marten
  • Topic is favorited by 7 Pinsiders

You

Linked Games

Topic Gallery

View topic image gallery

IMG_7407 (resized).jpg
20150920_123558.jpg
beavis-butthead-mtv.jpg
Bingo.jpg
100_3161.JPG
100_3158.JPG
100_3157.JPG
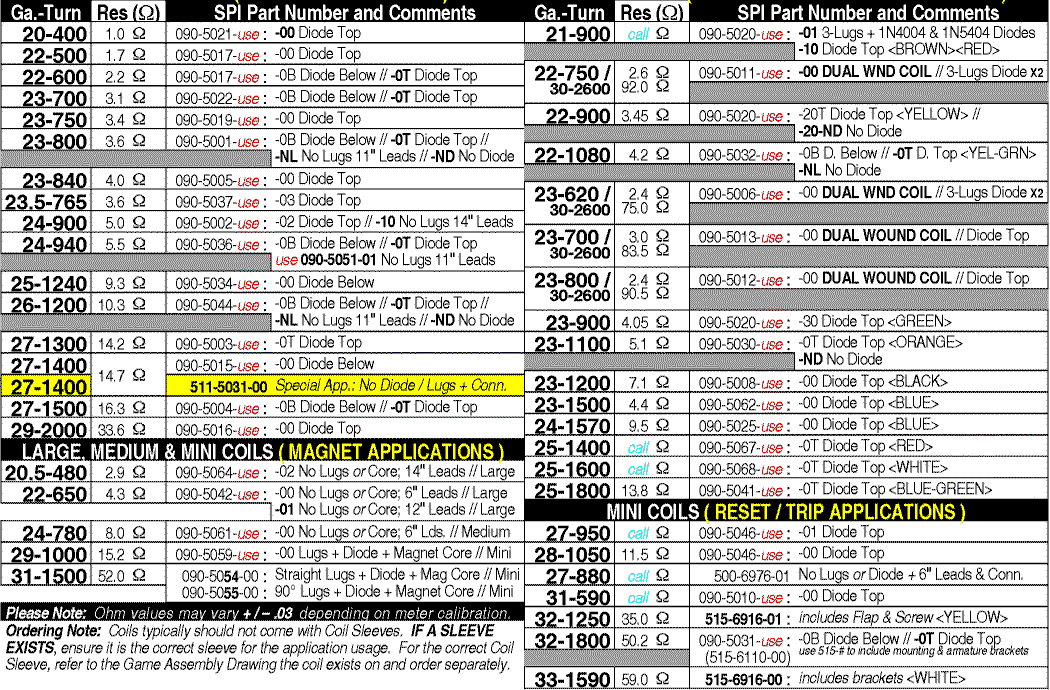
coil resistance chart.gif
a-11336.jpg
There are 64 posts in this topic. You are on page 1 of 2.
#1 9 years ago

Hi gang,
I know it sounds strange but the goalie striker coil on my WCS that is feeding the wire ramp is shooting the ball all over the place, it comes out firing like a bat out of hell and doesn't stay on the ramp. I've looked and it's the right coil.

So my question is..how do you weaken a coil? Do you put a stronger spring? or is there spomething overcharging the coil? Any troubleshooting tips would help.

Cheers.

#2 9 years ago

If you remove wire wraps it will make the coil stronger. Not what you want.
Which coil is in there now? You could go with a weaker one with a larger guage or more windings. So if it has a 23-800 coil you could try a 23-840 (about 10% weaker).

#3 9 years ago

First check if the sleeve is worn or a bracket is loose, or the tip broken, especially if this just started.

You would wind more wire on the coil to make it weaker.

#4 9 years ago

Thanks for the tips I'll take a look.

#5 9 years ago

Couldn't you just put a pot in series with the coil a dial it in until it was how you liked it?

#6 9 years ago
Quoted from StrangelovePhD:

Couldn't you just put a pot in series with the coil a dial it in until it was how you liked it?

Weaker coil is the way to go. A pot will add resistance and heat. Over kill for what is needed here.

LTG : )

#7 9 years ago

I would say you should look at the mechanics not the coil. Many wcs work fine with stock coil so your issue is not the coil but the mech. Sleeve, brackets, how it lines up, etc

There are a few ways to weaken a coil:
1) a bit of padding on the coil stop to give less throw
2) a resistor on the power lug. I wrote about this to weaken stern slings and used 25 watt 4 ohm resistors for those
3) swap with a weaker coil.

#8 9 years ago

+1 on the cement resistor.

#9 9 years ago

If you checked all what Vid said , and you decide to go modding...

As usual.... it is not only important WHAT you do, sometimes it important and HOW to do - it

My choice will be:

1) swap with a weaker coil

2) or..... swap with a weaker coil ? )

3) adding resistor ( but...see my first line
BTW I have 5 Ohm 25W wirewound pot to determine value
(when I decide to add a resistor)

Greetings from Croatia

#10 9 years ago

If it is not working right with the correct stock coil - then something else is your problem. Modifying the design by changing to a weaker coil is a band aid, IMHO

#11 9 years ago

yup to the resistor "bandaid" too.. which isnt a bad idea really either but its probably a real good idea to at least look at what kind of voltage is being fed there. in my much simpler sentinel "demolition derby" I'd installed a right flipper mechanism (stock theyre mechanically linked to the same flipper solenoid, ewww!) and put in a very comparable coil, same line feeding it but it hit MUCH harder than the left, so in with a 20w 3 ohm resistor was just about right.
noticed it even more in another sentinel I'd repaired with fatter bridge rectifier and power transistor to the pf channel, not more voltage but it hit harder having more current being fed out. maybe another possible idk, are both coils being powered up instead of primary-secondary power swapping with the EOS switch? something like that might make one flipper "all powerful", maybe get a look to that same time.

#12 9 years ago

Ok so I took a look and the coil sleeve was shot to hell. Suprised I didn't see it in the first place. Coil itself look brand new, there is nothing esthectically wrong with it. No gunk stuck. After changing, the coil still fires like crazy. Ramp seems to b e in the right place at the right angle. The ball is coming out so quick that it;s not making the first curve and dumping itself in the right ramp.

#13 9 years ago

This is the only other thing I can think of: Have you thought about changing the coil return spring? A newer/stiffer spring will put more resistance in the coil plunger stroke, making it a little weaker.

#14 9 years ago

I would take the plunger out of the coil, and place a rubber ring (5/16") on the plunger (near the end), so the plunger has less stroke.

I wouldn't do any electrical modifications for this.

#15 9 years ago
Quoted from Richard_BoK:

I wouldn't do any electrical modifications for this.

Modification on mechanic is....better ?

To be clear...I'm against ANY modifications with "no reason", BUT if something "smashing"...
there is NO reason (for me) to swap with a weaker coil.

For electrical modifications...

Quoted from cro_pinman:

As usual.... it is not only important WHAT you do, sometimes it important and HOW to do - it

#16 9 years ago
Quoted from Richard_BoK:

I would take the plunger out of the coil, and place a rubber ring (5/16") on the plunger (near the end), so the plunger has less stroke.
I wouldn't do any electrical modifications for this.

I really like this idea. On my Fathom, when the ball eject saucer in the back kicks out the ball, it usually bounces off a post and right back into the saucer, which ends your multiball and really stinks. I took the rubber off the post it bounces off of, but I like your idea better!

#17 9 years ago
Quoted from Richard_BoK:

I would take the plunger out of the coil, and place a rubber ring (5/16") on the plunger (near the end), so the plunger has less stroke.

The plunger riding higher in the coil will get a stronger whack.

Too strong already seems to be his issue.

LTG : )™

#18 9 years ago
Quoted from LTG:

Weaker coil is the way to go. A pot will add resistance and heat. Over kill for what is needed here.
LTG : )

I don't think you are going to see much heat put into the resistor because the power coil on the flipper is only on briefly until the hold coil engages. When the hold coil engages, the current draw drops off to around 0.5 A. I would suspect that the people who have used resistors, that if they put their thumb on the resistor after a game it never gets that warm. I even suspect you could get away with not even using a cement resistor, especially if you don't have any kids who like banging on the buttons like a madman.

#19 9 years ago

Curious if there are any other WCS owners with this problem...WCS owners - chime in, please.

#20 9 years ago

No issues here.

#21 9 years ago

Here is a video. Maybe the ramp is the culprit?

#22 9 years ago

I have a WCS and have never had this issue either.
Looking at your Video, it looks like the ball is leaving the rails right at that first turn. At least that's what it looked like to me.

At the top first curve, are the two side by side rails parallel and even? By even I mean not tilted one way or the other.
I'm thinking the rail is uneven and the ball is dropping off of it.
Can you post a better video? Maybe focus in on that top Curve and see if that is where the Ball always goes off the rails.

#23 9 years ago

Both rails are even. And yes the ball leaves right at the top curve. But the ball is really going fast.

#24 9 years ago

Whats the outlet voltage. and is the transformer on the right power tap?

#25 9 years ago

flash
How long have you had this Pin? Did it ever work properly, the ball staying on the rail?

#26 9 years ago

I just got this game. I had been looking for a while for it and couldn't find one local (within 700km). So i did the thing you shouldn't do and bought it through video feed and pictures...and the guys word that everything was working. DMD is showing signs of gassing out (early stages), the ramp is an issue, the GI as an issue, the wiring is hacked to shit. I've got a credit dot which I will have to figure out and a missing speaker panel (that was my fault...never saw it) The only consolation I have in all of this is that I will now have to learn how to change IDC sockets to Molex and change some headers if anyone has a video tutorial on the subject that would be awesome too.

#27 9 years ago
Quoted from LTG:

The plunger riding higher in the coil will get a stronger whack.

I don't want to question the masters, but that just doesn't make sense to me. I think the opposite is true.

If you took an extreme example and rigged up an extra fat coil stop to reduce the stroke to be just a quarter inch or so, you'd get a pathetic little bump, right?

#28 9 years ago
Quoted from LTG:

The plunger riding higher in the coil will get a stronger whack.
Too strong already seems to be his issue.
LTG : )™

I think he means placing the ring here
a-11336.jpga-11336.jpg

This way the stroke of the plunger is shortened to compensate for the strong coil.

#29 9 years ago
Quoted from jwo825:

I think he means placing the ring here

Ah yes, that sounds legit in my book. I didn't realize we were talking about a VUK.

#30 9 years ago

Well, I just used this pic as an example because it popped up first on a search. I'm not too familliar with WCS, but from the video, it looks like a VUK

#31 9 years ago
Quoted from mot:

I don't want to question the masters, but that just doesn't make sense to me. I think the opposite is true.

The jumping martians in AFM are a good example.

There is a rubber grommet sitting where the plunger rests, like a coil stop. When it is there the martians bounce up and down quite nicely. If it is gone, they barely move.

LTG : )™

#32 9 years ago
Quoted from flashinstinct:

Coil itself look brand new, there is nothing esthectically wrong with it. No gunk stuck.

After looking at that video, I would strongly suggest checking the resistance across that coil. I'm assuming you've checked in the manual to make sure it is the correct coil (going by the coil wrapper part number), but you haven't mentioned that yet. Coil wrappers can be wrong. You need to put a meter on the coil (with the power off) and check it. Compare your reading to the factory coils specs. Google pinball coil resistance chart, if needed. Just because it's esthetically good doesn't mean it's the right coil.

#33 9 years ago

This might sound stupid but I'm really a newbie when it comes to resistance and the entire electronic side of pinball. I get that a coil needs to be higher than 4ohms to be good. but when it comes to mensurements I'm a total newb. A bit of guidance would be helpful. When you say factory coil specs...where do I find those?

#34 9 years ago
Quoted from flashinstinct:

When you say factory coil specs...where do I find those?

Quoted from phishrace:

Google pinball coil resistance chart, if needed.

#35 9 years ago

This is a Stern Coil Chart but the resistances should be close to the same across manufacturers for the same size coil.
coil resistance chart.gifcoil resistance chart.gif

#36 9 years ago

Resistance in coil measured 4.1 - 4.2...according to chart it should be 4.2 So coil is good.

#37 9 years ago
Quoted from flashinstinct:

the wiring is hacked to shit.

Is it hacked to shit near the coil? What are the numbers/ letters on the coil ?
Can you do a better video focusing more on the area where the ball comes out to
the first curve?

#38 9 years ago
Quoted from flashinstinct:

...according to chart it should be 4.2

According to the manual, it shouldn't be 4.2 (or 4.1). I'd suggest you download a manual and make sure you have the correct coil installed.

http://ipdb.org/

#39 9 years ago

ok now I'm going to sound like a total newbie and will have wasted everyone else time if this turns out to be true. Can I adjust the coil bracket to the ball pooper sub assmbly. There is wiggle room on the bracket to bring the coil up or down. I always had to put them tight on other games. If I bring the bracket down the ball goes down the ramp just fine. But then the coil as some wiggle room....

#40 9 years ago
Quoted from phishrace:

According to the manual, it shouldn't be 4.2 (or 4.1). I'd suggest you download a manual and make sure you have the correct coil installed.
http://ipdb.org/

again total newb. I ahve to manual in front of me...you wouldn't to know the page?

#41 9 years ago

OK, the coil is an AE-23-800. I measured 3 Ohms.
The coil stop is small, brown and rubbery.
Not sure of the correct terminology but there is a round "weight" at the end of the shaft.
I figure this adds weight to the shaft. So when the coil is energized, the coil shaft should not move as fast.
Not sure if this is how it works, just throwing it out there.
So let us know if the coil is identical to the pics I posted

100_3157.JPG100_3157.JPG 100_3158.JPG100_3158.JPG 100_3161.JPG100_3161.JPG
#42 9 years ago
Quoted from flashinstinct:

again total newb. I ahve to manual in front of me...you wouldn't to know the page?

If you want to repair games, you need to know how to read a manual. Open it up and have a look. I could give you the page number, but what would you learn from that? I might as well come over and fix it for you.

Here's a hint: The coil is called the Goal Popper coil.

#43 9 years ago
Quoted from phishrace:

If you want to repair games, you need to know how to read a manual. Open it up and have a look. I could give you the page number, but what would you learn from that? I might as well come over and fix it for you.
Here's a hint: The coil is called the Goal Popper coil.

LOL. I know how to read a lamp matrix and the solenoid flasher charts and where to located them on the boards but when it comes to finding the resisntace and the wiring schematics... a little guidance would be nice.

#44 9 years ago
Quoted from flashinstinct:

I know how to read a lamp matrix and the solenoid flasher charts and where to located them on the boards but when it comes to finding the resisntace and the wiring schematics... a little guidance would be nice.

Don't need schematics yet. If you can find the solenoid/flasher table, you can find the part number of the coil. Once you find this, compare the part number on the coil to what the manual says. If correct, then compare the resistance you measured to what it should be reading. To find the correct factory resistance, google pinball coil resistance chart (like I mentioned above). Then look for the part number listed in the manual and note the specified resistance.

Quoted from flashinstinct:

Can I adjust the coil bracket to the ball pooper sub assmbly. There is wiggle room on the bracket to bring the coil up or down. I always had to put them tight on other games.

I'm not familiar with that assembly, but if there's only one bracket with play, it should be tight. How does your assembly look compared to the pics above? Is the rubber bumper missing at the bottom? That would likely cause what you are seeing.

#45 9 years ago

I'm missing the little grommet at the bottom of the bracket The armature is currently touching the bracket.

#46 9 years ago
Quoted from flashinstinct:

I'm missing the little grommet at the bottom of the bracket

Bingo.jpgBingo.jpg
#47 9 years ago

rubber grommet pn is 23-6340.
You may be able to go to home depot, lowes, Ace, a hardware store, and find a grommet that will fit.
HD and Lowes usually have grommets in big pull out drawers, basically containing specialty parts.
You could also temporarily mickey Mouse it by using a rubber washer or something for now.
Let us know how you make out.
Hopefully, this will fix your ball coming off the rails issue.
If you have other issues with your WCS, let me know and if I can help I will.

#48 9 years ago
Quoted from jwo825:

I think he means placing the ring here

This way the stroke of the plunger is shortened to compensate for the strong coil.

a-11336.jpg 6 KB

That is what I meant.
I have done this on Whitewater (lost mine vuk) and it works great.

#49 9 years ago

Flash
Did you ever fix this?

#50 9 years ago

I ordered the grommets will wait once thy get here.

Promoted items from Pinside Marketplace and Pinside Shops!
8,495 (OBO)
Machine - For Sale
Plantsville, CT
$ 49.99
Cabinet - Toppers
Lighted Pinball Mods
 
$ 8.50
Playfield - Decals
Pinball Haus
 
€ 69.00
Pinball Machine
Multiball mods
 
$ 41.99
Lighting - Interactive
Lee's Parts
 
$ 26.95
Playfield - Decals
Pinball Pimp
 
From: $ 20.00
Playfield - Decals
Pinball Invasion
 
$ 329.99
Lighting - Other
Lighted Pinball Mods
 
4,300 (OBO)
Machine - For Sale
Balt, MD
$ 10.00
Playfield - Toys/Add-ons
Pinball Haus
 
From: $ 9.99
Eproms
Matt's Basement Arcade
 
$ 63.95
Eproms
Pinballrom
 
$ 54.99
Cabinet - Shooter Rods
Lighted Pinball Mods
 
$ 17.50
Playfield - Plastics
Pinball Haus
 
$ 95.00
Cabinet - Sound/Speakers
Pinball Mod Co.
 
$ 29.99
Cabinet - Shooter Rods
Pinball Shark
 
$ 15.00
Playfield - Plastics
Pinball Haus
 
Wanted
Machine - Wanted
Plantsville, CT
Wanted
Machine - Wanted
Lafayette, LA
$ 259.99
Cabinet - Toppers
Lighted Pinball Mods
 
From: $ 225.00
Lighting - Interactive
Professor Pinball
 
$ 39.00
Cabinet - Other
Arcade Upkeep
 
$ 9.95
Eproms
Pinballrom
 
$ 22.50
Electronics
bdash's bits
 
$ 11.95
Playfield - Toys/Add-ons
ULEKstore
 
Great pinball charity
Pinball Edu
There are 64 posts in this topic. You are on page 1 of 2.

Reply

Wanna join the discussion? Please sign in to reply to this topic.

Hey there! Welcome to Pinside!

Donate to Pinside

Great to see you're enjoying Pinside! Did you know Pinside is able to run without any 3rd-party banners or ads, thanks to the support from our visitors? Please consider a donation to Pinside and get anext to your username to show for it! Or better yet, subscribe to Pinside+!


This page was printed from https://pinside.com/pinball/forum/topic/how-to-weaken-a-coil and we tried optimising it for printing. Some page elements may have been deliberately hidden.

Scan the QR code on the left to jump to the URL this document was printed from.