
Quoted from ArcadiusMaximus:I am working on a guide, but this project has stopped on my end while I wait for plastic to be delivered to construct the light bar. Below is a list of parts you need to purchase as well as a "quick start guide" I pulled together in case you want to jump ahead. You will need to create your own cables to wire everything up however. If you use the spike schematics for the boards listed and search for the CN connectors on Digikey, you'll get a link to the appropriate connection housing and terminal crimps. I can tell you I had a hard time tracking the PCB boards down using the usual go-to's. I ultimately contacted a distributor to get the parts I needed. You may have to do the same.
Obviously before you start please note that even though these are off the shelf parts, there is still a risk of damage to your machine. If you don't feel comfortable doing this work DON'T. Double and triple check your work and connections. I'm no electrical engineer, so I'm not going to tell you what gauge wires to use. If you search on this wonderful site you'll come across quite a few threads discussing pinball machine and choosing an appropriate wire gauge.
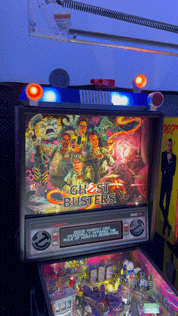
Special note regards to the genuine topper: Like many of you I balked at the $500 price tag of this thing. At first it seemed WAY over priced and I can see where you would think that. I can tell you that after ID-ing the (genuine) boards and sourcing just the components alone to make this, you're hovering close to $400 and that's not even making the toppers light bar, ghost sniffer, or siren. I'm sure you can find some deals, and cut corners but there is still some significant work involved. I think the Stern deserves a little more credit with the amount of work that went into this considering all the custom tooling required. Also at the end of the day they have to actually make a profit on the part. So in a sense I can now justify the cost especially when your alternative now is spending $1000-$1500 for one IF you can find it...
Lastly if you found this guide helpful, consider donating to pinside. Its places like this and the vast knowledge found with in the forums that make it possible to share projects like this.
First things first, how did we get to this point? Well it was not easy. It seemed like no one with an actual topper was willing to crack there's open to help us identify these parts. When all hope was lost I happened to stumble upon a random video on YouTube I cranked up the brightness and watched the video frame by frame paying attention to the boards inside. I then cross referenced the header pins and various other components against all the available Spike systems boards and finally ID'd the main parts. I also used the Johns Arcade video review to help with the connections in the back box. There is also a few shots he shows of the manual that will allow you to see the orientation of the LEDs boards inside the topper. Use this video if you get stuck with your connections.
The topper consists of (3) main parts: Node 12 - LED Driver - LED Flasher. Costs on these boards vary drastically from resource to resource so don't be afraid to shop around for the best deal.
The Node Board (Node 12): https://littleshopofgames.com/shop/boards/stern-boards/stern-spike-ii-spike-2-node-10-board-for-pinball-machine-520-6976-72/
You will need to purchase a Stern 520-6976-72A node board. This is the main bus controller for the topper. You'll need to fashion your own power connector and attach it to the power distribution connector CN7. You'll also need (2) standard cat5 network cables as well as an RJ45 coupler. Unplug the network cable from CN3 on the CPU board and insert it into the coupler. connect one of the (2) network wires to the other end of the couple then to the Node 12 board. Connect the final network cable from the Node 12 board back to CN3. It does not matter which cable from Node 12 you connect to the coupler or CN3. Lastly. set the the dip switches to "node 12" to have the machine recognize the board.
The LED controller: https://www.marcospecialties.com/pinball-parts/520-6831-01
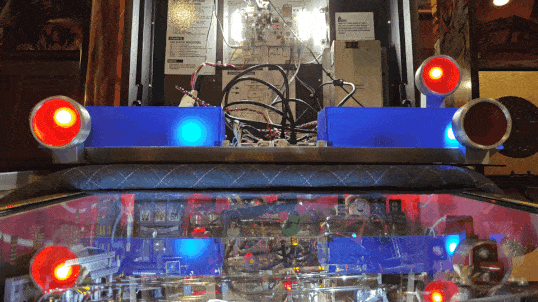
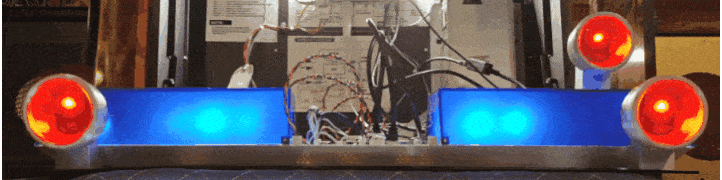
This part is Stern 520-6831-01 ( you can also use 520-6831-00 found in Mustang and similar). This board is essentially a set of shift registers to drive the LEDs. If you've ever done any work with an Arduino, you'll be very familiar with this. The important thing to note about this board is the connections are a little deceiving. Instinct will tell you to connect the 6pin connector from node 12 to the 6pin connector on the LED board, but you actually need to connect Node 12's 6 pin connector to the 7pin header on the LED board (as seen in above video). Make sure the correct pins are wired together. When in doubt use the silk screen on the back of the board as a cheat sheet.
As far as I can tell the pinout and function is as follows, but I still need to test the orientation of the rotating flasher LEDs.
CN1
1 - LED 15 - rotating flasher 1-1 (left end)
2 - LED 14 - rotating flasher 1-2
3 - LED 13 - rotating flasher 1-3
4 - LED 12 - rotating flasher 2-1 (left center)
5 - LED 11 - rotating flasher 2-2
6 - LED 10 - rotating flasher 2-3
7 - LED 9 - rotating flasher 3-1 (right center)
8 - LED 8 - rotating flasher 3-2
9 - LED 7 - rotating flasher 3-3
10 - +5v
11 - +5v
12 - +5v
CN 2
1 - LED6 - rotating flasher 4-1 (right end)
2 - LED5 - rotating flasher 4-2
3 - LED4 - rotating flasher 4-3
4 - LED3 - N/C
5 - LED2 - Rear right red signal light
6 - LED1 - Right blue signal light
7 - LED0 - Left blue signal light
8 - +5v
9 - +5v
The LED Flashers: https://www.marcospecialties.com/pinball-parts/520-6785-00
You will need (15) of these. The part number is 520-6785-00. I chose to make these myself using smd LEDs. At almost $16 a pop I couldn't justify spending over $250 on 15 LEDs, but if you want simple plug and play that's your go to part.
Various Other Components:
As stated above you'll need to purchase a few off the shelf items including what ever you want to use as a light bar. You can build your own (like I am) or source one on ebay or where ever.
- (2) Cat5e Ethernet cables
- (1) RJ45 (cat5) straight through coupler
- (1) 48v power cable (need to make CN7 to Node board CN14)
- (1) 6pin to 7pin data cable (Node 12 board CN1 to LED board CN4 - need to make)
- (1) 12pin connector for LEDs and +5v power (CN1 - need to make)
- (1) 9pin connector cable for LEDs and +5v power (CN2 need to make)
- Various lengths of wire in different gauges for 5v and 48v compatibility
- Various molex connector pin housings and crimp connectors.
- Prototype boards if you chose to fab any of your own components (IE, LED flashers)
Good Luck !
$16 for those "flash lamp" boards is criminal. It's just a pcb with a single resistor and single smd led? Someone should get the dimensions, spend 10 minutes making the pcb file in eagle, order a bunch of them and sell them for half the price. I'd do it myself but I don't have one of these boards, or a topper, or even a Gb anymore... But this looks like a good opportunity for someone to make an easy generic version and make a little money.
 San Clemente, CA

