 Pittsburgh, PA
I doubt were going to see another run unless there is a vault edition and even then it's probably a slim chance. At this point I think our best bet is to get a parts list and some photos from a generous topper owner....
(Topic ID: 253300)
 Ghostbusters (LE)
Stern, 2016
Ghostbusters (Premium)
Stern, 2016
Ghostbusters (Pro)
Stern, 2016
Ghostbusters (LE)
Stern, 2016
Ghostbusters (Premium)
Stern, 2016
Ghostbusters (Pro)
Stern, 2016You're currently viewing posts by Pinsider arcadiusmaximus.
Click here to go back to viewing the entire thread.
I doubt were going to see another run unless there is a vault edition and even then it's probably a slim chance. At this point I think our best bet is to get a parts list and some photos from a generous topper owner....
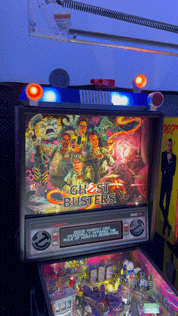
Finally ready to share the progress of one of my many quarantine projects ![]() . A full write up and parts list coming soon for those who want to build their own...
. A full write up and parts list coming soon for those who want to build their own...
Quoted from Zzap:Looks cool, is it connected to the node bus?
Yes. It functions exactly like the real topper and uses all genuine or off the shelf parts. You may also fab the components yourself using the spike schematics if you're feeling adventurous and want to save some $$. The only thing that you will need to build yourself is the light bar housing.
Quoted from Phatchit:I’m down for a kit when ready
That's the best thing. All the parts used are genuine Stern or off the shelf components. You'll just need to hook them up. You can spend as much or as little creating the light bar you want. Not really looking to make a buck selling kits but rather help out fellow GB owners stuck in the same situation I am.
I am working on a guide, but this project has stopped on my end while I wait for plastic to be delivered to construct the light bar. Below is a list of parts you need to purchase as well as a "quick start guide" I pulled together in case you want to jump ahead. You will need to create your own cables to wire everything up however. If you use the spike schematics for the boards listed and search for the CN connectors on Digikey, you'll get a link to the appropriate connection housing and terminal crimps. I can tell you I had a hard time tracking the PCB boards down using the usual go-to's. I ultimately contacted a distributor to get the parts I needed. You may have to do the same.
Obviously before you start please note that even though these are off the shelf parts, there is still a risk of damage to your machine. If you don't feel comfortable doing this work DON'T. Double and triple check your work and connections. I'm no electrical engineer, so I'm not going to tell you what gauge wires to use. If you search on this wonderful site you'll come across quite a few threads discussing pinball machine and choosing an appropriate wire gauge.
Special note regards to the genuine topper: Like many of you I balked at the $500 price tag of this thing. At first it seemed WAY over priced and I can see where you would think that. I can tell you that after ID-ing the (genuine) boards and sourcing just the components alone to make this, you're hovering close to $400 and that's not even making the toppers light bar, ghost sniffer, or siren. I'm sure you can find some deals, and cut corners but there is still some significant work involved. I think the Stern deserves a little more credit with the amount of work that went into this considering all the custom tooling required. Also at the end of the day they have to actually make a profit on the part. So in a sense I can now justify the cost especially when your alternative now is spending $1000-$1500 for one IF you can find it...
Lastly if you found this guide helpful, consider donating to pinside. Its places like this and the vast knowledge found with in the forums that make it possible to share projects like this.
First things first, how did we get to this point? Well it was not easy. It seemed like no one with an actual topper was willing to crack there's open to help us identify these parts. When all hope was lost I happened to stumble upon a random video on YouTube
I cranked up the brightness and watched the video frame by frame paying attention to the boards inside. I then cross referenced the header pins and various other components against all the available Spike systems boards and finally ID'd the main parts. I also used the Johns Arcade video review to help with the connections in the back box. There is also a few shots he shows of the manual that will allow you to see the orientation of the LEDs boards inside the topper.
Use this video if you get stuck with your connections.
The topper consists of (3) main parts: Node 12 - LED Driver - LED Flasher. Costs on these boards vary drastically from resource to resource so don't be afraid to shop around for the best deal.
The Node Board (Node 12): https://littleshopofgames.com/shop/boards/stern-boards/stern-spike-ii-spike-2-node-10-board-for-pinball-machine-520-6976-72/
You will need to purchase a Stern 520-6976-72A node board. This is the main bus controller for the topper. You'll need to fashion your own power connector and attach it to the power distribution connector CN7. You'll also need (2) standard cat5 network cables as well as an RJ45 coupler. Unplug the network cable from CN3 on the CPU board and insert it into the coupler. connect one of the (2) network wires to the other end of the couple then to the Node 12 board. Connect the final network cable from the Node 12 board back to CN3. It does not matter which cable from Node 12 you connect to the coupler or CN3. Lastly. set the the dip switches to "node 12" to have the machine recognize the board.
The LED controller: https://www.marcospecialties.com/pinball-parts/520-6831-01
This part is Stern 520-6831-01 ( you can also use 520-6831-00 found in Mustang and similar). This board is essentially a set of shift registers to drive the LEDs. If you've ever done any work with an Arduino, you'll be very familiar with this. The important thing to note about this board is the connections are a little deceiving. Instinct will tell you to connect the 6pin connector from node 12 to the 6pin connector on the LED board, but you actually need to connect Node 12's 6 pin connector to the 7pin header on the LED board (as seen in above video). Make sure the correct pins are wired together. When in doubt use the silk screen on the back of the board as a cheat sheet.
As far as I can tell the pinout and function is as follows, but I still need to test the orientation of the rotating flasher LEDs.
CN1
1 - LED 15 - rotating flasher 1-1 (left end)
2 - LED 14 - rotating flasher 1-2
3 - LED 13 - rotating flasher 1-3
4 - LED 12 - rotating flasher 2-1 (left center)
5 - LED 11 - rotating flasher 2-2
6 - LED 10 - rotating flasher 2-3
7 - LED 9 - rotating flasher 3-1 (right center)
8 - LED 8 - rotating flasher 3-2
9 - LED 7 - rotating flasher 3-3
10 - +5v
11 - +5v
12 - +5v
CN 2
1 - LED6 - rotating flasher 4-1 (right end)
2 - LED5 - rotating flasher 4-2
3 - LED4 - rotating flasher 4-3
4 - LED3 - N/C
5 - LED2 - Rear right red signal light
6 - LED1 - Right blue signal light
7 - LED0 - Left blue signal light
8 - +5v
9 - +5v
The LED Flashers: https://www.marcospecialties.com/pinball-parts/520-6785-00
You will need (15) of these. The part number is 520-6785-00. I chose to make these myself using smd LEDs. At almost $16 a pop I couldn't justify spending over $250 on 15 LEDs, but if you want simple plug and play that's your go to part.
Various Other Components:
As stated above you'll need to purchase a few off the shelf items including what ever you want to use as a light bar. You can build your own (like I am) or source one on ebay or where ever.
- (2) Cat5e Ethernet cables
- (1) RJ45 (cat5) straight through coupler
- (1) 48v power cable (need to make CN7 to Node board CN14)
- (1) 6pin to 7pin data cable (Node 12 board CN1 to LED board CN4 - need to make)
- (1) 12pin connector for LEDs and +5v power (CN1 - need to make)
- (1) 9pin connector cable for LEDs and +5v power (CN2 need to make)
- Various lengths of wire in different gauges for 5v and 48v compatibility
- Various molex connector pin housings and crimp connectors.
- Prototype boards if you chose to fab any of your own components (IE, LED flashers)
Good Luck !
Those boards look overly complicated for an LED. Looks like there are (3) MOSFETs and (3) resistors on the board (RGB?)?
In the Stern set up the MOSFETs are on the LED driver board right before the output header pins. The Stern flasher has (1) 22 Ohm (SMD 22R0) resistor and the SMD LED. Very simple.
Quoted from seenev:$16 for those "flash lamp" boards is criminal. It's just a pcb with a single resistor and single smd led? Someone should get the dimensions, spend 10 minutes making the pcb file in eagle, order a bunch of them and sell them for half the price. I'd do it myself but I don't have one of these boards, or a topper, or even a Gb anymore... But this looks like a good opportunity for someone to make an easy generic version and make a little money.
Yea they're pretty easy to make. I used a 22 Ohm resistor and a STW8Q14C-V5W5 SMD LED. No idea if these are the actual LEDs as they seem a tad warmer than the ones Stern uses. As I said I'm no electronics expert, but I measured the actual flasher led with calipurs, used the resistor value (22r0), and just started narrowing down the results.
Below is my cheap solution. All in all 15 of them took me a Jurassic Park and 3/4 of an Austin powers to make ( how I keep track of time ![]() ).
).
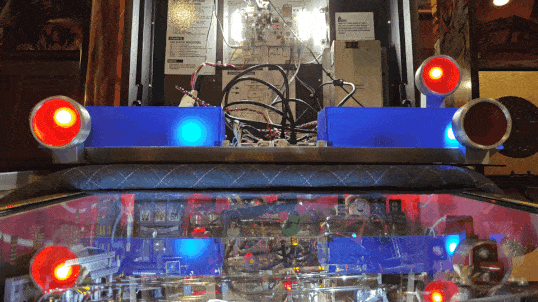
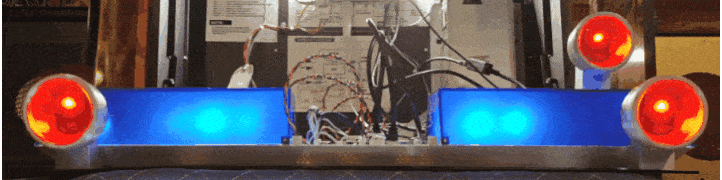
IMG_20200803_113510126 (resized).jpgFriday night update: Made a few brackets out of some spare aluminum for the DIY rotating flashers and rigged up a test rig. Seems to be working pretty well.
*** After slowing down the video I think I reversed the beacons. the ones on the inside need to move to the outside and vise versa ***
IMG_20200807_234619618 (resized).jpgIMG_20200807_234627903 (resized).jpg
Quoted from docquest:Instead of trying to use LED's to simulate the rotating beacon you could just use the real thing. You would need to take the LED signal from the node board and instead of having it drive an LED you instead have it trigger a relay to activate your beacons of choice. This way the topper still goes on and off via the node board control but you are not limited to just powering LED's. You could also use the LED node trigger to do activate other things like a motor to rotate the red sniffer block in the back.
Using one of the off the shelf light bars also eliminates having to fabricate a clear blue light diffuser.
People criticized the official Stern topper of looking too "toy like". Using something like this coupled with other parts would have a more DIY/garage built look like the real Ecto-1 roof rack in the movies.
https://www.vehiclesafetysupply.com/ecco-permanent-sae-15-blue-rotator-mini-lightbar-5315b-p-15265.html?gclid=CjwKCAjwmrn5BRB2EiwAZgL9oqcK5HW54TExNivPxnbizgngnO-rjRPyltvrZj53QShT01cB2wLQuhoCQ4gQAvD_BwE
https://m.northerntool.com/shop/tools/product_200593494_200593494
amazon.com link »
If you do a search on places like etsy you will find people make replicas of the sniffer block and federal siren, tanks and other Ecto-1 roof rack parts if you don't want to make your own parts.
Those are pretty cool. So the thing about the signal to the LED is each one is driven separately (3 per beacon). The output pulses to turn on the LED and fade it out. If you were to connect that signal to a relay wouldn't it only run the beacon when the pulse is detected? So wouldn't the beacons constantly be turning on and off rotating only a few degrees at a time with each pulse?
Quoted from docquest:You can make a reaistor capacitor circuit on the input side of to the relay so the pulsing would still produce an active on. Pinsider outcida (Tim's pinball mods https://m.facebook.com/TimsPinballMods/ ) sold relays in the past with that functionality built in them for around $15 or so. Not sure if he still makes them or not though. His relay was designed to detect a flashing/pulsing insert and convert it to a steady on signal to activate his relay to power externally powered mods. I used one of those relays when I made a better version of the Batman66 rotating beacon. My trigger signal was one of the LEDs from the the top of the stern beacon that pulsed when topper was on and used that to trigger the relay to turn on my new beacon.
Oh sweet. In that case that would be awesome if you could rig up an actual beacon. I did notice the LEDs flash at different speeds depending on modes and supper jack pots (PWM). So you'd loose a little bit of light show for a more authentic look.
In the research I've done the node board and led driver listed above seems to be the boards used for all toppers in the Spike era. The common node setting for toppers seems to be 12, but you can experiment untill you find the right setting if it doesn't work.
Check the games manual first to see what nodes are active to rule those out first. Then just walk through the settings 1 by 1 untill it recognizes the board. There doesn't seem to be any adverse affect to setting the topper to the wrong node as I accidently had it on 10 the first time I fired it up.
Use the diagnostic menus to verify the board was detected properly and check the outputs 1 by 1 before playing a game just to be on the safe side.
You could really do almost anything. The beauty of using legit boards is you'd no longer have to tap into existing lights and flashers. It makes for a very clean, self contained install.
The only limitation would be the amount of led outputs the actual topper utilizes. To docquest's point above you can get really creative and have the outputs drive motors or solenoids and what not for animations.
Spent the last two nights working on this. Trying to get as close to the original as possible. So much work in this seemingly easy part ( did I mention the $500 price tag for an OG topper is a steal...?). Couldn't resist throwing it up on the back box for a test fit.
IMG_20210226_233312106 (resized).jpgIMG_20210226_233645024 (resized).jpg
Couple of progress shots. All major electronics done. Just the sniffer and siren left to make. Some observations: I may paint the light cups black inside to hide the pcbs. Also might use a frosted spray paint to coat the lenses since they turned out a little clearer than I would have liked. I took a lot of pictures during the process. I'll probably host them somewhere for a bit if anyone is interested in the fab process.
IMG_20210319_141046072_HDR (resized).jpgIMG_20210319_164840191 (resized).jpgIMG_20210325_131134965 (resized).jpgIMG_20210325_133917445 (resized).jpg
You're currently viewing posts by Pinsider arcadiusmaximus.
Click here to go back to viewing the entire thread.
Wanna join the discussion? Please sign in to reply to this topic.

Great to see you're enjoying Pinside! Did you know Pinside is able to run without any 3rd-party banners or ads, thanks to the support from our visitors? Please consider a donation to Pinside and get anext to your username to show for it! Or better yet, subscribe to Pinside+!

This page was printed from https://pinside.com/pinball/forum/topic/hey-stern-make-some-new-ghostbusters-ecto-1-topper?tu=arcadiusmaximus and we tried optimising it for printing. Some page elements may have been deliberately hidden.
Scan the QR code on the left to jump to the URL this document was printed from.