(Topic ID: 158162)

Help with startup - Space Mission.

By Beck

8 years ago


Topic Heartbeat

Topic Stats

  • 82 posts
  • 10 Pinsiders participating
  • Latest reply 7 years ago by Chrisbee
  • Topic is favorited by 8 Pinsiders

You

Linked Games

Topic Gallery

View topic image gallery

001_(resized).JPG
SERIES_PARALLEL_(resized).png
IMG_0224_(resized).JPG
Make_Break_Ckt_(resized).png
Switch_types_(resized).png
Ckt_Basics_(resized).png
IMG_4444.JPG
IMG_0221_(resized).JPG
IMG_0220_(resized).JPG
IMG_0216_(resized).JPG
IMG_0217_(resized).JPG
IMG_0215_(resized).JPG
reel.gif
help_(resized).jpg
aSpMi-page-14_(resized).jpg
jonesplugs_(resized).jpg
There are 82 posts in this topic. You are on page 2 of 2.
#51 7 years ago
Quoted from rolf_martin_062:

Hi Beck
near the player, from left to right: A "two times five plugs" Jones-Plug to connect the Credit-Button and the flipper-buttons to the panel sitting in the cabinet, the many wires are on the side "towards the player".
Then a two times four plugs" Jones-Plug to connect the coin-door with the panel sitting in the cabinet, the many wires are on the side "towards the player".
Then - I refer to ipdb-manual-page-4 (ori-2) the 25-Cent-Adj.-Switch, then the 10-Cents-Adj.-Switch then the "1coin-1play---2coins-3plays Adj.-Switch, then the fuse holder, then the 5-cents-Adj.-Switch, the a Jones plug connecting the Knocker and the Chime-Unit ( I do not have a chime Unit. Greetings Rolf
P.S.: In switzerland it is "time to get to sleep" ...

Tomorrow, when you see this...I'm wondering where the Jones plugs should be plugged in exactly. For example, they can be plugged in fully or they can be plugged in so that two aren't plugged in at all, or 4, etc. So I'm trying to find out which holes should be populated, if that makes sense.

#52 7 years ago

Beck, if you haven't you should download the manual and any schematics that are available. Also google any pictures you can find, you might find the picture that shows what you are looking for...sounds like you have some great people giving you some advice.

#53 7 years ago
Quoted from Insane:

Beck, if you haven't you should download the manual and any schematics that are available. Also google any pictures you can find, you might find the picture that shows what you are looking for...sounds like you have some great people giving you some advice.

I have the original manual, came with the machine. Downloaded the schematics, working through it, kind of like learning Japanese to me.

#54 7 years ago

Granted, I am riding the short bus but here's one question about the previous startup. At some point this machine started when pressing the start button, sequence ran. How can the machine not startup at all when the only thing I've really tinkered with is the credit reel, whats the connection?

#55 7 years ago

The credit wheel is what allows the start button to work. I can't remember which switch it is on the credit unit but you can reset it to no credits, bend a leaf to make a switch contact n/c instead of n/o and it makes the machine essentially freeplay.

#56 7 years ago
Quoted from Chrisbee:

First thing, only work on one thing at a time, working from one end to the other. Make sure everything is right before moving on.
With Ems there is often a knock on effect, which will make you look in the wrong place, fixing symptoms and not the cause.
Schematic are drawn reset and with the game ready to play ball one and the power off.
So we need, credit on the credit reel, close the zero SW, we need the GO RE tripped to close the SW on the GO RE, we also need the score motor in the zero position to close the Scr Motor SW.
Remember that the coin door has a Jones plug. Now check that we are energising the Credit Unit reset coil.
Once this is confirmed we can move on.
Now you have Steve on-board, problem almost solved - Morning Steve (For me).
help_(resized).jpg
PS, I think most of your issue are related to the GO RE, will see as we move along.

Didn't quite follow

#57 7 years ago

The credit unit zero position switch is the one you were talking about - the switch on the credit unit where you adjust to make it normally closed putting the machine in free play mode.

The IND-A score motor switch would be the switches on the end of the score motor with five stacks of switches. You'd want to look at the bottom of the stack of switches to find the switch in the credit button circuit...

#58 7 years ago

Hi Beck
I refer to ipdb-manual-page-4 (ori-2). When I (hopefully: "When we") talk about Jones-Plugs I / We mean a goodie - two rows (lets say left row has 10 sockets and right row has 10 sockets - and there are 2 times 10 plugs in the holding bakelite). This is for to connect the playfield to the Backbox etc. Each of these 20 plugs is inserted into a socket. There is a "metal stop" mounted on the socket. The bakelite plate with the plugs is put in so the many wires on the bakelite are AWAY from the metal stop. Always look from the side - do the plugs sit IN the sockets - Or did You push them with an offset - this could / can cause very strange strange behaviour.

The manufacturers wanted to save money and used sockets (2 times 6) together with a bakelite holder having less (2 times 2) plugs --- these are Adjustment plugs. You can insert in various positions - You adjust to your needs, look manual-page-4 -> the 25-cent Adj.-Plug - inserted "on top" equals "6 games per quarter" - inserted a row below -> "5 games per quarter" etc. .
They used a 2 times 3 socket and a 1 times 3 bakelite holding plate - for to adjust: You plug-in to the left or You plug-in to the right. Look at manual-page-4 and -5 --- all these are Adjustment-Plugs.

Ok, another thing: Am I the only one who is interested in "What happens, when You manually actuate the armature of the Coin-RELAY (pushing / pressing the anchor-plate - simulating the coil gets magnetic and pulls) ? Greetings Rolf

#59 7 years ago

So Rolf, manually actuate the armature when the machine is on?

#60 7 years ago

Hi Beck
Yes - but be careful NOT to touch solder-lugs.
When the pin runs / functions 100%: You push the Credit-Button -> Credit-Relay pulls-in -> the Coin-Relay gets current -> Coin-Relay pulls-in and stays pulling for let the Reset-Relay pull-in.

Your pin does not do a thing when You push the Credit-Button -> What happens when we simulate "Coin-Relay gets current and pulls-in" ? --- YOU push the anchor-plate - simulating "anchor-plate is pulled-in". Greetings Rolf

#61 7 years ago

You mean the Coin relay, the second one to the back on the right side?

#62 7 years ago

Hi Beck
Yes - but be careful NOT to touch solder-lugs. Unplug the main power chord. Get a ruler from school (wooden or plastic ruler - NOT metal) practice a bit on the second-last relay -> when you have praxis -> plug-in -> turn-on and gently push with the ruler. Greetings Rolf

#63 7 years ago

OK if I hold the actuator arm, the scoring motor whirls and the coin unit continues to fire. Nothing else happens. They both stop when I let the actuator arm go

#64 7 years ago

Hi Beck
fine - the "pulling" Coin-Relay lets the Score-Motor run (we need the Score-Motor for pulsing some relays).
Unplug the main power chord. Can You manually put some points on the Score-Drums of player-1 ? I like to have the pin to do some work ...

Look at the Game-Over-Relay - the first relay sitting behind the transformer. The very first coil (behind the transformer) on that "Interlock-Relay, two coils mounted on the relay" - push its anchor-plate outwards towards (direction) "right" (maybe it is already) - the nylon stuff (milky white) moves towards the player (or is already moved): This is position "Game-Over".
Plug-in, turn-on -> actuate the Coin-Relay -> Score-Motor runs -> questions: Do the Score-Drums reset ? Does the Reset-Relay pull-in (the third-last behind the transformer) ? Do 1-2-Reset-Relay and 3-4-Reset-Relay pull-in and let go etc. (Well, hard to see - these two relays sit in the Backbox) ? Greetings Rolf

#65 7 years ago

Beck,
Can you construct a simple 24 volt tester by soldering two 12v automotive brake lights in series on long (3') leads... With an alligator clip on the end of the leads?

If you can make the tester then we can go through this repair step by step with photos.
I will also need to know if you understand basic circuitry concepts. How things in general are wired. A table lamp for example. No insult intended- most people in general don't understand it.

#66 7 years ago

Rolf - I'll give those things a try.

Steve - No insult taken as I am in the general population that doesn't really understand wiring/circuitry concepts. Was always more of the geeky computer guy. Not trying to get all philosophical here but I think we all have our weaknesses but I'd prefer to try and learn than throw up my hands and say I can't learn this. That said, I think I can probably make a tester when I get the opportunity.

#67 7 years ago

OK when I put point on player 1 score reels and pulled the actuator, player 3 score reels kept turning.

So I did this again....seems to be a few problems, credit reels does not move freely when advancing at certain points so I think that's one issue, probably needs cleaning. I have a string attached to the coin relay and when I pull on that, the score motor and coin unit kick in AND now that I reset the game over actuator, then pulled the coin relay, it reset the score reels to zero and the moving target motor is running so the game actually started. Then set the actuator to game over and pulled the coin relay again, same thing. Did it one more time but used the start button this time. Didn't work but I watched the credit reel and it doesnt decrement like it should, almost seems like it is sort of stuck. Flippers dont work either.

#68 7 years ago

Thanks Beck.
No problem. I'll try to have some time and post some basic concepts that might be helpful this evening. A EM pinball has some complex circuitry, might be a bit of a learning curve. Don't be discouraged, we'll see if we can slog through the how's and why's and get you through it.
Please let me know when you have your tester built.
Can you solder?

#69 7 years ago
Quoted from SteveFury:

Thanks Beck.
No problem. I'll try to have some time and post some basic concepts that might be helpful this evening. A EM pinball has some complex circuitry, might be a bit of a learning curve. Don't be discouraged, we'll see if we can slog through the how's and why's and get you through it.
Please let me know when you have your tester built.
Can you solder?

I can solder actually. It will be a learning curve, I don't doubt that but I'm up for it, not discouraged but rather I realize there will be alot of things to work through. I personally believe we will find issues after getting the initial ones resolved but at the end, hopefully I will have a working pinball machine and gained some knowledge. Thanks for the help Steve and thanks to everyone who has pitched in thus far with thoughts and suggestions.

#70 7 years ago

If you can take about 5 minutes to watch this video describing stepper units. It's not my video but quite excellent:

Steppers are notorious for being neglected over the years/decades. The main trouble with them will be the old lubricants which have fossilized and turned to glue, gumming it up. A gummed up stepper will not step up or down properly. The fix is to disassemble the stepper, clean out the old lubrication and apply new lubricant. As a general rule, only metal to metal rotating parts should have lubrication. No nylon parts or (especially) solenoid plungers get any lubrication at all. Leave those parts dry.

Once properly serviced, a stepper will be very reliable and only require periodic light maintenance.

Me? Like most people hate working on old nasty crappy looking dirty things. Many of us polish stepper parts while they are apart and take a lot of pride how they look when done.

I'd bet my bottom dollar all the steppers in your Space Mission will need to be disassembled, cleaned, re-lubed, reassembled and (if needed) adjusted.
The ones dealing directly with the reset sequence are all 16 score reels and the bonus stepper, located under the playfield.

Score reels are pretty easy but 16 of them are a PIA. If I were to only disassemble them, replace lubrication, reassembly and switch adjustment then I'm looking at about 8 hours of work. But I like to clean frames and other parts so I take a lot more time.

My general score reel work flow is:
1. Overall inspection for burned coils or anything obviously wrong. If parts are needed I call Steve at Pinball Resource and order right away. The 10's and 100's reel on player 1 always get the most workout so I pay particular attention to those.
-->I don't want to do 16 reels again anytime soon so I always order new solenoid sleeves from PBR before I begin.

I'd also order a point adjustment tool and point file right off the bat before you begin.

2. I take TONS of photos of the score reel solder connections from many angles. Closeups, mainly. That is for references when wires fall off due to cold solder joints.
3. I work on 1 score reel at a time. I carefully slide it out of its bay and gently lay it down circuit side up being careful not to put undue stress on the wires/connections.
4. Disassembly. More photos as I go. I try to keep the switch stack together, and tape around the switch stacks to keep them together while they are dismounted from the frame.
5. I clean all the various parts. Old lube removed, parts polished. I wash the plastic reels themselves in a sink with a toothbrush and water with a bit of dishwashing soap mixed in. Being extremely careful NOT to touch any of the numbers with my fingers, brush or wipe. I shake the water off and follow up with a compressed air blast, again avoiding contact with the numbers.
6. I inspect the numbers on the plastic reel and carefully touch-up defects with a black permanent Sharpie pen.
7. Some reels have PC boards with contacts. I clean those PC contact pads using a rag and alcohol.
8. I reassemble using as little lube as possible. I use white lithium grease where necessary and others use "SuperLube".
Every score reel gets a new solenoid sleeve.
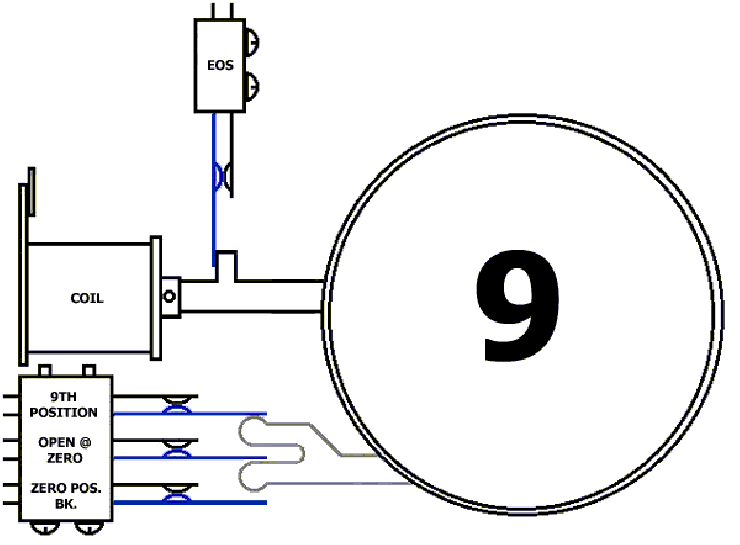
9. Switch adjustment. **It is critical this is set properly** see the animation I posted for reference. If the actuator wire/arm is not moving the switches properly then that is usually due to improper switch blade tension acting upon the arm. It's a careful balance between the switch blade tension against the return arm spring. It's not that difficult or rocket science but knowing that pressure balance exists can prevent some confusion and malfunctions. If you find you need adjustment with that balance, adjust the effecting switch blade not the arm's return spring. You'll be expert after doing 16 reels.
Be sure the switch stacks are snugged down (Not loose) before performing adjustments.

Instead of stressing behind the machine, I opt to remove the entire back box insert which everything is mounted to. This also relives much of the stress on the harness and solder joints.
You can observe a number of screws around the insert perimeter to remove it.
Below is a photo of some of the mounting screws (Circled in red)
IMG_4444.JPGIMG_4444.JPG

Once the insert is out then I place it component side up on a table etc and it is so much easier to work on. I use that opportunity to service all the components on that board, and to clean the "oldness" out of it.

An alternative to removing the insert is to just place the head somewhere glass side down. But you'll always be leaning over it and reaching in. Too much stress for me!

In your case, as a pinball noobe I would limit disassembling to only the 16 score reels and the player unit (The large stepper with a zillion contact rivets). I'd also -inspect- the other items such as relays, contacts etc.

Regarding the relays (etc) on the board, their switch blades should be already properly adjusted unless somebody has "messed" with them. Initially, I usually tear off a piece of copy paper and fold it over itself about 4 times into a strip about 1/8 X 3" long and get it wet with rubbing alcohol and gently run it over the switch blade contacts. I do it with the machine unplugged to prevent spark/flame.
Some switches may require a more aggressive cleaning/filing but the paper and alcohol clears up 90% of dirty contact troubles.

My first thought when I viewed your initial video was the score reel switches are not operating properly, among other things.

Score reels, along with the bonus unit -must- operate properly and reliably for any hope of reliable resets.

#71 7 years ago

Here's some circuit basics:

Example A only consists of a light bulb and battery, no connection so the bulb is dark.
Example B shows only one connection to the bulb. There is no path for the electricity so the bulb is still dark.
Example C adds the second half of the circuit. The bulb lights. Every circuit needs both sides for current to flow.
Example D shows a basic "make" switch. If you press the orange button down it will mash the switch blades together and provide a circuit to light the bulb. Release the button and the blades separate causing the bulb to go out.
Example E shows a "Break" switch. This time pressing the orange button down cause the blades to separate, extinguishing the bulb, otherwise it is on.
Ckt_Basics_(resized).pngCkt_Basics_(resized).png

The bulb can represent a light, a solenoid, a relay coil or a motor.

Here are some common switch types as they appear on your schematic:
Switch_types_(resized).pngSwitch_types_(resized).png

With a "Make Break" switch, pressing the button "Makes" one side of the connection and "Breaks" the other.
With the "Shorted" switch all 3 blades short together when the button is pushed.

Switches can be stacked and actuated in so many diverse configurations as you find them in the machine but they almost always follow those basic types.

The example below shows a simple make-break circuit.
Changing the state of switch A will illuminate the top bulb. Releasing it will extinguish it.
Changing the state both switches A and B will make the bottom bulb light. Then, if you keep switch A changed and then make switch B normal then the bottom bulb will go out and the top bulb will go on:
Make_Break_Ckt_(resized).pngMake_Break_Ckt_(resized).png

Please let me know if you understand what I outlined.

#72 7 years ago

Great effort in the your post Steve.

#73 7 years ago

I've been asked by someone to create a new thread, a noobe circuit basics thread. I might open one tonight and link this thread.
Beck seems to be pretty anxious to learn and get his pin working properly. A good attitude.
It's good to know the effort is appreciated.
Thanks!

#74 7 years ago
Quoted from SteveFury:

I've been asked by someone to create a new thread, a noobe circuit basics thread. I might open one tonight and link this thread.
Beck seems to be pretty anxious to learn and get his pin working properly. A good attitude.
It's good to know the effort is appreciated.
Thanks!

It is much appreciated, so don't think my lack of immediate responses is an indication of anything but. I just have the usual stuff to contend with like all of us, job, wife, kids, etc. Limits my free time that I can spend on the machine. However, when the weekend roles around, it becomes easier.

Let me digest all of this. I do think, for starters anyway, that the credit reel plays a role here, among other things I'm sure. I don't think the guy before me took care of this pin at all and I mean at all. The credit reel definitely seems to be gummed up and does not ratchet properly in certain areas. I think it will need some type of cleaning so maybe there already exists some videos on youtube with how-to's on cleaning.

#75 7 years ago

Beck if you have mechanical aptitude, that you can disassemble something and put it back correctly again then you shouldn't have any problems with rebuilding steppers. The credit unit and the score reels will need to be gone through based on observations and your information. Also the player unit by association.

No problem with taking your time. Life happens.

-1
#76 7 years ago

As a new owner of an old Bally Wizard that didn't power up when I took delivery, to today where it plays with a only a couple of minor problems. I can tell you from my experience, which is limited to this one machine that restoring and repairing all the stepper units was critical to making the machine play again. In each case all the contacts were dirty and not making clean connections as the arms would sweep across the contacts. Once they were repaired and adjusted the pinball played like it was new. All the repairs after that were relay adjustments. Good luck.

#77 7 years ago
Quoted from SteveFury:

Here's some circuit basics:
Example A only consists of a light bulb and battery, no connection so the bulb is dark.
Example B shows only one connection to the bulb. There is no path for the electricity so the bulb is still dark.
Example C adds the second half of the circuit. The bulb lights. Every circuit needs both sides for current to flow.
Example D shows a basic "make" switch. If you press the orange button down it will mash the switch blades together and provide a circuit to light the bulb. Release the button and the blades separate causing the bulb to go out.
Example E shows a "Break" switch. This time pressing the orange button down cause the blades to separate, extinguishing the bulb, otherwise it is on.

The bulb can represent a light, a solenoid, a relay coil or a motor.
Here are some common switch types as they appear on your schematic:

With a "Make Break" switch, pressing the button "Makes" one side of the connection and "Breaks" the other.
With the "Shorted" switch all 3 blades short together when the button is pushed.
Switches can be stacked and actuated in so many diverse configurations as you find them in the machine but they almost always follow those basic types.
The example below shows a simple make-break circuit.
Changing the state of switch A will illuminate the top bulb. Releasing it will extinguish it.
Changing the state both switches A and B will make the bottom bulb light. Then, if you keep switch A changed and then make switch B normal then the bottom bulb will go out and the top bulb will go on:

Please let me know if you understand what I outlined.

I'm following. I have a long task ahead with many hours to put in so I may come back to this thread off and on to ask further dumb questions but I think I need to go through the scoring reels, stepper units, etc. Tedious and time consuming but in the end I want the machine not only to work but work 100%. However, I will try to get the tester done soon.

Also, if attempting to clean the reels, either the credit or scoring, what is best used on them to clean, alcohol?

#78 7 years ago

Small update and another question. Did not take apart the credit reel but cleaned it and at least now when I press the start button, it decrements the credit reel by one like it should. So, first of many to be fixed. Hey I'm pumped....obviously doesnt take much to get me excited but something is working as it should so I'm happy about that. Game doesnt actually startup yet but a step in the right direction.

My question...I've taken some pictures of the scoring reels, specifically player one and player three, trying to get the switch contacts. Look at the picture below and can someone let me know if these look correct in terms of open and closed with the game unplugged? I ask because the player 3 switches look different in terms of what's open and what's closed.

IMG_0224_(resized).JPGIMG_0224_(resized).JPG

#79 7 years ago

Beck-The job of the score reel switches is to let the machine know the position of the reel in perspective as viewed through the glass. The switches will be in one position for digits 1-8, a different position for 9 and different again at zero. They -must- operate properly, see the score reel animation I made on page 1 of this thread. Cycle the score reel around using your finger on the coil plunger and watch the operation of the switches.

You said you are following my previous simple circuits....see if you can do the same with the next set.
They are series and parallel circuits. If you hope to be able to repair your machine then you must understand the concept.
SERIES_PARALLEL_(resized).pngSERIES_PARALLEL_(resized).png
Take a look at the (top) series circuit. You can observe the light will not illuminate unless switches A,B,C,D and E are all closed. When I am studying a schematic I think of switches in series as "AND" switches. "This switch, -and- that switch -and- that switch need to close" in order for the device to operate. The device being a light, coil or motor.

Now consider the two (middle) parallel circuits. Both left and right circuits are wired the same, they are only drawn differently. You can see that closing A -or- B -or- C will cause the light to illuminate. I think of switches placed in parallel as "OR" switches.

Getting a bit more complicated, see the bottom series-parallel circuit. That combines both types.
You can see that in order for the light to illuminate, switches A -and- B.... and C -or- D -or- E must be closed.

Series-parallel circuits are all over your machine.
If you can grasp it then I'll keep going.

#80 7 years ago

Beck, just to let you know I've moved the circuit concepts here:
https://pinside.com/pinball/forum/topic/em-pinball-circuits-basics-to-not-so-basic

Regarding your reel switches- Frankly, it's quite apparent they need to be serviced. Score reel switches are usually the last thing to do in that process. If you take the time to set your switches now you may be spinning your wheels with dirty malfunctioning reels.

#81 7 years ago

Hi Beck +
I refer to post-78, JPG. It is always difficult to to be 100% sure "I see what is there". I made JPG showing the 10-point-Scroe-Drum of player-1 in position "player does see position 8".
Grumble, my JPG is also not clear -> I put red numbers on the JPG - lets have a look at cabaret: https://pinside.com/pinball/forum/topic/help-with-startup/page/2#post-3132545 -> Manual -> page-15 (ori-13) -> down to "Switch adjustment" -> middle drawing "at 1st to 8th ..." -> My red-3 and red-6 are not in the page ( simple fishpapers for insulating). Red-1 and red-2 is the top switch, red-4 and red-5 is the middle switch, red-7 and red-8 is the bottom switch (red-9 and red-10 is the EOS-Switch to open when the moving plunger reaches "end of travel").
Lets forget for the moment (we have resetting problems - we do not have problems when making points) - lets forget red-7 and red-8.

The Reset-Relay in the cabinet pulls constantly and lets the Score-Motor run -> SCM pulses switches -> 1-2-Reset-Relay and 3-4-Reset-Relay (in the backbox near the Score-Drums) are pulsed and by beeing pulsed: closes switches (and open and close ...) -> electricity is fired to all coils on the score-drums -> they pull and let go -> drum is stepped towards position-zero. Reching position-zero "red-4 and red-5" open: "I am Score-Drum-XY - I have reached position-zero - I DO NOT WANT SOME MORE SHOTS OF ELECTRICITY - I am happily at position-zero".

Reaching position-zero: Red-1 and red-2 must also open - Score-Drum-xy reports to the "brain of the pin": "I am Score-Drum-XY - I am at position-zero - I don't mind if YOU BRAIN stop the resetting".
And when ALL 16 Score-Drums report the same (hey brain ...) -> The Reset-Relay in the cabinet lets go -> Score-Motor stops -> the 1-2- and 3-4-Reset-Relays are no longer pulsed - and the Score-Drums are no longer pulsed.

Beck, look at many Score-Drums manually step them forward - look at the moving of red-1 and red-2 / moving of red-4 and red-5 - adjust so the ALL open when doing the step "pos-9 -> pos-Zero".
(((Maybe I see in JPG, post-78 a faulty mounted red-1 red-2 (?) ))). Greetings Rolf

001_(resized).JPG001_(resized).JPG

#82 7 years ago
Quoted from SteveFury:

Beck, just to let you know I've moved the circuit concepts here:
https://pinside.com/pinball/forum/topic/em-pinball-circuits-basics-to-not-so-basic
Regarding your reel switches- Frankly, it's quite apparent they need to be serviced. Score reel switches are usually the last thing to do in that process. If you take the time to set your switches now you may be spinning your wheels with dirty malfunctioning reels.

This thread (SteveFury - em-pinball-circuits-basics-to-not-so-basic) is now a stick in the EM section.

Promoted items from Pinside Marketplace and Pinside Shops!
$ 50.00
Cabinet - Toppers
Slipstream Mod Shop
 
$ 10.00
Playfield - Protection
UpKick Pinball
 
$ 4.00
Playfield - Decals
UpKick Pinball
 
800 (OBO)
Machine - For Sale
Oceanside, NY
$ 1.00
Pinball Machine
Pinball Alley
 
Hey modders!
Your shop name here
There are 82 posts in this topic. You are on page 2 of 2.

Reply

Wanna join the discussion? Please sign in to reply to this topic.

Hey there! Welcome to Pinside!

Donate to Pinside

Great to see you're enjoying Pinside! Did you know Pinside is able to run without any 3rd-party banners or ads, thanks to the support from our visitors? Please consider a donation to Pinside and get anext to your username to show for it! Or better yet, subscribe to Pinside+!


This page was printed from https://pinside.com/pinball/forum/topic/help-with-startup/page/2?hl=docfinlay and we tried optimising it for printing. Some page elements may have been deliberately hidden.

Scan the QR code on the left to jump to the URL this document was printed from.