(Topic ID: 239476)
Linked Games
 Haunted House
Gottlieb, 1982
Haunted House
Gottlieb, 1982
Topic Gallery
 Houston, TX
Haunted house has EIGHT flippers. Instead of buying four flipper rebuild kits at a total cost of about $200, I went through each one and addressed any issues individually. For the most part, they just needed cleaning and new coil sleeves. However, there were a couple where the plunger was mushroomed. My easy fix is to take a dremel and grind a nice smooth edge so there is no scraping or binding.
IMG_7458[1] (resized).JPG
Putting everything back together takes a lot longer than stripping it down. When I'm stripping a playfield, I'm not worried about much of anything except removing all the mechs, and taking enough pictures to be sure I can put it back together correctly.
When I'm re-assembling, I'm checking everything, fixing anything broken (or about to break) and making sure it's all clean and shiny. It takes less than a minute to unscrew a target - but several to clean it, check the wiring, gap the switch and re-install. Then there are the pop bumpers, flippers, and other mechs that require even more attention. Add to that - Haunted House has these 'kickback targets' that act basically like slingshots. I was amazed how many coils were under the main playfield. At this rate, it looks like at least another week or so before I'll be ready to play-test.
...buy hey - I'm having fun! ![]()
![]()
 Muskoka, ON
If you need any reminders of how the toys go back together, I've got all the playfields out of the cabinet right now . . .
After double checking all the connections, I finally powered it up. I was hopeful that everything would work - but I knew that was wishful thinking. Overall, I'm still optimistic - as I'd say about 80% of everything works. The sounds (except background) are ok, and all the displays look good. Most of the lights appear ok - with a couple that are locked on..
But the biggest issues I am trying to track down are:
(1) Main playfield right two flippers do not work.
(2) Extra ball area kickout on main playfield does not work.
(3) Pop bumper in lower playfield does not work.
(4) Pop bumper on top playfield does not work.
I haven't really started digging into the above issues. It was late Easter Sunday when I powered it up, and I just didn't have the time to do much other than test what worked vs what wasn't.
I'll start with looking at the schematics of the right flipper issue - I've ruled out the flipper switch in the cabinet - but that's as far as I got.
I made some progress.
(1) Main playfield right two flippers do not work - FIXED - it was a contact in the U relay, which should normally be closed. Cleaned/gapped, and now works great.
(2) Extra ball area kickout on main playfield does not work - WIP - suspect a switch/contact.
(3) Pop bumper in lower playfield does not work - FIXED - cleaned and (re) gapped.
(4) Pop bumper on top playfield does not work - 80% - works now on one side of the pop, but still needs some spoon adjustments to work 100%.
As usual, with every few steps forward, there's always a couple steps back. I think I may have a blown TIP on the Pascal board. ![]()
![]() Not sure how it happened, or if it maybe came that way (doubtful), but I've ruled out just about everything else. It's coil #2 - the upkicker from the main playfield to the attic. It's giving me 'error #2' - "No current is flooding thru the coil, although it is energized".
Not sure how it happened, or if it maybe came that way (doubtful), but I've ruled out just about everything else. It's coil #2 - the upkicker from the main playfield to the attic. It's giving me 'error #2' - "No current is flooding thru the coil, although it is energized".
I checked, and there is power at the coil. I also checked continuity on the return line to the driver board, and even replaced the entire coil and diode. ...still no luck. I also have an issue with the trap door - it stays open for the entire game. It closes between games, so I know it 'works' - but not sure why it's staying open most of the time.
IMG_7531 (resized).JPGIMG_7536 (resized).JPGIMG_7537 (resized).JPG
Damnit. I think this machine is Haunted for real. I managed to fix the four issues listed above - so the only remaining problems were (1) the upkicker coil from main playfield giving Error 2 "No current is flooding thru the coil, although it is energized", and (2) the trap door stays open during gameplay (but closes between games).
That's it - those were the only two problems and everything else was working 100%. So I adjusted the rubbers to keep the ball from going into the upkicker, and played some games. Usually, as you're hitting targets/switches - it knocks off some of the crud and you begin to see improved performance. So far so good - until the coil that kicks the ball from the basement to the main locked on. WTF!!! It was working fine - and for that matter the upkicker was working ok for a while also...
Now the game is unplayable (unless I block off the basement)...and I'm at a loss as to why those coils which were working, are now F'ed up.
I'm frustrated and it's probably time I walk away for a bit before I break something else. My biggest worry is that there is some old funky wiring/repair that is causing backcurrent, and I'm blowing TIPS on my $400 Pascal board.
So I now have three problems - severe enough to keep me from booting the game.
1) The coil that kicks the ball from the basement is locked on.
2) The upkicker coil from main playfield giving Error 2 ("No current is flooding thru the coil, although it is energized").
3) The trap door stays open during gameplay (but closes between games).
I'm open to any suggestions...
 Flint
Flint
All problems have been FIXED!!
Details here for anyone interested: https://pinside.com/pinball/forum/topic/need-help-with-haunted-house-coils-locking-on
With the exception of an intermittent pop bumper, and the trap door staying open - everything is working 100%. And I'm also super happy that I didn't blow anything on the Pascal board. WooHoo! I'm a happy camper today.
![]()
![]()
Re-pinned and replaced the connector on the pop bumper driver board, and now that's working 100% nice and snappy. Played a few more games. Everything's GOOD! Time to make a drink!
Eventually - after I've had some fun playing my new (to me) game, and made sure everything pretty solid - I am going to attempt the multi-ball mod. ...stay tuned.
![]()
![]()
1 week later
Well, I know everyone's just been DYING to know what's been going on with this project. ![]()
![]()
I've been playing and enjoying the 'stock version' of Haunted House, and really enjoying it! I had a couple friends over and we all gave it a go. I still have the issue where the trap door opens when a game is started (have a couple ideas what could be causing this), and I know of one bulb that is out. But other than that, it's functioning 100% and has been rock solid and snappy.
SO - it's about time to start seriously thinking about the multi-ball mod. I've already sourced a couple parts, and earlier today I ordered almost $100 more in parts from Steve at The Pinball Resource. Once those come in, I should have most everything I need to get 'er done.
I've been reading, and re-reading the instructions and feel pretty confident about the multi-ball part - however - I'm beginning to second guess the speech. It involves downloading new binary/digital game files, and burning new Eproms - which may be hard to source. I have zero experience with this, and it just sounds scary. So for now, I'm going to focus on the multi-ball and leave the speech for a later time.
I'll post pics of the new parts stash once it arrives.... 'till then - y'all be safe out there!
![]()
![]()
Even if you don't add speech you should try the latest main game ROM. There was one unused sound on the sound board. The updated ROM assigns that sound to the trap door opening.
The speech upgrade shouldn't be a big deal. For that you need to install an SC-01 speech chip in the open socket on the sound board. It also requires new sound card ROMs to leverage the speech and a different game ROM to make sure all the speech is used.
I've got all the pieces to add speech to mine but I've been happy with just adding the sound for the trap door.
Quoted from Robotworkshop:Even if you don't add speech you should try the latest main game ROM. There was one unused sound on the sound board. The updated ROM assigns that sound to the trap door opening.
The speech upgrade shouldn't be a big deal. For that you need to install an SC-01 speech chip in the open socket on the sound board. It also requires new sound card ROMs to leverage the speech and a different game ROM to make sure all the speech is used.
I've got all the pieces to add speech to mine but I've been happy with just adding the sound for the trap door.
Robotworkshop do you have any site or details on the updated ROM with the unused sound? Would love to add that.
https://www.flipprojets.fr/PromHH_EN.php
https://www.flipprojets.fr/HHparlant_EN.php
..interesting choice of graphics...but anyway..
I'm still somewhat confused. These ROM's are all for the sound board, yes? I know I can email them for the file - but where do you get the actual ROM's? And where would I find a SC-01 speech chip? ..and how to you 'burn them'?
EDIT: reading more, it seems if I can't source and original SC-01, I'd need to perform the following surgery on my sound board....mmmmmmm - no thanks.
◾Desoldering and remove the E4-E5 and E4-E6 straps.
◾Connect the E4 point by a wire to pin 1 of U4 (74LS138).
◾Desoldering and remove the E9-E7 and E9-E8 straps.
◾Solder in place, between E9-E7 and E9-E8, two diodes 1N4148 (look at picture bellow).
◾Connect the E11-E12 and E13-E15 straps.
You can get the new main game rom 669-3 from one of the links you posted. I think I used the A variation. That just enabled the extra sound. You can just burn that ROM and plug into the MPU board with no mods. It works with the standard sound card.
If you add the SC-01 speech chip then you would need to use a 669-4 image for the MPU rom so it can use the sounds. No MPU mods needed.
On the sound card to enable for speech you need to add the SC-01 and swap the ROM chips. They sell the code on a single larger ROM and due to that you have to rejumper the sound board and modify it. I think that you could just use the binary file for the larger sound ROM, split it, and burn on two smaller chips and just plug in with no mods. That is what I'd try on mine. I'd rather do that and just plug in vs altering the board.
 Sydney
I haven't poked around in the 6502 code yet that is used on the Haunted House MPU and sound card but I have done a lot of work with the SC-01A chip. Years ago I wrote an article about the SC-01A and how to emulate it using a newer speech chip. It would be an option once all the SC-01A chips become unobtaniium.
https://www.robotworkshop.com/robotweb/wp-content/uploads/servo200712_HERO_Speech_translator.pdf
Don't want to derail your thread but if you're curious that chip was also used in the HERO 1, HERO Jr, and RB5X robots for speech....
Quoted from Robotworkshop:Even if you don't add speech you should try the latest main game ROM.
My understanding - and correct me if I'm wrong - is that I can't update the game ROM if I'm running the PI-80 board. Here's the FAQ from Pascal:
There are 2 separate projects around this game :
1. The Haunted House in multiball with speech project comes from a fruitful co-working with the Davroux brothers who added our specific sentences to the existing sounds.
This project only works with our PI-80 board.
It needs a PI-80 board + an original GTB sound/speech board with the specific sound proms, to be acquired directly from the Davroux brothers
2. The Haunted House with speech version (hence single ball) reuses the original CPU to which the Davroux brothers added code to trigger additional sentences
This version work with the original GTB boards ; the PI-80 board software has not be fitted for this yet, due to lack of time and demand
It needs an original GTB CPU board + an original GTB sound/speech board ; both boards require specific game and sound proms, different from the multiball version above, to be acquired directly from the Davroux brothers
Quoted from Robotworkshop:I think for multiball you need the other MPU board
For multi-ball, you most certainly need the PI-80 board. I'm good there.
I've also just purchased an SC-01 speech processor chip....so seems I just need the two new ROMs for the sound card and I'll be good to go.
I've got a couple questions for you guys.
1) Where can I purchase a couple ROM chips that will fit in my sound card - Great Plains Electronics (what specs) ?
2) How do you burn the data? (I've downloaded 669_3 and 669_4)
The alternative to the above is to spend 55 euro on the ROM from 'flipprojects' which also requires soldering a jumper and two diodes on the board. I'd prefer not to do that if I can.
As always - I greatly appreciate all the help!
-Brad
![]()
![]()
They only give the MPU rom image for free. If you have an EPROM prgrammer you can burn the appropriate game rom. You'd need the version with speech support.
For the sound card they don't give away the image. They sell the code on a larger ROM. I'd probably get that, read the content, then split the image to burn into two smaller EPROM chips to avoid altering the sound card.
 Zeist
Zeist
I believe one of the problems was the earlier revisions of the sound/speechboard had a hardware bug and were unable to address 2 2732 Eproms. I did use the 2764 speech rom from the Davroux brothers. It wasn't very difficult to adapt the board to use the single 2764 Eprom configuration. Although you need to have some solder skills of course. The changes can be easily reverted if necessary. The speech rom really adds something to Haunted House. It's a great job from Thierry and François.
Yup agree, pay the money to get the roms from the davroux brothers after all they did all the hard work.I have the rom files but would never send them out to anyone.I paid them as I wanted them to have some compensation for their work, and work on the board wise,it isn't really that hard,sure a mate could do that for you
Quoted from poibug:Yup agree, pay the money to get the roms from the davroux brothers after all they did all the hard work.I have the rom files but would never send them out to anyone.I paid them as I wanted them to have some compensation for their work, and work on the board wise,it isn't really that hard,sure a mate could do that for you
No issue with them getting compensation for their work. It would just be nice if it was also offered as a pair of ROM chips without the adapter board. If I ever do the mod on mine I'd probably buy their ROM then split it myself.
Quoted from SunKing:Now that all three playfields have been cleaned, I spent time this weekend starting the touch-ups. First, I laid down a protective coat of clear to lock in the remaining paint. Then, I decided to try the water slide decal route. There's another HH resto thread that posted some images of the worst wear spots - and when printed look like they may work pretty well.
[quoted image][quoted image]
Could you provide a link to this restoration thread with most worn images?
Thanks.
Quoted from Midniterider:Could you provide a link to this restoration thread with most worn images?
Most of the parts needed for the multi-ball conversion have arrived. I'm just hesitant to start the process, as I've been having fun playing the stock version (and tweaking it - making it rock solid). However, I think I'm going to bite the bullet this weekend. I'll post lots of pics as I go through this process, as I suspect that's what most folks are interested in seeing.
IMG_7571 (resized).JPG
1 year later
I’m doing a haunted house with multiple Ball right now. The Pascal PDF isn’t as well documented as I would like. And there’s one thing I’m just having a Hard time figuring out. That’s on the lower play field, Must add a switch. But it’s unclear if the switch goes under ball one or ball two? Does anybody have an answer for this? See the picture below please...
I would love to rewrite the documentation, but they’ll be a whole three people that would ever use it...
I haven’t really noticed any threads about this modification here. Which leads me to believe that not very many people have actually done this mod. after viewing the picture below, does anyone know if the added switch goes underneath ball one or ball two, as documented in the picture below. Thank you
Clay, I think you are right that probably only 3 people have completed it, but hell I'd read it if you wrote it. You've got a real knack for explaining tech that jives with my learning style.
While I haven't done the conversion myself (I may do it in the future with my old playfield and a spare cabinet/boardset) I've read a lot about it. From my understanding of it, it would go over the first not the second... I would just assume that it would follow the same switch orientation that Black Hole has... Rod, Switch, Release Lever. If the switch went over the second ball, wouldn't it not know when to release the second ball if there were 2 or 3 balls stacked up in the center drain?
Black-Hole-Pinball-Machine9 (resized).jpgYou would think it would be on the first ball or ball number one as shown in the picture. But then again ever looked at a three ball black hole ball trough? The switch is on the last ball, and only on the last ball. So I’m not entirely sure which ball position gets the switch...
I sent an IM to Poibug. He posted in this thread earlier, and has successfully completed a HH with multi-ball (one of the first, and I believe he worked with Pascal to create the current guide). I'm hopeful he'd know the answer.
Quoted from cfh:You would think it would be on the first ball or ball number one as shown in the picture. But then again ever looked at a three ball black hole ball trough? The switch is on the last ball, and only on the last ball. So I’m not entirely sure which ball position gets the switch...
I guess kind of just of assumed the back end switch in the 3 ball trough on Black Hole was to indicate whether or not there was a ball still on the playfield when starting a game, ensuring that you wouldn't start a game with only two balls and forever be waiting for that third ball to come out to activate the multi ball you weren't going to get anyway. From my understanding the lower playfield gate and switch was really just to stagger the release of the balls to the VUK so you didn't get two balls trying to shoot upward (since it struggles so hard with just one ball haha).
I'm mounting the switch under ball 1...
really need a better document for this procedure. their document is not very good, poor wording and poor pictures... and then it was translated to english... it's just hard to use. and there's no measurements or exact positioning. it makes for a lot of guess work. maybe they are thinking like me, that most people aren't going to take this on, so why put in all the effort?
i had a argument with Pascal when he originally developed this. My suggestion was to just have two ball multiball. And to stack the balls in the outhole area (like classic sterns do). it would have saved a lot of work and additional parts and frankly a lot of trouble. also with 2 ball MB i don't think you would need the lower playfield ball release either. it seems so much easier to accomplish. And the original ROM perhaps could have been hacked to achieve this (opposed to re-writing the software and using an entirely new board system to run new software.) It would have required one additional switch and no additional coils this way, and of course, hacking the original 6502 code. But he was having no part of it...
Quoted from cfh:My suggestion was...
That's an interesting back-story. Clay, I for one would really appreciate having an updated/improved document to walk me through the process of adding multi-ball to haunted house (speech is a separate issue). Heck, I've got all the parts already - just need the confidence to know I'm not going to mess up a 100% working machine. Well, even if that doesn't happen - thank you for all the guides, Ninja stuff, etc. Way back when I started in this hobby, that info was precious.
Quoted from cfh:Pascal got back with me. Indeed the switch goes under "ball one".
when i'm finished getting this all set up, i'll document it, with proper measurements and pictures.
Looking forward to it!
I always felt like Haunted House would be a great multi ball candidate if the lock shots were just a little harder to qualify and then easier to hit. I always dreamed of having a three ball multi ball but the balls remained captured while locked in the subways to the lower playfield, then released all at once down below. Just never felt like the multi ball would be very rewarding or interesting as it is right now.
There's something about the busyness of having balls on different levels at the same time that is very exciting and confusing and fun though.
GOTTLIEB HAUNTED HOUSE MULTIBALL MOD.
==============================
LOWER PLAYFIELD MODIFICATIONS.
Adding the parts to the upper playfield is a piece of cake. Pascal's document covers that part pretty well. But the lower playfield modifications, that's where all hell breaks loose. Pascal's instructions and picture are lacking. So i will try and fill in some details.
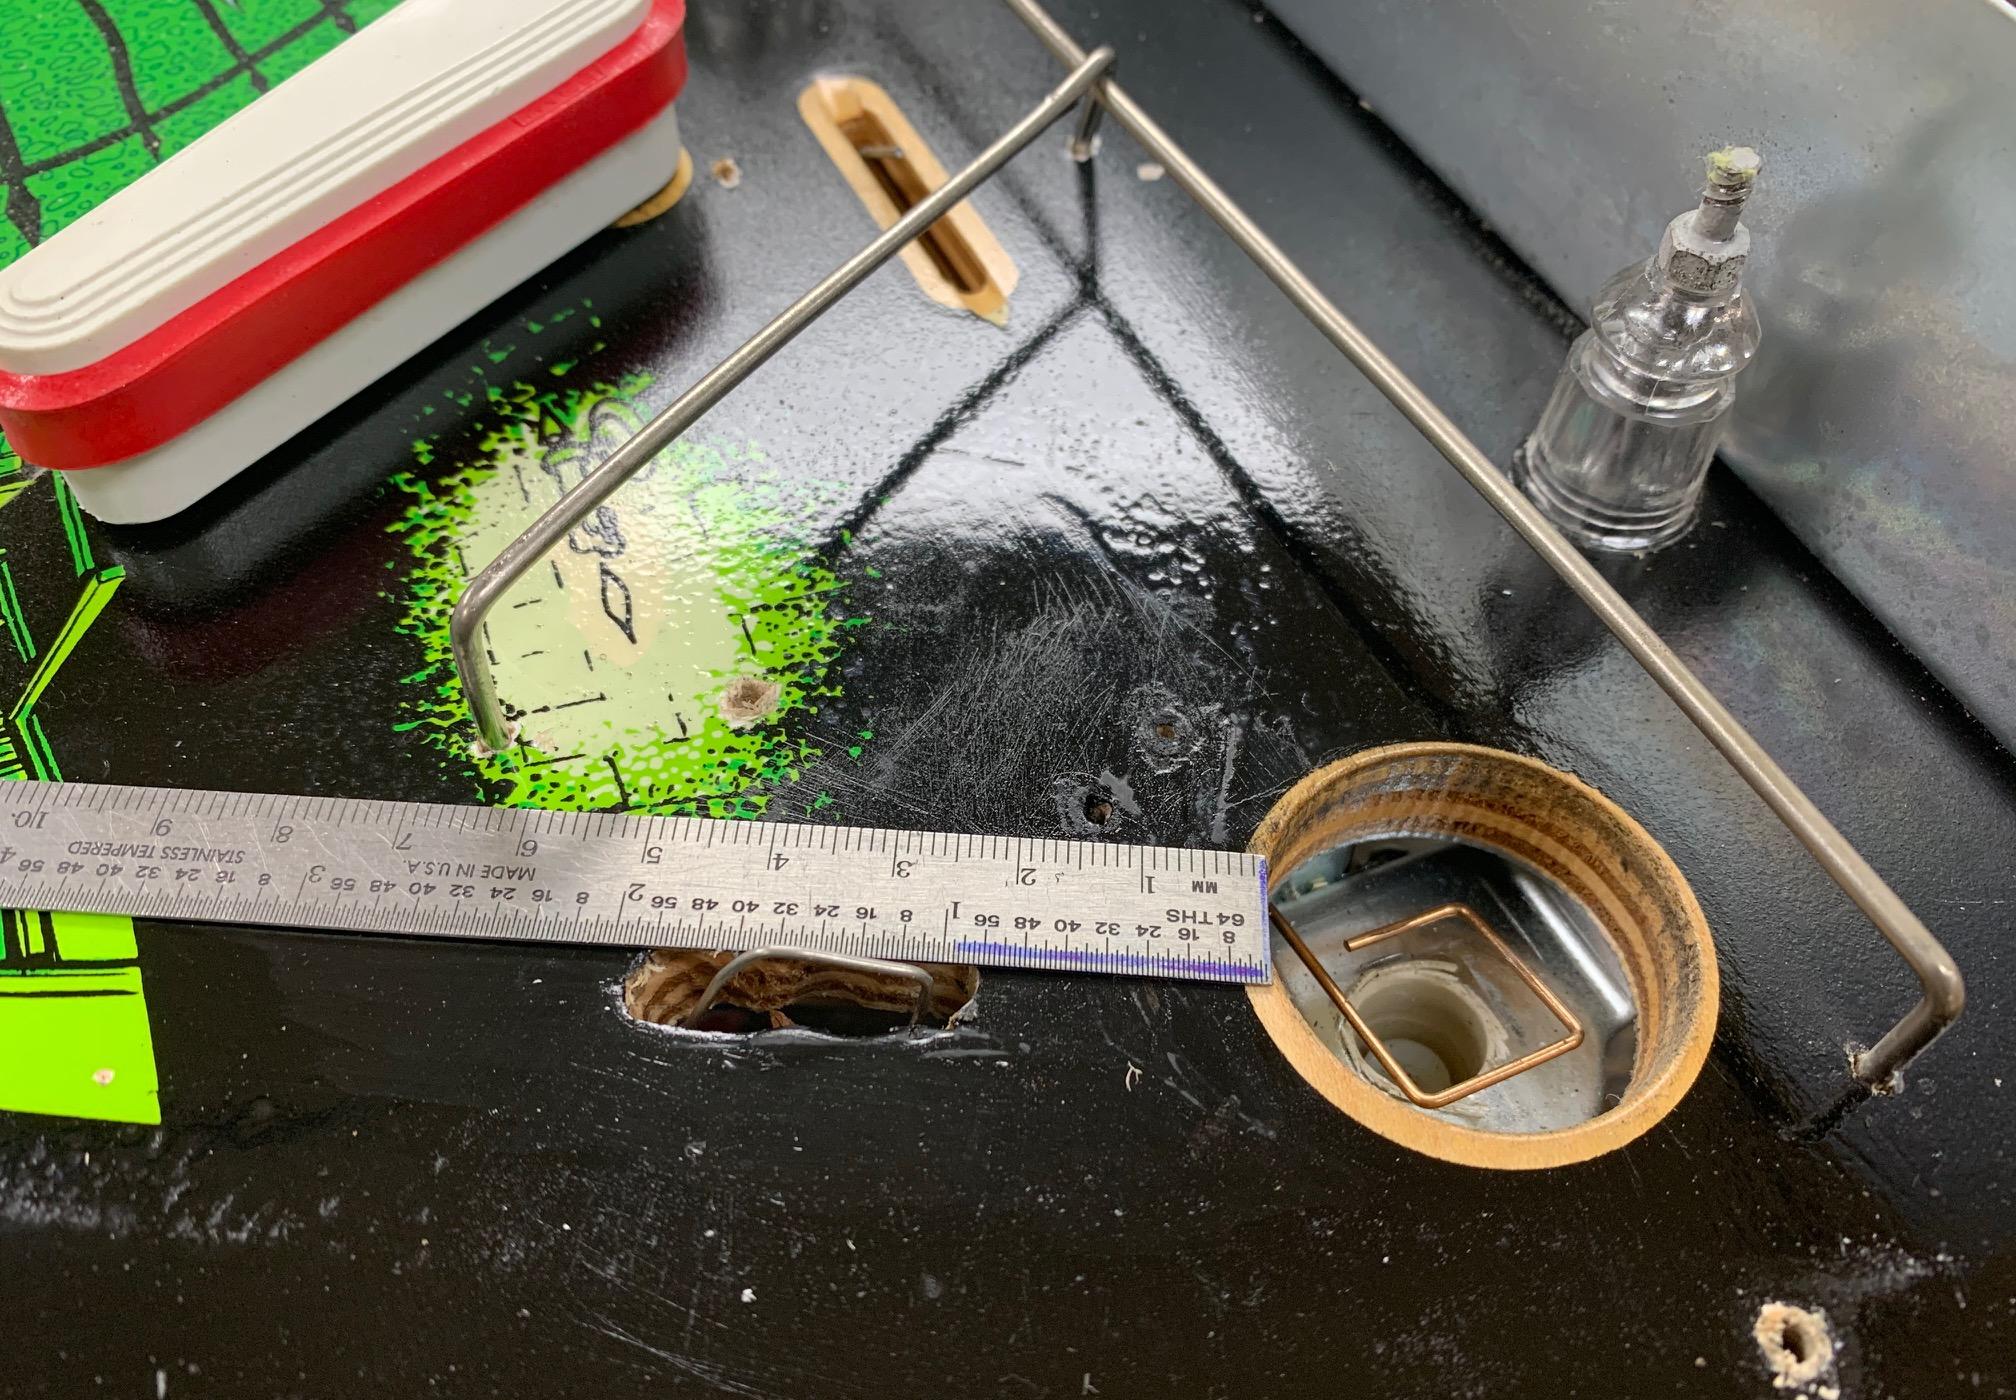
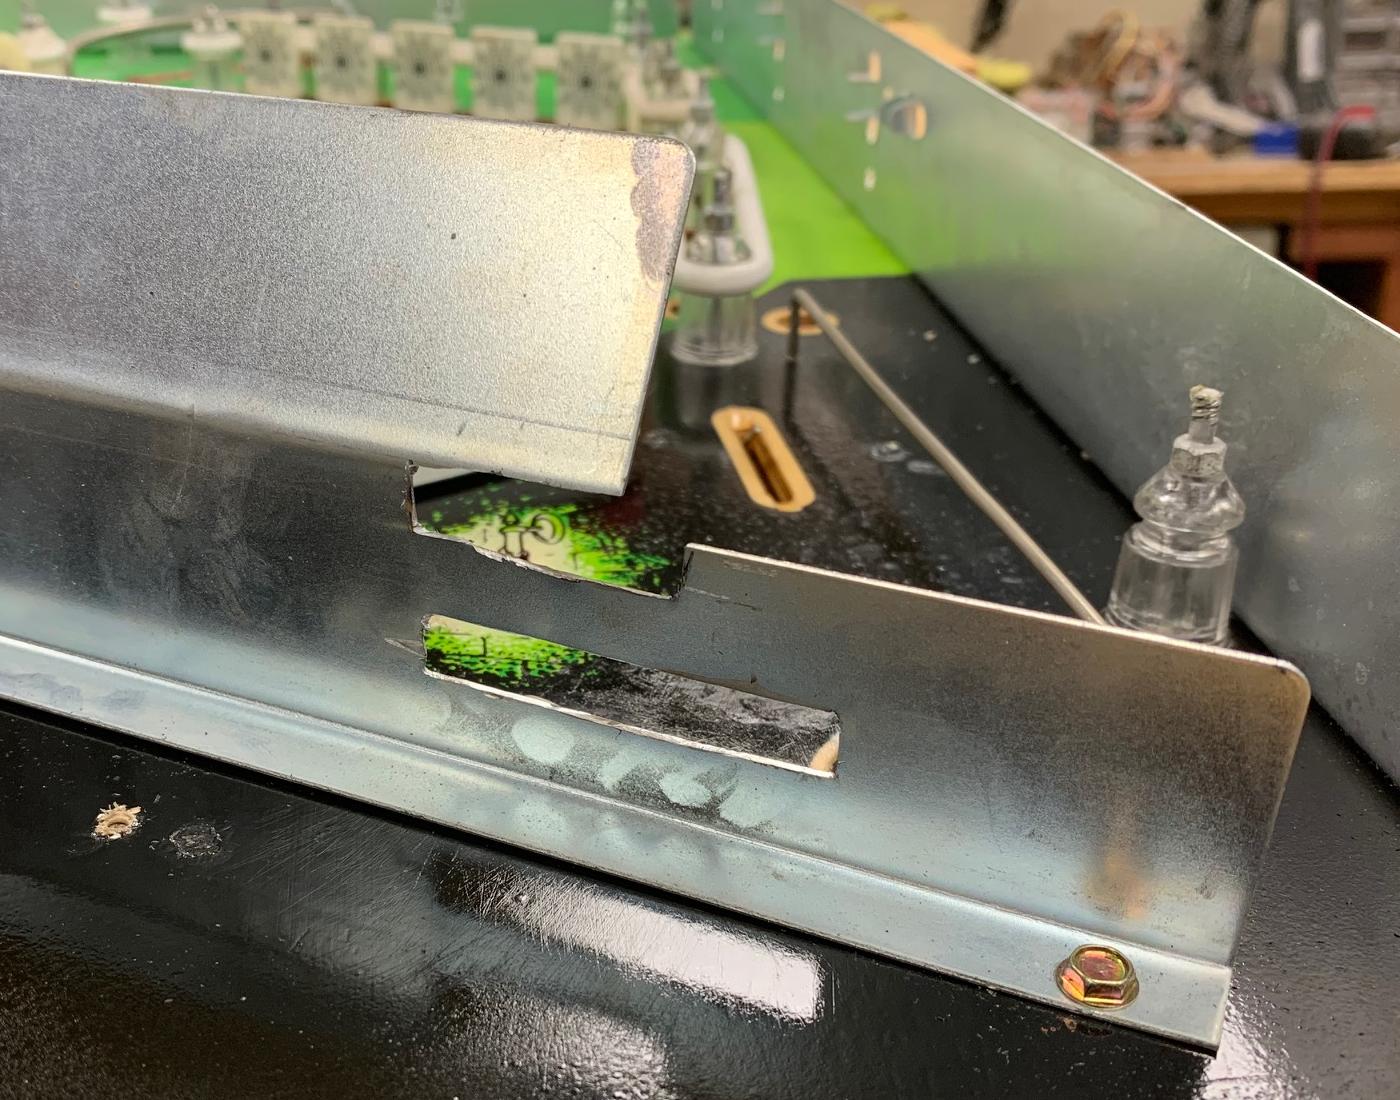
First thing to do is to cut the hole for the added switch. Pascal doesn't think this should be done first... but he's wrong! HA! It's the first thing that needs done, because it dictates the position of everything.
Remove the ball guides and all hardware around the VUK on the top side of the playfield. The ball track should be visible, where the ball follows the ball guide to the VUK. you will need that ball track...
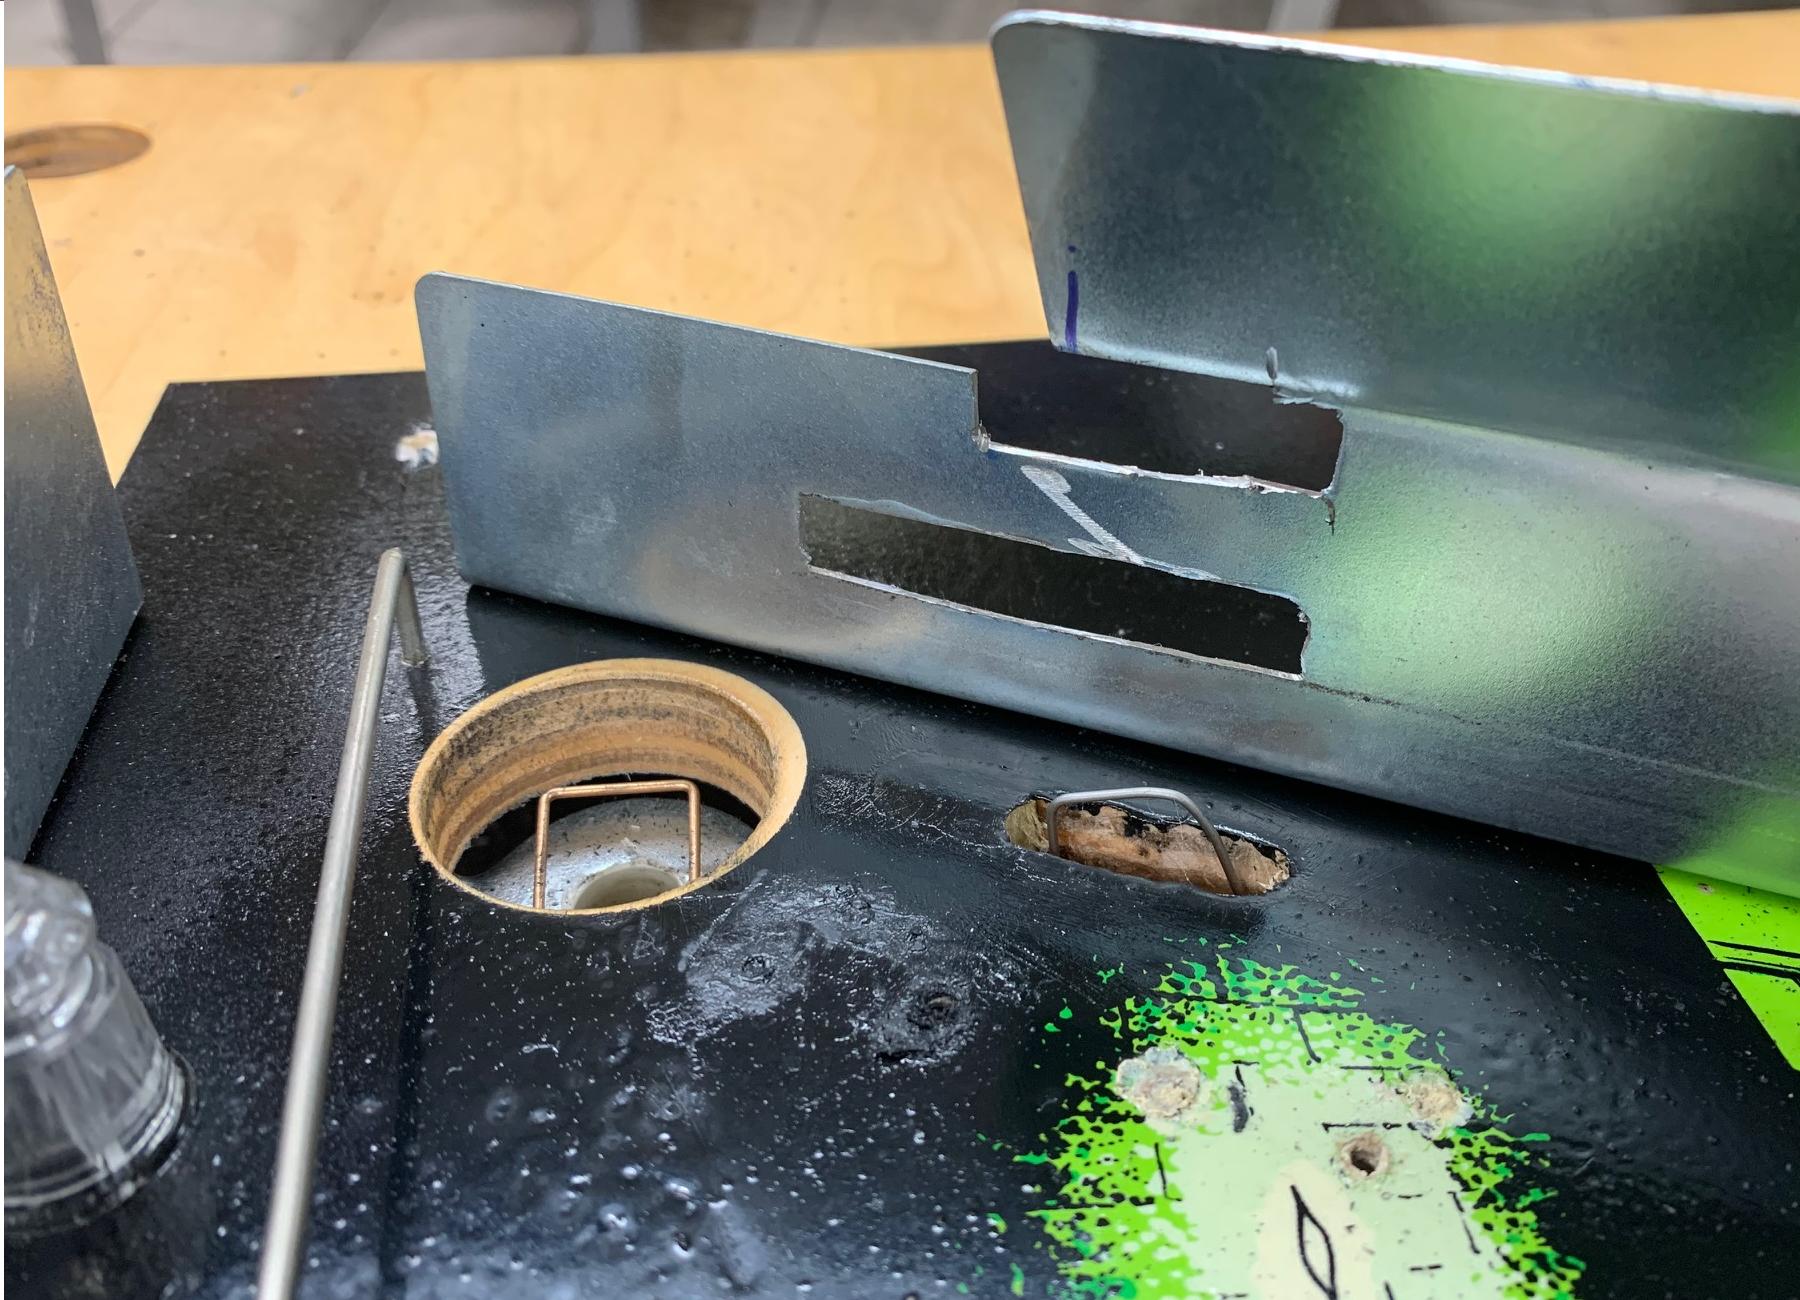
The position of the cut in the wood is very important. You want the new switch slot to be as close to the VUK as possible. But the problem is, the VUK's metal bracket (as seen from the bottom of the playfield) doesn't allow the switch to be too close. My picture below should show where the switch cut should begin and end. I used a 1/4 drill bit to drill the edges. Then a 1/4" end mill to cut the slot. Pascal uses a jig saw, that will work too. Note the position of the new switch slot should follow those ball marks!
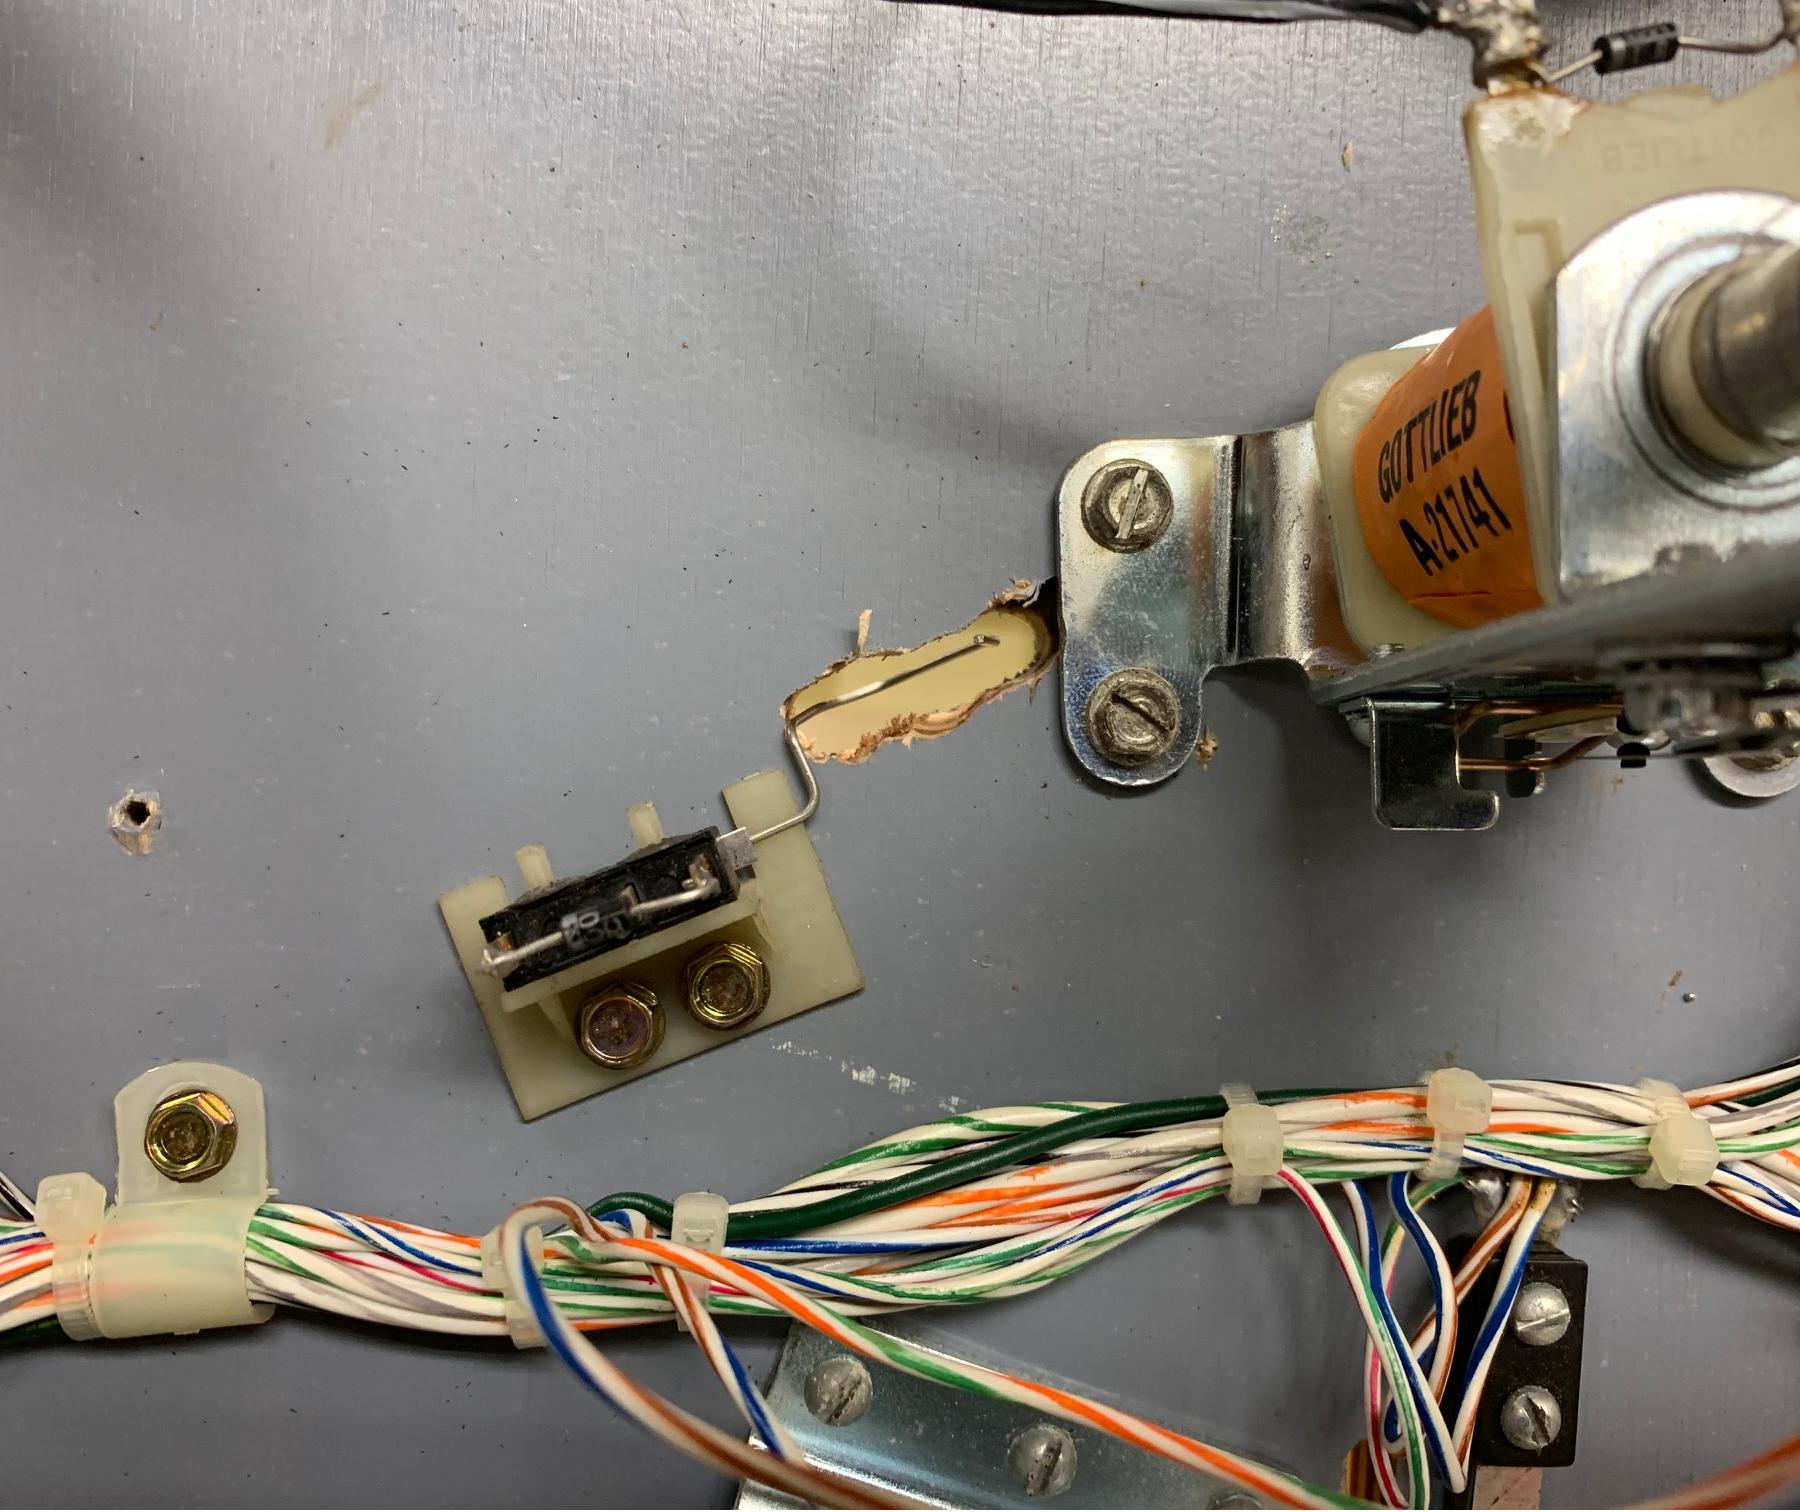
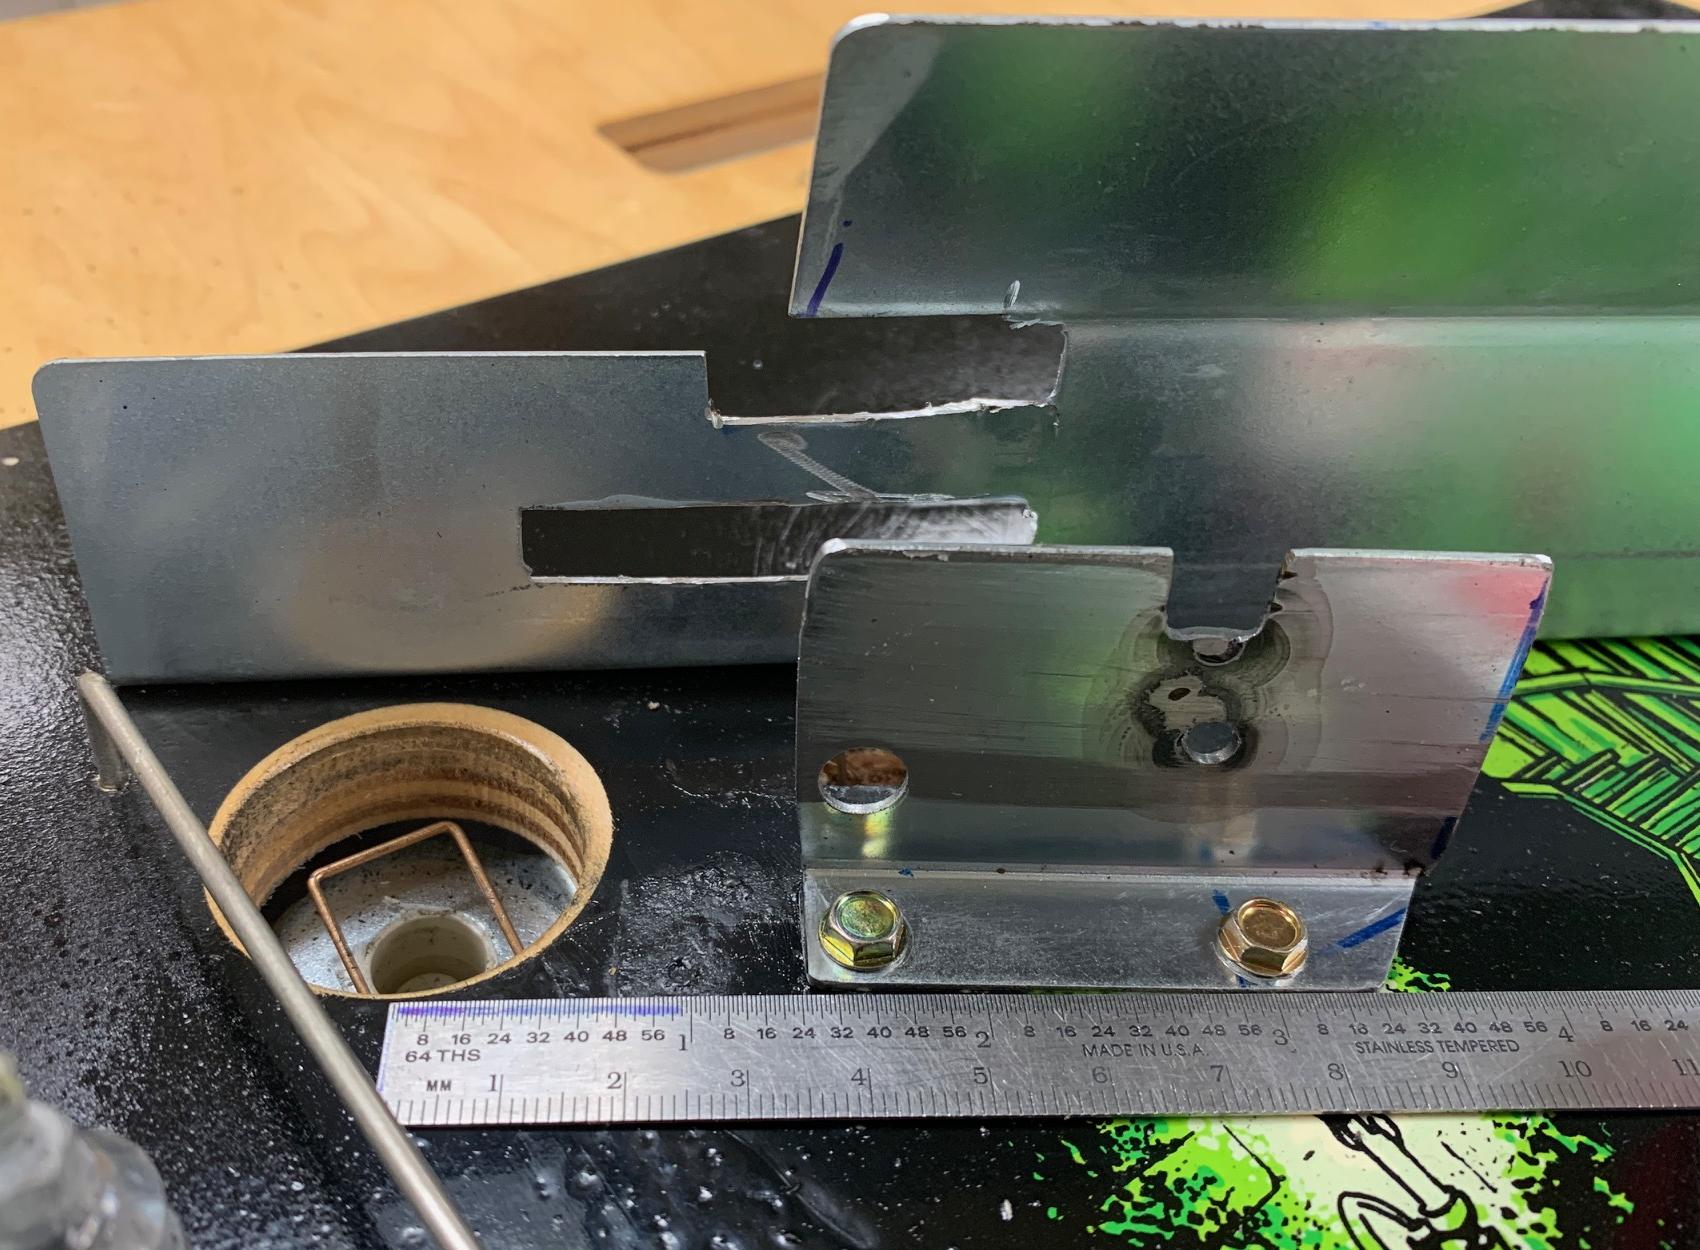
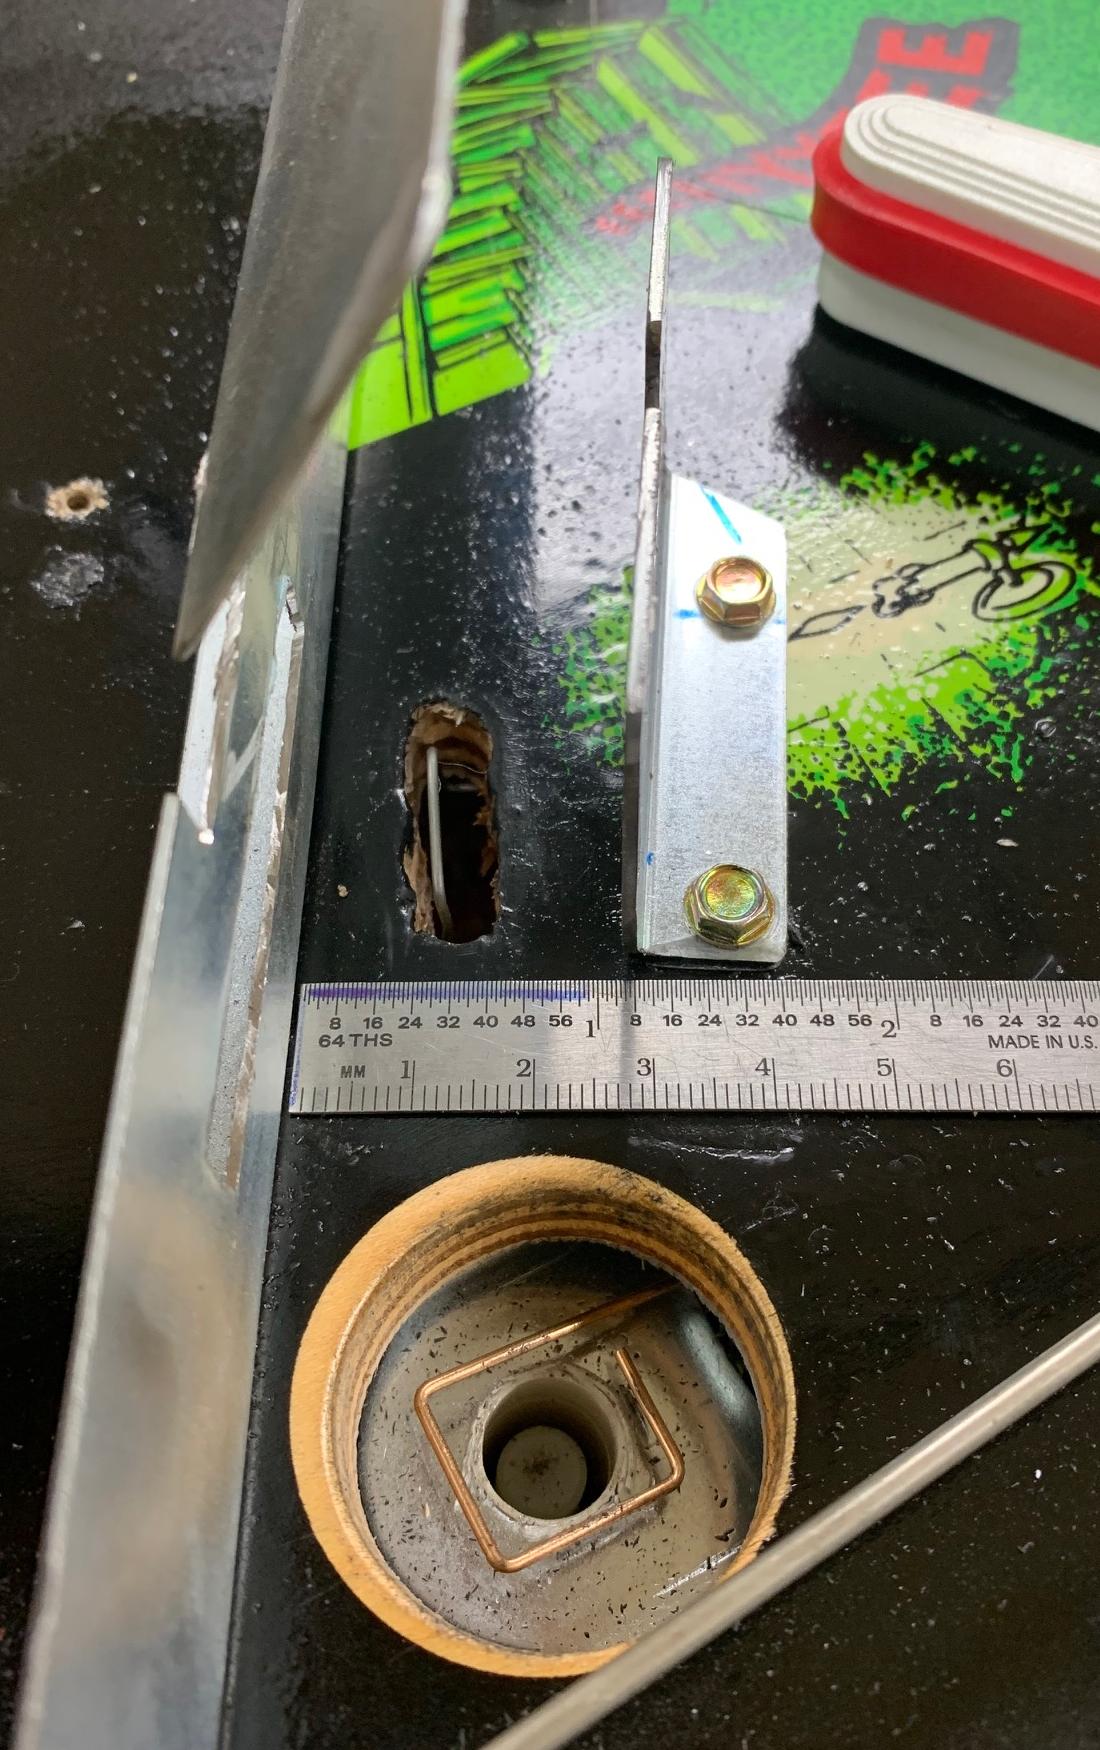
Pascal recommends using Gottlieb style hardware. I say NO to that, and used a micro switch. The diode will have to be changed (you can't use a 1n4001 diode) to a gottlieb style 270 diode. But i just prefer micro switches, as they are more reliable. Here's a picture from the bottom of the playfield. you can see my switch slot is cut right up next to the VUK kicker bracket. This positions the switch as close to the VUK as possible, which is what you want. On the micro switch I believe that's a Dataeast style bracket/switch. I did have to compress the switch's wire form a bit. This kept the newly cut switch slot as short as possible.
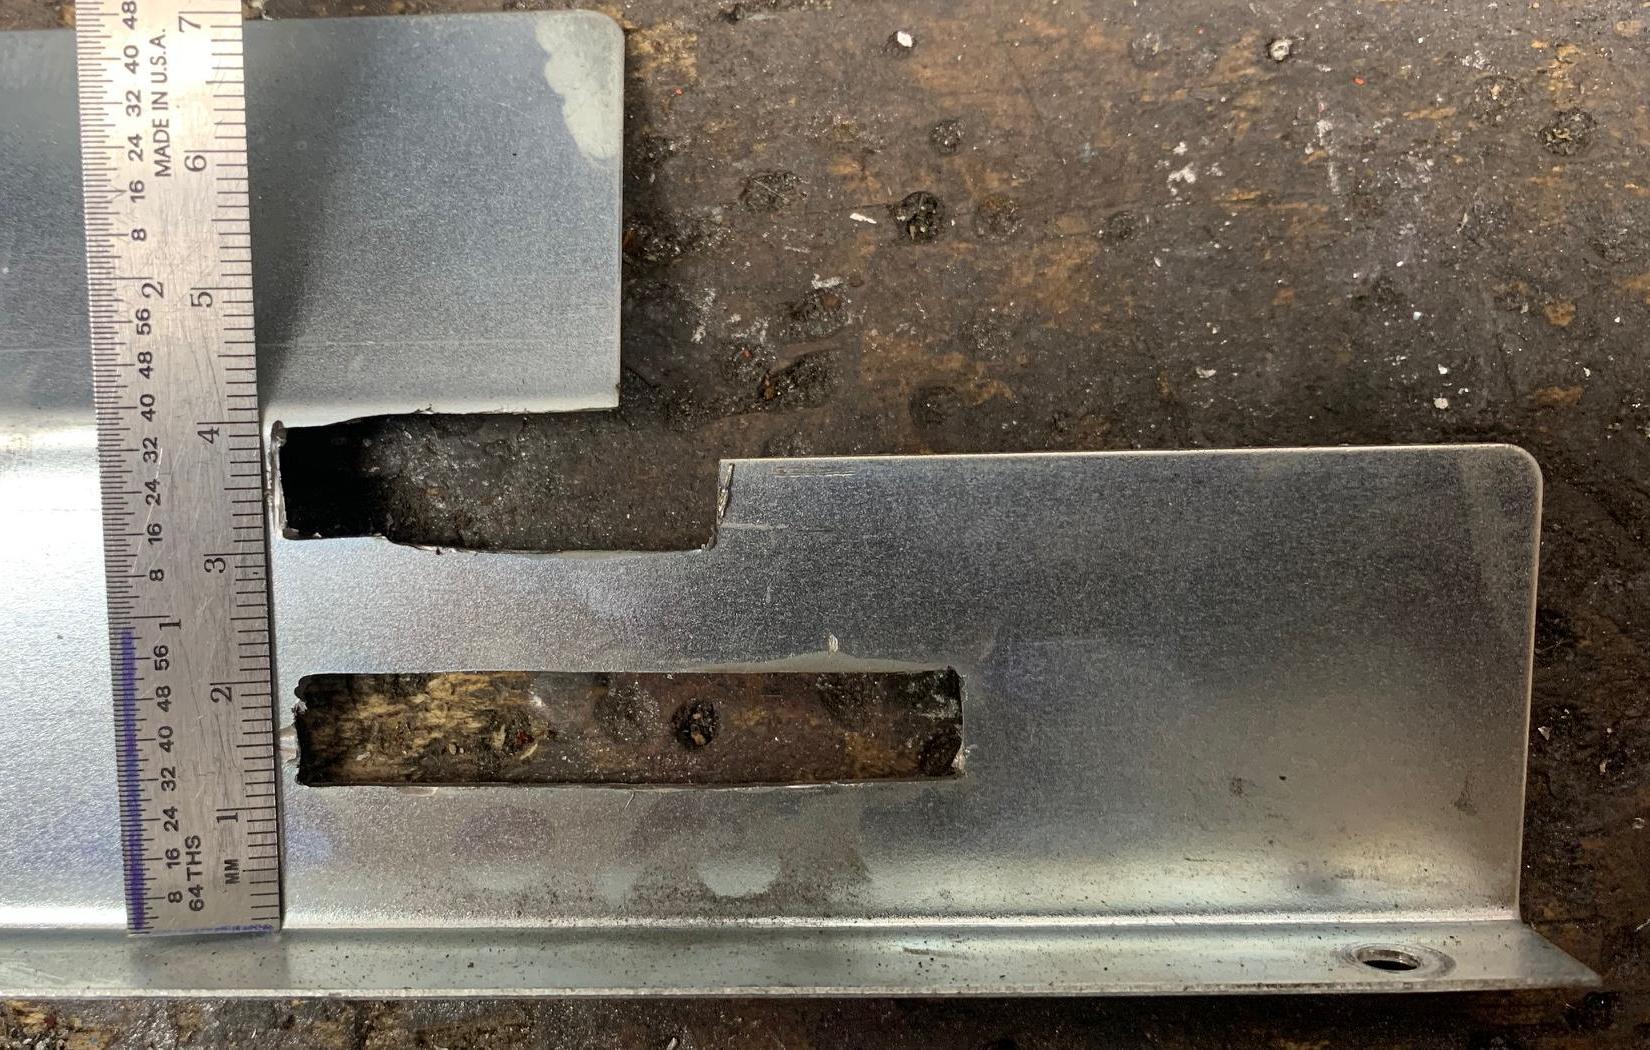
Next up is to modify the existing ball guide. this is the main lower PF ball guide that is closest to the back of the game, and directs the ball to the VUK. It needs two cuts... one for the ball release coil, and one for the wire gate that keeps the (potentially stacked) second ball in place, so it doesn't feed two balls to the VUK. I used a Dremel tool with a cut off wheel to do these cuts.
http://www.pinrepair.com/sys80/hhmb_lower03.jpg
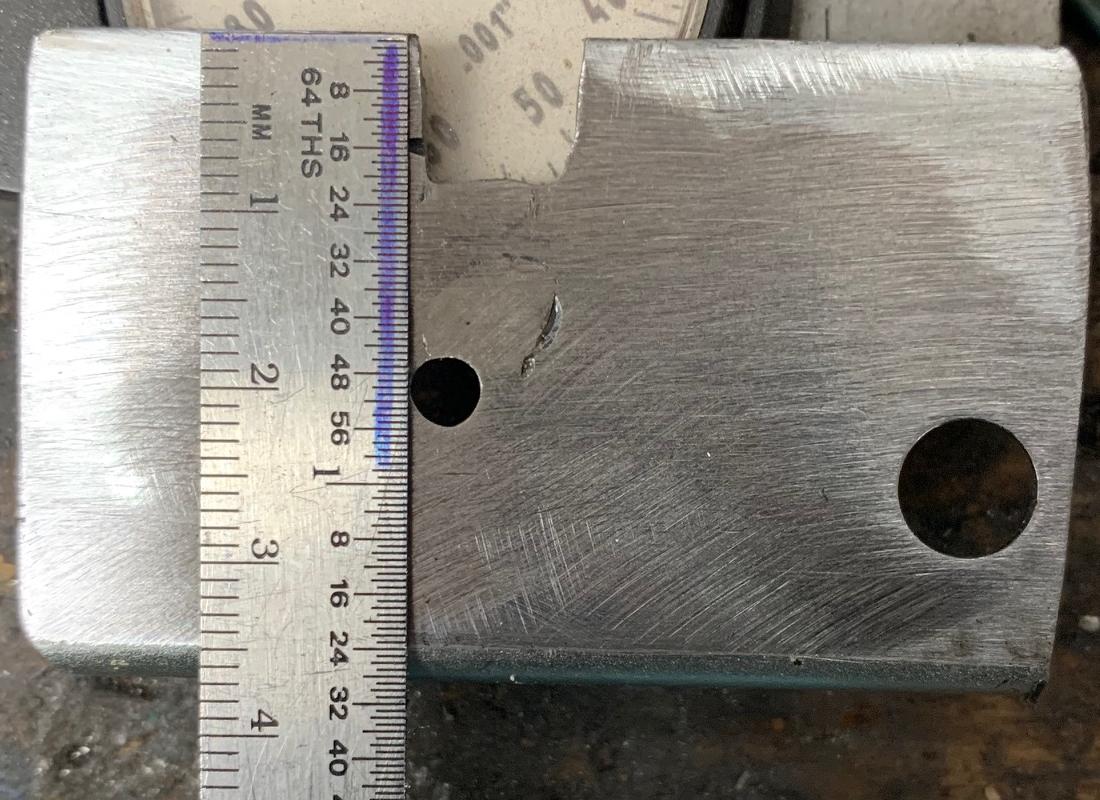
Next up is to make the upper ball guide. There is NO part for this piece existing in the stock Haunted House. If you did the upper playfield multiball modification, you will have a left over piece of metal from this process (which was removed to fit the multi-ball pieces to the upper playfield.) What i did was to cut this piece and use it on the lower playfield. Again used the Dremel with a cutoff wheel to do this. Also drilled a 1/8" hole for the wire gate. Note i miss-drilled the hole a few times (!), and had to TIG weld the holes shut and re-drill. So don't do that. ha!
http://www.pinrepair.com/sys80/hhmb_lower06.jpg
Here's the parts installed, to give it some perspective....
http://www.pinrepair.com/sys80/hhmb_lower09.jpg
http://www.pinrepair.com/sys80/hhmb_lower10.jpg
Hey Guys,
I did my conversion about 3 years ago and found this document helpful. https://www.pinballnews.com/learn/hauntedhouse/index.html
Promoted items from Pinside Marketplace and Pinside Shops!
Reply
Wanna join the discussion? Please sign in to reply to this topic.

Hey there! Welcome to Pinside!
Donate to PinsideGreat to see you're enjoying Pinside! Did you know Pinside is able to run without any 3rd-party banners or ads, thanks to the support from our visitors? Please consider a donation to Pinside and get anext to your username to show for it! Or better yet, subscribe to Pinside+!
