(Topic ID: 293848)

Gottlieb Big Shot Repair

By Flip-it-good

2 years ago


Topic Heartbeat

Topic Stats

You

Linked Games

Topic Gallery

View topic image gallery

20240406_205427 (resized).jpg
pasted_image (resized).png
20240303_200652 (resized).jpg
Big Shot Add Bonus (resized).jpg
20240208_202126 (resized).jpg
20240208_200927 (resized).jpg
Hot Shot3 output_slow.gif
Hot Shot2 output_slow.gif
Big Shot Add Bonus (resized).jpg
big shot - gtb - score motor dog (resized).jpg
bs-j relay (resized).png
C3DBC17C-DF19-4918-B156-248F91F70E91 (resized).jpeg
20220323_110047_HDR[1] (resized).jpg
IMG_20220313_154350 (resized).jpg
IMG_20220313_154340 (resized).jpg
IMG_20210611_174720 (resized).jpg
There are 211 posts in this topic. You are on page 3 of 5.
#101 2 years ago

Whoo hoo! 100! If this next photo is correct then there won't be too many more I suspect...

Replacement relay soldered in place.. I believe this is correct.........? The small black wire on the right is not touching the ground trace, it just looks like it from the angle the pic was taken
IMG_20210606_121629 (resized).jpgIMG_20210606_121629 (resized).jpg

#102 2 years ago

Game starts and plays, second player still does not function with the relay installed. Upon hitting the start button a second time nothing happens on the reset Bank with PB. To Howard's post earlier, the V relay does activate when the start button is pressed a second time.
If I start a game then press the start button a second time and manually activate PB then second player lights up and you can play a two-player game. So my deductions are wiring issue no power getting to PB or the coil I installed is not functioning. Can anyone tell me how to diagnose the coil to see if that's working?

#103 2 years ago

Does the 3rd switch on 2C score motor look OK? Based on an earlier post, that is the one for the player 2 relay.

#104 2 years ago

Yes motor 2C in third position, good contact and excellent continuity.

#105 2 years ago

There is a make break switch on the first player relay, ZB, that is in circuit to the 2nd player relay. Check all of the make break switches on ZB that are activated after the ZB relay is triggered.

Here is a snip of the schematic (PB is the 2nd player relay)..

2nd player relay pb (resized).JPG2nd player relay pb (resized).JPG
#106 2 years ago

You might also check the start relay "S" at a normally open switch with a maroon white wire.

#107 2 years ago

easiest thing is jumper the power into the circuit.

power is the red-wh wire coming from the bounce switch on the bottom board. You can attach a jumper end there or on the 10A fuse for the 25V circuit. Other end poke into the circuit along the path bonzo posted from motor 2C to the PB coil lug and see where the PB relay trips and where it doesn't.

that'll tell you which switch is open/cruddy and verify the coil works.

#108 2 years ago

I connected the jumper to the bounce switch and the PB coil is good, I touched it against the black wire side and it triggered immediately.... And I also found a single switch right upfront on ZB, that was not touching in its resting state which it should have been to trigger PB....second player now works perfectly!

Side Note: Do Not work on these old EM machines in your garage, or anywhere, in bare feet unless the machine is unplugged! Because even with the power switch off, juice can flow right through you to ground. I got hit about an hour ago and it went through me like a bad dream!! Touched a target reset coil lug inadvertently while adjusting drop target switches. Although, I lost about 6 pounds so, huge win there! Lol!

#109 2 years ago

What would cause flippers to chatter like this....? (See video link below)

Also, the flippers are weak, the ball kind of lags as it leaves the flipper. To get the ball near the top where the targets are you have to launch the ball off a flipper earlier than usual to get the trajectory....otherwise it's sort of "wilts" off The flipper to the left or right. Have brand new coil sleeves and bushings. Linkages are clean, free of slop and drag. I even adjusted the flipper return springs for less tension to give a stronger flip. This made no difference. Coils are tight in thier mounts. With no markings on the outside wrap it's hard to tell if these coils are correct for this machine.
IMG_20210606_174533 (resized).jpgIMG_20210606_174533 (resized).jpg

#110 2 years ago

Last shock I got was by bumping into the flipper button with my body while touching it with my hand. What you did though, is worse because those a full voltage coils..lol

Those end of stroke switches should open 1/8" when the flipper plunger is in the coil. It appears they are adjusted to open too soon..

#111 2 years ago

This kind of flipper chatter is often caused by the EOS switch being adjusted with too little gap between the points when the flipper is in the UP position. There is usually also a contributing factor, namely some mechanical slop in the linkage between the plunger and the crank arm that rotates the flipper shaft.

Try opening the EOS switch gap somewhat to see if the chatter goes away. You should always check the EOS gap by pushing the plunger itself into the coil until it hits the stop, then adjusting the gap. That way, you will get a proper adjustment even if there is some mechanical slop in the flipper linkage.

Flippers also chatter like this when there is excessive rebound between the plunger and the coil stop, or when there is some kind of fault in the wiring for the low-current winding of the flipper coil, so you may be dealing with that. But it's easiest to try the EOS switch adjustment first.

- TimMe

#112 2 years ago

You both were correct end of stroke switch was too close. Sparks were flying for longer than they should be between the two points I separated them a bit and the chatter is now gone. That leaves the weak flippers.... not sure if I should just buy new coils or maybe there's a test I can do with my multimeter?

#113 2 years ago

If you've gaped the end of stroke switch so that it opens as late as possible without resulting in the chatter, the next thing to check is the position of the flipper return spring. The spring should be installed in the position that results in the least upward resistance, but still returns the flipper to its lowest position. You might also try cleaning the end of stroke switches and the flipper switches in the cabinet.

#114 2 years ago

Here is a pic of me manually pushing the flipper plunger into the coil and the resulting gap on the end of stroke switch. The goal is as little gap as possible but not so little that you get the chatter. Id say the gap here is slightly less than 1/8" The coils do not normally ever need to be replaced.

20210606_182032[1] (resized).jpg20210606_182032[1] (resized).jpg
#115 2 years ago

That definitely made the difference! End of stroke was breaking too early causing the power drop and the coil could not get the shot off properly with enough umff!

So, here we are near the end. The very final thing is trying to get that end of ball bonus to score correctly without dropping a few thousand here and there and occasionally the the hundreds score reel does not reset. It's intermittent.

#116 2 years ago

While playing a two-player game first ball runs good.... first player up then switches to second player. then during the second ball the first player repeats play twice, it does not go to the second player. Then after the first player takes two turns, player 2 then lights. It's kind of skips around here and there. It does not follow player one, player two, player one, player two and so on...

#117 2 years ago

Sounds like the player stepper in the head isnt advancing consistantly...might want to check and clean.

#118 2 years ago

Everything looks clean on the player unit. I followed the 5 cams from the metal gear all the way to the top and they seem like they're in the proper place. I imagine the machine knows at what position the cams are in when it starts and brings them to where it has to go to begin a game for one or two players. Cams hit cleanly and make/break switches change states well. Whether they're in the right state when they change is something I couldn't say...
IMG_20210607_190812 (resized).jpgIMG_20210607_190812 (resized).jpg

IMG_20210607_192432 (resized).jpgIMG_20210607_192432 (resized).jpg

#119 2 years ago

Here is a test run of a two-player game with a video clip...

#120 2 years ago

Does the player unit movable outer disc self-adjust itself? Meaning do you just line up the pins anywhere on the stationary rivet disc and it will take over and find its spot when it starts a game or is there some sort of keystone or correct position to have this in when you attach the outer moving disc with the snowshoes onto the shaft?

IMG_20210608_192259 (resized).jpgIMG_20210608_192259 (resized).jpg
#121 2 years ago
Quoted from Flip-it-good:

Does the player unit movable outer disc self-adjust itself? Meaning do you just line up the pins anywhere on the stationary rivet disc and it will take over and find its spot when it starts a game or is there some sort of keystone or correct position to have this in when you attach the outer moving disc with the snowshoes onto the shaft?
[quoted image]

No, the zero position of the wipers has to align with the zero position of the cams on the back:

pasted_image (resized).pngpasted_image (resized).pngpasted_image (resized).pngpasted_image (resized).png

#122 2 years ago

Is the cam follower the wiper disc that rotates? Or is a Cam follower the stack of switches with the white plastic base that rides on the Cam?

Then, once the 5th Cam tooth is in the right spot at zero, how do you adjust the outer rotating disc with the snowshoes on it. I see two Allen screws that hold it to the shaft but where does it line up, on which rivets?

#123 2 years ago

You can remove the part with the snowshoes by removing the 3 adjusting screws all of the way.

#124 2 years ago

Yup, see that too. But which rivets does it line up with as the starting position? From what Howard said I believe the fifth cam pushes up on a stack of switches (cam follower) and when that happens it is in zero position. Now if the term 'cam follower' is indeed that stack of switches that ride on that single tooth of the fifth cam, then I have the cam sitting there in zero position. Now... Where does the snowshoe dial get locked in now that the cam is in the zero position? Meaning which rivets on the stationary dial do you line up the moving disc with snowshoes to? Once I find that out I will tighten the snowshoe disc into position and that will be the end of it.

#125 2 years ago

The easiest way to figure this out would be to get one of the other 61 Big Shot owners to post a picture of the Player Unit when it's reset and ready to play 1st player 1st ball.
https://pinside.com/pinball/machine/big-shot/owners

Raff has posted to this thread in https://pinside.com/pinball/forum/topic/gottlieb-big-shot-repair#post-6307023

If not we can figure it out from the wire colors on the schematic. The other Player unit wiper is at 13F on the schematic.

You'll know it's right when the Ball in Play lights light up correctly.

#126 2 years ago

If the game starts with player one ball one, I'm not sure the issue is the player unit starting starting in the wrong position. Does this always happen in the same pattern, or is this intermittent? If this is intermittent, maybe this is an issue of the stepper occasionally advancing two positions per pulse. Maybe check the travel of the player unit plunger to see if it can be adjusted to ensure one clean step per pulse.

#127 2 years ago

Good point. Yesterday it played through a two-player game perfectly with no errors. Today I tried it twice and both games had errors switching between player one and player two. There is a spot in the stepper that seems to stick when you do it by hand but the force of the coil firing is usually enough where it doesn't stick at all.

#128 2 years ago

the one thing you know is different between a 1 player and a 2 player game is the PB relay, so check the switches on that thing to make sure they make sense ... especially ones that open when PB is tripped, and extra especially one that has a WH-GR wire on one blade.

if that looks ok, the next easiest thing is disconnect the score more and dump the ball in the outhole. Then turn the score motor cams by hand slowly. Try not to stop turning when a solenoid coil is powered, but the only time turning slowly bites you is if you're doing it during reset and the 120V bank coils stay on too long. The fuse will blow.

the score motor cycle when not doing reset should be a 120 degree rotation of the cams assuming no bonus countdown.

the goal is to see if the player unit is stepping once or twice when you drain the ball on player one. You know the wipers went two positions, but you don't know if the unit got two step-up pulses or if the pawls grabbed two teeth.

you can also just watch the player unit and see/hear what it's doing, which I guess is really the simplest thing.

the ugly thing is the circuit is complicated. One of the other guys can confirm, but often (or always) the player unit is the same one used in a 4 player game, but the cams are oriented differently when used in a 2 player game.

4 player game tmi
---------------------

In a 4 player game with all 4 players enabled, the player unit steps up once for every ball drain and changes to the next player.

if you have a 4 player game with less than 4 players enabled, the player unit has to step additional times to skip over players positions that aren't being used.

e.g. if you only play one player, the player unit steps 4 times per ball drain to get back to player 1 again. You'll usually see the player lights flicker a little.

2 player game tmi
---------------------

if you have a 2 player game like yours, the player unit MAY still be a 4 player unit and it always steps extra times to skip over the non-existant player 3 and 4.

e.g. if you play two players, it steps once to go from player 1 -> player 2, then 3 times to go from player 2 -> player 1.

you can confirm by manually stepping up the player unit and seeing at which steps the lit player and ball in play lights change.

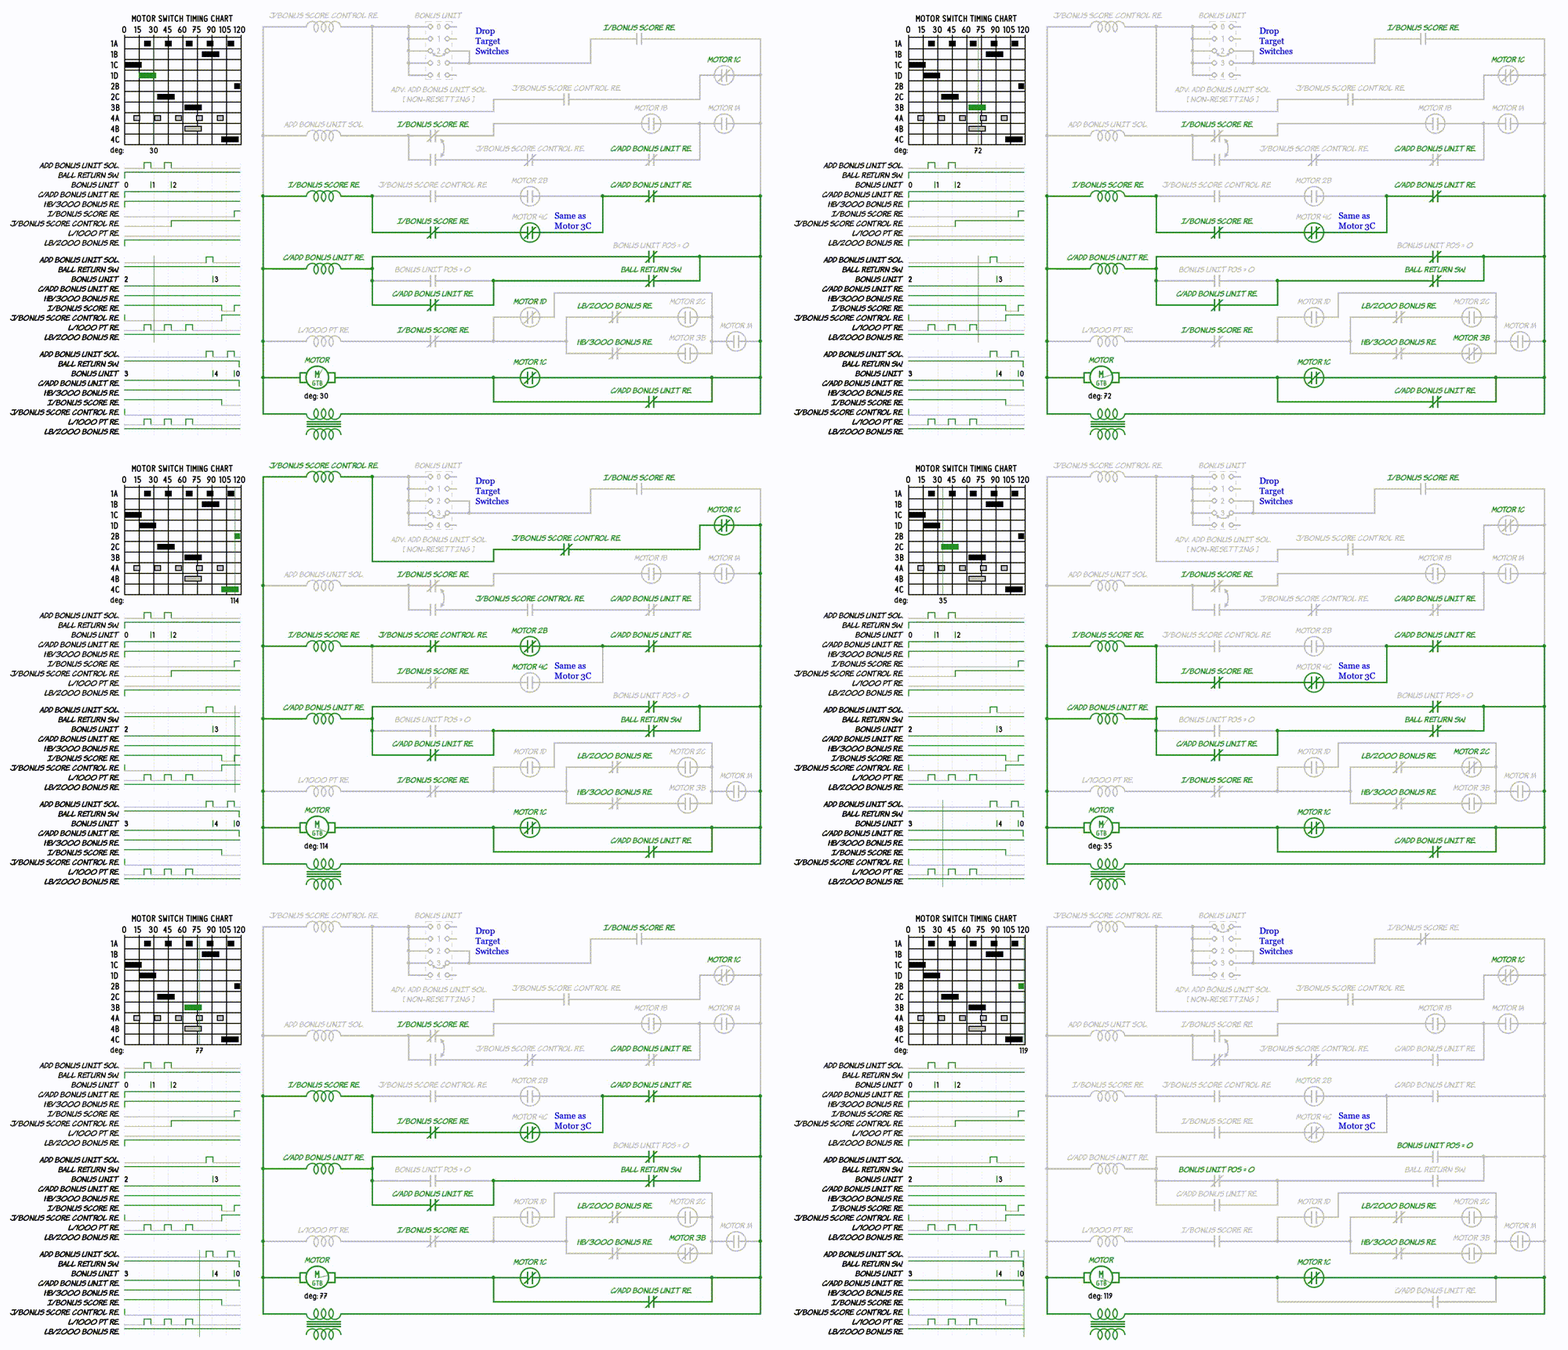
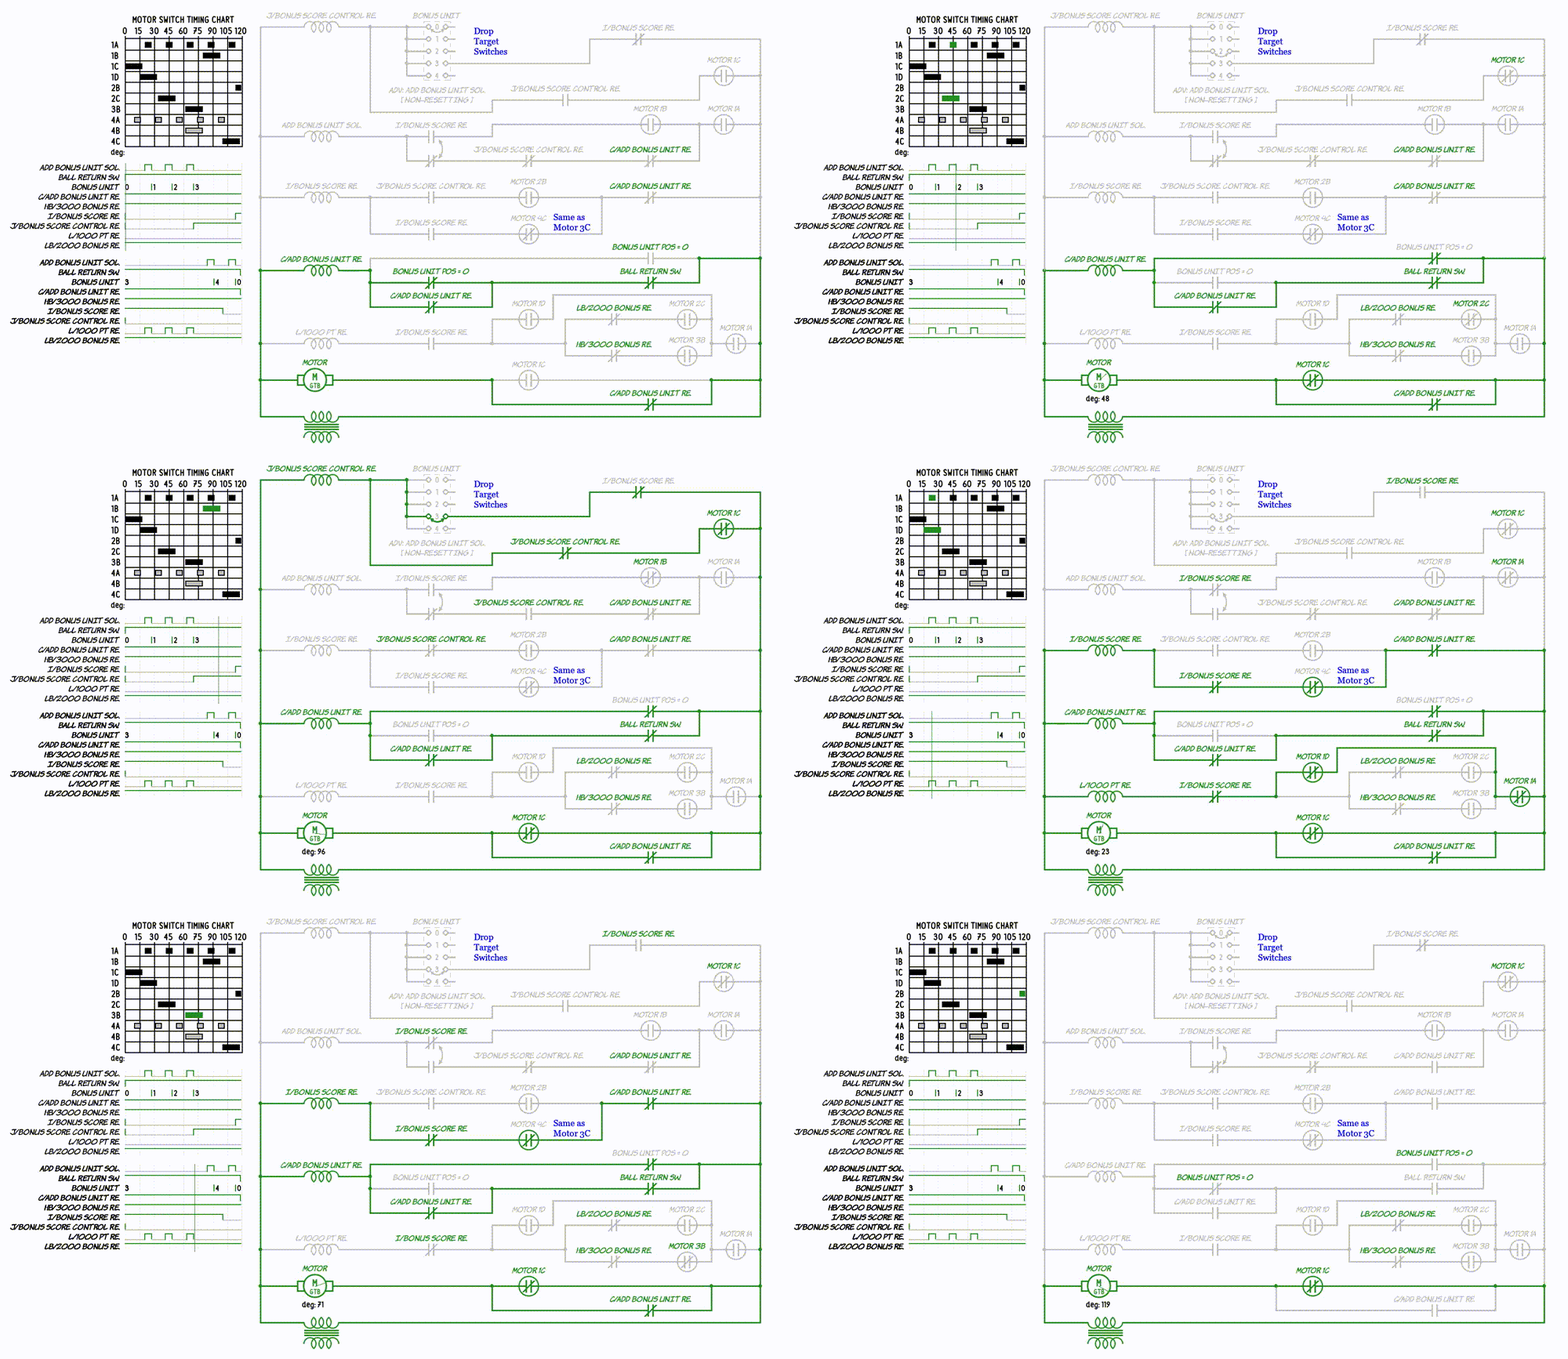
if anyone has a timing diagram for the player unit cam switch stacks, that would be really helpful in working out the circuit on the schem.

#129 2 years ago

That makes sense. Now it doesn't change over at all from player one to player two, so I must have done something with the snowshoe disc on the player unit. ...it may not be lined up properly. Still have to make sure it matches zero position with cam 5. But all the contacts on the PB relay seem like they're working great because when I press the button a second time it does add a second player....but the player unit is not doing its thing right now, will scope it out later today... PB relay has two sets of switches and when the bar moves two of them go on and two of them go off.

#130 2 years ago

Try aligning like this:
pasted_image (resized).pngpasted_image (resized).pngpasted_image (resized).pngpasted_image (resized).png
Not sure what machine this is out of but the key thing I think is that the side of the rotor with the single shoe needs to align with the first rivet on the inside rivet circle.

#131 2 years ago
Quoted from Flip-it-good:

That makes sense. Now it doesn't change over at all from player one to player two, so I must have done something with the snowshoe disc on the player unit. ...it may not be lined up properly. Still have to make sure it matches zero position with cam 5. But all the contacts on the PB relay seem like they're working great because when I press the button a second time it does add a second player....but the player unit is not doing its thing right now, will scope it out later today... PB relay has two sets of switches and when the bar moves two of them go on and two of them go off.

disclaimer: I don't have a big shot schem, so I'm just looking at the pics that have been posted and same era other games.

the player unit probably won't step if you don't score some points initially. You need the first ball relay to trip. You also need the P relay to be powered, which happens when the ball is kicked over the trough switch to the shooter.

if the ball is kicking to the shooter reliably, check ZB relay switch with WH-SL / WH-BL wires and a P relay switch with WH-SL / YEL+GR wires.

tmi
----

the circuits to step the player unit probably do NOT go thru the player unit wipers/contact plate. One set of wipers lights the ball in play lights and the other set is feeding the 3/5 ball adjust plugs to drive when stuff like the last ball relay powers.

you could take the snowshoe wipers off and the unit should still step and the player lights change position. Those functions are handled by the player unit cam switches.

if the player unit isn't stepping, you have to debug the "add player unit" coil circuit - which is about clear as you'd expect from circuits designed in the LSD era. However, if you manually step the player unit at least once and it resets ok when you reset the game, everything between motor 1A and the coil is probably ok.

below is all "probably". These are the details I always forget.

if you are debugging the game with the playfield tilted up against the head, you need to score points initially to get the first ball relay to trip, then

A] close the outhole (ball return) switch then the trough switch with your finger since the ball is out of the game.

timing matters, so it may be easier to hold the trough switch closed then close the outhole switch, after the score motor starts you can let go of both.

- or -

B] you can also hold closed the P relay then close the O relay which will run the score motor. Let go of the relays as soon as you close the O relay. O and P will stay powered until score motor switches release them.

doing either A or B, the player unit should step up at least once. If you don't have player 2 enabled, the player unit should step up at least twice. You can repeat A/B as many times as you like until the game is over.

if you ignore circuits dealing with skipping over player(s), then just getting the player unit to step once should be the circuit path from motor 1A switch thru a P relay switch, motor 2C, ZB relay switch and XB relay switch to the red-wh wire on the bounce switch.

you can jumper from the red-wh wire to anywhere in the circuit, but you may need to close the P relay. You definitely need to close motor 1A either by operating the switch stack with your finger or making the score motor run. Ditto with motor 2C depending on where you are jumpering to, and if manually closing 2C, you need to hold 1A closed at the same time.

#132 2 years ago

Based on hot shot, you must score a 10 or 100 for the 1st ball relay to trip.

#133 2 years ago

Recent test...

#134 2 years ago

Will the game advance from player 1 ball 1 to player 2 ball 1 if you limit scoring to 10s only?

Id also reccomend checking the player one 1000 point reel switches in all 3 positions.

#135 2 years ago

I think I may have found the issue. I adjusted the stroke of the coil that powers the player unit so that the arm did not go as far up into the coil. The metal arm that hits the teeth and advances the cams was going far too close to the next tooth when it moved one step. Then I took the long spring which retracts the arm back into position and adjusted it tighter. There is a point when two cams push on the cam followers or switch stacks at the same time.... there wasn't enough pressure to bring that arm back to grab the next tooth, now there is.... I've just played three games straight and it has not failed and worked correctly. Not quite sure if that was the issue but it seems to be functional at this point. Perhaps unlikely but I think springs lose their elasticity over time maybe that's what was going on here.. ?

IMG_20210609_140918 (resized).jpgIMG_20210609_140918 (resized).jpg

#136 2 years ago

you shouldn't need to add spring tension. Either the unit is gummy or the switches are applying too much downforce on the cam edges.

most operators just shortened the spring tho

dunno if that explains skipping the second player after ball 1 drain tho. Your player unit definitely stepped four times, which would be correct for a 1 player game.

oh well, see if the problem happens again. If it does, you need to figure out how the pulses on the WH-GR wire on the P relay switch are getting to the WH-SL wire on another P relay switch. Take a look at player unit P2A switch.

#137 2 years ago

I agree, the downward pressure of those switches is pretty good. But I'm afraid to mess with those because they seem to be adjusted correctly, if I start bending blades I may cause more issues. For experts this, I'm sure, would be a no brainer, but for now I stretched the spring a bit. Locks in tighter and the coil power has no problem dealing with that extra bit of tension.

#138 2 years ago

Question... The flipper button is pushed in and the flipper is activated, when the ball comes down and hits the held flipper it launches the ball back up the playfield, almost like a spring. Usually when you hold a flipper and the ball lands on it the ball bounces a very short distance but the flipper does not move, it's almost as if the flipper while in the hold position isn't very strong....thoughts?

#139 2 years ago
Quoted from Flip-it-good:

Question... The flipper button is pushed in and the flipper is activated, when the ball comes down and hits the held flipper it launches the ball back up the playfield, almost like a spring. Usually when you hold a flipper and the ball lands on it the ball bounces a very short distance but the flipper does not move, it's almost as if the flipper while in the hold position isn't very strong....thoughts?

hold the flipper button in then stick paper between the EOS switch contacts and see how hard it is to push the flipper down with your finger. Compare to the other flipper if they behave differently.

jumper a flipper button switch and if the hold is stronger the flipper button switch needs cleaning/filing/adjusting.

for max hold power comparison, jumper from the RED-WH wire on the bounce switch or the 25V fuse directly to the wire on the flipper that isn't black and isn't just a jumper to the EOS switch. i.e. jumper to the lug that has harness wire(s) AND a jumper to an EOS blade on it. I assume it's an end lug.

you can also stick a voltmeter on the black and x-RED (probably ... where X depends on which flipper) wires on the flipper coils and hold the flipper button. If you don't have 25V, you have a poor connection in the circuit someplace that is reducing current.

post a pic of the flipper/coil so people can check it's wired right and see if you can read the coil number on the wrapper.

if both flippers are weak, is everything else kinda feeble also (pop bumpers, slingshots)?

#140 2 years ago

You might also check the position of the return sping to make sure it is in the position that results in the least upward resistance.

Btw, I like the tip to jumper right to the 25v!

#141 2 years ago

Ill add this era flipper is known to be a bit weak..

#142 2 years ago
Quoted from Flip-it-good:

when the ball comes down and hits the held flipper it launches the ball back up the playfield, almost like a spring....thoughts?

The info in this post will explain what is going on here:

https://pinside.com/pinball/forum/topic/eos-switch-adjustment-em-flipper#post-6202123

- TimMe

#143 2 years ago

Excellent advice. I checked the end of stroke Gap and it was extremely tight so I widened it just a bit. So now the bounce factor is quite a bit less off the flipper if you're holding it and the ball hits it. I did push the plunger not the linkage to gap the EOS switch.

#144 2 years ago

In need of a right sling-shot plastic... The first picture shows a plastic that came from a 1969 Williams Paddock/Post Time machine.
It took me nearly a week to go through tons of pictures to try to figure out what machine it was from... Thank you Michael Shalhoub and the Pinball Compendium! I know it's a long shot but if anybody knows anyone I will be happy to purchase it... The second picture is the correct one, except flipped in reverse. It shows the same guy talking to his pool cue!

IMG_20210609_203817 (resized).jpgIMG_20210609_203817 (resized).jpgIMG_20210609_203824 (resized).jpgIMG_20210609_203824 (resized).jpg

#145 2 years ago

Just wanted to take a minute to thank everyone here for all of their input and great advice for helping me get the big shot up and running. It still doesn't score 100% accurately after the ball drains for bonus but I can live with that. I'll give it a rest for a couple months and then attack it again in the fall. Here's some final pictures before and after adding Titan standard replacement LED's in the back glass. They're about 15 to 20% brighter than #44 incandescents and they really make the colors pop without ruining the illumination level common for this era of machine. Thank you all again ...
God bless...Scott

IMG_20210611_173927 (resized).jpgIMG_20210611_173927 (resized).jpgIMG_20210611_174720 (resized).jpgIMG_20210611_174720 (resized).jpg
8 months later
#146 2 years ago

Hi again, thought I might tackle the end of ball bonus scoring issue. If anyone has some suggestions I would be happy to check it out. I know that there's a unit underneath the playfield that tells the machine how many thousands to score once the ball drains, someone told me once that that is tricky to adjust.... any input would be very appreciated....

#147 2 years ago
IMG_20220313_154340 (resized).jpgIMG_20220313_154340 (resized).jpgIMG_20220313_154350 (resized).jpgIMG_20220313_154350 (resized).jpg
#148 2 years ago

All rivets sanded smooth and shiny and cleaned with alcohol. Both pairs of snowshoes smooth and shiny cleaned the same way. Both sets of shoes line up perfectly to rivets. All connections are solid. Resoldered any suspect points.

#149 2 years ago

when the plunger pulls in, does it pawl look very close to grabbing two ratchet teeth instead of one?

the game yanks the plunger in harder than you can do it manually. If it's close when you do it manually, it may happen intermittently when the game does it.

there's a couple adjustable bars that limit the travel of the arm/pawls connected to the plunger. If you move the one near the corner tho, you may need to adjust the wiper position since that one limits how far the wipers rotate. Given the marks on the frame, it looks like that bar has moved. Plus the end of the bar is not really under one screw/washer much.

the wear on the pieces nearest the coil isn't helping as that allows the pawl to move further when the plunger pulls in.

#150 2 years ago

Good suggestion from baldtwit above:

Quoted from baldtwit:

when the plunger pulls in, does it pawl look very close to grabbing two ratchet teeth instead of one?

the game yanks the plunger in harder than you can do it manually. If it's close when you do it manually, it may happen intermittently when the game does it.

A good way to diagnose problems that only happen at high speed is to take a slow motion video with your cellphone camera.

Promoted items from Pinside Marketplace and Pinside Shops!
From: $ 12.99
Cabinet - Other
The Pinball Scientist
 
Hey modders!
Your shop name here
There are 211 posts in this topic. You are on page 3 of 5.

Reply

Wanna join the discussion? Please sign in to reply to this topic.

Hey there! Welcome to Pinside!

Donate to Pinside

Great to see you're enjoying Pinside! Did you know Pinside is able to run without any 3rd-party banners or ads, thanks to the support from our visitors? Please consider a donation to Pinside and get anext to your username to show for it! Or better yet, subscribe to Pinside+!


This page was printed from https://pinside.com/pinball/forum/topic/gottlieb-big-shot-repair/page/3 and we tried optimising it for printing. Some page elements may have been deliberately hidden.

Scan the QR code on the left to jump to the URL this document was printed from.