(Topic ID: 327107)

Gottlieb AS relay cleaning...

By Coyote

1 year ago


Topic Heartbeat

Topic Stats

  • 27 posts
  • 16 Pinsiders participating
  • Latest reply 1 year ago by jrpinball
  • Topic is favorited by 4 Pinsiders

You

Linked Games

#1 1 year ago

Am curious, as I've been reading a lot about these needing to be replaced, or burning out, etc..

Mine SEEMS to work, though it's 'slow' - essentially, it's gunked up from gosh-knows-how-long of being played. I've taken the boards off, and cleaned them which has helped with continuity, but the mehanics will still need some cleaning and adjusting.

What's the best cleaning materials to use when going through this thing? And should any kinda lube be used when reassembling?

#2 1 year ago

On my Lucky Hand KS relay mini stepper I just used 91% alcohol to clean and it was really gunked up and sluggish. It cleaned up nicely but it turned out that I had to get those switches adjusted just right to keep them making without putting too much pressure downward on the rotating gear.

I’ve seen people say that a light coating of Super Lube on the wipers helps but I’ve never had to.

#3 1 year ago

tighten screws
Lighter fluid to clean gunk off
Sandpaper all the traces & wiper to get them nice and clean
More lighter fluid to get any remaining crap off
Thin layer of super lube to get everything moving nice
Maybe clip that spring a bit to shorten it & get it nice & tight...if needed.

#4 1 year ago

MarkG turned me on to mineral spirits as a cleaning fluid. Does a great job washing off "gunk".

#5 1 year ago

In my experience alcohol is good for removing soot, grit, dirt, light oils, etc., hence its popularity. But when it comes to removing anything grease related I prefer mineral spirits. It cuts through grease better, probably because it's petroleum based like grease, and it has a longer working time because it's less volatile than alcohol.

#6 1 year ago

I’ve rebuilt quite a few of these little annoying assholes.

Some takeaways that make it less maddening (for me):

—for the printed circuit boards, I clean with brasso or equivalent. I really *really* don’t like sandpaper in any application like this. Polish that sucker up to a bright shine. I do this without removing the wipers. I just work the relay around to get all the areas.

—I clean the plastic gear inside with a q-tip and some naphtha.

—AS relays with a larger switch stack inside are way harder to adjust to click freely without sticking. In these applications, sometimes it helps to do little micro adjustments to the switch(s) to reduce tension, but still allow contact.

—I always finish the circuit board up with a very thin film of Teflon lube or PBR grease.

—Clicking the relay by hand out of the game doesn’t always predict how it’ll work in-game. So if you are having trouble getting it to advance properly with your hand, but you’ve tried everything, more often than not, the super quick pulse by the game will give it the rebound it needs to actually work in-game. You can kinda emulate it out of the game by “flicking” the actuator plate with your thumb or finger. If it advances under those conditions, you’re good to go.

Less is more with these things, so don’t overdo it if you can help it. They’re honestly not as bad as a lot of people say they are. They just take time getting a “feel” for them.

#7 1 year ago

Thanks guys, looks like mineral spirits and some lube is needed then. Will tackle this tonight! I've taken a close look, and while nothing looks burnt/fried, the two boards are quite gunked up. And it feels like there was some kind of oil or grease put on it before - light coating of whatever was on there really sticks to your fingers.

The whole reason for this is that in-game, this little thing is pulsed twice for every single spinner rotation, and it's plainly obvious that the coil's pulling the latch down, but the 'rebound' (spring) isn't strong enough to provide a quick snap back. Sometimes so much that it'll take up to a second before it 'clicks' into place and the proper light illuminates/circuit completed.

Thanks again guys, appreciated. Will post here after I finish getting it cleaned up.

#10 1 year ago

Thanks guys, appreciated. Today I was able to get the boards off and give the relay assembly a deep cleaning. Came out pretty darn clean, and close inspection of the ratchet wheel shows no damage or wear to it, which I read is a common issue. Sadly, because of work I wasn't able to get to the boards tonight. To top it off, I have no real suitable grease; so I'll be placing an order with PBR tomorrow for some.

#11 1 year ago

<<You can kinda emulate it out of the game by “flicking” the actuator plate with your thumb or finger. If it advances under those conditions, you’re good to go.>>

I pull it down with my fingernail, then let it flick off to get a full stroke.

#12 1 year ago

Make sure that the little white nylon anvil shaped part that engages to the cog on its shaft can also slide. If you look at it carefully, you'll see a little spring in its base to allow it to slide in its housing as it engages.( no.3 and 5 on the picture.) And I like to lightly use a contact file across the tip of coil to allow maximum current to pull the armature down.

#13 1 year ago

I’ve used a toothbrush and 91% alcohol to clean off the ratchet cog without disassembling the relay. I also applied Super Lube to the switch cam on the AS relay that controls the bonus on my Royal Flush when it was malfunctioning. Now it consistently works properly.

#14 1 year ago
Quoted from Vintage-Pinball:

Make sure that the little white nylon anvil shaped part that engages to the cog on its shaft can also slide. If you look at it carefully, you'll see a little spring in its base to allow it to slide in its housing as it engages.( no.3 and 5 on the picture.) And I like to lightly use a contact file across the tip of coil to allow maximum current to pull the armature down.

Interesting - my little white latch anvil thing rotates freely. I don't see a small spring, but it does rest against a thin piece of spring metal, that keeps it latched against the gear pawl so that the teeth don't roll backwards when the coil energizes.

In these games, there's no top switch stack on the pawl - so that removes some friction/pressure on the rotation. However, potentially unlike other games, one of the wipers handles current for not only a lamp (on one side), but the timing relay and scoring/large reset coils depending on where the wipers are.

What started this whole mess was that the game was acting like none of awards were lit - when they were. So first trial with Gottlieb schematics (vs my usual Williams), and was able to narrow down the issue to this little f*cker. Heh.

#15 1 year ago

I agree with the suggestions already mentioned. I’ll add a couple of other fine points.
Super lube works great on the circuit boards. You can find it at a decent hardware store.
Make sure the plastic axle is nicely centered in the little arms that they ride in (and hold the wipers) when you tighten the screws down.

I use mother’s mag and aluminum polish on the circuit boards to get the copper looking new. The brasso probably does just as well. I’m also not a fan of abrasives on these boards.

As you saw, previous hacks of just adding lubricant is usually the thing you’re fighting. Make sure the little wipers are clean and have a little tension on them that they make contact with the trace.

It took me a few times with these things, but now they are no big deal, especially when you can unplug them and do them at a bench. The links shared previously were a huge help.

Good luck,
Dave

1 week later
#16 1 year ago

"Good news, everyone!"

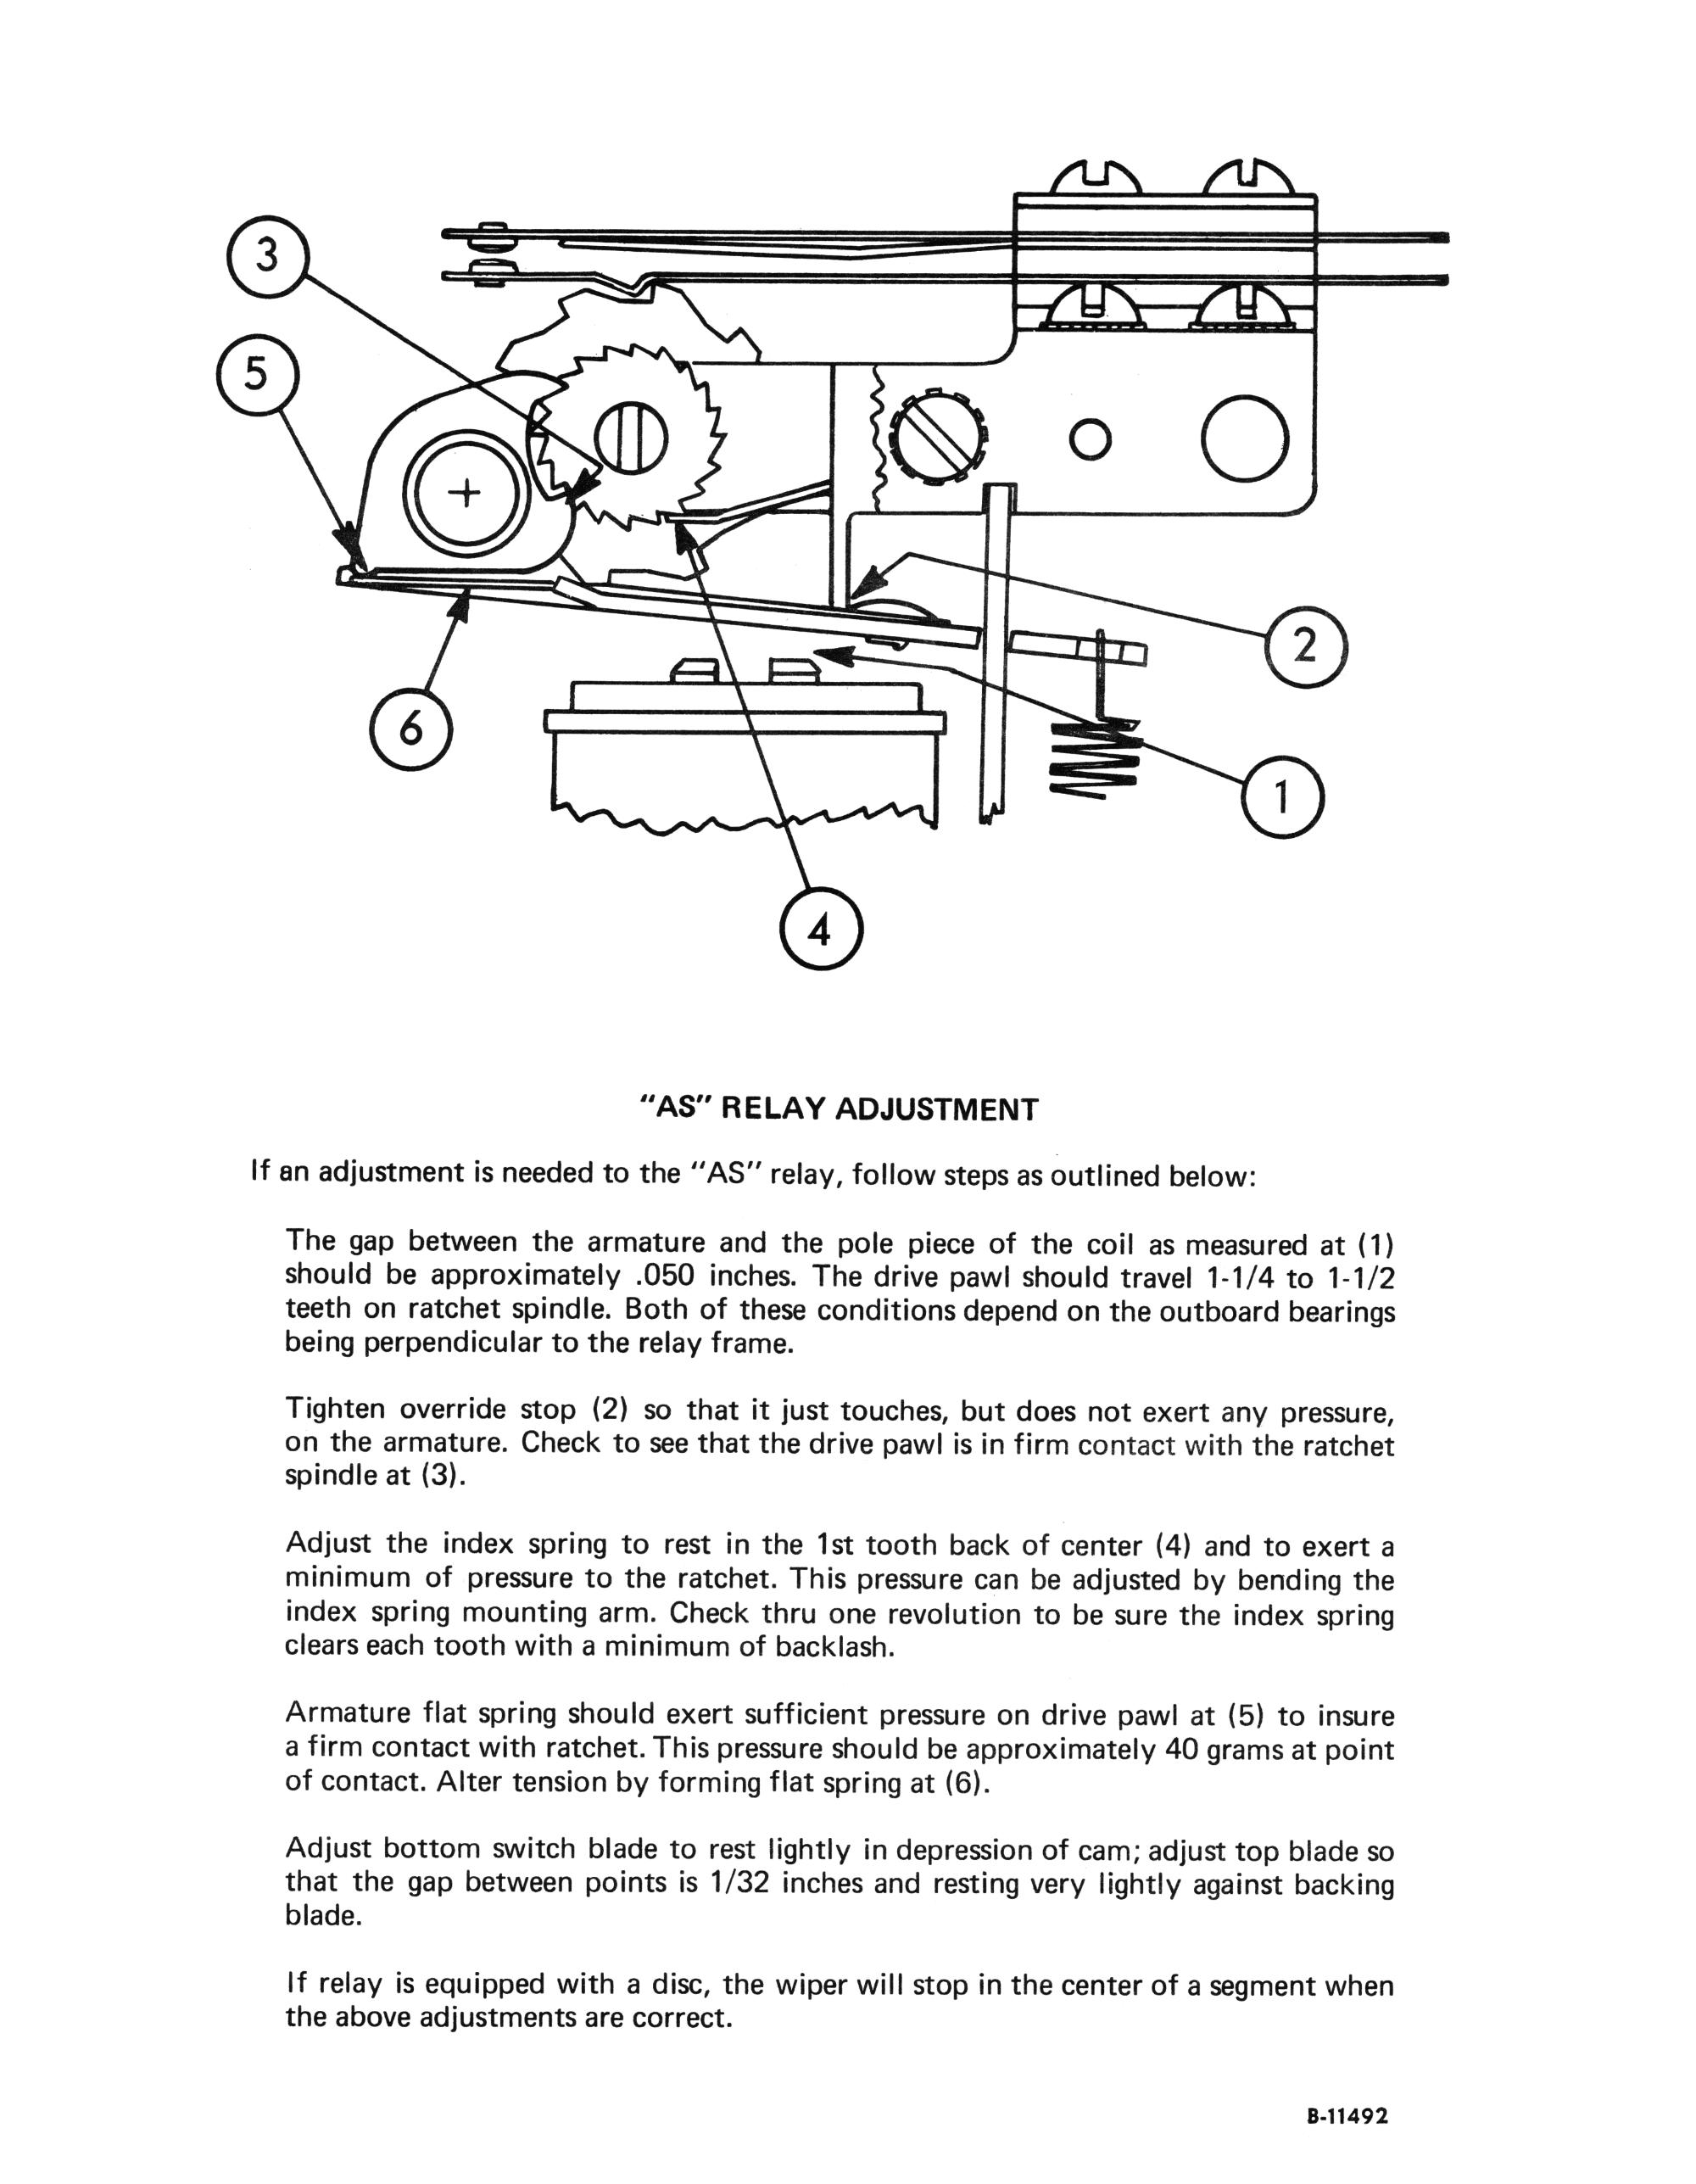
The PBR order came in while I was out of town, and so I was able to get to finish cleaning up the relay today. I had dropped all the metal relay parts in a supersonic cleaner, which made them shiny clean. Cleaned the boards with a VERY FINE sandpaper, and applied a very light coating of PBR grease to them. Referencing the AS Relay Adjustment image that was provided (http://www.pinballrebel.com/pinball/cards/cards/Used_cards/Gottlieb_AS-relay_Adjustment_B-11492.jpg), the first two steps proved impossible - if (2) was 'barely touching' the armature, my relay was traveling two stops per click. (The drive pawl, as referenced by the image, was going about 2.5 teeth per activation.) So, I had to adjust (2) down some, so that the arm's travel was minimized. This game has no switches, so no adjustment there was needed, and once everything was tighened down, the wiper disk was perfectly aligned!

However, I was running into an issue - the arm was getting stuck in the 'down' (read: against the coil) position. Studying it, I could NOT FIND what was holding it down until I noticed that once I exerted a little pressure upwards, it seemed to 'snap' up. Apparently, my coil has become slightly magnetized, and even when the coil wasn't active, it was strong enough to hold the armature down.

This would explain the odd piece of electrical tape that fell out of the relay when I first took it off the bracket on the PF - I had no idea where it came from, and I had just tossed it. I cut a small piece, put it on the coil's core, and...

It worked, and works, perfectly. I'm a happy camper.

I'm going to have to replace that coil (ALL coils in the game are original to the game. We're talking original Gottlieb coils - so I'm not too surprised about it maintaining a little magnetism after gosh knows how many plays.

Thanks for all the info and pointers, guys. Much appreciated. Now to tackle bigger things on this game. Like the playfield. Ugh.

#17 1 year ago
Quoted from Coyote:

Apparently, my coil has become slightly magnetized, and even when the coil wasn't active, it was strong enough to hold the armature down.

Is there any wear on the back of the armature where it hits the top of the coil? Sometimes the coil digs a divot into the armature such that the two mechanically (not magnetically) bind together. Deforming the divot with a flap wheel or something similar can prevent the mechanical binding.

/Mark

#18 1 year ago
Quoted from MarkG:

Is there any wear on the back of the armature where it hits the top of the coil? Sometimes the coil digs a divot into the armature such that the two mechanically (not magnetically) bind together. Deforming the divot with a flap wheel or something similar can prevent the mechanical binding.
/Mark

Interesting. I'll check tonight, thanks for that!

#19 1 year ago
Quoted from MarkG:

Is there any wear on the back of the armature where it hits the top of the coil? Sometimes the coil digs a divot into the armature such that the two mechanically (not magnetically) bind together. Deforming the divot with a flap wheel or something similar can prevent the mechanical binding.
/Mark

Or replacement if one has spares. I often change them on the 10s/100s/1000s relays of Gottlieb games since they are in constant use. The pivot points also get worn and sloppy.

#20 1 year ago

The switches on these old EM's can arc. We've all seen the sparks.

Isopropyl alcohol is flammable. So is lighter fluid.

Use extreme caution if using these as cleaners. Better be very sure there are no vapors or residue.

#21 1 year ago

I wojldbt worry too much aboot it; we use a ton of lighter fluid and nothing has flamed on yet

#22 1 year ago

I've played with fire before, and know that if you use a high-enough alcohol content, it evaporates quickly and leaves nothing left that will ignite. Since I don't plan on giving it a DEEP clean while still in the game and powered on, by the time I get it back in and am able to power it up, I'll be safe.

So after looking at the latch, it does have a distinct mark on it from where it was being pulled against the coil - HOWEVER, I tested the coil by using a small screw - and the screw stuck to the coil's center - juuuust barely.

So it looks like I'll need to replace both the coil and latch.

Thanks guys, Merry Christmas.

#23 1 year ago
Quoted from Coyote:

I've played with fire before, and know that if you use a high-enough alcohol content, it evaporates quickly and leaves nothing left that will ignite. Since I don't plan on giving it a DEEP clean while still in the game and powered on, by the time I get it back in and am able to power it up, I'll be safe.
So after looking at the latch, it does have a distinct mark on it from where it was being pulled against the coil - HOWEVER, I tested the coil by using a small screw - and the screw stuck to the coil's center - juuuust barely.
So it looks like I'll need to replace both the coil and latch.
Thanks guys, Merry Christmas.

Put them in the freezer for a couple of days, and the residual magnetism will be eliminated.

#24 1 year ago
Quoted from jrpinball:

Put them in the freezer for a couple of days, and the residual magnetism will be eliminated.

Wait, seriously?

#25 1 year ago
Quoted from jrpinball:

Put them in the freezer for a couple of days, and the residual magnetism will be eliminated.

Thats a first! Following to see if anyone can confirm.....?

Coyote, the PBR EM lube is awesome stuff, its all I use and that little tub of it should last forever.

#26 1 year ago

Google search is showing the use of magnets, striking with a hammer or heat.

#27 1 year ago
Quoted from Coyote:

Wait, seriously?

Yes. It's safer than heat or striking with a hammer. It works.

Promoted items from Pinside Marketplace and Pinside Shops!
From: $ 3.00
Cabinet - Other
Space Coast Pinball
 
From: $ 10.00
Playfield - Protection
UpKick Pinball
 
$ 15.00
Playfield - Toys/Add-ons
UpKick Pinball
 
Hey modders!
Your shop name here

Reply

Wanna join the discussion? Please sign in to reply to this topic.

Hey there! Welcome to Pinside!

Donate to Pinside

Great to see you're enjoying Pinside! Did you know Pinside is able to run without any 3rd-party banners or ads, thanks to the support from our visitors? Please consider a donation to Pinside and get anext to your username to show for it! Or better yet, subscribe to Pinside+!


This page was printed from https://pinside.com/pinball/forum/topic/gottlieb-as-relay-cleaning and we tried optimising it for printing. Some page elements may have been deliberately hidden.

Scan the QR code on the left to jump to the URL this document was printed from.