
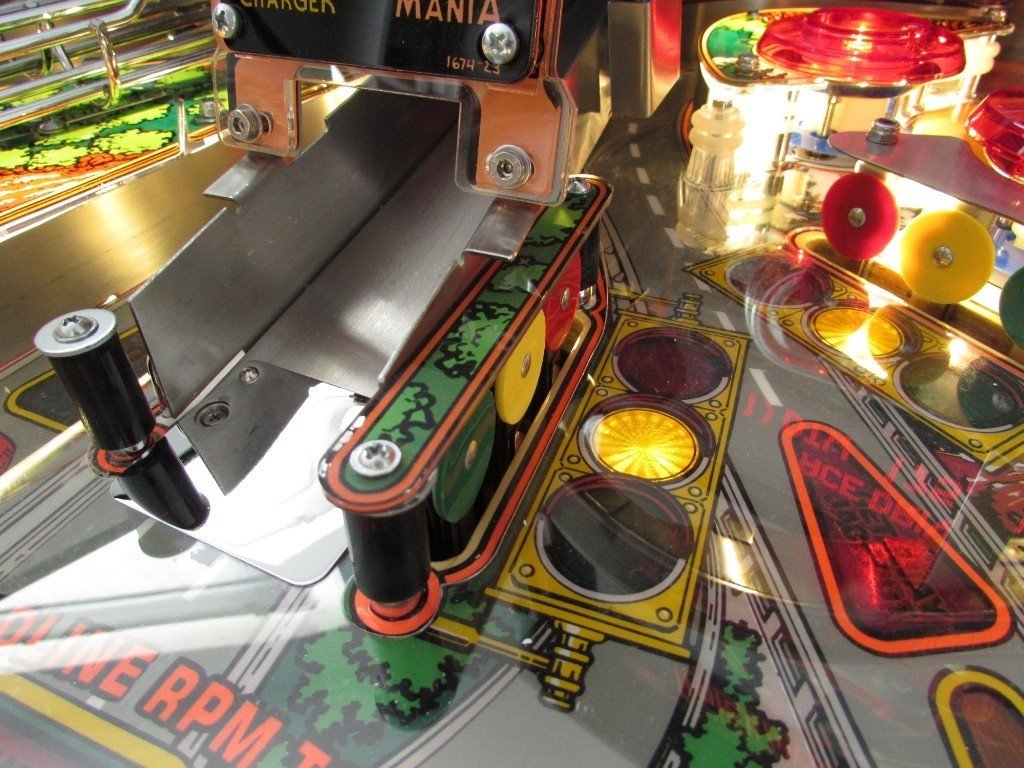
pretty... but be careful moving the playfield in and out. i just chipped my new supercharger cover on the metal flap that is attached to the cabinet behind the ramp :/
(Topic ID: 78179)
 Getaway: High Speed II, The
Williams, 1992
Getaway: High Speed II, The
Williams, 1992You're currently viewing posts by Pinsider flynnibus.
Click here to go back to viewing the entire thread.
pretty... but be careful moving the playfield in and out. i just chipped my new supercharger cover on the metal flap that is attached to the cabinet behind the ramp :/
Quoted from pinnyheadhead:Off topic, but on topic question- what other pins are like The Getaway? As in fast, loops, achieve some fun goals and do it again. Simple, but fun as heck.
BK2000 fit the bill? Any ideas? Thanks
BK2000 can be fast... but you leave much of the game out when focusing on score (playing upper playfield only)
No Fear is fast, orbits, and straight forward play.
Quoted from KornFreak28:Have you ever taken the back up and down ramp off? I'm almost there but I'm not sure if its several pieces or one big piece. Do you just pull it off the up and down arm? Thanks!
The ramp flap is supported by a pivot bar that must be removed from behind the backboard. It's just held on by a nut, which you must use plyers to hold the bar from the playfield side, then undo the nut from the backboard side. Remove that, along with the assembly that is the top of the ramp.
If memory serves, you need to undo the right wireform from the screw in the playfield near the lock area so it can be slid around and completely pull the supercharger loop away. Then the ramp assembly in the back corner can be accessed fully.. remove the screws holding it all down and to the sides.. and the bar under the ramp flap as described before.
That assembly is common for being hacked or bypassed and the flap fails and often isn't replaced.
Quoted from KornFreak28:Is not that I really want to do it this way, its just that I know it will be a PITA to screw that arm back to the lifting mechanism with the ramp back in place since I will have to maneuver the arm with a pair of pliers under the ramp and basically you can't really see what you are doing. Am I correct here? Is it difficult to screw the arm back? That is why I wanted to avioid removing the arm.
If I remove the arm, what will happen to the mechanism that holds the arm? Will it stay up or fall down?
Thanks!
Don't stress over it.. you need to remove a lot to get back here and get the assemblies out.. but as long as you keep the hardware organized its straightforward to put it all back together. Just note the sequence you did things and keep the hardware used for each together.
Its involved, but not complex. Just simple screws and nuts. I remember the triangle piece as well. The hardest part if I recall are the small screws that attach the steel pieces to the side/backboard. They are hard to reach if I recall.
Quoted from KornFreak28:Yes I can see that I will need to remove the wireform. I have two questions please.
1. As you can see in the last picture I posted, you can see the pivot bar wedged in the underside of the ramp in a bracket to hold it in. My question is, once I remove the wireform, all the screws and everything, is it even possible to just pull the ramp assembly "away" from the pivot arm and off the bracket? I was just trying to not unscrew the pivot arm. Will that be possible to just pull away from the arm to release the whole ramp assembly? Or pretty much the pivot arm has to be unscrewed no matter what? Sorry for the question but in the picture, it appears as if just pulling the ramp assembly away from the pivot arm will do the trick. What do you think?
2. If I must remove the pivot arm, when I put it back, will that cause ANY issues when I start a game? What I'm trying to say is: The arm pivot right now with the game disassembled is in the up position. If I remove the arm, the whole thing will problaly go down. Will this confuse the game or cause any problems because I messed with the position of the arm? Sorry but I just don't want to mess this up. Thanks!
You can't get the ramp out without removing the support bar. You don't need to do anything with the moving part of the assembly.. so you just put it back in and tighten the nut.. you won't have issues.
Your ramp flap is hacked... that is very common on this game. In fact mine was broke the very same way, but I solved it differently ![]() For years I had electrical tape wrapped around the ramp (perpendicular to the ball flow) to keep the flap in place and it worked fine. The welds holding the pivot on the bottom of the ramp is what ultimately failed on mine, and I had to cut a new ramp flap for the new ramp when I replaced it. The glue could be a factor, but don't forget to check the whole orbit leading up to the ramp. Normally shots like these can fail due to the ball being rattled around.
For years I had electrical tape wrapped around the ramp (perpendicular to the ball flow) to keep the flap in place and it worked fine. The welds holding the pivot on the bottom of the ramp is what ultimately failed on mine, and I had to cut a new ramp flap for the new ramp when I replaced it. The glue could be a factor, but don't forget to check the whole orbit leading up to the ramp. Normally shots like these can fail due to the ball being rattled around.
I don't know if that screw head in your photo looks correct... I'm not in front of my game, but that is standing out to me.
Getting up that ramp is no gimmie.. but it should be able to be made reliably on a clean orbit shot.
Quoted from KornFreak28:How about that washer under the actuator? Is it supposed to be there? Thanks!
Check out the manual...
Says there are washers on both top and bottom.. item 23 on PDF page 92
I don't remember the divertor being particularly tight up and down.. just make sure it doesn't give in the rotation direction.
when things go haywire after simple work... its usually due to plugging harnesses into the wrong place. Wrong voltages in the wrong place can give all kinds of wierd results.
Go back to where you were working.. and look for any connectors that are of similar size. Make sure you didn't plug a switch plug into a coil or light one, etc. Best thing to do is just review where you were.
You can run the game without the supercharger assembly entirely.. so you can remove the wiring you were working around and see if it cleans up. Also check for things that got moved around and can be shorting on other pieces of metal now.
The game's errors can give you hints on where to start looking.. look up those connectors and double check they are in the right spot, right colors, etc.
Low voltage is low voltage... the spike from coils dwarfs any light savings.
The line voltage can be changed to the low tap... Or just get rob kahr's board which will also give a clean 5v
Quoted from KornFreak28:My quesion is....How come my other machines aren't affected by the low voltage?
Its just about thresholds... The electronics on the driver board can be more on the edge depending on their age and health. You find all the time some examples are just more sensitive than others. The wpc system is notorious for this. Rob's board generates the 5v using a modern regulator off the 12v system that is less fickle.
Low tap is changing which windings off the transformer the game is wired to. Should be covered in the manual. It can help in some situations.
You might just find that your highspeed is on the edge with its driver board 5v system.
Quoted from KornFreak28:I have an L5 ROM.....How do you get to redline mania? Thanks
You mean secret mania? You shift the shifter during the donut shop animation on ball lock 2
Red Line Mania is the 'wizard mode' for getting to the top gear (rpm shots to fill guage, shift, then repeat for each gear)
Quoted from Zukboy2002:How would I figure out where it came from? Any markings would be there
The serial number sticker will clearly id it.. as well as stickers identifying 220Hz, etc. The coin door is different (3 slots vs 2).. and usually the coin reject inserts are still there from the foreign country.
You may also find the jumpers on the CPU board have already been cut for other countries too
Quoted from TheOnlyest:The most obvious is usually the coin reject buttons... And you can step thru the pricing adjustments and see what country option comes up other than USA, unless the ROM has been changed since it's been back.
My Whirlwind is a re-import from Germany, but I converted everything back to US stuff, nobody would ever know.
Jumpers on the board.. not ROM deltas in this era of game.
Quoted from wxforecaster:Just picked up a filthy but fully working Getaway. Full strip down, cleaned 8 rags worth of grime, new rubbers, flippers awesome, she plays better than any I've ever played with one exception. The plunger. I think I aligned it correctly and put on a new coil sleeve, but the ball still doesn't feed all the way around the loop. It makes it to about the top of the pops and that's it. Any ideas?
Like others have said.. check the coil sleeve part. It has a sleeve that has extensions outside the coil.. it's not a common sleeve and hence is often changed out for incorrect ones.
Quoted from Charger500:Help a potential first pin owner out, please. I have a lead on Getaway. I may be getting it this weekend, if the planets align. As a newbie, I'm apprehensive about the potential problems that can go wrong. The person I'm hoping to get it from looks to know what he's doing, and has taken care of this Getaway, and added numerous mods to it. Am I asking for headaches getting this? Do I need an electronics degree to figure out how to fix it? Ideally, it won't have any issues, but by the number of posts on this thread about problems, I am having doubts about buying this pin, or any pin at all, if I'm going to have to be troubleshooting it all the time. Thoughts? Thanks for the input.
getaway is a pretty reliable pin. There are things commonly broke on former routed games... but in the grand scheme its not a basket case game by any means (like StarTrekNG, etc). Usually the divertor on the ramp is beat up.. (it should be floppy to the shaft)... not uncommon for the silver plastics over the supercharger to be busted up. Look at the up/down ramp at the very back of the game.. see if you can tell if the ramp flap is intact, else you'll be fixing that. Look at the inserts all around the hub in the center of the playfield. That many inserts is hard on a playfield and its not uncommon for many games to have chipped, or sunken inserts around there. So check for playfield cracks, edges, wear around the main center and flipper area.
Check if the beacon (red light on top) is intact and working. Was pretty common for that to be busted or removed.
The other stuff is just the common stuff of this generation... fading/failing DMD screens... 5V issues causing reboots during multiball or when voltage dips.
Getaway is a great game for a small or new collection. Music, gameplay, pretty approachable and easy to understand, etc.
Quoted from Charger500:Just when I thought all was cool.
WPC games have the feature that if a switch hasn't registered in a # of games when it thinks it should have.. it will throw an alert theorizing that the switch isn't registering. It can simply be because you haven't made the shot. Simply scoring the switch, or doing so in test mode will clear it.
Quoted from grumpy712:Here's an original Terminator pinball cabinet decal. It's just one big decal that is why is so hard to sand off.
Its vinyl covered wood.. that is then silkscreened. It's not applied like an intact decal - which is why we don't call them decals (that came later in the WMS games). And why the cabinets wear to white around the flipper buttons.
(and why the vinyl is so hard to remove vs later decals)
Quoted from cavalier88z24:Those things are peices of shit
Quoted from Mr_Tantrum:To start with, I've always wondered what those devices are for as I've not once had a reset issue with my Getaway. So, I guess they are good for screwing up your pin
Quoted from Grinder901:Well I took it off and inserted the connector on the J210 pin. I booted her up and no freezing!!!! I played a dozen games and no freezing!!!
Anyone have a clue why this piece of tech was totally messing my Getaway up?
The board is from rkahr and is used to bypass problems with your game's 5V supply - which if it dips at all, the MPU will reset itself to avoid getting locked up. It works by generating a new clean 5V from a regulator powered by your game's 12V supply. That said, it can only work if your game's 12V supply is good. They aren't 'shit' - but they serve a purpose to give people more reliable play before they need to repair their power driver board. It's a bypass.. your original problem still persists. Maybe Rob can chime in on what's expected when the regulator looses input power. I'm suprised the watchdog isn't kicking in and resetting the game.. which probably means power is dropping and staying down. Clearly you've got lots of different things in that game pulling on your 12V supply too (LED speakers, ColorDMD, etc). You probably have a problem on the 12V system or the MPU board itself or those power connectors.
The board was put in there because the game was probably resetting before.. which means your Power Driver Board or path into the MPU has issues. The stuff you are loading onto it are probably dragging it down even more.
You gotta start troubleshooting by checking the actual voltages and not just shotgunning.
Quoted from Grinder901:No,I bought the board when I bought the game. It wasn't purchased by a previous owner. I bought the board along with a ton of other things for it like mods and the battery NVRAM replacement. I didn't have any reset issues when I played it many times before I got around to putting on the board.
Now that the board is off, it hasn't locked up again.
Then u busted it or like I said... have other issues with the 12v side. A working version of the board won't bring down a game with good 12v
It's possible your 5v is good, but 12v is struggling.
Quoted from Grinder901:How would I test to make sure the 12V isn't struggling?
What's your opinion on this weak or sometimes dead right lower flipper? The fuses in the upper left board all checkmok with a continuity tester. Could it be a bad coil or bad connection?
For flipper... determine if it's physical. Operate it by hand and check for any resistance besides the spring. It shouldn't drag or feel rough. See how much slop there is in the flipper. It should only move up and down a tad and rotate.. no side to side movement.
Make sure your power wires on the flipper are connected well without any breaks.
Determine if you are getting both high power and low power(hold). Make sure Eos switch isn't engaging to early. It should engage when the flipper is at the last 1/8-1/4 inch of travel. You can bypass the eos usually to eliminate it as a cause.
For 12v goto pinwiki and check the test points for the driver board and ensure your 12v isn't dropping.
You can start by simply unplugging your 12v mods and make sure none of them are shorting or pulling the board down
Quoted from Mr_Tantrum:In posting my score, this begs the question if people really score in the billions on this game? High score is 6+ billion on 3 balls. My machine was malfunctioning electrically when I first got it and I had scores in the billions, but I find it really hard that something like this is legit. Maybe I'm just a skeptical newbie, but thought I would ask the community what they thought.
Those are unrealistic scores. In a conventional setup... scores above 500million would be great games. Anything over a billion I'd give a scrutinous eye to who and how. Usually anything over 200 million is great game. Most scores should be 30-100million unless you get the Super Jackpot.
Quoted from Mr_Tantrum:My scores are typically in the 30-100 million range. I am talking about all the high scores posted on Pinside for Getaway. Not sure if anything can be done to verify these or not. I just wish/hope these were all accurate so that one could actually measure themselves score wise against the rest of the community.
Scores and pinside top ratings are two features of the site you should simply forgetbthry exist. Neither mean anything
Quoted from TheOnlyest:So, I took a mental-health day off from work today, and did something constructive to resolve an issue that's been bugging me... A serious lack of GI light in the back left corner of this game. So I added a PF light under that red "L" shaped plastic between the 2 loops, which lit up the Freeway loop beautifully. And to address the haripin turn ramp, I came up with this....
I like how the car blocks the bulb from being directly viewable. Nice
Yeah, your old ones just needed a serious visit with the vise and hammer clinic ![]()
My game when I bought it couldn't even be slid at all due to the brackets being mangled. I just bent them back to semi-normal shape. The end always spreads like that tho... good to hear the new parts are more durable for when the time comes..
Quoted from Kawydud:Where did you get your decals from? Wondering how good the detail is. I have a set, not sure where from, but the detail isn't as good.
These are decals that have been on the shelf for years. Pretty sure they came from phoenixarcades back when he did pinball work.
Re: superbee - I’ve been lurking here all along ![]() it’s just I finally tackled the cabinet restoration on this game I’ve owned since 2010. This guy was taken all the way down to the bones...
it’s just I finally tackled the cabinet restoration on this game I’ve owned since 2010. This guy was taken all the way down to the bones...
Here’s a tease...
D0EB2161-4CEE-4F37-B2F1-09CF3A1F2917 (resized).jpeg
Quoted from Pinless:Once you have it locked in the vertical position, what’s the easiest way to unlock it and lay it back down?
The last time I attempted it solo the playfield dropped (fell) down once I unlocked it. It’s hard to push it up and get it off of the locks at the same time without dropping it. Am I doing it wrong? Or do I need new brackets?
if they are bent and cracking... its hard to get them to dis-engage. Also if the springs are f'd up it will too. When working properly, just moving it front to back while lifted should free it. The replacement hinges are available at pinballlife and an easy upgrade. I bent my hinges years ago and its servicable, but I'm replacing them now
Quoted from Mr_Tantrum:From all the videos I have watched on how to correctly lift the playfield you are right in that I should not have to hold it that high, yet I absolutely cannot get it to work otherwise. Not sure what is going on but if I try the method you are outlining and what I've seen in the actual Williams training videos, the tips of the latches end up sliding under the posts and either don't catch at all or are bound up when I try to lift. I need to find someone locally (should have done it at TPF) and observe them as well as analyze their setup to see if mine is different somehow or if mine will actually work in the way shown and I'm just not getting it. Would love for someone to shoot an interior cabinet video of the mechanism while engaging so that I could see and compare in detail. Either way, I'm going to try again to see if I can actually get it to work using the "by the book" method.
Regarding the support bar, that is good insight and something I was not aware of. Common logic says it is there for a purpose (what I show is what others have shown me), but apparently experience and historical insight deems otherwise (I always appreciate your pinball wisdom). Not sure why the left it there, but now I know better and what you say makes perfect sense.
The PF support bar is more of a carry-over from prior generations. By the time we got WPC, the playfields had gotten so heavy they really are a 'sucker bet' and really are more bad than good. They will cause the PF to sit uneven in the cabinet.. so you'll likely drag along the sides of the cabinet, and it can warp/twist/pop things on the PF in extreme cases. It's best to just ignore it and work with the PF in the upright position or on the lockbar position for games that support it. even in SS games, you are generally better off avoiding it. Before games like Getaway, PFs were only on sliders on the side, or a hinge to rotate (but not slide THEN rotate). Getaway's time period was when WMSs switched to the new slide/latch system we love so much. I think Addams was the last game without them? Someone can correct me there..
Like the other poster mentioned when you are going to rotate the PF... all you need to do is pull the PF out to the lock position. Once you hear it click, you can rotate right from there to the upright position. You should always be careful to make sure the locks don't release as you rotate, but that's just sanity incase the click you hear didn't actually stick.
You use the 45 degree angle when you are trying to defeat the slide latches when looking to remove the PF from the cabinet. By moving the PF forward, but not enough to latch, then tilt up to get it off the hinge pins.
Quoted from Mr_Tantrum:What you guys are saying makes sense, but I'm not sure why I and others have such an impossible time getting it to work. I'm going to take a second look and see if I can figure it out. I've watched multiple videos where people show how to "properly" do it (always shot from outside the cabinet), but I swear it doesn't work for me. I would love to have someone shoot a video from inside the cabinet (stuff your wife or child in there) with the camera pointing at the mechanism so that I can actually see its position and how it engages throughout the process.
Is there anyone that is willing do make a video of this from inside the cab (I was only joking about the wife or kid - just put a light in there with your cell phone/action cam rolling)? It would be a tremendous help to the Getaway community!
Which part do you have a hard time getting to stick? The latch clicking, or unclicking?
There are two pins on the side of the cabinet. The back one is higher.. and the rails actually slide on that pin. The other pin serves to push the latch mechanism open when the PF is in the right spots.
The latch or pivot arm is the long arm, arrow shaped up front and spring loaded to close
This is the 'latched position' where the spring has forced the rear of the pivoting arm to 'close' or block the slide.
When the playfield is near horizontal or the rest position.. that long arrow shaped arm rests on the front pin.. holding the slide 'open'.. and you can move the PF freely forward and back. The bracket slides along the rear pin screwed into the cabinet side. As soon as the playfield is pulled forward enough so the rear pin moves backwards far enough to clear the pivoting arm's edge AND the PF tilted to where the front arrow shape is no longer against the front pin... the spring snaps the pivoting arm to the closed position and you hear the 'click'.
The spring holds the arm in this position until the inverse happens. Lowering the PF causes the pivoting arm to contact the front pin.. pivoting the arm so the slide area is open again.. and the PF moves backwards slightly so the back pin is clear of the latch.
Normally what happens is these slides get so bent up.. that either the rear pin doesn't slide cleanly back far enough to clear the pivoting arm... or the spring on the pivoting arm is so messed up it doesn't force the pivoting piece to close properly. Worn pins on the cabinet also contribute to problems either sliding the PF, or letting the latch close properly.
Fixes are always
1 - check the springs on the hinge and make sure they are securely pulling the latch close.. and the pivoting arm moves freely
2 - check that the cabinet hinge isn't so deformed that it keeps itself from fitting all the way back in the slide
3 - check that the slide bracket itself isn't so deformed that the cabinet hinge pin can't move all the way back and clear the latch
On Getaway's original design, #3 was a problem as the brackets would split, bend, and deform.
When I first got my game, you couldn't even lift the PF due to the bent brackets and pin interaction jamming up. When in the locked position, the pin is very snug in the bracket.. so it rotates cleanly without slop. This tight fit is why some games struggle to latch.
If I had to guess... I bet your hinge pins are worn and deformed. They should be pure circles.. if not, replace or at least swap so the rear pin is the one in better shape.
That red cabinet looks unusual... there is basically no white in it ![]() . It is actually a blend of white/red/black in the original
. It is actually a blend of white/red/black in the original ![]()
Quoted from VolunteerPin:Question for the upper flipper...
I read somewhere that the upper flipper configuration on Getaway does not have a two stage flipper switch but mine does. Is this correct? I ask because my upper flipper has some lag in action. I've adjusted the leaf switch at the button and maybe helped a little but there are times the flipper won't activate at all or not completely or with a slight delay. This (and my apparent lack of skill) make it very hard for me to hit the inner loop shot from the upper right flipper. This sucks from a fun factor and from trying to lock a ball from the right upper flipper.
I'm trying to decide if I need to change my flipper button switch or maybe rebuild that flipper. Input is appreciated.
Yes it has a stacked flipper switch to control the upper flipper. My guess is your flipper switch is not making great contact. Clean it with a business card or other fiberous paper (not a file/sandpaper!!) and make sure you are getting consistent, good registration in switch test.
Could also be flakey/broken wires too... coils love to break stranded wires due to vibration. It's also possible for a break to be inside the insulation. Confirm your switch action... then move to trying to make the flipper fail by moving the coil's power and ground around.. and see if you can make it fail.
Anyone have a lead on a nice clean translite?
Also, any strong opinions on ColorDMD LCD vs LED for this title?
I'm leading towards LED for the 'pop' and because there is limited animations in this that I think would benefit from scaling/smoothing
FWIW... I've had colorDMD in many games, its just I think the LED really works well in some titles better than others. But I think I'm in the minority in that POV ![]() I think many look at it as an across the board thing. I think it's a by-title topic.
I think many look at it as an across the board thing. I think it's a by-title topic.
Quoted from Pinless:29’s ordered, thanks for the tip!
What’s the best way to fix airballs caused by hitting the center red, yellow, and green targets? Is there a way to adjust them? Or a particular angle they should be set at?
Check the target foam and make sure it's not missing or blown out. Put new foam in. If the targets lean backwards, they airball more.
The supercharger ramp sign is two individual twist in lamp socket boards. Each held in with two screws and about 1/4 standoff’s. The type of pcb that just has the 555 twist in socket and solder pads on the back
Quoted from DML1001:Hi everyone,
I have a getaway that I am trying to get working again. I had to pull the power driver board out since the relay failed on it. I swapped in a new rottendog replacement board.
Unfortunately, the video I took on my phone was lost, and I am now lost trying to get things connected again. Most of the connectors are obvious since they are keyed, but someone did some (bad) repair work on this machine and replaced a lot of connectors, so some are the wrong size and aren't keyed.
Is there anyone who could take a few high resolution photos of all of the connectors on the power driver board? The machine isn't working right at the moment, so I must have something hooked up incorrectly. I started going through the manual, but I'm having trouble following everything since the wiring descriptions are split up over many pages.
Thanks!
Use the connector tables at the very back.. in section 3. Use the cable wire colors and general sizes to id which is which on the table
After finally getting my game running again and installing my colorDMD, I can say I'm very happy with the LED colorDMD choice for this title. The art style doesn't need smoothing, and the brightness level right out of the box is perfect with the rest of the game.
Now if that powdercoat order would just get here!!!
Quoted from Mr_Tantrum:I'm happy for you! So, what is being powder coated and what color(s)?
Legs, lockdown, siderails, hinges. Final look will be a surprise ![]()
Alas my cabinet is too tight tho.. Was hoping to put mirror blades in but no way in hell they'll fit in this cabinet. It's always been a tight one, and after the rebuild.. it still is.
But game continues to get more and more upgrades as I just can't leave it less than I would want for my own keeper game. Originally wasn't going to even touch the PF... but after being sanded and polished, complete topside, new rubber, all new flippers+mechs... now it's getting OCD'd with LEDs too. I need this game out of here before I order more and more ![]()
Quoted from cocomonkeh:Well tore the supercharger apart to re-rivet the ramp flap and clean up those optos. Lo and behold, my rear ramp is broken right at the hinge :/ Add that to the list of unobtainable parts I need!
Been there... iv expoxied it in the past. Then replaced it later
PSA - CPR has Getaway plastics in stock again...
Of course I had to add that to the project too... damnit! Now I gotta take the PF apart... again ![]()
Quoted from RVApinballer:Post some pics of the LED color DMD if you don't mind - I prefer the LED version and would love to see how it'd look in Getaway. Thanks!
Congrats on getting your game to the finishing stages.
Unfortunately since I had to repaint the head after my failed stencil attempt... the head is off the game now and I told myself I wasn't going to re-attach it until the Powdercoat finally comes in... to avoid redoing it all.. again. So screen won't be up for awhile..
Now to finish sanding/polishing the MARS dome... wait for powder... and now install new plastics ![]()
Quoted from maur:Alright I'm sending out an SOS....
My supercharger divertor is bugging me. The divertor works. Problem is that sometimes the ball is passes through the divertor because it is travelling faster than the divertor is engaging. I thought it was the coil that was losing strength. Tonight I replaced it and same thing happens. It works but only the pinball is not going through very fast. Any ideas?
Thanks in advance.
Maurizio
The divertor is nice and solid? No slop in the rivets that hold it to the shaft? The shaft and plate should be solid together. This is a common failure point where the divertor stretches out its mounts.
Quoted from Mancave:You made your own silk screen?
Yup! Some else did the art... im just making the screen and printing with it
screen printing adventure documented here - https://pinside.com/pinball/forum/topic/flynn-s-screen-printing-adventure-make-your-own#post-4510617
Quoted from Mr_Tantrum:Would you mind detailing the process (steps, products used, etc.?). Mine could use some improvement.
If you don't have supplies lying around.. your easiest bet is probably to just buy something like a 3M headlight restoration kit. The concept is basically the same. Start with high grit sandpaper, then continue with progressivly higher sandpaper, then switch to a compound, and then polish. Essentially.. rough grit to smooth grit.. just at very high grit levels. Each higher level smooths out the scratches from the prior level. It looks scary at first, but as long as your levels are good enough, anything can be taken back to gloss.
I think the 3M kit has a 1000, 1800, then 3000 grit pad with compound fluid.
My dome was really oxidized and hazed.. and didn't have enough material left from my last headlight kit, so I just used regular sandpaper, hand sanding, and machine applied compound/polish.
I think I started with 1000 grit. Wet the paper liberally and the dome a bit (I have a small spray bottle of water I use). I sanded by hand, in straight strokes around the circumference of the dome. Just work on a bit top to bottom.. rotate.. repeat till you get all the way around. Your goal is to get a UNIFORM finish at each stage. You shouldn't see deep patterns, gouges, etc. Keep the paper wet, and flush away the slurry as you go. The water makes the paper slide better and it keeps it from gumming up. Be liberal with the water. You'll see how much easier it makes things. Complete a pass around the sides and top. Remember... uniform looking is your goal. The lower grit sandpaper will create QUITE a bit of mess/slurry.
Rinse/wipe all the slurry away with a soft rag, then move to the next higher grit sand paper. I went, 1000, 1500, 2000, 2500. It only took like 5-10mins tops per grit, so I was generous with the levels I went through.
I took some photos as I went stage to stage.. so you can see how it progresses
1 (resized).jpg
2 (resized).jpg
3 (resized).jpg
4 (resized).jpg
After about 2000 or 2500 grit.. you can move to compound instead of sandpaper. I use Meguiars compounds and polishes.
I started with Mirror Glaze 'fine cut' cleaner #2.. which is 5 on their cut scale. Used a foam pad with a drill attachment and clamped the dome to my bench.. then just worked my way around the dome. It's a bit tricky given the round cylinder.. but besides hitting the the backing plate to the plastic.. you can't really hurt anything. Reapply to the pad whenever things start drying out or you look like you are dragging material vs applying it. Again, just work around, trying to make things uniform. It will really start to clear up at this step. Wipe it down with a clean soft rag after this step to remove all the excess compound. You want to use a machine to apply this stuff if you can.. as it really needs the rotary action to be effective.
Then I moved to 'swirl remover' #9 which is a 3 on their cut scale. Using a clean foam pad, on the same backing plate/drill attachment.. worked my way around the dome. Just wiped it up with the microfiber towel after that.. and finished.
Since this sits so far from the player... you don't have to be perfect. For the inside, I just wiped it out.. didn't even bother polishing.
The Meguiars stuff can usually be found in your local auto store, but finding the higher or various cut levels can be challenging. I don't remember if fine cut I found local, or had to go online for. Walmart suprisingly has a good selection of the 3M and Meguiar's products.
The high grit sandpaper is easily found in small pieces in the 3M auto supplies. Cheapest I found was walmart.. they sell an assortment pack even that is perfect for these smaller playfield and plastic applications.
Less than $4 gets you a pack of 1000, 1500, 2000, and 2500 pieces - https://www.walmart.com/ip/3M-Wetordry-Automotive-Sandpaper/17130294
Pickup 2 and you'll be set for numerous projects.
Quoted from Mr_Tantrum:Great detailed info. I also have some scratches/gouges on the inside of mine so looks like I'll need to follow the process inside & out. The lazy me says to just buy a new one, but the cheap me says no way I'm paying that much for a piece of plastic.
They are not available currently... unless someone is selling them for crazy money. None of the regular retailers have them ATM...
Unless the scratch is some gouge... it's unlikely you'd even see it. I would consider just working that one area if needed.
I considered 'frosting' the inside of mine to make the beacon itself less visible.
Quoted from Mancave:This is essentially the same method as polishing your stainless ball guides/anything stainless to a mirror finish (very close to mirror anyway) only difference being that the grit level is much lower down the scale. So if they have ball trails (most older ones will have) you would start at about 80 -100 (i use wet and dry paper and sand wet, cleaning as you go) to level out then gradually work your way up through the levels of grit to about 2000 or 2500 and then polish up with a calico wheel and a compound followed by a buffing wheel to finish with. The higher grit number you go to the better the finish after using the calico wheel and compound. Great guide flynnibus TY!!. Thought it would be timely to add this info also for those that may consider polishing their ball guides. I haven't got any photos at the moment to show the end result BUT i must say they come up very nice and makes a huge difference to the overall look.
Yup... but as you say, the grits are far less. I usually do emery paper if I have deep ball wear to clean out... and finish at about 600 grit if I want the grained stainless look. Going 600, 800, up to 1000 or 1500 should give you a really glossy look. But with the heavy grits, it's really important to sand in STRAIGHT lines... else you'll be fighting your own work a lot more.
But honestly I'm not a fan of the mirror finished guides for two reasons. 1) I prefer the factory gained look 2) Ball wear comes back within days or weeks of play... 3) the polished stuff shows fingerprints, etc more ![]()
I just sand out heavy ball wear if needed, move up to 320... maybe 600... and just use green polish on the tight cotton wheel on the buffer wheel. This gives me a polish level that is great, but requires very little effort.. so having it ruined with play, isn't a big deal.
Like this guide... I don't think I even sanded this one.. just used the buffer wheel.
Image uploaded from iOS (3) (resized).jpg
Image uploaded from iOS (2) (resized).jpg
I've shied away from sanding on ramps/etc because it's so hard to get a uniform finish into the corners, etc.
Quoted from GRUMPY:How would you do this, glass beading?
just sand with a high grit... like 1000 or 1500
Quoted from Kobaja:It's for the 'feet' of that plastic assembly above the super charger ramp entrance. The one that had the two Lanka for refline mania and super charger
Ok, the ramp sign... but no idea how it would be used?
Quoted from Kobaja:The center target one I have laying here, but it is too thick to allow enough threading to stick out for the nut to catch on to. I even have a custom made thinner metal plate, but even with that there's no way.
Then someone has substituted the wrong post. The correct post has a longer threaded top... like 3/8 or more tall. Its taller than the normal threaded too post... and afaik... Not currently available.
I had the metal plate and plastic and tons of thread above the nut
Quoted from maur:You're right Tiltmonster there is a set screw that holds the divertor but it was really difficult to adjust to the right position. When I took everything apart I found that there was alot of slack in the shaft and entire assembly was wonky. I tried to order it put I was told it was not available. Here is a better picture of the solution I found. It reduces the distance the divertor has to travel to engage the supercharger. In case someone else is having the same problem
Maurizio
[quoted image]
If there is slop, its almost always where the divertor is attached to the shaft. Those rivets get stretched out or fail all together. You can rebuild it even with pop-rivots you can get from the hardware store... vs needing the more fancy crush rivot types.
Quoted from gunstarhero:Mine was broken when I got it, I just cut the legs off and sanded down the bottom edge and just attached the sign straight to the ramp, and I actually think it looks better:
[quoted image]
I did that with the metal plate that is available... cleaning up the plastic to square and stacking it all
Quoted from gunstarhero:My understanding is the leading reason Getaway is so dirty is metal on metal wear from the Supercharger. I doubt your rubber choice has a lot to do with it.
More like... 'getaway has areas not easily reached, so people don't clean them... like the supercharger'
Get rid of the black rubber and actually clean inside the supercharger and trough as well as the usual open PF and it shouldn't be any worse than any other game.
Quoted from gunstarhero:It's no harder to clean/clean under the Supercharger than under/around other fixtures on similar pins. Remove a few screws and lift up.
The supercharger itself is multiple pieces that result in a long tunnel that I'd wager 95 out of 100 never bother to open up to clean out. Because it holds together so well, and requires handling the magnets, the optos, and the multiple ramp pieces... most would just say "close enough!" and move on vs actually splitting the supercharger loop up and actually cleaning inside the magnet tunnel. It's these unopened nooks and crannies that never get cleaned that love to track dirt right back out on your clean PF.
taking supercharger loop and ramp off... easy
disassembling supercharger... feels like a bit of juggling act ![]() It is a pretty neat piece of engineering though how they made it all fit together.
It is a pretty neat piece of engineering though how they made it all fit together.
That speed is nothing to be worried about.
If the divertor wiggles, see if the rivers that hole the plate to the shaft are tight and intact
Quoted from delt31:That might be it as I looked below and the base does look a little loose. Can it be tightened without taking charger apart?
The assembly is all on the bottom of the supercharger loop. The main culprit is the divertor itself. The rail is held to a shaft with 2 rivets... these tend to stretch out or fail. Pretty sure you gotta take the supercharger loop off to get any access to the assembly as it's all mounted on the bottom. But checking if the plate moves/wiggles free of the shaft you should be able to do in place.
The part is generally not available.. so you have to either a) replace rivets with screw/nut... or b) re-rivet the plate to the shaft.
Quoted from delt31:I don't think the rivets are bad but I will take pic....
No one can really tell from a photo.. unless it's trash. Literally, just see if the 'arm' portion wiggles independently of the shaft. That's what you are looking for.. and you will see it as 'give' in the divertor when the balls pass in the slow mo video. The divertor arm and shaft should be one rigid structure.
IIRC... it just goes through a metal collar as the bushing. It should have minimal side to side wiggle (similar to a flipper). It's possible the linkage on the plunger arm is worn and you are getting slop there... but I guess it really depends on how much slop there is, and would it be removed with a cleaner part.
I'd still start by focusing on watching it all during a simple slow mo video... watch the area near the transition/divertor for the ball getting rattled/etc
You may want to push a washer or two under the bracket supporting the supercharger to the center bank... or play with it loose to see if you can eliminate that ball hop/airborne.
The actuator on the diverter is slotted, so I doubt it will ever be fully taunt - https://www.marcospecialties.com/control/keywordsearch?SEARCH_STRING=A-15569+
The diverter looks fine to me... it's side to side rattle or hitting the edge that usually beats down the speed.
Quoted from delt31:Sorry but where do you put that washer?
I'm talking about adjusting the slope/height of the supercharger loop. So the leg that comes off the loop to the center bank that supports the front part of the supercharger loop. See if adjusting that height helps or not.
Quoted from Charger500:Can someone tell me if this is the correct flipper coil for the upper third flipper? The reason I ask is because it is difficult for me to hit the upper loop shot from this flipper. I’ve balanced the game with the PinGuy app and the flipper is adjusted to where it appears to be in the correct resting position. It flips as if it functions properly so I think it’s working correctly. Thanks.
[quoted image]
That is the correct flipper coil.
Check things like the actual alignment of the flipper bat. Also try to film the ball or watch it as it makes the loop and make sure it's not something else interfering with the smooth loop action of the ball.
That is the correct flipper paw, etc. Just make sure the flipper has the proper up/down adjustment.. should have enough play to wiggle up and down about 1/16". Make sure the flipper movement is without resistance or dragging in and out. Lastly you'd check that you are getting both high and low power flips.. but that's less of an issue with these fliptronics games
The little resistance at the end should be when it is contacting the EOS switch and is normal. Your alignment looks good.
Is it you can't get a clean shot to go all the way around, you can't hit the orbit at all? The ball limps around?
To everyone that ordered CPR Plastics for getaway (in the past or recently)...
I have been discussing with Kevin@CPR about the hole template on the set. I got a replacement set recently, and found the holes drilled for the layered plastics on the slingshots and near the shooter lane where the plastic snap-in standoffs were used were not big enough.
By stand-offs... I mean these fun puppies..
standoff (resized).jpg
Kevin says they've not had any issues with this in the past, and we're trying to understand if this is 'steve is stupid' moment, or if other people have had similar issues but just not brought it up (and if changes should be made!)
The specifics... the hole template seems to be 5/32 as the standard screw mount hole size. But there was no difference in size between screw mounts and these stand-off+screw mount hole locations. In particular, the gauge plastics that sit over the slingshots, and the speed sign plastic that is near the lock on the side of the playfield. Plastics at the back of the game, did have larger holes for the stand-offs.
In my case, I expanded the holes to 13/64 to make it large enough to accomodate the stand-off+bolt.
Before Kevin goes and makes going forward changes, can any of you previous buyers chime in on your experience?
Thx
Thanks guys. I figured people just cut the standoff’s or drilled the holes. Just trying to confirm with others to feel good about not being an outlier ![]()
Normally you use the 5/12V connector that is on the 3 plug connector near the power switch box (under the right flipper). Can't tell from your photo, but are both flipper boards daisy chained off that one 3 wire connector? If so, just use that and plug it into the 3 plug connector. The splitter with the IDC connector is for Spike games I think.. all the marco sets on their website show for Sterns. I expect that's an adaptor not needed if your game has the normal 3 pin 5/12V connector.
Quoted from Kawydud:CPR has them up on the website now, just not sure if they have corrected the orange color from the previous run.
https://classicplayfields.com/shop/pinball-plastics/getaway-2/
The orange is still the muted orange.. vs the fluorescent
Quoted from Kawydud:I'd be happy with just an orange, sucks they can't change it on the fly with the new process.
I spoke with Kevin about it at length, and basically he didn't believe it to be in significant error based on their prior feedback. He did say he could alter the colors some yet and make it brighter. I took photos of the plastics vs my originals. The camera dulls it a bit but shows the plastics vs the PF colors. He's not editing the color now, but I took from the conversation that if they felt it was necessary, it's do-able.
He is currently editing the cut template to increase the hole size where the snap-in standoffs go and putting in the plastic that was missing in the original set (piece under the supercharger in back corner). He expects to have a new set for me within a week.
Quoted from red-line:So I got a multimeter and it doesn't appear that either of the 12v connectors have a current. Any ideas what could cause that?
[quoted image][quoted image]
Well they won't have current unless under load. You want to test voltage.
You want to set your multi-meter on DC voltage, put the black lead on the ground braid in the cabinet, and the red lead into the connector. (technically you can test using the black lead in the connector too for ground.. but I digress)
Quoted from MustangPaul:If these are printed instead of silk screened they woun't be able to get the fluorescent orange because printers don't print fluorescent ink.
I know this... but they can still get a brighter orange than what they are currently printing.
Quoted from 1979wade:I've just picked up another Getaway that's been sitting in a warehouse for the last twenty years. It looks like it was vandalized then put into storage. The coin door was broken off, and the right decal on the cabinet has been ripped off.
Any chance anyone has just the right side cabinet decal they'd be interested in selling?
goto the overseas decal guys and see if they'll make a partial set. But honestly I think you'll do yourself a disservice that way as the red will certainly be different.
Quoted from Mr_Tantrum:Started having an issue today where my flashers are not working. F111 had burned, so I replaced and noticed that the 2 right bank flashers (below plastics on right side under Donut Heaven area) are stuck on.
I've checked the wiring and all looks good. Any advice on what to do next?
stuck flashers are same as stuck coils. look for short in wiring to ground... and if not there.. then it will be a transistor problem on driver board.. move to transistor troubleshooting on pinwiki/pinrepair.
Quoted from robertg130:Hi guys,I’m looking for a Gateway coindoor decal,if someone have one or can make one I’m interested
Thanks
That would be custom regardless. There is no factory decal on the door.
Quoted from MJW:Weird. My game has metal plates on either side. Your mod would not sit flush . Wonder why mine had these plates. It was a reimport .. anybody know?
[quoted image]
Looks like someone's hack to hold the cabinet together. That is not factory at all.. not even for re-imports ![]()
Notice all those screws outside the plate too? also not factory. That cabinet had come apart and someone used a heavy screw and plate method to try to keep it together.. instead of the proper wood joint repairs.
Quoted from Mr_Tantrum:That is gorgeous. BTW, are you doing your restoration inside the space station (all that silver stuff)?
We have basements here.. and that's insulation in an unfinished space ![]()
Quoted from red-line:Looks amazing! You've got me looking up how to remove side rails. Seems like too much of a pain, tho, haha.
Mr T, thanks for the coin slots pics. That deep red looks great.
Thx - factory ones are not too difficult to remove. The risk is about damaging the cabinet side OUTSIDE of where the rail is.. and bending the rail itself. For factory stuff, it comes off pretty easily.
Use heat, and a long putty knife/blade. Simply slowly work your way under the rail from the bottom a little at a time. Use something under your blade to keep from marking up the cabinet in places besides under the rail. With some heat, you'll be suprised how quickly it comes off. The real work would be cleaning up all the residue on the rail and cabinet.
Quoted from MustangPaul:What? All that holds them on are 2 small bolt each.
And a lot of 2 sided tape ![]() The bolt is only at the lockbar end.
The bolt is only at the lockbar end.
Quoted from red-line:Are your lighted flipper buttons not working?
I only ask because I can't get mine to work.
They weren't plugged in at the time.. just hadn't gotten there yet. Mine are the Pinball Life ones.. so they have a 4 pin header to plug into the power driver board.. instead of using a 3 position molex (which is common on the stern ones). J116, J117, and J118 are all the same thing on the driver board.. just plug the harness into one of those and plug the existing connector into the jumper position on the cable.
Screen Shot 2018-11-29 at 9.58.21 PM (resized).png
In my case, I have my colorDMD already jumping off J116, so I just used J117 or 118.. whichever was less crowded to reach cleanly.
Quoted from ajnin:Also i have been successful in converting my flippers from leaf switch to optical boards on HS2. I had some issues on the right side and for now have needed to remove the spring metal, on the right flipper. It works 100% and if your like me and like that nice opto feel you can do it quite easy. All the details are in https://pinside.com/pinball/forum/topic/converting-taf-flippers-from-leaf-switch-to-optical-boards
free free to ask me any questions
you can see the right flipper button with issue, then without and then left flipper button.
[quoted image][quoted image][quoted image]
That sure looks like it will get hammered as you move the PF in and out as the tolerances to the shooter coil brakcet is so tight
Quoted from red-line:You're going a bit over my head here? What do you mean by unregulated power?
The voltage source in the game is regulated or not. Regulated means it's processed so the output voltage will remain the same all the time... if input voltage drops, it stays constant, is cleaner, etc.
Unregulated are usually just from a transformer meaning any mess on the input side usually passes through to the output side, or greater load can pull the voltage down, etc. So in effect, they are just more sloppy..
Quoted from gunstarhero:Bushings looked fine but I didn't replace them so that might be a thing too.
The most overlooked part of rebuilds... the side to side slop kills so much flipper power...
Quoted from Beaumistim:so.... i have multiple real stop lights, very large ones. i want to hook one up to my getaway pinball. maybe attached to the wall above it. anyone with any ideas on how to accomplish this task?
someone just did it with HIgh Speed... search for it here on pinside.
If anyone is in need of plastics for Getway.. I'm selling a CPR set at a heavy discount - with all the included extras
https://pinside.com/pinball/market/classifieds/ad/74761
I also have just the topper/display set available
Quoted from robertmee:Have my game torn down....installing a PF protector in preparation of putting game on location at a local club. I have a new plastic set, lots of new mods, new coil sleeves, flipper kits etc. Already been through and bullet proofed the boards.
I usually throw everything in the dishwasher to get the carbon off everything before individually polishing metal components. Any reason not to throw the supercharger assembly, magnets and optos and all into the dishwasher? Of course no heated dry. For anything electrical I'll usually flush with alcohol to displace any moisture then dry with a hair dryer. I've done light boards, wiring harnesses, etc with no ill effects but not sure about the hunk of iron that's the magnets. Don't want them rusting inside out.
They aren't magnets - they are coils.
Quoted from robertmee:A coil is a magnet....with the wrap I couldn't tell if it's an iron or copper core.
These aren't magnets - they are simply coils being used as electro magnets. In this case, a winding of wires around a plastic bobbin - just like flipper coil. There is no 'core' - the ball is accelerated by passing through the magnetic field... just like a flipper plunger is. They are effectively super sized single wound flipper coils.
You use a core to be the material actually being magnetized... here they just need a magnetic field so no cores. There is no contact with the ball or cores.
Playfield magnets are the same.. they just put a metal slug in the middle to be the magnetized point of contact with the ball to hold it.
Washing them would be the same as washing a flipper coil.. if you're into that.
I just sold my game so I can't look anymore.. I know what you mean about the shooter lane bracket having two holes.. but AFAIK you just use the slotted hole.
See if the ball is rattling around - that kills energy. The other ball guides may not be lined up optimally. It's not uncommon for shots to fail to make the back up ramp if not clean. Balls should go up there nice and clean from the left orbit.. and a shot that doesn't bounce in the inner orbit should make it steady (not like racing up there). The inner orbit has a significant curve so balls can make the orbit, but loose speed rattling.
Left hand backhand to supercharger isn't a given on the game.. depends on the example.. but it is common.
If your flippers lack punch - step 1 is check the flipper bushings for slop - most people skip those when rebuilding and if its been awhile, you'll get tons of lateral movement from that killing power. Also, check the manual for the right coils.. there are two different flipper coils in use in this game (red and blue).
This is a fliptronic game as well.. so it's possible issues on that board can be killing power as it supplies the flipper voltages.
Quoted from robertmee:Hard to take a picture, but here it is from the backside
[quoted image]
That is not factory.
The pin is just held to the arm with the threaded post and nut. That's someone's hack
This is a data line issue. So its either your cables, the DMD board itself (which you've replaced) or the CPU board... like bad socket, ASIC connection, etc.
Quoted from Barr993:Yes! From a TAF. Would have been an awesome find for me if it matched the serial number of our TAF that had an RD board in it when I bought it. But it doesn't.
Now onto that daughterboard issue...
As to the serial sticker - no one really cares as board swapping is common, and stickers can be reproduced anyways. There is a preference at times for original boards vs 3rd party products.. especially when some of those are questionable.. but enlarge as long as the product is good, it doesn't matter. People these days want reliability over originality. "numbers matching" means nothing in his hobby unless you are talking about unique examples.. like a prototype, non-produced game, etc.
The daughterboard isn't an issue... as much as a bypass to the 5V problem that likely exists on your driver board or wiring. Chose to resolve it or just enjoy the freedom.
Quoted from pkrobin:My recollection is the diverter has a spring that keeps it open for the U-turn. The high/low solenoid are just that. High switches it to the SC but the low power holds it there so the high doesn't need to stay on too long.
You are correct that the enter ramp opto can cause a diverter error however in my case there seems not to be any issue with the opto and everything functions as expected despite the diverter error. It (the error) I sort of think went away for me at one point because I can't recall seeing it for a good chunk of time but I have noticed it lately though I don't recall anything I intentionally did that should have changed it. Cleaning here and there but that's all.
if the mechanisms are working - the only way the game knows is based on switches. So go through and test each switch around the ramp, etc... don't count on game play.. the game is built to compensate. Do the actual diagnosis.
You're currently viewing posts by Pinsider flynnibus.
Click here to go back to viewing the entire thread.
Wanna join the discussion? Please sign in to reply to this topic.

Great to see you're enjoying Pinside! Did you know Pinside is able to run without any 3rd-party banners or ads, thanks to the support from our visitors? Please consider a donation to Pinside and get anext to your username to show for it! Or better yet, subscribe to Pinside+!

This page was printed from https://pinside.com/pinball/forum/topic/getaway-club-dispatch-run-a-make-on-license-plate-kingpin?tu=flynnibus and we tried optimising it for printing. Some page elements may have been deliberately hidden.
Scan the QR code on the left to jump to the URL this document was printed from.
 Ashburn, VA