(Topic ID: 124724)

Flight 2000 Club - members and fans welcome!

By Snux

9 years ago


Topic Heartbeat

Topic Stats

  • 2,325 posts
  • 148 Pinsiders participating
  • Latest reply 36 days ago by chas10e
  • Topic is favorited by 79 Pinsiders

You

Linked Games

Topic Gallery

View topic image gallery

pasted_image (resized).png
Screen Shot 2024-03-16 at 5.55.11 PM (resized).png
PXL_20240310_020948866 (resized).jpg
PF (resized).JPG
IMG20230430200630 (resized).jpg
IMG_4170 (resized).jpeg
IMG_4169 (resized).jpeg
9054E268-F271-40DC-805F-FFAB1924C7B8 (resized).jpeg
9AE80644-F808-46B1-9F40-1EDD65ADB443 (resized).jpeg
15ADFD65-8328-4778-834A-E5EA14EF10DB (resized).jpeg
IMG_9952 (resized).JPG
IMG_9950 (resized).JPG
IMG_9947 (resized).JPG
IMG_9944 (resized).JPG
5D2006E0-2E7A-4A88-A92F-E32EC01C9A5C (resized).jpeg
IMG_9886 (resized).JPG

You're currently viewing posts by Pinsider robotworkshop.
Click here to go back to viewing the entire thread.

#181 5 years ago

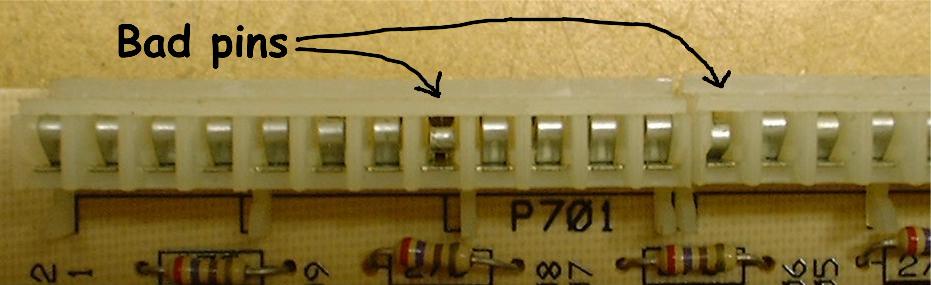
I just picked up a flight 2000 and have parts on the way to get it going again. It looks like there has been previous work done soldering the flipper coils and also the trough switches that looks a little questionable. Does anyone happen to have some good pictures on how the flipper coils are wired and also the trough switches? Once I get the machine setup I want to clean up that wiring and go from there.

Thanks!

1 month later
#203 5 years ago

Just bringing up a Flight 2000 that has been sitting for many years. Did the repairs and uogrades to the driver board, went through the lamp driver, and have both sound and Speech. At the moment I'm trying to resolve several switches that won't register. They are switches 4 and 5 for the spinners, and switches 9, 10, 11, 12, 13, 14, 15, and 16.

Since this machine had previous work I'm looking all that first.

#205 5 years ago
Quoted from cottonm4:

both spinners feed off of the same yellow/red power wire. On the blueprint Stern refers to the switches by name. Not numbers. (L)outlane and (R)outlane are also powered by the same Y-R wire. Tell me which switches are not working and maybe I can offer some ideas. The switch power wires are: W-R, BRN-W, W-BLU, W-Y, Y-R.
They are all located on connector A4-J2, pins 1,2,3,4,and 5. The return wires are on the same connector.
If it was me, with that many switches acting up, I would roll the dice and replace the pins and see what happens. At least pull the pins and look at them. They could have been replaced with shoddy workmanship.

Your note got me to go back and look at the connectors at the boards again. Found one sprung pin that broke when I pulled it out and after replacing that I have most of the switches working now. One center drop and the upper right sling switches still aren't but I will check those switches again and clean/adjust them.

It seems that the balls don't register properly when they drain so I have to look at that next. Once that is done it should be playable.

About half the GI is out and I noticed that one wire was cut for the coil going to the #3 drop. I had replaced a couple bad transistors on the driver. If the coil checks out i'll install a new diode and re-connect.

#207 5 years ago
Quoted from cottonm4:

All GI power is from the red wire on the J1 connector at rectifier board. Red wire splices into the bare stranded wire soldered the the bulb bases. If half the GI is out you probably have a broken strand wire.

It looks like someone may have replaced a lot a GI sockets in the past and changed some of those wires. I'll start going over all of it to see if one broke loose of if they wired it wrong. Tomorrows project!

1 week later
#211 5 years ago

If you clear and reset the audit settings with the front panel it should fix the numbers displayed during the attract mode. I ran into something similar after installing an NVRAM module.

1 week later
#231 5 years ago
Quoted from cottonm4:

It is 15/16". PBR stocks them.

They also stock the correct power cord...

#235 5 years ago

I had GI out as well. Went to LED's in the backbox to reduce the current and heat. Also added a couple Fire LEDs under the asteroid and under the rocket flames in the backglass. The effect is really cool.

2 weeks later
#254 5 years ago

Ended up with this as the final score the other day (I have done better)

Just thought it odd to end up with that exact score. Anyone else have one similar?

F2K_Score (resized).jpgF2K_Score (resized).jpg
2 months later
#306 5 years ago
Quoted from canoncitypb:

Anyone know why when my sound board is plugged in on my flight 2000 the machine boots, i hear start up pings, but then the MPU restarts? I just did a capacitor replacement and replaced large chip because mpu was locking up. I've connected the ribbon cables the wrong way a bunch of times, but didn't figure 5v would kill anything. Pretty strange.

If you are running the original driver board does it have the updates to tie the two 5v lines together and optionally the grounds? Without those it relies on a jumper in the cable. If you have a bad pin or connection you'll have issues.

https://pinside.com/pinball/forum/topic/bally-as-2518-club/page/31?gallery&galleryp=4

#313 5 years ago
Quoted from HPR:

Change caps for 5 volts on your driver board, when hot it become unstable

I'd also check the driver board to see if it has been updated with the extra jumpers on the back. There should be one to tie the 5v lines together and a couple others on grounds.

http://pinwiki.com/wiki/index.php?title=Bally/Stern#Solenoid_Driver_Upgrades

#314 5 years ago
Quoted from canoncitypb:

My Flight 2000 project has come to an end. I've put way to much money and time into trying to bring it back to life. I'm going to part it out if anyone is looking for something. Sad day, but I need to cut my losses at this point and no one is going to pay me for the machine in the state it is in.
PM me if there is something you are looking for.

Before you part it out there may be someone on here that would buy it as is.

1 month later
#334 4 years ago
Quoted from Tomass:

Still seems like the mpu should boot though without solenoid power. I dont get any beeps at all.

No, it won't boot. The 7th and last flash of the led on the MPU only happens if you have that 43v solenoid power.

There is a ton of details on Pinwiki about it.

http://www.pinwiki.com/wiki/index.php?title=Bally/Stern#How_to_make_a_Benchtop_power_supply_for_the_MPU_board

#336 4 years ago

Then back to basics checking for voltages at the MPU. If you're not getting any flashes and you have all the correct voltages the there is an MPU issue. You should get at least the first 6 even if the 43v is missing.

3 weeks later
#375 4 years ago
Quoted from Lovef2k:

If the game was resetting, that's a sign of the 5v regulator going out. LM323, order one and replace it and see what happens.

Before replacing that regulator I'd add the jumper on the back of the driver to tie the 5v points together instead of relying on the old contacts in the harness to do so. Also check to see if the large cap for the 5v supply was replaced.

#385 4 years ago

I used color matched LEDs under the inserts and used the purple in that spot

https://www.cometpinball.com/product-p/1-flux.htm

These have been running well with no strobe or flicker.

1 week later
#438 4 years ago
Quoted from ArcadeRaid:

Well, bad news. I clipped every cap on the game, one by one and nothing changed. It is sitting here now with every cap only attached by one leg and the problem remains so I'm guessing it is not the caps.

I've run into odd switch issues when I had an open connection in the switch matrix. Had a broken pin where it plugged into the MPU board. The contacts are often brittle and can break. Check those too.

#441 4 years ago
Quoted from ArcadeRaid:

I took of the J2 connector earlier and all of the header pins looked great.

That is a good sign since I've had to replace many where the plating was coming off. Still need to check for broken solder connections on the solder side of the MPU to confirm that part is ok.

While the headers may be fine the small contacts in the connector shell of the harness that plugs onto the header can be broken inside. You can sometimes see by shining a light in the end.

http://www.robotworkshop.com/robotweb/wp-content/uploads/badpin3.jpg

1 month later
#531 4 years ago

Broken solder connections on the driver board? Bent or broken pins in the connector shells that plug onto that board.

2 months later
#585 4 years ago

I would check the rectifier board in the cabinet and the connectors. Repin any bad ones. Also check pins in the connectors at the boards in the head. Many were brittle or weak on my game. It has performed solid ever since.

I've rebuilt a lot of the Bally and Stern driver boards and haven't had to replace an lm323 yet. Don't know who said you have too.

If you haven't done the ground and 5v jumper mod I'd do that before swapping that voltage regulator.

1 month later
#607 4 years ago

That lamp driver is a single sided board and those solder connections at the header pins are prone to crack. Have you pulled off that board and checked it?

Usually the passive components like resistors don't usually fail unless underrated. I've had more issues with pins losing tension or just brittle and braking off the portion that should touch the pin.

#610 4 years ago
Quoted from Kanned_69:

No I haven't looked at that, Would I be having lamp issues in that case? All lamps TOK.
I never really thought the resistors were going to be an issue but if I was going to be replacing components I may as well test the basics (all resistors within spec BTW).

Sure. Depends on how many solder joints are cracked. It only takes one fractured solder connection. Happens all the time and is very common. That is one of the first things I check on any boards I get in for repairs.

Definitely a great idea to test parts. Just look at how they are connected if you measure in circuit since other components can throw off the readings. You may need to unsolder a lead to measure. Usually not worth it for most resistors unless known ones that go bad. Electrolytic caps are worth pulling to test.

It's best not to replace parts unless you have to. Otherwise you risk board damage. A lot of repairs I do is stripping off all prior work and in many cases fixing traces and pads torn up by unnecessary repairs.

#613 4 years ago

Does anyone know of a good replacement spinner for the Flight 2000? Just plain white would be fine. I was looking at the new replacement from PB Resource:

Generic Enhanced White Replacement Wire Spinner for Gottlieb, Bally, and Williams games that had wire spinner. BLY-A3460+ $17.14ea

http://www.pbresource.com/spinner/bly-a3460+.jpg

http://www.pbresource.com/spinner.html

Has anyone tried these? My game has a couple random beat up Bally spinners and I'd like to get a fresh set on the game. I have decals.

1 month later
#667 4 years ago
Quoted from dubby:

Hi, everyone. I'm still working on my F2K restoration and I noticed that the speaker has like 3 holes in it. The speaker has stamped on it 8 ohm and I'm assuming it's original to the game. 8 ohm 6" speakers are pretty rare compared to the 4 ohm, same sized speakers. Has anyone replaced their speaker with a 4 ohm? Or, if you have a link to an 8 ohm replacement, that would work too. Thanks!

I don’t remember if it is a 6” or 6.5” speaker but there are a bunch of 8ohm of both sizes on Amazon.

4 weeks later
#700 4 years ago
Quoted from Inkochnito:

How do you think he is going to do that?
All solenoid transistors are used.
You could change the coin lockout to be used as knocker, but all others are used in the game.[quoted image]

Was going to use the coin lockout driver. I think there will be two versions. One that can use a knocker instead of coin lockout and another leaving it alone and keep the sound.

2 weeks later
#768 4 years ago
Quoted from Reaper802:

Inlane guides have now been digitized in Fusion 360. Anyone want to do a test 3D print to make sure I scaled the scans correctly?
Once they are verified does anyone have access to a CNC laser cutter that can handle 1/16" stainless steel?[quoted image]

Do you have the STL files? I could possibly try running a 3D print to compare with my machine. I plan on making face masks but may be able to slip this in between runs.

1 week later
#819 4 years ago
Quoted from wolffcub:

there fixed.....[quoted image]

Do you have an STL file for them? It would be good to export each one out separately for printing/machining.

1 week later
#823 4 years ago
Quoted from Zigzagzag:

This is one of the NOS playfields sold on Ebay last year.
It has been clearcoated, but the acryl paint pen used around the inserts (which were cupped) unfortunately "opened up" a bit during the process.
But all in all I'm happy with the result - just need to sort out a few of the lamp sockets, but it's fully working and a fun game ![quoted image][quoted image][quoted image]

Looks awesome! Enjoy the game.

2 months later
#897 3 years ago

I used a few Comet flame/fire LEDs behind the rocket flames for the back glass. Nice effect. Did the same for Meteor.

4 weeks later
#953 3 years ago
Quoted from clodpole:

You're welcome. MG Chemicals Superwick has given me the best results. I bought some no-name stuff for less, but it was oxidized and wouldn't absorb any solder. I like the wider widths (MG Blue or Yellow) for those big globs on solenoid tabs.

Yes! It is totally worth buying the quality solder wick. Comes in handy for board work too in addition to a good desoldering station.

2 months later
#1168 3 years ago
Quoted from Navystan:

OK, I'm in the club, thanks to another F2K guy, kind enough to sell to me.
2. I have one display out and one "wonky." Anyone have a couple displays for sale? I had a spare 6 digit Pinscore display and put in game/match slot. Works OK, but part of right digit is hidden. Are there any LED sets that work better?
Thanks.
[quoted image][quoted image]

As long as the display glass is ok then your displays can be repaired. As someone already mentioned one of the most common issues is cracked solder joints on the header connector where the plug goes. They can also crack on the pads going to the glass. That will fix a lot of Issues. I had to do that on mine. May also have open resistors, bad transistors, or bad decoder IC on the board. All those are fixable.

1 month later
#1245 3 years ago
Quoted from Navystan:

Is it worth sending to someone like Chris to fix the board? But, if it costs $100 fix and the board is only worth $125 to sell, probably not worth the effort, right? Or, maybe I can try to fix myself.

Unless you have a lot of burned up traces on the board they are worth fixing and are usually less than $100 to repair. Once gone over (and the updates applied / Jumpers on back of board) they are solid boards. I prefer clean updated original boards in these and running originals in all my games.

I've only had one Alltek MPU board. It was a nice board and I'm keeping it as a test board but went original MPU's so I can run the alternate code if I want.

2 weeks later
#1257 3 years ago

Is the Flight 2000 supposed to have a metal channel in front of the neck for the playfield glass? Don't have one on mine and looking at some of the pictures in this thread I didn't notice one on others either. Noticed it when I was taking a closer look at the neck area.

#1259 3 years ago
Quoted from clodpole:

Could you post a photo of the spot you're referring to, please?

My game is at my parents place so I just grabbed one of the images online. All my other games seem to have a metal bar up there at the front of the neck area. Just wondered if Flight 2000 should have one too. Since I haven't seen any in pictures I'm thinking that it may not.

f2kneck (resized).jpgf2kneck (resized).jpg
#1261 3 years ago
Quoted from kickabit:

Do you mean this metal bar? These were only on early Classic Sterns. [quoted image]

That's the one! Just wanted to find out if flight 2000 was supposed to have one or not. Mine doesn't.

#1263 3 years ago
Quoted from vec-tor:

Answer:
[quoted image]
Nope.

Thank you for the confirmation!

#1268 3 years ago

My early Williams Blackout has a metal bar and I think my other games do too. That's why I though it was odd that Flight 2000 didn't have one and I thought someone may have removed and lost it.

I guess Stern didn't think it was needed and left it off.

3 months later
#1307 3 years ago
Quoted from DanMarino:

I'll be replacing this when the new board comes in.
[quoted image]

That one actually doesn't look too bad compared to other boards I've seen. a set of new heavy duty bridges on the top of the board w/heatsinks and some other cleanup would make that board work ok.

1 week later
#1332 3 years ago

Pull the connectors on the lamp board and MPU and shine a light in them to see the contacts. Some can be sprung or broken. My flight 2000 had some brittle pins where the contact broke and had to be repinned. May also have a wire off that needs to be resoldered. Could be bad lamp sockets too.

1 week later
#1344 3 years ago
Quoted from Lovef2k:

Yes. Resets during a game are a good indication that the 5v regulator is going bad. It's the large silver transistor in the center of the large heatsink on sol driver. LM323 I believe.

I haven’t run into any bad LM323 regulators yet. I have had to replace the large 5V capacitor on almost all the boards I’ve fixed as well as replacing some headers with worn or sanded off plating.

Not saying that the LM323 never go bad but I’ve had more issues with old caps and bad connections (including cold/cracked solder joints) than anything else. Also an occasional bad diode on a coil. I’d check all these first before the regulator.

#1358 3 years ago
Quoted from DanMarino:

Thanks emsrph. This is helpful.
I am trying to figure out what is causing the Second Stage Go light to be on constantly on the play field down by the 5 drop targets.
This is my first pinball machine and I am new to reading the wire diagrams. From what I can tell, the Second Stage Go is J2, Pin 5. If I follow that to the light board, it is Q52 and R52 that are controlling the light, is this correct?
If I am understanding PinWiki, then the Q52 is bad, is this correct?
Is there any sort of diagnostic test I can do on the Q52 2NSO60 to make sure this is the problem?
Next, how difficult is this for me to replace? I'm guessing the light board needs to be removed from the machine, then a soldering iron used to remove the Q52 2NS060 and install a new one? This sounds kinda fun and a little scary. haha. Does Great Plains Electronics sell them?
Thanks a bunch.
Tom[quoted image][quoted image]

That is probably one of the easiest repairs to start with. If you have a Digital volt meter with a diode test you can pretty quickly verify one of them failed shorted.

If you know it if bad cut off the body of the part or bend it back and forth to break it off. Then warm up the solder and pull out each pin. Some good quality solder wick will remove the excess solder. If you don't currently have solder make sure you get regular solder with a rosin type flux or similar. Avoid any acid based solder and aldo avoid the newer ROHS solder as that is awful.

1 month later
#1430 3 years ago
Quoted from DanMarino:

Congruatulations! Excellent find! Had mine for a couple of months now and it always has something wrong with it. Continuous problems. This is my first pinball machine, so maybe all machines are like this one? It's fun if it works right. My machine has never been 100% fully working. Your playfield looks pretty nice! I dig it.

What issues and what has been done? Does it have the original boards? If you haven't done so there are updates to the driver that add three jumpers on the back to ensure you have solid power for the game. That and replace the large 5V capacitor if original. I did notice on my flight 2000 that the .100" connector pins were brittle and some switched stopped registering after unplugging and plugging in a connector to test another board. One of the pins broke. Had to put on fresh pins, etc. Once you work out the bugs it should be fine.

4 weeks later
#1540 2 years ago

Can someone snap a picture of the trough switches and diodes? I want to confirm the way the diodes are installed.

#1541 2 years ago

Could also use reference photos of the two switches for the ball walker assembly.

#1544 2 years ago
Quoted from chas10e:

I happen to have my playfield inverted so easy pics

hope they help

These did help. Thank you! Someone had a switch wired wrong with the wire on the wrong side of the diode. The diode was completely out of the circuit. All fixed now.

3 weeks later
#1582 2 years ago

Anyone in need of the large drop target assembly? I have a whole assembly that includes an extra new coil to reset the bank and a full drop target set. I also have a very clean MPU-200 with NVRAM already installed. It was working well but just had as a backup for my Flight 2000. Won't need either of these. Just send a PM if you're interested.

5 months later
#1706 2 years ago
Quoted from A1k71:

Today issue:
Displays are showing random numbers, but in test mode and while playing a game all is correct.
Also game is set to give an extra ball at 500K 1M and when beat the record, but is not doing it.
Any ideas??
[quoted image]

As mentioned there could be random garbage stored in th battery backed RAM. Should try resetting each of those settings. If the problem persists then will need to do some troubleshooting.

I’d start with the basics. How is the power and voltages? Is the driver board original and has the driver board been gone over? Typically the main 5V capacitor will need to be replaced as well as a few ground mods to the driver and a 5V jumper. Once gone through the original boards are great. Next I would check the MPU. Maybe a failing PIA or RAM chip.

It can all be fixed and once you work the bugs out they can play well for quite a while.

#1708 2 years ago
Quoted from A1k71:

Just replaced the rectifier board by a technician and this issue started appearing

That board is responsible for some but not all of the voltages. Some are done on the driver. Was it replaced with another used board or new one? There are several new replacement options. Some are better than others but most should work fine in that game. That particular board is often burned up on many machines and getting an aftermarket is usually the best for that one. I usually prefer original boards for the rest. If the displays stopped working after replacing that board did they double check their work and verify all the voltages are correct?

Another thought is if the battery is going bad on the MPU or if it has a small memory cap and game was off too long you can lose the settings and get garbage data in there. A picture of the MPU will help.

#1711 2 years ago
Quoted from A1k71:

here are the pics all all the boards:[quoted image][quoted image][quoted image]

Your driver should be fine but on the MPU I see a couple issues:

- One of the EPROM chips is uncovered. They should always be covered as too much exposure to light can start to erase the data on them. If even one bit flips in the wrong spot it can make the game act weird or not work at all. I’d want to verify ROM chips are all ok.

- The big one is the 6810 RAM chip. That is the AMI brand and many of those are known to fail. I’d pull it, test it, and probably replace it even if it checks ok since there have been many failures of AMI chips in the past.

The MPU his the correct MPU-200 for your machine. With the sticker it looks like it may have been in a Big Game at one time. Also looks like one PIA chip was replaced. When I get in one of those boards for repairs I always pull those and test them and if ok put them back in and test again in the board.

1 month later
#1723 2 years ago
Quoted from swillie:

I have fixed a long hated problem with my F2K, what I call faultiball. Occasionally the ball walker would randomly advance a locked ball/balls which would result in two balls in play and once one dropped out it would advance to next ball or player while another ball was still in play. Drove me crazy. Anyway i dropped the top rollover switch at the entrance to the ball walker to inspect. The heavier metal blade separating the leaf switches was bent down almost touching the blade the rollover moves. Also the wires for the resistor and capacitor on the switch were crossed over each other as to almost be touching as well. I moved those wires apart and reshaped the switch leafs apart from each other to what seemed appropriate. Now after thorough testing the walker mech is behaving perfectly. Finally!!

Good find! On my Flight 2000 I found someone had replaced a switch on the walker and even though it had a diode on the new switch they had soldered to the wrong terminals bypassing the diode. Corrected that gremlin before selling it.

Promoted items from Pinside Marketplace and Pinside Shops!
From: $ 115.00
Playfield - Protection
Beehive Pinball Co.
 
From: £ 110.00
$ 12.00
Playfield - Toys/Add-ons
UpKick Pinball
 
Wanted
Machine - Wanted
Melbourne Beach, FL
$ 125.00
$ 69.00
$ 10.00
$ 3.00
Cabinet Parts
20eyes
 
From: $ 14.00
Electronics
Third Coast Pinball
 
$ 20.00
Playfield - Protection
arcade-cabinets.com
 
$ 149.95
Boards
Allteksystems
 
Wanted
Machine - Wanted
Crown Point, IN
From: $ 150.00
Hey modders!
Your shop name here

You're currently viewing posts by Pinsider robotworkshop.
Click here to go back to viewing the entire thread.

Reply

Wanna join the discussion? Please sign in to reply to this topic.

Hey there! Welcome to Pinside!

Donate to Pinside

Great to see you're enjoying Pinside! Did you know Pinside is able to run without any 3rd-party banners or ads, thanks to the support from our visitors? Please consider a donation to Pinside and get anext to your username to show for it! Or better yet, subscribe to Pinside+!


This page was printed from https://pinside.com/pinball/forum/topic/flight-2000-club-members-and-fans-welcome?tu=robotworkshop and we tried optimising it for printing. Some page elements may have been deliberately hidden.

Scan the QR code on the left to jump to the URL this document was printed from.