(Topic ID: 124724)
Linked Games
 Flight 2000
Stern Electronics, 1980
Flight 2000
Stern Electronics, 1980
Topic Gallery
 Mount Washington, KY
Does anyone have a F2k playfield they want to sell? Doesn’t have to be nos or CPR. It could be, but I’m mainly looking for one that’s in decent shape for a decent price.
Quoted from Tomass:Anyone know which machine this should be on?
[quoted image][quoted image]
im 99% sure its Stellar Wars that those spinners came off of They look good on F2k too!
Quoted from pinplayerinva:im 99% sure its Stellar Wars that those spinners came off of They look good on F2k too!
Yeah, I though that it was the correct spinner till I saw others.
1 week later
Quoted from RustyLizard:projects
Doesn't look like much of a project to me!
![]()
Quoted from mof:Doesn't look like much of a project to me!
In storage for 20 some years.
1 month later
Id like to protect the play field and resolve some cupped inserts on mine. Preferably without having to strip it all down and putting auto clear coat on it. Has anyone seen a play field protector for this game?
Quoted from fissionch1ps:Id like to protect the play field and resolve some cupped inserts on mine. Preferably without having to strip it all down and putting auto clear coat on it. Has anyone seen a play field protector for this game?
You will have to make your own. If you are handy with some basic tools, it is not all that hard to do.
Here is a link that is good reading. Pretty much everything you need to know is in this link.
https://pinside.com/pinball/forum/topic/i-made-a-playfield-protector-self-evaulation#post-4627717
Quoted from cottonm4:You will have to make your own. If you are handy with some basic tools, it is not all that hard to do.
Here is a link that is good reading. Pretty much everything you need to know is in this link.
https://pinside.com/pinball/forum/topic/i-made-a-playfield-protector-self-evaulation#post-4627717
Thanks for the reply and the link. The back glass on my game is good and i'd like to keep it that way. I'm moving to LEDs to lower the heat, but i'd also like to seal the back side of the pane over the paint. I'd hate to mess it up with the wrong sealer/solvent. Has anyone done this?
Quoted from fissionch1ps:Thanks for the reply and the link. The back glass on my game is good and i'd like to keep it that way. I'm moving to LEDs to lower the heat, but i'd also like to seal the back side of the pane over the paint. I'd hate to mess it up with the wrong sealer/solvent. Has anyone done this?
I sealed mine with Krylon Triple Thick. Works well. You can LED of course, but in a home enviro where the game is likely not on 12hrs each day you could also consider replacing the 44's with 47's. This preserves the original look of the lighted back glass while at the same time reducing heat / power consumption.
I’m thinking about replacing all of the inserts I can in my machine. Has anyone done this? Any tips?
Quoted from fissionch1ps:I’m thinking about replacing all of the inserts I can in my machine. Has anyone done this? Any tips?
Just heat them and remove them. Then sand them flat and smooth and reinstall with epoxy.
Quoted from fissionch1ps:I’m thinking about replacing all of the inserts I can in my machine. Has anyone done this? Any tips?
Vid has a great thread on this - but here is a summarized version. For full deets check out his thread on PF Restorations:
1) Heat of old inserts with a heat gun or hair dryer. Just enough heat to loosen insert. Tap out from bottom using the largest diameter socket that will fit the hole. Set socket in hole and tap out with mallet. If not coming out easy heat it up more.
2) Prep new inserts. rough up edges and make sure you prime them with something to ensure the plastic adheres to the epoxy and wood. Note that most inserts were made to be installed then sanded down with the PF when it was being manufactured. So check that they are not too thick for direct replacement. if they are then sand them down before installing them.
3) Apply epoxy from the bottom side of pf into the insert hole. Then add insert from the top. Use some wax paper between the pf and a block that you will use to make the insert flush with the PF surface. Clamp them down with a giant ass C clamp that will reach the center of PF. Wait till cured then voila.
High level summary here. But Vid's thread will detail what type of epoxy and primer to use, sandpaper grits. All that jazz.
good luck!
Thanks. With the ones I can’t source I was going to level and smooth with UV resin. Auto clear coat is a bit more than I can get into at the moment. Otherwise, do you know of any sources for Flight’s insert to buy new?
My game has coin door quarter and dollar coin slots. I think the actual coin mech was changed for a token system. Can someone point me in the right direction on how to make the coin receiver/system work again and maybe a line on some coin mechanisms for quarters and dollar coins that would fit this machine?
It could be fun to play around with.
I've finished rebuilding the sound, voice, and solenoid driver so it's running good. Playfield inserts and what to cover it with are my current challenge.
watching this video, I noticed my token mech was converted to accept quarters
another good video:
The images from left to right: a Nickle, Dime, Quarter from Bally EM , Then a plastic token mech but I noticed the coin receiver had been worked then another quarter mech & a SBA (Susan B. Anthony) Dollar mech , it will accept newly minted "Presidential Dollars"
They are all the same frame size
IMG_1683 (resized).JPGIMG_1685 (resized).JPGchas10e thanks for the info. That answers all my questions. I found some coin mech distributors and some older ones on ebay as well. Your machine looks great by the way.
Another general question for you guys. The plastics in my machine are really good with the exception of the inlane guides. They're both missing portions by the post nearest the flipper. The game is still playable like this as long as the flippers are used to nudge the ball out.
I see that places sell the entire playfield plastics for about $200, which is more than I will pay for this. I haven't seen these pop up for sale separately. Does anyone know of a source to get these inlane plastics?
Short of that, does anyone know where I can get a high-res image of the playfield? I might try my hand at fabricating a pair of these.
Thanks
Quoted from fissionch1ps:chas10e thanks for the info. That answers all my questions. I found some coin mech distributors and some older ones on ebay as well. Your machine looks great by the way.
Another general question for you guys. The plastics in my machine are really good with the exception of the inlane guides. They're both missing portions by the post nearest the flipper. The game is still playable like this as long as the flippers are used to nudge the ball out.
I see that places sell the entire playfield plastics for about $200, which is more than I will pay for this. I haven't seen these pop up for sale separately. Does anyone know of a source to get these inlane plastics?
Short of that, does anyone know where I can get a high-res image of the playfield? I might try my hand at fabricating a pair of these.
Thanks
You could make clear ones easily out of Lexan. Sorry I can’t be if more help
Quoted from chubtoad13:The bar that resets the large drop target bank just broke in my F2k. Before I have it welded, does anyone know where I can get another?
[quoted image][quoted image]
A weld shop will know what to do, most likely. But it would be better if you could find a sheet metal shop to bend you a new one---if the price would be reasonable.
Quoted from chubtoad13:The bar that resets the large drop target bank just broke in my F2k. Before I have it welded, does anyone know where I can get another?
I'd throw a line out on the classifieds.
If the clearance works, you could try to fab a small steel bracket with a hinge opening and bolt it on with two countersunk screws.
You should be able to make it with just a drill and an angle grinder.
I will most likely have one fabricated when I swap the playfield. But for now it is welded back together.
Luckily I have access to a weld shop and tool makers at work.
 Laval, QC
1 week later
I just picked up a flight 2000 and have parts on the way to get it going again. It looks like there has been previous work done soldering the flipper coils and also the trough switches that looks a little questionable. Does anyone happen to have some good pictures on how the flipper coils are wired and also the trough switches? Once I get the machine setup I want to clean up that wiring and go from there.
Thanks!
Quoted from Robotworkshop:I just picked up a flight 2000 and have parts on the way to get it going again. It looks like there has been previous work done soldering the flipper coils and also the trough switches that looks a little questionable. Does anyone happen to have some good pictures on how the flipper coils are wired and also the trough switches? Once I get the machine setup I want to clean up that wiring and go from there.
Thanks!
I have full teardown pics. I should be able to get them off my computer tonight.
Quoted from Tomass:I have full teardown pics. I should be able to get them off my computer tonight.
I'm in a bit of trouble my self having lost the 100's of picts i took of mine, before a complete tear down. now im looking at all these parts wondering ware they go. any help would be greatly appreciated
Quoted from Robotworkshop:I just picked up a flight 2000 and have parts on the way to get it going again. It looks like there has been previous work done soldering the flipper coils and also the trough switches that looks a little questionable. Does anyone happen to have some good pictures on how the flipper coils are wired and also the trough switches? Once I get the machine setup I want to clean up that wiring and go from there.
Thanks!
F2K is a two flipper pin. Flipper wiring is easy. This is the left hand flipper. The blue/white wire is the power wire that comes from the rectifier board. You will pick it up at the 1 amp slow blo fuse under the play field. The green "trip" wire originates from your left flipper button and travels to the SDB relay. From the SBD, the green wire travels to your flipper coil. The two orange wires are jumper wires; For practical purposes, they can be any color you want them to be.
The right hand flipper will wire the same way except the green wire has been replaced by an orange wire that travels from your right flipper button, to the SBD relay, then from the SBD to the flipper coil. If your jumper wires are orange then the right hand flipper will have 3 orange wires.
Flipper coils can be installed in two positions. If your solder lugs are reversed from what is shown in the pic, then your wire positions will be reversed. Don't solder them up backwards.
This pic is showing a Meteor left hand flipper, but the Stern two-flipper pins are all the same.
Got an extra powered sub laying around and was wondering if anybody has used one on their f2k and if it's worth the effort.
I've got my Gotg pro hooked up to sound system with sub and it sounds awesome. Would like to try on my f2k.
Quoted from Robotworkshop:I just picked up a flight 2000 and have parts on the way to get it going again. It looks like there has been previous work done soldering the flipper coils and also the trough switches that looks a little questionable. Does anyone happen to have some good pictures on how the flipper coils are wired and also the trough switches? Once I get the machine setup I want to clean up that wiring and go from there.
Thanks!
Here are a few pics...
Trough switches
Left flipper
Right flipper
Hope this helps, shout if you need any other pics and I will do what I can.
IMG_5062 (resized).JPGIMG_5065 (resized).JPGIMG_5068 (resized).JPGGot around to the haggard coin door last week. Used rustoleum hammered antique pewter. It’s a couple shades darker but looks similar to the old textured silver that was on it. One of these days I’ll lay it up and do the legs the same.
A8D026DA-3ABD-4C8C-B811-32CD6DD5E2EC (resized).jpegC9FA139C-FC04-4296-9596-4614C83A9EE3 (resized).jpegQuoted from fissionch1ps:I got some CPR plastics in for my F2K. The original plastics have these riveted posts on them. The Repos dont. Any of you have experience finding the part to fit these? Thanks!
[quoted image]
Use a solder iron to heat up the metal bell, pull out of old plastic to remove... heat and press / shimmy them into place into the new plastic
... That’s how I did the ones on my Gamatron and paragon anyways, it worked pretty well
member @nicovolta had some made. I hadn't tried them as of yet though
https://pinside.com/pinball/forum/topic/need-new-metal-standoffs-under-your-em-plastics#post-
4178422
This is a surprisingly hot button issue. I've found this as well:
https://web.archive.org/web/20160320050407/https://classicplayfields.com/f2khelp.html
Quoted from Chosen_S:Use a solder iron to heat up the metal bell, pull out of old plastic to remove... heat and press / shimmy them into place into the new plastic
... That’s how I did the ones on my Gamatron and paragon anyways, it worked pretty well
I'm worried about cooking the artwork with this method. This is great for the clears.
Quoted from chas10e:member @nicovolta had some made. I hadn't tried them as of yet though
https://pinside.com/pinball/forum/topic/need-new-metal-standoffs-under-your-em-plastics#post-
4178422
Thanks for the tip! I contacted him.
I dont think you need to use heat to reinstall - provided you restraighten the top collar with pliers before hand. The screw will bevel out the top again when you install onto the pf. If you leave the top flared out they will not go in clean and then you have to heat them up to soften plastic.
Yep got a few more if anyone needs some.
As pictured, those are the fatties. The skinny ones have a slightly smaller diameter. Also have the tall double-height ones which are about 30mm high.
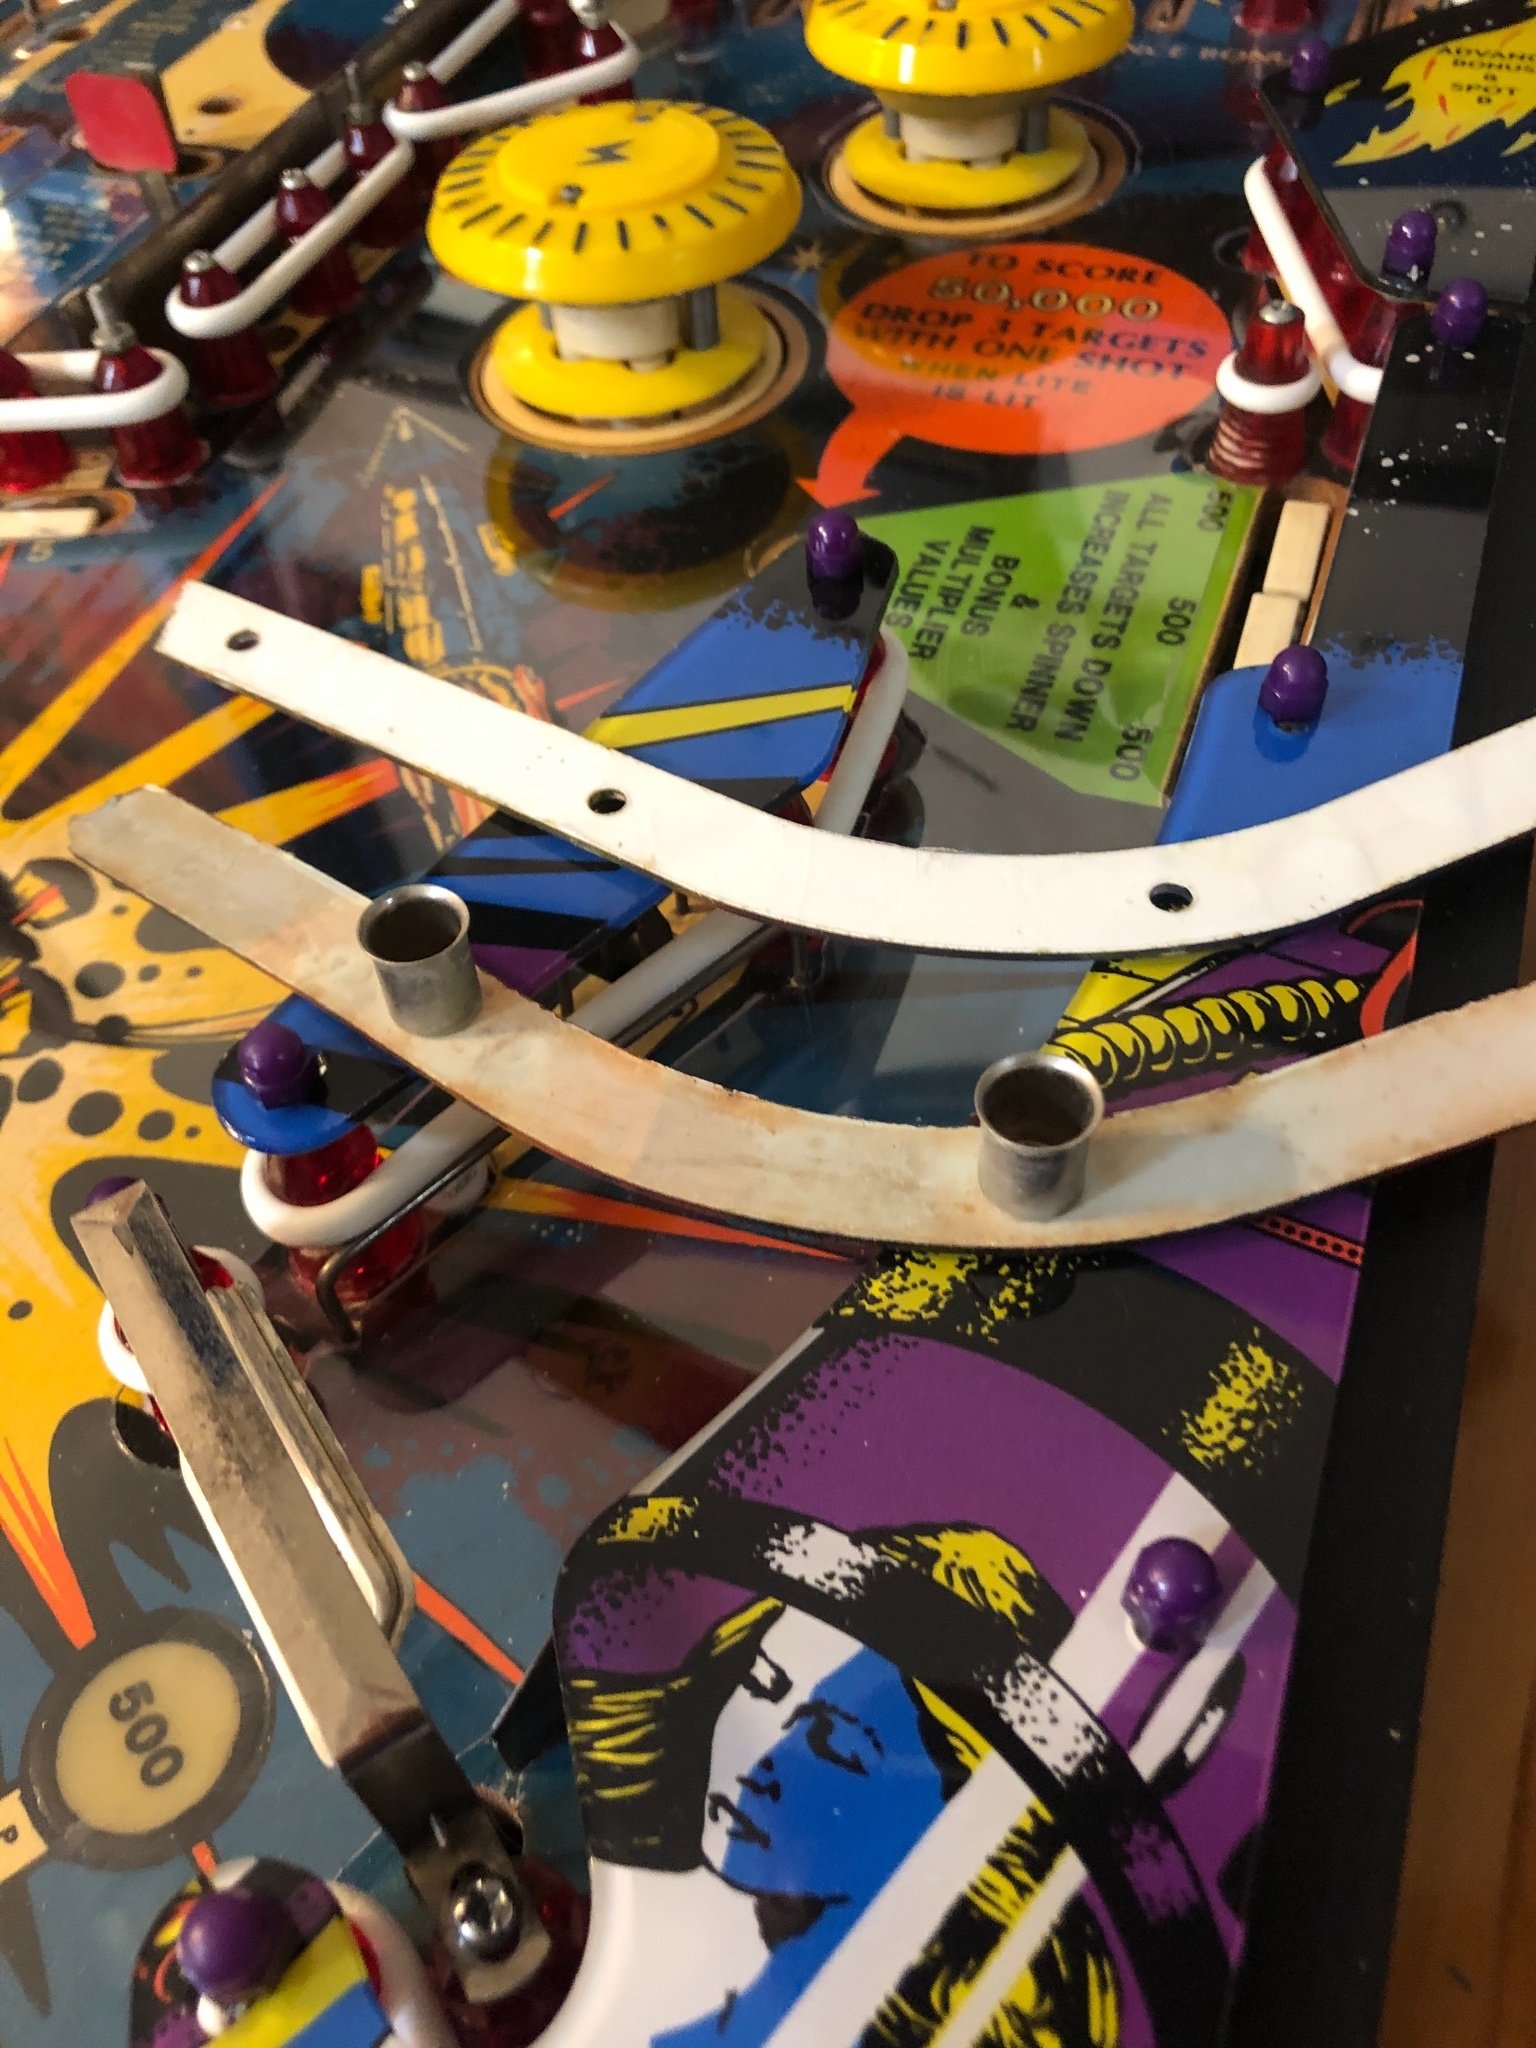
What’s with the post right above the top drop target?
https://images.pinside.com/7/97/797b71332eef1a46e1f55ed7313c464730456180/resized/large/797b71332eef1a46e1f55ed7313c464730456180.jpeg
pasted_image (resized).jpegQuoted from Xtraball:What’s with the post right above the top drop target?
Good question. It's not on the manual's layout. Ghosts of the games past. Maybe some cover up because there are 2 screw holes under it. It used to be on route somewhere in Ohio. I bought it off a guy who had it sitting in his garage for 12 years. It doesn't bother me much, but if it starts to i'll probably pull the post, fill, sand and paint.
Quoted from fissionch1ps:This is a surprisingly hot button issue. I've found this as well:
https://web.archive.org/web/20160320050407/https://classicplayfields.com/f2khelp.htmlI'm worried about cooking the artwork with this method. This is great for the clears.
Thanks for the tip! I contacted him.
Hmmmmm! I kinda wish I had seen that before, but I can see no heat spots from my work, so I’m good, but I’ll keep this in mind for the next time
Quoted from Chosen_S:Hmmmmm! I kinda wish I had seen that before, but I can see no heat spots from my work, so I’m good, but I’ll keep this in mind for the next time
I went ahead and drilled them out. It took like 5 minutes and didn't damage the plastics. you just have to keep the standoff from spinning.
1 week later
Promoted items from Pinside Marketplace and Pinside Shops!
Reply
Wanna join the discussion? Please sign in to reply to this topic.

Hey there! Welcome to Pinside!
Donate to PinsideGreat to see you're enjoying Pinside! Did you know Pinside is able to run without any 3rd-party banners or ads, thanks to the support from our visitors? Please consider a donation to Pinside and get anext to your username to show for it! Or better yet, subscribe to Pinside+!
