(Topic ID: 14681)

Finished shopping my Rocky & Bullwinkle. It's hella fun.

By RussMyers

12 years ago


Topic Heartbeat

Topic Stats

  • 191 posts
  • 31 Pinsiders participating
  • Latest reply 7 years ago by FirebrandX
  • Topic is favorited by 9 Pinsiders

You

Topic Gallery

View topic image gallery

pinballbombtargets.jpg
bombstickeroriginal.jpg
bombstickeralt.jpg
DEDops3.jpg
DEDops4.jpg
DEDops2.jpg
DEDops.jpg
starpostmod.jpg
nosbullwinkleplastics.jpg
IMG_3667-1024.JPG
IMG_3666-1024.JPG
IMG_3653-1024.JPG
IMG_3652-1024.JPG
DE logo repainted.jpg
Pinball Level Sticker.jpg
Pinball Caution Sticker.jpg
There are 191 posts in this topic. You are on page 2 of 4.
#51 10 years ago

Thankfully I can get the glass channels, rails, and side armor all from the same place here in the States. In other news, I finally heard back from the online dealer in Norway, and they sent me a set of detailed photographs of their return lane ramp. The sucker is in pristine condition! So I ordered it immediately for $50 USD. This means I will have two spare return lane ramps if anyone ends up needing one. They are both intact and in working order, except that since they are used, the metal tongues have rusted spots on them and the air plane decal is worn on both. Maybe I will put up a for-sale thread for them at some point.

At any rate, I'm really stoked. All three plastic ramps will now look show-room quality, and yet I started off with little chance of replacing ANY of them! About the only things left I could replace are the playfield board itself and the pie display. Both are in good condition, but not NOS-quality flawless. I can live with that though.

#52 10 years ago

Just got the LED flashers in the mail today. I installed all 30 of them, and all worked perfectly. I went with FLEX style on the majority of them, which gave me freedom to aim the light output where I needed it on the various flasher inserts. I also used some blue-colored flashers in a few key spots to keep up with my cool-white and blue G.I. combo. They looked stunning when I turned on the diagnostic flasher cycle test.

So this completely finishes off the LED conversion from head to toe. I used almost exclusively cointaker premiums and flashers, except for the pop-bumpers and and overhead ramps lights, which were from Noflix in Germany. Total cost of LED conversion (not counting shipping): $255. This means those pre-packaged LED kits don't save you any money, especially when you consider I used all premiums whenever possible.

Lastly, I placed another order with Marco and Pinrestore to completely finish off replacing the screws, washer, nuts, and spacers with shiny brand new ones. Project log is updated:

http://www.firebrandx.com/downloads/pinballrestorationproject.png

#53 10 years ago

Sounds good Firebrand. We need to see video of this sucker running though. I've replaced most of the inserts with LEDs on mine now but i've still got a few more to do and then I can start on the backbox GI. At the moment the playfield GI is pretty much entirely cool whites but I think i'm going to swap some of those out and use coloured ones at key locations.

Anyway, bits came back from the powder coaters the other day so here's a picture. I think it suits the game quite nicely.

2013-11-07 20.56.09.jpg2013-11-07 20.56.09.jpg

#54 10 years ago

There is one thing I do not like about the post. You used the word "Shopped" this is "Restored". "Shopped" to me means I threw some new rubbers in it and added some LED's and waxed the play field "You should have seen all the dirt". This is sweet! I love what you did and it look so good! I just love seeing a game that someone took to the next step! GREAT JOB!

#55 10 years ago

Nice red scheme there, worm!

BTW, I noticed no score cards in your apron display. I made my own free play card if you want to print it out and use it yourself:

http://www.firebrandx.com/downloads/bullwinklecard.bmp

#56 10 years ago

Thanks Firebrand

It was on my list to do but I hadn't got around to it yet. I want to get some nicely printed and then possibly laminate them too, just to make them a little harder wearing. Like your design as it's nice and clean whereas some of the others i've seen have had really bad lines on them.

Have you got an instruction card too? No problems if not as I think there are some over on Pinball Rebel which I could probably touch up and reprint.

#57 10 years ago

I still have the original instruction card, but even those are of poor print quality. I'm thinking of redesigning a new one, probably in color too.

#58 10 years ago

If you do then i'd love to see your finished work (and by that I mean shamelessly steal a copy and put it on my Pin too).

A question then for the group.

Anyone have any idea what the small post to the right of the shooter lane is? I just refitted a shooter cover plastic on mine (home-made repro using a scan from my broken one) and once fitted I noticed the post and wondered what it's purpose was.

Any clues?

#59 10 years ago

The one on the metal plate? My guess is these shooter lanes were universal, so some games may have used that post to attach plastic art too possibly.

#60 10 years ago

Firebrandx you just need to sell yours to me. I'll be coming threw before Thanksgiving heading to Lewisville. I will have my trailer picking up a TOM and SWE1. I am sure there will be room.

#61 10 years ago

LOL. I've spent too much money restoring it at this point to even come close to breaking even. But I understood that going in. This was to be my introduction to pinball and restoration as I've never owned one before. I have plenty of experience with arcade machines, so I wasn't completely clueless, but honestly the trick is to just do a lot of research and get your hands dirty.

Edit: I also need to mention I found that replacing the 2 1/4 inch hex spacer holding up the return ramp with a 2 1/2 inch version seemed to improve the alignment of the ramp. With the shorter post, the underneath of the ramp was touching the WABAC ramp right where the decal is worn. Now they do not touch, and this will help protect the new ramp when I get it in the mail. Speaking of which, I heard back from Norway that my return ramp has been shipped. When it arrives, that will give me an excuse to swap out the pop-bumpers with the new parts sitting on my shelf. The old ones work perfectly fine, but putting in pristine new ones is all part of my effort to make it showroom quality. Here's a pic of the ramp coming in the mail (click on the image to zoom in):

bullwinklereturnramp.jpgbullwinklereturnramp.jpg

#62 10 years ago

Seems we're both working to the same target Firebrand. I'm also trying to get mine to pristine condition but it's going to be a tall order because the back end of my cabinet is in terrible condition.

I stripped the visible bolts from mine last night and have taken some time to clean them before applying two coats of undercoat and some black satin paint. Should look much nicer against the red rails when I refit things.

Making slow progress and still a way to go, but half the fun of this is that it's a long-term project which I can do little bits on as and when I get the time.

#63 10 years ago

Well the wood is at least something you can restore without unique parts if you're willing build a new box. I'm considering rebuilding the entire cabinet with better quality wood on mine once I scan in all the artwork. Then I'm going to have laminated stickers made to scale with the artwork printed on them that can be applied to the cabinet.

#64 10 years ago
Quoted from FirebrandX:

Well the wood is at least something you can restore without unique parts if you're willing build a new box. I'm considering rebuilding the entire cabinet with better quality wood on mine once I scan in all the artwork. Then I'm going to have laminated stickers made to scale with the artwork printed on them that can be applied to the cabinet.

All ready working on creating the cabinet for some DE games. Let me know how many people would be interested in them. Right now we are going to be making cabs for,

Rocky & Bullwinkle
Tales from the Crypt
Jurassic Park
Star Wars

#65 10 years ago
Quoted from Pinballfantexas:

All ready working on creating the cabinet for some DE games. Let me know how many people would be interested in them. Right now we are going to be making cabs for,
Rocky & Bullwinkle
Tales from the Crypt
Jurassic Park
Star Wars

Fantastic! If the price is reasonable, I'm in for an R&B cab as that will save me a lot of time and effort.

#66 10 years ago

Anyone successfully touched up Bullwinkle's nose on the bg?

#67 10 years ago

DE games don't get the love like other games out there and these are titles we are restoring so if I can help fellow collectors out there why not. Price I'm not sure of because this a first but we will keep it reasonable.

#68 10 years ago
Quoted from Erik:

Anyone successfully touched up Bullwinkle's nose on the bg?

That is one thing that I will need done too.

#69 10 years ago
Quoted from Pinballfantexas:

That is one thing that I will need done too.

Yep. I've got two different backglasses, and both have damage to the nose. Putting a little square of self-adhesive felt padding on the screw head prevents this kind of damage, but you'd be hard-pressed to find a glass that isn't already ruined from it.

#70 10 years ago

Not a fix as such but something you can do to prevent the nose problem from getting any worse or re-occurring.

http://rgparchive-removed.com/rgpforum/showthread.php?t=153257

I'd love a new cab for my R&B but being in the UK I suspect the shipping would make it very expensive. I was actually planning on doing my own cabinet scan at some point. If someone else can either provide the artwork or a set of decals for me to apply to my own cabinet then i'd sure be interested. That way I could at least strip the contents of the cab, fill the dings, sand it and then repaint and re-decal.

Not quite as good as the original screen printed cab but a close second place in my view.

Has anyone here got any clue where I can get a new button housing for the Boris Button from? Mine is beaten to hell but it's looking like it's another 'unobtainium' part. This is what i'm after: http://www.marcospecialties.com/pinball-parts/545-5285-03

Thanks in advance.

#71 10 years ago
Quoted from wiredworm:

That way I could at least strip the contents of the cab, fill the dings, sand it and then repaint and re-decal.

We figured its better to have a great decal then a destroyed DE cab.

Quoted from wiredworm:

Has anyone here got any clue where I can get a new button housing for the Boris Button from? Mine is beaten to hell but it's looking like it's another 'unobtainium' part. This is what i'm after: http://www.marcospecialties.com/pinball-parts/545-5285-03

This part I always find missing on a lot of them out there and I have to say the operators with this game get really creative when replacing it. Pinballcenter.eu was the last place I saw it in stock keep an eye out they pop up time all over the place.

http://www.pinballcenter.eu/catalog/pushbutton-housing-data-east-500581500-p-3994.html?language=english

#72 10 years ago

Yep, that one at Pinball Center was actually in stock just 2 days ago.

Went back today to grab it - gone!!!

I'll keep an eye out over the next few weeks and fingers crossed I can track one down.

#73 10 years ago
Quoted from Pinballfantexas:

We figured its better to have a great decal then a destroyed DE cab.

So are you looking at selling a completed cab or the decals to make our own? Or even better would you consider doing both maybe?

#74 10 years ago

So I got bored and rebuilt the flippers with the kit I had on hand. What's funny is R&B doesn't use half the "default" parts online dealers include with these kits, like EOS switches and those large springs.

Anyway, when I stripped out the old parts, I noticed someone had installed the spring washers on the diode side instead of the coil-stop side. I checked the manual and indeed it shows they should be on the coil-stop side, so I'm going to assume whoever serviced the flippers prior had merely made a mistake.

So now I'm just waiting on the return ramp to get here, and then I will finish off the playfield restoration in one final swoop.

Edit:

I said "screw it" and when ahead and rebuilt all 3 pop-bumpers. Actually rebuilding them with new parts was easy, but getting everything stripped off the playfield to get to them was a major pain in the ass. I did take the opportunity to replace all the microswitch screws with new ones while I was stripping off parts. At any rate, start-to-finish took 5 hours and I'm beat. Now the new ramp will be a simple swap out when that arrives.

Finally nearing the end of the internal restoration:

http://www.firebrandx.com/downloads/pinballrestorationproject.png

#75 10 years ago

Couple of pro-tips after my experience with rebuilding/replacing the pop-bumpers:

1. Replace EVERYTHING you can. This includes the coil sleeves, but keep the coils if they are still working properly. I originally had attempted to clean the black sooty crap off the original sleeves, but for 50-cents a pop, I realized to just toss the old ones and use new ones from Marco. They are the 1-11/16ths sleeve FYI.

2. If the rods are old and crusty, it can be difficult to pull them free of the yokes. I found using a pair of pliers and applying pressure to the edge of the yokes and the tip of the rods causes them to pop loose much easier. Here again, everything should be replaced with new parts, including both metal and fiber yoke parts.

3. You'll have no choice but to unsolder and re-solder the lamp socket wires when doing a complete pop-bumper rebuild. I decided this was only going to happen once, so I got some extra wire length and made removable connectors mid-wire after soldering the other ends back in place. This makes it to where I can quickly unhook the pop-bumper lamp sockets next time around without having to do any soldering work.

4. Inspect the switch contacts underneath the spoons (since these are unobtainium at the moment). I used an emery board and gently polished off the black carbon off the contact heads. My pop-bumpers now react quickly and violently to any nudge by the skirt. That's what you want!

#76 10 years ago
Quoted from FirebrandX:

4. Inspect the switch contacts underneath the spoons (since these are unobtainium at the moment). I used an emery board and gently polished off the black carbon off the contact heads. My pop-bumpers now react quickly and violently to any nudge by the skirt. That's what you want!

OK, just wanted to throw this out there. You really have to be careful when you clean low-voltage leaf switch contacts because most of them are gold-flashed. That means any abrasive cleaning method (like emery paper) can permanently sand off the gold-flashing, leaving those contacts prone to oxidize and corrode.

The best cleaning method is rough paper (like a business card) and a little alcohol, or similar.

Abrasive cleaning methods should only be used on high-voltage tungsten switch buttons (like older-style flipper EOS switches).

RussMyers

#77 10 years ago

That's why I was careful. The only thing that came off was black soot, and it was shiny gold underneath. Obviously I did it right because all 3 bumpers worked splendidly.

#78 10 years ago

BTW digging through the virtual "back alleys" of online dealer sites, I found something that will be a VERY nice part to replace for those that could use it like myself. If it turns out to be the correct part, I'll post the link here after I buy one.

#79 10 years ago

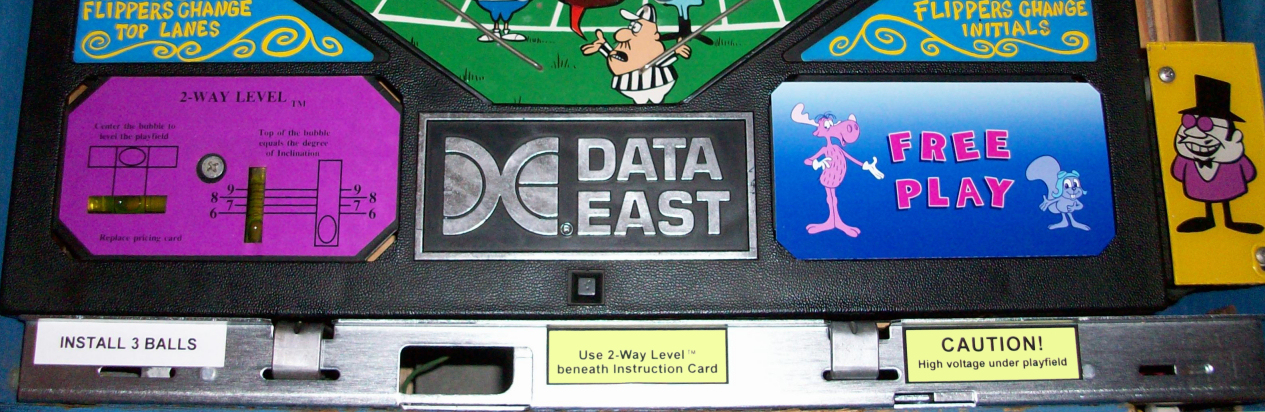
Unfortunately, the part didn't pan out. It was a DE apron, but one had no kickback hole and the other had the hole on the wrong side. I suppose the one without a hole could be modified, but I'm going to try just using a chrome paint pen to touch up the Data East logo, which is the only reason I'd want to replace the apron anyway.

In other news, the return ramp arrived from Norway and I'm thrilled with it. Zero micro cracks around the rivets, and all the tongues and tabs are shiny new looking. The decal is also fully intact and vibrant. This now makes all 3 ramps in beautiful condition. That reminds me about a pro-tip: A poorly adjusted ramp divider arm will damage the return ramp over time. The two old return ramps I have (my original and the crappy one sent from Bulgaria) both have deep groove marks from repeated hits taken from the divider arm swinging open and smacking the plastic at the corner of the curved plate. The trick to prevent this is to reposition the linkage arm setting until the coil cannot pull the arm open wide enough to make contact with the plastic. I've been doing this as a practice since I got the machine, and naturally I made the same adjustment after putting the new ramp in.

So next up, I removed the current apron and serviced/cleaned all the coils and plungers for the kicker, returner, and launcher. I discovered the plastic striker ring was missing on the returner plate, and there was some rust in a few spots. The coil also had some slight heat damage, and the sleeve was permanently stuck inside it. I went on Marco and found they had every part listed in the entire assembly, so I ordered it all, including a new coil and new sleeves for the other apron coils as well.
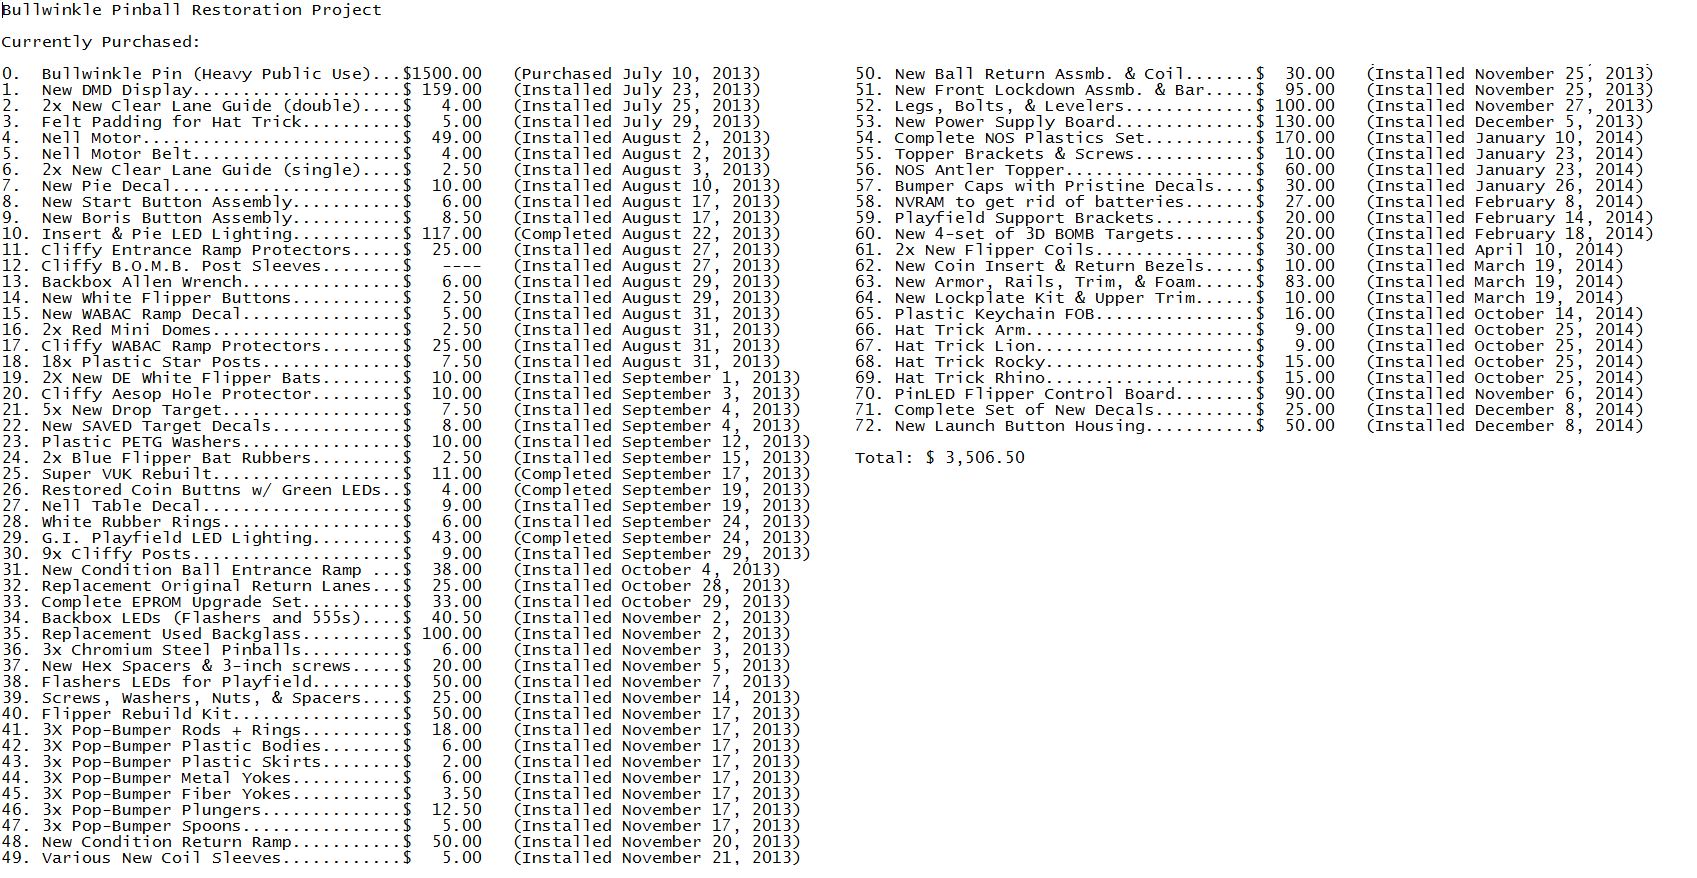
Current progress:
http://www.firebrandx.com/downloads/pinballrestorationproject.png

Edit: Just ordered a brand new complete lockdown receiver and bar assembly from pinball life. On mine, the bar wasn't factory original, and the receiver plate was completely covered in rust (which I had sanded off). Now once I order the side armor from Marco, I'll be pretty much down to restoring the cabinet wood itself as the last job.

Below is a list of what I call "keep dreaming" parts I'd like to get NOS versions of:

1. Long plastic art piece that runs underneath the Nell table.
2. Backglass.
3. Hat Trick target decals.
4. Apron.
5. Playfield board (not paying more than $300 for).

If I had the above, my machine would be in flawless showroom quality condition.

#80 10 years ago

As far as i'm aware you can't get hold of the plastic that runs underneath the nell table. Mine is also cracked and at the moment i'm looking at making my own repro of it.

It's quite a challenge because the size of the piece meant I had to scan it in two parts. It also means it will most likely have to be printed that way so aligning the vinyl onto the lexan is going to be real fun.

Work has kinda ground to a halt on mine of late. Need to get some bits down to the powder coaters for a price and i've still got some insert lamps that need changing over to LED's. At least it's playable in it's current state.

#81 10 years ago
Quoted from wiredworm:

As far as i'm aware you can't get hold of the plastic that runs underneath the nell table. Mine is also cracked and at the moment i'm looking at making my own repro of it.
It's quite a challenge because the size of the piece meant I had to scan it in two parts. It also means it will most likely have to be printed that way so aligning the vinyl onto the lexan is going to be real fun.
Work has kinda ground to a halt on mine of late. Need to get some bits down to the powder coaters for a price and i've still got some insert lamps that need changing over to LED's. At least it's playable in it's current state.

Mine isn't cracked or anything that severe, but I would like a fully intact paint job as mine has some yellow paint worn off in a few places. There is a shop here in the states that prints vinyl directly onto PETG plastics, so I'm considering sending them my scan of the piece (which I also had to do in two parts and splice the images together). Then they would just mail me the reproduction and I would cut the shape of it out of the sheet.

I've also scanned in the backglass in 8 segments, and I'm almost done editing the complete image in my paint program. I figure it might be worth getting a reproduction made of that as well, though I doubt the printing shops can handle printing the mirrored parts, so I may turn those into silver.

#82 10 years ago

Some pics of my latest new parts installation on my Bullwinkle machine. You can see just how much rust can happen from years of kids spilling their sodas on the glass and down into the machine on the old lockdown assembly. Also pictured is the completely rebuilt ball return assembly with all brand new parts and a new coil:

pinballrestorepics-00.jpgpinballrestorepics-00.jpg pinballrestorepics-01.jpgpinballrestorepics-01.jpg pinballrestorepics-02.jpgpinballrestorepics-02.jpg
#83 10 years ago

I just got a really nice R&B, but every time I play it I'll think how inferior it is to yours.

Great work; fun thread to read.

#84 10 years ago
Quoted from jfh:

I just got a really nice R&B, but every time I play it I'll think how inferior it is to yours.
Great work; fun thread to read.

You're probably referring to Russ's machine in the OP, but mine's getting there. After the new side armor and legs arrive, I'll be pretty much down to restoring the wood parts, which I'm considering doing a complete rebuild.

#85 10 years ago

Any tips for restoring the chrome DE logo on the apron?

#86 10 years ago

Nice work.

I reckon i'm going to strip my lockdown bar assembly and get it sand blasted to clean it up some.

#87 10 years ago
Quoted from Erik:

Any tips for restoring the chrome DE logo on the apron?

I'm going to use a chrome paint pen to recolor it, though another option is to buy one of the aprons BAA has and drill a hole for the outlane kicker since the one they have doesn't have a hole (and another they have has the hole on the wrong side).

Be warned though that replacing the apron means replacing the stickers as well, and right now the purple 2-way level sticker that is specific to Bullwinkle is sold out.

#88 10 years ago

Using one of Russ's photos, I attempted to reproduce the lockdown stickers myself using some cheap printer stickers. It seems to work well enough. My apologies for the wall-eye effect going on in the photo. I had zoomed in a little too close and it ended up curving straight edges:

http://www.firebrandx.com/downloads/pinballrestorepics-03.jpg

#89 10 years ago

Looks good Firebrand.

Don't suppose you fancy sharing the images you printed off for those do you please? I need to do some for my machine once i've got the lockdown cleaned up.

#90 10 years ago

Sure no problem, though the "Install 3 Balls" was just a text print out in Arial.

Pinball Caution Sticker.jpgPinball Caution Sticker.jpg Pinball Level Sticker.jpgPinball Level Sticker.jpg
#91 10 years ago

Thanks

1 week later
#92 10 years ago

I got my Krylon paint pens in the mail today. The "Sun Yellow" pen turned out to be a 100% perfect match for the yellow used in the playfield. I also got the chrome pen and painted out all the blemishes and scratches in the DE logo on the apron (ended up painting the entire logo to make it look nice and even). While not perfect, it was a vast improvement over the old beat-up appearance.

I just wish Krylon made a purple pen so I could do some touch-up work on the last remaining old plastic piece on my Nell table assembly (the others got replaced with NOS parts). I'll have to shop around and see if I can come up with one.

#93 10 years ago

Here's a pic taken with the glass on after the first chrome coat. The logo before the paint job had scratches and flaked spots all over it. You can see that it definitely is looking better.

DE logo repainted.jpgDE logo repainted.jpg
#94 10 years ago

Looks great

#95 10 years ago

So next I'm going to replace the apron screws with news ones. They weren't listed in the manual, so I had to measure them to find out the exact specifications:

#10-24 x 2-1/4 Machine Screw Phillips Flat Head.

#96 10 years ago

Are the ones you've got really dirty Firebrand?

Amazingly on mine they are pretty much pristine condition, but I figure that's because they're usually hidden behind the instruction cards.

#97 10 years ago
Quoted from wiredworm:

Are the ones you've got really dirty Firebrand?
Amazingly on mine they are pretty much pristine condition, but I figure that's because they're usually hidden behind the instruction cards.

Yep, pretty much every metal part was dirty/rusty. That's why I think the machine survived a flood of some sort. These screws are pretty much the last of the metal to be replaced as I've already swapped/buffed all the other nuts & bolts. My next project is to have the original coin door shipped off to be blasted and repainted.

#98 10 years ago

Hey worm, can you tell me the size of the carriage bolts used to secure the side armor? I went to replace the side armor on mine, and I discovered the bolts were rusted beyond all recognition. They in fact disintegrated when I attempted to remove the securing nuts. I want to replace them, but I can't tell what size they are. They look to be maybe 10-24 x 1-1/4 inch, but I need to be certain they are the right size of course.

Also on the apron screws, I found that 2-1/2 inchers will work perfectly fine instead of the 2-1/4, which are harder to find in hardware stores. Theses screws are secured by T-nuts, which allow for the extra 1/4 inch to pass through them.

#99 10 years ago

Is the sawblade supposed to spin during the Nell mode? I haven't noticed it move yet although Nell does.

Also mine is missing the gate and switch over the left orbit so the hat trick diverter never moves If anyone knows where I could find the gate plz tip me off!

#100 10 years ago
Quoted from Erik:

Is the sawblade supposed to spin during the Nell mode? I haven't noticed it move yet although Nell does.
Also mine is missing the gate and switch over the left orbit so the hat trick diverter never moves If anyone knows where I could find the gate plz tip me off!

Mine was missing some of that stuff when I bought it. I fixed it over a year ago, so I have no idea where it was I bought the parts from.

I would check the manual for part numbers and type them into the Marco search bar.. maybe you'll come up with something?

Marco is where I bought all my parts a year ago...

Promoted items from Pinside Marketplace and Pinside Shops!
$ 29.50
From: $ 399.95
Boards
PinSound
 
$ 30.00
Playfield - Other
Filament Printing
 
$ 12.00
Playfield - Toys/Add-ons
UpKick Pinball
 
$ 79.99
Cabinet - Armor And Blades
PinGraffix Pinside Shop
 
$ 18.00
From: $ 0.99
Playfield - Toys/Add-ons
Daddio's 3D Printed Mods
 
$ 14.95
Playfield - Toys/Add-ons
ULEKstore
 
$ 27.95
$ 49.95
Lighting - Led
Mitchell Lighting
 
$ 35.00
Hardware
Filament Printing
 
From: $ 40.00
Lighting - Interactive
Professor Pinball
 
$ 69.99
Playfield - Toys/Add-ons
Daddio's 3D Printed Mods
 
$ 30.00
Playfield - Other
YouBentMyWookie
 
From: $ 9.99
From: $ 10.00
Playfield - Protection
UpKick Pinball
 
$ 65.00
Boards
Pinball Haus
 
$ 18.00
Playfield - Plastics
Pinball Haus
 
There are 191 posts in this topic. You are on page 2 of 4.

Reply

Wanna join the discussion? Please sign in to reply to this topic.

Hey there! Welcome to Pinside!

Donate to Pinside

Great to see you're enjoying Pinside! Did you know Pinside is able to run without any 3rd-party banners or ads, thanks to the support from our visitors? Please consider a donation to Pinside and get anext to your username to show for it! Or better yet, subscribe to Pinside+!


This page was printed from https://pinside.com/pinball/forum/topic/finished-shopping-my-rocky-bullwinkle-its-hella-fun/page/2 and we tried optimising it for printing. Some page elements may have been deliberately hidden.

Scan the QR code on the left to jump to the URL this document was printed from.