(Topic ID: 66172)

F14 Tomcat Owners Club Fans Also Welcome.

By Hellfire

10 years ago


Topic Heartbeat

Topic Stats

  • 5,596 posts
  • 469 Pinsiders participating
  • Latest reply 26 hours ago by pb456
  • Topic is favorited by 205 Pinsiders

You

Linked Games

Topic Gallery

View topic image gallery

pasted_image (resized).png
IMG_5286 (resized).jpeg
20240415_204854.jpg
2024-04-1520.55.50581660535718955564.jpg
IMG_5273 (resized).jpeg
20240412_180621.jpg
IMG_6898 (resized).jpg
IMG_6899 (resized).jpg
F-14 red legs (resized).jpg
pasted_image (resized).png
25 (resized).JPG
image (resized).jpg
pinside.beb8aa6ea670a2343b9c15463e46ada2dea4ae8f.jpg
20240323_184048.jpg

Topic index (key posts)

19 key posts have been marked in this topic, showing the first 10 items.

Display key post list sorted by: Post date | Keypost summary | User name

Post #91 Insert color list Posted by jodini (10 years ago)

Post #98 Video - Add red flashers back to light show. Posted by Patofnaud (10 years ago)

Post #163 Technical Sheet - Matrix, etc. Posted by Snux (10 years ago)

Post #205 Speaker Panel - Early model= glue Posted by IceCreamMan (10 years ago)

Post #406 Pop bumper cap replacement. Posted by Fifty (9 years ago)

Post #466 Bulletproof - rectifier fuses Posted by Snux (9 years ago)

Post #477 Removing warming resistors Posted by Jumping-Box (9 years ago)

Post #513 Cliffy Flipper Frames Posted by Xenon75 (9 years ago)

Post #569 How to increase Bonus Posted by wayout440 (9 years ago)

Post #747 Pinball Cards Posted by agodfrey (9 years ago)


Topic indices are generated from key posts and maintained by Pinside Editors. For more information, or to become an editor yourself read this post!

You're currently viewing posts by Pinsider averell.
Click here to go back to viewing the entire thread.

#930 9 years ago

Hello,

I'm Averell from germany and I own a F-14 Tomcat, too.
Actually I try my best to recreate this great pinball machine.

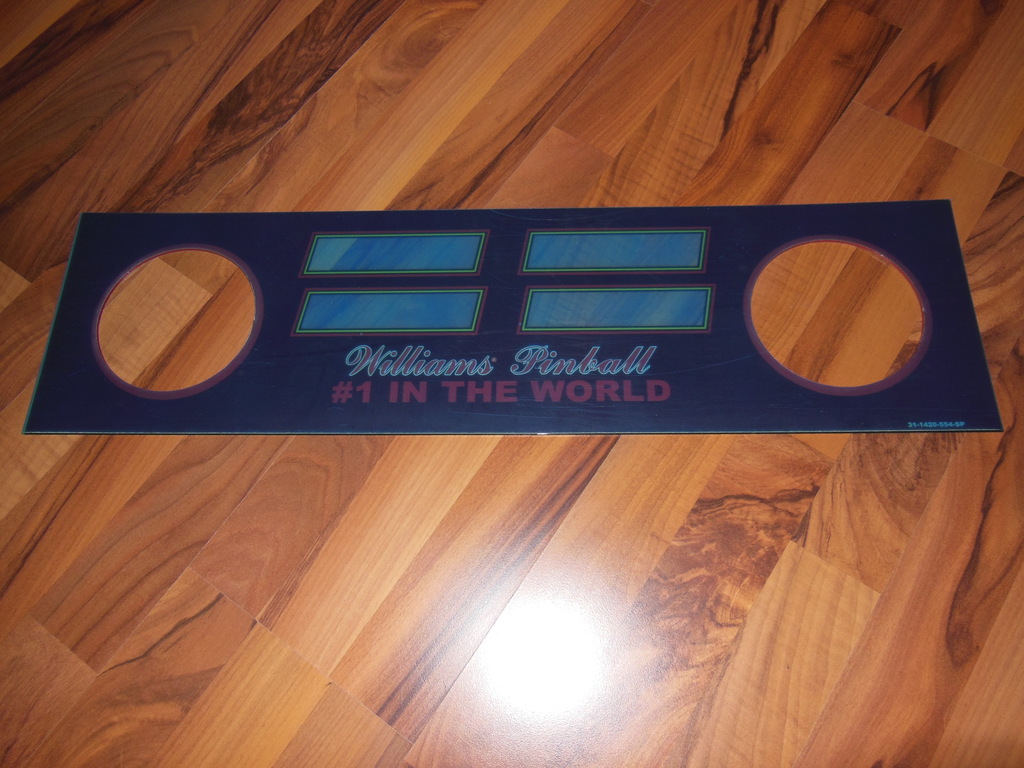
The first new part was a new speaker panel.

http://abload.de/img/dscn0784yarwf.jpg

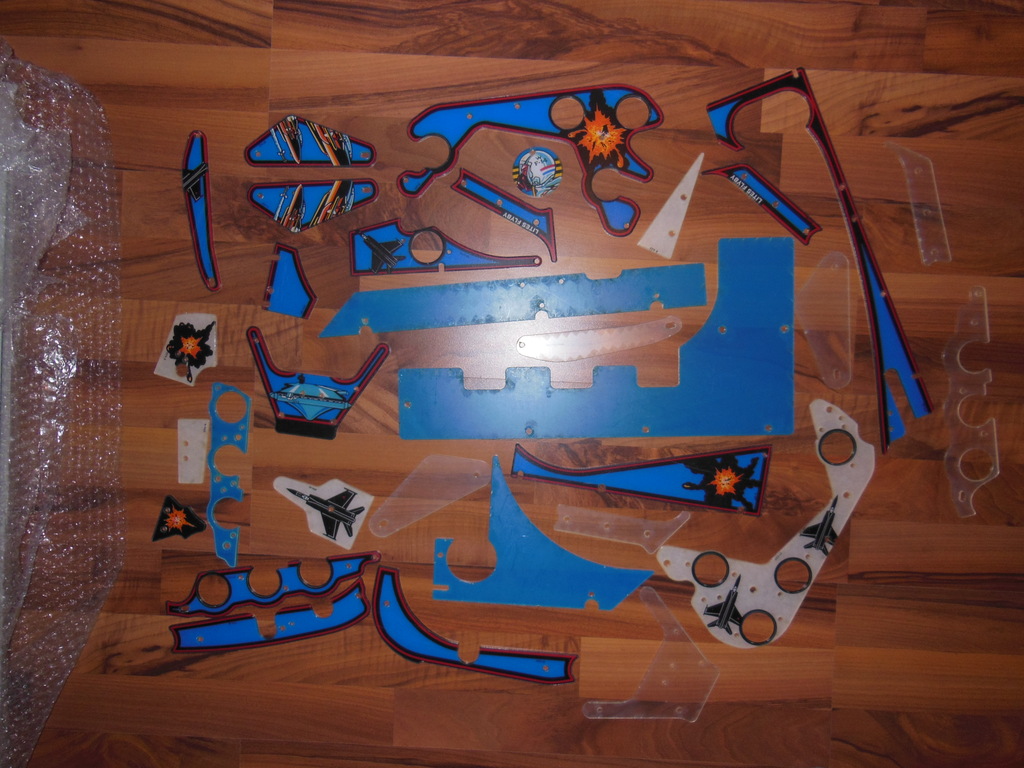
Here is the last available set of plastics in europe - I got it from a dealer in france and it really was the last set in stock.

http://abload.de/img/dscn0850tzdut.jpg

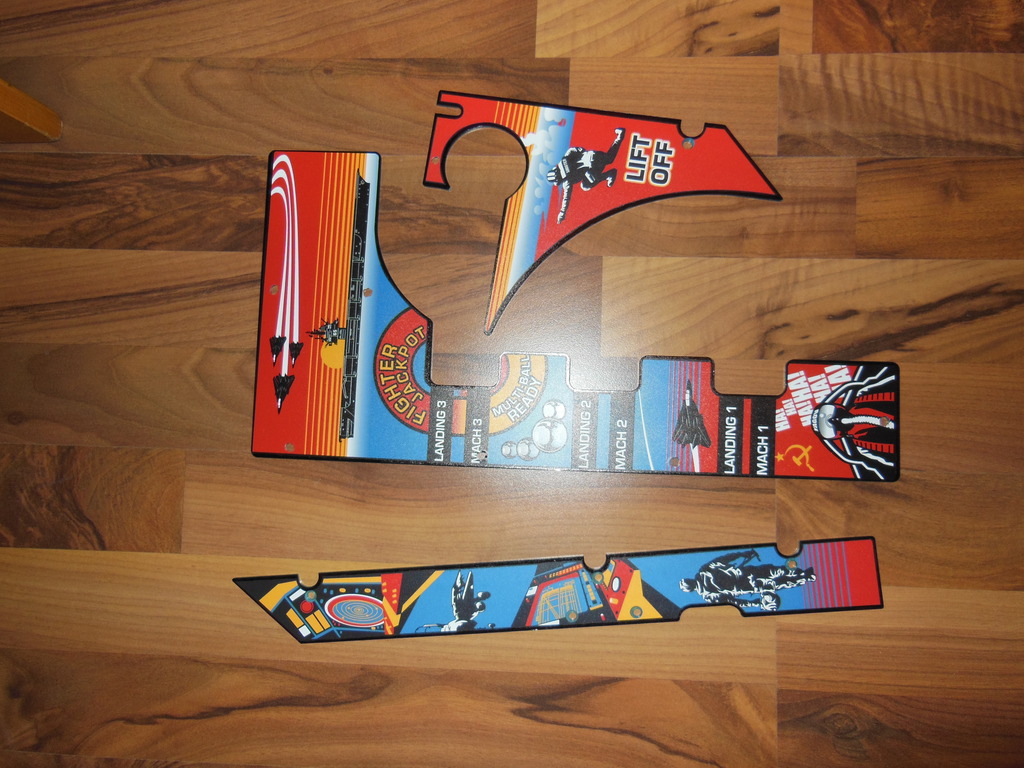
The clear plastics now look like this - a great job from a guy here in this community - I just changed the color on the edge of the decals.

http://abload.de/img/dscn0854pck9u.jpg

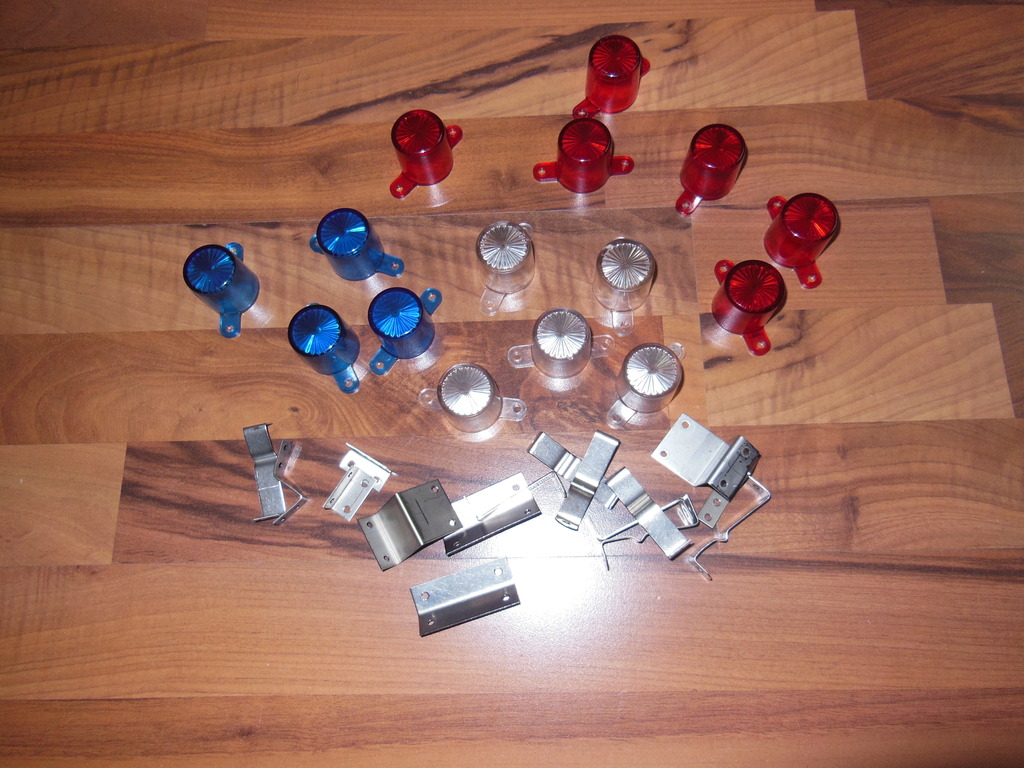
Here the cleaned lightcabs and holders.

http://abload.de/img/dscn1047vsoxn.jpg

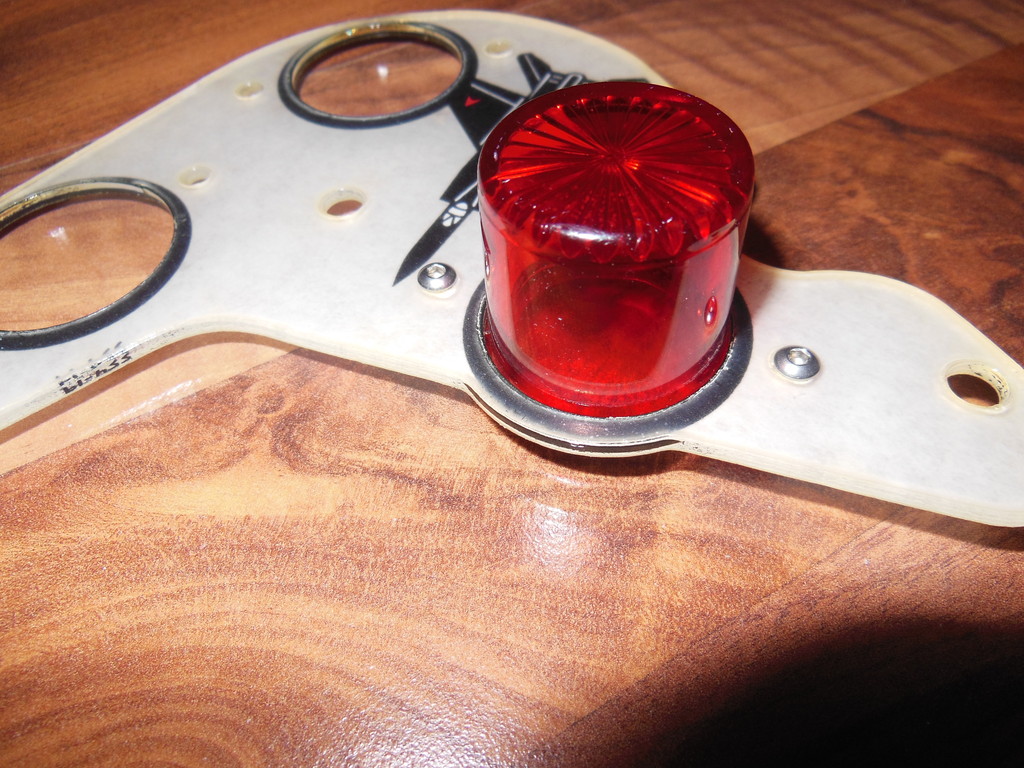
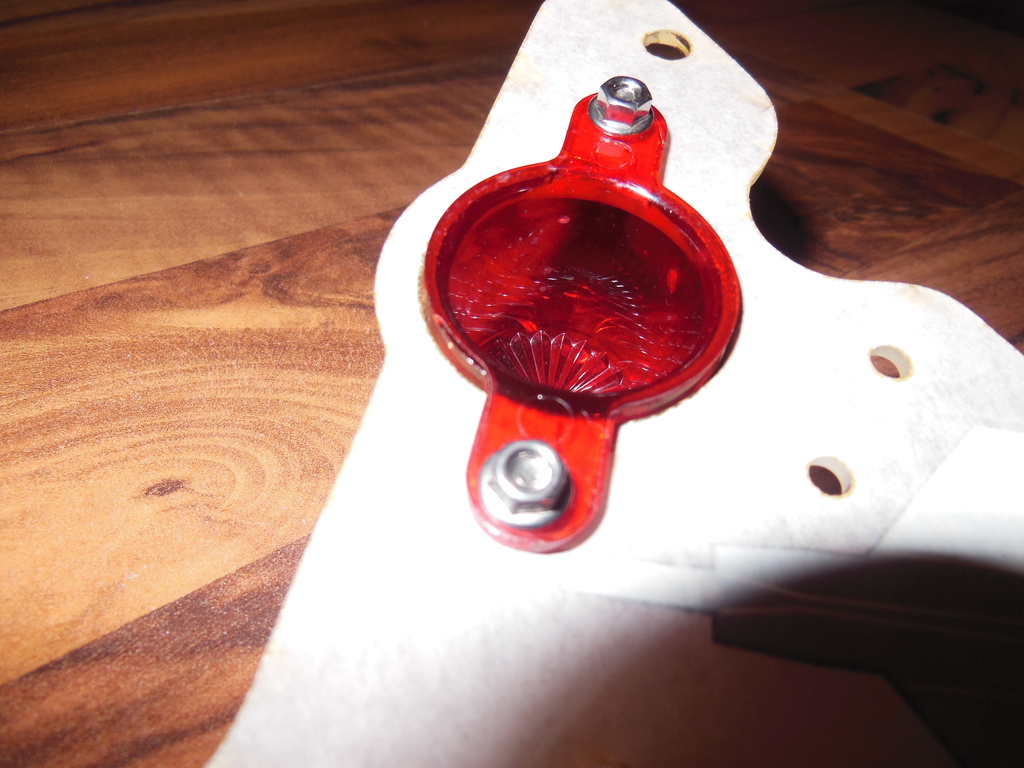
The cabs and plastics itself will bei screwed, not clinched.

http://abload.de/img/dscn1072g3rry.jpg

http://abload.de/img/dscn1073f3ogk.jpg

The next step is the reconditioning of the ugly coin door and the change to euro coins including special coin acceptor.

1 month later
#1061 9 years ago

My F-14 before I started the restauration... damaged decals and broken plastics.

DSCN0671.JPGDSCN0671.JPG

DSCN0678.JPGDSCN0678.JPG

#1063 9 years ago

Take a look at the bad coindoor...

DSCN0673.JPGDSCN0673.JPG
#1064 9 years ago

Well,
here's my F-14 - not finished yet, but soon it will be an amazing pinball again.

First I cleaned the coindoor...

DSCN1239.JPGDSCN1239.JPG

... then came the primer.

DSCN1248.JPGDSCN1248.JPG

After that I started to coat it with a special coating for speakers. Now the door has got the same surface like original.

DSCN1287.JPGDSCN1287.JPG

The restored coindoor with new galvanized parts and new Euro coincontrols.

DSCN1325.JPGDSCN1325.JPG

DSCN1327.JPGDSCN1327.JPG

Screwed plastics

DSCN1072.JPGDSCN1072.JPG

DSCN1073.JPGDSCN1073.JPG

DSCN1199.JPGDSCN1199.JPG

Cabinet better as new with new better speaker.

DSCN7375 (Small).JPGDSCN7375 (Small).JPG

Playfield coated 21 times and of course new set of CPR-plastics with protectors.
There's no more mylar!
Left and right modified clear plastics (thanks André) with black border.
Restored flashers in the upper playfield like the early Tomcats had and LED everywhere.

DSCN7377 (Small).JPGDSCN7377 (Small).JPG

Selfmade Spinner decals with an entirely MIG (look at the details on its wings) and a high resolution explosion.

DSCN7380 (Small).JPGDSCN7380 (Small).JPG

kind regards
Averell

#1067 9 years ago
Quoted from kilmarnock1350:

Averell,
Beautiful! Did you do the paint/clear coat yourself?
Recent refurb pics are making me think about doing it, but I have ZERO painting experience of this nature. Would appreciate information.
Also,
Why the red star post on the left exit lane about the kickback? Does it affect play at all? And why not add the second one right above it?
I've been thinking about doing the same with the star post.
Thoughts?

This paintjob is very difficult and you need a lot of experience to do it.
You have to consider, that you must get rid off the mylar and repair the broken parts on the playfield first. This playfield was painted from a company with more than 10 years of experience with this work, and of course our F-14 is quite special because of bent inserts and rubbed decals. It took four month to repair it and the paintjob was done with an incredible dedication. If you have no experience - don't do it yourself. Most of the work I did myself, but not this beautiful playfield.
The starpost is just an idea to protect the plastic and keep the ball in distance, although I use protectors for every plastic, but you can observe that most of the Tomcats are often damaged in that area.
I also set a metal protector in the upper playfield between the flashers like some early Tomcat had. This prevents breaking the big plastic if the ball gets stuck under the rubber.
But it's not finished at all.

#1095 9 years ago

Here's a picture, where the metal protector is installed.
Some Tomcat had it, but most of them not?
Mine only had the holes in the playfield, but not the protector itself!

Bild 2.jpgBild 2.jpg

This happens, when your engine is to fast... result is broken plastic or short circuit!

Bild 1.jpgBild 1.jpg

The address is www.pinball-dreams.com

#1108 9 years ago

Well,
you see this part is very necessary in that area.
My Tomcat is very very fast because not only the playing field has become very fast, I also have strengthened the coils, in addition, with condensers.
It's no compare to the normal coils or the weak green ones.
Now, the game is as quick as it should be.
A problem is the yagov kicker, the backfire is so hard, that the ball almost smashes the glass. That needs an adjustment, then this F-14 is perfect.

#1112 9 years ago

When you have a playfield like mine, it doesn't matter what kind of coil you use. The surface is so smooth, that the balls became so fast - they get of out control!
That's the reason I only use the normal coils with condensers.
The one and only "problem" is the yagov kicker.
Of course, my intension was, to get this F-14 so fast as it was playable, without getting any trouble.
Another problem is, that I use a coated glass with antireflection and it's very expensive.
I have to consider that the coating of the glass could be damaged.
But you can thrust me, I will solve the problem in the next days.

1 week later
#1145 9 years ago

Hello,

here's a decal for my Apron.

DSCN1366.JPGDSCN1366.JPG

First I have to clean the Apron and then it'll be powder-coated RAL9005.
Then it'll be pasted with the decals.
I bet, it'll look better as new!

#1147 9 years ago

If you clean the Apron yourself you just have to blast it with fine glass or sand to get a smooth surface.
Then it can be powdered - you have to count with ~30,- Euros.
The advantage is simple that the powder is tougher as the original thin layer of varnish and you never get light rust or corrosion in that area again.

#1151 9 years ago

I own the decal for Corel-Draw.
You can print this decal for ~25,- Euros in your printshop.
At the moment I think about to create target decals.

Anonther innovation is this - adjustable Flipperarms:

fl.jpgfl.jpg

They're soon available in different versions.
With this part you can adjust ankle and lengths from above, it's not needed to open the cabinet anymore.

#1153 9 years ago

Hello,

today I have received mail from Steve Ritchie - he's a nice guy!

DSCN1376.JPGDSCN1376.JPG

This plastic will get a special place in my Tomcat.

#1155 9 years ago

Yes, first I've sent him some pictures of the Tomcat and then I asked him signing that plastic - that's it.
He told me also, that he and his brother are the voices behind Yagov and Hitman, Steve is Yagov - very funny.
My Pin is almost finished, I just have to wait for the new LED-Displays.

#1157 9 years ago

Rec: Yes, it's an honor to have something special on our pinball and you must be a lucky man!
I try to meet Steve somehow here in Germany. Next I want to restore an Indiana Jones and then I want to have something signed from Steve's brother Mark.

#1163 9 years ago

Here's my next idea - Target decals for our Tomcats.
It's the same design like on the playfield.
The white targets get black decals, the red and blue ones get white decals.

unbenannt-1dgb28.jpgunbenannt-1dgb28.jpg

#1166 9 years ago

The Decals will be printed next week, then I will get a Proof to check how they fit on the target.

And here's another innovation: Buttons manufactured from aluminium

Here's a first prototype.

Flippertaster Aluminium.JPGFlippertaster Aluminium.JPG

In a few weeks they're available in five different colors - same like the adjustable flipperams.

#1169 9 years ago

Yes, I think about it - this is just a prototype.

#1173 9 years ago

The switch uses the same electric potential like the side borders and glass cover - that's it.

#1181 9 years ago

Here're some new pictures of my Tomcat.
It's finished to 90 %, I still have to wait for the new LED-Displays.

Coindoor with polished bolts, same as at the backbox

DSCN8068.JPGDSCN8068.JPG

ALU-Buttons in new polished sidebars, they're drilled with only two screws.

DSCN8069.JPGDSCN8069.JPG

Finished Playfield with new Inserts, Decals, Plastics, Protectors, Rubbers, and LED.

DSCN8071.JPGDSCN8071.JPG

Left Lane

DSCN8072.JPGDSCN8072.JPG

Right Lane

DSCN8074.JPGDSCN8074.JPG

Rebuilt Flashers like the Prototypes and some Early's had on the right (not finished).

DSCN8078.JPGDSCN8078.JPG

Rebuilt Flashers like the Prototypes and some Early's had on the left (not finished).

DSCN8079.JPGDSCN8079.JPG

Polished Early-Beacons looking new.
In play you have to wear sunglasses.

DSCN8085.JPGDSCN8085.JPG

#1185 9 years ago

This Tomcat is not finished yet and it took me 7 month of time and a lot of money, but it's worth it.
I have no restore thread here, all information about this Tomcat is in this thread.

Here're my new Instructions and Checklist, but I don't know which one I should use?

F-14 Tomcat Instruction-Coin-Cards_3.jpgF-14 Tomcat Instruction-Coin-Cards_3.jpg

F-14 Tomcat Instruction-Coin-Cards_5.jpgF-14 Tomcat Instruction-Coin-Cards_5.jpg

F-14 Tomcat Instruction-Coin-Cards_6.jpgF-14 Tomcat Instruction-Coin-Cards_6.jpg

#1188 9 years ago

Very nice Cards...

#1194 9 years ago

That's weird...

#1198 9 years ago

No Beacons on top - no Tomcat!

#1201 9 years ago

Just look at post 1181 how beautiful these beacons could be.
They're an elementary component on this pin.

#1203 9 years ago

Hi,
I've ordered a LED-System from PINLED in Germany, but I still have to wait for delivery.
Same problem at my Tomcat with the old damaged display.
A good choice to change in new technology.

#1206 9 years ago

The LED from PINLED is adjustable with same color as original and they use a filter between LED and Panel.

Here's a picture to the entrance of my pinball hall of the future downstairs.
I use old but good translites from Tomcat and Indiana Jones, last one will be the next pin, if Tomcat is finished.

DSCN1391.JPGDSCN1391.JPG

#1213 8 years ago

So it is, you have to fix all the inserts to have a nice playfield.
Remember, my playfield was coated 21 times and now it has a perfect smooth surface.
In combination with new plastics and the custom decals from André it looks fantastic.

dscn7379small8yu20.jpgdscn7379small8yu20.jpg

#1216 8 years ago

In my opinion the playfield protector is useless, while there would still get dust and dirt under the protector and damage the playfield.
And for sure you just cover existing scribbles and scratches, but they're still there - no option for me.
It's a long process and it took four month for the playfield only!

#1222 8 years ago

White on slingshot and others like that and blue for the flippers.

#1226 8 years ago

Here's the first Proto from my target decals.
The white on transparent with black lines and for the red and blue ones I print them with white lines.
They'll have a hole in the middle, so they'll fit for 100%.

DSCN1397.JPGDSCN1397.JPG

#1237 8 years ago

Yes, that's the reason why I use same target decals for all.
Just wait for the new pictures, you'll understand if my Tomcat is finished - it'll look harmoniously great!

#1241 8 years ago

Good news for me, I'll get my display next week.

#1243 8 years ago

Check the tilt-switch in the coindoor and the cables, maybe they're broken or short circuit?

#1280 8 years ago

If someone need the manual (all parts) from the Netherland page, I can send it via email as PDF.

#1282 8 years ago

Hello Guys,

here're new pictures of my Tomcat.
It's still not finished at all, but in a few days the work is done!
Enjoy...

Finished Cabinet that looks inside as good as outside.
f14-01.JPGf14-01.JPG

f14-03.JPGf14-03.JPG

Finished Electric, LED-Lamps, Coils, Wires, Inserts, etc.
f14-04.JPGf14-04.JPG

f14-05.JPGf14-05.JPG

New LED-Display and Speakerpanel - Backglas fired by LED.
Still there's a sight with the original translite.
f14-15.JPGf14-15.JPG

Finished Playfield with very fast smooth surface that looks like ice.
There're no scratches or damages - this is the best condition you can get on a Tomcat.
f14-22.JPGf14-22.JPG

f14-34.JPGf14-34.JPG

f14-35.JPGf14-35.JPG

f14-38.JPGf14-38.JPG

Finished Backbox - all parts inside look like new, there was no damage.
f14-45.JPGf14-45.JPG

f14-46.JPGf14-46.JPG

Adjustable Speaker level for the new Sound System.
f14-48.JPGf14-48.JPG

It looks like someone had forgotten this beautiful Pinball since 1987 in the storeroom.
This was really a hidden treasure.
f14-16.JPGf14-16.JPG

#1306 8 years ago

Here're new pictures...

DSCN1413.JPGDSCN1413.JPG

This is the capacitor to power up the upper flipperfingers

DSCN1419.JPGDSCN1419.JPG

Here the restored flashers from Prototype and Early protected against short circuit.

DSCN1418.JPGDSCN1418.JPG

The key-fob signed from Steve, in my opinion the best place to put in.

DSCN1429.JPGDSCN1429.JPG

Mirror metal plate left...

DSCN1428.JPGDSCN1428.JPG

... and right.

The Apron was in a bad condition.

DSCN1432.JPGDSCN1432.JPG

I've cleaned it outside...

DSCN1445.JPGDSCN1445.JPG

... and inside

DSCN1446.JPGDSCN1446.JPG

The Speakerpanel will be upgraded, too.

First sanding...

DSCN1455.JPGDSCN1455.JPG

then painting...

DSCN1458.JPGDSCN1458.JPG

... and new LED-Display.

DSCN1459.JPGDSCN1459.JPG

I will change the speakers against Visaton FX16-4 and SC10N-8, they will fit into the panel like the original. They also harmonize with the Visaton BG20 in the cabinet. I just have to use a 10 yF Capacitor for the SC10N.

The panel for the translite was not so beautiful.

So again sanding...

DSCN1471.JPGDSCN1471.JPG

... and painting.

DSCN1483.JPGDSCN1483.JPG

With the new Superfluxx-LED it will be an amazing effect with the translite.

#1308 8 years ago

Here're the new speakers - not high-end, but better as original at all.
They fit perfect in the panel and the drillings are same.

DSCN1498.JPGDSCN1498.JPG

DSCN1499.JPGDSCN1499.JPG

DSCN1500.JPGDSCN1500.JPG

DSCN1517.JPGDSCN1517.JPG

Now the panel is ready, I had to turn the speakers for 90° to be able to solder the cables.

#1309 8 years ago

Next step is my "Afterburner" for the upper flipperfingers.

With this modified circuit you get much more power into the game.

DSCN1518.JPGDSCN1518.JPG

DSCN1519.JPGDSCN1519.JPG

DSCN1522.JPGDSCN1522.JPG

DSCN1523.JPGDSCN1523.JPG

With the little switch you can fly without "Afterburner".

DSCN1524.JPGDSCN1524.JPG

The sign just shows the direction how to switch to play with "Afterburner".
DSCN1525.JPGDSCN1525.JPG

#1311 8 years ago

Now, the speaker panel is finished with self build filter.

DSCN1553.JPGDSCN1553.JPG

DSCN1554.JPGDSCN1554.JPG

DSCN1560.JPGDSCN1560.JPG

#1312 8 years ago

Today the apron was finished.

Inside...

DSCN1570.JPGDSCN1570.JPG

and outside in top condition - better than new!

DSCN1572.JPGDSCN1572.JPG

#1314 8 years ago

I have had so much work with it but now the end is in sight.

I just have to do some cosmetic into the cabinet and the electric for the proto-flashers.

Just take a look at this beauty... I love this pinball so much.

DSCN1579.JPGDSCN1579.JPG
Finished speakerpanel

DSCN1582.JPGDSCN1582.JPG
Undamaged translite

DSCN1583.JPGDSCN1583.JPG

DSCN1584.JPGDSCN1584.JPG

#1316 8 years ago

Me too
Here's my idea with decals on the apron - it looks like original.
They're colored same as the apron in glossy RAL 9005
With my special playfield glass the outlines are invisible.

DSCN1585.JPGDSCN1585.JPG

DSCN1586.JPGDSCN1586.JPG

DSCN1594.JPGDSCN1594.JPG

#1317 8 years ago

Polished plate for main switch...

DSCN1602.JPGDSCN1602.JPG

#1319 8 years ago

Hi pinballfan,

the decals are created on my own - if you need them, send me your Email.
The panel is glossy white and I did the same for this:

DSCN1615.JPGDSCN1615.JPG

DSCN1616.JPGDSCN1616.JPG

DSCN1618.JPGDSCN1618.JPG

#1321 8 years ago

No,
I have created button in full Aluminium - they're in outstanding quality.

Flippertaster Aluminium.JPGFlippertaster Aluminium.JPG

Next week we launch new customized sets of buttons with different options.
Just wait, I will show some pictures then.

#1323 8 years ago

Thank you, the next generation will be much more innovative.

#1327 8 years ago

Yes, full automated cnc.
It's just another feelling with those buttons - no comparison to that plastic crap.

#1328 8 years ago

Now I'm working on the Proto-Flashers.
First step was to separate the blue and white flashers.
Now they're working how Steve had designed it.

Here you see the white and the white/black wire soldered together.

DSCN1634.JPGDSCN1634.JPG

Just unsolder the white/black wire and solder it to the connector lamp on the other side of the resistor board.

DSCN1636.JPGDSCN1636.JPG

Flasher 9 and 10 with LED.

DSCN1642.JPGDSCN1642.JPG

Now you see the blue one on flasher 9.

DSCN1643.JPGDSCN1643.JPG

The white one on flasher 10.

DSCN1644.JPGDSCN1644.JPG

And here're the isolated bulb sockets as they used to be in the proto-models and early productions.
They will work on flasher 7.

DSCN1633.JPGDSCN1633.JPG

#1329 8 years ago

This night I finished the circuit for the proto-flashers.

First I solder a black wire on the switch-board to connector A7 and lay the wire to a resistor-board with free connectors driver and lamp.

Switch-Board.jpgSwitch-Board.jpg

Next I solder the wire from A7 to the connector driver on the resistor-board.
The other wire is soldered on connector lamp and put to the proto-flashers.
The 24 volts must be taken from multiplexed lamps with orange wire.
I took a red wire back to the proto-flashers.
Don't solder the wire on the power-supply for the coils, this won't work!

Resistor-Board.jpgResistor-Board.jpg

Here the first of the two flashers - protected against short circuit.
On the backside of the target I use the same isolator as fitted frontside.
The bulb socket is isolated twice.

Flasher 7.jpgFlasher 7.jpg

#1330 8 years ago
#1331 8 years ago

Today I've finished the flashers.
All is working fine.

DSCN1669.JPGDSCN1669.JPG

My last building site - the beacons.
I'll restore them complete...

DSCN1673.JPGDSCN1673.JPG

DSCN1676.JPGDSCN1676.JPG

DSCN1693.JPGDSCN1693.JPG

#1332 8 years ago

Cleaned and polished parts of the beacons.

DSCN1712.JPGDSCN1712.JPG

#1333 8 years ago

I also have to fix the power supply and use a power reducer.

DSCN1727.JPGDSCN1727.JPG

#1334 8 years ago

The Beacons are ready - take a look, it's better then it ever was!
All parts cleaned and polished including drive.

DSCN1761.JPGDSCN1761.JPG

DSCN1762.JPGDSCN1762.JPG

#1336 8 years ago

What exactly do you mean?
Behind the speaker panel - normally there're no lights.
You think there're light because there're sockets in the LED-Panel?
Well, this panel is same as used in the Williams Millionaire pinball, but in F-14 Tomcat, there's no function!

#1338 8 years ago

Today I finished the power supply - very beautiful look.

DSCN1768.JPGDSCN1768.JPG

DSCN1776.JPGDSCN1776.JPG

DSCN1781.JPGDSCN1781.JPG

#1339 8 years ago

Here's a picture how the F-14 looks at the moment...

DSCN1787.JPGDSCN1787.JPG

#1342 8 years ago

@ChoppaCade: Good idea... I think about it.

@FiftyQuid: Also a good idea...

#1344 8 years ago

@pinballfan: Do you mean the led for slingshots? There are no led installed. The rest of lights are led and I've bought them in a complete set from camper (www.superfluxxer.de). But you have to keep in mind that you have to install some standard lights into the circuit to prevent "spirit lights" by the led.

#1355 8 years ago

Just follow the hyperlink posted above and look at "Kuppel LED".

#1357 8 years ago

And now here's Tomcat with exposed mirror blades!

DSCN1804.JPGDSCN1804.JPG

DSCN1803.JPGDSCN1803.JPG

DSCN1812.JPGDSCN1812.JPG

DSCN1813.JPGDSCN1813.JPG

#1359 8 years ago

Thanks, I just have to wait for the new proto-buttons, target decals and then this mission is accomplished!

#1364 8 years ago

And now here they're: ALU-Flipperfingers and brand new ALU-Buttons.
With these fingers you can change the angle from upper playfield without disassembling the whole assembly.
The buttons can be changed in hardness and length by using different springs.

You can get this cool stuff here: http://www.adpin.de/

DSCN1824.JPGDSCN1824.JPG

Here I've used a combination with red housing and polished button - great look.

DSCN1825.JPGDSCN1825.JPG

Three of four fingers are ready.

DSCN1826.JPGDSCN1826.JPG

The left finger in the upper playfield is a bit tricky to change, but it's possible without disassembling the diverter gate.

DSCN1829.JPGDSCN1829.JPG

Installed fingers

DSCN1837.JPGDSCN1837.JPG

#1365 8 years ago

Here're the last and long awaited parts for this project:

DSCN1846.JPGDSCN1846.JPG

• Target Decals (selfmade design)
• different Protectors
• Decal for Service-Buttons (new selfmade design)
• different Scorecards (on translite)

Decal for Service-Buttons fit perfect

DSCN1852.JPGDSCN1852.JPG

DSCN1854.JPGDSCN1854.JPG

Custom made target decals - great look.

DSCN1859.JPGDSCN1859.JPG

DSCN1860.JPGDSCN1860.JPG

DSCN1861.JPGDSCN1861.JPG

#1369 8 years ago

I think there's something wrong with the solenoid circuit - check blanking signals!

#1374 8 years ago

First Update of the axes, you can see that they're knurled now.
This is necessary to prevent that the fingers twist in the assembly.
I hope this solution works with the weak Williams clamps.
Another idea is to change the clamps and use newer massive ones from Stern.

// Error: Image 419899 not found //

1 week later
#1376 8 years ago

I only use old aprons with decals.

Today I've inserted a cliffy protector for the ball box - very usefully.

DSCN1867.JPGDSCN1867.JPG

#1381 8 years ago

No,
the reason is, to prevent danger of a short circuit to the switch line board if the prototype flashers are installed.
Just take a look at the service bulletin SS41 and you'll understand.
You can see how my solution works one page before.
You can use more powerful coils, but you have to make sure the problem mentioned above!
I also have modified the flipper board with a stronger capacitor to get the speed Tomcat is designed for - it works and it makes the machine much more attractive to play.

#1383 8 years ago

Yes, it's right.
But this is not the reason - in fact, this improvement is just to keep warranty for Williams and take the game as long as possible in play with low costs to earn money!
The design of the playfield with the prototype flashers was wrong and took effect in the short circuit of the switch line board, caused by contact of backside target and lamp socket.
I never saw a F-14 with damaged targets, I only know damaged machines due to short circuit.
Trust me and try my modification and you'll see - it's impossible to destroy a target or the switch line board.
It doesn't matter if with or without the flasher installed.

#1387 8 years ago

I use later EL 11722-50V (green) - but with capacitor switched on the EOS-contact will be fired with ~70 Volt and burns down much stronger and quicker.

#1389 8 years ago

My assemblies and bearing are modified, too.
In my case it's regardless what type of coils I use, because when I switch on the capacitor the coils become stronger and the game gets very fast.
I have improved the whole pinball machine to make it steady and playable.
The playfield is protected everywhere and I have produced special bearings for the axes and I use clamps from Stern to prevent twisting the axes into the clamps.
Also, I have installed ALU-Flipperfingers - I know what I do, and I bet there's no F-14 that makes possible a stable powerplay like mine.

Achslager_Williams[1].jpgAchslager_Williams[1].jpg

#1392 8 years ago

Are these new balls after playing a while, or are they still old balls?
You should use new balls and check the playfield and the ramps, it looks that the surface is not only dirty... do they have grooves or scratches?
First clean your pinball machine - the most dirt appears from rubbers, smoke and bad balls, of course - they wear out the surface of the playfield!
Don't play with these balls anymore!
And don't use lubrications on the playfield or assemblies, because remains of it stick on the balls and close up with the wear.
And be sure to get rid of superfluous wax, that causes the same problems.

#1394 8 years ago

Today we finished the new modified axes for the adjustable flipper fingers.
In combination with the much more better Stern clamps, it's impossible that the axes will twist again into the assembly.

DSCN1890.JPGDSCN1890.JPG

And here's the clear evidence - Stern clamps fit perfect with the Williams assembly.
Now I change all four assemblies for a steady gameplay.

DSCN1893.JPGDSCN1893.JPG

#1397 8 years ago

Yes, show us some pictures, maybe it's not so much trouble.
For example, I've cleaned my cabinet and used complete new decals.
You also have the choice to restore the cabinet with stencils.

#1400 8 years ago

I agree with Superbee, strip the cabinet and use new decals.
You also have to close the holes from the damned door lock in the front, so did I.

Here's my machine after restoration with decals.

DSCN1787.JPGDSCN1787.JPG

DSCN1788.JPGDSCN1788.JPG

DSCN1855.JPGDSCN1855.JPG

DSCN1858.JPGDSCN1858.JPG

DSCN1533.JPGDSCN1533.JPG

#1403 8 years ago

Now my Scorecards are finished - they look like translite.

Inverter for 110 Volts
DSCN1916.JPGDSCN1916.JPG

Electric light foil
DSCN1926.JPGDSCN1926.JPG

Scorecards on translite
DSCN1925.JPGDSCN1925.JPG

Tomcat in play
DSCN1923.JPGDSCN1923.JPG

#1405 8 years ago

This morning I've finished the protector for the right outlane and it fit perfect..
It's really usefully to protect the wooden part.

DSCN1927.JPGDSCN1927.JPG

DSCN1931.JPGDSCN1931.JPG

DSCN1933.JPGDSCN1933.JPG

Now left and right lane are protected.

DSCN1936.JPGDSCN1936.JPG

#1407 8 years ago

Here's the connection to the inverter at the power supply (Connector 3J6 ).
You have to connect pin 6 for 12 volts + and pin 11-14 for ground - that's it.

dscn1914bzb8x.jpgdscn1914bzb8x.jpg

#1411 8 years ago

Congratulation and much success with the restoration.

#1416 8 years ago

Ah, it's a late Tomcat.
For me there's no choice for a perfect restauration, just look at the areas spinner, the inserts 32k and 64k and the right targets.
First you have to get rid of the Mylar and then you'll see.
You can order a new set of plastics at CPR, they're still in stock.

1 week later
#1423 8 years ago

These decals from André Gagnon are looking great.
I also create a new decal for the ramp and the spinner.
The original decal for the ramp would be covered anyway, so I stuck mine in front.
And the new decal for the spinner has a new design with the entire MIG and a better explosion on the other side.

dscn18042szni.jpgdscn18042szni.jpg

And I create these decals for the targets, too.
In the center is a hole for the rivets, so there shall be no evidence of lifting or blistering of the decal.

rt.jpgrt.jpg

4 weeks later
#1445 8 years ago

Now it's done - Tomcat is finished!

DSCN1992.JPGDSCN1992.JPG

Thanks goes to all which were involved "somehow" in the restoration of the pinball machine.

• André Gagnon
• CPR-Californien
• Flippermarkt.de
• Flipperservice Litfin
• Fody
• Fredelchen
• Froesius
• HanBee
• Krummel
• Michael
• GTE-Oberflächentechnik
• MBT-Eurotec Pulverbeschichtung
• RC-Schrauben
• Pinball-Dreams
• Pinball-Shop Fach 8
• Pinside.com
• Pro-Kilo
• The PinWitch Pinballparts
• Zpeakabonks-Pinball-Paradise

And quite special thanks go to STEVE RITCHIE for the nice contact, good tips and the signed Plastic No. 554-10.

Soon I want to start the next project - Williams Indiana Jones Pinball Adventure

1 month later
#1478 8 years ago

Prototype have these two red flashers in the upper playfield, other stronger coils for the upper flipper fingers, a gate under the upper plastic in the middle and of course cable wired insert lamps and no compact switchboards.
Prototype and early Tomcats only had six white flashers in the back, later Tomcats had red ones.
Also Flasher 7, 9 and 10 are different connected as later Tomcats.
Take a look into the backbox, if this is a prototype, roms are suitably labeled.
Prototype and early Tomcats also have another mainboard with other optical diagnostic program, too.
Some Tomcats also have other lightboards in the backbox between translite and mainboard - some are laminated, others are raw.
The white beacon on prototype and early Tomcats is clear, later ones were glazed like shower glass.

#1483 8 years ago

The reason is funny. People in bars, shops or amusement arcades had complained about the bright lights.
So Williams decided to change the white beacons!

#1486 8 years ago

Yes, this is correct, but lots of machines were modified over the years - I have seen Tomcats with other artwork on the cabinet that was colored with yellow stripes like on the picture, and some machines had artwork (like Key fob) on the speaker panel, too.
I know, prototypes have the x in serial number.
My information about Earlys was, there have been about 80 units, but I can't believe it.

#1488 8 years ago

Mine is S/N I100470

#1492 8 years ago

F-14 is still my favourite machine!
This weekend it's possible to get an Indiana Jones, also one of the best machines ever built - I must have it.
And again I will restore it and try to get a keyfob signed by Mark Ritchie.

3 weeks later
#1556 8 years ago

@zippydapinhead

If you send me an email ([email protected]), I can send you a new artwork (Corel) for the spinner-decal.
On this decals you will see the entire MIG and a better explosion in higher Resolution.
I remember, that all decals in stock are done unkind - they look terrible.

Kind regards
Averell

#1569 8 years ago

Looks not so bad.

3 weeks later
#1668 8 years ago

Show us how nice your Bombcat is and then we discuss your membership.

#1675 8 years ago

You should change the Display to LED-Technology to reduce power consumption and save the electric power supply.
Unfortunately the original Displays die earlier or later.

#1677 8 years ago

Ah ok, that's good.
I use a LED too and it works fine.

1 week later
#1684 8 years ago

These are just covers - some Pins had this as decals painted on the grills.

#1706 8 years ago

As I promised - here's the new wingman for my F-14 Tomcat.

Indiana Jones - The Pinball Adventure

dscn2728e4sh8.jpgdscn2728e4sh8.jpg

dscn2737lko86.jpgdscn2737lko86.jpg

3 months later
#1810 8 years ago

@KingBW:

A lot of work and it looks fantastic - you just have to change the ramp decal like I did.
If you need corel-data to print it, send me an email.
You can see the "Landing/Lock On"-decal in the Galerie (unknown pic.8 and 13)

#1812 8 years ago

Ahh, not exactly what i mean - look at page 28.
Take a look at post #1365 here in this Topic, there you see the modified "Landing/Lock On"-decal.
You use the plastic-decal from André and on the left side it interferes the "Landig/Lock On"-decal - you now understand?
I also create an new Spinner-decal with the entire MIG and an improved explosion and the "Kill Gen. Yagov" is also new aligned and fit better on the assembly in front of the ramp.
If needed, you can get these decals in corel to print.

#1815 8 years ago

Hi KingBW,

just send me an email to this address and I send you the decals, ok?

[email protected]

regards
Averell

#1818 8 years ago

Left in the cabinet, near by the tilt mechanism is the volume control.
And it's more and more difficult to get slingshot plastics, often the left one is more damaged.
I use double-sided protectors on both of my new slingshot plastics.

#1822 8 years ago

That's right, on F-14 there's no knob on the potentiometer - looks like missing, but it's original.
Service assembly with Buttons is easy to get.

If you need the decal for the service assembly, send me an email.

#1835 8 years ago

There's a problem with my internet provider - since monday it's not possible to send emails - sorry.
I try again later.

#1839 8 years ago

@ KingBW: I tried twice to send you an email, but I get the request that the host refused to talk to arcor-server. Do you have another account or mail address?

#1843 8 years ago

@KingBW: OK, I hope that's useful for your project?

4 months later
#1899 7 years ago

Good luck...

Salute_F-14_(resized).jpgSalute_F-14_(resized).jpg

2 weeks later
#1922 7 years ago

With a lot of work and patience F-14 can look like this again. Keep the faith!

DSCN1787_(resized).JPGDSCN1787_(resized).JPG

DSCN1812_(resized).JPGDSCN1812_(resized).JPG

DSCN1992_(resized).JPGDSCN1992_(resized).JPG

#1926 7 years ago

They should work. Important is a good preliminary work for a smooth surface to get the best result at the end.
But I promise, every halfhearted work will take revenge, every day you play and this can be annoying.

4 months later
#2116 7 years ago

Just take a look at page 27 to understand how to work with prototype flashers. You can see pictures also.

2 weeks later
#2142 7 years ago

Regarding to the not working service button, check the harness and connector. I've got the same problem and the reason was a bended pin in the connector of the coin door harness.

3 weeks later
#2177 7 years ago

If you send me an email, I can send you a new artwork (Corel) for the spinner-decal.
On this decals you will see the entire MIG and a better explosion in higher Resolution.
I remember, that all decals in stock are done unkind - they look terrible.
I also redesigned the ramp decals in right dimensions.

Please feel free to mail to: [email protected]

Kind regards
Averell

#2182 7 years ago

If you want to have Yagov more evil you can increase the coil strenghts using a capacitor. The flippers have more power and the game runs faster, but be careful not to destroy plastics, targets or fingers.
How to do that - take a look here on page 27.

https://pinside.com/pinball/forum/topic/f14-tomcat-owners-club-fans-also-welcome/page/27#post-2453329

1 week later
#2191 7 years ago

It's the most underrated 11 of all, but in fact it's the best!

#2202 7 years ago

We're in charge to do that - it's not so difficult.
You need some resistors, sockets, bulbs or LED and the connection to the power supply or to the GI wiring.
The base of the LED-Panel is the same as used in the Millionaire, but that Pin has two more displays for credit counter.

#2204 7 years ago

Yes, I will get it on.
Today I tested with regular bulb and LED... power consuption is 0,5 A with a bulb and only 0,15 A with LED.
Resistor gets really hot with bulb, so we need resistors with wattage up to 2 Watts.
With LED there's no problem with consumption and heat, but not everyone likes LED, so I want to design the circuit interchangeable.
My solution is a resistor with 15 Ohm and 2 Watts - that will work.

#2206 7 years ago

I use a PinLED-Board and this board has four sockets for bulbs and a connector, but not equiped.
Two bulbs have their own circuit, and the other two are connected parallel and there are three placeholders for resistors and the wiring is connected via these resistors to the sockets.
I take 12 Volt from Power Supply and therefor I need the resistors to operate LED with 6 Volts.
First I have to solder the connector and the resistors.

#2208 7 years ago

I wrote a manual how to reinstall the prototype flashers, but it's available in German only.
So Do I with the summary for the PinLED-Board.
It's not difficult to understand and very easy to do.
My new calculation now is a 12 Ohm resistor for standalone circuit and 6,8 Ohm for parallel switched bulbs.
That will work and I have tested yesterday.
I've ordered the parts but now I have to wait for delivery.

#2215 7 years ago

@aerobert: I need your Email, please send to [email protected] and I send you the manual.

#2218 7 years ago

Here you can see the free area in the PinLED-Board that can be used in F-14 Tomcat also.

1 (resized).jpg1 (resized).jpg

I soldered high power resistors with 12 Ohm and 6,8 Ohm, remembering that two bulbs have their own circuit, and the other two are connected parallel. The angled plug is in delivery.

2 (resized).jpg2 (resized).jpg

I prepared the electric directly from the power supply as well.
I use unregulated 12 volts via pin 6 (Plus) and pin 14 (Ground) at plug 3J6.
The required counter plug is in delivery also.

4 (resized).jpg4 (resized).jpg

3 (resized).jpg3 (resized).jpg

#2230 7 years ago

I hope to get the counter plug this week to complete the short upgrade on the PinLED-Board.
I did a change for the plug and put it upside down on the board.
Now it's more useable for the lock pad, it's a bit different to the built in plugs.

DSCN4670 (resized).JPGDSCN4670 (resized).JPG

DSCN4673 (resized).JPGDSCN4673 (resized).JPG

DSCN4669 (resized).JPGDSCN4669 (resized).JPG

#2233 7 years ago

Now PinLED-Board is finished and it works.
I only have to swap the current LED against LED with a wider angle, then it's perfect.

DSCN4674 (resized).JPGDSCN4674 (resized).JPG

The wiring for the LED is easily triple bridged.

DSCN4675 (resized).JPGDSCN4675 (resized).JPG

On the right there's the additional plug for LED.

DSCN4678 (resized).JPGDSCN4678 (resized).JPG

Bombcat back in action... under supervision of the Master himself.

DSCN4682 (resized).JPGDSCN4682 (resized).JPG

1 month later
#2380 7 years ago

Now my F-14 is equipped with a new Power Bridge and fused rectifiers.
This little circuit is developed by Peter Koch and prevents burning wires caused by damaged solenoids.
Of course the pinball machine is better protected against fire hazards.

1 (resized).jpg1 (resized).jpg

2 (resized).jpg2 (resized).jpg

#2383 7 years ago

Yes, TomDK is right,
I love that mega capacitor... now it's out of function but I leave it at it's place.
And it's not as dangerous as it might be, the voltage is 25 only.
Take a look at the smaller one right on the bottom - that's really bad if you touch it!

#2385 7 years ago

No solution possible with that weak Motor, for F-14 you have to use 8W replacement. 3W works on Getaway only!

3 weeks later
#2445 6 years ago

Maybe these picture will help?

dscn1500b9jqk (resized).jpgdscn1500b9jqk (resized).jpg
dscn1499gkker (resized).jpgdscn1499gkker (resized).jpg
dscn1498a3jah (resized).jpgdscn1498a3jah (resized).jpg

dscn15179rk96 (resized).jpgdscn15179rk96 (resized).jpg

1 week later
#2452 6 years ago

Yes, Inkochnito's Bridge is a great replacement and a must have.

DSCN4776 (resized).JPGDSCN4776 (resized).JPG

#2456 6 years ago

Yes you have to remove the two old rectifiers and replace them with the board.
Further more you have to disconnect the big capacitor.
I left it in the BB, but of course you can remove it, it has no more function.
At all, it's very easy to install.
The benefit next to the new rectifiers is that the wiring is fused.

2 weeks later
#2484 6 years ago

Congratulation, this Fighter looks really nice for it's age and it's almost complete - some broken parts, but nothing special.
Just clean it up, refit the broken parts and swap some decals - done.

3 weeks later
#2514 6 years ago

That's exactly the only way to protect the decals.
Use metal protector and first cut the decal at that area.

DSCN2567 (resized).JPGDSCN2567 (resized).JPG

DSCN2569 (resized).JPGDSCN2569 (resized).JPG

#2516 6 years ago

My F-14 already has decals... possibly most owner use stencil kits or repaint, but decal is an Option.

#2521 6 years ago

TomDK did a very well paint job some weeks ago on a F-14.

2 weeks later
#2570 6 years ago

Either you have to reposition the switch or clean them.
Often the small cam switch is hooked by dust, or the switch is burned.

3 weeks later
#2608 6 years ago

It's a Milionaire Board that commits a Bonus/Level and Coin counter.
F-14 doesn't have that, early production units have bigger boards but no Bonus/Level or Coin Counter.

1 month later
#2835 6 years ago

Take care of the switching, these three lamps for the beacons are working in series connection but on alternating current!

#2840 6 years ago

Not sure, I think if all balls during released multi-ball were landed again... you will get free play?

1 month later
#2871 6 years ago

Check diode elements at flipper coils and scoring switches at the slingshots.
Take care, the scoring switches are mounted under the playfield, the both on top behind the slings are for slingshots coils only!

#2878 6 years ago

Check the Micro-Switches in the gates and locks.
Sometimes CPU is unable to count the locked balls if a switch is not working properly, then during gameplay balls will be rejected one by one through the CPU.

#2881 6 years ago

Does F-14 knock while self-testing?
Then check counter switches for slingshots!

1 week later
#2945 6 years ago

Really hard work but possible... mine look similar before and know it's a Beauty again.
And it's not a BUT reproduction playfield, it's the original.

DSCN0671 (resized).JPGDSCN0671 (resized).JPG

DSCN1718 (resized).JPGDSCN1718 (resized).JPG

3 weeks later
#2985 6 years ago

I don't paint anymore, I use white glossy decal in all of my Pinball Machines - same material used on front of kitchen doors.
The light behind the translite then shines in very nice colors without hard edges.
It just need some time to cut out all the holes, but can be done in an hour.
Another advantage is that the board is very easy and quick to clean without scrawl.

Unbenannt (resized).PNGUnbenannt (resized).PNG

1 week later
#3003 6 years ago

Take care, I suggest the beacon bulbs running in series connection!

1 month later
#3075 6 years ago

That's nonsens... but maybe the previous owner "created" a kind of protector to prevent a smashing ball fired back to the glass from Yagov-Kicker?

1 week later
#3091 6 years ago

Right, it's clear (Prototypes and Early) and later changed by opacity of lens.
Due to effect of nicotin and dust, they often appear yellow.

1 week later
#3106 6 years ago

Why on earth you don't go to a local welding shop to repair the ramp?
Easy job with laser equipment... I also had the problem and it's fixed now.
Later you can galvanize the ramp with chrom then it's better as new.

2 weeks later
#3132 6 years ago

Which one you need exactly - Nr.?

#3134 6 years ago

I see... it's not a decal, it's silkscreen printed.
This Version is rare to find, but I can send you a decal-file to print, I use on all of my machines right edge on the top of the backbox.
It's a official decal Nr. STD-880.

DSCN5426 (resized).JPGDSCN5426 (resized).JPG

#3136 6 years ago

Yes no problem, please send me your mail address.
Here in Germany we have a few shops that offer decals as replacement for the silkscreen print, but not that version you need.
Mostly they sell newer versions from WPC-Series and these in two Version - small and big.
I never saw a decal with the content you have... and my F-14 shows a different print, too.

3 weeks later
#3161 6 years ago

Really nice, this is the best part of restoration - have fun.

3 weeks later
#3241 6 years ago

Can be a result of a blocked contact... remember same issue on my Bombcat at the right slingshot... alos burned both Transistors (Driver and Main).

5 months later
#3513 5 years ago

I have new decals created with corel designer, vectorized with best resolution and colors.
If interessted just mail me.

4 months later
#3696 5 years ago

Hello, everybody,

in the course of a troubleshooting I want to update the ROMs U26 and U27 on a F-14 Tomcat.
The reason is that the device is not playable after an extensive troubleshooting and a previous short circuit.
The assumption is obvious that the ROM bricks might have been damaged or are not compatible at all (unlikely).
The CPU was checked by our highly appreciated colleague "Flipperwerk" and tested without a doubt as flawless.
The status of the ROMs is "Proto" and clearly assigned with various stickers.
Is it sufficient in this case, if the ROM blocks U26 and U27 are burned to the current state L1, or is there more behind it, which must be adapted or changed?
So are the stones U4, U19, U21 and U22 identical in content?

regards
Averell

3 months later
#3796 4 years ago

Best F-14 I've ever seen in original condition - congratulations and welcome to the club.

3 months later
#3880 4 years ago

Check the diodes of the flipper coils if damaged.
Often reverse current after switching a coil off can cause these problems, if the impulse is not deleated.

#3884 4 years ago

I have written a manual with pictures to reinstall the flashers... it's in German but not too difficult to understand.
You can use DeepL as translator to understand the text in detail.
Keep an eye to the isolation of the bulb sockets - that's the main problem why Williams removed the flashers!

regards
Averell

Manual attached...
Anleitung_F-14_Proto-Flasher.pdfAnleitung_F-14_Proto-Flasher.pdf

#3891 4 years ago

This is a professional repair of the playfield. It has been in existence for five years without wear or damage. Not exactly cheap, but of very high quality.
All is clear coated, no protector.

DSCN1715 (resized).JPGDSCN1715 (resized).JPG

DSCN1716 (resized).JPGDSCN1716 (resized).JPG

DSCN1717 (resized).JPGDSCN1717 (resized).JPG

1 week later
#3913 4 years ago

Hello guys,

I was already often asked if I can write a manual how to refit the prototype flashers back into the F-14 Tomcat.
So I decided to translate my German description.
I will upload the PDF later this evening.

Regards
Averell

#3915 4 years ago

Here's a short description how to reinstall the proto flasher in your F-14 Tomcat.

F-14 - Retrofitting the Proto-Flasher.pdfF-14 - Retrofitting the Proto-Flasher.pdf

#3924 4 years ago

LED

3 weeks later
#4005 4 years ago

Nice machine...

1 week later
#4036 4 years ago

What are these big sized wirings at the coils used for?

3 months later
#4104 4 years ago

Take care, behind the rubbers theres a gate missing.
This is needed to prevent that balls get stucked under the plastic and break it!

pasted_image (resized).pngpasted_image (resized).png

This is how it should look like original... left you see the reinstalled early/prototype flashers.

pasted_image (resized).pngpasted_image (resized).png

#4105 4 years ago
#4107 4 years ago

Mine was the same, but I have a reinforced circuit to power up the coils for a more harder gameplay.
I call it Afterburner... and it really is.
So I decided to reinstall the early flashers and all gates and stuff, as how Williams had designed the game.
Man, believe me, this Tomcat is a hell of a bitch and extremly fast if the Afterburner is switched On.
And as Steve said: "You can't win!"

DSCN1518 (resized).JPGDSCN1518 (resized).JPG

DSCN1525 (resized).JPGDSCN1525 (resized).JPG

DSCN1576 (resized).JPGDSCN1576 (resized).JPG

DSCN1658 (resized).JPGDSCN1658 (resized).JPG

Promoted items from Pinside Marketplace and Pinside Shops!
$ 35.00
Cabinet - Other
Rocket City Pinball
 
$ 5.00
Playfield - Decals
Metal-Mods
 
$ 12.50
Lighting - Led
RoyGBev Pinball
 
$ 1.00
Pinball Machine
Pinball Alley
 
$ 10.00
Playfield - Protection
UpKick Pinball
 
$ 65.00
Playfield - Toys/Add-ons
arcade-cabinets.com
 
$ 18.00
Electronics
Yorktown Arcade Supply
 
$ 18.95
Eproms
Pinballrom
 
$ 69.00
Gameroom - Decorations
Pinball Pimp
 
$ 39.99
Eproms
Matt's Basement Arcade
 
$ 2.50
Lighting - Led
Pinballrom
 
$ 5.95
Playfield - Protection
The Pinball Scientist
 
From: $ 100.00
Cabinet - Shooter Rods
Super Skill Shot Shop
 
Wanted
Machine - Wanted
Fort Lauderdale, FL
$ 170.00
Displays
Digipinball Shop
 
2,100
Machine - For Sale
Rancho Cucamonga, CA
$ 36.95
Eproms
Pinballrom
 
$ 19.99
Eproms
Matt's Basement Arcade
 
$ 25.00
Playfield - Decals
Pinball Invasion
 
2,900
Machine - For Sale
Cedar Rapids, IA
5,000 (Firm)
Machine - For Sale
Vandalia, OH
Hey modders!
Your shop name here

You're currently viewing posts by Pinsider averell.
Click here to go back to viewing the entire thread.

Reply

Wanna join the discussion? Please sign in to reply to this topic.

Hey there! Welcome to Pinside!

Donate to Pinside

Great to see you're enjoying Pinside! Did you know Pinside is able to run without any 3rd-party banners or ads, thanks to the support from our visitors? Please consider a donation to Pinside and get anext to your username to show for it! Or better yet, subscribe to Pinside+!


This page was printed from https://pinside.com/pinball/forum/topic/f14-tomcat-owners-club-fans-also-welcome?tu=averell and we tried optimising it for printing. Some page elements may have been deliberately hidden.

Scan the QR code on the left to jump to the URL this document was printed from.