(Topic ID: 127701)

DIY: Repair 20-10293 Reed Switch

By lyonsden

8 years ago


Topic Heartbeat

Topic Stats

  • 67 posts
  • 14 Pinsiders participating
  • Latest reply 2 years ago by swinks
  • Topic is favorited by 51 Pinsiders

You

Linked Games

Topic Gallery

View topic image gallery

IMG_7449 (resized).JPG
tn_IMG_20160619_132648_(resized).jpg
tn_IMG_20160619_132638_(resized).jpg
Reed_switch_housing_(resized).jpg
REED SWITCH new.GIF
REED SWITCH 1a.GIF
REED SWITCH2.GIF
REED SWITCH3.GIF
REED SWITCH 1.GIF
REED SWITCH.GIF
IMG_4477.JPG
IMG_4486.JPG
IMG_4485.JPG
IMG_4483.JPG
IMG_4482.JPG
IMG_4481.JPG

You're currently viewing posts by Pinsider lyonsden.
Click here to go back to viewing the entire thread.

#1 8 years ago

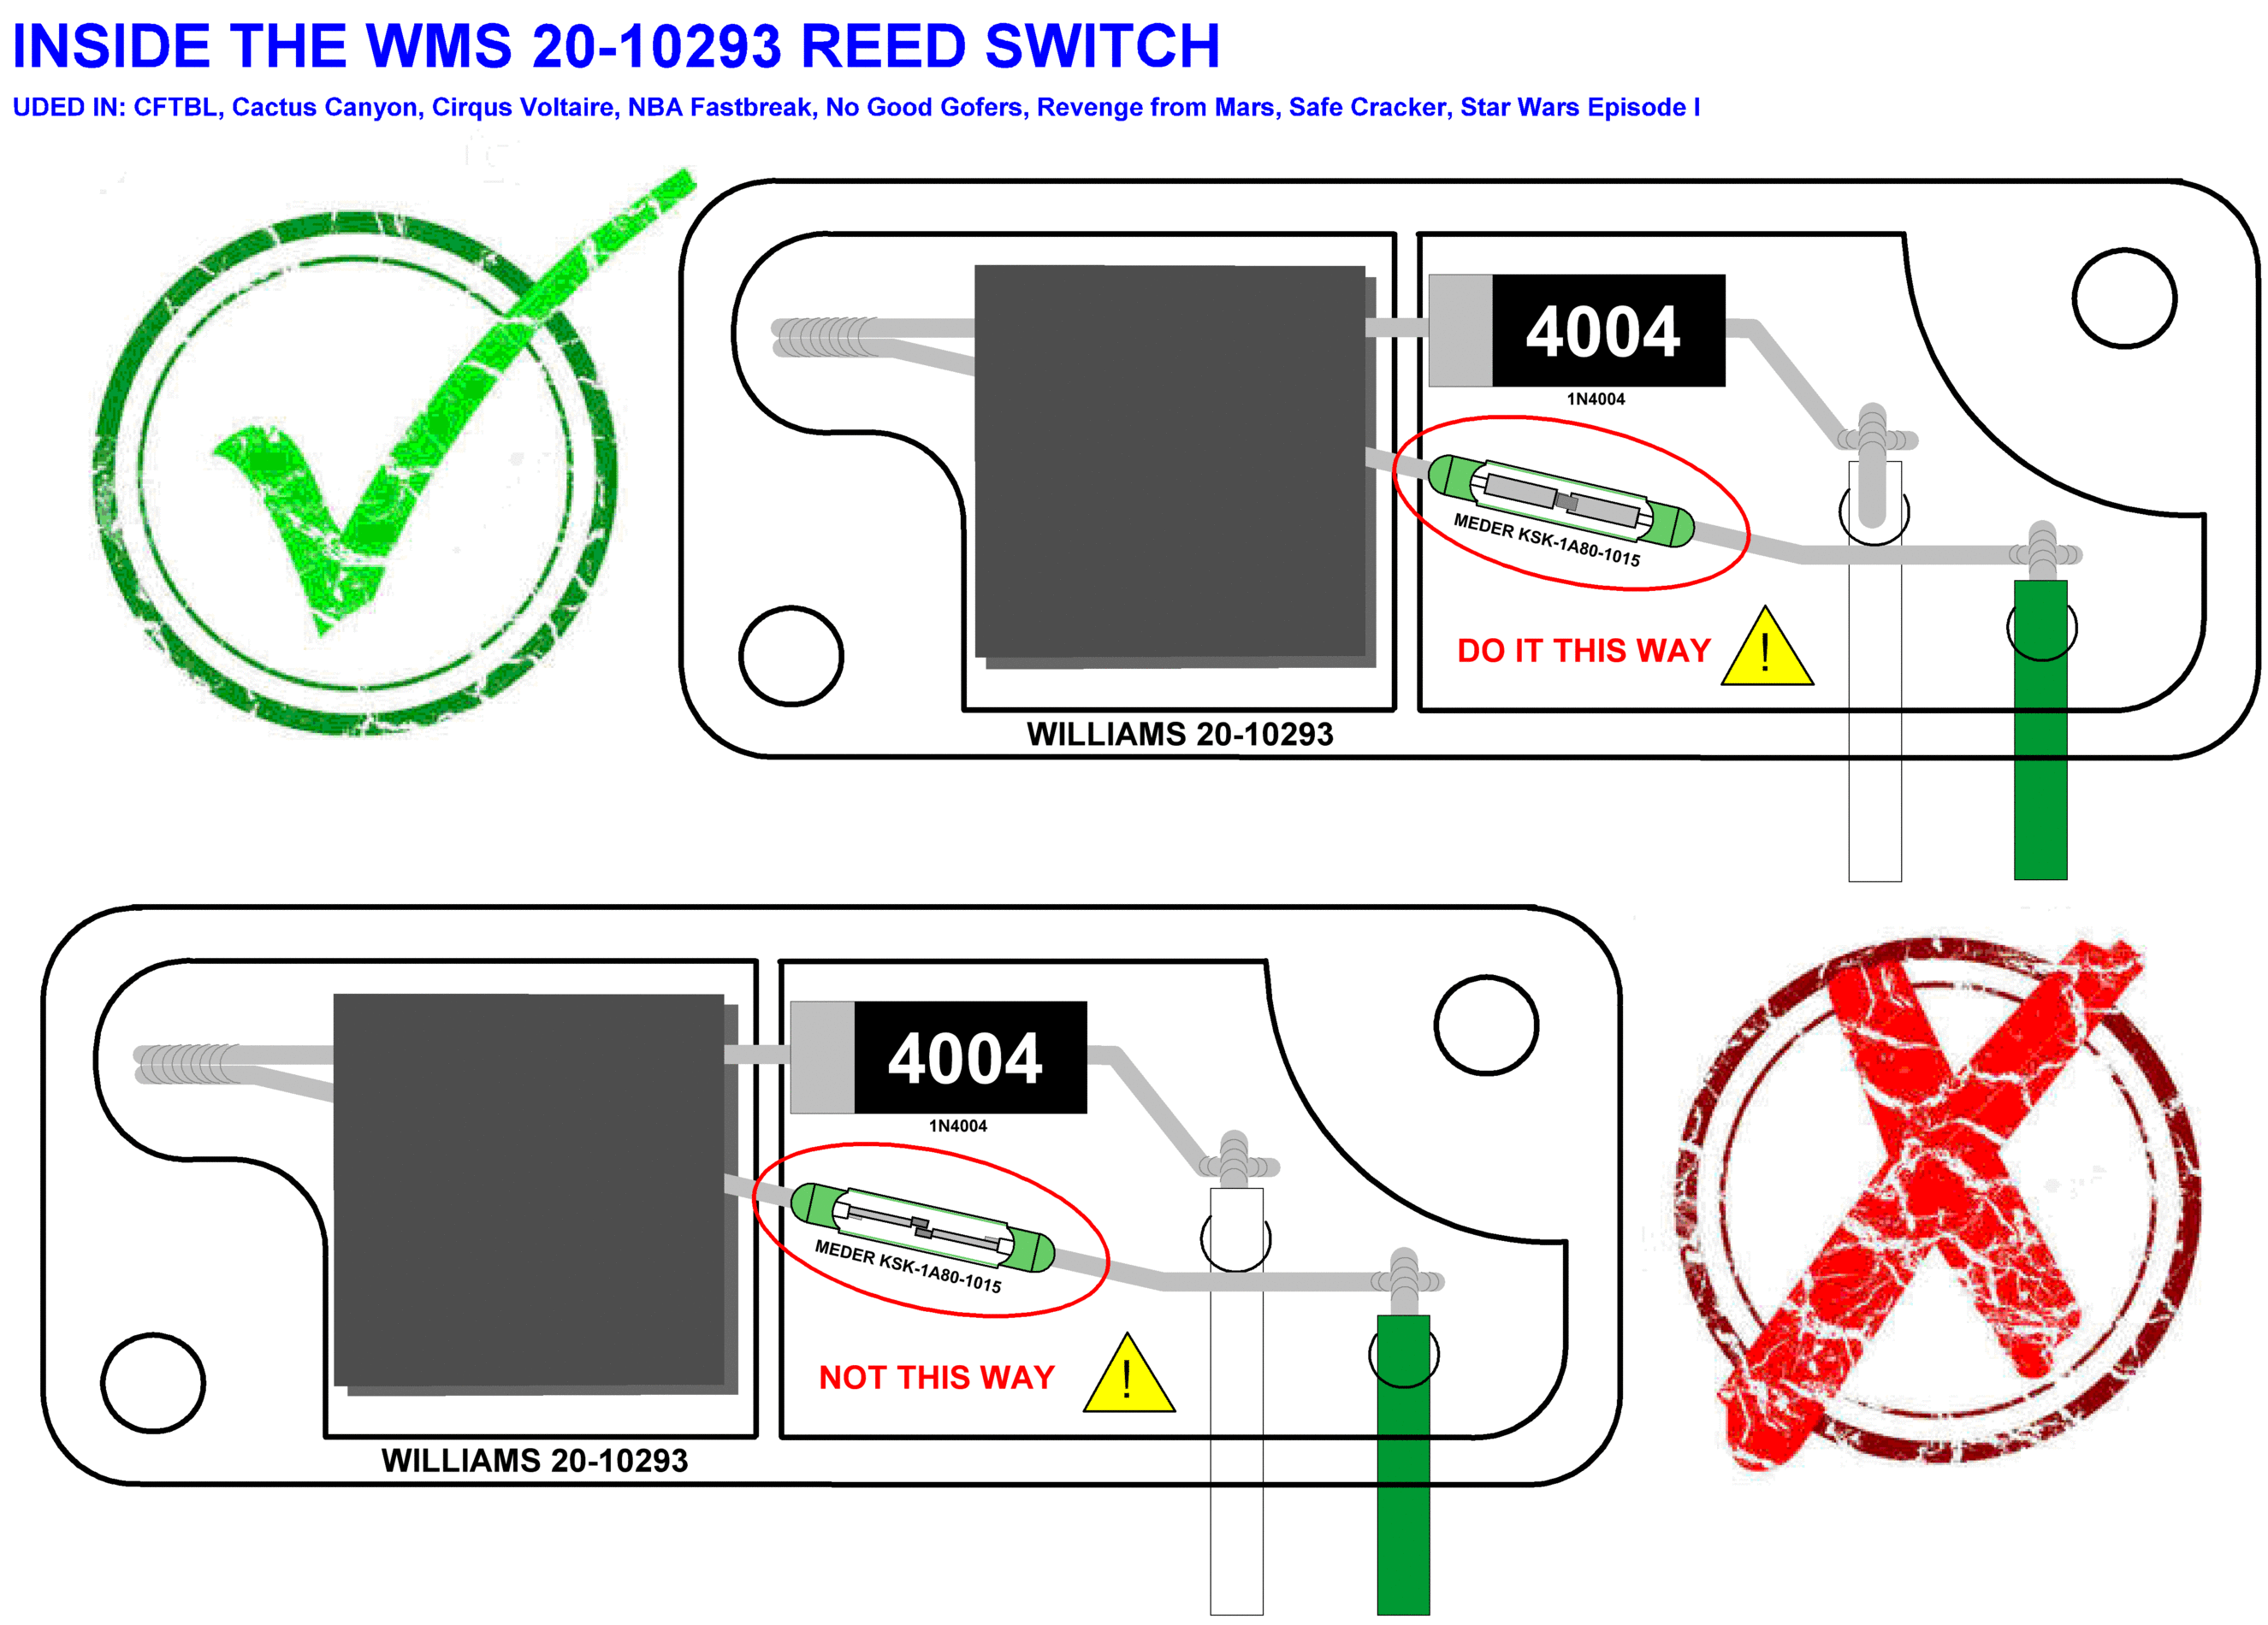
The Williams 20-10293 Reed Switch is nearly unobtainium and used in several Williams/Bally pins:

Cirqus Voltaire
Cactus Canyon
NBA Fastbreak
No Good Gofers
Revenge From Mars
Safe Cracker
Star Wars Episode 1

And if you can find them, they cost $20 -- pretty expensive for a switch. I had a dead one in my NGG, and pretty much gave up replacing it as it wasn't essential for game play (one in a set of two in front of Buzz for detecting hits). However, after reading this post by german-pinball:

https://pinside.com/pinball/forum/topic/has-anyone-found-a-replacement-for-the-20-10293-reed-switch#post-2441237

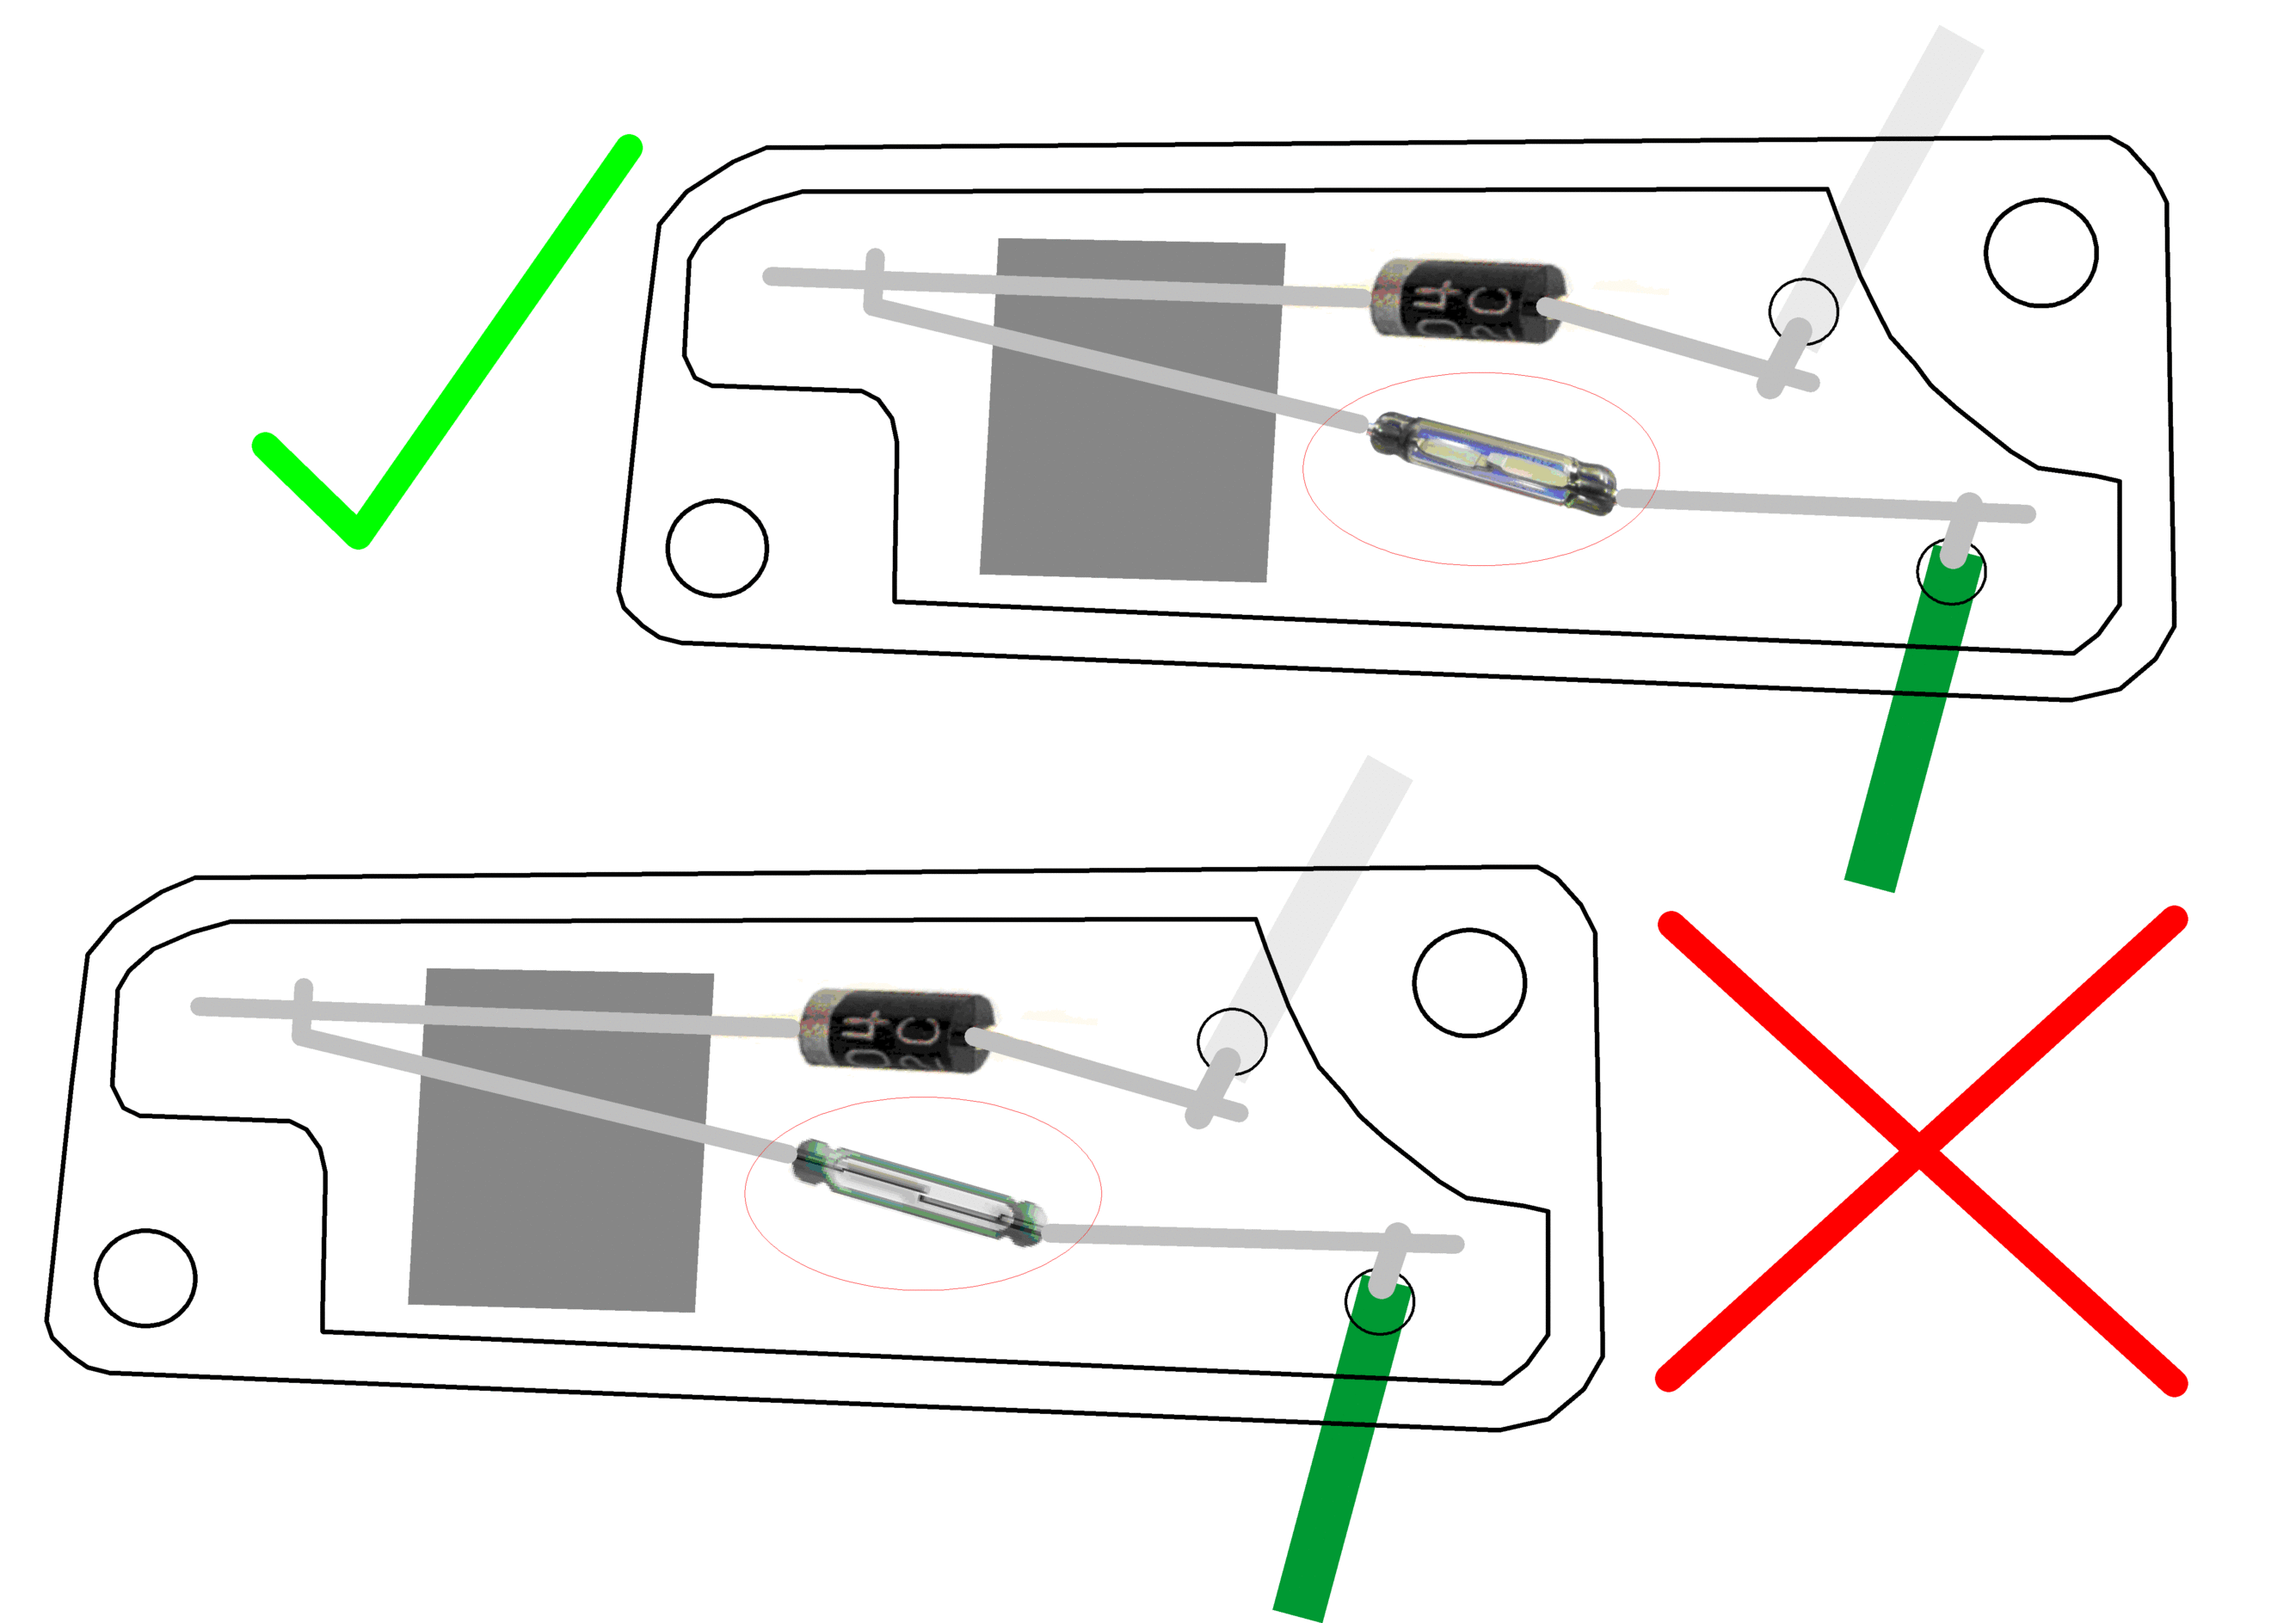
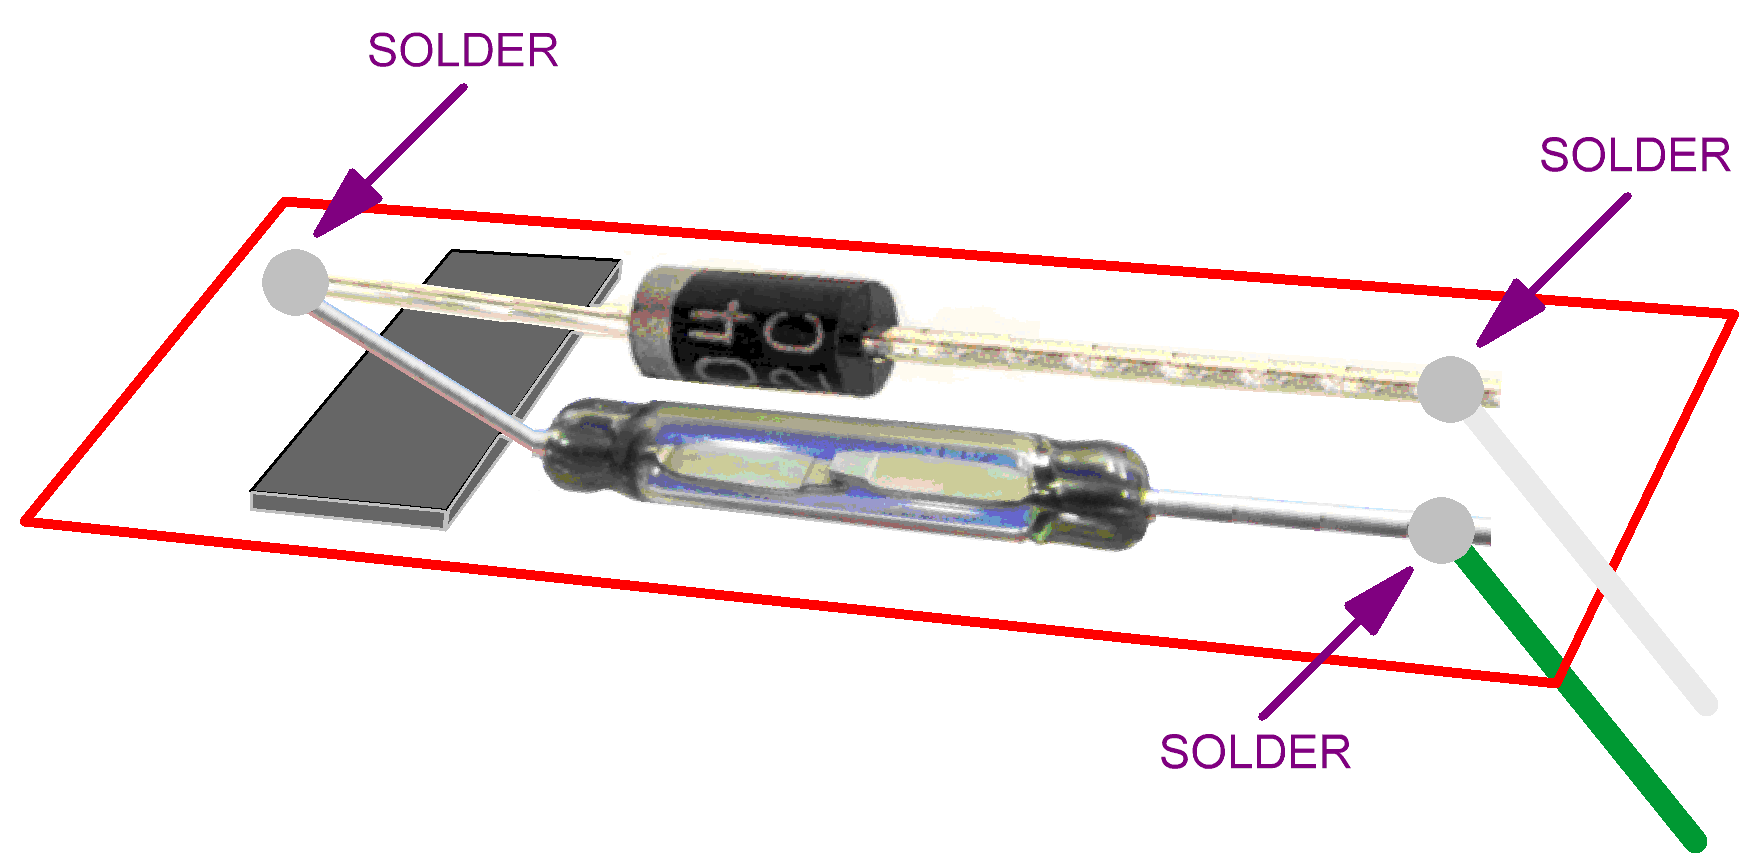
I thought I'd give it a try. And it worked. And it was pretty easy. And it was cheap ($1.50 for the actual reed switch). So to expand on german-pinball's short instructions, here are step-by-step instructions with pictures.

#2 8 years ago

Parts:
Magnetic / Reed Switches 1 Form A 7mm AT 1015: http://www.mouser.com/ProductDetail/MEDER-electronic-Standex/KSK-1A80-1015/?qs=KFo7JewZbUFX%252bU5EsD5Ziw%3D%3D
Diode: http://www.pinballlife.com/index.php?p=product&id=173
Silicone or caulk

Tools:
Soldering gun and solder
Helping hands (they really help)
Small flathead screwdrivers to pick and pry
Wire snippers

#3 8 years ago

Step 1: Take out reed switch
Step 2: Pick out silicone (whatever it is). I used a small flathead screwdriver.
Step 3: Expose diode and reed switch

IMG_4468.JPGIMG_4468.JPG
IMG_4469.JPGIMG_4469.JPG

#4 8 years ago

Step 4: Pry out magnet
Note: Don't pry out magnet on the other side of the reed switch.

IMG_4474.JPGIMG_4474.JPG IMG_4475.JPGIMG_4475.JPG
#5 8 years ago

Step 5: push out reed switch and diode with switch wires.
Note that there are small channels the wires run through in an internal bracket and then between the magnets

IMG_4477.JPGIMG_4477.JPG
#6 8 years ago

Step 6: Remove old reed switch and diode (might as well replace everything)
Step 7: Tin new reed switch and place in channel
Note: orientation of reed switch *may* be important (need to test). In this example, both the original and the replacement were oriented with the flat sides of the switch facing up/down (not looking at the edge from above).

IMG_4478.JPGIMG_4478.JPG

#7 8 years ago

Step 8: Tin new diode and place in channel. Note the direction of the diode!
Note: You'll have to cut the lead to fit

IMG_4480.JPGIMG_4480.JPG

#8 8 years ago

Step 9: Solder leads of diode and reed switch together
Note: just a quick tap with a soldering iron should do it

IMG_4481.JPGIMG_4481.JPG
#9 8 years ago

Step 10: Solder plug wire to reed lead. Clip excess lead
Step 11: Solder plug wire to diode lead. Clip excess lead

IMG_4482.JPGIMG_4482.JPG IMG_4483.JPGIMG_4483.JPG
#10 8 years ago

Step 12: replace magnet

IMG_4485.JPGIMG_4485.JPG
#11 8 years ago

Step 13: Fill with silicone or caulk. I had a tube of 100% silicone for aquariums on hand. Let cure till surface is solid.

IMG_4486.JPGIMG_4486.JPG
#12 8 years ago

Step 14: Put back in game and test with switch test.
Step 15: Play some pinball!

#14 8 years ago
Quoted from G-P-E:

Excellent post!

Thanks GPE! Do you sell the reed switch? I'd like add a link to it, if you do.

#16 8 years ago
Quoted from german-pinball:

@lyonsden:
Really absolute excellent post and write up.
Very helpful foto documentation - will help the whole pinball community for the eternity.
I think, you will be "pinwikified", if you write to Chris Hibler - this should be stored in pinwiki.

GPE should put it in his shop as a "repair kit for WMS 20-10293 reed sensor".
CONGATS and THANKS for your great documentation.

Thanks GP! Wouldn't have been able to do this without your work. I'll send the link to Chris to see if he'd be interested in it for his wiki and I agree that it would be great if a small kit was available through GPE.

#19 8 years ago
Quoted from german-pinball:

It is correct. We use here a normally open (make contact) reed switch. We do not have to abserve polarity. Both, north and south pole, switch equally.

I may have had some dumb luck, but does it matter if the switch is rotated 90 degrees so that, from above, you are looking at the sides of the leaves in the switch (as asked by GPE)?

#21 8 years ago
Quoted from german-pinball:

I do not think, it does matter here in this application, BUT mightbe, I had the same luck at that time as you now had.
Look here
http://www.pic-gmbh.com/en/interactive/
there you can play a bit interactive - choose one pole and manual modus.
By the way- the disgusting old silicon or whatever it was, could be something like this:
http://www.acc-silicones.com/products/encapsulants.ashx

Neat tool! I have a couple of extra reed switches from Mouser. If anyone wants to send me a broken switch that I can test, I'll do my best to fix it and send it back to you. Just PM me.

#22 8 years ago

I updated Step 7 to address the orientation of the switch (just in case).

#24 8 years ago
Quoted from Pinmot:

Great post! Thanks for sharing this information.
Does anybody know if the same part could be used to repair Sega reed switches 180-5145-XX ?

Based on what German-Pinball has said, I think length is the big factor in these switches. Can you open it up and measure? If you want to send it to me, I'm happy to try one of the Mouser switches and test it out. I'll send it back to you regardless.

#27 8 years ago
Quoted from german-pinball:

I like, to draw grafics
REED SWITCH 1.GIF (Click image to enlarge)

Nice. This should help people understand the orientation.

3 weeks later
#33 8 years ago
Quoted from G-P-E:

Anybody have time to add this to pinwiki?
Also, a Hamlin reed relay is sometimes easier to find -- MITI-3V1-8-12.5

I requested a new account to do this, but never was authorized. Anyone else have one that can do this?

2 weeks later
#35 8 years ago

Very nice! Thank you GPE. Are you carrying The reed switch?

#37 8 years ago
Quoted from G-P-E:

Yep -- I have the Hamlin (now Littelfuse) version of these reed switches:
http://www.greatplainselectronics.com/proddetail.asp?prod=MITI-3V1-8-12.5

Fantastic!

1 month later
#39 8 years ago

Yes -- and that also explains way the orientation of the reed switch is important. If put in 90 degrees offset from how it is supposed, the lower field won't push it closed.

4 months later
#43 8 years ago

Awesome work, German-Pinball. Most places seem to be out of stock, but here is one for $20: http://www.flippers.com/catalog/product_info.php/reed-switch-p-4953

It would be great if they can be remade.

2 weeks later
#50 8 years ago
Quoted from DDDwingmaster:

Drawback of these sensors is that the ball is attracted by a magnet. Not much, but still noticeable. DO the original sensors also do this?

I have never noticed any grab by the sensors on a passing ball on an installed switch, which I've done many, many times while testing these switches. However, I haven't tried with the sensor out of the game. Most of these are mounted below plastic (ramp, insert), so 9mm range is probably too much. In any case, try testing through a ramp and see how much the magnets in the switch grab a ball.

#51 8 years ago
Quoted from german-pinball:

A friend of mine made a 3D-grafic and we want to put it on a 3D-printer the next days and want to see the result.

Nice!

#53 8 years ago
Quoted from german-pinball:

Thats ABSOLUTLY correct - my grafics above are in this way misleading, as I drawed a playfield and not a plastic ramp or so. As far as I know, none of these reed switches is used through wooden playield. 3-5mm range should be OK, so the magnets could be weaker - my guess only.

Yes -- that is my thought as well: 3-5mm sensing should be perfect.

5 months later
#59 7 years ago
Quoted from DDDwingmaster:

I just published on thingiverse a 3d printable sensor pinball sensor with instructions how to build one. See here: http://www.thingiverse.com/thing:1652237. The maximal distance to detect a pinball is about 4.5mm.

Nice work! This is exactly the missing piece that people need to build their own from scratch.

Promoted items from Pinside Marketplace and Pinside Shops!
$ 399.00
Cabinet - Decals
Mircoplayfields
 
$ 9.95
Eproms
Pinballrom
 
From: $ 10.00
Playfield - Protection
UpKick Pinball
 
$ 89.99
Lighting - Led
Lighted Pinball Mods
 
$ 14.95
Playfield - Toys/Add-ons
ULEKstore
 
8,500 (OBO)
Machine - For Sale
Bay Shore, NY
$ 9.95
Eproms
Pinballrom
 
$ 24.50
Playfield - Plastics
Pinball Haus
 
4,500 (OBO)
Machine - For Sale
Oakdale, CA
4,000 (OBO)
Machine - For Sale
Milan, PA
$ 120.00
Cabinet - Shooter Rods
Super Skill Shot Shop
 
$ 18.50
Playfield - Plastics
Pinball Haus
 
From: $ 29.95
Playfield - Toys/Add-ons
RavSpec
 
$ 84.99
Displays
FlyLand Designs
 
$ 169.99
Cabinet - Shooter Rods
Maine Home Recreation
 
$ 1.00
Pinball Machine
Pinball Alley
 
$ 79.99
Cabinet - Armor And Blades
PinGraffix Pinside Shop
 
$ 8.99
Cabinet - Other
Inscribed Solutions
 
$ 225.00
Cabinet - (Alt) Translites
FlyLand Designs
 
$ 84.99
Playfield - Decals
FlyLand Designs
 
$ 84.99
Cabinet - Decals
FlyLand Designs
 
$ 27.95
Eproms
Pinballrom
 
$ 11,300.00
Pinball Machine
Yellow River Pinball
 
From: $ 1.00
Playfield - Other
Rocket City Pinball
 
$ 119.99
Cabinet - (Alt) Translites
FlyLand Designs
 
$ 1,139.00
Pinball Machine
Mircoplayfields
 
5,800 (OBO)
Machine - For Sale
Wilmington, VT
$ 20.00
Playfield - Toys/Add-ons
Pinball Haus
 
$ 45.95
Eproms
Pinballrom
 
Great pinball charity
Pinball Edu

You're currently viewing posts by Pinsider lyonsden.
Click here to go back to viewing the entire thread.

Reply

Wanna join the discussion? Please sign in to reply to this topic.

Hey there! Welcome to Pinside!

Donate to Pinside

Great to see you're enjoying Pinside! Did you know Pinside is able to run without any 3rd-party banners or ads, thanks to the support from our visitors? Please consider a donation to Pinside and get anext to your username to show for it! Or better yet, subscribe to Pinside+!


This page was printed from https://pinside.com/pinball/forum/topic/diy-repair-20-10293-reed-switch?tu=lyonsden and we tried optimising it for printing. Some page elements may have been deliberately hidden.

Scan the QR code on the left to jump to the URL this document was printed from.