(Topic ID: 8059)

DE Simpson restoration project

By Doot77

12 years ago


Topic Heartbeat

Topic Stats

  • 55 posts
  • 28 Pinsiders participating
  • Latest reply 12 years ago by kwiKimart
  • Topic is favorited by 3 Pinsiders

You

Linked Games

Topic Gallery

View topic image gallery

100_8202.JPG
100_8201.JPG
100_8200.JPG
100_8087.JPG
100_8020.JPG
100_8086.JPG
100_8014.JPG
100_8093.JPG
100_8092.JPG
100_8088.JPG
100_8091.JPG
100_8087.JPG
100_8086.JPG
100_8075.JPG
100_8053.JPG
100_8042.JPG
There are 55 posts in this topic. You are on page 1 of 2.
#1 12 years ago

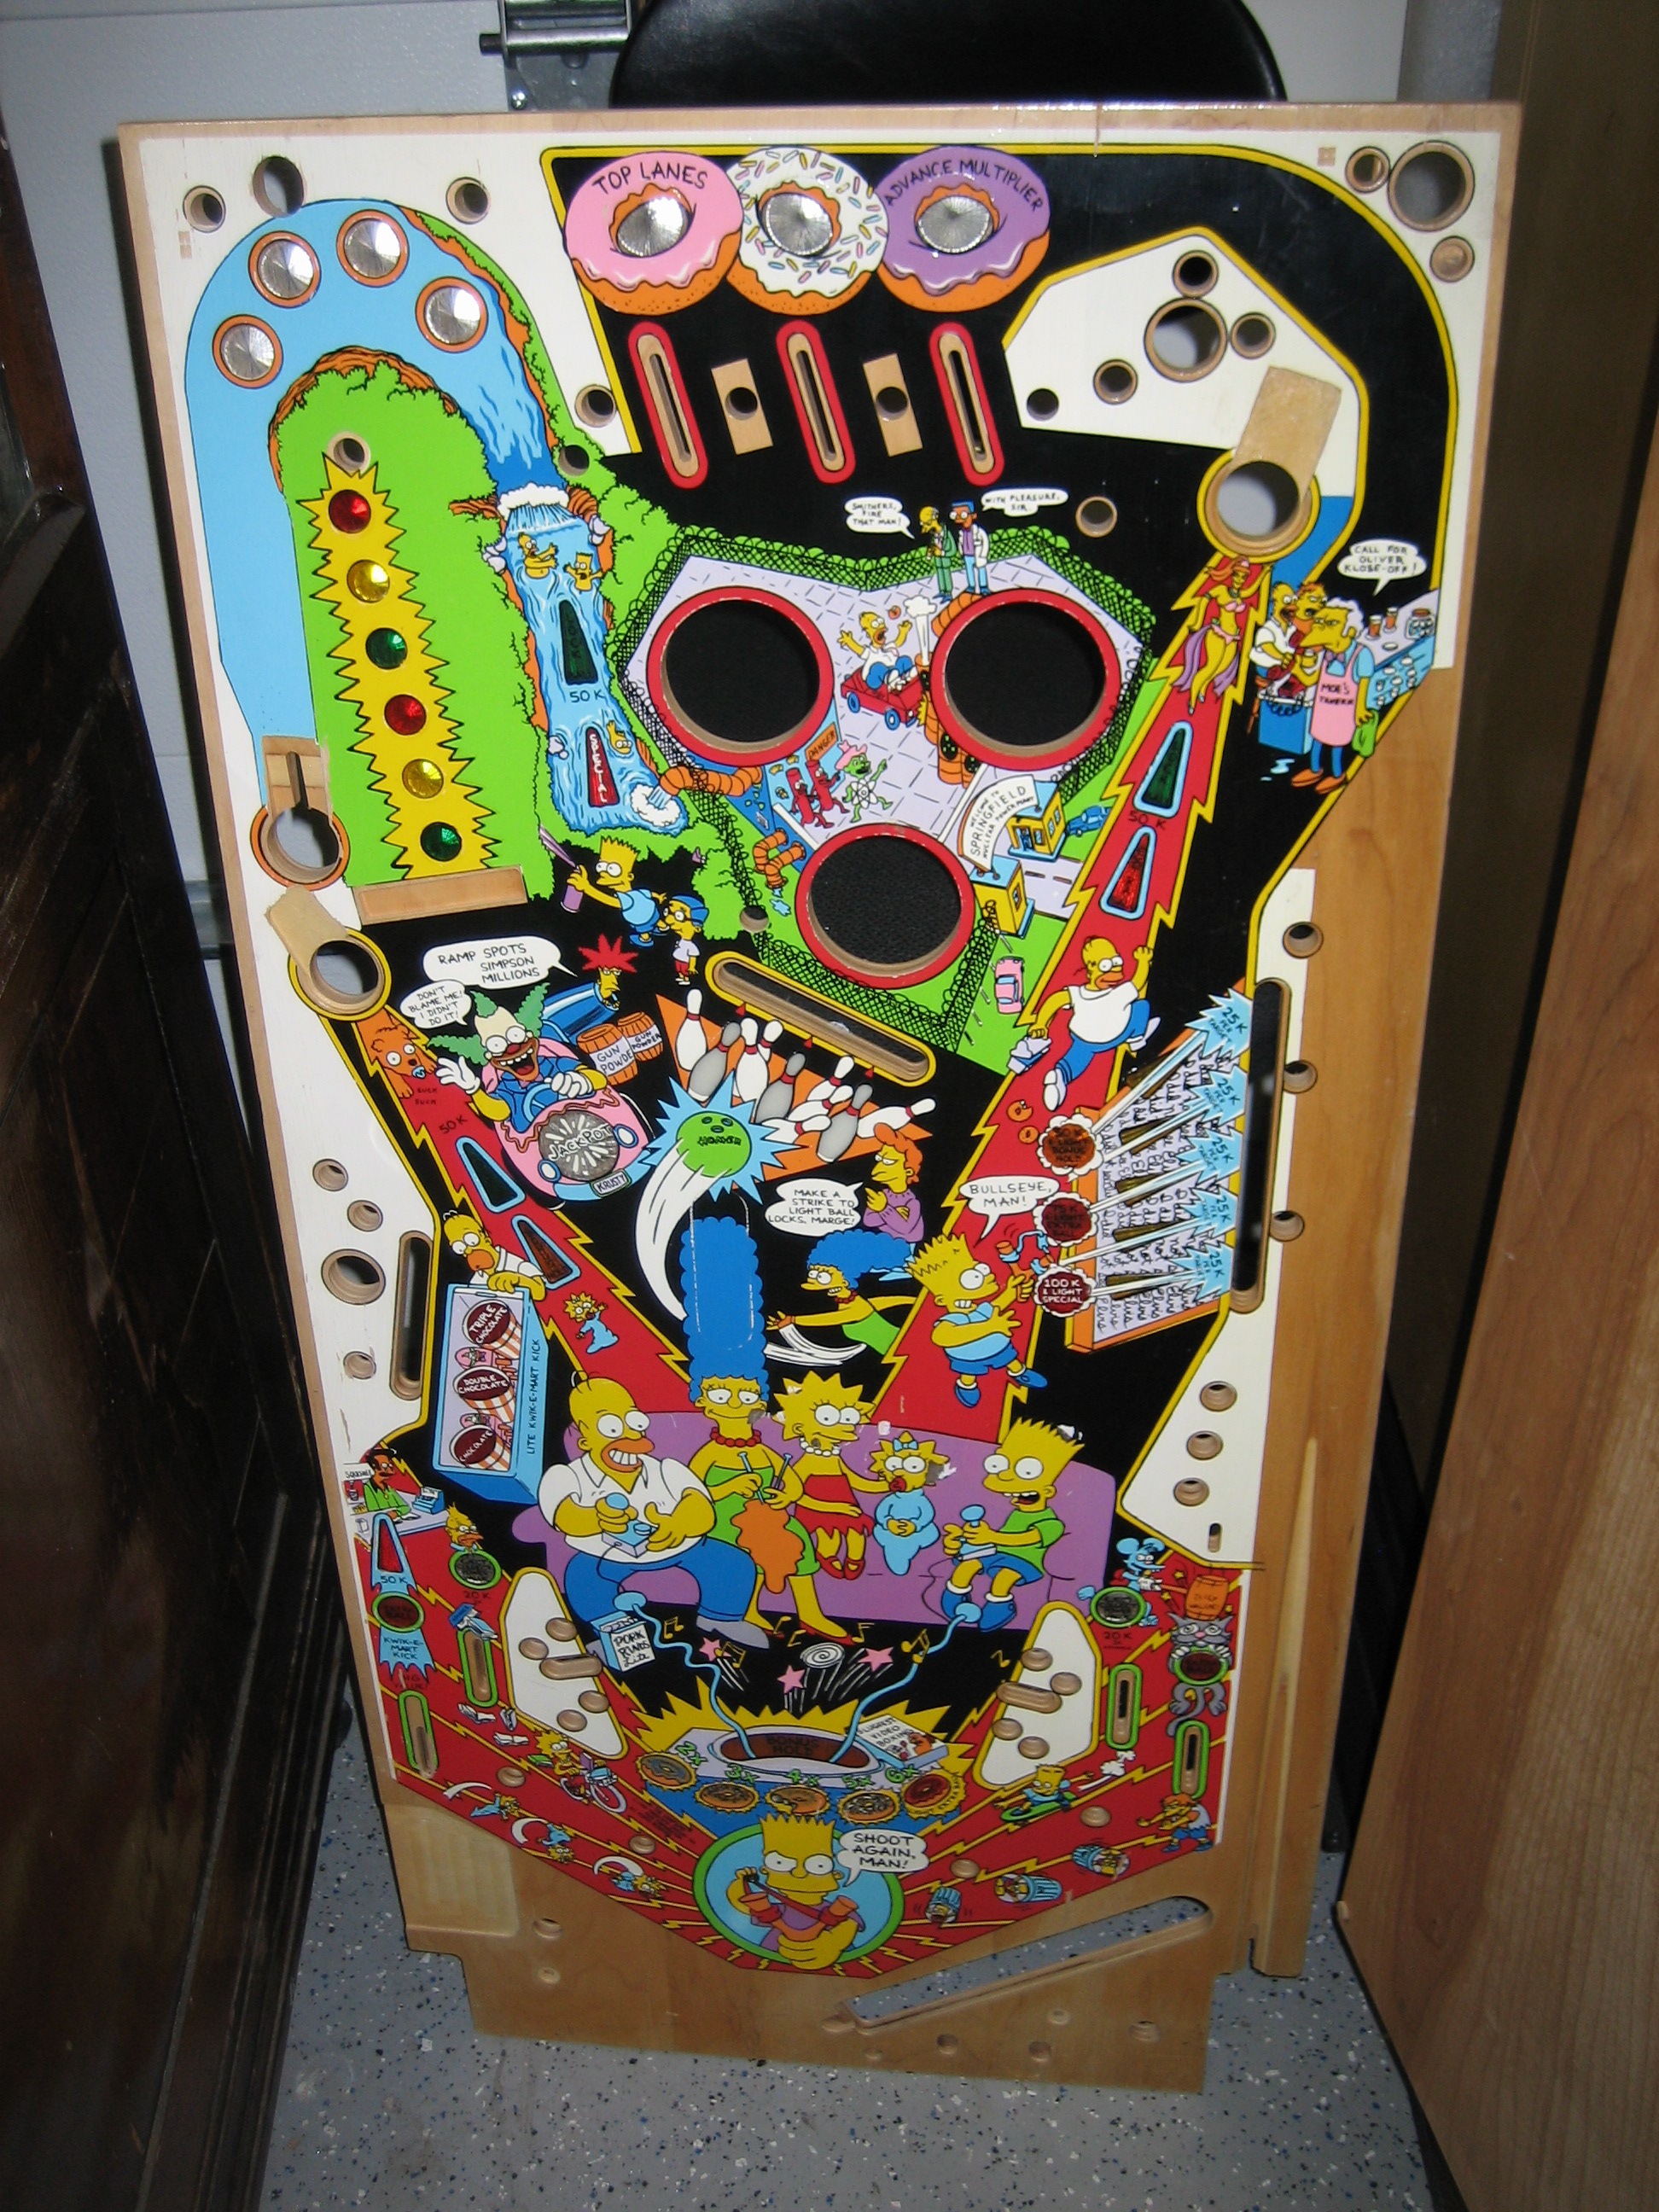
I'm just finishing up on a Data East The Simpson's PF resto and thought I'd put up some before and after pics for everyone to see. After purchase and starting work on the game, I found that i shouldn't have bought it, but it ended up pretty nice.

Here are a few of the worst spots.

100_7978.JPG100_7978.JPG 100_7980.JPG100_7980.JPG 100_7981.JPG100_7981.JPG

#2 12 years ago

The playfield had mylar over the most of it so at least that was good. Here's a before and after a quick cleaning.

100_7983.JPG100_7983.JPG 100_7991.JPG100_7991.JPG

#3 12 years ago

Being in such bad shape the mylar didn't come off as good as I'd hoped for. After teardown and some scrubbing it became more obvious how bad it really was.

100_8014.JPG100_8014.JPG 100_8015.JPG100_8015.JPG 100_8022.JPG100_8022.JPG

#4 12 years ago

Next I started to draw in the missing artwork from pics I found online. I got some help from member's here with a couple pics I couldn't find also. This first pic I ended up changing a bit as when I found a better pic of Bart's hand.

100_8025.JPG100_8025.JPG 100_8026.JPG100_8026.JPG 100_8027.JPG100_8027.JPG

#5 12 years ago

I then painted with black over the lines I drew to give me the baseline to which I could start to color in the artwork

100_8028.JPG100_8028.JPG 100_8029.JPG100_8029.JPG 100_8030.JPG100_8030.JPG

#6 12 years ago

A few more of the above process. Here the almost entire body of Smither's was removed with the mylar. I used the freeze spray technique to remove the mylar and with th combination of very bad condition of the game and being my first time doing it some artwork was removed with the mylar.

100_8032.JPG100_8032.JPG 100_8033.JPG100_8033.JPG

#7 12 years ago

And then from there started the month long process of touching up almost the entire playfield. I've found I'm very picky on color matching and not very good at it and its almost just as easy to redo the whole entire area that I'm touching up to ensure a perfect match. That however adds drastically to the time of repair, but looks perfect after clearcoating.

100_8035.JPG100_8035.JPG 100_8036.JPG100_8036.JPG 100_8040.JPG100_8040.JPG

#8 12 years ago

Looking good!!! Can't wait to see it finished!!

#9 12 years ago

Keep it up! thats a great game that you are saving from the junk pile!

#10 12 years ago

Your doing a really nice job keep it up.

#11 12 years ago

Here's some pics prior to clearcoating, with most of the touch up work done.

100_8043.JPG100_8043.JPG 100_8044.JPG100_8044.JPG 100_8045.JPG100_8045.JPG 100_8042.JPG100_8042.JPG

#12 12 years ago

Some more prior to clearcoat.

100_8046.JPG100_8046.JPG 100_8047.JPG100_8047.JPG 100_8048.JPG100_8048.JPG 100_8049.JPG100_8049.JPG

#13 12 years ago

wow great work!

i suppose no real playfields out there so gotta repair it all by hand?

#14 12 years ago

And a few full PF shots before Clearcoating. I'll post up some after clearcoat tomorrow.

100_8053.JPG100_8053.JPG 100_8075.JPG100_8075.JPG

#15 12 years ago

dvandentop: No NOS playfields out there, but I'm too cheap for that anyway. But I actually enjoy doing the work on the games bringing them back to their former glory about as much as I do playing them. Unfortunately I seem to keep jumping into projects one after another and seem to work more than play lately. My Pinbot was going to be next and I was waiting until next year to start, but I ended up getting a TZ and while shopping it out i decided it needed to be clearcoated too. Just got it sprayed yesterday.

#16 12 years ago

Looks fantastic considering what you started with....I had an EBC that looked nearly the exact same after mylar removal and I chickened out....I couldn't put in the work you did and sold it at a loss to a fellow collector.

Could you detail a little the types of paint used, the process of prep afterwards for CC, and finally the CC and method used? I have a couple of PFs that I'm considering touching up and CC, but have never really done either to the level you've accomplished.

#17 12 years ago

Outstanding! Great job and just a great effort on your part I have a beat Flash Gordon that after i stripped it down and tried the touchups, I just gave up. A little to detailed for me. Im awaiting the CPR playfield now. Good for you.

#18 12 years ago

Damn, good luck to you. Ide like to own this pin though

#19 12 years ago

awesome restore work. that is amazing.

#20 12 years ago

Kudos to the restore Doot!
It will all be worth it when that last clearcoat hardens and the re-build starts!
Great job with the color matching too!

#21 12 years ago

Excellent job Doot. I've noticed there seem to be three major types of PinHeads, the Players, the Collectors and the Restorers, you certainly qualify as a major Restorer.
Like Robertmee I would also like to know what paint you prefer. It looks great in the photos.

#22 12 years ago
Quoted from Kane:

Like Robertmee I would also like to know what paint you prefer. It looks great in the photos

Looks nice,Am also interested in your paints of choice for touch-ups and can you buy them in pints or smaller (if you are having them mixed,then I suppose qts. are the smallest you can get)
Also good tip that the color matching is not as noticeable after the work is clearcoated +1

#23 12 years ago

Wow..Very nice restore. Wish I had the artistic ability.....

#24 12 years ago

Ok, so to answer a few questions, the paint is just the cheap $1 bottles of acrlyic craft paints. The brand I prefer is Folk Art, Walmart carries these as well as many of the hobby type stores. As for the prep work for CC anything that isn't new paint needs to be scuffed and cleaned before clearing. I've found it easiest that if your going to clear to take a good wax & grease remover and scrub the PF with a fine scuff pad (gray). Then from there after all touchup is complete you just wipe down the entire PF with the cleaner and spray. The clearcoat I use is an automotive clear (Family runs a Body shop so this is easy access) and is applied just like painting a car via spray gun.

#25 12 years ago

Loving this thread, and enjoying the pics and progress reports. I've started a KISS restore project, and the playfield is not nearly as bad as this one. But the detail and tips provided give me more confidence going into it.

#26 12 years ago

Ok here are some pics after Clearcoating has been completed.

100_8086.JPG100_8086.JPG 100_8087.JPG100_8087.JPG 100_8091.JPG100_8091.JPG

#27 12 years ago

Thanks jk2171 glad your enjoying it, if you have any specific questions don't hesitate to ask. I tried buying a Kiss machine from one of my brother's friends but he'd rather it just sit disassembled in his basement than get rid of it.

#28 12 years ago

A few more after CC pics.

100_8088.JPG100_8088.JPG 100_8092.JPG100_8092.JPG 100_8093.JPG100_8093.JPG

#29 12 years ago

Now here's a few Before/After pics of the worst areas to show the progress again. I've yet to take any fully assembled pics, so I'll take some and post them up later to finish it out.

100_8014.JPG100_8014.JPG 100_8086.JPG100_8086.JPG 100_8020.JPG100_8020.JPG 100_8087.JPG100_8087.JPG

#30 12 years ago

Awesome job....You should be proud of that work! Wish I knew someone who did Automotive clear in my area (Raleigh)...I'd be more inclined to take on projects like this.

#31 12 years ago

holy crap looks awesome any idea how many hours??

#32 12 years ago

I thought about keeping track of the hours, but I knew it would be too many! I worked on it most nights for a couple hours and many hours on most of the weekends.

BTW how do you Quote someone, can't figure it out on this new setup?

#33 12 years ago

just highlight it and it will show up as a little button to click

#34 12 years ago

if your on an i device, quoting text no longer works.

#35 12 years ago

wow that is some nice work! even as simple as simpsons art is, there's some pretty small detail in there.

#36 12 years ago
Quoted from Doot77:

A few more of the above process. Here the almost entire body of Smither's was removed with the mylar. I used the freeze spray technique to remove the mylar and with th combination of very bad condition of the game and being my first time doing it some artwork was removed with the mylar.

Congrats on that awesome restoration. I wonder of less artwork would of come off if you heated the mylar instead freezing?

#37 12 years ago

Amazing work. Thanks for sharing.

#38 12 years ago

That's one crazy amount of work. I think my wife would divorce me.

#40 12 years ago
Quoted from Doot77:

No NOS playfields out there ...

Looks like Lloyd still has one:

http://www.ssbilliards.com/forsale/images/playfields/depsegastern/pf-nos-simpsons-front.jpg

Quoted from Doot77:

BTW how do you quote someone, can't figure it out on this new setup?

Quoted from dvandentop:

just highlight it and it will show up as a little button to click

Looks like Robin also put the traditional quote button back at the upper right of the reply area.

Doot, I gotta give you some serious props, man! That took a hell of a lot of hard work, and the end result is nothing short of amazing. You should be very proud of yourself.

#41 12 years ago

Great job, coming along nicely!

#42 12 years ago

Thanks for all the compliments, I definitely am proud of the work I did. It does make it hard to ever want to sell one of the games that I've put so much time into. This was my second complete resto and this one was alot worse than the first but not as much detail.

I see the Quote option has changed since yesterday, I guess I wasn't the only one who couldn't figure it out.

#43 12 years ago

Did you leave the inserts in when you sprayed the clear coat?

#44 12 years ago
Quoted from Firebaall:

Did you leave the inserts in when you sprayed the clear coat?

Yep, most were fine a few were slightly raised and I leveled them out the best I could and sprayed with them in. That way after clearcoating, wetsanding and buffing it will be perfectly level.

#45 12 years ago

All I can say is holy crap that is impressive!! Nicely done!!!

#46 12 years ago
Quoted from robertmee:

Awesome job....You should be proud of that work! Wish I knew someone who did Automotive clear in my area (Raleigh)...I'd be more inclined to take on projects like this.

Have you checked with A local shop. They might do it for a small fee. I sure they would help out. It would not take them long to do.

#47 12 years ago

Well done Doot77! You really saved that playfield!

#48 12 years ago

Wow looks great, crazy how close the colors match, great job!

#49 12 years ago

Wow that looks great. You did a great job. The touch up is very good. What kind of paint did you use for the touch up work? can't wait to see it all back together.

#50 12 years ago
Quoted from tatman9999:

Wow that looks great. You did a great job. The touch up is very good. What kind of paint did you use for the touch up work? can't wait to see it all back together.

I used Folk Art craft acrylic paint - the cheap $1 2oz tubes. You can get them at Walmart or any craft store.

Promoted items from Pinside Marketplace and Pinside Shops!
$ 54.99
Cabinet - Shooter Rods
Lighted Pinball Mods
 
3,200
Machine - For Sale
Boca Raton, FL
$ 15.99
Playfield - Toys/Add-ons
Daddio's 3D Printed Mods
 
$ 18.95
Eproms
Pinballrom
 
$ 44.99
Cabinet - Shooter Rods
Pinball Shark
 
$ 12.99
Playfield - Toys/Add-ons
Daddio's 3D Printed Mods
 
From: $ 40.00
Lighting - Interactive
Professor Pinball
 
$ 99.99
Lighting - Other
Lighted Pinball Mods
 
$ 50.00
Playfield - Protection
Duke Pinball
 
From: $ 19.99
$ 27.95
Eproms
Pinballrom
 
$ 39.99
Playfield - Toys/Add-ons
Daddio's 3D Printed Mods
 
$ 39.99
Playfield - Toys/Add-ons
Daddio's 3D Printed Mods
 
$ 44.95
Playfield - Toys/Add-ons
PinBoss Mods
 
Trade
Machine - For Trade
Myrtle Beach, SC
From: $ 159.00
Playfield - Toys/Add-ons
Sparky Pinball
 
$ 5.00
Playfield - Protection
UpKick Pinball
 
$ 25.00
Cabinet - Other
Filament Printing
 
$ 35.00
Cabinet - Other
Rocket City Pinball
 
$ 18.95
Eproms
Pinballrom
 
There are 55 posts in this topic. You are on page 1 of 2.

Reply

Wanna join the discussion? Please sign in to reply to this topic.

Hey there! Welcome to Pinside!

Donate to Pinside

Great to see you're enjoying Pinside! Did you know Pinside is able to run without any 3rd-party banners or ads, thanks to the support from our visitors? Please consider a donation to Pinside and get anext to your username to show for it! Or better yet, subscribe to Pinside+!


This page was printed from https://pinside.com/pinball/forum/topic/de-simpson-restoration-project and we tried optimising it for printing. Some page elements may have been deliberately hidden.

Scan the QR code on the left to jump to the URL this document was printed from.