(Topic ID: 108246)

Curbfeeler's F14 Tomcat Restoration -- It Begins...

By Curbfeeler

9 years ago


Topic Heartbeat

Topic Stats

You

Linked Games

Topic Gallery

View topic image gallery

20160110_135344_(resized).jpg
20160110_135333_(resized).jpg
IMG_4922.JPG
IMG_4921.JPG
IMG_4924.JPG
IMG_4923.JPG
IMG_4919.JPG
IMG_4920.JPG
IMG_4661.jpg
IMG_4659.jpg
IMG_4660.jpg
IMG_4658.jpg
IMG_4655.jpg
IMG_4657.jpg
IMG_4653.jpg
IMG_4652.jpg
There are 81 posts in this topic. You are on page 1 of 2.
#1 9 years ago

Hi all. I've been holding on to an F14 for over a year, waiting to attempt a restore until inserts are available. Well, I've I've decided not to wait any longer. Just going to do my best with what I have. Here are some pics of the playfield cleaned with ME and all inserts removed. Four pieces of factory mylar also removed.

I bought this as a player machine due to the "cobblestone insert" issue that's common to F14. I flattened them back then with a widemouth c-clamp and have been playing it as-is since then. Even though I have several plays on it, I didn't realize exactly what I had until I started pulling it apart. This thing is the cleanest pin I own by far. I talked to the op that sold it to me, and it was in the gameroom of a campgrounds but didn't know the history prior to that. There is absolutely no nicotine staining on this thing, and the inside of the cab is spotless. No dirt or grime at all. There's also almost no UV yellowing from the GI, the shooter lane looks amazing, and there is a bit of white corrosion on the lamp sockets, but it's much less than other machines of this era. I'm going to guess it was in a climate controlled environment and that it was seldom even powered up.

It's going to make a GREAT restore! Very stoked about it.

IMG_4443.JPGIMG_4443.JPG
IMG_4444.JPGIMG_4444.JPG
IMG_4445.JPGIMG_4445.JPG

#2 9 years ago

Inserts are the only part of this machine that look like crap. They are going to get the business. Progress pics below.

IMG_4404.JPGIMG_4404.JPG IMG_4435.JPGIMG_4435.JPG IMG_4436.JPGIMG_4436.JPG IMG_4437.JPGIMG_4437.JPG IMG_4438.JPGIMG_4438.JPG IMG_4440.JPGIMG_4440.JPG IMG_4441.JPGIMG_4441.JPG
#3 9 years ago

Congrats on the find! I picked up an F-14 a few weeks ago and have been having a blast with it! A game definitely worthy of a restore!

#4 9 years ago

Wow, that playfield does look nice. Good luck with this. Your pinbot looks awesome, guess this will look good too. Are you going to put down new insert decals and then clear over it all?

#5 9 years ago

Thanks Mark. I am watching your F14 project with great interest

Quoted from Snux:

Are you going to put down new insert decals and then clear over it all?

This game came with a set of inserts that are a mylar type, so I'm on the fence. I could just clear it with no art and put those on at the last or I could ditch those and get the waterslide type and clear those in. I really can't decide at this point. I hate the idea of wasting something I already have, but the waterslide are probably the most professional-looking.

#6 9 years ago

Worked on epoxying the inserts until pretty late last night. I think I counted 16 that are glued in. These on the kickback side I hit with 91% alcohol so you can get kind of a preview of how they will look cleared.

IMG_4448.JPGIMG_4448.JPG IMG_4449.JPGIMG_4449.JPG
#7 9 years ago

Did you get away without lifting any paint when you got the inserts out? Or have you got a few black lines to redraw?

#8 9 years ago

Do not use the Mylar insert decals on the top of the clear! The common ones available have the printing on the top which makes the shine uneven and are so thick, they deflect the ball when they roll! I'm not a fan of the water slides either as they are not real black when backlit by the inserts. I would check with vid to see if you can use the Mylar decals under the clear.

#9 9 years ago
Quoted from Snux:

Did you get away without lifting any paint when you got the inserts out? Or have you got a few black lines to redraw?

No, I was really lucky. The mylar came away without lifting any paint at all except a little of the lettering, which I was sanding off anyway. A few keylines may need touched up very lightly here and there, but nothing major at all.

The only true problem area that I will have to account for at some point is where somebody tried to remove the pop bumper mylar in a past life. Looks like they scraped at it with some sort of tool and took a bit of the paint. They did this on both sides. It's that dithered dot artwork, so it won't be easy to restore, but I like a challenge!

#10 9 years ago
Quoted from Schwaggs:

Do not use the Mylar insert decals on the top of the clear! The common ones available have the printing on the top which makes the shine uneven and are so thick, they deflect the ball when they roll!

Hmm. Okay, thanks for that tip. I guess I can scan the new mylar decals and use the scans to make stencil masks with my Silhouette Cameo. Then I can spray the black, which is probably the closest thing to the original screen process. I'll cross that bridge when I come to it, I guess.

Right now I just have to worry about getting the inserts glued down. It's cold here, and Wednesday looks like my ideal window for clear coating the first layer.

#11 9 years ago

So last night while waiting for epoxy to dry, I was playing around with my Silhouette Cameo. I was testing out the theory that this thing would make airbrush stencil masks that could replace the black ring around my newly-sanded inserts. This is just Dollar Tree shelf paper, and I'm not able to float it as I can with the more expensive stuff, but I'm thinking it's going to work!

IMG_4456.JPGIMG_4456.JPG
IMG_4454.JPGIMG_4454.JPG
IMG_4455.JPGIMG_4455.JPG

That's a ways away, though. First I have to get it sprayed. Wednesday high of 60 degrees, so looks like that's my only window. Better get prepping! Three inserts drying and four still to install, but almost done gluing.

IMG_4457.JPGIMG_4457.JPG

#13 9 years ago

I restored a BK2K and cleared over the waterslide decals with excellent results. I cleared the playfield with several coats. Wet sanded flat, installed decals, then buried then in more clear. You can't even tell they are decals unless you really look hard

#14 9 years ago

Umm...what just happened? Is this the problem where Vid1900 says that after your first coat of clear you'll quickly find out if somebody ever used Pledge or another silicon-based product on your machine?

IMG_4461.JPGIMG_4461.JPG

IMG_4462.JPGIMG_4462.JPGIMG_4475.JPGIMG_4475.JPGIMG_4470.JPGIMG_4470.JPG

#15 9 years ago

Ouch that's not good. What was your prep procedure? Did you mist first coats? Sys 11's are are very tricky and risky to auto clear.

#16 9 years ago

ME and 91% for the initial cleaning. Then pulled all the inserts out of it with a hairdryer, sanded them and washed them with hot water. Put them back in with clear epoxy. Used 91% to clean any epoxy that got on the pf as I worked. For the most part I didn't get any epoxy on the pf, but things happen sometimes. This morning I hit it all with a dupont sanding sponge to rough up the clear. Waited until it was the warmest part of the day (61 degrees) and moved it out to the garage paint room. Hit it with a tack cloth, then Naptha on a clean towel. Then a brand new tack cloth again. I didn't do a mist coat, just went right for it because today is the only day I can spray due to weather.

I cleared my pinbot recently no issues. Only difference is the mist coat and I wasn't gluing any inserts.

#17 9 years ago

So many things can go wrong. Your guess will prob be as good as anyone's . The sanding sponge could have had something on it. The playfield prep might not have removed all the oils. I mist first with a snap dry clear and try to spray when its warm and humidity is lower than 50%. I'm no expert but on the only sys 11 playfield I cleared I sprayed a few coats of Varathane first to seal it then weeks later cleared with auto clear.

#19 9 years ago

That can be fixed. you just need to sand it flat and shoot it again. Use a random orbital and start with 100 grit and go through the range up to around 320 to 400. Even if there are still tiny dents, if they have some of the new clear in them, it will stick and they will fill.

When you start sanding it will freak you out because it will turn white and look like it is ruined. Take your time with the 100 and do not go to the artwork. After the 100 the paper will not sand as fast and you shouldn't be able to get to the art if you keep it totally flat. Wipe it with Naptha once in a while if you want to see the white go away and make sure your artwork is still ok.

#20 9 years ago

Wow that's aggressive 100 grit. Obviously if you go thru that clear and into the art work is probably going to be firewood. I wonder if you can rough up the bad areas, brush some 2PAC to try and level before you hit it with sander?

#21 9 years ago

Thanks. Too cold here for this crap!!! I have it on my sun porch, and it's curing so, so SLOWLY.

The night after I sprayed it (6 hours +-) the pad of my finger under the apron left a fingerprint. Last night (30 hours) it was still soft enough that I could see a mark from a fingernail pressed lightly.

Today it seems pretty hard and doesn't smell, so I think tonight I will sand. 100 grit, ha, not sure about that BadBrad. But maybe 320 and I could sand and not risk heart attack. I have a lot of sanding ahead of me, but my goal is to sand flat. I agree even the low spots have some clear, so I agree it will be fine eventually.

SDF - I am on the fence about filling the low spots first or sanding first. Found a local shop that sells Shopline 660 clear coat and for $40 I could be up and running and have product to fill these low spots. But should I do that or sand first, can't decide.

Thanks for comments. Stay tuned.

Dan

#22 9 years ago

Put some 400 grit on your sander and knock down all the high spots, don't get too crazy, you are not going to sand that disaster back to level- too risky.

Now take some well worn 600-800 grit (worn so the back of the paper is soft) and just using the tip of your finger, degloss all the low spots and depressions. make sure nothing is glossy.

Clean with Naphtha

Now, using the same brand clear as before (this is important), go ahead and flood out those craters.

When this all dries, NOW you can sand it flat and buff it out.

#23 9 years ago

Curing idea I've used when cold. I take play field inside house to a heated bathroom, turn on exhaust fan, close door, put sign on door to stay the F out

#24 9 years ago

Get some wax and grease remover from a automotive paint supply company.

#25 9 years ago

Thanks, Vid!

#26 9 years ago

Hello all. Sanded with 400 yesterday morning as Vid1900 advised. I was pretty aggressive with it, using the shiny low spots as a guide to tell me how close I was to hitting the original surface. But I didn't go crazy and by no means tried to sand it flat. I just got close and left the low spots. Then I used a 3m 800 sanding sponge and an old piece of 800 and tried to work with my fingers into any shiny spot until there were no shiny spots. Next I put two heaters in my spray room and brought the temp up to 65 degrees (it was 40 outside). Then I sprayed it very wet. Then I really cranked up the heaters, getting the room as high as 85 degrees!

The result is much improved! I think I can sand this flat and then start with my touchups. A few spots that are still low, but I'm happy with my progress.

IMG_4513.JPGIMG_4513.JPG IMG_4514.JPGIMG_4514.JPG IMG_4515.JPGIMG_4515.JPG IMG_4516.JPGIMG_4516.JPG IMG_4517.JPGIMG_4517.JPG IMG_4518.JPGIMG_4518.JPG IMG_4519.JPGIMG_4519.JPG IMG_4520.JPGIMG_4520.JPG IMG_4521.JPGIMG_4521.JPG
#27 9 years ago

Hang in there. Looking good.

#28 9 years ago

You are going to be just fine. Similar problem happened to my Taxi when I did it. Your heavier final coats will fill in just fine.

Remember that you are going to have several layers of clear to even out the decals.

-scott

#29 9 years ago

Hi guys. Well, I got busy with 400 grit again and removed a TON of clear. Then I sanded those scratches out with the 800, to see what was what. This left me closer to totally flat, but there were still a number of shiny spots. Plus it turns out my inserts weren't as level as I'd hoped and a few were down. On the chevrons it was tough not to end up with one corner down as about half of them were down somewhere.

So... I made the decision to sand the shiny spots again using my finger and a torn off corner of old 800 grit. This is the technique Vid1900 recommended above at a previous step. I got as much of the shiny off as I could, and went to town with the Walgreens medicine dropper.

Since I'm using a rattle can, I had to spray the can into a jelly jar. Then I sucked it up into the syringe. I think it worked pretty well. We will see when I go to sand, I guess. I'm sure I'll still have at least a couple low spots but hopefully they are close enough I can start on the touchups soon.

Dan

IMG_4547.JPGIMG_4547.JPG
IMG_4548.JPGIMG_4548.JPG
IMG_4549.JPGIMG_4549.JPG
IMG_4536.JPGIMG_4536.JPG
IMG_4537.JPGIMG_4537.JPG
IMG_4538.JPGIMG_4538.JPG
IMG_4539.JPGIMG_4539.JPG
IMG_4543.JPGIMG_4543.JPG

#30 9 years ago

Well, this whole thing is a learning process. When I start doing my beloved Star Wars then the s_ gets real. Anyway, difficult for me to tell if I'm a making it better or worse sometimes. I sanded off where I flooded the low spots with clear. Including the couple "whoops" spots where the clear dropped out without my wanting it to. Still a few low spots but much fewer in number. I think I'd like to spray another wet coat on this, sand that 800, THEN I want to get to my playfield touchups.

IMG_4551.JPGIMG_4551.JPG IMG_4552.JPGIMG_4552.JPG IMG_4553.JPGIMG_4553.JPG IMG_4556.JPGIMG_4556.JPG IMG_4557.JPGIMG_4557.JPG IMG_4559.JPGIMG_4559.JPG IMG_4560.JPGIMG_4560.JPG IMG_4561.JPGIMG_4561.JPG IMG_4562.JPGIMG_4562.JPG IMG_4563.JPGIMG_4563.JPG IMG_4564.JPGIMG_4564.JPG IMG_4566.JPGIMG_4566.JPG
#31 9 years ago

Geez, It's cold here. I used space heaters to get 70 degrees in the sprayroom and sprayed again. It's still not perfect, but once I sand it will be good enough to start the playfield touchups. You are starting to see that mirror shine that SprayMax will give you once you're spraying wet over an already-flat surface. The verdict is still out on this stuff, to be honest. It's a love-hate at this point. Looks good, obviously, but it's not without its issues.

IMG_4575.JPGIMG_4575.JPG IMG_4567.JPGIMG_4567.JPG IMG_4569.JPGIMG_4569.JPG IMG_4570.JPGIMG_4570.JPG IMG_4571.JPGIMG_4571.JPG IMG_4572.JPGIMG_4572.JPG IMG_4573.JPGIMG_4573.JPG IMG_4574.JPGIMG_4574.JPG
#32 9 years ago

I wish I had the skills to do playfield touchups and clearcoat, but unfortunately I'm about as artistic as a potato.

This is going to look nice when it's done I'm sure. You should add an autolauncher and get P-ROCing again

#33 9 years ago

Hey Curbfeeler, two questions - where did you get the plans for that rotisserie? And what is 2Pac?

PF looks nice - gotta be stressful though!!!

#34 9 years ago

https://groups.google.com/forum/m/#!topic/rec.games.pinball/Ca2mbcJ1nUg

I designed it pre-pinside. This link work? I now use two pieces of conduit to stablize the triangles instread of threaded rod.

And 2 pac is two-part auto clearcoat.

Dan

#35 9 years ago

You have a really love a system 11 to own it at my house. Due to a narrow door at the basement landing, I have to remove the head to get one down there. Here's the head ready to be removed

IMG_4590.JPGIMG_4590.JPG

and the harness in the bottom of the cab.

IMG_4591.JPGIMG_4591.JPG

1 week later
#36 9 years ago

Looking good so far! =) I know the basement door thing... I have the same issue. Door is 70cm, box is 73... Hehe

#37 9 years ago

Hi guys. thought I would give a little update on a process I am just beginning. I'm going to be painting the keylines with my airbrush per Vid1900's guide. I want to make the lines as perfect as possible and will be using a silhouette cameo to cut masks.

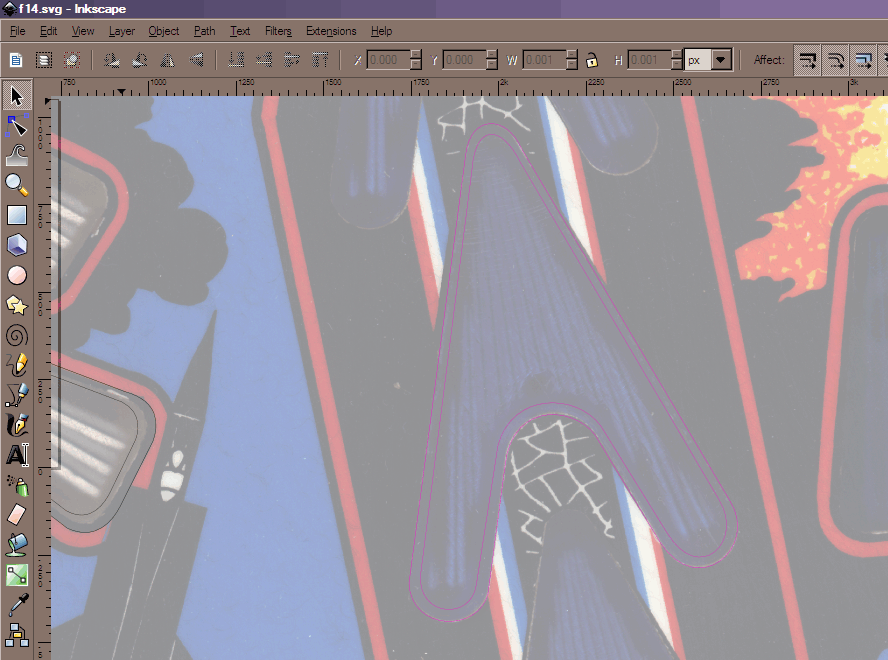
First step is scan the playfield, then in inkscape trace the keylines. I use 1 pixel stroke and mark it pink so it's easy to see. I set the scan's opacity low in this pic so you can see my trace.

Untitled-3.gifUntitled-3.gif

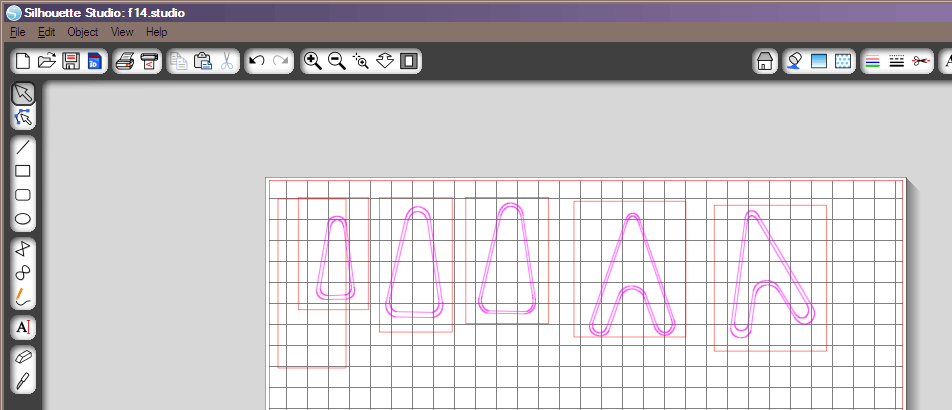
Next in the silhouette software I import the SVG and add a box around each shape. I don't have this process down 100% yet, admittedly. Sometimes when I scan I put a steel rule on the playfield for reference so I can make sure I keep the correct scale. For this scan, I just measured the height to the nearest mm of the chevron and scaled the chevron on the screen to the same, allowing the other shapes to be scaled with it.

Untitled-2.gifUntitled-2.gif

Once I have my shape, I'm ready to test it out on the playfield. I will often use contact paper from the Dollar Tree, but today I'm feeling like using the good stuff. This is OraMask Stencil Film 813. It's great stuff. Has a really nice thick release backing, cuts like a dream.
IMG_4614.JPGIMG_4614.JPG

Here is the shape after a small amount of weeding. I use a Harbor Freight dental pick for this step. Note that I have two variations of keyline thickness. The outside is the same, as that's the shape of the actual insert, but the thickness of the keyline, I'm on testing variations.

IMG_4615.JPGIMG_4615.JPG

Once the material is weeded, I put it on a release tape. I use Clear Choice AT60n.

IMG_4616.JPGIMG_4616.JPG

And here are the two insert masks applied. The first one I messed up and got it crooked. I have not attempted to float this material using liquid, but if I keep messing up when I attempt to line these up, that may become a necessary step.
IMG_4619.JPGIMG_4619.JPG

IMG_4620.JPGIMG_4620.JPG

Last pic is a circle I cut. I didn't scan the playfield for this, just measured.
IMG_4613.JPGIMG_4613.JPG

#38 9 years ago

Hi. Tonight I decided I would try to make some progress and have something to show for all my efforts. I loaded up the Oramask 813, cut my inserts, started to put them on the playfield, etc. But there was something I didn't like about this stuff. It's too tacky for my tastes. You have to pretty much destroy it to get if off the playfield. Cuts great, but there's always some adhesive film left over after I'm done scraping it away in a big blue ball of goo...

What to do?

I decided to try my luck with the Dollar Tree contact paper instead. My initial tests have been good, and I figure it can't hurt to try it. Airbrush paint comes off if needed.

The results? Well, it cuts nice. Here are a couple pics. Sorry the color is ugly, but it's a dollar...

IMG_4625.jpgIMG_4625.jpg
IMG_4627.jpgIMG_4627.jpg

Next I started spraying it black.
IMG_4629.jpgIMG_4629.jpg

Here are after 3-4 thin coats. Showing the light through it the best I can. You can see my inserts need to be cut bigger, but the process itself shows some promise.

IMG_4641.jpgIMG_4641.jpgIMG_4639.jpgIMG_4639.jpgIMG_4636.jpgIMG_4636.jpg

Thanks Silhouette Cameo. Thanks Dollar Tree.

Note: When I pulled the vinyl off the playfield, I saw the remnants of adhesive. Sigh. Maybe the Oramask set down on a linty towel to be less adhesive will do the trick.

#39 9 years ago

Nice Job.. Keep the pictures coming.... NT

#40 9 years ago

Very interesting process with the contact paper! Looking forward to future progress.

#42 9 years ago

So before calling it a night I wanted to try a slightly thicker version of the chevron, and I wanted to spray thicker paint to make it more opaque. There's a feature in the Cameo software that allows you to "offset" a shape with another identical but bigger or smaller shape. Perfect for keylines, and perfect for making the Chevron just a tad bigger. Once cut, I applied them as evenly as I could and sprayed them. This time I tested with an led flashlight and sprayed until I could see no light through the lettering. I'm pretty pleased with the result now, especially compared to the earlier effort.

IMG_4646.jpgIMG_4646.jpg IMG_4647.jpgIMG_4647.jpg IMG_4649.jpgIMG_4649.jpg IMG_4651.jpgIMG_4651.jpg
#43 9 years ago

Not everyone is going to love this idea, but I'm thinking of changing fonts on the inserts to be more "military." The font on there now is just a bold Helvetica / Arial, which is fine but I'm kind of indifferent to it. Here's where I'm leaning.

12-3-2014 10-15-45 AM.png12-3-2014 10-15-45 AM.png

Will just need to see how it mixes with the fonts on the playfield and plastics that I won't be changing. I may throw together a mock-up from my scans.

#44 9 years ago

You could try a look at "Blackoak Std" font - it's a close match to the font in the F14 logo....

#45 9 years ago

Making masks out of vinyl is a great way to go about painting these older playfields. We just did this with my dad's Taxi that we are working on. We actually repainted all of the gray on the playfield. It wouldn't have been possible without first scanning the playfield and then making masks for all of the shapes out of vinyl.

Taxi1.jpgTaxi1.jpg Taxi2.jpgTaxi2.jpg Taxi3.jpgTaxi3.jpg Taxi4.jpgTaxi4.jpg Taxi5.jpgTaxi5.jpg Taxi6.jpgTaxi6.jpg
#46 9 years ago
Quoted from Gov:

It wouldn't have been possible without first scanning the playfield and then making masks for all of the shapes out of vinyl.

Did you use a Cameo to cut those? Those look amazing! There's another guy doing a Taxi that needs to see these results! I'll PM him to check it out. Thanks for posting.

Dan

#47 9 years ago

Yes, please let me know how you did this. I'm at a real crossroads with my playfield and could use all the inspiration I can get.

#48 9 years ago
Quoted from Snux:

You could try a look at "Blackoak Std" font - it's a close match to the font in the F14 logo....

Thanks Mark. That one does look great for the word "Tomcat" but the X and K are wonky IMO. Strange how when you see it in a specific context it isn't what you expect.

12-3-2014 2-11-32 PM.png12-3-2014 2-11-32 PM.png
#49 9 years ago
Quoted from Curbfeeler:

Did you use a Cameo to cut those? Those look amazing! There's another guy doing a Taxi that needs to see these results! I'll PM him to check it out. Thanks for posting.
Dan

I have a vinyl cutter where I work and I used to work for a sign shop a long time ago This process works really good and we would not have been able to do the Taxi without it. I honestly don't know how the guys that use Frisket and a hobby knife do it.

If you have a Facebook account you can see the blog that a few of us use to document our restorations.

https://www.facebook.com/jurassicarcade

#50 9 years ago

Ok, wow and super wow. I bought my cameo on a leap of faith, hoping I could use it for making at least a limited number of stencils. I held my breath the entire time doing keylines and large fonts. Please work, please work, please work, I kept thinking. I'm floored that you've already been able to mask large areas with that kind of detail! Very impressive.

Dan

Promoted items from Pinside Marketplace and Pinside Shops!
Wanted
Machine - Wanted
Fort Lauderdale, FL
$ 18.95
Eproms
Pinballrom
 
$ 1.00
Pinball Machine
Pinball Alley
 
$ 18.00
Electronics
Yorktown Arcade Supply
 
$ 25.00
Playfield - Decals
Pinball Invasion
 
$ 170.00
Displays
Digipinball Shop
 
From: $ 100.00
Cabinet - Shooter Rods
Super Skill Shot Shop
 
$ 69.00
Gameroom - Decorations
Pinball Pimp
 
$ 35.00
Cabinet - Other
Rocket City Pinball
 
$ 65.00
Playfield - Toys/Add-ons
arcade-cabinets.com
 
$ 3.00
Tools
Nezzy's Pinball Prints
 
$ 19.99
Eproms
Matt's Basement Arcade
 
$ 36.95
Eproms
Pinballrom
 
$ 44.99
Cabinet - Shooter Rods
Pinball Shark
 
$ 39.99
Eproms
Matt's Basement Arcade
 
5,000 (Firm)
Machine - For Sale
Vandalia, OH
$ 54.99
Cabinet - Shooter Rods
Lighted Pinball Mods
 
$ 5.00
Playfield - Decals
Metal-Mods
 
$ 10.00
Playfield - Protection
UpKick Pinball
 
$ 2.50
Lighting - Led
Pinballrom
 
There are 81 posts in this topic. You are on page 1 of 2.

Reply

Wanna join the discussion? Please sign in to reply to this topic.

Hey there! Welcome to Pinside!

Donate to Pinside

Great to see you're enjoying Pinside! Did you know Pinside is able to run without any 3rd-party banners or ads, thanks to the support from our visitors? Please consider a donation to Pinside and get anext to your username to show for it! Or better yet, subscribe to Pinside+!


This page was printed from https://pinside.com/pinball/forum/topic/curbfeelers-f14-tomcat-restoration-it-begins and we tried optimising it for printing. Some page elements may have been deliberately hidden.

Scan the QR code on the left to jump to the URL this document was printed from.