(Topic ID: 310417)

Build your own GamePlan multi MPU-board

By pinballj

2 years ago


Topic Heartbeat

Topic Stats

You

Linked Games

Topic Gallery

View topic image gallery

modifié_couleur (resized).jpg
original (resized).jpg
20231028_163048.jpg
20231028_163434.jpg
20231022_194457 (resized).jpg
gameplan cpu board (resized).png
received_689196629466320 (resized).jpeg
IMG_20221102_202008 (resized).jpg
IMG_20221013_221813 (resized).jpg
20220925_113357 (resized).jpg
20220925_112558 (resized).jpg
20220925_113351 (resized).jpg
20220925_111442 (resized).jpg
20220925_111157 (resized).jpg
20220925_112018 (resized).jpg
20220925_101033 (resized).jpg
There are 254 posts in this topic. You are on page 4 of 6.
#151 1 year ago

MrBigg - if you want to try and repair, there are several threads on how to remove battery corrosion on circuit boards. They all involve acid (I use toilet bowler cleaner), 90% + isopropol alcohol, water, lots of soldering/desoldering - the corrosion makes solder removal difficult. You will need to remove a lot of components, because the corrosion travels along the circuit board runs amazingly far. On top of all of this, its possible to miss something, and you end up with a flakey board.

There used to be someone who repaired boards like this, but I think they stopped - too much work for such small rewards, but since this board is a game plan, someone may be willing to take on the task. However, with new boards available, I think that's your best route. Also, don't throw away the board. Cut off the battery and offer it up for sale. Someone may want it.

#152 1 year ago
Quoted from MrBigg:

I have an Old Coney Island

I just repaired one for my Son in law's father and I can tell you with the looks of that MPU, I would be willing to bet you also need to repin all the connectors to the playfield otherwise you will have constant intermittent problems with switches and lights not working.

I would see if Robotworkshop has a completed board or a kit, he has done an outstanding job putting them together.

As far as the Kit goes I would rate it intermediate to expert soldering skills required. You have to be able to make clean small solder pads. I have been in this field for 40 years, taught basic soldering skills to FAA technicians, and put quite a few electronic kits together in my time, it took me about 5 hours to complete. I would classify myself as intermediate soldering skills on board level repair

#153 1 year ago

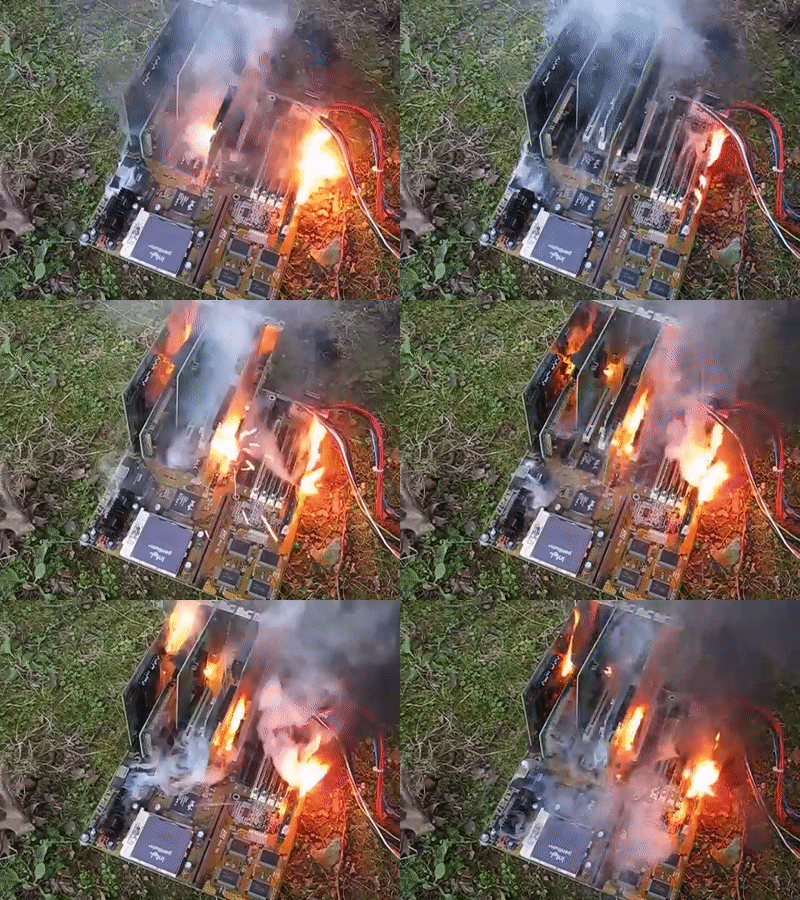
Yeah, that O.G. board needs to go on the bonfire...

Whatever price one of these new already built Gameplan boards sells for is worth it!
I was so glad back in the day when Alltek starting making boards. I'd buy one of those and sell the old battery nuked ones as-is on ebay for $100 to crazy (talented) people who wanted to fix them. Win/Win.
board burn.gifboard burn.gif

#154 1 year ago

How much should one expect to spend for all the parts needed to build a board? (Board, components, programmed ROMs)

#155 1 year ago

I suggest messaging Robotworkshop for both the do it yourself kit and the fully assembled kit prices. I'm not sure he wants it posted or not but i will say it is VERY reasonable considering the effort these gentlemen have made.. awesome work for sure!

#156 1 year ago
Quoted from Dee-Bow:

I suggest messaging Robotworkshop for both the do it yourself kit and the fully assembled kit prices. I'm not sure he wants it posted or not but i will say it is VERY reasonable

I agree! Just ordered a kit from Robotworkshop and I am looking forward to giving this a try. It is more than I have done before but the instructions look good and I am excited to get Coney Island up and running!

#157 1 year ago

I have an Echo Lake board in a Sharpshooter 2 with a Nova rom. I’d like to either get the correct Rom or one of these kits.

65D73960-901C-4BAD-9C8E-EE5E4238260B (resized).jpeg65D73960-901C-4BAD-9C8E-EE5E4238260B (resized).jpeg
#158 1 year ago

For building these boards if you want really nice looking components it helps to have a lead forming tool or set of them.

For the small diodes and resistors I use one like this:

https://www.amazon.com/CANADUINO-Bending-Resistor-Forming-300-700/dp/B089NZVB7S

These are also handy to have:

https://www.amazon.com/KDHLJ-Benders-Resistor-Capacitor-forming/dp/B07L4PVWWG

If you have access to a 3D printer there are ones you can download and print.

They save time preparing the components and they look a bit more uniform once installed.

#159 1 year ago
Quoted from Robotworkshop:

For building these boards

wow thats a hell of a lot easier then the calipers I used didn't know that existed

#160 1 year ago

Thanks for the info, and I'll be calling to get my board sent back from the people who thought could repair it. I'm pretty good with a soldering iron, just need my magnifying glass. I own a custom guitar company, and hand-build custom electric guitars, so I solder quite often. I appreciate all the advice, and will probably try to go both routes on my board, and a new one. I bought a surf pro Saturday that was in a doctor's office since it was new, and it looks like it was timed warped here, so pristine it was scary. I got it for a song, and now at least have a good working machine to play while I fix the coney.

20220514_105641 (resized).jpg20220514_105641 (resized).jpg
#161 1 year ago
Quoted from MrBigg:

Thanks for the info, and I'll be calling to get my board sent back from the people who thought could repair it. I'm pretty good with a soldering iron, just need my magnifying glass. I own a custom guitar company, and hand-build custom electric guitars, so I solder quite often. I appreciate all the advice, and will probably try to go both routes on my board, and a new one. I bought a surf pro Saturday that was in a doctor's office since it was new, and it looks like it was timed warped here, so pristine it was scary. I got it for a song, and now at least have a good working machine to play while I fix the coney.
[quoted image]

You can see the latest version of the assembly docs for the new board here:

https://github.com/jfleitz/gp-mpu/blob/main/docs/GP_Multi_Assembly_V1.3.pdf

1 week later
#162 1 year ago

How is everyone doing on their builds? So far the feedback has been good. Any held needed? So far most issues have been with the machine itself.

#163 1 year ago

I haven’t been on Pinside in awhile and just came across this exciting project. I love my Game Plan games and have the following:

Andromeda
Captain Hook
Sharpshooter
sharpshooter II
Super Nova
Old Coney Island
Attila the Hun

I will definitely be ordering some of these. Thank you very much for doing this.

I glanced through all the posts and was wondering if there were any current issues for finding parts and where everyone has had the best luck getting all the components.

#164 1 year ago

So I got my new board, and it's a work of art btw Robot. Checked everything out, and seemed fine, voltages really close, plugged it up, turned it on, all three green LEDs lit up on new card, and started checking out my devices, flippers, etc. About 2 minutes in, 24 volt fuse blew, and I lost 24 volts as well. Need some advice on where to start there on that power supply setup please.

20220528_172953 (resized).jpg20220528_172953 (resized).jpg20220528_173006 (resized).jpg20220528_173006 (resized).jpg
#165 1 year ago

I would start with the bridges to the right of the card. There's several videos and steps on how to check them on Utube and on this website.

#166 1 year ago

Is there a place specific where Gameplan games can get chatted up? Have an issue that sort of have narrowed down, but hit a dead end on what my options are. https://pinside.com/pinball/forum/topic/sharp-shooter-ii-all-insert-lighting-is-out

#167 1 year ago
Quoted from desertT1:

Is there a place specific where Gameplan games can get chatted up? Have an issue that sort of have narrowed down, but hit a dead end on what my options are. https://pinside.com/pinball/forum/topic/sharp-shooter-ii-all-insert-lighting-is-out

This one?

https://pinside.com/pinball/forum/topic/game-plan-owners-club-sharpshooters-welcome/page/15#post-6950995

#168 1 year ago
Quoted from desertT1:

Is there a place specific where Gameplan games can get chatted up? Have an issue that sort of have narrowed down, but hit a dead end on what my options are. https://pinside.com/pinball/forum/topic/sharp-shooter-ii-all-insert-lighting-is-out

Just replied on this thread ..before seeing Robert’s reply

#170 1 year ago

<blockquote

Quoted from SchertzPinball:

I haven’t been on Pinside in awhile and just came across this exciting project. I love my Game Plan games and have the following:
Andromeda
Captain Hook
Sharpshooter
sharpshooter II
Super Nova
Old Coney Island
Attila the Hun
I will definitely be ordering some of these. Thank you very much for doing this.
I glanced through all the posts and was wondering if there were any current issues for finding parts and where everyone has had the best luck getting all the components.

The assembly docs have the list of parts needed. If you are sourcing parts you will probably need to hit at least three or more sources. For the PCB you’ll have to get some fabricated or get those from someone else who already had extras made. You’ll also need to program the EPROM.

There are a couple different ways to build the board. If you use an NVRAM chip then the battery section isn’t populated except for a jumper instead of a diode. If you use an 8K low power 6264 then the diodes are populated (swapped locations on board) and either a coin cell holder or three pin header for an external battery pack. I’ve built both versions and they work great.

To save people time I put together a limited number of full kits with everything needed. All parts ready to go. Just need to add solder.

Robert

#171 1 year ago

Just recieved the Gameplan assembled board. Very happy, works.like a charm. Now the fun part repinning all the connectors.

#172 1 year ago

Well I've had a sharpshooter sitting in my shed for a few years that has the worst acid damaged mpu I've ever seen, now it looks like maybe I can make it live!

#173 1 year ago
Quoted from Tsskinne:

Well I've had a sharpshooter sitting in my shed for a few years that has the worst acid damaged mpu I've ever seen, now it looks like maybe I can make it live!

Maybe Coinbox Pinball Podcast will have to come back for one show and talk about their garage imprisoned Sharpshooter getting new life as well. Must be some sort of rite of passage.

10
#174 1 year ago

I got my board today and all I can say is thank you! I've had this for over 20 years not working and it fired right up after adding the new MPU. I just have to do some very minor things and the game will play perfectly!

IMG_3169 (resized).jpgIMG_3169 (resized).jpg
#175 1 year ago
Quoted from Woolwich01:

I got my board today and all I can say is thank you! I've had this for over 20 years not working and it fired right up after adding the new MPU. I just have to do some very minor things and the game will play perfectly![quoted image]

Ok.. this is frikkin awesome! 20 years of not being playable and back to life! Amazing work indeed!

#176 1 year ago

Finally got a chance to assemble the MPU for my buddy's Sharpshooter and it's working great!!! It was a fun project to build.

It finally put to rest an issue we were having with intermittence in the switch matrix. By the time I installed the new board, the column we were having trouble with had gone out completely for like the 3rd time and he hadn't been playing it for about a week. Now the game plays much better in result, most notably the pop bumpers are now super sensitive and responsive, tons of action...They had been on the intermittent/dead switch column, and are now finally working as designed! The memory appears to be working as well, so it looks like his game will finally be firing on all cylinders.

Thank you sooo much for making this happen @pinballj! I've been watching the forum the past couple years hoping for someone to come along and make the next repro Gameplan MPU a reality and you did it!!!

I also gotta thank Robotworkshop for taking the initiative and amplifying the impact of this great project. Making the parts and boards available as kits was huge. (Not to mention they were quickly shipped, well-organized, with detailed instructions, and a socket for every chip. Price was very reasonable too!)

This community rocks because of guys like you! Thanks!

#177 1 year ago

Update on my coney island... installed 3 new bridge rectifiers, cleaned all the connector pins, reinstalled everything, and boom! She's alive and well. Got a few issues with some lights not coming on, and a few of the star rollover things. But it all plays, all bumpers, scores, etc, are now working. Glass on order, and new rubber all installed. Played it yesterday for the first time, and it looks like I'm making serious progress thanks to you guys, and robotworks. Cleanup, and cosmetics still to go, but it's finally alive.

#178 1 year ago

Just looked over the BOM for this board, and noticed a $9 capacitor, do we need the 2% tolerance on this capacitor or can I use the 56 cent ones with 5% tolerance?

Screenshot 2022-06-07 at 13-06-49 Mouser Electronics - Compare Products (resized).pngScreenshot 2022-06-07 at 13-06-49 Mouser Electronics - Compare Products (resized).png
#179 1 year ago
Quoted from FunkyFreshWalrus:

Just looked over the BOM for this board, and noticed a $9 capacitor, do we need the 2% tolerance on this capacitor or can I use the 56 cent ones with 5% tolerance?
[quoted image]

The 5% will do fine as well. Prices are changing often for components!

#180 1 year ago

The owner of Sharpshooter (whom I bought an MPU from Robotworkshop ) has abandoned the project.

I have an MPU kit for sale, for what I have into it. PM me for details.

#181 1 year ago
Quoted from pb456:

The owner of Sharpshooter (whom I bought an MPU from Robotworkshop ) has abandoned the project.
I have an MPU kit for sale, for what I have into it. PM me for details.

For anyone that wants a full kit with everything included you should jump on this. I am out of kits. Since I am set on boards for myself and have a bunch of other projects I need to work on I'm not sure when there would be any more.....

#182 1 year ago
Quoted from Robotworkshop:

For anyone that wants a full kit with everything included you should jump on this. I am out of kits. Since I am set on boards for myself and have a bunch of other projects I need to work on I'm not sure when there would be any more.....

I jumped!

1 week later
#183 1 year ago

I wanted to thank Jeremy and Robert for their wonderful work.

Robert, your solders are so perfect, and the packaging for shipping was top.

I was finally able to play on my star trip, it's a real happiness, and that's thanks to you, congratulations guys you are on top.

2 months later
#184 1 year ago

Does anyone have any kits available? If not a bare PCB would be great so I don't have to order 5.

#185 1 year ago
Quoted from slag:

Does anyone have any kits available? If not a bare PCB would be great so I don't have to order 5.

There is an update coming to fix an issue with the display connector for the Cocktail machines. The board works flawless in all the standard upright machines but it needs a few traces fixed for the connector used by the cocktail games. Testing the fix for that and I plan on adding notes to the assembly docs about updating the older boards so they will run in the cocktail games.

Jeremy did a fantastic job on the design of these boards and they work really well. I know of one arcade that has one running in a Sharpshooter every day all day without issue.

I wrote up some assembly documentation as my contribution to the project. I also made a couple batches of complete kits for people. If there is enough interest I may make up one more batch on an updated PCB with the fix for the cocktail games.

#186 1 year ago
Quoted from Robotworkshop:

There is an update coming to fix an issue with the display connector for the Cocktail machines. The board works flawless in all the standard upright machines but it needs a few traces fixed for the connector used by the cocktail games. Testing the fix for that and I plan on adding notes to the assembly docs about updating the older boards so they will run in the cocktail games.

I bought 5 blank boards a few months ago. Built up 1 to be used as a backup for my Star Trip “cocktail” machine. However, my ST isn’t at my house, so I haven’t been able to test it yet. I think this is the 1st I’ve heard of this problem on cocktail machines.

Once you’ve tested this fix, can you share the details with me? I may be able to test it over Labor Day, and I am able to address “trace changes”.

slag - I have 4 blank boards (and can share some parts ordering info) if you’re interested.

Jeff

#187 1 year ago
Quoted from Grangeomatic:

I bought 5 blank boards a few months ago. Built up 1 to be used as a backup for my Star Trip “cocktail” machine. However, my ST isn’t at my house, so I haven’t been able to test it yet. I think this is the 1st I’ve heard of this problem on cocktail machines.
Once you’ve tested this fix, can you share the details with me? I may be able to test it over Labor Day, and I am able to address “trace changes”.
slag - I have 4 blank boards (and can share some parts ordering info) if you’re interested.
Jeff

Hey Jeff, my fault on the cocktail connector issue.I messed up on the schematic with routing the Display Clocks and Enable to the cocktail connector itself. Robotworkshop and strikerxtreme and others have helped to figure out the issue. I used a Ver 1.3 board to do the cut and straps, which it was 4 traces to cut and 5 jumpers to add. I took some pics and going to help with writing up the steps for Robotworkshop as well for the older boards.

Do you know what board version you have?

I am going to do an update to the board layout as well as add some additional labels to Vias and connectors for easier troubleshooting, and some other changes.

-Jeremy

#188 1 year ago

I got the schematic and board layout updated with the changes for the cocktail display connector. I placed an order for some boards to test out a batch. While I am waiting, I am going to shop out my Foxy Lady and fix some inner cabinet wiring issues, so that I can do a full test. I have a Version 1.3 board modified to have the cocktail display connector work, which I will do some more testing as well (Oh darn, I have to play pinball!)

Link to the project on PCBWay. You can download the schematic and gerber files here, as well as order in qty from PCBWay:
https://www.pcbway.com/project/shareproject/GamePlan_Multi_MPU_Board_601e3e7b.html

The project source files (done with KiCad btw) and this release of gerber files can be found on GitHub: https://github.com/jfleitz/gp-mpu/releases/tag/v1.5
The schematic is attached to this post as well. Pages 6 (adding the jumper for nvram) and 7 (changes to the cocktail display connector) is what changed from the previous release.

List of changes for Version 1.5 from 1.4:
1. Fix trace routing for Cocktail BDU Display connector
2. Add a jumper pad for NVRAM
3. Add labels to pinouts of connectors
4. Add labels to Vias

For previous versions (<1.5):
Steps on what to do cut and jump is being documented.

gp-mpu.pdfgp-mpu.pdfver15bottom.pngver15bottom.pngver15top.pngver15top.png
#189 1 year ago
Quoted from pinballj:

Do you know what board version you have?
-Jeremy

I have V1.4.

ACF3B094-C475-47E9-9AAE-522E8A44E6CD (resized).jpegACF3B094-C475-47E9-9AAE-522E8A44E6CD (resized).jpeg
#190 1 year ago
Quoted from Grangeomatic:

I have V1.4.[quoted image]

V1.4 is the version of the board I am working on. I think I have the updates done to the board. Just haven’t confirmed it yet. In order to test I had to get a couple cocktail displays (unknown if working) and had to make a cable. The cable is odd with pins removed from each of the display connectors. Lots of variables but once confirmed will post a method for updating it.

#191 1 year ago

I have good news! Just confirmed the updates to the rev 1.4 board. 4 cuts near the J5 connector and 5 jumpers.

The ribbon cable not only has a couple pins out on each of the connectors they also have a twist in the cable. All good and now I have a full set of Gameplan displays for bench testing any of the boards.

A9C324EE-1173-4256-873D-25D544E35247 (resized).jpegA9C324EE-1173-4256-873D-25D544E35247 (resized).jpeg
#192 1 year ago
Quoted from Robotworkshop:

I have good news! Just confirmed the updates to the rev 1.4 board. 4 cuts near the J5 connector and 5 jumpers.
The ribbon cable not only has a couple pins out on each of the connectors they also have a twist in the cable. All good and now I have a full set of Gameplan displays for bench testing any of the boards.
[quoted image]

Awesome job!!

3 weeks later
#193 1 year ago

Uffe from Sweden here..
I'm want to buy a mpu1 for one of my StarTrip games, the old damage mpu is driving me nuts... I have repaired two mpu's to my other games but this is to hard and i have spent to meny hours on it...
So I hope I can buy one

1 week later
#194 1 year ago

If you use the V1.4 or earlier board in a standard upright pinball machine then this modification isn't required. It is only needed to fix an issue with the display on cocktail games using the J3 connector.

I am going to try and add the following set of pictures to the assembly manual but in the mean I wanted to post the fix for cocktail display J3 connector on the V1.4 boards (may work on v1.3 but don't have an example here to try).

There are two issues. One was a missed ENABLE signal going to the J3 for the cocktail displays. The other was something that was sort of caused by the way Gameplan renamed signals for the same lines. On the cocktail connector the display clock lines were renamed. They actually trace back to different lined on the J9 connector for the upright pinballs. The renaming of the signal lines can frustrate someone doing repairs too.

In order to fix this (4) four traces need to be cut and then (5) jumper wires added. This is best done with a fine wire wrap style wire. The pictures in this first post show an image of the board along with an image showing the three cuts on the top and one cut on the bottom. I use a sharp hobby knife and use a meter to confirm they are properly open. So, 4 cuts and 5 jumper wires and then the cocktail displays will work on that J3 connector.

20220925_100653 (resized).jpg20220925_100653 (resized).jpg20220925_101033 (resized).jpg20220925_101033 (resized).jpg20220925_101450 (resized).jpg20220925_101450 (resized).jpg

#195 1 year ago

First three jumpers installed on the component side of the PCB.

20220925_111157 (resized).jpg20220925_111157 (resized).jpg20220925_111442 (resized).jpg20220925_111442 (resized).jpg20220925_112018 (resized).jpg20220925_112018 (resized).jpg
#196 1 year ago

Pictures that show the long two jumper wires that need to be added. After these are complete you are ready to use the board in your cocktail games.

20220925_112558 (resized).jpg20220925_112558 (resized).jpg20220925_113351 (resized).jpg20220925_113351 (resized).jpg20220925_113357 (resized).jpg20220925_113357 (resized).jpg
#197 1 year ago

I believe the J3 connector has been fixed in the latest PCB files so this fix should only be needed on V1.4 and earlier PCB's.

2 weeks later
#198 1 year ago

After three hours of assembly its almost done. Tomorrow some traces must be cut and some wires soldered to fix the displayproblem for cocktail games and hopefully the last components will arrive shortly.
Thanks to all of you who made this possible, soon it will be possible to play on my StarTrip again.
Uffe from Sweden

IMG_20221013_221813 (resized).jpgIMG_20221013_221813 (resized).jpg
1 week later
#199 1 year ago

Anyone soldering your own boards may want to reference this excellent guide by NASA:

https://workmanship.nasa.gov/lib/insp/2%20books/links/sections/601%20General%20Requirements.html

1 week later
#200 1 year ago

Hi everyone.
Installed my circuit board, it starts with 6 blinks goes for a few seconds then starts over again and again and again....
The soundcard playes the startup tune and if I am quick I can play for some seconds.....
Have the psu and mpu on the bench now...
Some ideas?

IMG_20221102_202008 (resized).jpgIMG_20221102_202008 (resized).jpgreceived_689196629466320 (resized).jpegreceived_689196629466320 (resized).jpeg Added 17 months ago:

It turned out to be a faulty CTC.

There are 254 posts in this topic. You are on page 4 of 6.

Reply

Wanna join the discussion? Please sign in to reply to this topic.

Hey there! Welcome to Pinside!

Donate to Pinside

Great to see you're enjoying Pinside! Did you know Pinside is able to run without any 3rd-party banners or ads, thanks to the support from our visitors? Please consider a donation to Pinside and get anext to your username to show for it! Or better yet, subscribe to Pinside+!


This page was printed from https://pinside.com/pinball/forum/topic/build-your-own-gameplan-multi-mpu-board/page/4?hl=robotworkshop and we tried optimising it for printing. Some page elements may have been deliberately hidden.

Scan the QR code on the left to jump to the URL this document was printed from.