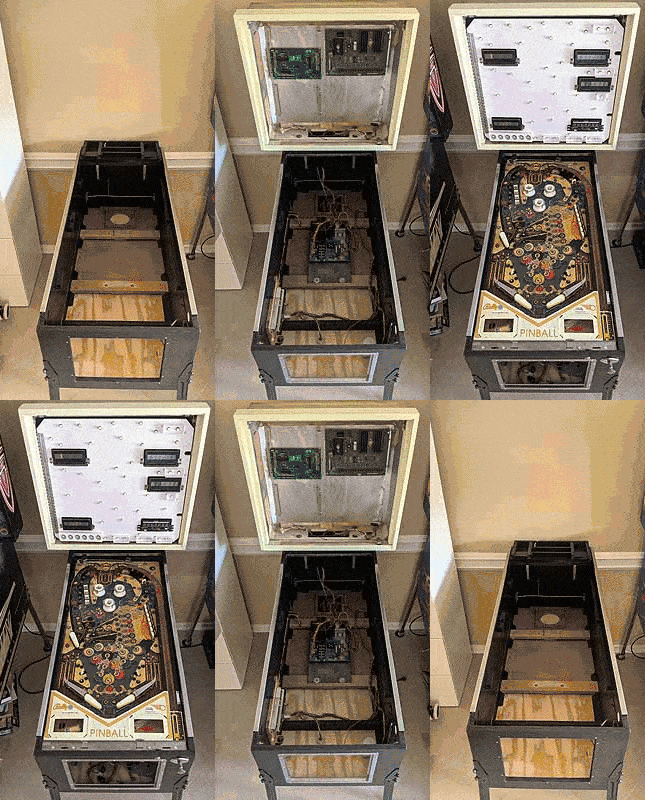
(Topic ID: 267345)

Bringing back to life an Eight Ball Deluxe

By matiou

3 years ago


Topic Heartbeat

Topic Stats

  • 187 posts
  • 31 Pinsiders participating
  • Latest reply 3 years ago by Lovef2k
  • Topic is favorited by 49 Pinsiders

You

Linked Games

Topic Gallery

View topic image gallery

Pic147 (resized).jpg
Pic140 (resized).jpg
Pic146 (resized).jpg
Pic145 (resized).jpg
Pic144 (resized).jpg
Pic143 (resized).jpg
Pic142 (resized).jpg
Pic139 (resized).jpg
Pic141 (resized).jpg
Pic138 (resized).jpg
ebdgif.gif
Pic137 (resized).jpg
Pic135 (resized).jpg
Pic134 (resized).jpg
Pic133 (resized).jpg
Pic132 (resized).jpg
There are 187 posts in this topic. You are on page 2 of 4.
#51 3 years ago
Quoted from Mathazar:

Good karma, lovef2k! Keep those EBD's alive!!! Just laid down my new EBD hardtop this afternoon. Dremel trimming/adjustment starts tonight, should be starting to rebuild the playfield with new and cleaned bits this weekend. Perhaps will get to the cabinet interior freshening up next weekend!

I'm following your thread... great job so far, it will be soon a whole new machine! good luck with the dremel job. one day maybe it will be my turn to install a hard top on this machine, so I take notes

#52 3 years ago
Quoted from matiou:

Look what I got in the mail today! Thank you SO much lovef2k !
[quoted image]
A bit of sanding and a light coat of white paint will make it like new!

Good ol' UPS comes thru again! I would get new trace wire for the lamps and use the old board as a guide to install.

Also check pinwiki for the s&t issues. They may have a trouble shooting guide for that board and what the boot flashes represent.

1 week later
#53 3 years ago

Quick update... Not much done these past 10 days. I managed to spend only few hours of EBD time during this period... Kids home-schooled and busy job are not helping... at all.

I had a closer look at the transformer board. Filthy!

Pic36 (resized).jpgPic36 (resized).jpg

But surprisingly... All the voltages are testing good! All the test points are showing the expected values.
I will still replace the bridge rectifiers. Someone relocated them to the side of the board, directly glued to the metal plate. As you can see, the soldering and wiring job is not.... ideal
And definitely, I need to give a big big clean up to this metal plate, board, connectors and transformer...

#54 3 years ago

I also primed my front of cabinet...
Pic37 (resized).jpgPic37 (resized).jpg

But I should have done a better job at filling the wood to hide the grain... This is not good looking. I will sand and start from scratch.

And I started to take care of the new light board...
Pic38 (resized).jpgPic38 (resized).jpg

I sanded and primed... but in some places in the top part the wood particles are really visible (some light humidity damage). Same... I will sand, wood-fill and try again.

#55 3 years ago
Quoted from matiou:

And definitely, I need to give a big big clean up to this metal plate, board, connectors and transformer...

Glad to see you back in action! I wanted to ask....do you have plans yet on how you're going to go about cleaning up the metal plate? You pointed me to some good tips on how to clean the transformer itself in the Bally repair thread. For the metal plate, I was going to soak it in Evaporust for a couple of days, scrub it clean, and then *maybe* paint it.

IMG_8409 (resized).jpgIMG_8409 (resized).jpg
#56 3 years ago

I just spent 15 minutes cleaning it up (first pass)
- removed the rust with steel wool
- removed the goo with "goo gone"
- cleaned up with mean green, rinsed with water, dried with cloth

now it's clean... and smooth... but not good looking

not sure if I'm going to paint it... and be careful with all the locations requiring electrical contact for ground... the paint will have to be scratched to allow conductivity.
Pic39 (resized).jpgPic39 (resized).jpg

#57 3 years ago
Quoted from matiou:

be careful with all the locations requiring electrical contact for ground... the paint will have to be scratched to allow conductivity.

Absolutely. Was thinking of not painting the backside at all (connectivity to ground braid) and painting the top with sacrificial screws in place in the holes so that those areas aren't painted over either, then scratch off anything additional as needed.

#58 3 years ago

@Mathazar... You'll find a great example of black transformer plate in the making here, from HEP:
https://pinside.com/pinball/forum/topic/hep-this-week-9-17-18/page/27#post-4702358

from the thread: "They are then lightly blackened using a black metal etching primer. This gives it both a nice bond and the correct look I am after. Kind of industrial or military like but clean."

1 week later
#59 3 years ago

Some painting happened this week-end...
Not my favorite activity... Had to restart a couple of time to get the desired results.
Pic40 (resized).jpgPic40 (resized).jpg
Pic41 (resized).jpgPic41 (resized).jpg
But for now I'm happy with my front cabinet. And the light board looks like new! Except for a little drip, but this is exactly where the light baffle will go, so should not be notiveable.

#60 3 years ago

As you can see, for the front of the cabinet, I took the easy route of using the stencil from EBD 84'

#61 3 years ago

Jeff from Pinball Pimp will most likely make a partial stencil set just for the front.

Painting the cab can be a pain. I have had mixed results with different paints going on plywood. In the future I'm going to try using a primer sealer before paint.

I still don't see a hole for the shooter

#62 3 years ago

Ok... It's now time to paint the inside... A good way to get rid of stains and bondo marks. I'm going for full black sides and bottom board natural. I won't go crazy on the finish as it is the inside, but it will definitely looks better.

Pic42 (resized).jpgPic42 (resized).jpg
Pic43 (resized).jpgPic43 (resized).jpg

Paint job sponsored by Trader Joe's

2 weeks later
#63 3 years ago

Ok... not much EBD time these past few days... However this long week-end should allow me to progress a bit on the project.

Where was I ? Oh yes my last update was about the inside paint.

Pic44 (resized).jpgPic44 (resized).jpg

I was hesitating to do it, because, remember, my goal is to make it a player first... and who cares about inside paint when it comes to play ? But honestly, that's a game changer... it looks so clean now! I don't regret the time spent.

#64 3 years ago

And a bit of black gloss on the neck grid will look good as well!

Pic45 (resized).jpgPic45 (resized).jpg
#65 3 years ago
Quoted from matiou:

I was hesitating to do it, because, remember, my goal is to make it a player first... and who cares about inside paint when it comes to play ? But honestly, that's a game changer... it looks so clean now! I don't regret the time spent.

Looking good! Now's the time to do it, when everything is apart....no doubt you'd look back a few months from now playing your machine and thinking "I wish I took the extra few hours and....".

#66 3 years ago

Now the ground braid...
Pic46 (resized).jpgPic46 (resized).jpg
Pic47 (resized).jpgPic47 (resized).jpg
Pic48 (resized).jpgPic48 (resized).jpg
And with this step I reach a big milestone.... the cabinet moved from the garage to the house... No need anymore to work on it in the heat of a non-AC equipped Texas garage!

1 week later
#67 3 years ago

Cleaned up the siderails.... nothing crazy. mean green and scotch brite. Enough to get rid of the light rust.
pic49 (resized).jpgpic49 (resized).jpg
Drilled the missing flipper button hole....
pic50 (resized).jpgpic50 (resized).jpg
The cream of the backbox frame looked not only used but dirty... So I decided to sand and paint it. I identified "lime gelato" from Sherwin Williams to be quite a good match.
pic51 (resized).jpgpic51 (resized).jpg
And it definitely looked a lot better with a fresh layer (without touching the stenciled areas)
pic52 (resized).JPGpic52 (resized).JPG
Now what I get really starts to look like a pinball machine!
pic53 (resized).jpgpic53 (resized).jpg
I can't wait to start having electrical issues instead of wood working, sanding and painting issues

1 week later
#68 3 years ago

Remember this super rusty lockbar receiver...
pic54 (resized).jpgpic54 (resized).jpg
Well... Vinegar did its work... no more rust, but heavily pitted of course, and not really shiny... but like I said: "solid and clean"
pic55 (resized).jpgpic55 (resized).jpg

#69 3 years ago

I built a new wooden "switch support" for the bottom of the cabinet... nothing crazy here, but I like before/after pics
pic56 (resized).jpgpic56 (resized).jpg

#70 3 years ago

I took a bit of time to rebuild the tilt panel as well...
pic57 (resized).jpgpic57 (resized).jpg
I flipped the wood board, cleaned all the items with scotch brite and soap, rerouted the wires properly, and molex'ed the thing to make it practical. It now looks a lot better!
pic58 (resized).jpgpic58 (resized).jpg
I know it's not the type of molex you find in these machines... but I have a lot of these "minifit" on hand, and good tooling to crimp them.

10
#71 3 years ago

That's where I am now:
pic60 (resized).jpgpic60 (resized).jpg
Lovef2k will ask why the heck I have not drilled the hole for the shooter yet

#72 3 years ago

Coming back to life!

#73 3 years ago
Quoted from matiou:

That's where I am now:
[quoted image]
Lovef2k will ask why the heck I have not drilled the hole for the shooter yet

Yup!

#74 3 years ago

Not sure why I postponed so far... I guess I'm so proud of my pure and even black paint on the front of the cabinet that I'm afraid to drill a hole in it

But I will soon as the game won't be fun if I cannot launch a ball into the playfield!

#75 3 years ago
Quoted from matiou:

Not sure why I postponed so far... I guess I'm so proud of my pure and even black paint on the front of the cabinet that I'm afraid to drill a hole in it
But I will soon as the game won't be fun if I cannot launch a ball into the playfield!

b\\

Haha yes. Not to break b*lls, but it would have been much easier to do before the assembly and paint. But you are doing great work and you had one heck of a challenge when you started, I think most would have sourced another cab and transferred the parts over.

#76 3 years ago

I guess you're right... not the best strategic decision... I was under the impression I would make sure of the shooter alignment only once the playfield is in... but it may not be that practical... oh well... it will be ok

#77 3 years ago

Time to play a bit with electronics...

Let's take care of the solenoid board... after a basic clean up with soap, I replaced the 3 electrolytic capacitors. The new ones are a lot smaller!
Pic61 (resized).jpgPic61 (resized).jpg
I also added the 2 or 3 bridges advised by pinwiki...
Pic62 (resized).jpgPic62 (resized).jpg
Then I tested all the transistors with my DMM... They all tested good. (more convenient to do this now than when it is in the machine)

Time to install the board in the backbox to see if I get good voltages.... and yes! they all tested good, especially the steady 5VDC... It means I can safely install my MPU board.

#78 3 years ago

As I said earlier... I will use a LISY35 from bontango for the MPU. It took me few nights to assemble, but looks like it's working well so far.

Who would have thought that a 1977 power supply board would one day power up a 2020 raspberry based system....
pic63 (resized).jpgpic63 (resized).jpg

#79 3 years ago

What's awesome with LISY is that it provides a web interface you can connect to from any phone or computer to perform any type of test, in a very precise manner... Solenoids, switches, display and so on.

So let's test the 40+ year old plasma displays by displaying "8888888" on each of them...
pic64 (resized).jpgpic64 (resized).jpg
And... Impressive! I can't believe they survived that long in such a humid environment. Only "player 4" has a little issue, the top left segment is off on all digits... Maybe it can be fixed. I'll investigate.

I had purchased in advance some LED displays as I was not counting on these to work Now I need to choose which one to use... plasma or led...

#80 3 years ago
Quoted from matiou:

What's awesome with LISY is that it provides a web interface you can connect to from any phone or computer to perform any type of test, in a very precise manner... Solenoids, switches, display and so on.
So let's test the 40+ year old plasma displays by displaying "8888888" on each of them...
And... Impressive! I can't believe they survived that long in such a humid environment. Only "player 4" has a little issue, the top left segment is off on all digits... Maybe it can be fixed. I'll investigate.
I had purchased in advance some LED displays as I was not counting on these to work Now I need to choose which one to use... plasma or led...

Sweet! With three out of four HV displays looking great and the fourth one likely being able to be fixed, I'd save the pretty LV LED displays for a future project that you're going to restore top to bottom.

As for the 4th display...if memory serves, Q18 drives that upper left segment for all digits. It may be as simple as replacing that transistor or, if that doesn't resolve it, replacing the 4543 Decoder chip.

#81 3 years ago
Quoted from Mathazar:

As for the 4th display...if memory serves, Q18 drives that upper left segment for all digits. It may be as simple as replacing that transistor or, if that doesn't resolve it, replacing the 4543 Decoder chip.

Thanks! I confirm your memory is right... However Q18 appears to test ok from basic DMM test... Anyway I'll order a transistor and a decoder and change both... but I wait to accumulate issues before placing an order, to save on shipping. I'm sure I'm going to need more things in the coming days!

#82 3 years ago
Quoted from matiou:

Thanks! I confirm your memory is right... However Q18 appears to test ok from basic DMM test... Anyway I'll order a transistor and a decoder and change both... but I wait to accumulate issues before placing an order, to save on shipping. I'm sure I'm going to need more things in the coming days!

Big daddy sells kits on ebay for $12 shipped that has all the transistors, socket, decoder and 6 upgrade resistors.

#83 3 years ago

Lock bar receiver installed today!

Pic65 (resized).jpgPic65 (resized).jpg
#84 3 years ago

And then I worked on the shooter rod........ and sh*t happened

As you know the original front panel of the machine was rotten and destroyed... So no way to use it as a model to know where the rod was. So I used a template from a Xenon machine... a Bally from the same era. And then... after having drilled and properly installed the whole thing... I figured out that the Xenon and EBD cabinets were different. The Xenon rod is way lower than the EBD one......................... so I drilled the front panel at the wrong location... you know, the nice front panel I spent so much time painting... lol. Oh well, lesson learned. Measure twice and verify physically with your playfied before you drill something! I will drill higher and find a way to mask the other hole. To be continued...

Pic66 (resized).jpgPic66 (resized).jpg
#85 3 years ago

Mistake "fixed".......................
Pic67 (resized).jpgPic67 (resized).jpg
I'll have to find the best way to fix this... Structurally speaking there is no issue, knowing the hole is way higher than the other one... But... I guess I'm not done with painting after all!

#86 3 years ago

Oh, no! FWIW, it's looking fantastic and I'm sure you'll make it look like the first drill spot never happened.

#87 3 years ago
Quoted from matiou:

I'll have to find the best way to fix this... Structurally speaking there is no issue, knowing the hole is way higher than the other one... But... I guess I'm not done with painting after all!

Don't feel bad, my Medusa has the same repair from factory!

IMG_0002a.jpgIMG_0002a.jpg

#88 3 years ago

Looking good. Keep up the good work.

#89 3 years ago
Quoted from Quench:

Don't feel bad, my Medusa has the same repair from factory!
[quoted image]

Very interesting! Thanks for sharing... I guess they were repurposing cabinets depending on the needs.

#90 3 years ago

Ok..... time to fix that thing and move on...

First I created a "wood plug" shaped like the mean bad hole which ruined my Sunday night
Pic68 (resized).jpgPic68 (resized).jpg
I glued it inside
Pic69 (resized).jpgPic69 (resized).jpg
Then 2 layers of bondo... nicely sanded with fine grid... quite ugly but with your eyes closed you cannot tell where the hole is
Pic70 (resized).jpgPic70 (resized).jpg
After that... painting... well I could not use spray paint inside my house... so paintbrush only... and some novus 2 to try to blend the touch up.
Pic71 (resized).jpgPic71 (resized).jpg
Not perfect... but pretty good. Good enough!
Pic72 (resized).jpgPic72 (resized).jpg
If I'm courageous enough one of these days... I'll bring the machine outside and spray paint the whole front panel to make this disappear... Maybe it will be the opportunity to actually stencil it.

#91 3 years ago

Nice!

#92 3 years ago

Ok I brought in the playfield... It was stored and I have not looked at it for a while.

Man, that thing is old and heavily used!!! Never saw a playfield that yellowed. The plastics are really really faded and dark, no way to recover anything from them... nothing is transparent anymore.

This is going to be quite some work on top and below... I see rusty solenoid plungers...

First easy test... installing the playfield and connecting the GI power...
Pic73 (resized).jpgPic73 (resized).jpg

I see 3 GI lights on........ that's a start

#93 3 years ago
Quoted from matiou:

Ok I brought in the playfield... It was stored and I have not looked at it for a while.
Man, that thing is old and heavily used!!! Never saw a playfield that yellowed. The plastics are really really faded and dark, no way to recover anything from them... nothing is transparent anymore.
This is going to be quite some work on top and below... I see rusty solenoid plungers...
First easy test... installing the playfield and connecting the GI power...
[quoted image]
I see 3 GI lights on........ that's a start

All right now your really getting started!

#94 3 years ago

"Backbox light" week-end job...

I know these sockets don't get much love... but once cleaned I got 90% of the ones from the backbox working pretty well.

Pic74 (resized).jpgPic74 (resized).jpg
Pic75 (resized).jpgPic75 (resized).jpg

Stapling session...

Pic76 (resized).jpgPic76 (resized).jpg

I'm going full warm white LEDs for the backbox (I'll do LED for the inserts as well, and I think I'll keep the incandescents for the playfield GI)

Pic76b (resized).jpgPic76b (resized).jpg

And then wiring and soldering... well as much as I could

Pic77 (resized).jpgPic77 (resized).jpg

#95 3 years ago
Quoted from matiou:

I'm going full warm white LEDs for the backbox (I'll do LED for the inserts as well, and I think I'll keep the incandescents for the playfield GI)

That's what I do on all my SS pins as well. When I first got into this hobby a couple of years ago, I put LEDs everywhere. I've since refined my tastes to incans for GI, color matched LEDs for inserts, and warm LEDs for the backbox (and sometimes color matched LEDs in the backbox).

#96 3 years ago
Quoted from matiou:

"Backbox light" week-end job...
I know these sockets don't get much love... but once cleaned I got 90% of the ones from the backbox working pretty well.
[quoted image]
[quoted image]
Stapling session...
[quoted image]
I'm going full warm white LEDs for the backbox (I'll do LED for the inserts as well, and I think I'll keep the incandescents for the playfield GI)
[quoted image]
And then wiring and soldering... well as much as I could
[quoted image]

Now you can see how bad the original panel was sheesh!

1 week later
#97 3 years ago

Once the cat was gone, I managed to finish wiring up and stapling all the GI lamps of the backbox... Here a quick test with a 5V power supply (this is without the harness, so some bulbs are not connected yet):
IMG_20200807_225617 (resized).jpgIMG_20200807_225617 (resized).jpg

I cleaned up the lamp extension board, and removed the ugly ground fix that was done to it (see post #42). Then I hooked up the harness... That took more time than planned... Some corroded wires were not really cooperative when trying to solder them to the bulb sockets! But the results is quite OK, I like my fresh new door!
IMG_20200809_215517 (resized).jpgIMG_20200809_215517 (resized).jpg

#98 3 years ago

I'm keeping the playfield GI as incandescent... But I put leds under all the inserts... quite a task. The leds are quite hard to fit in these old 555 sockets... but when they're in, the contact is usually pretty good. Here is a nice picture from underneath... And yes, I need to get rid of these fuse holders.
IMG_20200801_002820 (1) (resized).jpgIMG_20200801_002820 (1) (resized).jpg

I have 2 inserts stuck on... and 2 that never turn on... But the led and sockets are good... so maybe a transistor or a faulty connector... I'll troubleshoot this later.

And there is ONE bulb that I have not changed yet... I guess the whole drop target assembly has to be removed to reach it ?? I'll do that later too!
Pic81 (resized).jpgPic81 (resized).jpg

#99 3 years ago

She's coming along really nice! Hopefully the 2 on / 2 off lamps is one or the other (lamp board transistors or connectors) and not both. Tho given the kind of condition you started with, you'll probably be re-pinning all of the connectors anyway. Hopefully it'll just be that!

#100 3 years ago

Backbox door fully installed and functional... with new light baffles and original displays.

Pic82 (resized).jpgPic82 (resized).jpg
Promoted items from Pinside Marketplace and Pinside Shops!
From: £ 22.00
Electronics
Retro Electro Designs
 
$ 859.00
Flipper Parts
Mircoplayfields
 
$ 25.00
Electronics
Yorktown Arcade Supply
 
4,500
Machine - For Sale
Mesa, AZ
Wanted
Machine - Wanted
Forest City, PA
$ 8.00
Electronics
Third Coast Pinball
 
$ 179.00
From: $ 150.00
11,500 (OBO)
Machine - For Sale
Homer Glen, IL
$ 15.00
Hardware
Volcano Pinball
 
$ 30.00
Lighting - Led
Pinballrom
 
$ 69.00
Gameroom - Decorations
Pinball Pimp
 
$ 69.00
Gameroom - Decorations
Pinball Pimp
 
Hey modders!
Your shop name here
There are 187 posts in this topic. You are on page 2 of 4.

Reply

Wanna join the discussion? Please sign in to reply to this topic.

Hey there! Welcome to Pinside!

Donate to Pinside

Great to see you're enjoying Pinside! Did you know Pinside is able to run without any 3rd-party banners or ads, thanks to the support from our visitors? Please consider a donation to Pinside and get anext to your username to show for it! Or better yet, subscribe to Pinside+!


This page was printed from https://pinside.com/pinball/forum/topic/bringing-back-to-life-an-eight-ball-deluxe/page/2?hl=mathazar and we tried optimising it for printing. Some page elements may have been deliberately hidden.

Scan the QR code on the left to jump to the URL this document was printed from.