(Topic ID: 163782)

BoP: Father and Son's First Restoration [COMPLETE]

By jsa

7 years ago


Topic Heartbeat

Topic Stats

  • 450 posts
  • 52 Pinsiders participating
  • Latest reply 7 years ago by MajorHavoc
  • Topic is favorited by 76 Pinsiders

You

Linked Games

Topic Gallery

View topic image gallery

IMG_5782 (resized).JPG
IMG_5776 (resized).JPG
VH1A4993 (resized).jpg
VH1A5002 (resized).jpg
VH1A5004 (resized).jpg
VH1A4987 (resized).jpg
VH1A4986 (resized).jpg
VH1A4985 (resized).jpg
VH1A4983 (resized).jpg
VH1A4979 (resized).jpg
VH1A4976 (resized).jpg
VH1A4975 (resized).jpg
VH1A4970 (resized).jpg
bop_gif.gif
010517203830 (resized).jpg
IMG_5535 (resized).JPG

You're currently viewing posts by Pinsider jsa.
Click here to go back to viewing the entire thread.

19
#1 7 years ago

I arrived here about a year ago. A few buddies play in a league in SF at Free Gold Watch, snd they exposed me to pinball, and expos, and the whole thing. It was weird how fast I got hooked. I got my first machine a year ago, a ToM, and I didn't expect to get so into restoration and modding...Anyway, the short version is that I'm learning by doing and sometimes it's a bit like painting a jet while it's flying.

Anyway, the subject of what would be my pin #2 has been one of debate and curiosity for my friends and family. My decision was to get a working pin that needed a ton of work (not exactly a full project pin) that I could learn restoration on.

Meanwhile, in parallel, my son (15) was going through a bit of a revolution himself. As he entered high school, he had a number of learning challenges and social challenges until he discovered a class called "Principles of Technology," aka "Maker's Class." Basically, my son was rescued by an amazing teacher who focused him on learning to use all the tools in the workshop, from lathes to 3D printers to multimeters and soldering irons. He developed confidence in these things and we, his parents, threw as much fuel on the fire as we could.

As the summer approached, I suggested the idea that he and I try restoring a pinball machine together. You have to understand, it's been incredibly hard to find something that captures his interest and leverages his talent, and even harder to find one of those things he would do with me. He surprised me by showing a deep interest and thus the hunt began for the right machine.

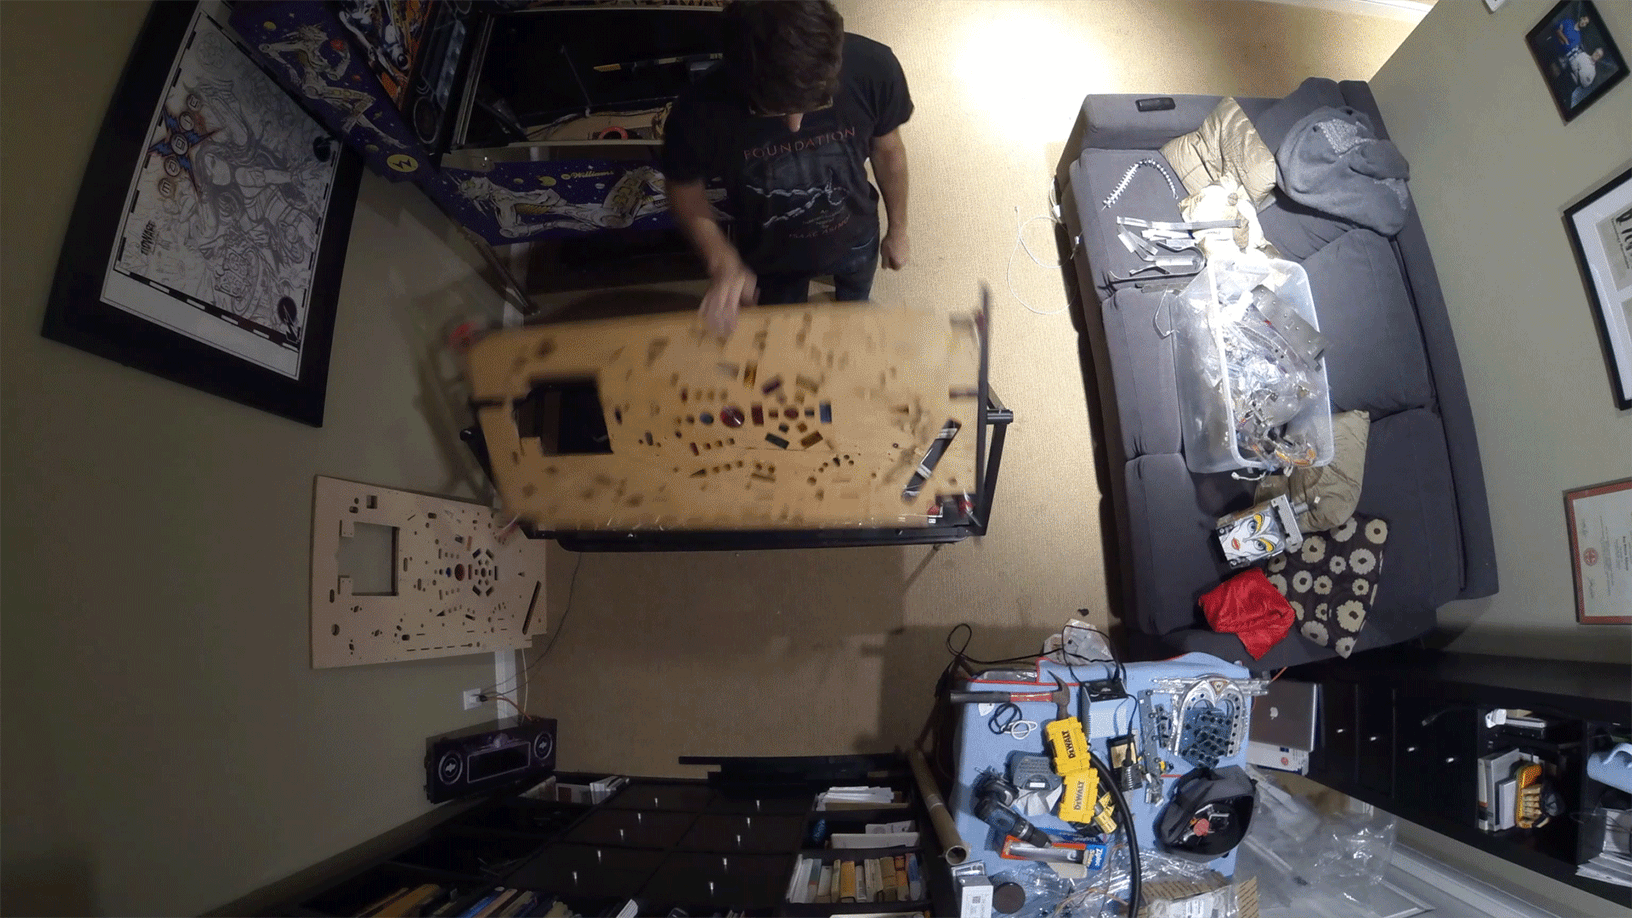
I recently picked up a BoP that fit the bill. It was barely playable; Two posts were actually drywall screws, the head randomly spun, and the cabinet was faded and damaged. It wasn't entirely clear what worked and what didn't on the playfield. The electronics seemed to work perfectly, or at least were in very good shape. I brought it home a couple weeks ago and we started the process of tearing it down.

We're not in a rush. I figure there are plenty of BoP restoration threads, so probably not much new here. Regardless, I want to document it in case anyone wants to join in and help with comments...but also to share the experience of working with my son. I expect this to take months, as I have a day job, but who knows...Things are moving faster than I expected, so I'll post the stages here.

-JayIMG_1978_(resized).JPGIMG_1978_(resized).JPG

#3 7 years ago

Taking a quick peek around the machine...

That coin door has definitely seen a crowbar or two:

IMG_1980_(resized).JPGIMG_1980_(resized).JPG

The right side of the cabinet has lost all it's red pigment. This must be the side that was in the sun:

IMG_1982_(resized).JPGIMG_1982_(resized).JPG

Backbox has a ton of damage and bizarre faded repainting:

IMG_1986_(resized).JPGIMG_1986_(resized).JPG

A little scorching around the eggcrate lamps behind the translite:

IMG_2006_(resized).JPGIMG_2006_(resized).JPG

The electronics are actually clean and show no sign of damage. Time to start stripping this down. First step, get the backbox emptied, then we'll remove the playfield and start working on the cabinet.

#4 7 years ago

Our strategy was to empty the backbox first and remove the head.

Am I the only one who is surprised to see the MPU board looking this shiny? I'm assuming someone cleaned this in recent years.

IMG_2015_(resized).JPGIMG_2015_(resized).JPG

The power driver board... Can anyone confirm these are new caps?

IMG_2016_(resized).JPGIMG_2016_(resized).JPG

My son removing the parts from the backbox:

IMG_2065_(resized).JPGIMG_2065_(resized).JPG

Success! We have decapitated the bride.

IMG_2070_(resized).JPGIMG_2070_(resized).JPG

Next we turn our attention to stripping the head, taking out the playfield, and stripping the cabinet.

#6 7 years ago

We took plenty of photos as we removed parts. It's not like we've done this before so we've been a bit careful. As we took parts out, we throw them in the tumbler for good measure. My son loves the tumblers. The idea that it's working all night long is pretty appealing to him. That, and he loves the simplicity and physics of it!

IMG_2109_(resized).JPGIMG_2109_(resized).JPG

Anyway, slowly the parts come out of the head and are arranged where we can get to them:

IMG_2100_(resized).JPGIMG_2100_(resized).JPG

I would not have guessed the ground braid went behind the lock in the backbox.

IMG_2102_(resized).JPGIMG_2102_(resized).JPG

Eventually the playfield comes out. It's really not in horrible shape, but we're not exactly talented painters and clear coating seems like something that could use some experience. We'll see as we progress how ambitious we are.

IMG_2114_(resized).JPGIMG_2114_(resized).JPG

#7 7 years ago

Looking inside the cabinet, other than the cabinet itself being a filthy mess, it's actually in pretty good shape. The wiring harness isn't very dirty. I get the feeling at least one of the owners of this machine took good care of it. The boot print is a bit concerning though.

IMG_2115_(resized).JPGIMG_2115_(resized).JPG

IMG_2120_(resized).JPGIMG_2120_(resized).JPG

Ok folks. What is the deal with this ground braid. Is this crazy path really necessary? It almost feels like a random path.

Looking closer at these leg plates, it's got me wondering. I've read some posts (vid) recommending you replace the plates with newer style plates. Others (bryan) simply restore the plates...Maybe clean them off, etc. I have new plates, but they obviously don't fit without some wood work. I'm not exactly the world's gift to using table saws, so I'm curious what people do with these things typically. Here's the plate in all its original painted glory:

IMG_2160_(resized).JPGIMG_2160_(resized).JPG

The full cabinet interior:

IMG_2189_(resized).JPGIMG_2189_(resized).JPG

After my son and I removed everything:

IMG_2273_(resized).JPGIMG_2273_(resized).JPG

Anyone know who "A.M." or "J.M." might be?

IMG_2276_(resized).JPGIMG_2276_(resized).JPG

Cabinet has been stripped, rails removed. Next we'll have to get those crappy faded graphics off the cabinet.

#8 7 years ago

For those who are wondering, this is not how you use a heat gun:

IMG_2290_(resized).JPGIMG_2290_(resized).JPG

This is more like it:

IMG_2459_(resized).JPGIMG_2459_(resized).JPG

The painted vinyl (I believe it's screen painted vinyl vs. a decal, assuming it's original. There isn't any way for me to tell, honestly.) came off fairly easily, but as I was warned and expected, left the glue behind.

IMG_2471_(resized).JPGIMG_2471_(resized).JPG

You can see here the damage to the coin door opening:

IMG_2474_(resized).JPGIMG_2474_(resized).JPG

Is this what is meant by "cabinet/corner separation," or is this just needing some filler?

IMG_2475_(resized).JPGIMG_2475_(resized).JPG

Other corners seem like they are holding together, just need some restoration:

IMG_2476_(resized).JPGIMG_2476_(resized).JPG

Not sure what I'll do with this. I realize it's partially hidden under the backbox, but my OCD says I'm going to make this pretty before it's hidden again:

IMG_2478_(resized).JPGIMG_2478_(resized).JPG

#9 7 years ago

Removed the glue today. I learned something. Glue particles can fly in the air and land on your sports car.

Right. That's bad. Okay. All right. Important safety tip. Thanks, Egon

#12 7 years ago
Quoted from MustangPaul:

The HD leg plates are worth their weight in gold, your cab will be rock solid once all the seperated seams are fixed. They will help protect your newly fixed seams from resplitting down the road.

The question is, replace the gosset in the corner with a smaller one, or notch out the existing gosset? Otherwise it just doesn't fit. The existing gosset on the corner comes out too far, plus as you can see the other gosset will need to be modified or shortened to make room:

IMG_2489_leg_plate_(resized).JPGIMG_2489_leg_plate_(resized).JPG

#14 7 years ago

We managed to get the cabinet and backbox sanded clean with 80 grit paper. The hardest part was the back of the main cabinet. It's interesting how when you sand, since you expose paint that was shielded from the sun, you can see the original color in the dust. There is no question the backbox was painted on wood, not on vinyl like the main cabinet.

IMG_2491_(resized).JPGIMG_2491_(resized).JPG

My son in appropriate sanding gear:

IMG_2493_(resized).JPGIMG_2493_(resized).JPG

The sanded backbox. I've got to say, I'm impressed it's not more beat up than it is. Some of the corners are gouged but that will be covered in my next post.

IMG_2498_(resized).JPGIMG_2498_(resized).JPG

For the cabinet, we cleaned up the outside completely (we HOPE we got all the glue off, it's sort of hard to tell). For the inside, I gave it a good go with 80 grit, but didn't get too crazy. The more I look at the overspray and mess on the bottom inside, the more I think I'll end up priming/painting that as well. While I totally respect the restoration keeping the original bare cabinet bottom, I love the look of a black, clean cabinet floor. The flipside of this is that it will show more dirt (I have a black sports car, what a nightmare).

IMG_2499_(resized).JPGIMG_2499_(resized).JPG

Next stop: Fixing cabinet and backbox damage.

#16 7 years ago
Quoted from MustangPaul:

I see, I didn't have that problem with my High Speed.

Yeah, the more I look at it, the more it seems it's an extremely small (maybe four mm?) difference. If the corner gosset was chiseled just a few mm, I think the new plate would fit completely flush over the exisiting holes.

It seems to me, since I'm not hung up on having everything exactly original, chiseling out some space to accommodate the new plates will be ideal to reinforce the corners. I'm not a master chiseler but my son is pretty good so we'll see how this goes. First I'm going to repair the cabinet corners and pipe clamp them nicely before I do any chiseling. I'm nervous I might break something.

#17 7 years ago

If I were Bryan Kelly I'd probably make new gossets. I'm no Bryan Kelly.

#19 7 years ago
Quoted from MustangPaul:

That would work as long as the cab bolt holes stay in the same place. The screw holes in the plates are for wimpy #6 screws so I drilled out all of them and put big honkin #10's in. I ALWAYS over build stuff.

#8's fit, for what it's worth. Overbuilding is the right move, but I think I'll stick with #8's for the plates.

#22 7 years ago

We decided to use vid's aluminum dam/mold method to repair the bad corners on the cabinet and backbox. My son and I love watching fiberglass resin dry:

IMG_2503_(resized).JPGIMG_2503_(resized).JPG

Here's the resin drying. I had no idea working with this stuff would be so much fun. We haven't even started with the bondo yet!

IMG_2506_(resized).JPGIMG_2506_(resized).JPG

Gratuitous post-apocalyptic selfie:

IMG_2512_(resized).JPGIMG_2512_(resized).JPG

Our first repaired corner pre-sanding, with embedded screw:

IMG_2514_(resized).JPGIMG_2514_(resized).JPG

The challenge with these corners is they look better than the rest of the cabinet. Just making sure we have it square:

IMG_2516_(resized).JPGIMG_2516_(resized).JPG

And the finished product:

IMG_2517_(resized).JPGIMG_2517_(resized).JPG

If I've learned one thing doing this corners, is that you get excited and then you get ambitious. I don't recommend doing two at once. We got a little over-confident and tried too much. They still came out great but it adds unnecessary stress.

IMG_2521_(resized).JPGIMG_2521_(resized).JPG

We applied the same concept to the bottom of the main cabinet. What I like about the fiberglass resin is that it adds a certain corner strength that can't be knocked off later. In the case of this older (1989) Williams cabinet, the underside joints reveal some weird layering and delaminating of the plywood around the corners. The resin just drips right in and solidifies the entire thing:

IMG_2526_(resized).JPGIMG_2526_(resized).JPG

The other part of this process is applying glue (we're using Titebond III) to the corners. The corners aren't exactly separating. The bevel, or groove at the marriage of the two sides, may have had glue at some point but now has sections of empty space. We do our best to put glue in the groove and then clamp it. Some oozes out so we know we must be doing something right:

IMG_2530_(resized).JPGIMG_2530_(resized).JPG

Now that we've done all the fiberglass resin and glue work repairs, next stop, bondo treatment of any remaining damage on the cabinet and backbox. Meanwhile, one last little puzzle to solve:

IMG_2531_(resized).JPGIMG_2531_(resized).JPG

This shows how the new leg mounting plate doesn't quite fit. My idea was to chisel out the gosset to fit the plate. I did about two inches in like a half hour and realized how ridiculously hard it would be to do all four legs. I asked my son what he thought, and his idea is that we 3D print a small plate that fits between the cabinet walls and the bracket, and perhaps loops up and over the mounting plate. I kind of like his idea better (except the minor issue that we don't have a 3D printer today). It's really two thin for wood to be cut to fit, and a metal plate would have to be pretty thin as well. I'm also open to the idea of putting the old leg mounting plates back, but I'm not willing to give up yet!

#24 7 years ago

I sure hope my photo record can help me remember what size goes where... Yikes.

IMG_2539_SCREWS_(resized).JPGIMG_2539_SCREWS_(resized).JPG

#27 7 years ago
Quoted from MustangPaul:

Well the 2 bigger 2 piece ones on the left are for the bb hinge. Does that help.

It does. You can see I incorrectly put the hinge "receivers" on the two equal gauge, shorter ones. I'm getting a little ahead of myself here, though.

#28 7 years ago
Quoted from kvan99:

Nice job on the corners...big pet peeve of mine. Which resin did you use?

Thanks! We used fiberglass resin, Bondo brand. You can actually buy it at Home Depot. We also picked up some actual Bondo for the next phase, repairing the various dings on the cabinet. Curiously, Bryan Kelly's photos of Bondo are gray. When you add the hardener to Bondo, it turns pink, right? Maybe there is a non-pink version.

#29 7 years ago

Fixing the first side with bondo:

IMG_2545_(resized).jpgIMG_2545_(resized).jpg

We will bondo and hit each side with 80 grit, then once we're happy the dings are gone, we'll hit the whole cabinet with 120 and 220.

IMG_2548_(resized).jpgIMG_2548_(resized).jpg

#31 7 years ago
Quoted from lostlumberjacks:

Nice job Jay, I've seen the bondo in pink, blue and gray. I basically skim coat the whole outside of the cabinet because I always seen to miss something. I use a spot putty if it's not deep.
This made thread made me look back to one of the first ones I did with my son. It was a cyclone in 2008 and he was 10 now he's going to college!
You guys look like your doing it the right way with no cutting corners! Gonna be a showpiece when done. Todd Scott

I love hearing that. We're really enjoying this, I can imagine doing many with him in the future. He's almost 16 now so we're getting a late start, but better late than never.

Interesting strategy about skim coating the whole thing. You're making me think we'll be well suited to inspect it carefully before priming. The primer has to help smooth it to some degree, though, right?

Today we were looking at how Chris Hutchins at High End Pins restores this game. He's got two examples on his gallery. One had chrome for the stainless parts (that's our plan, it looks amazing), another has stainless (which it came with). There definitely will be some tweaking to the look as we get closer to final painting. Exciting stuff!

#33 7 years ago
Quoted from lostlumberjacks:

If you click on this there is some pictures of the cyclone. this website needs updating bad but you can see some pictures.
http://solidstatepinball.com/restorations.html

Todd, my son and I have gone through all your photos. We love the double-decker rotisserie! That's brilliant! For a playfield swap, that makes absolute sense. We have the standard PinTisserie from Marco, not nearly as cool.

Just FYI, The Flash Gordons are ridiculously awesome. We have a ToM...It had been so well taken care of by its original owners (Mike and Bill Hollenbeck of Pacific Coast Pinball) that I can't bring myself to restore it further. I updated the speaker panel and performed the process here:

http://www.dziedzic.us/wpc_speaker_replacement.html

Perhaps one day we'll strip the playfield and have it more professionally restored. We have so much fun playing it we can't imagine taking it down long enough to do anything else to it.

#35 7 years ago
Quoted from RyanClaytor:

...and any avenue to give your son ownership over this project is gonna pay dividends. Could he still get access to that maker-space at school and print one out? Either that, or do a quick shapeways order. Just a couple of thoughts

Ryan, thanks for the kudos! Agreed 100% on giving my son ownership. Frankly, I'll benefit, because well, he's a genius.

Given my son's knowledge of 3D printing from school, and his desire to dive deep into that world, I took the plunge and ordered a lulzbot. It means one less pinball machine in the next few years, but if in exchange we throw more fuel into his fascination with making things then I think it's the right investment.

Today we discussed what filament would be best for it (he thinks ABS), and that we could post the STL file so other pinball restorers running into this problem could just print their own. I'll keep you all posted on progress on that.

By the way, it seems that Bondo has color options for the cream hardener. Apparently my local Home Depot only carried the red, hence my confusion. From the Bondo website:

Screen_Shot_2016-07-12_at_11.12.31_PM_(resized).pngScreen_Shot_2016-07-12_at_11.12.31_PM_(resized).png

I can't decide what I love more right now, the Bondo or the fiberglass resin. I'll never fix things with duct tape again.

#37 7 years ago
Quoted from Chosen_S:

Don't tell that to the U.S. Navy, hehe, they love duct tape and zip ties
Following along! So glad to have another few members of the bop club...
I have seen a few guys paint the floor of the cabinet white or tan, it looks great that way if you needed a suggestion to get away from black.
Which decals for the cabinet are yall using? I've seen purple and black... Or are you guys doing something custom??
Ben

We ordered decals from Bay Area Amusements. To be honest, we haven't opened them yet, figuring they are probably somewhat fragile and we should avoid it until we're ready. I'd assume they are purple, which was stock. The only black ones I've seen were after market or custom, though there is some beautiful art in the BoP and BoP 2.0 threads.

#42 7 years ago
Quoted from Chosen_S:

I have read using rapid tac is really good for installing large decals like these...
I personally apply decals dry, but if you aren't installing vinyl or decals on a regular basis it helps to have all the advantages you can get...
Oh... If your planning to use a squeegee, you may want to find one with felt on its edge. Every time I apply a decal with one with a plastic or rubber edge it leaves micro scratches.

Clearly I failed to read the tutorial on applying cabinet decals! Why wet vs. dry? What's the advantage?

Quoted from MustangPaul:

That might work but you really want to distribute the brackets clamping force evenly , that's why I say use full metal. Plastic especially that thin will have to much flex.

Unfortunately, I can't print (easily) metal. I could find some brackets that can fit in the gap, but they won't be connected to each other, which I think would enhance the value. I agree metal is better but...This might be enough. Only one way to find out.

I noticed that Chris Hutchins installed these in his two BoP restorations without any brackets you can see, so I'm guessing he used washers. We're talking 3-4mm here, so I'm guessing also the brackets can bend slightly to accommodate.

#47 7 years ago

We'll post some updates tomorrow. We're being a bit OCD on the bondo process.

#49 7 years ago
Quoted from Chosen_S:

I have read using rapid tac is really good for installing large decals like these...
I personally apply decals dry, but if you aren't installing vinyl or decals on a regular basis it helps to have all the advantages you can get...
amazon.com link »
Oh... If your planning to use a squeegee, you may want to find one with felt on its edge. Every time I apply a decal with one with a plastic or rubber edge it leaves micro scratches.
Ok, I'll shut up for now ... Just too many problems I'd like to help yall avoid.

My son and I watched all these videos. By the end he was saying "Dad, can we not watch another person put on decals, I'm dying over here." LOL.

Anyway, what strikes me here is that the wet method may be best for decals that aren't 100% flat on arrival or are in danger of some kind of awkward application. On the flip side, my intuition is that I'd rather apply the decal dry, if I had my choice. The actual act of spraying the decal's underside while applying introduces a point in the process where I could introduce a mistake (i.e. a crease), whereas the cleanliness and simplicity of the dry process seems more my style.

Once we open up the packaging the decals arrived in (tube with tape covering the ends, not exactly hermetically sealed) and see their condition, we'll make the call on our first decal application method!

Now, back to sanding Bondo. My whole body is covered in pink dust.

#50 7 years ago

BY THE WAY, my son and I will be at California Extreme this weekend, both Saturday and Sunday, if anyone following this thread wants to meet us. I'll look for my Pinside badge...

#51 7 years ago

My son is into the Bondo. We've been a little obsessed with making it right.

image_(resized).jpegimage_(resized).jpeg

He likes doing the hard work. He'll sweat on this for an hour, why not do the dishes? I do not understand.

image_(resized).jpegimage_(resized).jpeg

This is the sort of thing we spend too much time on. On many BoPs this little spot just beneath the backbox tends to be worn and chipped. We rebuilt it with Bondo.

image_(resized).jpegimage_(resized).jpeg

Almost finished with the outside!

image_(resized).jpegimage_(resized).jpeg

Now we'll take a weekend off to attend the California Extreme show in sunny Santa Clara, California. My wife is scared I'll come home with another machine. I'm just here to play!

#54 7 years ago

We have a orbital sander. Honestly, for taking off glue, going one direction was marginally faster. For finish work and sanding smooth, we like the control of hand sanding. We used the orbital for removing paint and for really rough spots.

I get the feeling a belt sander would be perfect but that being an amateur could ruin my day. Plus, you get a great workout with a block sander!!

As we move to the inside we'll move to an orbital probably since it's so awkward.

#56 7 years ago

My son got a good look at some of the restorations here on Pinside. Why did I get him a computer? Anyway, he prefers the "clean look" of the natural wood for the floor of the cabinet. Since this is a BoP from 1989, when they made the cabinet, they were liberal with the black spray paint and overspray onto the floor of the cabinet. To make matters more complicated, the floor is MDF, so it absorbed quite a bit of black paint at the overspray locations.

So, for cleaning out the inside of the cabinet, we decided to sand out the overspray black paint. There are certain areas that no electric sander can hit, and even a manual block sanding is complicated. For example, in this corner where the power switch plate is located, it's hard to get into the corner. I came up with this trick, using a small razor blade to scrape the black layer of paint off:

IMG_2613_(resized).JPGIMG_2613_(resized).JPG

Finally, for those hard-to-reach channels and edges, a thin piece of plywood wrapped in sandpaper does the trick:

IMG_2615_(resized).JPGIMG_2615_(resized).JPG

The final result is surprisingly effective. I keep seeing black paint, but that may be my sun blindness at this point.

IMG_2617_(resized).JPGIMG_2617_(resized).JPG

IMG_2616_(resized).JPGIMG_2616_(resized).JPG

IMG_2618_(resized).JPGIMG_2618_(resized).JPG

No sign of boot prints anywhere. We'll paint the sides and the gossets semi gloss black, so no sense in getting the gossets perfect.

We'll do some final bondo on the inside walls of the cabinet, then we'll hit it all with 80, 120, and 220. Then repeat all again for the backbox!

#62 7 years ago
Quoted from Bryan_Kelly:

Sanding the inside bottom is one of the jobs I hate the worst. Very time consuming. I now use a couple of very sharp paint scrapers to remove most of the paint along edges and tight corners. For that power switch block, I would have just removed it and reinstalled after sanding. Makes life lots easier.
And thank you for not taking the easy way out and just painting the bottom black to hide everything. I really hate that!!

First I'm honored you're following this thread, thanks for the kind words, Bryan! We are trying to follow your example as best we can. Somehow, going through your restoration of IJ thread, I figured out that I had most of these tools you use now...So I might as well give it a shot. What my son and I don't have is the miles of experience so this is definitely going to take a while.

We have these moments in this process where something is so hard (like the sanding of the inside bottom) where you almost feel like cutting a corner. Our agreement is to just take a break and attack it again the next day. So far, we've managed to not take short cuts. I'm a little nervous removing cabinet wood parts (like gossets or the power switch block) because we don't quite have the grace to not damage the cabinet. Maybe on the next restoration.

You probably saw I mentioned that you probably would have re-made the gossets to fit the new plates. We took a different tact, and have successfully created a 3D model of a perfect adaptor (we tested printing an ABS plastic draft) that sits between the leg plate and the wood. It's stronger than the cabinet wood, so I'm not worried about using ABS for structural integrity. We could also send the model to Shapeways and get metal adapters. When we're finished with the final touches, we can post the 3D model so if someone wants to print it (in ABS or metal) they can use it. We are a ways off from putting them in but it gave us something fun to do. So in this case, we literally avoided "cutting corners." (Terrible pun.)

Today and tomorrow we're hoping to finish the bondo/sanding work so we're ready to prime.

Question for all of you: We have a HVLP paint sprayer we were hoping to use with some white Kilz Original primer. Anyone have any experience with this? I've only used it years ago for general spraying with a thinned paint. It's a 1.7mm nozzle so I'm hoping it works without any thinning. We have some naptha we can use or can acquire some better thinner. I know Bryan uses rattle cans, but since we're going to be matching the purple decal with a latex paint for the top and back of the backbox, I figure we'll need a sprayer option anyway. Think this is doable?

#63 7 years ago

All Bondo work is complete. Next we'll sand and sand and sand (120, 220). Then prime.

Backbox all filled in:

IMG_2625_(resized).JPGIMG_2625_(resized).JPG

Meanwhile, my son is printing the next draft of the adapter plate:

#64 7 years ago

Fits like a glove, I love that this works:

IMG_2627_(resized).JPGIMG_2627_(resized).JPG

IMG_2628_(resized).JPGIMG_2628_(resized).JPG

#69 7 years ago
Quoted from Bryan_Kelly:

If this is your first restoration, jsa, I'd say you're doing great. I'd even go so far as to say it's better than the first one I did many years ago! Needless to say, they get easier the more you do. After a few, you'll look back at this one and wonder why you did some things the hard way.

It's my first, for sure. I'll be honest, we keep looking at the playfield in the corner of our garage (still not stripped down) and it's super intimidating. We're focusing on the cabinet for now. I'm hoping to do a playfield swap, but even then, I can't imagine keeping all of this straight. We probably should swap out all the microswitches with new ones, but man, I'm terrible at soldering!

#74 7 years ago
Quoted from lb1:

Get a Hakko soldering station. I should've done this years ago.
Great thread.

Thanks! I have a Weller with a digital temperature setting. My issue is mostly around de-soldering, which I must have a genetic defect preventing me from doing without damage.

#77 7 years ago
Quoted from dudah:

That print is a great idea! Mind throwing it up on Thingiverse?

We will throw it up on Thingiverse, but we really want to test it in our own restoration first. (Also we're new to all things 3D printed so any tips to posting on Thingiverse?) However, if you need it sooner than that (we're moving at a first-time restorer's pace) just PM me with an email and I can send it to you.

We're just getting back from some travel, so hopefully we can post more progress this week.

#78 7 years ago

Made some progress today. We focused on getting the main, lower cabinet ready for priming. I wanted to show off some of our repairs before they were covered up!

This is what the side looks like after it has been hit with 220:

IMG_2685_(resized).JPGIMG_2685_(resized).JPG

I find it interesting that the cabinet was not sanded to this level in the first place, particularly the inside where you can see the side of cabinet above the playfield. It didn't take much work to get it smooth:

IMG_2688_(resized).JPGIMG_2688_(resized).JPG

Here you can see the repair to the front where someone took a crowbar to the coin door. We chose to drill some shallow holes in the damage, fill with fiberglass resin (after putting an aluminum dam around the coin door edge). That worked for most of it, but for the more shallow areas we ended up adding some Bondo:

IMG_2690_(resized).JPGIMG_2690_(resized).JPG

A close up:

IMG_2693_(resized).JPGIMG_2693_(resized).JPG

The original:

IMG_2474_(resized).JPGIMG_2474_(resized).JPG

My son next to the cabinet, ready to get primed. We're proud of our work, this is all new to us!

IMG_2692_(resized).JPGIMG_2692_(resized).JPG

IMG_2694_(resized).JPGIMG_2694_(resized).JPG

IMG_2696_(resized).JPGIMG_2696_(resized).JPG

Even the back was filled up and sanded smooth:

IMG_2697_(resized).JPGIMG_2697_(resized).JPG

I repaired the damaged ridge beneath the backbox. I somewhat regret not using fiberglass resin for this particular repair, because I have a feeling it gets dinged a lot:

IMG_2698_(resized).JPGIMG_2698_(resized).JPG

IMG_2699_(resized).JPGIMG_2699_(resized).JPG

And finally, the inside. I don't look forward to taping the bottom out for priming, but we'll get it done:

IMG_2700_(resized).JPGIMG_2700_(resized).JPG

Since we're getting closer to priming, anyone have any particular advice around 1) thinning Kilz Original for spraying and 2) what grit sandpaper to scuff sand the primer coat before putting on another coat or a final top coat?

-Jay

#80 7 years ago
Quoted from Skypilot:

Jay,
I can't answer on the paint. I use automotive urethane primers through an HVLP. I can tell you I lightly sand with 220 grit between coats.

I also plan to use an HVLP. I lack the ambition to use any two part primers or paints. If I can't get the primer to spray the way I want, I may just purchase some Kilz in rattle cans.

#83 7 years ago

All good advice. I'll experiment with my 1.7mm nozzle and see what works and what doesn't. I'll post my results here.

Meanwhile, completed the backbox with 120 and 220 grit:

IMG_2701_(resized).JPGIMG_2701_(resized).JPG

The only things we haven't done is "break" or bevel the edges and make/install new chocks. Anyone have any feedback on the beveling? The backbox and cabinet did not have beveled edges on all the edges. It had that on the bottom of the backbox and maybe the back edges, but most of the edges came to a point. I understand there is value in the beveling for installing the decal art, but what exactly? The beveled edges would need to be painted the color of the art (purple) and match pretty perfectly to not stand out.

#85 7 years ago
Quoted from MustangPaul:

Have you thought about putting T molding on the bb?

By T molding are you referring to edge covering? I think I know what you mean... I saw someone put brass molding on their ToM.

I'm leaning towards painting the edge and backbox area in front of the backlass semi gloss black. I was originally thinking purple, but the more I imagine it the more I think black will look great. It will be primed well so I don't think the plywood grain will be very visible. Is that why you are suggesting it?

#86 7 years ago
Quoted from MustangPaul:

Have you thought about putting T molding on the bb?

Also, the Sterns with that stuff kind of look cheesy to me, but that's just my opinion.

EDIT: Referring to the chrome t mouding... Though I suppose if kept in good shape it would look pretty good.

#88 7 years ago
Quoted from MustangPaul:

Yes that's it. The plywood edge grain is murder to get rid of because of all the voids and different kinds of wood in the plies and changing directions of the plies. Just put black T molding on.

Well the beauty of T moulding is that I can wait to see how it looks and add it after...Though I'd have to cut a slot, correct?

#93 7 years ago

I think I'm going to pass on the T moulding this time. I see the value but I don't think we have the right tools and right experience yet to make it happen.

Meanwhile, prior to priming (and building our amateur spray booth), we're going to need to break these corners. I see Bryan uses a longer sanding block to make it a bit more consistent... We can try that. There already were SOME beveled edges on the cabinets, so we'll probably work to match it.

Since this is a BoP, and we're dealing with dark purple, will the white part of the vinyl be a problem on the edges?

#95 7 years ago

Did my best to make some new chocks out of oak. It's not hyper precision (I think they are a millimeter too shallow) but they look better than the originals, that's for sure. Think it's safe to nail gun them with finish nails into the cabinet?

IMG_2767_(resized).JPGIMG_2767_(resized).JPG

#96 7 years ago

Chocks installed! I did my best to put them close to where they were when we took them off. However, they weren't equidistant to the sides before, so we corrected that now (the holes in the back of the cabinet are also off-center slightly).

IMG_2769_(resized).JPGIMG_2769_(resized).JPG

#97 7 years ago

I've beveled the corners of both cabinets.


Quoted from Bryan_Kelly:

Yes. It's going to stand out. Once the decals are on, tape off the decal and also tape off the part of the cabinet that's painted. What you should have left is the tiny slit that is the white. Spray some paint into a small jar and use a small, good artist brush to paint the white. Only use as much as you need to cover the white. Put it on too thick and you'll feel a paint edge after removing the tape.

I imagine that the color you paint the bevel will depend on what edge you're looking at. For example, it seems the bevels on the two front corners of the main cabinet would be purple (where purple meets purple), and probably on the bottom (where purple meets unpainted bottom edge). However, where purple meets black on the rear two corners, it seems to me that I might be better served painting the bevel black, because otherwise when you look at the cabinet from the back you would see a purple outline. Am I thinking of this correctly? I guess the alternative is a black outline for the side decals, which might be annoying as well. (Why are we beveling again? LOL.)

The back of the backbox I was planning on painting black to match the original, and painting the rear bevels black as well. The top would be purple to match the decals. I noticed HEP paints them a darker purple. Anyone have any thoughts on this? The back of both the backbox and main cabinet were black when I got it.

#98 7 years ago

My temporary spray booth looks like a creepy scene from the TV show Dexter. Yikes.

IMG_2793_BOOTH_(resized).JPGIMG_2793_BOOTH_(resized).JPG

Tomorrow I'm going to experiment spraying Kilz Original with a 2.0mm nozzle at various levels of thinning. I'll try it first without thinning, as 2.0mm is supposedly a primer nozzle after all.

#99 7 years ago

Reading online that my 1.7mm nozzle might be better. Where are the auto painting enthusiasts when you need them?

#101 7 years ago

My son and I finished off the taping and masking of the cabinet today, and managed to prime the backbox. Here's my son reaching into the cabinet. We learned that the Harbor Freight lift table is also useful for raising the height of a helper so he can reach the inside of the cabinet:

IMG_2826_(resized).JPGIMG_2826_(resized).JPG

Here's what I learned priming my backbox today:

I chose a Neiko 2.0mm HVLP spray gun. The gun's specs are about 4.5cfm for nominal operation at 40psi. The compressor I have is a pancake compressor that does about 3.5cfm at 40psi. This is not ideal. Don't do this. I think for the cabinet I'll rent a larger compressor.

The nozzle size was fine spraying Kilz Original, but I had to thin it about 20% with thinner. I honestly don't think this matters much, though spraying this took a really long time (partially because I had to keep waiting for my compressor to catch up).

Here's the final product, after three hyper thin coats of Kilz:

IMG_2830_(resized).jpgIMG_2830_(resized).jpg

My poor man's spray booth was not adequately ventilated. I had a good respirator but really folks, don't do this, get proper ventilation if you're going to use a HVLP gun, it gets everywhere. I looked at myself in the mirror after and thought I aged, and realized that a fine mist of white Kilz was in my hair. I guess I should have worn hair protection!

As far as the finish is concerned, it's hard to say if it's orange peel or just my inconsistent sanding, but I think it looks pretty good. I experimented using Kilz from a spray rattle can for part of it and there is no question the atomization of the HVLP gun was superior to the rattle can. The trouble is that you can't get the HVLP gun into small areas, so using both isn't crazy if you're careful with the rattle can.

Anyway, next stop...priming the cabinet, and matching the purple decal color at a paint store.

#103 7 years ago
Quoted from Chosen_S:

Looks good from here! If the orange peel is concerning... I'm sure you're going to do this, but; sand, paint, sand, paint, sand, paint... it will come out so smooth it will feel like butter rubbed on chrome.
curious, are you going to paint the whole cab purple, or do the black and purple combo?

My intent is to sand again with 320 until it's super smooth before painting a color. Do you feel we should paint another coat of primer after sanding it again?

As for the purple/black debate...I keep going back and forth. I'm definitely going with black for the inside of the main cabinet, inside of the main backbox, and the front edge and visible inside area of the backbox. Originally I was going to paint that purple but despite the marketing flyer showing this, I like the look of the black better there.

The question is what to paint the back of the backbox and cabinet. My current plan is to paint the back of the backbox purple and the back of the cabinet black, though I'm struggling a bit figuring out what to paint the beveled edges. If I stuck with just purple, this debate disappears. I have the same problem on the front edge of the backbox, where black meets purple. Decals will be married up against these edges, so my instinct is to paint the bevels the color of the decal, so I can paint the white vinyl to match. I'd love thoughts on this.

#105 7 years ago

I rented a larger, 7CFM compressor, and it made a huge difference. Now I have a good motivator to get the painting done quickly:

image_(resized).jpegimage_(resized).jpeg

Once the paint was dry, I was less concerned about orange peel. It was gone. There was one spot where I painted too thickly, but that is easily rectified with sanding. A primed cabinet!

IMG_2843_(resized).jpgIMG_2843_(resized).jpg

Next step, sand down with 220, then paint color.

#107 7 years ago
Quoted from beatmaster:

great work. cabinet looks brand new now.

Thanks. I think we'll sand the primer-only decal areas with 320 prior to applying decals, everything else will be 220, paint, 220, 320, paint.

#108 7 years ago

We learned a few things today.

First, for anyone in the future trying to get a paint matched to your BoP purple, let me help limit your wasted time. High end and low end paint matching stores all use a variation of the same software matching system (Sherwin Williams and Home Depot included) that scans a source color and comes up with a match. Vinyl decals, specifically purple, have a reflective quality as well as a faint dithering to create the colors. This dithering, combined with the fact that bright ink colors in general are fairly rare in household paint, will cause any computer matching system to basically fail creating this purple.

However, if you stick to Home Depot or Lowes, there is a way to do this. You start with a purple (in my case, I found a swatch called Academy Purple), and you find an experienced person with no chip on his/her shoulder working the paint matching counter. They can edit your color by hand to create a match. It took him about twenty minutes, and to be honest, I'll never go anywhere else but this dude again, bless him.

purple_paint_(resized).jpgpurple_paint_(resized).jpg

It's not going to be perfect. If you want a perfect match for touch-ups, don't use this paint, use Createx Airbrush Colors and mix your own, you'll be way closer to the original. Here's a link: http://www.createxcolors.com/airbrushcolors.html

However, given that this paint will only be visible on the bevels, on the edge of the vinyl, and on the top and back of the backbox, I think it will be a great choice...We'll see when I get there! If you want to use it, in theory, a home depot can scan that QR code on that image and make you this paint.

Meanwhile, back to our restoration: Today we sanded the primer with 220 (and 320 where decals were going over primer) on both the cabinet and backbox. We then HVLP sprayed the first coat of semi-gloss black on the front/insides of the backbox and the inside and back of the cabinet.

The second important thing I learned today is more regarding HVLP spraying. For today's paint, which was a Behr Ultra Plus Semi-Gloss latex black paint, I used a Neiko 1.7mm nozzle HVLP spray gun, again with a 7CFM air compressor. I didn't need to do any thinning at all! In fact, right out of the can, it sprayed beautifully, though I did need to remove the stupid built in filter that ships with the Neiko (it is a small, white plastic cylinder that sits between the paint reservoir and the nozzle that is easy to remove). Here are the results of the first coat:

IMG_2857_(resized).JPGIMG_2857_(resized).JPG

IMG_2858_(resized).JPGIMG_2858_(resized).JPG

I can already see the extra attention to the details really paying off, particularly in places like this:

IMG_2859_(resized).JPGIMG_2859_(resized).JPG

Tomorrow, if the paint is ready, we'll sand all the black areas with 220, then 320, then do a final coat of semi-gloss black. This thing is really coming together! I also just got word that my repro playfield is coming soon, so now I know what my plan will be for the playfield.

#111 7 years ago

The magic of Bondo and fiberglass resin:

restoration_progress_(resized).jpgrestoration_progress_(resized).jpg

#112 7 years ago

The HVLP gun sprays a super consistent coat, but fair warning, it's also SUPER THIN. This latex paint covers really well so it's hard to tell how thin it is. I hit the black from yesterday with 220/320 before spraying the final coat, and the white primer was quick to show through in places. You can't spray thicker because you'll get orange peel, so you may need multiple coats, your milage may vary. I think I'm good with two coats.

#113 7 years ago

While the black paint is available, we have a couple more projects besides the cabinet to hit with black paint!

We painted the bolts we want to be black with a Scotch Brite pad, then painted with a self-etching primer:

IMG_2866_(resized).JPGIMG_2866_(resized).JPG

Nothing quite like the fun of removing the old, moldy, boogery paint from the U and H channel pieces. Just imagine how many sneezes these pieces saw over the past 26 years!

IMG_2870-1_(resized).JPGIMG_2870-1_(resized).JPG

The channels get cleaned with a Scotch Brite pad, cleaned with naptha, then also spray painted with self-etching primer. Finally, they get a couple coats of semi-gloss black:

IMG_2872_(resized).JPGIMG_2872_(resized).JPG

IMG_2874_(resized).JPGIMG_2874_(resized).JPG

Finally, the bolts got a couple thin coats of semi-gloss black as well:

IMG_2875_(resized).JPGIMG_2875_(resized).JPG

Now I'm debating painting another coat of black on the cabinet. I'm unsure if the shinier areas are that way because of my lame ass sanding or because of inconsistent painting! I'll let it cure for another hour or two and check again.

#116 7 years ago
Quoted from MustangPaul:

For the bolts and channel why didn't you just use a wire wheel on a bench grinder, takes about 20 seconds per bolt to do the top, sides and under side of the bolt. The channels take a couple of minutes per piece.Takes off the rust and paint in a snap.

Well, the simple answer, because I don't have one. Regardless, it didn't take long. Also, the bolts had already been tumbled, so all I needed to do was a second of Scotch Brite per bolt on the head. Still, probably worth buying a wheel soon, since at some point I'll be re-surfacing the ball guides and other stainless items. It might make easier work.

Quoted from lb1:

I am no paint expert, but I use enamel black paint. I find it easier to sand than latex paint.

That's a valid choice. In fact, working with two part automotive paints probably would give me the best results, but I have more experience with latex so I went for it. If I went to an automotive paint store, chances are I'd have an easier time matching the purple! The truth is, after reading through a number of Vid's threads, I got attached to the idea of a good latex paint.

When I sanded the paint it sanded quite easily. The key with most latex paints is that it takes longer to cure, so for best sanding results, you must wait much longer. Regardless, the results look pretty good. I'll post some better lit photos tomorrow.

#118 7 years ago

Ok experts. What would you recommend doing about this orange peel?

IMG_2877_(resized).JPGIMG_2877_(resized).JPG

Should I let cure, wet sand, and re-paint? What grit to wet sand with?

#120 7 years ago
Quoted from lb1:

Paint too thick and/or two much of it? Where is it?

My guess is that my sprayer was too close to the surface. It's on the very back of the main cabinet.

#122 7 years ago
Quoted from lb1:

I would start by gently dry sanding an small area with 400 grit and see.

I'm thinking I should let it cure for a day first, though. It's dry to the touch but this paint takes a while.

#124 7 years ago
Quoted from MustangPaul:

I'd wait 3 or 4 days then sand. After sanding wait another couple days to allow the sanded paint to cure AGAIN....cuz you exposed paint that MAY not have dried to that depth and beyond.

My son thinks it looks good this way. Maybe we're overthinking this! Regardless, time to stop trying to correct it and let it cure for a few days at least as you suggest.

I lose my compressor tomorrow. I may try to paint the purple somehow, though I'm afraid to mask anything fresh.

#126 7 years ago
Quoted from MustangPaul:

Since your loosing your compressor tomorrow just think on it for a while, if it still bugs you then respray it.

Exactly my thoughts. Since the backbox black is finished, I'll HVLP the purple tomorrow if I think it can handle the masking tape. I also managed to get the playfield mounted on a rotisserie:

Never seen a drywall screw used as a bumper post before.Never seen a drywall screw used as a bumper post before.

This is my first time using this rotisserie (the one Marco sells), and I have to say, I'm really disappointed. The brackets that hold the playfield bend easily under the weight of the playfield. When you turn it upside down, if the C clamps aren't super tight right up against the horizontal brackets, they will just bend and break. I'll probably screw this playfield directly into the brackets. I could probably improve this with some thought, but for now, it seems stable enough. I'll end up making my own rotisserie in the future, but a shame to pay this money and have it be flimsy.

#128 7 years ago

I'm feeling the purple pinbot power.

IMG_2920_(resized).JPGIMG_2920_(resized).JPG

Do you folks typically paint the sides where the decals go? I was thinking of doing the edges of the sides so the bevel matches.

#131 7 years ago

Since decals are going on the sides of the backbox, and the current surface is perfect for the decal, I may limit the spray to the edges. Then again, if I start spraying and I'm covering most of it anyway, I'll just finish the job.

The cabinet is making progress as well:

IMG_2922_(resized).JPGIMG_2922_(resized).JPG

#134 7 years ago
Quoted from lb1:

Looks like you've got a bit of orange peel there as well. You're not thinning your paint at all?

Well, interestingly, the paint comes out initially in a bit of an orange peel, then it flows outward and the orange peel disappears, particularly on a surface properly sanded.

My painting process ran into a few hiccups. The purple turned out great. The black, however, has inconsistent semi-gloss. I'm thinking that the black paint unmixed itself at some point, or something about spraying it un-thinned. The purple, which is the exact same base, I thinned with about 10% water, and it worked beautifully.

To fix it, I abandoned the HVLP for the black and went to Rustoleum 2x "Painter's Touch" Semi-Gloss black spray paint. The stuff really looks great. In fact, I was just about finished with all the painting, when I made a rookie mistake. I had taped on top of the black paint with a high end 3M masking tape, and when I pulled it off, it left its glue residue behind, rendering wherever it was with zero gloss. If I wet with naptha or thinner, the gloss returns.

So now I'm experimenting with removing the glue with thinner. If that fails, I'll have to either repaint with black, or paint over with a semi-gloss clear, which I have handy. If anyone has any experience with this problem, let me know.

Also... I'm wondering if anyone has cleared over the warning screen text? One option would be to hit everything with a semi-gloss clear once the screen text is on, though my fear is that it would dissolve the screen ink.

#136 7 years ago
Quoted from lb1:

I have used the Rustoleum spray cans quite extensively for my TZ cab and other stuff. I like them a lot except that I find the solvent so hot that unless you wait long enough between two coats, you end up dissolving the previous coat. It's happened to me multiple times, as recently as Sunday, painting wood rails. The other problem is that the geometry of the spray pattern isn't as wide and adjustable as with a gun.
As far as the clear goes, I'm pretty sure it's a lot easier to apply than paint. Back to the rails I had problems with, I ended up sanding the painted problematic areas and applying the oil based clear gloss over it. The rails came out great with a beautiful gloss. The clear is almost as fluid as water, it isn't that hot so it plays nicely with the rustoleum even when it hasn't fully cured, and it dries relatively fast. If you wait a few days after you have screened, you should be able to apply some semi-gloss clear without a problem.
For the glue, try alcohol.

Great tips, thank you. For the clear, I was planning on using the Rustoleum Semi-Gloss clear spray rattle can, since this isn't a playfield after all. Any experience with that?

#139 7 years ago

You can see some inconsistency with the semi-gloss clear. I'm pretty sure this happened because the pressure out of the can was so high, even at 12", it pushed or blew the previous line of paint aside.

image_(resized).jpegimage_(resized).jpeg

Do you guys recommend we add a coat or two, or sand down (maybe wet sand with high grit) and then a new coat?

#140 7 years ago

Also, can someone explain to me the science/wisdom around this:

FullSizeRender-1_(resized).jpgFullSizeRender-1_(resized).jpg

or from another angle:

FullSizeRender_(resized).jpgFullSizeRender_(resized).jpg

It seems that after sanding a coat of paint (say, at 320 grit), the entire surface will appear 100% uniform. Then, when I paint a new coat, there will be some areas that look like that. Almost like a naturally occuring steel diamond plate pattern. Is this random? Something left behind in the previous coat? We're at a loss.

#143 7 years ago
Quoted from PinMonk:

What's the ambient temperature? I can't imagine it's too cool this time of year, but this has happened to me when the temp was too cool.

The temperature was about 72 degrees. What causes checking and lifting?

#145 7 years ago
Quoted from MustangPaul:

You used latex paint then cleared it with enamel clear?

This depends on what photo. On the black photo with the strange lifted pattern, that's just spray enamel (Rustoleum Painter's Touch) on top of Kilz primer. The inconsistent clear coat photo is spray enamel clear (Rustoleum Painter's Touch Semi-Gloss) over latex.

#146 7 years ago

...and I should add, the strange lifted pattern was really enamel on top of enamel, as I sanded a previous coat of semi-gloss black and painted another coat on top, and got that pattern.

#153 7 years ago
Quoted from MustangPaul:

When you sanded the last coat of black paint how long did you let it dry after sanding before you sprayed the clear?

I didn't spray on clear in this case, it was another layer of black paint, three days later. Unfortunately, not long enough for curing.

Quoted from PinMonk:

That temp should be fine. You have to get into the 60's before you could have issues.
Other causes could be two incompatible types of paint/primer or the timing of the second coat.

Alas, you have all deduced correctly, I rushed it. I'm learning a new level of patience watching paint dry.

Quoted from Classic_Stern:

That is doing too much to fast. The layers need time to cure and if too thick same thing.

Yes, I agree, I will force myself to take more time. Interestingly, the raised areas sank back down after about an hour. More evidence that patience is a virtue.

#155 7 years ago
Quoted from PinMonk:

It wasn't anything major, at least. I really like what you're doing and am a little jelly.
Two questions:
1. Are you going to make this a Bride 2.0 machine? That new DP software is amazing.

Honestly, my son and I haven't decided. We both really enjoy playing BoP 2.0, so it may be in the future. Before we would do that, we would want to fully restore the original as best we can.

Quoted from PinMonk:

2. Putting in a new repro playfield? Most of the BoP's I've seen are fully mylared and pretty ugly compared to the new repros:
https://pinside.com/pinball/forum/topic/bop-bride-of-pinbot-repro-playfield-list-closing/page/8#post-3034943

We are going to be using a repro playfield. Our playfield is actually in decent shape, and if we had some more experience, would probably be worth restoring. It is fully mylared, though that could also be a good thing as once removed it might be somewhat protected. However, as you might see from this thread, painting is our biggest weakness, so we'll stick with the repro playfield.

Doing a playfield swap is also new for us, so we're researching good ways to document our teardown.

#157 7 years ago
Quoted from PinMonk:

Just take a LOT of pictures, from every angle, with each step of taking everything off, top and bottom. You'll never be sorry you took too many pictures, or not taking pictures from enough angles. When you're done, send them to me and I'll add them to http://www.theteardown.com for everyone to reference in the future!
When I do a teardown, I usually have either 4 or 6 large ziplock bags and label them in quadrants to keep the pieces in the approximate areas they came from. Big stuff like ramps I obviously don't put in the bags, but where they go is self-explanatory.

You got it, I'll be sure to organize the photos as best I can for your reference site. So far, the only playfield elements that have been photographed/removed is the apron, rear wood panel (whatever you call that), and the two wireform rails, as I intend on having them plated. I took photos from various angles as I removed them.

What I remembered most from the cabinet was that I really needed a photo of a removed screw in context. As I unscrewed something, I would lay the screw sideways near the hole and take a photo, so I could get a sense of what size screw went there. This being said, I really think I'll throw a spreadsheet together saying how many of which type of screw is associated with each removed part, and put the part and its associated screws in a bag labeled with a sharpie. Maybe I'll take a photo of the parts all on a table together for each bag as well.

Then, for screws/washers/nuts etc., I'll total up the count when it's all torn down and buy new ones (cheaper than Flitz). I'll tumble the rest of the stuff, or in the case of guides, polish them up.

That's the current plan. I got a bunch of ideas from this thread I started last year:

https://pinside.com/pinball/forum/topic/teardown-techniques

If there is something I could add to make your reference site easier let me know.

#161 7 years ago
Quoted from lb1:

For this one, I would do a light sanding, and add two wet coats of clear applied with a foam brush or a spray can, but with the head horizontal. This way you can get a nice wet coat with no run.

My concern here with a rattle can is that we'll end up with the same effect (inconsistent gloss) due to the burning or blowing away the clear as the can makes each traversal across the face. That leads you to using a roller, but with a roller, does it dry flat or is the nap of the roller an issue? I suppose I could do a light sanding (what grit, by the way, do you recommend for this, and any reason to wet sand vs. dry at this stage) and then wait for a few days before spraying, and worse case, sand it again.

#163 7 years ago
Quoted from lb1:

I think the MixWax fast drying clear is more fluid because it contains more solvent.

Thanks for the advice, I'll give it a shot. Any problem using a polyurethane clear on top of a latex paint?

#164 7 years ago

I seem to recall Vid saying that oil-based polyurethane will yellow over time...

#166 7 years ago

I agree, no need for clear, the issue was that my HVLP sprayed on latex had inconsistent semi-gloss on the back of the backbox. The purpose of the semi-gloss clear was to even it out. Ironically, it just made it less even, furthering the wisdom that what is on bottom is amplified by coats above it.

Pretty soon we'll be finished with the painting... I can't wait. I'm done with this respirator! We need to psych ourselves up for wet application of decals next.

2 weeks later
#172 7 years ago

After traveling for a week, we're almost finished painting. I'll post some final photos of the paint work soon. Meanwhile, does anyone here have a good photo of the ground braid behind the pcb panel in the backbox? I failed to take a good photo.

#174 7 years ago
Quoted from Chosen_S:

Sorry, I don't have a good pic, but I look forward to the paint job!
here's a shameless link to my current project, I used Krylon rattle cans, I think it turned out ok, but i wasn't going for restoration perfection
https://pinside.com/pinball/forum/topic/gamatron-scratch-build/page/3#post-3334379

I think it looks fantastic, though I grant you my son does most of the detailed observation. My eyes aren't what they used to be!

#175 7 years ago
Quoted from Chosen_S:

Sorry, I don't have a good pic, but I look forward to the paint job!
here's a shameless link to my current project, I used Krylon rattle cans, I think it turned out ok, but i wasn't going for restoration perfection
https://pinside.com/pinball/forum/topic/gamatron-scratch-build/page/3#post-3334379

Sweet lord that Gamatron is going to be ridiculously sweet. I want video when it's done.

#178 7 years ago
Quoted from Chosen_S:

Thanks guys!
Still want to see that paint job, lol

Ok, it's coming! I need to move the cabinet out of its redneck spray booth and into the harsh light of day and take some photos. When I get back from work tomorrow (if there is still daylight) I'll roll it out. Seeing as tomorrow is my birthday, I might leave work early, we'll see.

#179 7 years ago

The paint job is finally complete. We now present to you our very first pinball cabinet paint job! We're clearly not perfectionists. Regardless, we learned a ton during this process that will come in handy in the future. Here are the photos, hope you don't mind all the angles:

VH1A1432 (resized).jpgVH1A1432 (resized).jpg

VH1A1433 (resized).jpgVH1A1433 (resized).jpg

VH1A1434 (resized).jpgVH1A1434 (resized).jpg

VH1A1435 (resized).jpgVH1A1435 (resized).jpg

VH1A1445 (resized).jpgVH1A1445 (resized).jpg

VH1A1437 (resized).jpgVH1A1437 (resized).jpg

VH1A1440 (resized).jpgVH1A1440 (resized).jpg

VH1A1441 (resized).jpgVH1A1441 (resized).jpg

VH1A1443 (resized).jpgVH1A1443 (resized).jpg

VH1A1444 (resized).jpgVH1A1444 (resized).jpg

VH1A1447 (resized).jpgVH1A1447 (resized).jpg

VH1A1442 (resized).jpgVH1A1442 (resized).jpg

I believe next stop is the warning label screen printing. Does anyone have any recommendations on thinning the ink, how much and with what? Then we will move on to the dreaded decal application. My son wants to do it wet, because he believes we should have a second chance if we screw anything up.

#181 7 years ago

Took a break from the cabinet today to work on the PCB panel. I took a note from Bryan Kelly (who in turn credited Chris at HEP) and tried to make my panel a bit nicer to look at. Here's what I started with:

IMG_1410 (resized).JPGIMG_1410 (resized).JPG

Here's my son giving it a once over with 120 grit:

IMG_1412 (resized).JPGIMG_1412 (resized).JPG

He recently cleaned a steel machete which had oxidized with lemon juice. While I realize the nature of this corrosion was a bit different, we decided to try the experiment anyway. First, apply lemon juice to paper towel:

IMG_1415 (resized).JPGIMG_1415 (resized).JPG

Next spread the lemon juice over the panel:

IMG_1417 (resized).JPGIMG_1417 (resized).JPG

After a minute or so, the lemon juice creates this film over the panel. At first I thought maybe it was just oxidizing it worse.

IMG_1419 (resized).JPGIMG_1419 (resized).JPG

Then, after a few minutes, I cleaned it with naptha and sanded again with 120. You can see it seemed to be a bit shinier than before:

IMG_1422 (resized).JPGIMG_1422 (resized).JPG

I have no idea the science behind this. Here is the final result, after 220, 320 and a red Scotch Brite pad:

IMG_1430 (resized).JPGIMG_1430 (resized).JPG

I then sprayed it with some semi gloss clear and called it a day. It's not perfect and as shiny as Bryan's but considering it's a piece of metal you can't see I'm pretty satisfied.

#182 7 years ago

We restored the light panel and did our silk screens. Unfortunately, we made a rookie mistake on the screens.

First, the light panel. The plastic light shield that fastens to the front of the light panel is super brittle. It looks like, over time, heat from the incandescent lamps caused some of the very thin outer plastic to shrink, causing them to crack or bend inward. I made an executive decision we shouldn't bother trying to restore the outer edge of this component, it was way too brittle. Instead, I just sprayed it with Rustoleum 2X Painters Touch Semi-Gloss White.

IMG_3248 (resized).JPGIMG_3248 (resized).JPG

The light panel itself required I remove the bulb sockets from the back. I then sanded the back with 120 and 220, cleaning it up quite nicely. For the front, I did a very light sanding with 320 and then sprayed also with Rustoleum 2X Painters Touch Semi-Gloss White. I think it looks quite nice.

IMG_3247 (resized).JPGIMG_3247 (resized).JPG

Removing the bulb sockets from the back did result in a few chips and pieces of old, brittle plastic coming off some of the sockets. None of the integrity of the sockets themselves were damaged so it's not that big a deal, but has anyone ever sourced new sockets anywhere? I've never seen these for sale. Also, those wires love to pop out of the IDC connectors. What's the best tool for punching them down? I was hoping my 110/66 punch tool would work but it's not perfect for these. The IDC punch tool I use for the wires in the backbox also doesn't fit right for these sockets. I'm just curious what you all use.

The amateur mistake with the silk screen was we put in too much thinner. Basically, I thinned it until it looked about the viscosity I saw in the video in which Bryan Kelly shows us how to do the screens. Here was the final result:

IMG_3241 (resized).JPGIMG_3241 (resized).JPG

The letters came out satisfactory, maybe a bit soft on the edges:

IMG_3243 (resized).JPGIMG_3243 (resized).JPG

Honestly, that doesn't bother me at all. It's the CAUTION area that really came out blotchy that really bothers me:

IMG_3242 (resized).JPGIMG_3242 (resized).JPG

The patent text on the back of the cabinet also was blotchy, you can see from this photo:

IMG_3245 (resized).JPGIMG_3245 (resized).JPG

Now the question: Should I try to fix this stuff? There is something almost realistic and legit about it not being perfect. Thoughts? How would I even begin to tackle fixing it even if I wanted to?

#186 7 years ago

I like all this advice. Besides, it looks already better than when it was new by any comparison, and no one ever sees the back of the machine anyway.

Next step for us is the decals. My son is most anxious about this step, because he's afraid (even with wet application) of ruining all the previous work. Personally I think it will go well.

Do you think it's really critical to have wood to fill the coin door area during the application? What purpose does that serve, just provide support for the decal in that space?

#188 7 years ago
Quoted from lb1:

You are better off with the wood. It takes 15 minutes to build using plywood scrap. It helps support the decal particularly when you press on it to get the application fluid (i.e. Windex) out. And you want to press pretty hard if you use the brayer. This is the front decal, the one you see the most. No point cutting corners there.

Based on that, it sounds like I would want to temporarily screw the wood into place with a support block of some kind, correct? I've seen photos of this, it looks like it would work well to avoid anything protruding outward.

#192 7 years ago
Quoted from dudah:

Why did you spray clear on the ground plate? You need it to make good contact with the ground braid for a solid ground connection. At this point I'd sand down around the holes where the ground screw clips go. Double check resistance/continuity with a multimeter.
As for the light panel, Terry at Pinball Life is 3D printing new ones of these for CFTBL, perhaps if you contact him and send him yours he'll be able to make a reproduction of it?

I didn't spray the back where the ground braid makes connections. Also the boards make contact with clips that touch the rear of the pcb panel so they would have a good connection there. I may go a little overboard and sand a bit on the back on the panel where those clips come in to be 100% sure everything is grounding right.

My light panel baffle looks pretty good and should work fine, despite having some dimples. I'm not sure it's worth the effort having one reproduced. If it was broken, different story. (I could also 3D scan the baffle myself and print a replacement, though honestly I'm not sure I see the point, unless it cracks completely.)

#194 7 years ago
Quoted from mollyspub:

Someone needs to make a reproduction light shield and while they're at it... Skill shot rollers !

I may 3D scan mine if I can get the right tools together. I'll suggest it to my son who is the 3D genius in the house. If I do and we're successful I'll post the STL file. Meanwhile, after the decals go on, we'll test our 3D printed leg bracket adapters.

#195 7 years ago

Washing the light panel wire harness.

FullSizeRender (resized).jpgFullSizeRender (resized).jpg

#197 7 years ago
Quoted from MustangPaul:

You could always put it in the dishwasher.

You know, I probably could. I'm a little worried about the plastic parts melting. An ultrasonic cleaner would be ideal, but unless I'm using it a ton, I'm not sure I can justify the expense.

Regardless, this took about 10 minutes of work. As I tooth brushed each socket, I found a few that were partially cracked. I'll replace those with new ones.

#199 7 years ago
Quoted from DiggerPSU:

I used this for decal application and thought it was better than windex. It seemed more forgiving. Wet both the cabinet and the decal. Then press out the liquid. My TAF came out great. I also did it with the cabinets in the upright position. Try to get as much dust off your cabinet as you can just before application. My 2 cents.
amazon.com link »

I have some RapidTac which I believe is the same thing. We'll definitely do a wet application (Bryan and Jim make doing a dry application seem so simple it's tempting, but for my first time, I'd like the flexibility of a do-over)... Questions for those of you familiar with this:

I've heard using a brayer is great, or a felt squeegee. Does anyone have any opinions on this? Maybe the squeegee to get the water out and the brayer to lock it down? I have both available.

How does everyone trim their edges? My corners are beveled, but not perfectly and not 100% consistently. I get the sense that trimming the edges on the decal about 1/4" from the graphic edge prior to applying the decal would be a good first step to remove the unnecessary weight, then using a blade on a 45 degree angle to trim.

Do you all wait for it to dry to do the final trim?

What type of blade do you all use?

Finally, how long do you wait before flipping over and doing the other side? We'll start with the coin door side first.

#202 7 years ago
Quoted from Plumonium:

What you mean exactly? Wait 1 day before doing the other side. And use towels to catch any dripping water?

I think what he's saying is that when you rest the cabinet down on the side that has already been decaled, put it on a soft towel so the decal doesn't get damaged.

#206 7 years ago

Dos the fluid really hurt anything? It's just soapy water, right?

#209 7 years ago

Received my repo playfield from Peter in Hamburg. She's a beauty! Going to a safe place to cure for a few weeks before we're ready to do the swap.

IMG_3302 (resized).JPGIMG_3302 (resized).JPG

IMG_3304 (resized).JPGIMG_3304 (resized).JPG

#211 7 years ago
Quoted from MustangPaul:

Do you plan on adding any led's or led strips to the back of the pf?

Yes, though I will restore it to the original condition first. Do you have any recommendations, or before/after shots?

#215 7 years ago

We put on our first decal today, on the backbox. Everything was great until the trimming. We now understand the value of the beveled edge for trimming the decal. We ended up taking paint off with my blade, that was total amateur hour... Plus there are areas where we had a jagged decal edge (I've since trimmed smooth, but it's not perfect).

Still, with some paint touch up, I think this first side will look great. Photos when I'm less embarrassed.

Do you guys wait until the decal is dry before you do the final beveled edge trim? My concern with waiting is that the decal could stick to the bevel, and then we'd have a hell of a time getting it off!

#218 7 years ago

Taking everyone's advice, we did the second side of the backbox this morning, and AMAZING what just a little practice does to help.

Here are some lines once completed:

IMG_3325 (resized).JPGIMG_3325 (resized).JPG
IMG_3326 (resized).JPGIMG_3326 (resized).JPG
IMG_3327 (resized).JPGIMG_3327 (resized).JPG

Here are my lessons learned.

- Cutting (with the backing still on) so only about a centimeter was left turned out to be super helpful, because during the application, it doesn't fold down under its own weight and stick to the edge or bevel beneath.

- After the decal is first applied, using Bryan Kelly's method of taking a utility knife with a brand new blade and doing an initial cut using the perpendicular edge as a guide works really well. This reduced the amount needed to trim to only four or five millimeters depending on the width of the bevel.

- We used an xacto knife with a brand new blade to do the final cut in one, continuous cut. The blade in this case was parallel to the bevel, if not even a bit more shallow, and cut the decal in a nice, straight line. Quality of the bevel has a huge impact on this.

- I can see the pros/cons either way of having a bevel. The challenge now is that the paint isn't a perfect match, so the bevels on the main cabinet are likely to be pretty visibly darker than the decals. This may be an acceptable effect or not, this remains to be seen. If not, we'll find some createx colors and do some matching touch up on the bevels.

#220 7 years ago
Quoted from lb1:

Nice one.
PS - Not sure if you are interested, but I just finished my LOTR and I am getting ready to put away the rotisserie. You are welcome to borrow it for as long as you need.

Thanks for the offer. I guess that since I already have a (crappy) rotisserie, and the way you tear it down/build it up in a swap is linear, I'm not sure I could take advantage of two at once, right?

#222 7 years ago
Quoted from lb1:

Also, properly cleaning and polishing parts means there are some steps between when one part leaves the old playfield and lands on the new one.

This is what we're thinking... Removing the playfield in batches and doing a tumbling/cleaning as we go. Also, we're a little nervous because the playfield seems to be missing some parts, posts, etc. It's hard to figure out what the original was supposed to look like since this was Frankensteined over so many years. Any favorite photo locations we can compare against?

#224 7 years ago

Here's the painted lines on the edge of the backbox decal:

IMG_3340 (resized).JPGIMG_3340 (resized).JPG
IMG_3341 (resized).JPGIMG_3341 (resized).JPG

Also, we added the front cabinet decal:

IMG_3342 (resized).JPGIMG_3342 (resized).JPG

#229 7 years ago

Did a little purple decal edge painting tonight. I hope to get to the side decals this weekend. Exciting!

#230 7 years ago

My son using his better eyesight to find water bubbles:

IMG_3352 (resized).JPGIMG_3352 (resized).JPG

Looking pretty good! Got one side done, anyway:

IMG_3355 (resized).JPGIMG_3355 (resized).JPG

#234 7 years ago

Yes, the truth is we tried using the bevel to guide the cut. Unfortunately, sometimes it worked and sometimes it did not. If the bevel wasn't perfect, it created a jagged cut. Therefore, for now on, we are cutting using a straight edge and an xacto knife, as close to the bevel as we can. I'll probably straighten the jagged cuts out with a straight edge. Then, once that's done, we can paint the edges with clean lines overlapping the white decal edge to clean it up.

I found that another problem with the bevel method is you tend to remove paint! We will repaint, but still, I think this takes a steadier hand than mine!

#236 7 years ago
Quoted from lb1:

Not to be a nag, but be careful putting stuff (particularly metal) on the inner cabinet black sides. Black shows scratches like nothing else and it looks like you have a nice smooth finish. I'd put at least some paper towels to protect.

You're not being a nag at all. It shows our fatigue. Great advice that we'll heed.

The inside sides were not as perfect as we would have liked, due to issues with my first attempts at using a HVLP gun and latex paint. I switched to rattle cans and improved it significantly, but cut our losses in a few places where paint prep wasn't ideal.

#237 7 years ago

Ron (woody76) at Pinball Plating and More did fantastic work on my various exposed stainless steel!

IMG_3357 (resized).JPGIMG_3357 (resized).JPG

Seriously, super impressed with the beautiful work.

#238 7 years ago

I see that Chris Hutchins puts soft velcro beneath the cabinet protectors that get screwed into the cabinet. I don't think Bryan Kelly does that. Both score the protector and Bryan removes the decal, best as I can tell.

Anyone have any thoughts on this velcro thing? I also have some craft felt. What's the point? To avoid pinching the cab?

#241 7 years ago
Quoted from Bryan_Kelly:

You're only doing this once. Cut the decal and be safe.

Yeah, I figure that if some future person over-cranks the leg bolt, that's generally where you would see a pinching or wrinkling. I'll score it thoroughly and remove the decal from under the protector like Bryan does. I don't really see the point in the velcro or felt. In fact, I'd like that protector to be as flush against the cabinet as I can get it and never, ever come off.

We're painting the decal edges now. Once we're satisfied we'll take some photos and move on to the leg protectors.

#242 7 years ago

A couple of photos of the newly painted edges:

IMG_3360 (resized).JPGIMG_3360 (resized).JPG

IMG_3361 (resized).JPGIMG_3361 (resized).JPG

If I were really anal, I'd use createx colors and match the purple myself more exactly. Strange how it changes depending on the light. However, I like the framing and clean edge it gives me (and takes away from the imperfections of my bevel). I should point out, on the first photo, the bevel is black to match the back, and the second it's purple to match the front.

#245 7 years ago
Quoted from Plumonium:

Why remove the decal left-over behind the leg protector once it's scored? Should this be enough to prevent wrinkling?

The logic of what you are saying makes sense, as the decal will simply sit behind the protector, and move independently of the rest of the decal. However, if you wanted to be absolutely, 100%, dead-certain that you've scored it properly, a simple way to know would be to remove it.

#247 7 years ago
Quoted from awarner:

Since we're on this subject, how do you cut the decal? Do you use a sharp knife and go around the outside of the leg protector or do you want to cut inside it?

My plan is to use an Xacto knife around the outside.

#250 7 years ago
Quoted from lb1:

- Start by running the bit counterclockwise and just enough to remove the extra clear that's at the top and prevent the post from going in. Doing the very top part should be enough.
problem.

I have to ask a follow up question: I assume this is being done from the top, not the bottom?

#254 7 years ago
Quoted from lb1:

Great points. Personally, I did not do the T-nut fitting you describe, and I would not do it myself by fear of removing too much.
I first tried to have the T-nuts teeth go back into the existing holes but I found it hard because each the used T-nut teeth are bent differently. I also bent a few teeth back to their positions when new and it helped some but it's a pain. So in the end, I left the clear, just drilled so the sunk part of the T-nut could go through, and re-used the old T-nuts.

My lord... Our existing playfield LITERALLY has a dry wall screw instead of a post in one spot. We have zero confidence the posts and various other bits are in the right places. We'll use Chris Hutchins' photos as best we can but there are definitely some missing pieces we'll need to figure out as we get there. At least our new playfield won't have any holes that aren't supposed to be there.

I have decent drill bits but I'll probably get some newer ones with brad points that will help with my accuracy.

#256 7 years ago

IMG_3586 (resized).JPGIMG_3586 (resized).JPG

#257 7 years ago

Time for an update!

We decided it was time we installed the cabinet protectors and leg brackets. You may remember, my son designed a leg bracket adapter plate using a 3D printer and industrial grade ABS plastic. The stuff is harder than wood and allowed us to fit the newer style leg brackets into the corners of our BoP which didn't quite fit properly.

Here's the bracket before it was attached:

IMG_3591 (resized).JPGIMG_3591 (resized).JPG

Here is the new style leg bracket with the adapter plate:

IMG_3592 (resized).JPGIMG_3592 (resized).JPG

We then screwed in both bolts through the outer cabinet protectors:

IMG_3594 (resized).JPGIMG_3594 (resized).JPG

This affixed the cabinet protector, leg bracket adapter and leg brackets in the precisely correct location with the bolts tight. (Note, we hadn't scored the decal yet, so we didn't crank on it!)

Next, of course, we scored the decal around the outer edge of the cabinet protector with an Xacto knife:

IMG_3596 (resized).JPGIMG_3596 (resized).JPG

We also wanted to make sure the brackets never moved, so we pre-drilled pilot holes in the leg bracket holes (note the poor man's stop on the drill so we didn't drill too deep):

IMG_3619 (resized).JPGIMG_3619 (resized).JPG

Then we added the hex washer head wood screws. We used hex washer head #8 at 5/8" long, which would end up penetrating the cabinet sides about half depth. Unfortunately, all I could find for the screws are slotted in 5/8" #8, but they look pretty good:

IMG_3599 (resized).JPGIMG_3599 (resized).JPG
IMG_3626 (resized).JPGIMG_3626 (resized).JPG

After drilling some pilot holes where the cabinet protector gets screwed down, we then remove the bolts and cabinet protectors revealing the scored decal:

IMG_3627 (resized).JPGIMG_3627 (resized).JPG

Next, we CAREFULLY remove the decal from the cabinet where we scored. I find it interesting, the purple latex paint tended to stick to the decal, leaving behind the Kilz Original primer in places:

IMG_3628 (resized).JPGIMG_3628 (resized).JPG

Next, we put the cabinet protector back on, bolt it on again to ensure the protector is in the precise same location, and screw them in:

IMG_3629 (resized).JPGIMG_3629 (resized).JPG

That leaves us with a permanent cabinet protector that won't stretch any decals over time, even if someone over aggressively cranks down on the bolts!

IMG_3630 (resized).JPGIMG_3630 (resized).JPG

I love these permanent protectors, they really clean up the corners. I'm trying to decide if next up is the ground braid in the cabinet (which may require removing the leg brackets to sandwich them between the bracket and the adapter plate) or installing cabinet hardware. My photos of the tear down of the cabinet aren't helping me figure out what to do with this braid!

#259 7 years ago
Quoted from MustangPaul:

Looks like you'll need the longer leg bolts for sure.

Well, they fit so far, though they don't extend beyond the brackets, which is probably ok. I ordered new chrome bolts so we'll see how they look. If they are short I can always grab new ones.

#260 7 years ago

While I'm getting ready to start attaching the ground braid on the backbox (figure I'll start there where I have better photos), I decided to make some reproductions of the labels. FYI, I'm using the Xyron Creative Station Lite 5" to make laminated versions of the stickers. You can find info on those here:

https://www.xyron.com/en-us/products/creative-station/5--creative-station/xyron-creative-station-lite--5in_624740/

I found these reproductions on Inkochnito's site: http://www.pinballrebel.com/pinball/cards/

IMG_3635 (resized).JPGIMG_3635 (resized).JPG

IMG_3636 (resized).JPGIMG_3636 (resized).JPG

#261 7 years ago

What does everyone use for their lockdown bar and playfield stand handle? I suspect Williams used heat shrink, but I don't have an intact enough piece that isn't so brittle I can figure it out.

#264 7 years ago

Finished up the new lock bar... The old one was rusted and was going to be a nightmare to clean and tighten up. I purchased a new one from Mantis Amusements and added the laminate stickers. (Thanks for the idea, Bryan.)

IMG_3638 (resized).JPGIMG_3638 (resized).JPG

#266 7 years ago
Quoted from MustangPaul:

Yeah I wanted mine nice and padded so I did it 4 times.

Dip is on it's way to me. I didn't even know this substance existed until you guys told me about it. Frankly, this entire restoration has been insanely enlightening about the sorts of things out there to help with projects like these.

Another thought while we're working on putting the cab together; Has anyone had any success restoring the rubber rollers with rubber rejuvinators? I know I used to use these to bring printers back to life (allow the rollers to grab the paper once they get dull), but I'm not sure that's what you're trying to achieve with the rollers. They are mostly in good shape (not shrunken or cracked), but dried out and my instinct says I should clean them properly then use one of these restorers. Here's a photo of them covered with filth:

IMG_2929 (resized).JPGIMG_2929 (resized).JPG

#269 7 years ago

It's starting to get real. We got acquainted today with ground braid and pneumatic staple guns. My son is disappointed that the stapler has so little recoil. What have I done?

IMG_3645 (resized).JPGIMG_3645 (resized).JPG
IMG_3644 (resized).JPGIMG_3644 (resized).JPG

#274 7 years ago

We freshened up the transformer:

IMG_3647 (resized).JPGIMG_3647 (resized).JPG

IMG_3648 (resized).JPGIMG_3648 (resized).JPG

Then hit it with a scotch-brite pad and gave it a coat of heat-resistant paint:

IMG_3649 (resized).JPGIMG_3649 (resized).JPG

As we lay in the ground braid, my son adds the elements which go over it:

IMG_3657 (resized).JPGIMG_3657 (resized).JPG

We've developed our own style with the braid. We like to create tributaries and fold the braid over a main trunk, staple it in place, and add some solder to make sure everything is conducting well.

IMG_3666 (resized).JPGIMG_3666 (resized).JPG
IMG_3664 (resized).JPGIMG_3664 (resized).JPG
IMG_3663 (resized).JPGIMG_3663 (resized).JPG
IMG_3665 (resized).JPGIMG_3665 (resized).JPG

Overall, some pretty good progress!

IMG_3669 (resized).JPGIMG_3669 (resized).JPG

Here's a question for all of you wise folk. I've replaced my lockdown bar receiver with a new one, and the wood screw holes don't precisely match up with the old ones. So, before I put new holes in the cabinet and fix it in place (the bolts fit perfectly), should I get the side cabinet rails on first to make sure the lockdown bar fits properly? I have this fear I'll fix the receiver in place and then have to move it.

For that matter, any advice on how to put those rails back on? I have two-sided tape... I just roll it out and press it in place? It seems a bit of a dance since the flipper buttons and bolt need to go through it as well.

Also, anyone happen to know if the wood screws holding the back slide channel are #6 or #8? My photos are useless.

#276 7 years ago

Probably not. Still, why not?

#279 7 years ago

Finished up most of the cabinet today. We are pretty excited to marry the backbox back on the main cabinet!

IMG_3700 (resized).JPGIMG_3700 (resized).JPG

I'm not going to lie, that chrome looks pretty amazing. Great work from Ron at Pinball Plating and More:

IMG_3705 (resized).JPGIMG_3705 (resized).JPG

The inside is ready for wiring harnesses. My old coin door is beyond restoration, the crowbar bent it in a way that I couldn't reverse. Instead I have a new one, but it doesn't have a high voltage switch like the original does. Have any of you re-installed it using a bracket of some kind?

IMG_3706 (resized).JPGIMG_3706 (resized).JPG

Final question for folks who have restored games of this vintage... My original FCC sticker on the back was faded to the point where the date was no longer visible. Here's a shot of the original:

IMG_2274 (resized).JPGIMG_2274 (resized).JPG

I figured out the manufacture date from stamps on the playfield, and I worked up a reproduction of the sticker. My first instinct was to list the date as MAR 25 1991, then I took at look at Chris Hutchins' work and he uses a date code like "91255." Here's examples of both formats:

IMG_3710 (resized).JPGIMG_3710 (resized).JPG

Do any of you know what the original format looked like for the date?

#281 7 years ago
Quoted from lb1:

Looking really nice.
By high voltage switch/bracket, are you referring to the switch/plate that pushes against the white switch(es) that is installed inside the cabinet to the left of the door and registers when the door is opened?

Yes. On my original BoP coin door, the switch is integrated into the door, as in this photo:

IMG_3711 (resized).JPGIMG_3711 (resized).JPG

There doesn't appear to be any integration options on replacement doors. However, there are holes in the door where you can mount a bracket that triggers a switch (or two) that would be mounted inside the cabinet.

#287 7 years ago
Quoted from pinballinreno:

Did you get the newer modern door that has the plate on it to actuate the cabinet mounted switch?
If so you will have to get the bracket and switch and then rewire it to the newer location.
Unless of course you can get the original style door.

We purchased the modern door. We like it better also for other reasons (we plan on installing the PinPac coin door headphone jack mod, we use it quite a bit on our other pinball machine). The one you see in the previous photo was the old door, which is beyond restoration, unfortunately.

Quoted from lb1:

You could still use this bracket, which has the correct rectangular hole size, but you would need to mount it differently.

The modern coin doors have two holes designed for this:

http://www.marcospecialties.com/pinball-parts/27-4921

We shouldn't need to weld it on. It screws into the inside edge of the swinging door and presses a properly mounted switch when closed. The challenge is how to mount the switch on the inside, which I've seen various brackets (of various sizes) designed to hold one or two switches. Anyone know where Chris got that bracket?

Quoted from lb1:

3D printing might well be your best choice here to make a bracket that attaches to the inside left of the cabinet and positions the switch where it needs to be.

That is a fantastic idea. I'll put my son on the case!!

Quoted from dmacy:

You and your son should be very proud. I've done a few (not BoP) machines and you both should really take pride in what you've done here. The cabinet is fantastic and what a great project for a father and son. I wish my dad was into this stuff when I was young!

Thanks! He's super into the idea that this is the outcome of our combined strength. I can't be happier about it. He's a bit of a perfectionist though (notices every tiny little detail that is even microscopically off) but as a result, well, you can see the result! This is great exposure also for me, because honestly, while I was super into caring and modding my ToM, I had NO idea how all of this stuff really was put together in the first place until now. It gives me a whole new appreciation of pinball.

Now, if I could only play the game better, I'd probably join the SF Pinball League...Having two in the house will help immensely.

#289 7 years ago

We reinstalled the PCBs over the weekend, and it got me to thinking; I'd like to get the RAM replaced with NVRAM and lose the battery holders. I can do this with the BoP MPU, right? Also, while I'm at it, I'm curious about moving to ROM revision L-8, which I hear introduces some bug fixes that could be interesting, though requires re-wiring the jumper...Also I may burn myself the newer sound ROMs if I can find them. Does anyone have any experience with this with BoP?

I hate doing board work on the MPU myself. Last time I tried to do a NVRAM upgrade I fried my MPU board. Anyone have any recommendations on folks who could do both that and the W1 jumper for me and avoid a disaster? I've heard mention of Coin Op Cauldron before but I'm not sure if this is their specialty.

#294 7 years ago
Quoted from Zitt:

Borygard is here on Pinside or at:
http://lockwhenlit.com/

PM sent. Thanks guys.

#298 7 years ago
Quoted from mollyspub:

Very true but...there would have to be a batch 4.

My kit arrives Monday. I like optionality.

#299 7 years ago

Just a bump on the question from before... Which is the accurate tag?

IMG_3710 (resized).JPGIMG_3710 (resized).JPG

#301 7 years ago

Problem solved.

IMG_3725 (resized).JPGIMG_3725 (resized).JPG

#302 7 years ago

We received my 2.0 kit (batch 3) today. Again, we plan on fully restoring the 1.0 functionality before we put in the 2.0 upgrade. The only real exception to this is the cabinet speaker.

My challenge with all-things-audio is I'm somewhat of a sound snob. With my first pin, a ToM, I completed the speaker upgrade process that is outlined here:

http://www.dziedzic.us/wpc_speaker_replacement.html

The difference was night and day, a major improvement in the sound quality. We would do the same for my BoP, but knowing that we will likely eventually be putting in the 2.0 speaker panel, we feel like it would be a waste of time.

The kit came with Flipper Fidelity speakers on the new speaker panel and an 8" Flipper Fidelity speaker for the cabinet. The speaker has a thick foam ring integrated into the speaker, which does create some space for the throw, but it doesn't change the fact that the BoP cabinet has an opening for a 6" speaker. Our plan would be to install the Flipper Fidelity cabinet speaker and for now, plug it into the existing system. The challenge with this approach is that we won't be satisfied unless the hole in the cabinet matches the speaker, and also that we add an MDF mounting block.

The last time I did this, I took a hand-held jigsaw and cut the hole larger in the cabinet. I used the process here:

http://www.dziedzic.us/wpc_speaker_8_cabinet.html#newmountingblock

Honestly, it was really challenging for me to make a smooth cut. Does anyone have any tips on a better way to make the cut? It's not like there is any margin for error here. My default method will be to take the mounting block and trace the hole with a pencil, then cut the hole larger with a jigsaw.

Also, I struggled with making the mounting block without breaking it. I did after a few tries, but I'll be honest, I'm sure someone with better tools could do this better than we could. I don't suppose I could pay anyone out there would be willing to fashion me a proper mounting block (designed to go over the correct size hole) in MDF? I see Flipper Fidelity sells adapter plates here:

http://flipperfidelity.com/parts-and-diy/wood-and-plastic-adaptors/8-square-wood-adaptor-for-williams-bally-and-data-east.html

The problem with this is that it's designed for adapting to the smaller hole, not simply serve as a proper mounting block for the 8" hole.

You guys tell me, am I over-thinking this?

#304 7 years ago
Quoted from PinMonk:

I forgot, did you put solid wood on the bottom of the cabinet? If so:
See if a local equipment rental store has one of these for rent:
amazon.com link »
Alternate plan? Just drop the $59 and buy one. You know this isn't the last time you'll need to cut an 8" hole. Admitting you have a problem is the first step to recovery.

The cabinet has MDF as the bottom of the cabinet. I had no idea this tool existed. Do you think it will work on MDF? It also solves my problem fabricating a mounting block. Hmm!

1 week later
#307 7 years ago
Quoted from PinMonk:

Some of the tools of this type say they work on MDF, but you have to go slow. I'd probably try it on scrap first, and tape the surface with painter's tape before cutting.

FYI, I've been traveling in southeast asia for work (no freaking pinball anywhere, by the way, it's not at all ok) but we'll be back at this soon. The next step is going to be fabricating a MDF mounting block for the new 8" cabinet speaker, enlarging the cabinet speaker hole, installing the crossover for the speaker...disassembling the speaker panel, enlarging the speaker panel holes for 6 1/2" speakers, fabricating a new wiring harness for the speakers, etc etc... Once all of that is done, I'll finish reassembling the backbox and begin the playfield teardown.

#309 7 years ago

Fabricating the mounting plate for the new speaker using a circle cutter. The end result is acceptable:

IMG_3958 (resized).JPGIMG_3958 (resized).JPG

The problem is that circle cutters (at least the one I used) have a maximum depth of about .25". This requires you flip over the MDF to meet at the middle. It then "bevels" the cut slightly so you have to sand the inside:

IMG_3959 (resized).JPGIMG_3959 (resized).JPG

Anyway, that part complete, it's always scary and fun to cut a hole in a standing pinball machine. NOT.

IMG_0076.JPG (resized).jpegIMG_0076.JPG (resized).jpeg

My son opted to have me make the cut.

#312 7 years ago

Now for properly installing the mounting plate and speaker hardware.

First, we need to countersink the speaker screws. They are long enough for most speakers, but the Flipper Fidelity speaker that was sent as part of a BoP 2.0 kit has a thick foam ring to create a strong seal. As such, at least 1/8" additional length would be necessary, so we countersink the screws:

IMG_3999 (resized).JPGIMG_3999 (resized).JPG

So now we have four speaker screws with just enough length to grab the new cabinet speaker:

IMG_4001 (resized).JPGIMG_4001 (resized).JPG

We also countersink the screws to mount the plate, so the speaker grille sits flush with the plate:

IMG_4003 (resized).JPGIMG_4003 (resized).JPG

Then we add the speaker grille. We are using a new metal grille, as the plastic ones I've found from Marco and others were either too small or too weak. The original one was metal, so why not use metal again? Note that in this photo we haven't put the ground braid back around the speaker screw under the grill yet, we were just making sure everything fit properly.

IMG_4005 (resized).JPGIMG_4005 (resized).JPG

Here's the finished product. We also installed a 100hz crossover with spacers. With BoP 1.0, we'll be using this along with a new speaker wiring harness and upgraded speakers in the speaker panel (following Tony's how-to here: http://www.dziedzic.us/wpc_speaker_replacement.html). I realize that when we install BoP 2.0 components this will be bypassed, as BoP 2.0 has an amplifier with a crossover inside of it (which is why the Flipper Fidelity doesn't come with the usual crossover). However, since we're restoring BoP 1.0 to the max before we do anything remotely 2.0, we want this machine in better-than-new 1.0 condition first!

Next stop: Restoring the speaker panel.

IMG_4010 (resized).JPGIMG_4010 (resized).JPG

#313 7 years ago

And so it begins.

IMG_4020 (resized).JPGIMG_4020 (resized).JPG

We disassembled the speaker panel, removed the plastic and all the parts. Next, we enlarged the two speaker holes to accommodate 6.5" speakers (the screw holes were correct for the left speaker but the hole is slightly too small). We then fabricated spacers to keep the coaxial speaker tweeters from pressing up against the speaker grille. Next the cut areas all had a coat of matte black paint so you won't see the exposed MDF through the front of the speaker holes. Tomorrow, we'll reassemble everything back together again and put it back in the machine, the first time it's been there since last June.

#314 7 years ago

Enlarging the speaker holes is no simple task. We used a circle cutter but continued to run into problems because of the bevel/angled nature in which the cutter cuts. Making spacers was easy, though. Today/tomorrow, we'll fully reassemble the speaker panel with new speakers. Getting ready to re-apply the plastic to the front of the panel:

IMG_4037 (resized).JPGIMG_4037 (resized).JPG

#315 7 years ago

Speaker panel is now complete. Getting the spacers right required a little shaving off the sides. For future reference, the spacers for a typical 6.5" speaker has to go no farther than the leftmost and rightmost edge of the speaker itself so it does not interfere with the backbox wood which the J hook holds on to. Here's the new panel from the back:

IMG_4044 (resized).JPGIMG_4044 (resized).JPG

The front:

IMG_4045 (resized).JPGIMG_4045 (resized).JPG

...and finally, in the backbox!

IMG_4046 (resized).JPGIMG_4046 (resized).JPG

Next up: Cleaning and replacing the cabinet wiring harness and creating/installing the new speaker wiring harness. Maybe also returning the backbox light panel... Then onto the playfield. We find the playfield intimidating, as it's our first playfield swap, but we'll take it slow.

#317 7 years ago

Thanks! Restored light panel installed (we're wondering for later, since we plan on used LEDs, if the red bubble is required with a red LED):

IMG_4047 (resized).JPGIMG_4047 (resized).JPG

We were a little worried if the backbox, after all the restoration work, still would fit and the hinges work properly. Looking good:

IMG_4048 (resized).JPGIMG_4048 (resized).JPG

Finally, we had to see what this thing looked like with a new mirrored backglass. I won't lie, it's pretty amazing. Can't wait to light this thing up.

IMG_4049 (resized).JPGIMG_4049 (resized).JPG

#319 7 years ago

Yesterday, we cleaned the wiring harnesses.

IMG_4050 (resized).JPGIMG_4050 (resized).JPG

Today, we finished wiring the cabinet and added all the new harnesses for the new speaker system. You can see the new L-pot and wired crossover here, along with the cabinet wiring harnesses.

IMG_4055 (resized).JPGIMG_4055 (resized).JPG

Next, we added the warning label to the light panel. Big moment!

IMG_4056 (resized).JPGIMG_4056 (resized).JPG

Then, finally, the Williams serial stickers and FCC labels:

IMG_4059 (resized).JPGIMG_4059 (resized).JPG

IMG_4060 (resized).JPGIMG_4060 (resized).JPG

Ok folks. We can't procrastinate any longer. There's nothing left we can do on the cabinet (besides mods later). It's time to move the playfield into teardown mode!

#326 7 years ago
Quoted from PinSinner:

Are you planning on doing any mods? For example, this shuttle mod would be sweet.

Yes, we are definitely doing some mods...Though we want to get this completely restored first. We'll probably accommodate the Pinduino (thanks @lyonsden) including a path for the wiring, though other mods will have to wait until later. I'm nervous that we'll get this all together and have a lot of troubleshooting for switches or other issues, and mods could complicate that process.

#328 7 years ago
Quoted from MustangPaul:

Wise move. You have new switches going in?

You know, I wasn't planning on it. I'm hoping I can just re-use what is there without re-soldering everything. What do you think?

This is the sort of thing I'm dealing with:

IMG_4068 (resized).JPGIMG_4068 (resized).JPG

#330 7 years ago

For the record, the missing screw was for the launch rail.

#331 7 years ago

We have been busy, to say the least!

We moved the playfield and rotisserie into our pinball room. The garage was getting colder and damper and I didn't feel comfortable leaving everything out there. All of you have been incredibly helpful, with the most common advice being "take pictures of everything." I've taken hundreds of photos of the playfield, the underside, and everything I could get access to. I walked the playfield and underside slowly with a video camera.

Then it occurred to me... I had access to a GoPro Hero 3 I wasn't using at the moment, so I thought...This might make a really cool time lapse video, doing the complete teardown. I mounted the camera above our heads on a wide angle, and I've been turning it on when we work on the teardown. Here's a still from the GoPro:

GPExportPhoto (resized).jpgGPExportPhoto (resized).jpg

I'll post the whole video once we've finished the entire teardown and playfield swap! I have it set to take photos every five seconds, so I figure if I miss something I could probably zoom in from the camera and have a good backup...Though mostly I'm doing this because I think it will look cool.

As of this moment, we've torn down the underside completely. We had to remove a few playfield components to get all the wiring harnesses out. We chose to leave the sockets and switches soldered on...We may regret that at some point, but for now, it seemed to make sense. We're finding no real consistency to screw sizes. Everything is disgustingly filthy. Here's a few photos of the current state. If you see anything that seems out of whack to you please point it out. There are certainly some missing pieces.

Underside:

IMG_4362 (resized).JPGIMG_4362 (resized).JPG

Topside:

IMG_4359 (resized).JPGIMG_4359 (resized).JPG

IMG_4360 (resized).JPGIMG_4360 (resized).JPG

IMG_4361 (resized).JPGIMG_4361 (resized).JPG

#333 7 years ago
Quoted from PinMonk:

Are you polishing out your stainless ball guides? They look like mirrors when you're done if you do, and really add to the "wow" factor. Here's a couple pics from a ToM I did where I polished out the lane guides. Really makes a difference.

Ok, yes, that looks awesome. Tell me more...How do you polish the guides? Is it just incrementing sanding grit? Did you use a dremel or polisher of some kind?

I'd be happy with a "like new" stainless look, or a mirrored look. The challenge with mirrored is how fast the ball trail will show, don't you think?

#335 7 years ago
Quoted from PinMonk:

I usually start by going against the grain to lost the ball trails, then going with the grain (that's now gone) to get the mirror finish. Sometimes I do 45 degree angles across the surface, too, if there are heavy trails.

This advice is gold. I'll give it a try once I get there. I've also got a ToM, I love that look in yours, I may have to do it myself.

#337 7 years ago
Quoted from PinMonk:

On re-reading that I saw there was a typo and I also wasn't clear that I meant going perpendicular to the grain when I said "going against" the grain.
That particular Theatre was my favorite restoration job, ever. I did a cool orange-ish powder coating that really looked boss on the cabinet. Playfield was cleared, too.

As my son and I are going through this process, he asks me from time to time if we'll give the same treatment to the ToM. My ToM is in really great shape. Any further work on it is just my OCD. However, at some point, I'll want to restore the playfield to perfection, and when I do, I'll do some work on the cabinet.

Meanwhile, there is a Harbor Freight not far from here, I think I'll learn how to polish.

#339 7 years ago
Quoted from PinMonk:

Don't forget to take a 25% off coupon from the paper.
The main reason I did that particular ToM was it had a literally perfect cabinet. It was a warehouse find that had to have been parked right after it came out because I've never seen a non-HUO cabinet that was literally as perfect as the day it came out of the box. The insides were a different story. They had been using it for parts, so it was missing a ton of playfield stuff. The playfield itself was okay with just some scratches from careless removal of parts, so I decided to have it cleared. The whole thing took a little over a year (6 months to get the cleared PF back and another 6 months to let it cure completely, plus the re-assembly time and experimentation on powdercoating rails). I sold it before pin prices went crazy, I think maybe $5k? It'd pull about twice that now. It is still the most beautiful ToM I've seen.

Yeah, I'm going to have to agree that it looks pretty fantastic. My only question now is what to polish to that level... My son will have some opinions!

Our ToM had an interesting history (at least to a nerd like me). It was purchased by William Hollenbeck and his brother who operated Pacific Coast Pinball. They did restorations and repairs for years, but apparently kept this ToM as their personal favorite. They took care of it like a classic car. Mike Chestnut gold plating of the rails and playfield hardware, nice work with the saw blade, fairly unique trunk chain that matched the "Joos" locks on the cabinet art. They sold it to someone in the SF pinball league who took great care of it and then sold it to me. I learned the provenance because I found a little treasure: Wedged deep inside the cabinet underneath a cross cabinet bracing was an envelope, addressed to the Hollenbecks, return address from Leon Borre, the famous Belgian pinball repair genius. Inside the envelope was a mysterious chip labeled "Atari Test." I ended up contacting William Hollenbeck and learning the history of the machine, and the chip. Leon created these custom ROMs that if you placed into a machine, would somehow help you diagnose issues for repair. It was a fairly nuanced and mysterious process and it turns out he created one for Atari pinball machines, which the Hollenbecks accidentally lost in this ToM. It's fun to know where your machine has been!

For this restoration of our BoP, we have no such history available to us. Even the guy who sold us the machine in its original crappy condition couldn't offer us much, as it had been traded for cheap amongst various pinball machine pushers for a number of years before finding us. Miraculously, despite the boot print inside the cabinet, it really was in decent shape and the electronics were spotless. The drywall screws seem to be where the ramps cracked, so at least I understand the method to the madness. I have Cliffy's for when the new ramps go in.

Anyway, my son and I finished the underside teardown and have begun removing parts from the topside.

Does anyone have any thoughts/recommendations on tumbling parts? Which parts are worth tumbling, which parts should never be put in a tumbler, how to keep from mixing up parts? We have a large and smaller tumbler so we can do a ton at once, but the challenge with that is the fear of losing track of what goes to what. (Obviously we'll take photos but I'm just being cautious.) Our intent is to clean all the assemblies and coils, put in new coil sleeves, re-paper them and do clean solder work for each coil. We may molex the assemblies, but honestly, I'm not sure it's worth it since I have no intention on removing anything with any frequency.

#341 7 years ago

Preview of our progress:

teardown_spin_3.gifteardown_spin_3.gif

#343 7 years ago
Quoted from MustangPaul:

What the heck is that??? You better take a look, something is wrong with that vid..

You're right, it's missing the music soundtrack.

1 week later
#346 7 years ago

Getting ready for the re-assembly. The original playfield has been fully stripped:

IMG_4766 (resized).JPGIMG_4766 (resized).JPG

New playfield up in the rotisserie. We put rubber pads on the clamps to protect the clear coat:

IMG_4767 (resized).JPGIMG_4767 (resized).JPG

We've pre-drilled out the clear from any of the smaller holes, and also the tops of the starter holes. Have you guys bothered to drill those starter holes any deeper or wider prior to adding wood screw type of posts? Also, if a screw hole had a counter-sink depression on the original playfield, I assume we should create the same on the new one. This has been a perfect opportunity for the hand drill. I love this thing.

IMG_4768 (resized).JPGIMG_4768 (resized).JPG

Also tumbled and organized all the loose post-related hardware. I still have to take apart each of the assemblies and tumble them. I'll begin photographing and doing that next as the initial work begins.

IMG_4771 (resized).JPGIMG_4771 (resized).JPG

#348 7 years ago
Quoted from MustangPaul:

Make sure you drill out the clear for the top side T nuts and the nails for the pop bumpers.

The t nuts seem to have counter sink depressions already, are you suggesting that I drill that out? Also, the original playfield had pop bumper nails that resembled large wood screws (with reverse threads). The new ones are fin-shank nails with a thinner head. Should those heads be perfectly flush with the playfield? I assume so... Though with the fin-shank nails it might make sense to pre-drill the clear and provide a SMALL counter-sink hole by comparison to the original screws. Thoughts?

#350 7 years ago

Great use for a Forstner drill bit. When you have the tools...

IMG_4772 (resized).JPGIMG_4772 (resized).JPG

Disassembled the ramps, ramp switches, and a few assemblies to send to the tumbler. We've set aside all the brushed aluminum rail guides (and Cliffy kits) for polishing... While we're at it, let's restore those rubber rollers!

IMG_4897 (resized).JPGIMG_4897 (resized).JPG

#353 7 years ago
Quoted from MustangPaul:

Found it on Amazon $8 with $5.50 shipping. Ouch.

Yikes! Yeah, the roller spray is designed to remove ink, which isn't exactly what's going on here. My rollers were disgusting and getting pretty hard to the touch. I cleaned them first with Purple Power degreaser and used a tube brush to clean out the centers (they were filled with disgusting gunk). Then I sprayed this stuff on and let it soak in a bit. When you wipe off the excess an hour later, the rubber regains its elasticity and hold. I'm not sure that is the desired outcome, but I'm sure it will last longer (less likely to shrink and crack).

#354 7 years ago

Ok folks, progress has been made!

IMG_4907 (resized).JPGIMG_4907 (resized).JPG

We managed to get most of the posts on as well as the new wooden rails. We were using the Bryan_Kelly method of pulling in t-nuts, but I kept scratching the clear with the felt. I'm thinking that this clear coat, despite being a few months into curing, must be pretty soft. I tried putting a microfiber towel beneath it and I ended up pushing the waffle pattern into the spot I was pulling the t-nut! Fortunately you can't really notice it. I'm sure we can buff it out.

Here's the pop bumpers with the fin shank nails countersunk:

IMG_4905 (resized).JPGIMG_4905 (resized).JPG

The new playfield had a few little gotchas so far but they were failry easy to remedy. We discovered this slot that wasn't completely through the playfield:

IMG_4904 (resized).JPGIMG_4904 (resized).JPG

All it took was just drilling through it. It was one of the "adjustable" posts for making the side drains easier or harder. Meanwhile, the machine came with one of these posts:

IMG_4901 (resized).JPGIMG_4901 (resized).JPG

You can see where it was installed on the machine when we got it here:

IMG_4436 (resized).JPGIMG_4436 (resized).JPG

Can anyone here verify they have the same metal post in the same spot? Also, the parts list mentions there should be two. Anyone know where the second one goes?

Every hole needed to be drilled, not only to remove the clear, but in many cases to increase the size of the pilot hole. The last thing I need is the plywood cracking near and edge. Next up, we'll disassemble all the mechanical assemblies and start tumbling parts. The wire guards and tall posts are still being tumbled, and hopefully tomorrow we'll get a chance to buff out the ball guide rails.

#356 7 years ago

More progress on the playfield. I'll deconstruct some of what we've chosen to do with stainless parts. A good example is the skill shot roller assembly.

First, we pulled it all apart to see how nasty it was and how it worked:

IMG_4893 (resized).JPGIMG_4893 (resized).JPG

IMG_4894 (resized).JPGIMG_4894 (resized).JPG

IMG_4895 (resized).JPGIMG_4895 (resized).JPG

The ring clamps were sometimes missing, sometimes in the wrong place. The axles have grooves to fasten them to one side:

IMG_4896 (resized).JPGIMG_4896 (resized).JPG

As I mentioned before, we took out the rubber rollers and restored them:

IMG_4897 (resized).JPGIMG_4897 (resized).JPG

Next we cleaned the stainless sides as best we could with degreaser:

IMG_4923 (resized).JPGIMG_4923 (resized).JPG

Then we polished them using a slight tweak to the PinMonk method mentioned earlier. I wouldn't exactly say we had the patience that PinMonk has to create a true mirror effect, but we're still super happy with the results. The skill shot assembly:

IMG_4932 (resized).JPGIMG_4932 (resized).JPG

IMG_4926 (resized).JPGIMG_4926 (resized).JPG

Our ball guides:

IMG_4933 (resized).JPGIMG_4933 (resized).JPG

IMG_4936 (resized).JPGIMG_4936 (resized).JPG

To get this effect, we would start with @bryan_kelly's method of 120 grit to get rid of the ball trail, then 220 for the entire surface, then a Scotch Brite pad to make it consistent. At this point, it looked good enough to stop, but just to see what it would look like, we then used a bench buffer with white compound and finally green compound. Holy crap do those buffers make a mess! Still, nice effect.

#359 7 years ago
Quoted from PinMonk:

I have mine facing the wall of the garage with a big piece of cardboard on the wall to catch all the crap it slings at it. I have a shopvac to get the crap that ends up on the floor (threads from the buffing wheels and polishing "dust"). White's pretty lightweight. I might have done a brown then white buffout if you were only doing two. You'd get even more mirror-like results.
This place sells stainless-specific polishing compounds, but I haven't tried them yet:
http://www.formaxmfg.com/stainless-steel-buffing-wheel-bar-compounds
When I run out of what I have now, I'm going to give these ones a shot.

You know, we tried brown first on the guides. Maybe with more work it would have removed the ball trails, but nothing I did seemed to get that trail off. That's when we decided to move to the Bryan_Kelly method for removing the trails. Probably if we then had returned to brown we would have ended up with a more mirror-like effect. That being said, I really love how it looks. The thing about doing the mirror polish on this game is that both sides of the guides are exposed, and the sides with the screw mounts are extremely hard to polish to that level. This way, everything looks excellent and the backs aren't too far from the fronts.

Another slight modification; We used the 6" bench buffer from Harbor Freight. We didn't try it with a converted grinder (perhaps it has more horsepower?).

#361 7 years ago
Quoted from PinMonk:

Might be an RPM issue. Higher RPM cuts faster, and for ball trails you want to start perpendicular to the wheel. I think the wheels I have are like 10". Are you sure you had the brown? The brown and "red" (which is more of a reddish brown) look similar, but the red doesn't cut as well. I can blow even deep ball trails off guides in 2-3 minutes starting with a heavy cut polishing compound (usually brown - I've only done black once).

Yep, it's the brown compound you linked to earlier. I think it might be RPM. The buffer is not quite as hefty as the grinder. Nevertheless, I'm super happy with the results. The elbow grease required to remove trails using 120 grit is relatively small! Takes only a minute to get the trail of, another couple minutes of 220, then a quick hit with the ScotchBrite and you're at a perfect neutral state for polishing. At that point, using your method (brown, white, green) would probably result in mirrors even with my buffer, I just didn't have the patience...Though as I look at the guides now, I really like them this way.

I've audited my switch harness today and making the (gulp) decision to replace my switches and most of the actuators. They are all corroded and in crappy shape, some don't even "click" when pressed. I'm not very good at soldering, but I will be when this is finished.

Near as I can tell, all the microswitches take the same diode (1N4004 1.0a). Am I safe using the same one for pretty much everything?

#363 7 years ago

Made a map and labeled all the switches on the switch harness:

IMG_5403 (resized).JPGIMG_5403 (resized).JPG

Then took vid1900 advice and put it all in the dishwasher:

IMG_5407 (resized).JPGIMG_5407 (resized).JPG

...and I mean put it all in there. I unsoldered the switches and kept those out (I'm replacing them anyway), but bulb sockets and the small PCBs for bulbs I left in there. We'll see what happens... Boy my dishwasher is making some crazy noises. (Yes, I checked that the washer arm wasn't blocked!)

#364 7 years ago

Thanks, vid1900 for the tip... They came out great!

IMG_5409 (resized).JPGIMG_5409 (resized).JPG

IMG_5410 (resized).JPGIMG_5410 (resized).JPG

IMG_5412 (resized).JPGIMG_5412 (resized).JPG

#366 7 years ago

All the new switches are soldered on. Let's just say I wouldn't get hired to build spacecraft.

Continuity checks out, but I'm curious; Some have mentioned checking the switches while the playfield is still out of the machine. When you do this, I assume you plug the switch harness into the MPU and do the switch tests from there after the harness gets installed?

#368 7 years ago

Happy Holidays everyone. We're overdue for an update.

It has been a furious, non-stop hard push to see if we can get this machine operational by New Year's Eve. Not the end of the world if it's not, but it's been fun trying.

Where to start, indeed!

First off, let's discuss Bride's Head. As many of you know, CPR's BoP reproductions are excellent, but the faces of the head, while beautiful, have some issues.

The original head had some different hardware. The guides on the front were screwed in, and beneath the mouth and eye holes there was metal hardware designed to keep the balls from dropping into the head box:

IMG_5430 (resized).JPGIMG_5430 (resized).JPG

In that photo, you see the hardware behind the eye holes. Also, the original faceplate holes were beveled. On the new faces, the holes are slightly larger and are not beveled. Also, there is no penetrations with which to mount the old hardware (if you have it).

If you did decide to mount the old hardware somehow, because the holes are bigger, I've read complaints about the eyes looking cross-eyed or wabbling, which could cause problems with the ejectors or rollover switches.

To this set of problems I set my son on a mission to fix, and we were successful!

For starters, we traced the original hardware and measured everything with a caliper.

IMG_5431 (resized).JPGIMG_5431 (resized).JPG

My son then entered the measurements into his design software for the 3D printer and created some prototypes. The general idea was to create a new, lighter weight but durable mounting hardware with individual 1" holes for both the eyes and mouth. We experimented with different thickenesses (adding a couple mm mades the ABS twice as strong, but we wanted to make sure it was similar to the original hardware). Once we were happy with the shape and orientation, made final versions and added some super strong 3M two sided tape. This is the same tape we used to mount the outer cabinet rails.

IMG_5472 (resized).JPGIMG_5472 (resized).JPG

The key to placing the tape is making sure you can't see it, since we wanted the black to show through the hole properly.

IMG_5473 (resized).JPGIMG_5473 (resized).JPG

Here's what it looks like from inside:

IMG_5479 (resized).JPGIMG_5479 (resized).JPG

More importantly, it catches the ball perfectly and looks great. Plus, we didn't need to drill any additional holes in the face plate, which is a great bonus (fewer screws in the front). Here's how it looks from outside:

IMG_5449 (resized).JPGIMG_5449 (resized).JPG

We thought about printing it in white, but honestly we like the look of the black better. Problem solved!

Next, each assembly was disassembled, tumbled, and reassembled. The coils were desoldered, cleaned and re-papered. We chose to print the coil wrappers ourselves onto brightly colored paper. I think the look turned out pretty good. Here are the three coils from the head assembly:

IMG_5469 (resized).JPGIMG_5469 (resized).JPG

Included in all of this was a complete flipper rebuild. Thanks to vid1900 for the instructions. I started by reversing the order of the photos I took taking them apart, but quickly after reading vid1900 's guide, I realized they were completely built wrong when we got the machine. Now we've upgraded the System 11 flippers to more of the WPC feel. Let me know if you see anything wrong, though, this is our first time even adjusting flippers let alone rebuilding them. We're about 80% sure the wiring is right, you'll notice we left out soldering one lead so we can do it while we solder it into the harness later.

IMG_5499 (resized).JPGIMG_5499 (resized).JPG

We decided to replace all the switches on the switch harness, as they were in various states ranging from sometimes functional to clearly having been immersed in beer. This was our first go at this, but we managed to get through it all.

Tonight was a pretty big moment of truth, we installed the switch harness onto the playfield. Despite all your careful advice about photos, mine must have absolutely sucked, because I could barely figure out from them where to put everything. Fortunately it worked itself out. With the switch harness installed, we connected the umbilical to the MPU and tested the switches. I was terrified we'd turn on the machine and the diodes would be backwards or something, but fortunately all was good (except for a few switches that I needed to swap around). Here's the current state:

IMG_5497 (resized).JPGIMG_5497 (resized).JPG

Since we haven't installed the ramps, pop bumpers or upper playfield and wireform rails yet, we couldn't test all the switches, but so far aso good. Any opinions on what our next step should be? We're thinking install the assemblies on the underside, then the other two harnesses, before adding the additional levels on the playfield above. Thoughts?

#372 7 years ago

I'll post some photos soon, but we've put the playfield back into the cabinet. We start it up and the game works, though we need to tweak a few things. The only problem is that fuse F105 blows about once every third or fourth time we turn it on. Anyone have any immediate places to look for what might be causing something intermittent like that?

#374 7 years ago
Quoted from PinMonk:

Sounds like a bad/miswired solenoid.

Hmm. I actually like that answer. Any tips on how to identify it? We basically used photography to ensure we had the wiring as it was when we got the machine, but that doesn't mean it was in any way correct when we got it.

#376 7 years ago
Quoted from PinMonk:

If you can get it not to blow immediately, I'd go into solenoid test and make sure they all fire without blowing the fuse. After that, it gets more complicated.
I'd also trace the line going to them to make sure you didn't short it to a screw or pinch it or something.

I've been able to run the solenoid test (at least yesterday) and everything fired as it should, I'm afraid. I'll check again with a new fuse today. It literally blows immediately upon turning the machine on, but only after it's been played a bit and on for a while.

#378 7 years ago
Quoted from PinMonk:

So maybe a solenoid on the edge of bad that only shorts when it gets warmed up. Once it starts blowing fuses, it keeps doing it for a while?
I guess ohming out those 8 solenoids is probably the next step to make sure there's not an obvious short.

Well, to be fair, once it blows F105, it takes me a little while to replace the fuse (let's call it ten minutes?). It has a little down time before lighting back up, which it does fine for the next few power ups. Strange right?

I'll ohm out the solenoids. You say there are 8... Is this an obvious page in the manual I'm missing, which solenoids go to F105?

#382 7 years ago
Quoted from PinMonk:

So maybe a solenoid on the edge of bad that only shorts when it gets warmed up. Once it starts blowing fuses, it keeps doing it for a while?
I guess ohming out those 8 solenoids is probably the next step to make sure there's not an obvious short.

@vireland, I've ohmed out all the solenoids in the machine. They all register 10-14 or so, so that implies no obvious short.

I'm going to install molex connectors on each coil, then disconnect them one by one until the fuse stops blowing. Any other ideas of what I could check for?

Quoted from pinballinreno:

Thin CA glue should be applied to the bare wood with a tiny dropper or tube to keep the clearcoat edge from chipping and lifting in the future.

@pinballinreno, Unfortunately, the entire playfield was completed before I read that... It would require tearing it down again to get to those spots. As I expose them from time to time I'll drop the glue as you suggest.

Quoted from Mancave:

I'd be up for a set of these if you decide to make them for sale. LIKE the idea and the look of them

@mancave, I'll be putting all these files up for free to download soon. I've been setting up a file repository for this kind of thing.

Quoted from davijc02:

Looks awesome so far. Are you gonna put the 2.0 kit in it?

@davijc02, Yes I'll be putting a 2.0 in it eventually. I have the kit. The plan is to play this for a while as an original 1.0 first, though. We set up our speaker upgrades/other restoration with the idea of having a 2.0 kit exist without changing the mint nature of the machine (not that we'll ever sell it). The bass speaker in the cabinet is from the kit, though we added a crossover so it would work properly with our speaker upgrade until the amp is installed for 2.0.

#384 7 years ago
Quoted from PinMonk:

Unplug the connector (J-130, according to the manual) that supplies those coils from the driver board in the backbox first and see if that stops the fuse from blowing. This probably won't do anything but confirm the area you're already looking in is the problem, but one more issue confirmed is always good.
The molex connectors might work if you get lucky, but I'm of the mind that you have a short (screw through cable, pinched cable, exposed insulation), and if that's the case, it won't help because the line feeding the power is shorted.

I've molexed the connectors (was quite a task) with the exception of the head coils and the controlled gate relay. Of course, now that I've done this, I can't get the fuse to blow. It could also be that there was a short that was eliminated just through my mucking about with the wiring to molex the connectors. I'll keep playing it and see if I can get it to fail again. If it does, I'll try your suggestion on the next fuse, to eliminate that possibility.

I have noticed some intermittent behavior of certain coils... On the last power up, the controlled gate wouldn't fire (unless that's somehow tied to the same connector that I had unplugged with the outhole?), but now it's firing. Strange.

#385 7 years ago

dupe

#387 7 years ago
Quoted from Chosen_S:

The eye and mouth black plastic parts you made... do you see their outline when lights light up the face from behind? Just curious

You know, I don't think so, but I'll check tonight. They are the exact same dimensions as the original plates, so it wouldn't be any different than those plates. Still, best to check.

#388 7 years ago
Quoted from Chosen_S:

The eye and mouth black plastic parts you made... do you see their outline when lights light up the face from behind? Just curious

Took a look tonight, and yes, if you look for it, you can see the outline of the plates. Note that I have not yet installed the LED and GI OCD boards yet, so the LEDs are brighter than they probably should be as well. I would imagine you can see the outline of the metal plates that are the same dimensions as well on a stock machine. Here's a photo:

IMG_5524 (resized).JPGIMG_5524 (resized).JPG

#389 7 years ago

We're proud to announce we've successfully played our first game together, father and son, on the machine!

Here's a still of the playfield:

IMG_5521 (resized).JPGIMG_5521 (resized).JPG

A video:

It's been quite a journey. We're not quite finished yet, so we're not yet ready to proclaim victory.

Does anyone have any suggestions on how to increase the power of the shooter lane plunger? We're using the blue spring per the manual, though it just doesn't quite feel right. It appears on center, and only barely protrudes from behind the apron.

We're debugging the head/face situation. It seems to sometimes calibrate itself properly part of the time. I'll post a question to the BoP club topic and see if I can't get any guidance here.

While it's not predictable, PinMonk you may be interested that while testing the upper right pop bumper switch, I heard a sudden increase in the humming sound of the transformer and ultimately the fuse blew. I haven't had it repeat itself though with any consistency.

#392 7 years ago
Quoted from PinMonk:

So maybe intermittently bad coil, then? What's interesting is that coil isn't in the first 8 that are protected by the fuse that was blowing. However, it could also be that the vibration from the pop bumper is what caused the intermittently shorted line to "line up" with whatever it's shorting against, and it's not the pop bumper coil at all.
Get these gremlins worked out so you can get that BoP 2.0 kit in there!

Exactly... I'm hoping I can figure out what short hits and causes that to happen. So far, no luck.

#394 7 years ago
Quoted from Catalyze:

Congratulations Sir!!!
Sometimes the hardest part is doing the last bit of tidying up after working so long on the major components. Check the helmet flasher domes to make sure they are fastened with the "lip" on the inside of the helmet. I think yours may be fastened on the outside surface of the helmet. However....it could be my eyes since it is almost midnight here.

Thanks, I did check that, they are on the inside. I think it may be the ramp's position, that it may be a bit farther from the cabinet side than it should be. I ended up loosening the lower left metal L post that holds the lower left side of the helmet up. Does anyone's helmet have spacers beneath any of the four screws that mounts it to the playfield? Mine did not, but I almost think like I can see those in others' photos.

#396 7 years ago
Quoted from Catalyze:

My helmet mounts flat on top of the 4 long posts. This is a photo of the Right side of the helmet with flasher dome. The dome extends just to be a tiny bit short of the rubber ring. If your right side is like this one, then your helmet should be sitting as intended.

It appears my helmet is mounted identically on the right side, as you can see here:

IMG_5535 (resized).JPGIMG_5535 (resized).JPG

Something must be off in the way I mounted the left ramp. The left red lens pushes into the bend of the ramp.

#398 7 years ago
Quoted from Chosen_S:

You need to remount the red flasher dome in the helmet, it's poking out too far, the mounting spacers are in the wrong succession. I've done this myself

Spacers! Of course. I have no mounting spacers between the lenses and the helmet. Thank you!

#400 7 years ago

Ok, the game has been pretty solidly working. Almost ready to declare victory. When you folk adjust leaf switches, such as stand up targets or slingshot switches, do you remove them from the playfield first or adjust with them in place? Right now, this appears to be our biggest challenge in ironing out the little bugs. That, and identifying what is supposed to be "normal behavior" and making necessary changes to accomplish that. It's remarkable to me how much variation the ramps have from the original ramps (thickness), which definitely creates its own set of challenges. I've also installed Cliffy protectors. Clearly, these are 100% required, as the ramp entrances are completely destroyed on our original set.

We installed plastic protectors as well. The challenge here is that now that everything is installed, we can see how certain gates, the spinner, and other hardware can get caught on the protectors. I have no problem adjusting them... Would you folks think there would be any problem shaving them down "in place" with a dremel? Removing plastics that are under ramps can be... frustrating.

Some additional thoughts about the reassembly process:

-Photo context is everything. I've found a good technique is to place the end of a post or screwed in object next to the hole it belongs in during teardown for the photo...making sure to have a wide enough angle that you can see the context of the location.

-Existing restoration photos reveal there is some artistic license involved in this process. What one restorer choses to do in a location is different than another. Furthermore, the restorers before you may actually have a better solution than the original game had, so take that into account as well.

-Tumbling screws can remove their magnetic plating. If I could do one thing differently, I would have audited each screw type during teardown and bought 100 of each type. Finding screws in a tumbling batch royally sucks, and losing magnetic capability will make you want to poke your eyeballs out with a fork.

-Repro playfield screw holes are just markers. They aren't big enough to be pilot holes for a #6 screw. Best investment I made was a hand crank drill for this purpose. It keeps you from over-shooting and is great for protecting your playfield.

-Repro playfield screw holes are about 99% accurate. Pretty close to 100%. I had to move a couple but they were marginal and clearly visible from the playfield art (hole not quite inside a circle, etc).

-I ended up with parts, mostly screws, that have no place to be installed. How is that possible? The answer is that when you don't find a screw you need, you don't have time to go through every screw in the batch, so you grab a new one.

-Doing this project with my son was the most rewarding thing we've ever done together. Playing this game with him was just plain amazing. The challenges with this have to do with what is largely one person jobs (screwing in a screw), so it was easier to involve him in the cabinet work than the playfield work. That being said, even having him around during the playfield work was a complete joy.

I will post some photos soon.

#402 7 years ago

She's alive!

010517203830 (resized).jpg010517203830 (resized).jpg

I'll get some in daylight tomorrow.

#404 7 years ago

I installed the wrong LEDs. Ordered regular supers and got premiums accidentally, and they aren't compatible with the LED/GI OCD boards I was planning on installing, so oops. I'll have to swap out all those bulbs. ARGH!

#406 7 years ago

bop_gif.gifbop_gif.gif

10
#407 7 years ago

VH1A4970 (resized).jpgVH1A4970 (resized).jpg
VH1A4975 (resized).jpgVH1A4975 (resized).jpg
VH1A4976 (resized).jpgVH1A4976 (resized).jpg
VH1A4979 (resized).jpgVH1A4979 (resized).jpg
VH1A4983 (resized).jpgVH1A4983 (resized).jpg
VH1A4985 (resized).jpgVH1A4985 (resized).jpg
VH1A4986 (resized).jpgVH1A4986 (resized).jpg
VH1A4987 (resized).jpgVH1A4987 (resized).jpg
VH1A5002 (resized).jpgVH1A5002 (resized).jpg
VH1A4993 (resized).jpgVH1A4993 (resized).jpg
VH1A5004 (resized).jpgVH1A5004 (resized).jpg

#410 7 years ago

Other than installing Pinduino, getting the helmet running on incandescents, and finally 2.0, I think we can call this one done. I've got a timelapse video of the entire teardown and reassembly which I'll post, but I'm lacking the drive space to compile it all at the moment. I will see if I can find an external to get me through it.

#416 7 years ago
Quoted from Manic:

Also before you can say stick a fork in it... you may want to tweak the left flipper as it seems a tad higher than the right. Yes this is of the utmost importance! lol

Already on it. It seems that when I tighten the flipper, it's perfect, then it drifts up...So something about the way that flipper defaults when loosened is goofing me up.

#418 7 years ago

Here's a video with the GI & LED OCD boards installed. Note that we installed red and purple incandescents into the helmet as the controller board interferes with the GI OCD's ability to dim/anti-ghost those lamps. To do this required replacing the F3 fuse on the GI OCD with a 4A slow blow. We like how this is all looking now.

#419 7 years ago

Last but not least, here is a time-lapse video of the complete teardown and reassembly:

Let me know what you think.

#423 7 years ago
Quoted from PinMonk:

Looks like about 80% Father, 20% Son on this one.

We learned quickly that the playfield work was easier with one person, since it involves flipping it over frequently and another person working on another part gets interrupted. Instead, he focused on parts, tumbling, getting assemblies organized, etc. We're a great team!

That was one lesson I took away from this, that the cabinet work (however menial) is easier to do with two people than the rest of the experience.

#424 7 years ago
Quoted from DocRotCod:

What's with the ghost rag on the siderail? Spooky

You mean at 4:58? Yeah, it's amazing how when something moves slowly enough, you can't see it or notice it with the naked eye, but in a time-lapse, it jumps out at you. That is a very clean rail, and a microfiber towel that was just heavy enough to slowly get pulled down the rail!

#426 7 years ago
Quoted from Chosen_S:

Super Cool!
One more thing to add! Rock Custom under cab interactive LED Strips, $100 well spent. I do wander if it works with the Bop2.0 though??

Interesting. What triggers them? If it's run of an existing light, it should work fine.

#428 7 years ago

Two pinball champions just came over my house and both scored over 1 billion on our BoP. I'm now confident the machine works properly! Just need to adjust the sensitivity of the slings. Well, that and I need to work on my game.

Any tips from you folks on adjusting the sling leaf switches?

#430 7 years ago
Quoted from Chosen_S:

I think Marco or pinlife has the leaf adjustment tool, I use it almost exclusively since someone told me about it

I've got the tool, and mostly know how to use it. The challenge is figuring out how to adjust it while installed, so I can test different gaps. If I pull it out, adjust it, and re-install it, it's this awkward process that takes forever.

2 weeks later
#433 7 years ago

Added an apron magnet. Oh, and this BoP 2.0 thing. Thanks to NinJaBooT for a great product:

IMG_5776 (resized).JPGIMG_5776 (resized).JPG
IMG_5782 (resized).JPGIMG_5782 (resized).JPG

Also, for future restorers, if you bother to soup up the sound with a larger throw hole and 8" bass speaker in the cabinet, you'll need anti-rattle tape. I have new side rail channel plastic and the bass was so strong (particularly with 2.0), I first tried felt (too thick), then electrical tape (too much grip), and finally bought the bullet and went for Pinball Pro's anti-rattle tape. Problem solved.

#436 7 years ago
Quoted from PinSinner:

Better than new. Well done. You guys must be proud.

The best part is listening to my son talk to his friends about it. It's really amazing to hear his pride.

#438 7 years ago
Quoted from MustangPaul:

Think he could do one by himself?

I think he could, but I think he wouldn't. My son tends to get distracted pretty easily, so having me as structure to bring him back into the project every few days (which he didn't mind) was part of why it worked so well. For that reason, I think we should work together on another project. He wants to restore our Theatre of Magic but it's in such great shape I really don't want to mess with it. Instead, I think we'll find something a bit older. Maybe a Future Spa?! LOL.

#444 7 years ago
Quoted from Chosen_S:

Stuff like this is just done one step at a time, not fully focusing on the final goal, but rather in the small victories. And like my dad always told me, "you eat an elephant one bite at a time"

Part of this process, at least for me, was this exercise of deep diving into a new skill about once a week. For example, I went through this whole process around HVLP spraying. First, learning how it worked. Then, what types of paint and at what thickness would work. Then weeks of experimenting. I learned my compressor was too weak, so I rented a more powerful one, etc. I learned how to clean the parts. Finally, once all was done, I realized that it just wasn't producing the results I wanted with the black, so I switched to rattle cans.

Some of these kinds of experiments could have been avoided, I'm sure, but the act of going through it was in many ways part of the satisfaction. I know more now about HVLP sprayers than I would have ever known! One thing is clear: Latex isn't ideal for an HVLP gun, and while you can make it work, if you want automotive like results, you need great equipment. Bryan_Kelly talks about using rattle cans after years of work, and honestly, you should take advice like that very seriously.

Another part for me is this community. It's not just about the machine, my son and I, though that's huge. I get a major kick out of engaging with a positive, uplifting group of people as I do it. I've managed communities online in the past, and let me tell you...it's refreshing to work with folks like all of you.

#448 7 years ago
Quoted from Morydees:

Amazing...and you've made me want the OCD again. I better get on that!

If you're sticking with BoP 1.0, get the OCD cards, it's amazing. If, on the other hand, you're going BoP 2.0, I would hold off, at least for now. herg is trying his absolute best to support the P-ROC but we don't know if it's going to get there, stay tuned. Instead, buy two sets of OCD cards for your other machines.

Promoted items from Pinside Marketplace and Pinside Shops!
From: $ 30.00
Cabinet - Toppers
+CY Universal
 
$ 54.99
Cabinet - Shooter Rods
Lighted Pinball Mods
 
$ 399.00
Cabinet - Decals
Mircoplayfields
 
$ 1.25
Lighting - Led
Mitchell Lighting
 
$ 170.00
Displays
Digipinball Shop
 
From: $ 1.00
Playfield - Other
Rocket City Pinball
 
3,850 (OBO)
Machine - For Sale
Firestone, CO
$ 9.99
$ 250.00
Lighting - Interactive
Professor Pinball
 
3,700 (OBO)
Machine - For Sale
Memphis, TN
Wanted
Machine - Wanted
Westminster, MA
$ 40.00
$ 1.00
Lighting - Led
Mitchell Lighting
 
£ 58.00
Lighting - Led
PinballToys
 
$ 200.00
Lighting - Interactive
Professor Pinball
 
£ 69.00
Playfield - Other
PinballToys
 
$ 69.00
Gameroom - Decorations
Pinball Pimp
 
$ 9.95
From: $ 35.00
Cabinet - Other
Rocket City Pinball
 
$ 1.00
Lighting - Led
Mitchell Lighting
 
$ 27.95
$ 20.00
Playfield - Decals
DevilsMuse Arcade
 
$ 9.95
$ 44.99
Cabinet - Shooter Rods
Pinball Shark
 

You're currently viewing posts by Pinsider jsa.
Click here to go back to viewing the entire thread.

Reply

Wanna join the discussion? Please sign in to reply to this topic.

Hey there! Welcome to Pinside!

Donate to Pinside

Great to see you're enjoying Pinside! Did you know Pinside is able to run without any 3rd-party banners or ads, thanks to the support from our visitors? Please consider a donation to Pinside and get anext to your username to show for it! Or better yet, subscribe to Pinside+!


This page was printed from https://pinside.com/pinball/forum/topic/bop-father-and-sons-first-restoration?tu=jsa and we tried optimising it for printing. Some page elements may have been deliberately hidden.

Scan the QR code on the left to jump to the URL this document was printed from.